climate control MERCEDES-BENZ GLK-Class 2011 X204 User Guide
[x] Cancel search | Manufacturer: MERCEDES-BENZ, Model Year: 2011, Model line: GLK-Class, Model: MERCEDES-BENZ GLK-Class 2011 X204Pages: 304, PDF Size: 13.08 MB
Page 124 of 304
_directs the airflow to the entire vehicle
interior 16bdirects the airflow through the
defroster, center and side air vents 16adirects the airflow through the footwell
and defroster vents
i Regardless of the air distribution setting,
airflow is always directed through the side
air vents. The side air vents can only be
closed when the controls on the side air
vents are turned downwards.
XTurn the key to position 2 in the ignition
lock.XPress the _ button repeatedly until the
desired symbol appears in the display.
The indicator lamp in the à button goes
out. Automatic control is deactivated and
the air distribution is controlled according
to the selected setting.
Setting the airflow
XTurn the SmartKey to position 2 in the
ignition lock.XTo increase/reduce: press the K or
I button.
Switching the MONO function on/off
This function is only available in vehicles in
Canada.
You can use the MONO function to adopt the
temperature and air distribution settings on
the driver's side for the front-passenger side.
XPress the º button.
The indicator lamp in the º button lights
up or goes out.Defrosting the windshield
You can use this function to defrost the
windshield or to defrost the inside of the
windshield and the side windows.
i You should only select the defrosting
function until the windshield is clear again.XTurn the SmartKey to position 2 in the
ignition lock.XTo activate: press the ¬ button.
The indicator lamp in the ¬ button lights
up.
The climate control system switches to the
following functions:
R cooling with air dehumidification on
R high airflow 17
R high temperature 17
R air distribution to the windshield and
front side windows
R air-recirculation mode offXTo deactivate: press the ¬ button.
The indicator lamp in the ¬ button goes
out. The previously selected settings come
into effect again. The cooling with air
dehumidification function remains on. Air-
recirculation mode remains deactivated.
or
XPress the à button.
The indicator lamp in the ¬ button goes
out. Airflow and air distribution are set to
automatic mode.
or
XTurn controls : or D clockwise or
counter-clockwise ( Y page 119).
or
XPress the K or I button.
Maximum cooling MAX COOL
The MAX COOL function is only available in
vehicles for the USA.
16 Canada only.
17 Depending on the outside temperature.122Operating the control systemsClimate control
BA 204.9 USA, CA Edition A 2011; 1; 6, en-USd2mwentsVersion: 3.0.3.62010-06-15T08:58:39+02:00 - Seite 122
Page 125 of 304
MAX COOL is only operational when the
engine is running.
When you activate MAX COOL, climate
control switches to the following functions:
R maximum cooling
R maximum airflow
R air-recirculation mode onXTo activate: press the Ù button.
The indicator lamp in the button lights up.XTo deactivate: press the Ù button
again.
The indicator lamp goes out. The previously
selected settings come into effect again.
Defrosting the windows
Windows fogged up on the inside
XActivate the "cooling with air
dehumidification" function ¿.XActivate automatic mode Ã.XIf the windows continue to fog up, activate
the defrosting function ( Y page 122).
i
You should only select this setting until
the windshield is clear again.
Windows fogged up on the outside
XSwitch on the windshield wipers.XPress the _ button repeatedly until the
O or P symbol appears in the
display.
i You should only select this setting until
the windshield is clear again.
Rear window defroster
Activating/deactivating
GWarning
Any accumulation of snow and ice should be
removed from the rear window before driving.
Visibility could otherwise be impaired,
endangering you and others.
The rear window heating has a high current
draw. You should therefore switch it off as
soon as the window is clear as it only switches
off automatically after several minutes.
If the battery voltage is too low, the rear
window heating may switch off.XTurn the SmartKey to position 2 in the
ignition lock.XPress the ¤ button.
The indicator lamp in the ¤ button lights
up or goes out.
Problems with the rear window heating
The rear window heating has deactivated
itself prematurely or cannot be activated.
XSwitch off any consumers that are not
required, e.g. reading lamps or interior
lighting.
When the battery is sufficiently charged,
the rear window heating is activated again
automatically.
Activating/deactivating air-
recirculation mode
You can deactivate the flow of fresh air if
unpleasant odors are entering the vehicle
from outside. The air already inside the
vehicle will then be recirculated.
GWarning
Fogged windows impair visibility,
endangering you and others. If the windows
begin to fog on the inside, switching off the
air recirculation mode immediately should
clear interior window fogging. If interior
window fogging persists, make sure the air
conditioning is activated, or press the ¬
button.
XTurn the SmartKey to position 2 in the
ignition lock.XTo activate: press the g button.
The indicator lamp in the g button lights
up.Operating the control systems123Climate controlBA 204.9 USA, CA Edition A 2011; 1; 6, en-USd2mwentsVersion: 3.0.3.62010-06-15T08:58:39+02:00 - Seite 123Z
Page 126 of 304
iAir-recirculation mode is activated
automatically at high outside
temperatures. When air-recirculation mode
is activated automatically, the indicator
lamp in the g button is not lit.
Outside air is added after about 30
minutes.
XTo deactivate: press the g button.
The indicator lamp in the g button goes
out.
iAir-recirculation mode switches off
automatically:
Rafter approximately five minutes if
outside temperatures are under about
41 ‡ (5 †)
Rafter approximately five minutes if
cooling with air dehumidification is
deactivated
Rafter approximately 30 minutes if outside
temperatures are over about
41 ‡ (5 †)
Setting the air vents
Important safety notes
GWarning
When operating the climate control, the air
that enters the passenger compartment
through the air vents can be very hot or very
cold (depending on the set temperature). This
could cause burns or frostbite to unprotected
skin in the immediate area of the air vents.
Always keep sufficient distance between
unprotected parts of the body and the air
vents. If necessary, use the air distribution
adjustment to direct the air to air vents in the
vehicle interior that are not in the immediate
area of unprotected skin.
In order to ensure the direct flow of fresh air
through the air vents into the vehicle interior,
please observe the following notes:
Rkeep the air inlet between the windshield
and the hood free of blockages, such as ice,
snow or leaves
Rnever cover the vents or air inlet and outlet
grilles in the vehicle interior.
iFor virtually draft-free ventilation, adjust
the sliders of the air vents to the center
position.
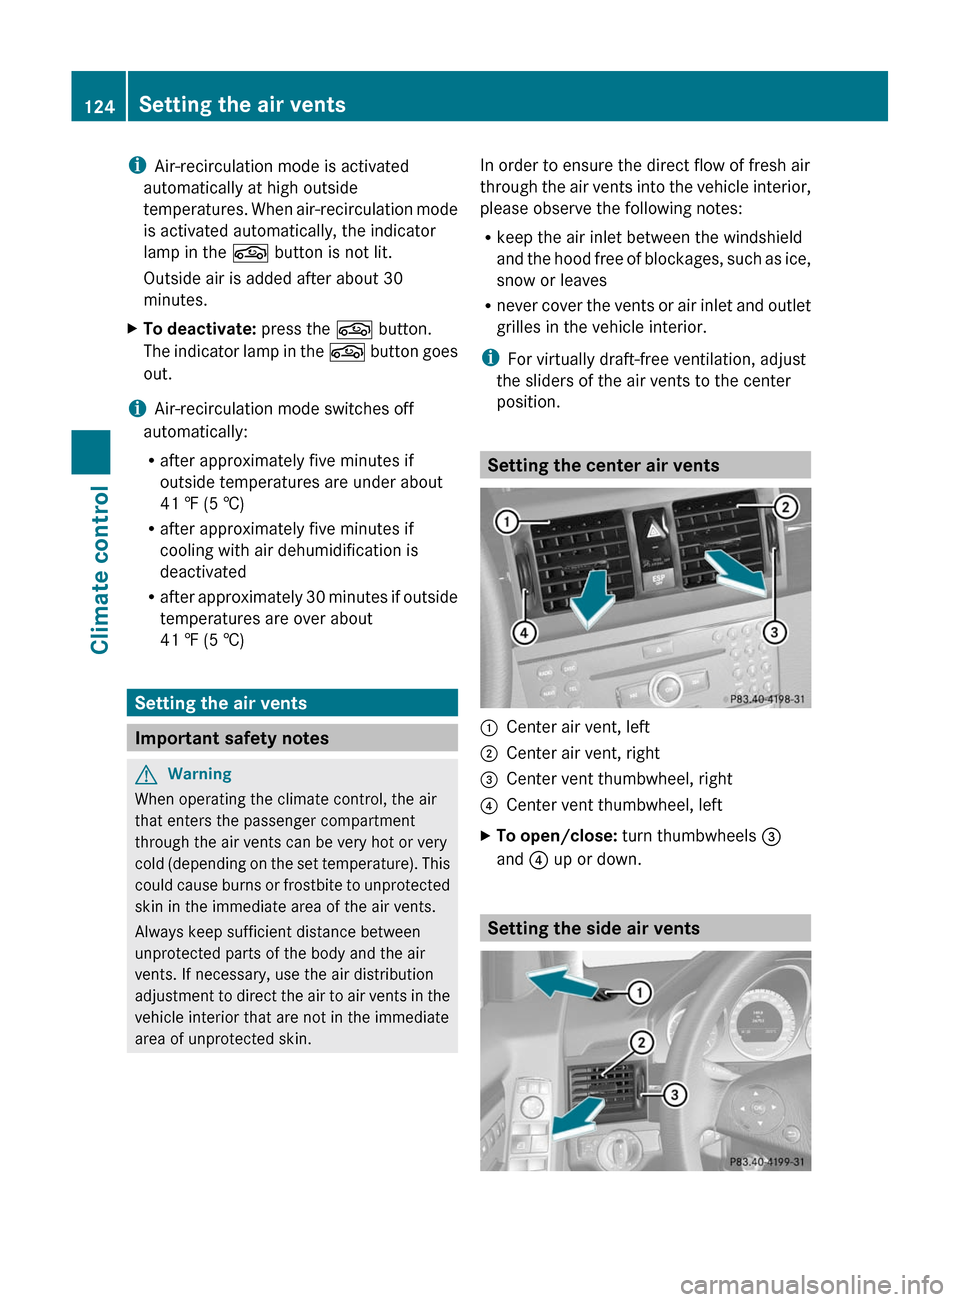
Setting the center air vents
:Center air vent, left;Center air vent, right=Center vent thumbwheel, right?Center vent thumbwheel, leftXTo open/close: turn thumbwheels =
and ? up or down.
Setting the side air vents
124Setting the air ventsClimate control
BA 204.9 USA, CA Edition A 2011; 1; 6, en-USd2mwentsVersion: 3.0.3.62010-06-15T08:58:39+02:00 - Seite 124
Page 127 of 304
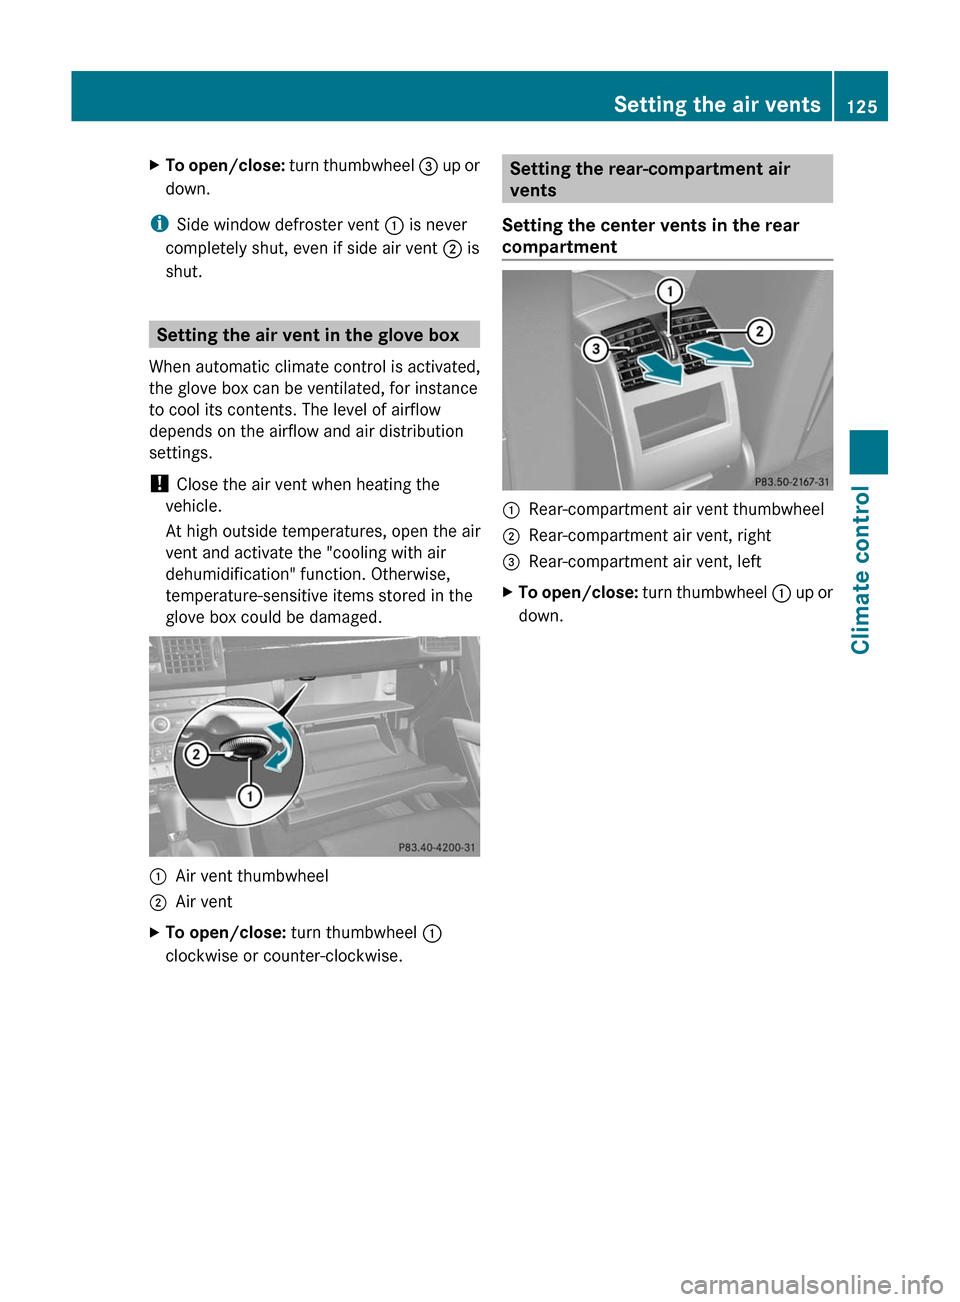
XTo open/close: turn thumbwheel = up or
down.
iSide window defroster vent : is never
completely shut, even if side air vent ; is
shut.
Setting the air vent in the glove box
When automatic climate control is activated,
the glove box can be ventilated, for instance
to cool its contents. The level of airflow
depends on the airflow and air distribution
settings.
! Close the air vent when heating the
vehicle.
At high outside temperatures, open the air
vent and activate the "cooling with air
dehumidification" function. Otherwise,
temperature-sensitive items stored in the
glove box could be damaged.
:Air vent thumbwheel;Air ventXTo open/close: turn thumbwheel :
clockwise or counter-clockwise.
Setting the rear-compartment air
vents
Setting the center vents in the rear
compartment
:Rear-compartment air vent thumbwheel;Rear-compartment air vent, right=Rear-compartment air vent, leftXTo open/close: turn thumbwheel : up or
down.
Setting the air vents125Climate controlBA 204.9 USA, CA Edition A 2011; 1; 6, en-USd2mwentsVersion: 3.0.3.62010-06-15T08:58:39+02:00 - Seite 125Z
Page 230 of 304
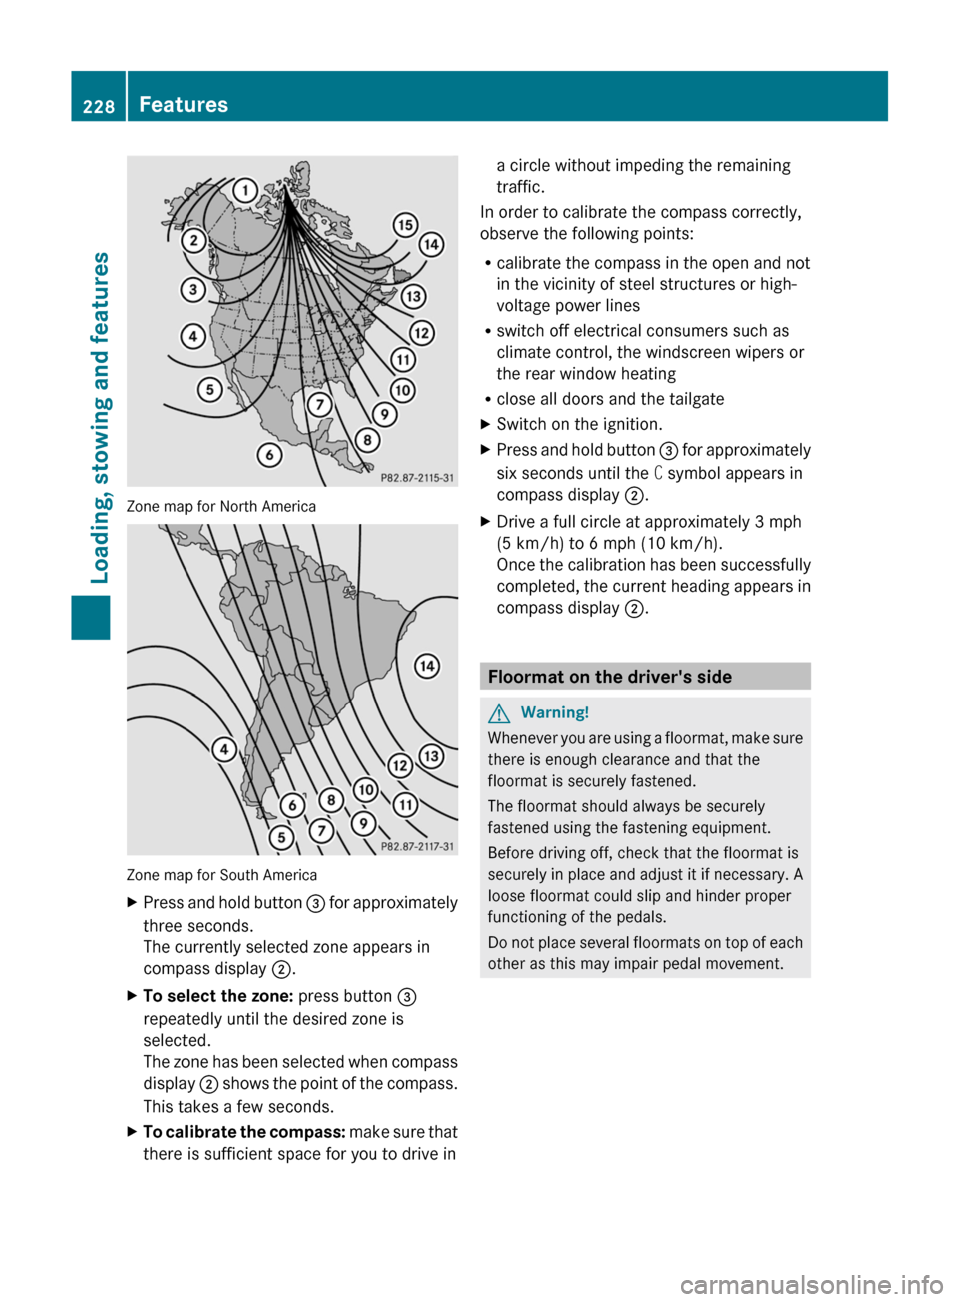
Zone map for North America
Zone map for South America
XPress and hold button = for approximately
three seconds.
The currently selected zone appears in
compass display ;.XTo select the zone: press button =
repeatedly until the desired zone is
selected.
The zone has been selected when compass
display ; shows the point of the compass.
This takes a few seconds.XTo calibrate the compass: make sure that
there is sufficient space for you to drive ina circle without impeding the remaining
traffic.
In order to calibrate the compass correctly,
observe the following points:
R calibrate the compass in the open and not
in the vicinity of steel structures or high-
voltage power lines
R switch off electrical consumers such as
climate control, the windscreen wipers or
the rear window heating
R close all doors and the tailgate
XSwitch on the ignition.XPress and hold button = for approximately
six seconds until the C symbol appears in
compass display ;.XDrive a full circle at approximately 3 mph
(5 km/h) to 6 mph (10 km/h).
Once the calibration has been successfully
completed, the current heading appears in
compass display ;.
Floormat on the driver's side
GWarning!
Whenever you are using a floormat, make sure
there is enough clearance and that the
floormat is securely fastened.
The floormat should always be securely
fastened using the fastening equipment.
Before driving off, check that the floormat is
securely in place and adjust it if necessary. A
loose floormat could slip and hinder proper
functioning of the pedals.
Do not place several floormats on top of each
other as this may impair pedal movement.
228FeaturesLoading, stowing and features
BA 204.9 USA, CA Edition A 2011; 1; 6, en-USd2mwentsVersion: 3.0.3.62010-06-15T08:58:39+02:00 - Seite 228
Page 281 of 304
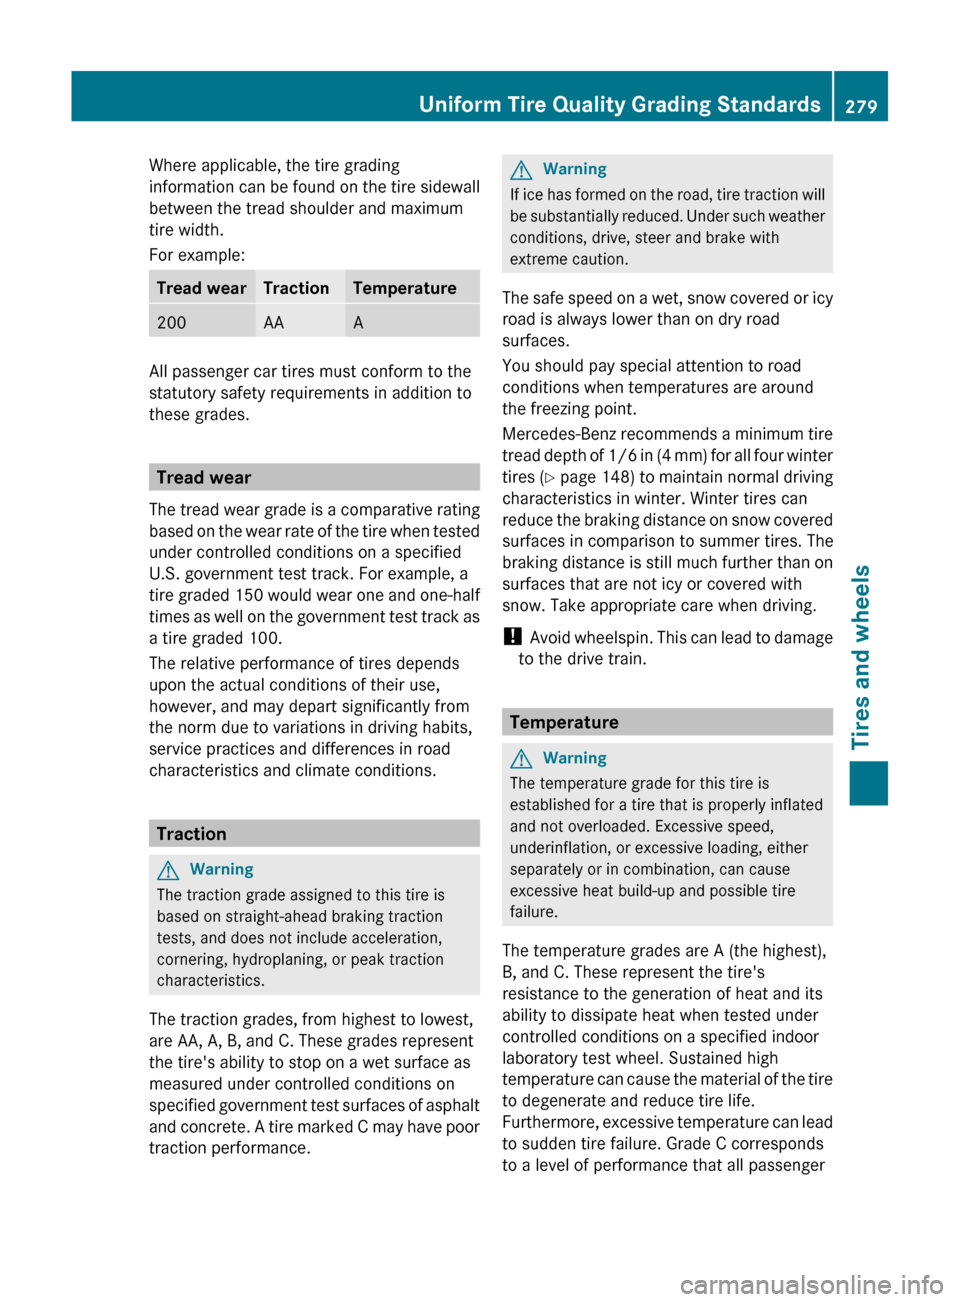
Where applicable, the tire grading
information can be found on the tire sidewall
between the tread shoulder and maximum
tire width.
For example:Tread wearTractionTemperature200AAA
All passenger car tires must conform to the
statutory safety requirements in addition to
these grades.
Tread wear
The tread wear grade is a comparative rating
based on the wear rate of the tire when tested
under controlled conditions on a specified
U.S. government test track. For example, a
tire graded 150 would wear one and one-half
times as well on the government test track as
a tire graded 100.
The relative performance of tires depends
upon the actual conditions of their use,
however, and may depart significantly from
the norm due to variations in driving habits,
service practices and differences in road
characteristics and climate conditions.
Traction
GWarning
The traction grade assigned to this tire is
based on straight-ahead braking traction
tests, and does not include acceleration,
cornering, hydroplaning, or peak traction
characteristics.
The traction grades, from highest to lowest,
are AA, A, B, and C. These grades represent
the tire's ability to stop on a wet surface as
measured under controlled conditions on
specified government test surfaces of asphalt
and concrete. A tire marked C may have poor
traction performance.
GWarning
If ice has formed on the road, tire traction will
be substantially reduced. Under such weather
conditions, drive, steer and brake with
extreme caution.
The safe speed on a wet, snow covered or icy
road is always lower than on dry road
surfaces.
You should pay special attention to road
conditions when temperatures are around
the freezing point.
Mercedes-Benz recommends a minimum tire
tread depth of 1/6 in (4 mm) for all four winter
tires ( Y page 148) to maintain normal driving
characteristics in winter. Winter tires can
reduce the braking distance on snow covered
surfaces in comparison to summer tires. The
braking distance is still much further than on
surfaces that are not icy or covered with
snow. Take appropriate care when driving.
! Avoid wheelspin. This can lead to damage
to the drive train.
Temperature
GWarning
The temperature grade for this tire is
established for a tire that is properly inflated
and not overloaded. Excessive speed,
underinflation, or excessive loading, either
separately or in combination, can cause
excessive heat build-up and possible tire
failure.
The temperature grades are A (the highest),
B, and C. These represent the tire's
resistance to the generation of heat and its
ability to dissipate heat when tested under
controlled conditions on a specified indoor
laboratory test wheel. Sustained high
temperature can cause the material of the tire
to degenerate and reduce tire life.
Furthermore, excessive temperature can lead
to sudden tire failure. Grade C corresponds
to a level of performance that all passenger
Uniform Tire Quality Grading Standards279Tires and wheelsBA 204.9 USA, CA Edition A 2011; 1; 6, en-USd2mwentsVersion: 3.0.3.62010-06-15T08:58:39+02:00 - Seite 279Z