key battery MERCEDES-BENZ GLK-Class 2011 X204 Owner's Manual
[x] Cancel search | Manufacturer: MERCEDES-BENZ, Model Year: 2011, Model line: GLK-Class, Model: MERCEDES-BENZ GLK-Class 2011 X204Pages: 304, PDF Size: 13.08 MB
Page 6 of 304
1, 2, 3 ...
115 V socket ...................................... 218
12 V socket ........................................ 217
4ETS see ETS/4ETS
4MATIC (permanent four-wheel
drive) .................................................. 156
A
ABS (Anti-lock Braking System) Display message ............................ 181
Function/notes ................................ 62
Warning lamp ................................. 197
Accident (notes) ................................ 245
Active light function (display
message) ............................................ 186
Active service system see Service interval display
Air bags
Display message ............................ 179
Front air bag (driver, front
passenger) ....................................... 37
Important safety notes ....................36
Knee bag .......................................... 38
PASSENGER AIRBAG OFF
indicator lamp (only Canada) ...........46
PASSENGER AIRBAG OFF
indicator lamp (only USA) ................41
Pelvis air bag ................................... 40
Safety guidelines ............................. 35
Side impact air bag ..........................39
Window curtain air bag ....................41
Air-conditioning system
see Climate control
Air dehumidification
Activating/deactivating with
cooling ........................................... 120
Air distribution
Setting ........................................... 121
Airflow
Setting ........................................... 122
Air nozzles
see Air vents .................................. 124
Air pressure
see Tire pressure
Air-recirculation mode
Activating/deactivating .................123
Air vents ............................................. 124
Glove box ....................................... 125
Important safety information .........124
Rear ............................................... 125
Setting the center air vents ...........124
Setting the side air vents ...............124
Alarm system
see ATA
Anti-lock Braking System
see ABS
Anti-Theft Alarm system
see ATA
Anti-theft system
ATA (Anti-Theft Alarm system) .........65
Ashtray ............................................... 215
ATA (Anti-Theft Alarm system) Activating/deactivating ...................65
Function ........................................... 65
Switching off the alarm ....................65
Audio menu (on-board computer) .... 168
AUTO lights see Light sensor
Automatic car wash .......................... 237
Automatic transmission Display message ............................ 192
Driving tips .................................... 136
Emergency running mode ..............139
Kickdown ....................................... 136
Malfunction .................................... 139
Program selector button ................137
Pulling away ................................... 131
Releasing the parking lock
manually ........................................ 139
Selector lever ................................ 134
Starting .......................................... 131
Trailer towing ................................. 136
B
Backrest (display message) ............. 193
Bag hook ............................................ 210
BAS (Brake Assist System) ................. 62
Battery Charging ........................................ 254
Checking (SmartKey) .......................72
Display message ............................ 188
4IndexBA 204.9 USA, CA Edition A 2011; 1; 6, en-USd2mwentsVersion: 3.0.3.62010-06-15T08:58:39+02:00 - Seite 4
Page 15 of 304
Service productsBrake fluid ..................................... 298
Capacities ...................................... 295
Coolant (engine) ............................ 298
Engine oil ....................................... 297
Fuel ................................................ 296
Important safety notes ..................294
Notes ............................................. 294
Refrigerant (air-conditioning
system) .......................................... 298
Washer fluid ................................... 299
Settings
Factory (on-board computer) .........174
On-board computer .......................171
Shift ranges ....................................... 137
Side impact air bag ............................. 39
Side marker lamp (display
message) ............................................ 185
Side windows Convenience closing feature ............83
Convenience opening feature ..........83
Important safety information ...........81
Opening/closing .............................. 82
Resetting ......................................... 84
Troubleshooting ............................... 84
Sliding sunroof
Important safety information ...........85
Troubleshooting ............................... 88
see Panorama roof with power
tilt/sliding panel
SmartKey
Changing the battery .......................72
Changing the programming .............71
Checking the battery .................68, 72
Convenience closing feature ............83
Convenience opening feature ..........83
Display message ............................ 193
Important safety notes ....................68
Malfunction ...................................... 74
Starting the engine ........................131
Snow chains ...................................... 148
Socket ................................................ 217
Dashboard ..................................... 217
Luggage compartment ...................217
Rear compartment .........................217
SOS
see mbrace Spare wheel
Notes/data .................................... 289
Storage location ............................ 246
Stowing .......................................... 246
see Emergency spare wheel
Speedometer
Additional speedometer (on-
board computer) ............................ 166
Segments ...................................... 163
Setting the unit (on-board
computer) ...................................... 171
SRS (Supplemental Restraint
System) Display message ............................ 177
Introduction ..................................... 34
Warning lamp ................................. 199
Warning lamp (function) ................... 34
Standard display (on-board
computer) .......................................... 166
Starting the engine Important safety notes ..................130
Station
see Radio
Steering (display message) .............. 193
Steering wheel Adjusting (electrically) .....................96
Adjusting (manually) ........................96
Buttons (on-board computer) ......... 163
Cleaning ......................................... 241
Important safety notes ....................95
Memory function (storing
settings) ........................................... 96
Storing settings (memory
function) ........................................ 100
Stowage compartments
Armrest (under) ............................. 207
Glove box ....................................... 207
Stowage space
Cup holders ................................... 214
Important safety information .........206
Submenu (on-board computer)
Convenience .................................. 173
Factory setting ............................... 174
Instrument cluster .........................171
Lights ............................................. 172
Standard display ............................ 166
Time/Date ..................................... 171
Vehicle ........................................... 173Index13BA 204.9 USA, CA Edition A 2011; 1; 6, en-USd2mwentsVersion: 3.0.3.62010-06-15T08:58:39+02:00 - Seite 13
Page 67 of 304
Trailers with a high center of gravity may tip
over before the system recognizes swaying of
the trailer.
Trailer stabilization does not work if ESP ®
is
deactivated or disabled because of a
malfunction.
EBD
GWarning
Observe "Important safety notes"
( Y page 61).
EBD monitors and controls the brake
pressure on the rear wheels to improve
driving stability while braking.
GWarning!
If the EBD malfunctions, the brake system will
still function with full brake boost. However,
the rear wheels could lock up during
emergency braking situations, for example.
You could lose control of the vehicle and
cause an accident.
Adapt your driving style to the changed
driving characteristics.
Anti-theft systems
Immobilizer
The immobilizer prevents your vehicle from
being started without the correct key.
When leaving the vehicle, always take the
SmartKey with you and lock the vehicle. The
engine can be started by anyone with a valid
key that is left inside the vehicle.
XTo activate with the SmartKey: remove
the SmartKey from the ignition lock.XTo activate with KEYLESS-GO: switch the
ignition off and open the driver's door.XTo deactivate: switch on the ignition.
i
The immobilizer is always deactivated
when you start the engine.
In the event that the engine cannot be
started when the starter battery is fully
charged, the immobilizer may be faulty.
Contact an authorized Mercedes-Benz
Center or call 1-800-FOR-MERCedes (in
USA) or 1-800-387-0100 (in Canada).
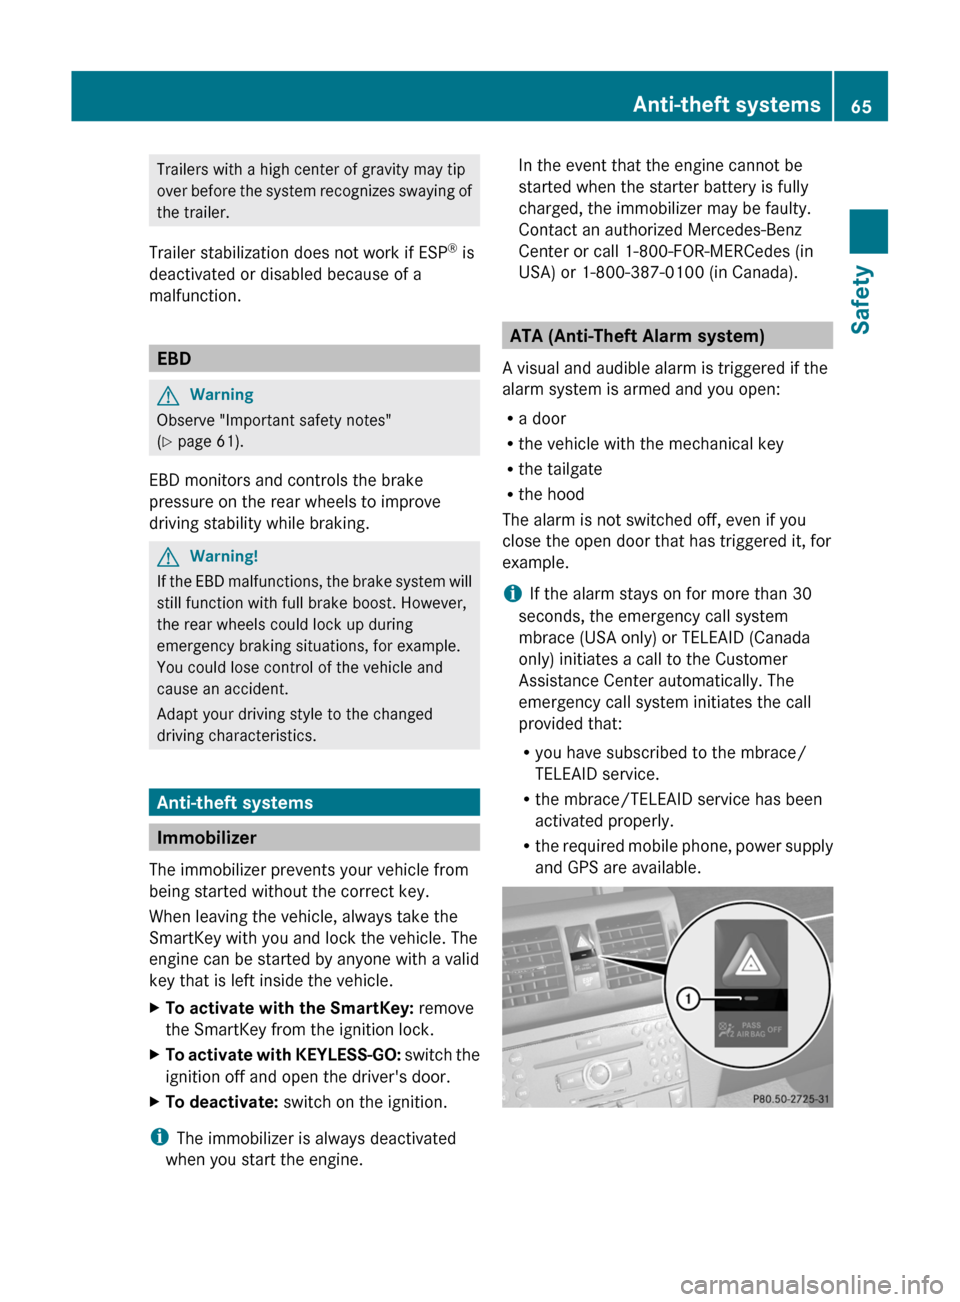
ATA (Anti-Theft Alarm system)
A visual and audible alarm is triggered if the
alarm system is armed and you open:
R a door
R the vehicle with the mechanical key
R the tailgate
R the hood
The alarm is not switched off, even if you
close the open door that has triggered it, for
example.
i If the alarm stays on for more than 30
seconds, the emergency call system
mbrace (USA only) or TELEAID (Canada
only) initiates a call to the Customer
Assistance Center automatically. The
emergency call system initiates the call
provided that:
R you have subscribed to the mbrace/
TELEAID service.
R the mbrace/TELEAID service has been
activated properly.
R the required mobile phone, power supply
and GPS are available.
Anti-theft systems65SafetyBA 204.9 USA, CA Edition A 2011; 1; 6, en-USd2mwentsVersion: 3.0.3.62010-06-15T08:58:39+02:00 - Seite 65Z
Page 70 of 304
Vehicle equipment
i This manual describes all the standard
and optional equipment of your vehicle
which was available at the time of
purchase. Country-specific differences are
possible. Bear in mind that your vehicle
may not feature all functions described
here. This also refers to safety-related
systems and functions.
SmartKey
Important safety notes
GWarning!
When leaving the vehicle, always remove the
SmartKey from the starter switch. Always
take the SmartKey with you and lock the
vehicle. Do not leave children unattended in
the vehicle, even if they are secured in a child
restraint system, or with access to an
unlocked vehicle. A child's unsupervised
access to a vehicle could result in an accident
and/or serious personal injury. The children
could
R injure themselves on parts of the vehicle
R be seriously or fatally injured through
excessive exposure to extreme heat or cold
R injure themselves or cause an accident with
vehicle equipment that can be operated
even if the SmartKey is removed from the
starter switch or removed from the vehicle,
such as seat adjustment, steering wheel
adjustment, or the memory function
If children open a door, they could injure other
persons or get out of the vehicle and injure
themselves or be injured by following traffic.
Do not expose the child restraint system to
direct sunlight. The child restraint system's
metal parts, for example, could become very
hot, and the child could be burned by these
parts.
GWarning!
Do not carry heavy or hard objects in the
passenger compartment or cargo
compartment unless they are firmly secured
in place.
Unsecured or improperly positioned cargo
increases a child’s risk of injury in the event
of
R strong braking maneuvers
R sudden changes of direction
R an accident
General information
All doors and the tailgate must be closed.
If you cannot open or lock the vehicle with the
SmartKey, either the battery in the SmartKey
is empty, the SmartKey is faulty, or the vehicle
battery is discharged.
XCheck the battery in the SmartKey and
replace it if necessary ( Y page 72).XUnlock the driver's door using the
mechanical key ( Y page 71).XLock the vehicle using the mechanical key
( Y page 71).XHave the vehicle battery and battery
contacts checked by an authorized
Mercedes-Benz Center.
If the SmartKey is faulty, contact Roadside
Assistance or an authorized Mercedes-Benz
Center.
SmartKey functions
Locking and unlocking centrally
The SmartKey centrally locks/unlocks:
R the doors
R the tailgate
R the fuel filler flap
68SmartKeyOpening and closing
BA 204.9 USA, CA Edition A 2011; 1; 6, en-USd2mwentsVersion: 3.0.3.62010-06-15T08:58:39+02:00 - Seite 68
Page 73 of 304
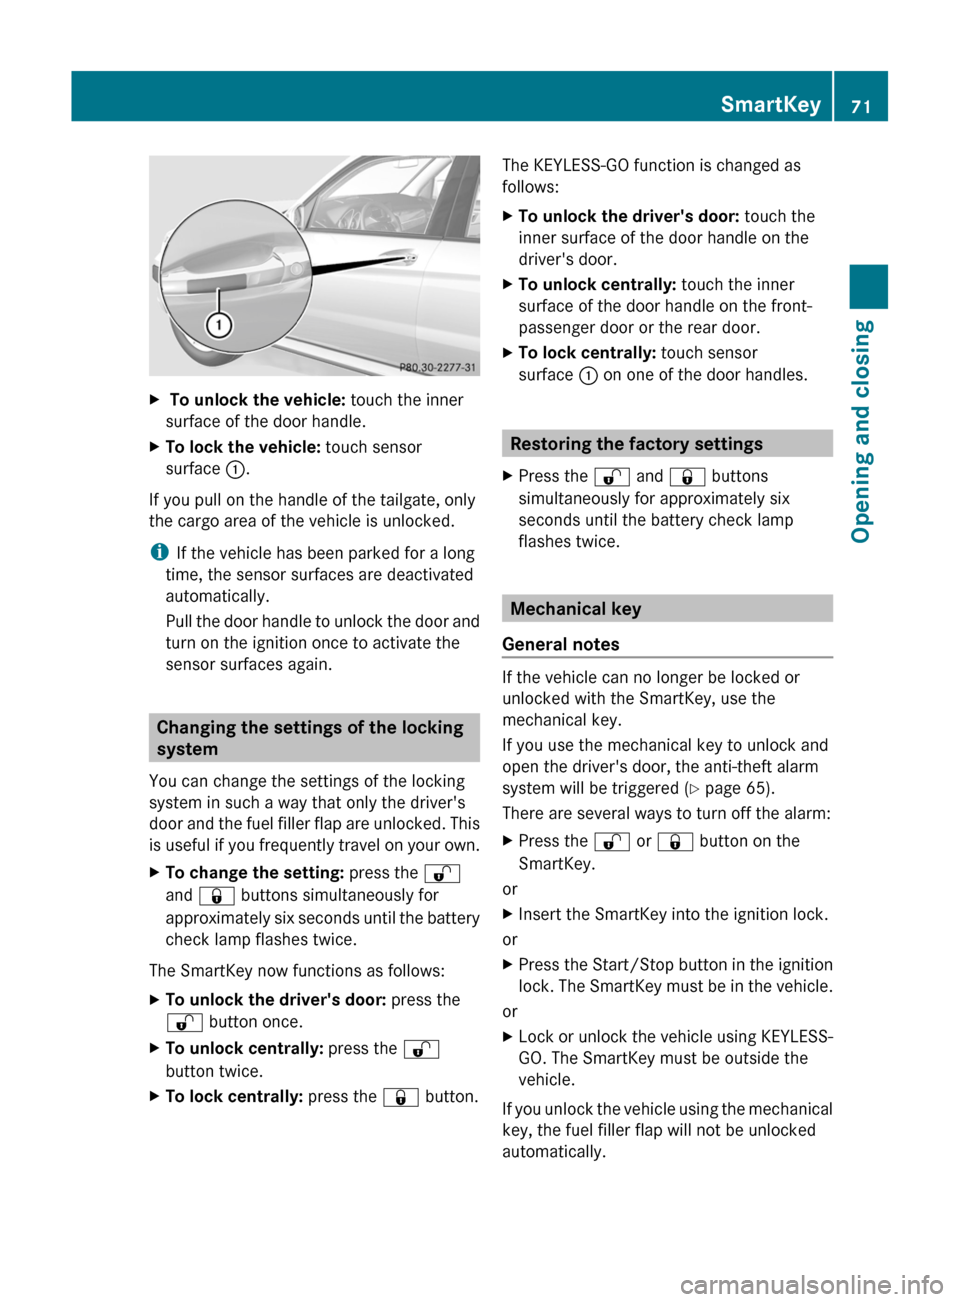
X To unlock the vehicle: touch the inner
surface of the door handle.
XTo lock the vehicle: touch sensor
surface :.
If you pull on the handle of the tailgate, only
the cargo area of the vehicle is unlocked.
iIf the vehicle has been parked for a long
time, the sensor surfaces are deactivated
automatically.
Pull the door handle to unlock the door and
turn on the ignition once to activate the
sensor surfaces again.
Changing the settings of the locking
system
You can change the settings of the locking
system in such a way that only the driver's
door and the fuel filler flap are unlocked. This
is useful if you frequently travel on your own.
XTo change the setting: press the %
and & buttons simultaneously for
approximately six seconds until the battery
check lamp flashes twice.
The SmartKey now functions as follows:
XTo unlock the driver's door: press the
% button once.
XTo unlock centrally: press the %
button twice.
XTo lock centrally: press the & button.The KEYLESS-GO function is changed as
follows:
XTo unlock the driver's door: touch the
inner surface of the door handle on the
driver's door.
XTo unlock centrally: touch the inner
surface of the door handle on the front-
passenger door or the rear door.
XTo lock centrally: touch sensor
surface : on one of the door handles.
Restoring the factory settings
XPress the % and & buttons
simultaneously for approximately six
seconds until the battery check lamp
flashes twice.
Mechanical key
General notes
If the vehicle can no longer be locked or
unlocked with the SmartKey, use the
mechanical key.
If you use the mechanical key to unlock and
open the driver's door, the anti-theft alarm
system will be triggered (Y page 65).
There are several ways to turn off the alarm:
XPress the % or & button on the
SmartKey.
or
XInsert the SmartKey into the ignition lock.
or
XPress the Start/Stop button in the ignition
lock. The SmartKey must be in the vehicle.
or
XLock or unlock the vehicle using KEYLESS-
GO. The SmartKey must be outside the
vehicle.
If you unlock the vehicle using the mechanical
key, the fuel filler flap will not be unlocked
automatically.
SmartKey71Opening and closingBA 204.9 USA, CA Edition A 2011; 1; 6, en-USd2mwentsVersion: 3.0.3.62010-06-15T08:58:39+02:00 - Seite 71Z
Page 74 of 304
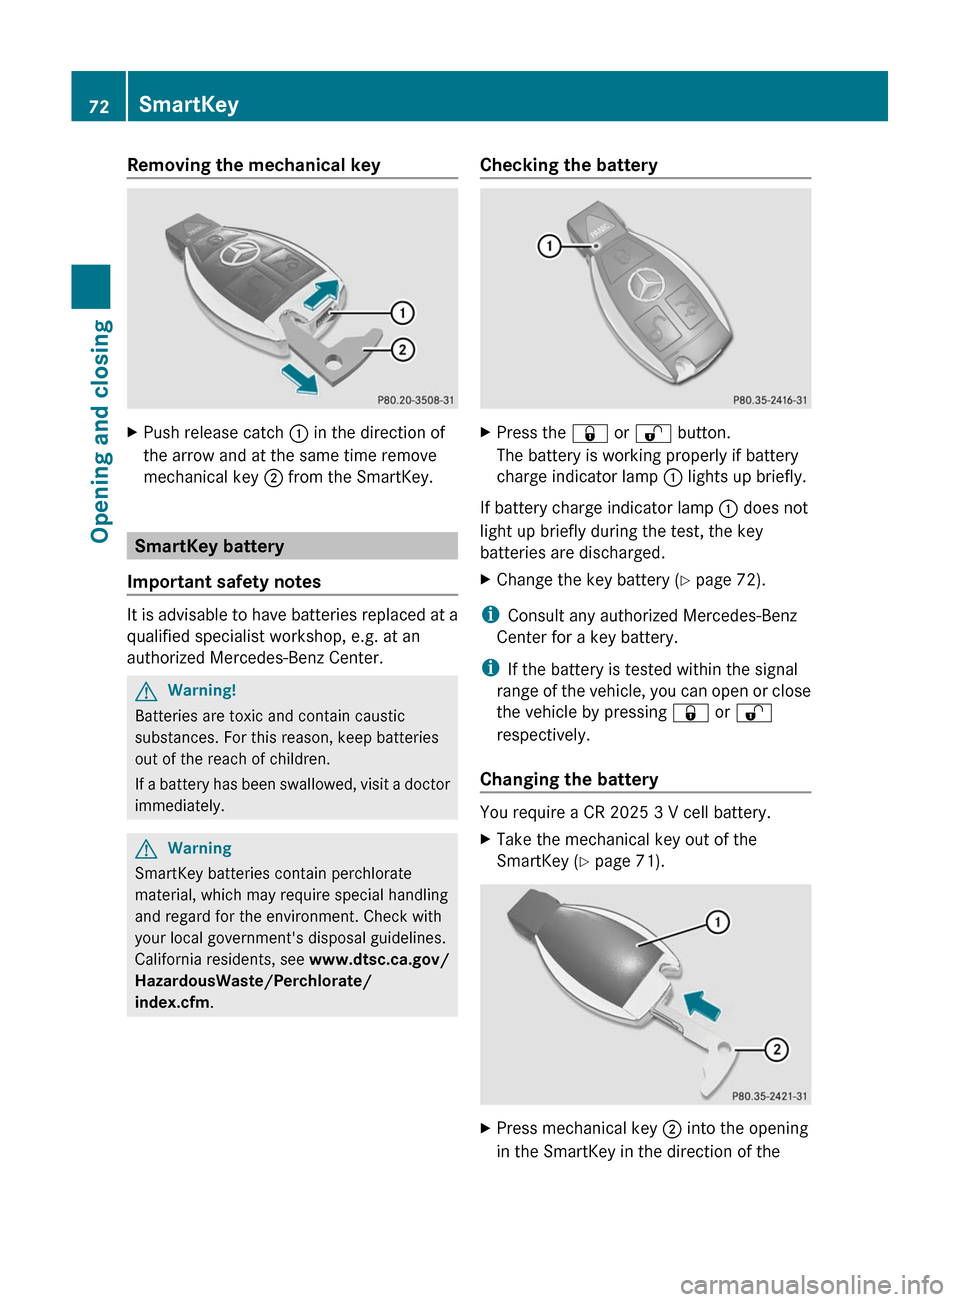
Removing the mechanical keyXPush release catch : in the direction of
the arrow and at the same time remove
mechanical key ; from the SmartKey.
SmartKey battery
Important safety notes
It is advisable to have batteries replaced at a
qualified specialist workshop, e.g. at an
authorized Mercedes-Benz Center.
GWarning!
Batteries are toxic and contain caustic
substances. For this reason, keep batteries
out of the reach of children.
If a battery has been swallowed, visit a doctor
immediately.
GWarning
SmartKey batteries contain perchlorate
material, which may require special handling
and regard for the environment. Check with
your local government's disposal guidelines.
California residents, see www.dtsc.ca.gov/
HazardousWaste/Perchlorate/
index.cfm .
Checking the batteryXPress the & or % button.
The battery is working properly if battery
charge indicator lamp : lights up briefly.
If battery charge indicator lamp : does not
light up briefly during the test, the key
batteries are discharged.
XChange the key battery ( Y page 72).
i
Consult any authorized Mercedes-Benz
Center for a key battery.
i If the battery is tested within the signal
range of the vehicle, you can open or close
the vehicle by pressing & or %
respectively.
Changing the battery
You require a CR 2025 3 V cell battery.
XTake the mechanical key out of the
SmartKey ( Y page 71).XPress mechanical key ; into the opening
in the SmartKey in the direction of the72SmartKeyOpening and closing
BA 204.9 USA, CA Edition A 2011; 1; 6, en-USd2mwentsVersion: 3.0.3.62010-06-15T08:58:39+02:00 - Seite 72
Page 75 of 304
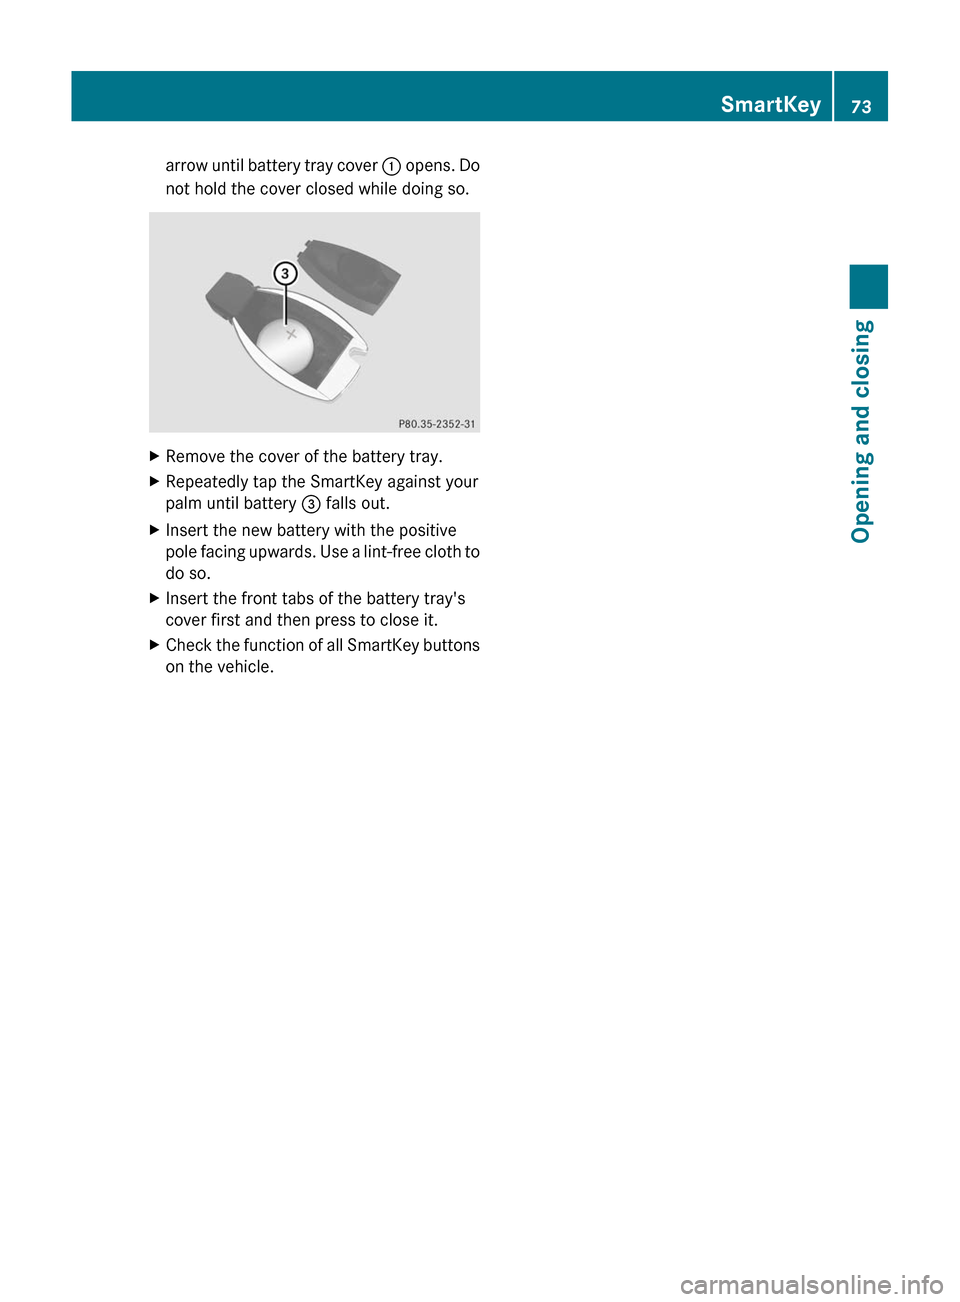
arrow until battery tray cover : opens. Do
not hold the cover closed while doing so.XRemove the cover of the battery tray.XRepeatedly tap the SmartKey against your
palm until battery = falls out.XInsert the new battery with the positive
pole facing upwards. Use a lint-free cloth to
do so.XInsert the front tabs of the battery tray's
cover first and then press to close it.XCheck the function of all SmartKey buttons
on the vehicle.SmartKey73Opening and closingBA 204.9 USA, CA Edition A 2011; 1; 6, en-USd2mwentsVersion: 3.0.3.62010-06-15T08:58:39+02:00 - Seite 73Z
Page 76 of 304
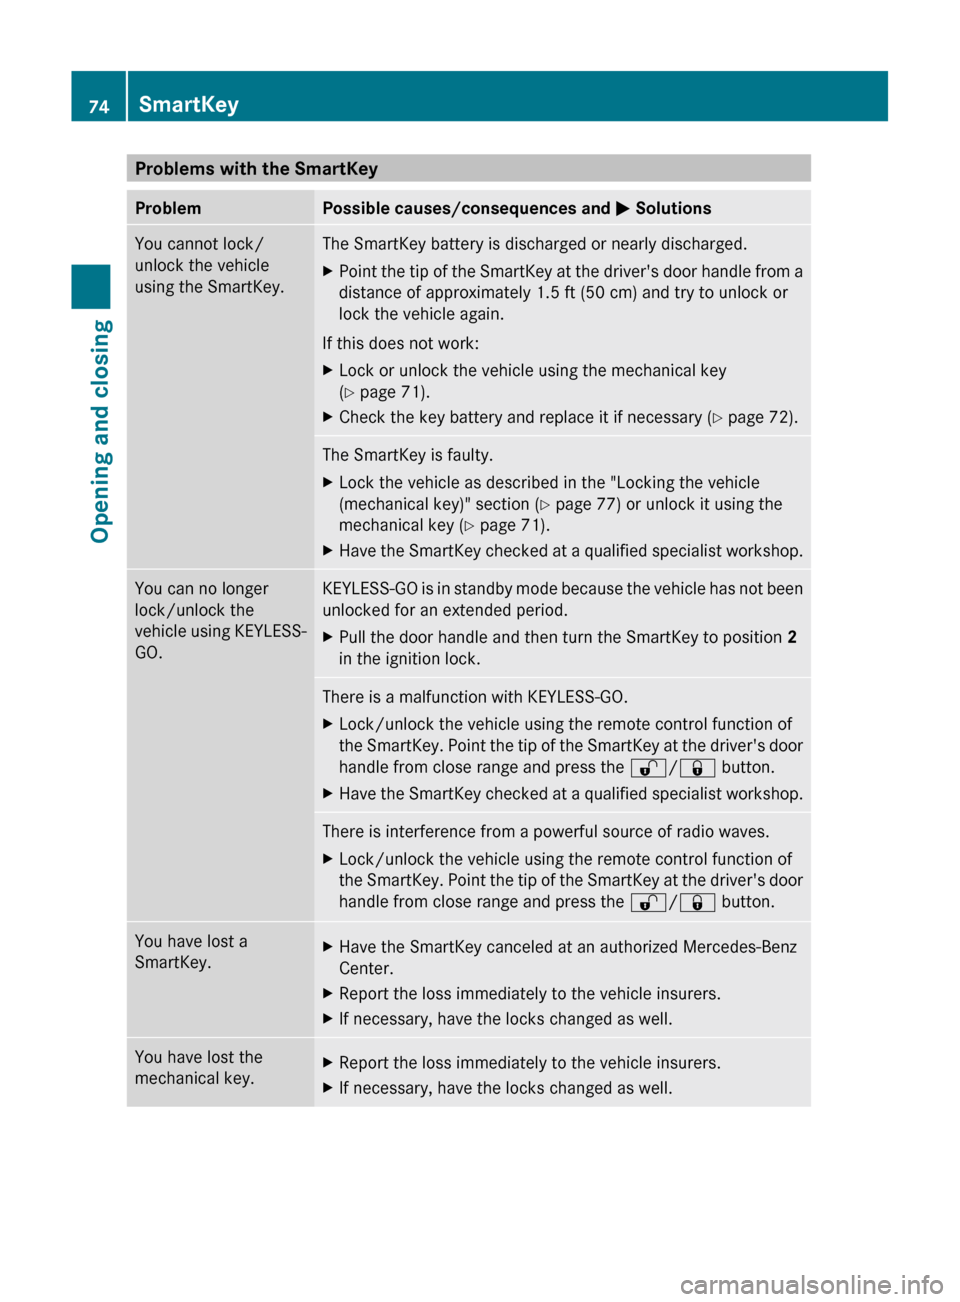
Problems with the SmartKeyProblemPossible causes/consequences and M SolutionsYou cannot lock/
unlock the vehicle
using the SmartKey.The SmartKey battery is discharged or nearly discharged.XPoint the tip of the SmartKey at the driver's door handle from a
distance of approximately 1.5 ft (50 cm) and try to unlock or
lock the vehicle again.
If this does not work:
XLock or unlock the vehicle using the mechanical key
( Y page 71).XCheck the key battery and replace it if necessary ( Y page 72).The SmartKey is faulty.XLock the vehicle as described in the "Locking the vehicle
(mechanical key)" section ( Y page 77) or unlock it using the
mechanical key ( Y page 71).XHave the SmartKey checked at a qualified specialist workshop.You can no longer
lock/unlock the
vehicle using KEYLESS-
GO.KEYLESS-GO is in standby mode because the vehicle has not been
unlocked for an extended period.XPull the door handle and then turn the SmartKey to position 2
in the ignition lock.There is a malfunction with KEYLESS-GO.XLock/unlock the vehicle using the remote control function of
the SmartKey. Point the tip of the SmartKey at the driver's door
handle from close range and press the %/& button.XHave the SmartKey checked at a qualified specialist workshop.There is interference from a powerful source of radio waves.XLock/unlock the vehicle using the remote control function of
the SmartKey. Point the tip of the SmartKey at the driver's door
handle from close range and press the %/& button.You have lost a
SmartKey.XHave the SmartKey canceled at an authorized Mercedes-Benz
Center.XReport the loss immediately to the vehicle insurers.XIf necessary, have the locks changed as well.You have lost the
mechanical key.XReport the loss immediately to the vehicle insurers.XIf necessary, have the locks changed as well.74SmartKeyOpening and closing
BA 204.9 USA, CA Edition A 2011; 1; 6, en-USd2mwentsVersion: 3.0.3.62010-06-15T08:58:39+02:00 - Seite 74
Page 77 of 304
ProblemPossible causes/consequences and M SolutionsThe engine cannot be
started using the
SmartKey.The on-board voltage is too low.XSwitch off non-essential consumers, e.g. seat heating or interior
lighting, and try to start the engine again.
If this does not work:
XCheck the starter battery and charge it if necessary
( Y page 253).
or
XJump-start the vehicle ( Y page 256).
or
XConsult a qualified specialist workshop.The engine cannot be
started using KEYLESS-
GO. The SmartKey is in
the vehicle.A door is open. Therefore, the SmartKey cannot be detected as
easily.XClose the door and try to start the vehicle again.There is interference from a powerful source of radio waves.XStart your vehicle with the SmartKey in the ignition lock.Doors
Important safety notes
GWarning!
When leaving the vehicle, always remove the
SmartKey from the starter switch. Always
take the SmartKey with you and lock the
vehicle. Do not leave children unattended in
the vehicle, even if they are secured in a child
restraint system, or with access to an
unlocked vehicle. A child's unsupervised
access to a vehicle could result in an accident
and/or serious personal injury. The children
could
R injure themselves on parts of the vehicle
R be seriously or fatally injured through
excessive exposure to extreme heat or cold
R injure themselves or cause an accident with
vehicle equipment that can be operated
even if the SmartKey is removed from the
starter switch or removed from the vehicle,
such as seat adjustment, steering wheel
adjustment, or the memory function
If children open a door, they could injure other
persons or get out of the vehicle and injure
themselves or be injured by following traffic.
Do not expose the child restraint system to
direct sunlight. The child restraint system's
metal parts, for example, could become very
hot, and the child could be burned by these
parts.GWarning!
Do not carry heavy or hard objects in the
passenger compartment or cargo
compartment unless they are firmly secured
in place.
Unsecured or improperly positioned cargo
increases a child’s risk of injury in the event
of
R strong braking maneuvers
R sudden changes of direction
R an accident
Doors75Opening and closingBA 204.9 USA, CA Edition A 2011; 1; 6, en-USd2mwentsVersion: 3.0.3.62010-06-15T08:58:39+02:00 - Seite 75Z
Page 97 of 304
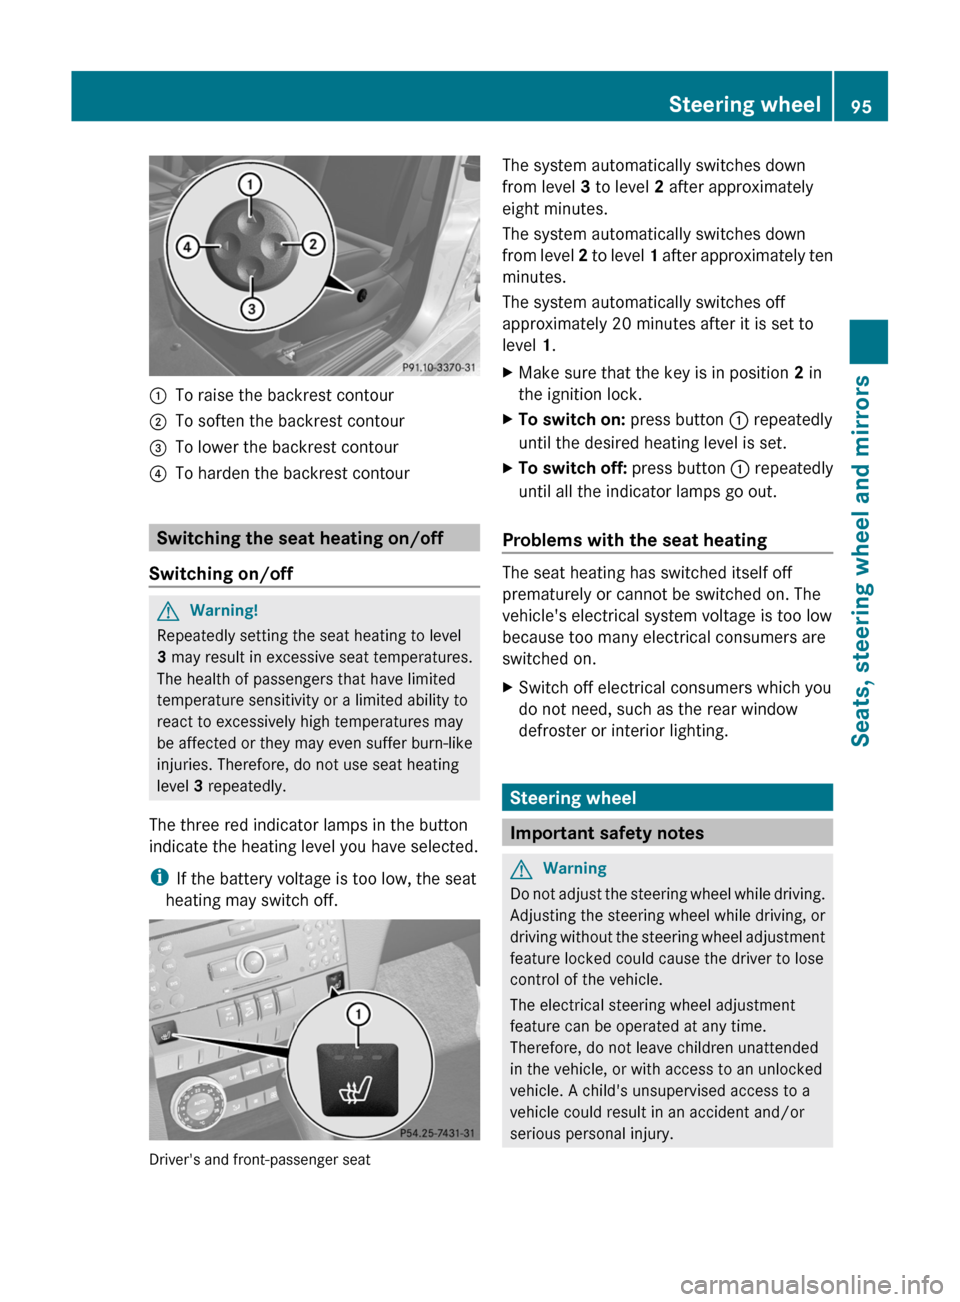
:To raise the backrest contour;To soften the backrest contour=To lower the backrest contour?To harden the backrest contour
Switching the seat heating on/off
Switching on/off
GWarning!
Repeatedly setting the seat heating to level
3 may result in excessive seat temperatures.
The health of passengers that have limited
temperature sensitivity or a limited ability to
react to excessively high temperatures may
be affected or they may even suffer burn-like
injuries. Therefore, do not use seat heating
level 3 repeatedly.
The three red indicator lamps in the button
indicate the heating level you have selected.
iIf the battery voltage is too low, the seat
heating may switch off.
Driver's and front-passenger seat
The system automatically switches down
from level 3 to level 2 after approximately
eight minutes.
The system automatically switches down
from level 2 to level 1 after approximately ten
minutes.
The system automatically switches off
approximately 20 minutes after it is set to
level 1.
XMake sure that the key is in position 2 in
the ignition lock.
XTo switch on: press button : repeatedly
until the desired heating level is set.
XTo switch off: press button : repeatedly
until all the indicator lamps go out.
Problems with the seat heating
The seat heating has switched itself off
prematurely or cannot be switched on. The
vehicle's electrical system voltage is too low
because too many electrical consumers are
switched on.
XSwitch off electrical consumers which you
do not need, such as the rear window
defroster or interior lighting.
Steering wheel
Important safety notes
GWarning
Do not adjust the steering wheel while driving.
Adjusting the steering wheel while driving, or
driving without the steering wheel adjustment
feature locked could cause the driver to lose
control of the vehicle.
The electrical steering wheel adjustment
feature can be operated at any time.
Therefore, do not leave children unattended
in the vehicle, or with access to an unlocked
vehicle. A child's unsupervised access to a
vehicle could result in an accident and/or
serious personal injury.
Steering wheel95Seats, steering wheel and mirrorsBA 204.9 USA, CA Edition A 2011; 1; 6, en-USd2mwentsVersion: 3.0.3.62010-06-15T08:58:39+02:00 - Seite 95Z