tire pressure MERCEDES-BENZ GLK-Class 2011 X204 Owner's Manual
[x] Cancel search | Manufacturer: MERCEDES-BENZ, Model Year: 2011, Model line: GLK-Class, Model: MERCEDES-BENZ GLK-Class 2011 X204Pages: 304, PDF Size: 13.08 MB
Page 6 of 304
1, 2, 3 ...
115 V socket ...................................... 218
12 V socket ........................................ 217
4ETS see ETS/4ETS
4MATIC (permanent four-wheel
drive) .................................................. 156
A
ABS (Anti-lock Braking System) Display message ............................ 181
Function/notes ................................ 62
Warning lamp ................................. 197
Accident (notes) ................................ 245
Active light function (display
message) ............................................ 186
Active service system see Service interval display
Air bags
Display message ............................ 179
Front air bag (driver, front
passenger) ....................................... 37
Important safety notes ....................36
Knee bag .......................................... 38
PASSENGER AIRBAG OFF
indicator lamp (only Canada) ...........46
PASSENGER AIRBAG OFF
indicator lamp (only USA) ................41
Pelvis air bag ................................... 40
Safety guidelines ............................. 35
Side impact air bag ..........................39
Window curtain air bag ....................41
Air-conditioning system
see Climate control
Air dehumidification
Activating/deactivating with
cooling ........................................... 120
Air distribution
Setting ........................................... 121
Airflow
Setting ........................................... 122
Air nozzles
see Air vents .................................. 124
Air pressure
see Tire pressure
Air-recirculation mode
Activating/deactivating .................123
Air vents ............................................. 124
Glove box ....................................... 125
Important safety information .........124
Rear ............................................... 125
Setting the center air vents ...........124
Setting the side air vents ...............124
Alarm system
see ATA
Anti-lock Braking System
see ABS
Anti-Theft Alarm system
see ATA
Anti-theft system
ATA (Anti-Theft Alarm system) .........65
Ashtray ............................................... 215
ATA (Anti-Theft Alarm system) Activating/deactivating ...................65
Function ........................................... 65
Switching off the alarm ....................65
Audio menu (on-board computer) .... 168
AUTO lights see Light sensor
Automatic car wash .......................... 237
Automatic transmission Display message ............................ 192
Driving tips .................................... 136
Emergency running mode ..............139
Kickdown ....................................... 136
Malfunction .................................... 139
Program selector button ................137
Pulling away ................................... 131
Releasing the parking lock
manually ........................................ 139
Selector lever ................................ 134
Starting .......................................... 131
Trailer towing ................................. 136
B
Backrest (display message) ............. 193
Bag hook ............................................ 210
BAS (Brake Assist System) ................. 62
Battery Charging ........................................ 254
Checking (SmartKey) .......................72
Display message ............................ 188
4IndexBA 204.9 USA, CA Edition A 2011; 1; 6, en-USd2mwentsVersion: 3.0.3.62010-06-15T08:58:39+02:00 - Seite 4
Page 16 of 304
Summer openingsee Convenience opening feature
Sun visor ............................................ 215
Supplemental Restraint System see SRS
Surround lighting (on-board
computer) .......................................... 172
SUV (Sport Utility Vehicle) .......................19
Switching off the alarm (ATA) ............ 65
T
Tachometer ........................................ 163
Tailgate Display message ............................ 192
Emergency unlocking .......................81
Limiting the opening angle ...............80
Tail lamp (display message) ............. 184
Taillight see Tail lamps
Tank content
Fuel gauge ....................................... 26
Technical data ................................... 292
GLK 350 ........................................ 299
GLK 350 4MATIC ........................... 300
Tires/wheels ................................. 287
TELEAID
Call priority .................................... 223
Display message ............................ 177
Downloading destinations
(COMAND) ..................................... 223
Emergency call .............................. 220
Important safety notes ..................219
Locating a stolen vehicle ...............224
MB info call button ........................222
Remote vehicle locking ..................224
Roadside Assistance button ..........221
Self-test ......................................... 219
System .......................................... 219
Vehicle remote unlocking ..............223
Telephone
Accepting a call ............................. 170
Display message ............................ 193
Menu (on-board computer) ............169
Number from the phone book ........ 170
Redialing ........................................ 170
Rejecting/ending a call .................170
Telephone compartment .................. 207
Temperature Coolant .......................................... 162
Outside temperature ...................... 163
Setting ........................................... 121
Theft deterrent locking system
Immobilizer ...................................... 65
Time (on-board computer) ................ 171
Tire pressure Calling up (on-board computer) .....271
Checking manually ........................269
Display message ............................ 189
Maximum ....................................... 274
Notes ............................................. 267
Pressure loss warning ....................269
Recommended ............................... 266
Tire pressure monitoring system
Function/notes ............................. 271
Restarting ...................................... 273
Warning lamp ................................. 202
Tires
Aspect ratio (definition) .................286
Average weight of the vehicle
occupants (definition) ....................284
Bar (definition) ............................... 284
Characteristics .............................. 284
Checking ........................................ 265
Cleaning ......................................... 266
Definition of terms .........................284
Direction of rotation ......................278
Distribution of the vehicle
occupants (definition) ....................287
DOT, Tire Identification Number
(TIN) ............................................... 283
DOT (Department of
Transportation) (definition) ............284
Flat tire .......................................... 247
GAWR (Gross Axle Weight Rating)
(definition) ..................................... 285
GTW (Gross Trailer Weight)
(definition) ..................................... 285
Guidelines to be observed .............265
GVW (Gross Vehicle Weight)
(definition) ..................................... 285
GVWR (Gross Vehicle Weight
Rating) (definition) .........................285
Increased vehicle weight due to
optional equipment (definition) ......28414IndexBA 204.9 USA, CA Edition A 2011; 1; 6, en-USd2mwentsVersion: 3.0.3.62010-06-15T08:58:39+02:00 - Seite 14
Page 17 of 304
Kilopascal (kPa) (definition) ...........285
Labeling (overview) ........................280
Load bearing index (definition) ......286
Load index ..................................... 283
Load index (definition) ...................285
Maximum loaded vehicle weight
(definition) ..................................... 285
Maximum load on a tire
(definition) ..................................... 286
Maximum permissible tire
pressure (definition) ....................... 285
Maximum tire load .........................278
Maximum tire load (definition) .......285
Optional equipment weight
(definition) ..................................... 286
PSI (pounds per square inch)
(definition) ..................................... 286
Replacing ....................................... 280
Service life ..................................... 265
Sidewall (definition) .......................286
Speed index (definition) .................285
Storing ........................................... 266
Structure and characteristics
(definition) ..................................... 284
Temperature .................................. 279
TIN (Tire Identification Number)
(definition) ..................................... 286
Tire bead (definition) ......................286
Tire pressure (definition) ................286
Tire pressures (recommended) ......284
Tire size (data) ............................... 287
Tire size designation, load-bearing
capacity, speed index ....................281
Tire tread ....................................... 265
Tire tread (definition) .....................286
Total load limit (definition) .............287
Traction ......................................... 279
Traction (definition) .......................286
Tread wear ..................................... 279
TWR (permissible trailer drawbar
noseweight) (definition) .................286
Uniform Tire Quality Grading
Standards ...................................... 278
Uniform Tire Quality Grading
Standards (definition) ....................284
Unladen weight (definition) ............285
Wear indicator (definition) .............286
Wheel rim (definition) ....................285Tires and wheels (important safety
information) ....................................... 264
Top Tether ............................................ 59
Towing Important safety guidelines ...........258
Installing the towing eye ................258
Removing the towing eye ...............259
Towing a trailer
Driving tips .................................... 156
Trailer
Coupling up ................................... 157
Decoupling ..................................... 158
Display message ............................ 183
Power supply ................................. 159
Towing ........................................... 157
Trailer loads and drawbar
noseweights ...................................... 158
Trailer towing .................................... 136
ESP ®
................................................ 64
PARKTRONIC ................................. 153
Transfer case ..................................... 139
Transmission position display ......... 135
Transmission positions .................... 135
Trip computer (on-board
computer) .......................................... 166
Trip odometer Calling up ....................................... 166
Resetting (on-board computer) ......167
Trunk
Automatic opening ..................... 78, 79
Trunk lid
Opening/closing .............................. 78
Turn signal (display message) ......... 184
Turn signals ....................................... 104
TWR (permissible trailer drawbar
noseweight) (definition) ................... 286
Type plate see Vehicle identification plate
U
Unlocking Emergency unlocking .......................77
From inside the vehicle (central
unlocking button) ............................. 76
Index15BA 204.9 USA, CA Edition A 2011; 1; 6, en-USd2mwentsVersion: 3.0.3.62010-06-15T08:58:39+02:00 - Seite 15
Page 18 of 304
V
Vanity mirror Sun visor ........................................ 215
Vehicle
Data acquisition ............................... 21
Emergency unlocking .......................77
Equipment ....................................... 17
Exterior view .................................... 24
Individual settings (on-board
computer) ...................................... 171
Loading .......................................... 274
Lowering ........................................ 252
Maintenance .................................... 18
Parking up ..................................... 144
Raising ........................................... 248
Reporting problems .........................20
Towing away .................................. 258
Tow-starting ................................... 258
Transporting .................................. 260
Vehicle data
see Technical data
Vehicle identification number
see VIN
Vehicle identification plate .............. 293
Vehicle tool kit .................................. 245
Video (DVD) ........................................ 169
Video DVD (on-board computer) ...... 169
VIN ...................................................... 293
W
Warning and indicator lamps ABS ................................................ 197
Brakes ........................................... 195
Check Engine ................................. 200
Coolant .......................................... 201
ESP ®
.............................................. 198
ESP ®
OFF ....................................... 199
Fuel tank ........................................ 200
Overview .......................................... 27
PASSENGER AIRBAG OFF
indicator lamp (only Canada) ...........46
PASSENGER AIRBAG OFF
indicator lamp (only USA) ................41
Reserve fuel ................................... 200
Seat belt ........................................ 196
SRS ................................................ 199
Tire pressure monitor ....................202
Warranty ............................................ 292
Washer fluid reservoir Removing/attaching ......................110
Wheel bolt tightening torque ........... 252
Wheel chock ...................................... 248
Wheels Changing/replacing .......................280
Changing a wheel .......................... 247
Checking ........................................ 265
Cleaning ......................................... 238
Guidelines to be observed .............265
Mounting a wheel .......................... 250
Removing a wheel ..........................250
Tightening torque ........................... 252
Wheel size/tire size .......................287
Window curtain air bag
Display message ............................ 178
Operation ......................................... 41
Windows
see Side windows
Windows (cleaning instructions) ..... 239
Windshield Defrosting ...................................... 122
Windshield washer fluid (display
message) ............................................ 193
Windshield washer system Adding washer fluid .......................235
Notes ............................................. 299
Windshield wipers
Important safety notes ..................113
Replacing the wiper blades ....114, 115
Switching on/off ........................... 113
Troubleshooting ............................. 116
Winter operation ............................... 149
Winter tires M+S tires ....................................... 148
Wiper blades
Cleaning ......................................... 23916IndexBA 204.9 USA, CA Edition A 2011; 1; 6, en-USd2mwentsVersion: 3.0.3.62010-06-15T08:58:39+02:00 - Seite 16
Page 29 of 304
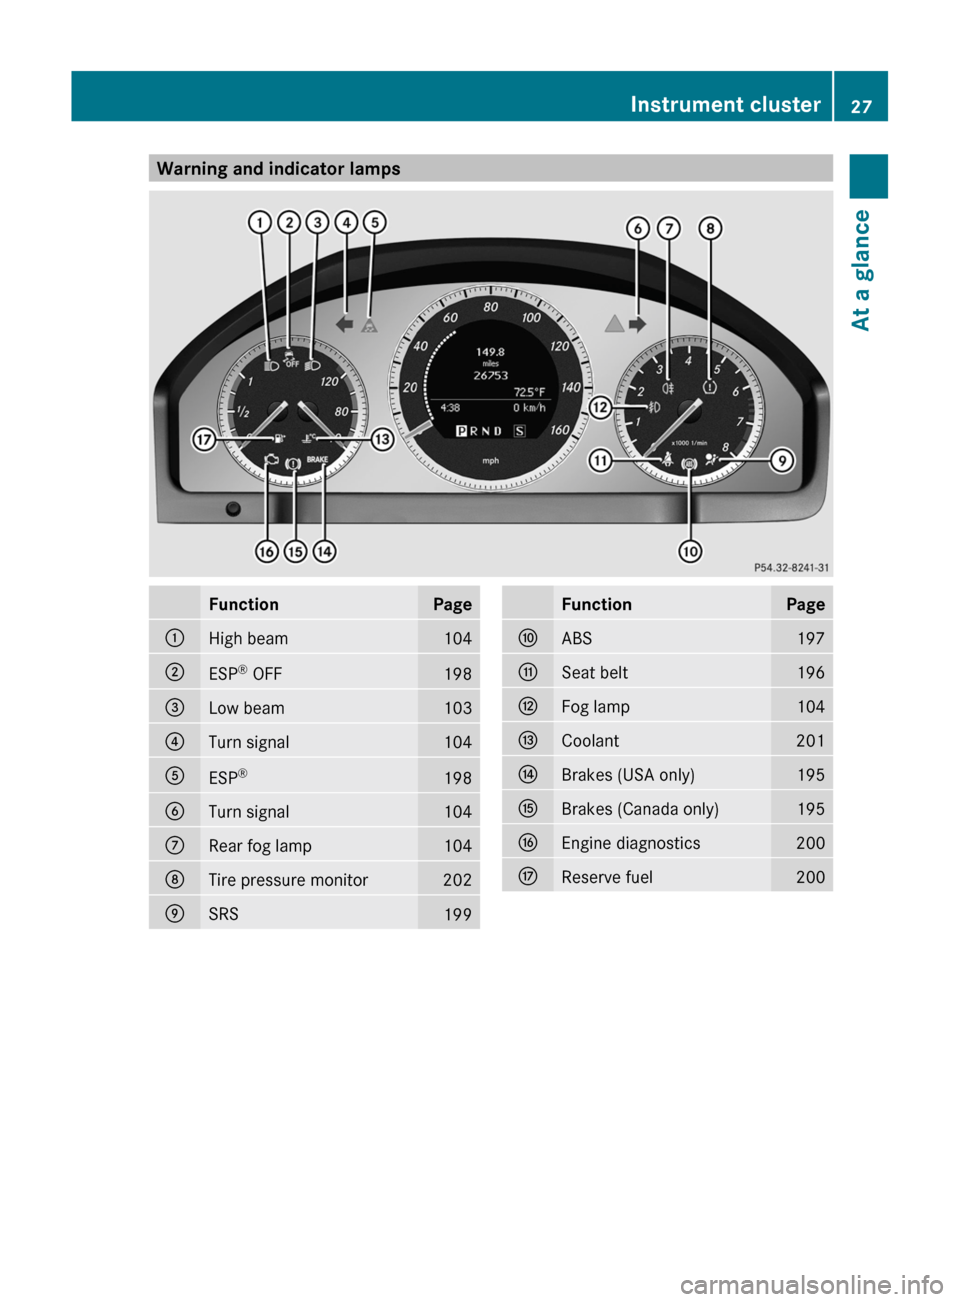
Warning and indicator lampsFunctionPage:High beam104;ESP®
OFF198=Low beam103?Turn signal104AESP ®198BTurn signal104CRear fog lamp104DTire pressure monitor202ESRS199FunctionPageFABS197GSeat belt196HFog lamp104ICoolant201JBrakes (USA only)195KBrakes (Canada only)195LEngine diagnostics200MReserve fuel200Instrument cluster27At a glanceBA 204.9 USA, CA Edition A 2011; 1; 6, en-USd2mwentsVersion: 3.0.3.62010-06-15T08:58:39+02:00 - Seite 27
Page 64 of 304
or dangerous manner which could jeopardize
the user's safety or the safety of others.
Always adjust your driving style to the
prevailing road and weather conditions and
keep a safe distance to other road users and
objects on the street.
If a driving system malfunctions, other driving
safety systems may also switch off. Observe
indicator and warning lamps that may come
on as well as messages in the multifunction
display that may appear.
i In wintry driving conditions, always use
winter tires (M+S tires) and if necessary,
snow chains. Only in this way will the
driving safety systems described in this
section work as effectively as possible.
ABS (Anti-lock Braking System)
Important safety notes
GWarning
Observe "Important safety notes"
( Y page 61).
GWarning
Do not pump the brake pedal. Use firm, steady
brake pedal pressure instead. Pumping the
brake pedal defeats the purpose of the ABS
and significantly reduces braking
effectiveness.
ABS regulates brake pressure in such a way
that the wheels do not lock when you brake.
This allows you to continue steering the
vehicle when braking.
ABS works from a speed of about
5 mph (8 km/h) upwards, regardless of road-
surface conditions. ABS works on slippery
surfaces, even when you only brake gently.
The ! warning lamp in the instrument
cluster lights up when the ignition is switched
on. It goes out when the engine is running.
Braking
If ABS intervenes when braking, you will feel
a pulsing in the brake pedal.
XIf ABS intervenes: continue to depress the
brake pedal with force until the braking
situation is over.XTo make a full brake application:
depress the brake pedal with full force.GWarning
If the ABS malfunctions, other driving systems
such as the BAS or the ESP ®
are also switched
off. Observe indicator and warning lamps that
may come on as well as messages in the
multifunction display that may appear.
If the ABS malfunctions, the wheels may lock
during hard braking, reducing the steering
capability and extending the braking distance.
The pulsating brake pedal can be an
indication of hazardous road conditions and
functions as a reminder to take extra care
while driving.
BAS (Brake Assist)
GWarning
Observe "Important safety notes"
( Y page 61).
BAS operates in emergency braking
situations. If you depress the brake pedal
quickly, BAS automatically boosts the braking
force, thus shortening the stopping distance.
XKeep the brake pedal firmly depressed until
the emergency braking situation is over.
ABS prevents the wheels from locking.
The brakes will function as usual once you
release the brake pedal. BAS is deactivated.
GWarning
If the BAS malfunctions, the brake system still
functions, but without the additional brake
boost available that the BAS would normally
provide in an emergency braking maneuver.
Therefore, the braking distance may increase.
62Driving safety systemsSafety
BA 204.9 USA, CA Edition A 2011; 1; 6, en-USd2mwentsVersion: 3.0.3.62010-06-15T08:58:39+02:00 - Seite 62
Page 88 of 304
entire body parts or portions of them may
protrude from the passenger compartment.
! Only open the sliding sunroof if it is free
of snow and ice. Otherwise, malfunctions
may occur.
Do not allow anything to protrude from the
sliding sunroof. Otherwise, the seals could
be damaged.
! If the sliding sunroof cannot be opened or
closed due to a malfunction, contact a
qualified specialist workshop, e.g. an
authorized Mercedes-Benz Center.
! Do not forget that the weather can
change abruptly. Make certain that the
sliding sunroof is closed when you leave the
vehicle. The vehicle electronics can be
damaged if water enters the vehicle
interior.
i Resonance noises can occur in addition
to the usual airflow noises when the sliding
sunroof is open. They are caused by minor
pressure fluctuations in the vehicle interior.
Change the position of the sliding sunroof
or open a side window slightly to reduce or
eliminate these noises.Operating the panorama sliding
sunroof
Opening and closing
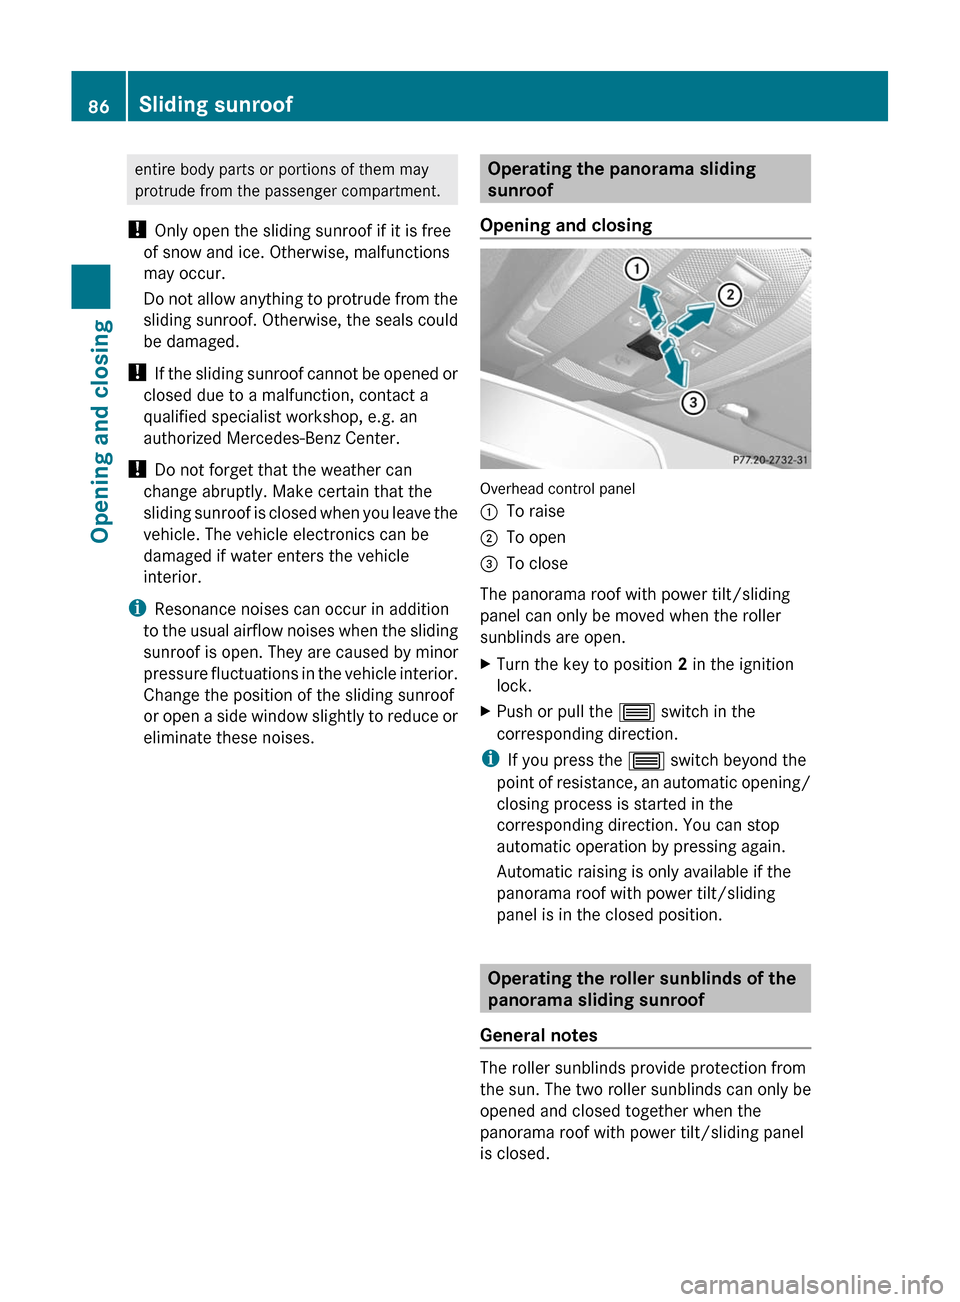
Overhead control panel
:To raise;To open=To close
The panorama roof with power tilt/sliding
panel can only be moved when the roller
sunblinds are open.
XTurn the key to position 2 in the ignition
lock.XPush or pull the 3 switch in the
corresponding direction.
i If you press the 3 switch beyond the
point of resistance, an automatic opening/
closing process is started in the
corresponding direction. You can stop
automatic operation by pressing again.
Automatic raising is only available if the
panorama roof with power tilt/sliding
panel is in the closed position.
Operating the roller sunblinds of the
panorama sliding sunroof
General notes
The roller sunblinds provide protection from
the sun. The two roller sunblinds can only be
opened and closed together when the
panorama roof with power tilt/sliding panel
is closed.
86Sliding sunroofOpening and closing
BA 204.9 USA, CA Edition A 2011; 1; 6, en-USd2mwentsVersion: 3.0.3.62010-06-15T08:58:39+02:00 - Seite 86
Page 143 of 304
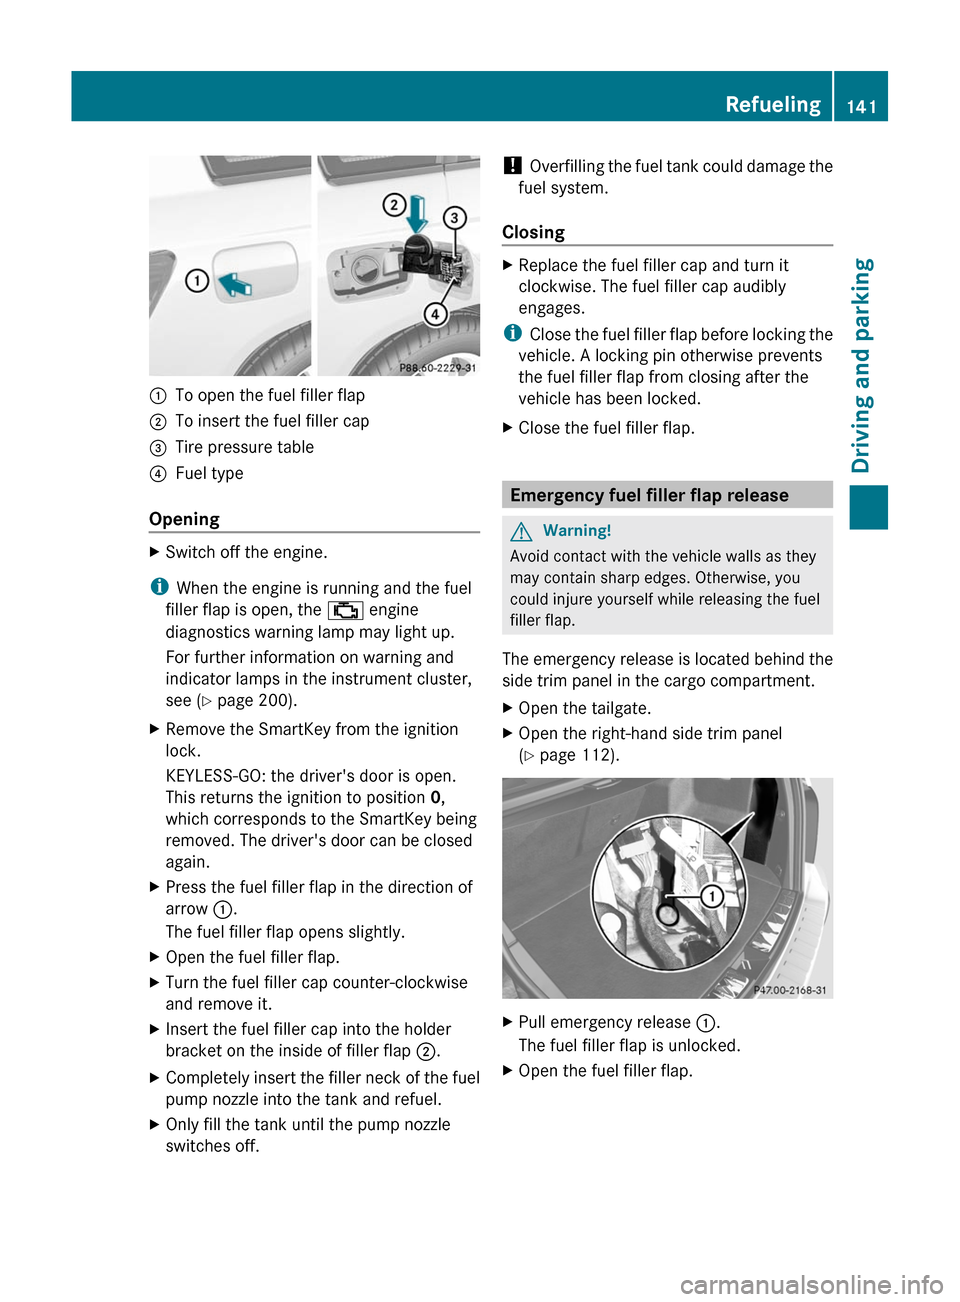
:To open the fuel filler flap;To insert the fuel filler cap=Tire pressure table?Fuel type
Opening
XSwitch off the engine.
iWhen the engine is running and the fuel
filler flap is open, the ; engine
diagnostics warning lamp may light up.
For further information on warning and
indicator lamps in the instrument cluster,
see (Y page 200).
XRemove the SmartKey from the ignition
lock.
KEYLESS-GO: the driver's door is open.
This returns the ignition to position 0,
which corresponds to the SmartKey being
removed. The driver's door can be closed
again.
XPress the fuel filler flap in the direction of
arrow :.
The fuel filler flap opens slightly.
XOpen the fuel filler flap.XTurn the fuel filler cap counter-clockwise
and remove it.
XInsert the fuel filler cap into the holder
bracket on the inside of filler flap ;.
XCompletely insert the filler neck of the fuel
pump nozzle into the tank and refuel.
XOnly fill the tank until the pump nozzle
switches off.
! Overfilling the fuel tank could damage the
fuel system.
Closing
XReplace the fuel filler cap and turn it
clockwise. The fuel filler cap audibly
engages.
iClose the fuel filler flap before locking the
vehicle. A locking pin otherwise prevents
the fuel filler flap from closing after the
vehicle has been locked.
XClose the fuel filler flap.
Emergency fuel filler flap release
GWarning!
Avoid contact with the vehicle walls as they
may contain sharp edges. Otherwise, you
could injure yourself while releasing the fuel
filler flap.
The emergency release is located behind the
side trim panel in the cargo compartment.
XOpen the tailgate.XOpen the right-hand side trim panel
(Y page 112).
XPull emergency release :.
The fuel filler flap is unlocked.
XOpen the fuel filler flap.Refueling141Driving and parkingBA 204.9 USA, CA Edition A 2011; 1; 6, en-USd2mwentsVersion: 3.0.3.62010-06-15T08:58:39+02:00 - Seite 141Z
Page 146 of 304
Parking up the vehicle
If you leave the vehicle parked up for longer
than four weeks, the battery may be damaged
by exhaustive discharge.XDisconnect the battery or connect it to a
trickle charger.
i You can obtain information about trickle
chargers from a qualified specialist
workshop, e.g. an authorized Mercedes-
Benz Center.
If you leave the vehicle parked up for longer
than six weeks, the vehicle may suffer
damage as a result of lack of use.
XVisit a qualified specialist workshop and
seek advice.
Driving tips
General driving tips
Important safety notes
GWarning
Please do not forget that your primary
responsibility is to drive the vehicle. A driver's
attention to the road must always be his/her
primary focus when driving. For your safety
and the safety of others, we recommend that
you pull over to a safe location and stop
before placing or taking a telephone call.
If you use the telephone 18
while driving,
please use the hands-free device and only use
the telephone when road, weather and traffic
conditions permit. Some jurisdictions prohibit
the driver from using a mobile telephone while
driving a vehicle.
Only operate the audio system or
COMAND 18
(Cockpit Management and Data
System) if road, weather and traffic
conditions permit. Otherwise, you may not be
able to observe traffic conditions and could
endanger yourself and others.
Bear in mind that at a speed of just 30 mph
(approximately 50 km/h), your vehicle is
covering a distance of 44 feet (approximately
14 m) every second.
Drive sensibly – save fuel
To save fuel, observe the following notes:
XKeep tires at the recommended inflation
pressures.XRemove unnecessary cargo.XRemove the roof rack when not in use.XMaintain a low engine speed until the
engine is warm.XAvoid frequent acceleration and
deceleration.XHave all maintenance work performed at
the service intervals specified in the
Service Booklet or indicated by the service
interval indicator.
Fuel consumption is also increased by driving
in cold weather, in stop-and-go traffic, on
short trips and in mountainous areas.
Drinking and driving
GWarning
Drinking and driving and/or taking drugs and
driving are very dangerous combinations.
Even a small amount of alcohol or drugs can
affect your reflexes, perceptions and
judgment.
The possibility of a serious or even fatal
accident are greatly increased when you drink
or take drugs and drive.
Do not drink or take drugs and drive or allow
anyone to drive who has been drinking or
taking drugs.
Pedals
GWarning
Make sure absolutely no objects are
obstructing the pedals' range of movement.
18 Observe all legal requirements.144Driving tipsDriving and parking
BA 204.9 USA, CA Edition A 2011; 1; 6, en-USd2mwentsVersion: 3.0.3.62010-06-15T08:58:39+02:00 - Seite 144
Page 150 of 304
Observe the notes in the "Winter operation"
section ( Y page 149).
Winter tires
At temperatures below 45 ‡(+7 †), use
winter tires or all-season tires. Both types of
tire are identified by the M+S marking.
Only winter tires also bearing the i
snowflake symbol next to the M+S marking
provide the best possible grip in wintry road
conditions. Only these tires will allow driving
safety systems such as ABS and ESP ®
to
function optimally in winter, as these tires
have been designed specifically for driving on
snow.
Use M+S tires of the same make and tread on
all wheels to maintain safe handling
characteristics.
GWarning
M+S tires with a tread depth of less than 1
/ 6
inch (4 mm) must be replaced. They are no
longer suitable for winter operation.
Always observe the maximum permissible
speed specified for the M+S tires you have
mounted.
Once you have installed the winter tires:
XCheck the tire pressures ( Y page 269).XRestart the tire pressure monitor
( Y page 271).GWarning
If you use your spare wheel when M+S tires
are fitted on the other wheels, be aware that
the difference in tire characteristics may very
well impair turning stability and that overall
driving stability may be reduced. Adapt your
driving style accordingly.
Have the spare wheel replaced by a regular
road wheel with an M+S tire at the nearest
authorized Mercedes-Benz Center.
Snow chains
For safety reasons, Mercedes-Benz
recommends that you only use snow chains
which have been specially approved for your
vehicle by Mercedes-Benz, or are of a
corresponding standard of quality.
! There is not enough space for snow
chains on some wheel sizes. Observe the
information under "Tires and wheels" in the
"Technical Data" section to avoid damage
to the vehicle or the wheels.
R Only use snow chains when driving on an
area completely covered by snow. Do not
exceed the maximum permissible speed of
30 mph (50 km/h). Remove the snow
chains as soon as possible when you are no
longer driving on snow-covered roads.
R Local regulations may restrict the use of
snow chains. Applicable regulations must
be observed if you wish to mount snow
chains.
R Snow chains must not be mounted on
emergency spare wheels.
If you intend to mount snow chains, please
bear the following points in mind:
R you may not attach snow chains to all
wheel-tire combinations; see the "Tires and
wheels" section in the "Technical data"
chapter.
R mount snow chains only in pairs and only
on the rear wheels. Observe the
manufacturer's installation instructions.
! If snow chains are mounted on the front
wheels, the snow chains could grind
against the bodywork or components of the
chassis. This could result in damage to the
vehicle or the tires.
! Vehicles with steel wheels
If you wish to mount snow chains to steel
wheels, make sure that you remove the
respective wheels' hubcaps first. The
hubcaps may otherwise be damaged.
148Driving tipsDriving and parking
BA 204.9 USA, CA Edition A 2011; 1; 6, en-USd2mwentsVersion: 3.0.3.62010-06-15T08:58:39+02:00 - Seite 148