MERCEDES-BENZ GLK350 4MATIC 2010 X204 Owner's Manual
Manufacturer: MERCEDES-BENZ, Model Year: 2010, Model line: GLK350 4MATIC, Model: MERCEDES-BENZ GLK350 4MATIC 2010 X204Pages: 344, PDF Size: 8.45 MB
Page 261 of 344
Vehicle equipment ............................260
Where will I find ...? ..........................260
Vehicle status messages in the
multifunction display .......................262
What to do if … ..................................288
Unlocking/locking manually ...........299
Resetting activated NECK-PRO
active front head restraints .............301
Replacing SmartKey batteries .........302
Replacing bulbs .................................303
Replacing wiper blades ....................310
Flat tire ..............................................312
Battery ...............................................317
Jump starting ....................................319
Towing the vehicle ............................321
Fuses ..................................................325
259Practical hintsX204_AKB; 3; 23, en-USd2ureepe,Version: 2.11.8.12009-07-16T19:16:58+02:00 - Seite 259
Page 262 of 344
Vehicle equipment
iThis Operator’s Manual describes all
features, standard or optional, potentially
available for your vehicle at the time of
purchase. Please be aware that your
vehicle might not be equipped with all
features described in this manual.
Where will I find ...?
First aid kit
iCheck expiration dates and contents for
completeness at least once a year and
replace missing/expired items.
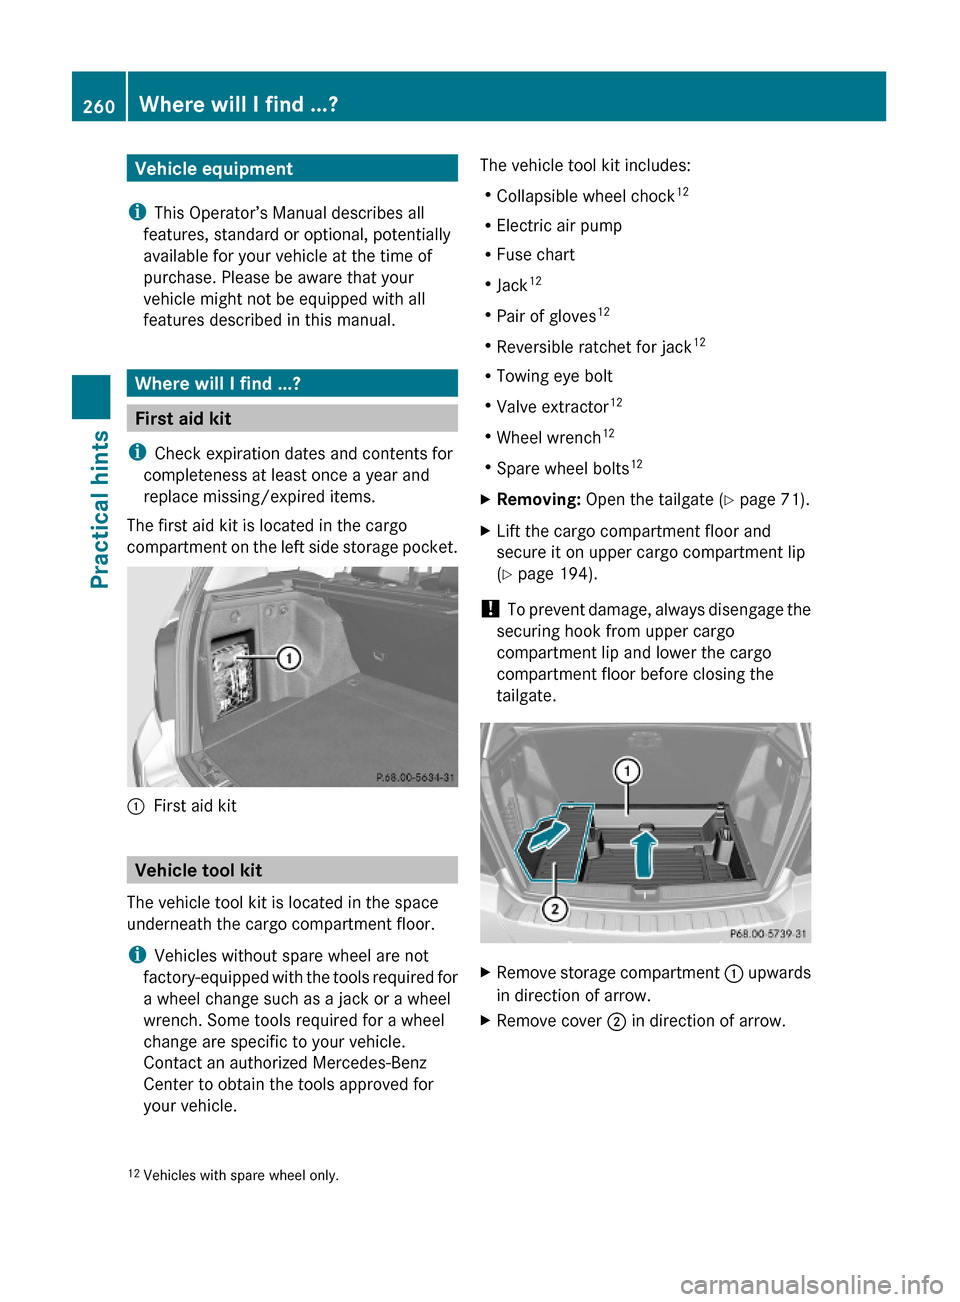
The first aid kit is located in the cargo
compartment on the left side storage pocket.
:First aid kit
Vehicle tool kit
The vehicle tool kit is located in the space
underneath the cargo compartment floor.
iVehicles without spare wheel are not
factory-equipped with the tools required for
a wheel change such as a jack or a wheel
wrench. Some tools required for a wheel
change are specific to your vehicle.
Contact an authorized Mercedes-Benz
Center to obtain the tools approved for
your vehicle.
The vehicle tool kit includes:
RCollapsible wheel chock12
RElectric air pump
RFuse chart
RJack12
RPair of gloves12
RReversible ratchet for jack12
RTowing eye bolt
RValve extractor12
RWheel wrench12
RSpare wheel bolts12
XRemoving: Open the tailgate (Y page 71).XLift the cargo compartment floor and
secure it on upper cargo compartment lip
(Y page 194).
! To prevent damage, always disengage the
securing hook from upper cargo
compartment lip and lower the cargo
compartment floor before closing the
tailgate.
XRemove storage compartment : upwards
in direction of arrow.
XRemove cover ; in direction of arrow.12Vehicles with spare wheel only.260Where will I find ...?Practical hints
X204_AKB; 3; 23, en-USd2ureepe,Version: 2.11.8.12009-07-16T19:16:58+02:00 - Seite 260
Page 263 of 344
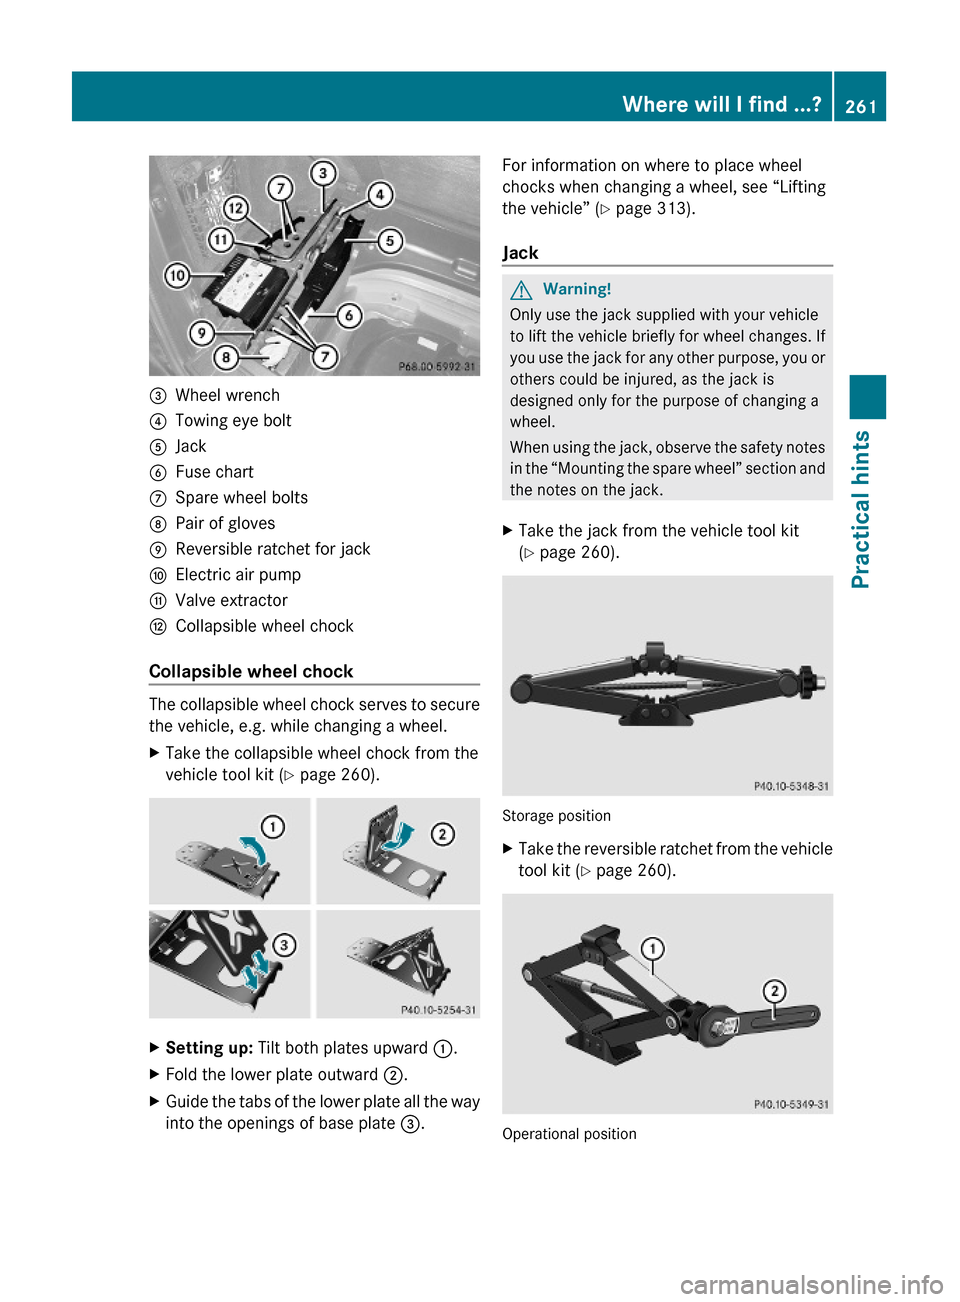
=Wheel wrench?Towing eye boltAJackBFuse chartCSpare wheel boltsDPair of glovesEReversible ratchet for jackFElectric air pumpGValve extractorHCollapsible wheel chock
Collapsible wheel chock
The collapsible wheel chock serves to secure
the vehicle, e.g. while changing a wheel.
XTake the collapsible wheel chock from the
vehicle tool kit (Y page 260).
XSetting up: Tilt both plates upward :.XFold the lower plate outward ;.XGuide the tabs of the lower plate all the way
into the openings of base plate =.
For information on where to place wheel
chocks when changing a wheel, see “Lifting
the vehicle” (Y page 313).
Jack
GWarning!
Only use the jack supplied with your vehicle
to lift the vehicle briefly for wheel changes. If
you use the jack for any other purpose, you or
others could be injured, as the jack is
designed only for the purpose of changing a
wheel.
When using the jack, observe the safety notes
in the “Mounting the spare wheel” section and
the notes on the jack.
XTake the jack from the vehicle tool kit
(Y page 260).
Storage position
XTake the reversible ratchet from the vehicle
tool kit (Y page 260).
Operational position
Where will I find ...?261Practical hintsX204_AKB; 3; 23, en-USd2ureepe,Version: 2.11.8.12009-07-16T19:16:58+02:00 - Seite 261Z
Page 264 of 344
XAttach reversible ratchet ; to jack : in
such a way that the word UP can be seen.
Before placing the jack and the reversible
ratchet back into the vehicle tool kit:
XFully collapse the jack (storage position).XRemove the reversible ratchet.
Spare wheel
GObserve Safety notes, see page 312.
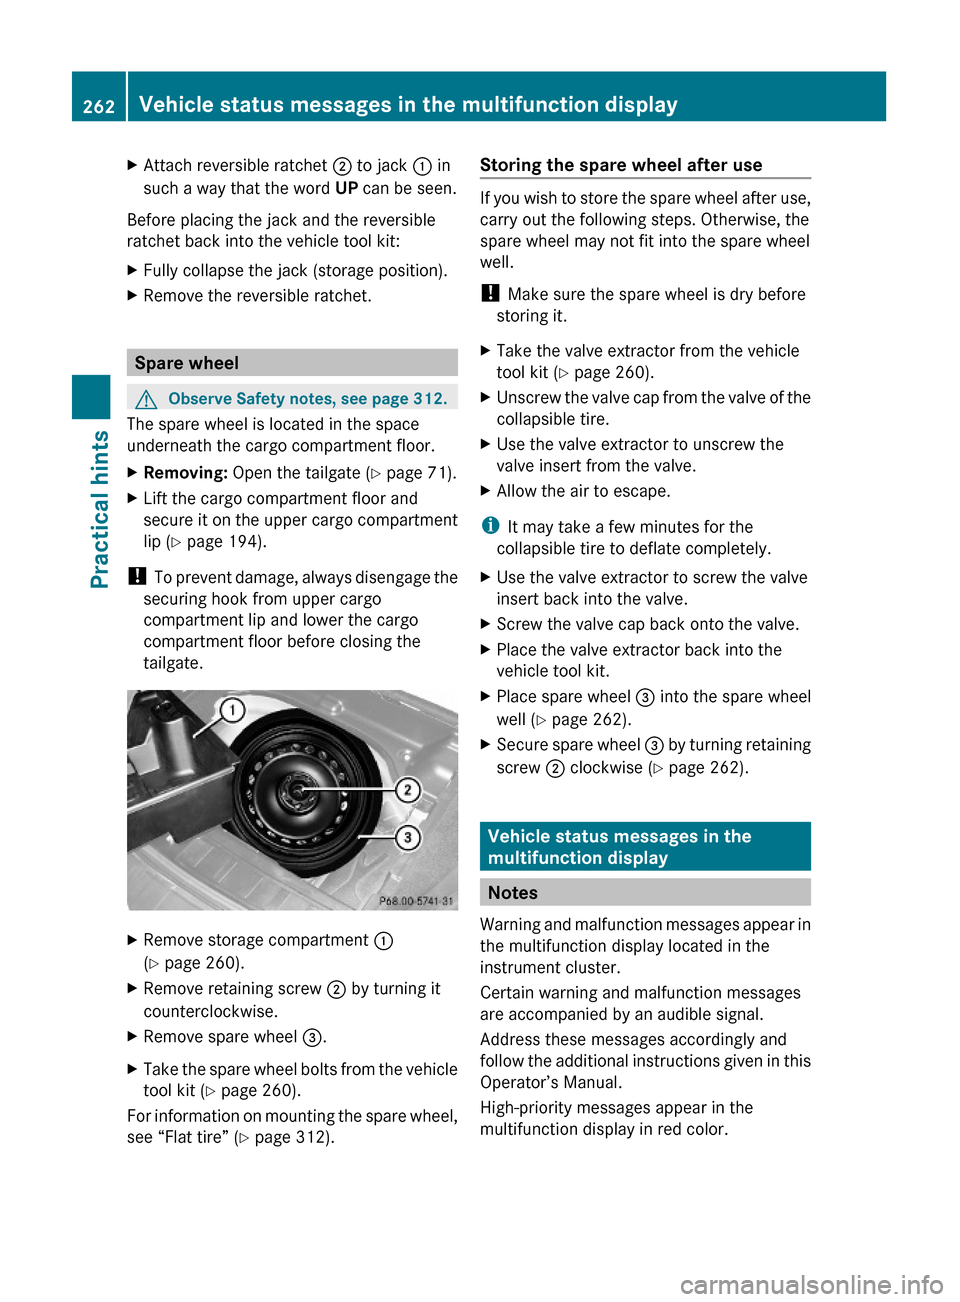
The spare wheel is located in the space
underneath the cargo compartment floor.
XRemoving: Open the tailgate (Y page 71).XLift the cargo compartment floor and
secure it on the upper cargo compartment
lip (Y page 194).
! To prevent damage, always disengage the
securing hook from upper cargo
compartment lip and lower the cargo
compartment floor before closing the
tailgate.
XRemove storage compartment :
(Y page 260).
XRemove retaining screw ; by turning it
counterclockwise.
XRemove spare wheel =.XTake the spare wheel bolts from the vehicle
tool kit (Y page 260).
For information on mounting the spare wheel,
see “Flat tire” (Y page 312).
Storing the spare wheel after use
If you wish to store the spare wheel after use,
carry out the following steps. Otherwise, the
spare wheel may not fit into the spare wheel
well.
! Make sure the spare wheel is dry before
storing it.
XTake the valve extractor from the vehicle
tool kit (Y page 260).
XUnscrew the valve cap from the valve of the
collapsible tire.
XUse the valve extractor to unscrew the
valve insert from the valve.
XAllow the air to escape.
iIt may take a few minutes for the
collapsible tire to deflate completely.
XUse the valve extractor to screw the valve
insert back into the valve.
XScrew the valve cap back onto the valve.XPlace the valve extractor back into the
vehicle tool kit.
XPlace spare wheel = into the spare wheel
well (Y page 262).
XSecure spare wheel = by turning retaining
screw ; clockwise (Y page 262).
Vehicle status messages in the
multifunction display
Notes
Warning and malfunction messages appear in
the multifunction display located in the
instrument cluster.
Certain warning and malfunction messages
are accompanied by an audible signal.
Address these messages accordingly and
follow the additional instructions given in this
Operator’s Manual.
High-priority messages appear in the
multifunction display in red color.
262Vehicle status messages in the multifunction displayPractical hints
X204_AKB; 3; 23, en-USd2ureepe,Version: 2.11.8.12009-07-16T19:16:58+02:00 - Seite 262
Page 265 of 344
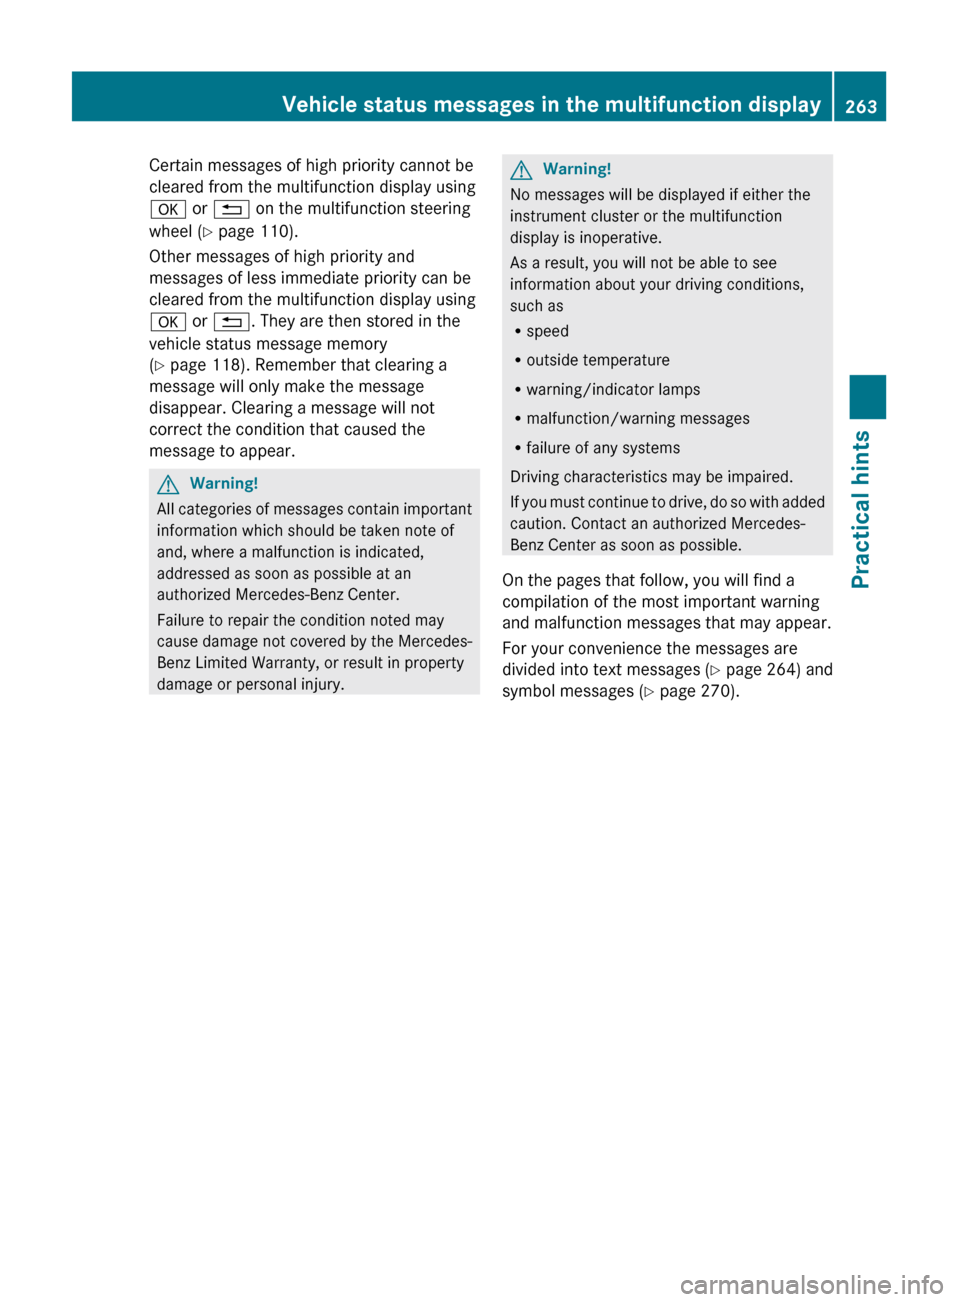
Certain messages of high priority cannot be
cleared from the multifunction display using
a or % on the multifunction steering
wheel ( Y page 110).
Other messages of high priority and
messages of less immediate priority can be
cleared from the multifunction display using
a or % . They are then stored in the
vehicle status message memory
( Y page 118). Remember that clearing a
message will only make the message
disappear. Clearing a message will not
correct the condition that caused the
message to appear.GWarning!
All categories of messages contain important
information which should be taken note of
and, where a malfunction is indicated,
addressed as soon as possible at an
authorized Mercedes-Benz Center.
Failure to repair the condition noted may
cause damage not covered by the Mercedes-
Benz Limited Warranty, or result in property
damage or personal injury.
GWarning!
No messages will be displayed if either the
instrument cluster or the multifunction
display is inoperative.
As a result, you will not be able to see
information about your driving conditions,
such as
R speed
R outside temperature
R warning/indicator lamps
R malfunction/warning messages
R failure of any systems
Driving characteristics may be impaired.
If you must continue to drive, do so with added
caution. Contact an authorized Mercedes-
Benz Center as soon as possible.
On the pages that follow, you will find a
compilation of the most important warning
and malfunction messages that may appear.
For your convenience the messages are
divided into text messages ( Y page 264) and
symbol messages ( Y page 270).
Vehicle status messages in the multifunction display263Practical hintsX204_AKB; 3; 23, en-USd2ureepe,Version: 2.11.8.12009-07-16T19:16:58+02:00 - Seite 263Z
Page 266 of 344
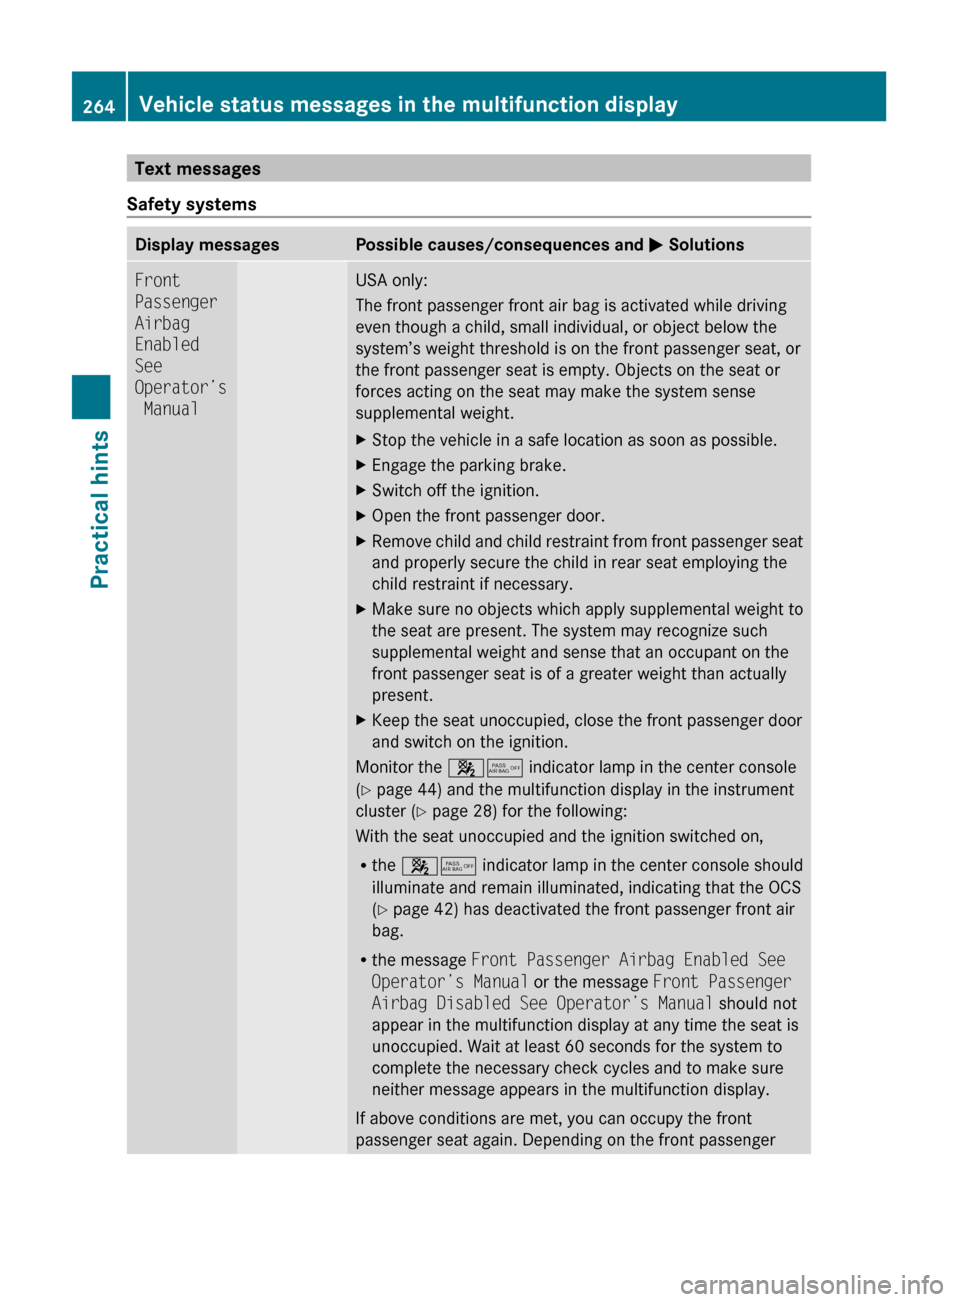
Text messages
Safety systemsDisplay messagesPossible causes/consequences and M SolutionsFront
Passenger
Airbag
Enabled
See
Operator’s
ManualUSA only:
The front passenger front air bag is activated while driving
even though a child, small individual, or object below the
system’s weight threshold is on the front passenger seat, or
the front passenger seat is empty. Objects on the seat or
forces acting on the seat may make the system sense
supplemental weight.XStop the vehicle in a safe location as soon as possible.XEngage the parking brake.XSwitch off the ignition.XOpen the front passenger door.XRemove child and child restraint from front passenger seat
and properly secure the child in rear seat employing the
child restraint if necessary.XMake sure no objects which apply supplemental weight to
the seat are present. The system may recognize such
supplemental weight and sense that an occupant on the
front passenger seat is of a greater weight than actually
present.XKeep the seat unoccupied, close the front passenger door
and switch on the ignition.
Monitor the 45 indicator lamp in the center console
( Y page 44) and the multifunction display in the instrument
cluster ( Y page 28) for the following:
With the seat unoccupied and the ignition switched on,
R the 45 indicator lamp in the center console should
illuminate and remain illuminated, indicating that the OCS
( Y page 42) has deactivated the front passenger front air
bag.
R the message Front Passenger Airbag Enabled See
Operator’s Manual or the message Front Passenger
Airbag Disabled See Operator’s Manual should not
appear in the multifunction display at any time the seat is
unoccupied. Wait at least 60 seconds for the system to
complete the necessary check cycles and to make sure
neither message appears in the multifunction display.
If above conditions are met, you can occupy the front
passenger seat again. Depending on the front passenger
264Vehicle status messages in the multifunction displayPractical hints
X204_AKB; 3; 23, en-USd2ureepe,Version: 2.11.8.12009-07-16T19:16:58+02:00 - Seite 264
Page 267 of 344
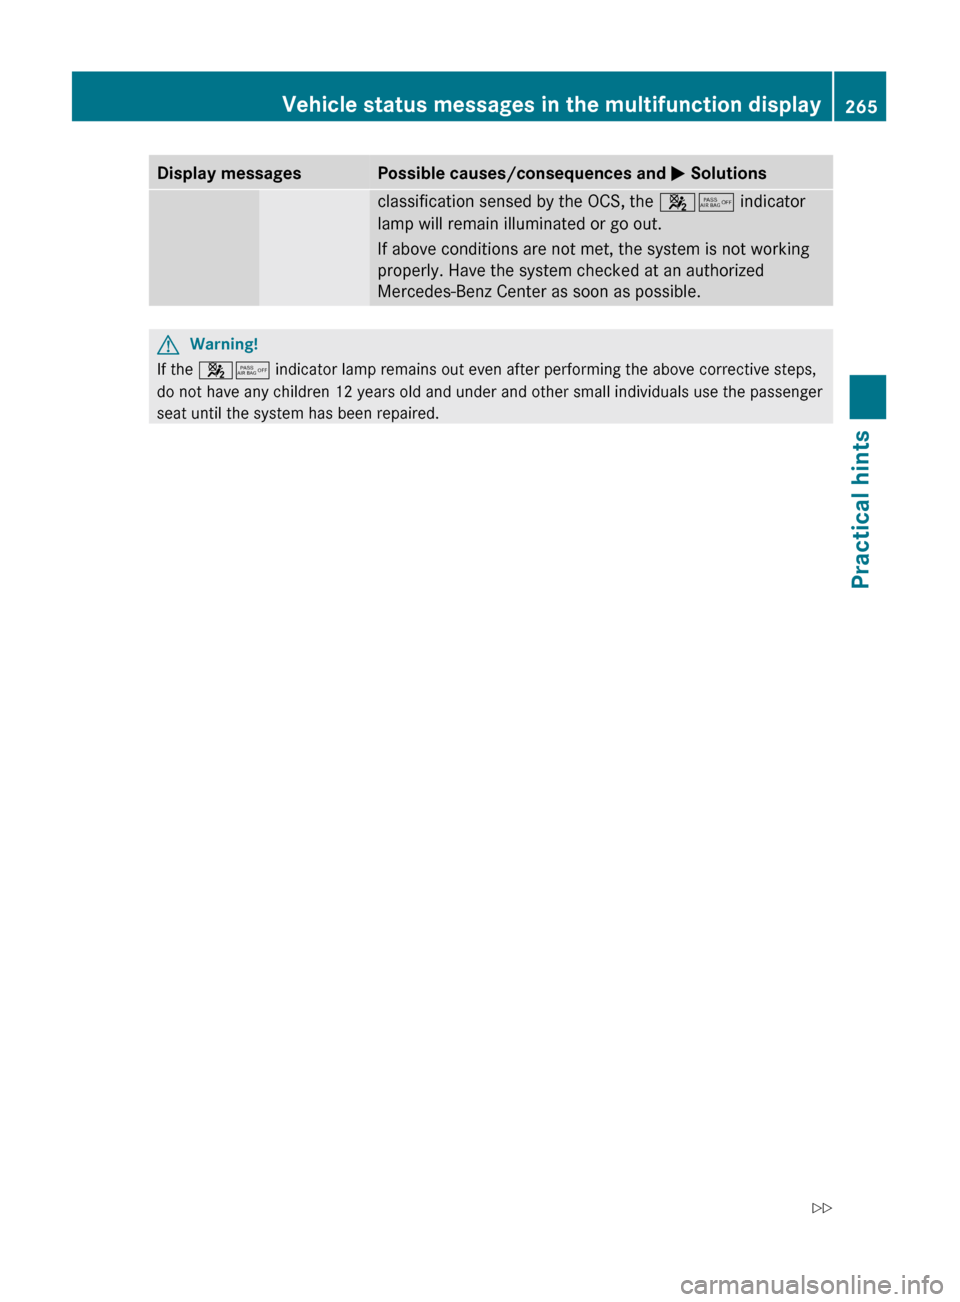
Display messagesPossible causes/consequences and M Solutionsclassification sensed by the OCS, the 45 indicator
lamp will remain illuminated or go out.
If above conditions are not met, the system is not working
properly. Have the system checked at an authorized
Mercedes-Benz Center as soon as possible.GWarning!
If the 45 indicator lamp remains out even after performing the above corrective steps,
do not have any children 12 years old and under and other small individuals use the passenger
seat until the system has been repaired.
Vehicle status messages in the multifunction display265Practical hintsX204_AKB; 3; 23, en-USd2ureepe,Version: 2.11.8.12009-07-16T19:16:58+02:00 - Seite 265Z
Page 268 of 344
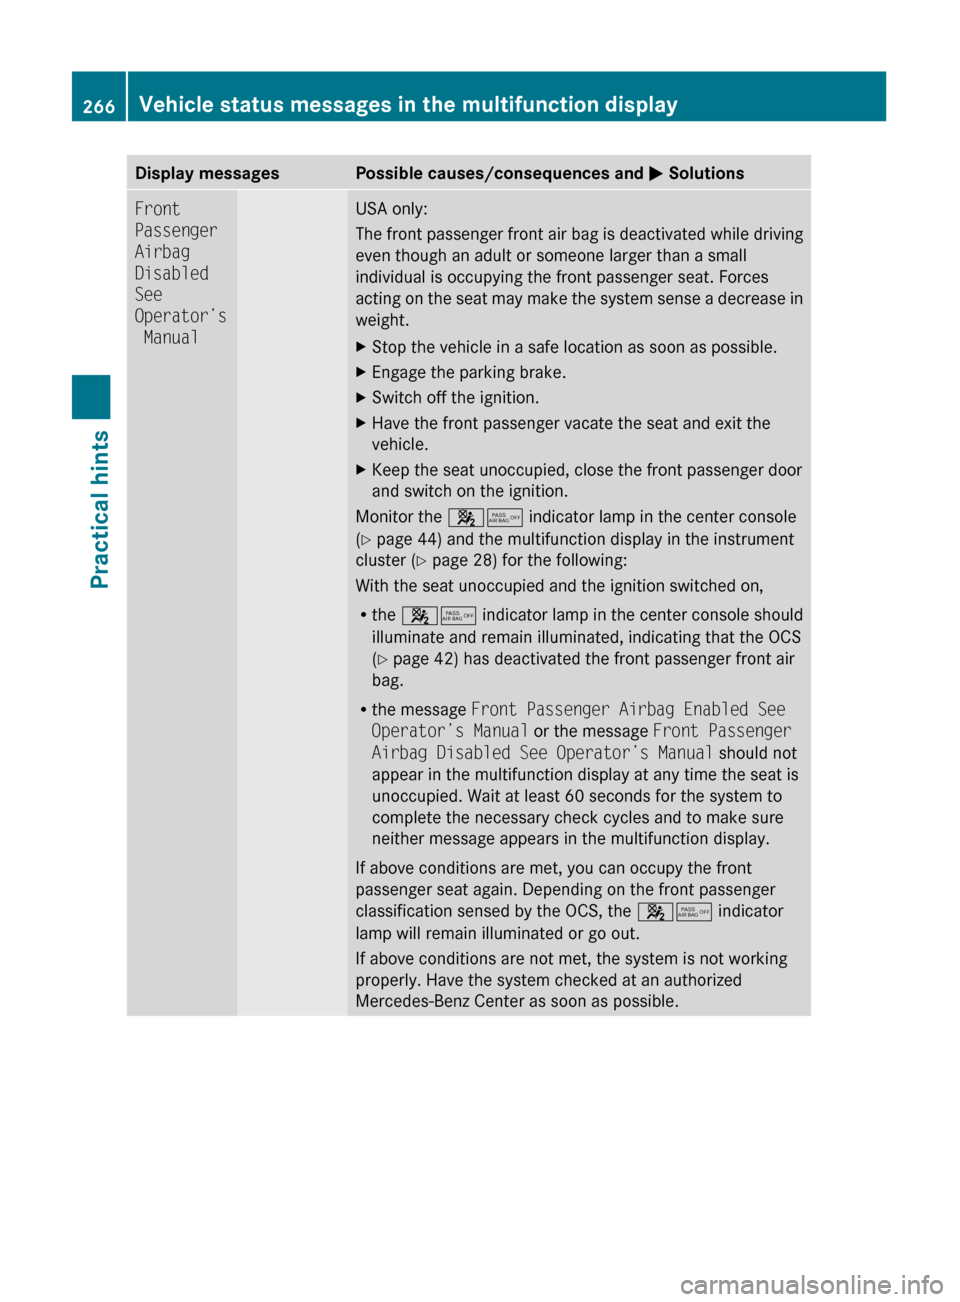
Display messagesPossible causes/consequences and M SolutionsFront
Passenger
Airbag
Disabled
See
Operator’s
ManualUSA only:
The front passenger front air bag is deactivated while driving
even though an adult or someone larger than a small
individual is occupying the front passenger seat. Forces
acting on the seat may make the system sense a decrease in
weight.XStop the vehicle in a safe location as soon as possible.XEngage the parking brake.XSwitch off the ignition.XHave the front passenger vacate the seat and exit the
vehicle.XKeep the seat unoccupied, close the front passenger door
and switch on the ignition.
Monitor the 45 indicator lamp in the center console
( Y page 44) and the multifunction display in the instrument
cluster ( Y page 28) for the following:
With the seat unoccupied and the ignition switched on,
R the 45 indicator lamp in the center console should
illuminate and remain illuminated, indicating that the OCS
( Y page 42) has deactivated the front passenger front air
bag.
R the message Front Passenger Airbag Enabled See
Operator’s Manual or the message Front Passenger
Airbag Disabled See Operator’s Manual should not
appear in the multifunction display at any time the seat is
unoccupied. Wait at least 60 seconds for the system to
complete the necessary check cycles and to make sure
neither message appears in the multifunction display.
If above conditions are met, you can occupy the front
passenger seat again. Depending on the front passenger
classification sensed by the OCS, the 45 indicator
lamp will remain illuminated or go out.
If above conditions are not met, the system is not working
properly. Have the system checked at an authorized
Mercedes-Benz Center as soon as possible.
266Vehicle status messages in the multifunction displayPractical hints
X204_AKB; 3; 23, en-USd2ureepe,Version: 2.11.8.12009-07-16T19:16:58+02:00 - Seite 266
Page 269 of 344
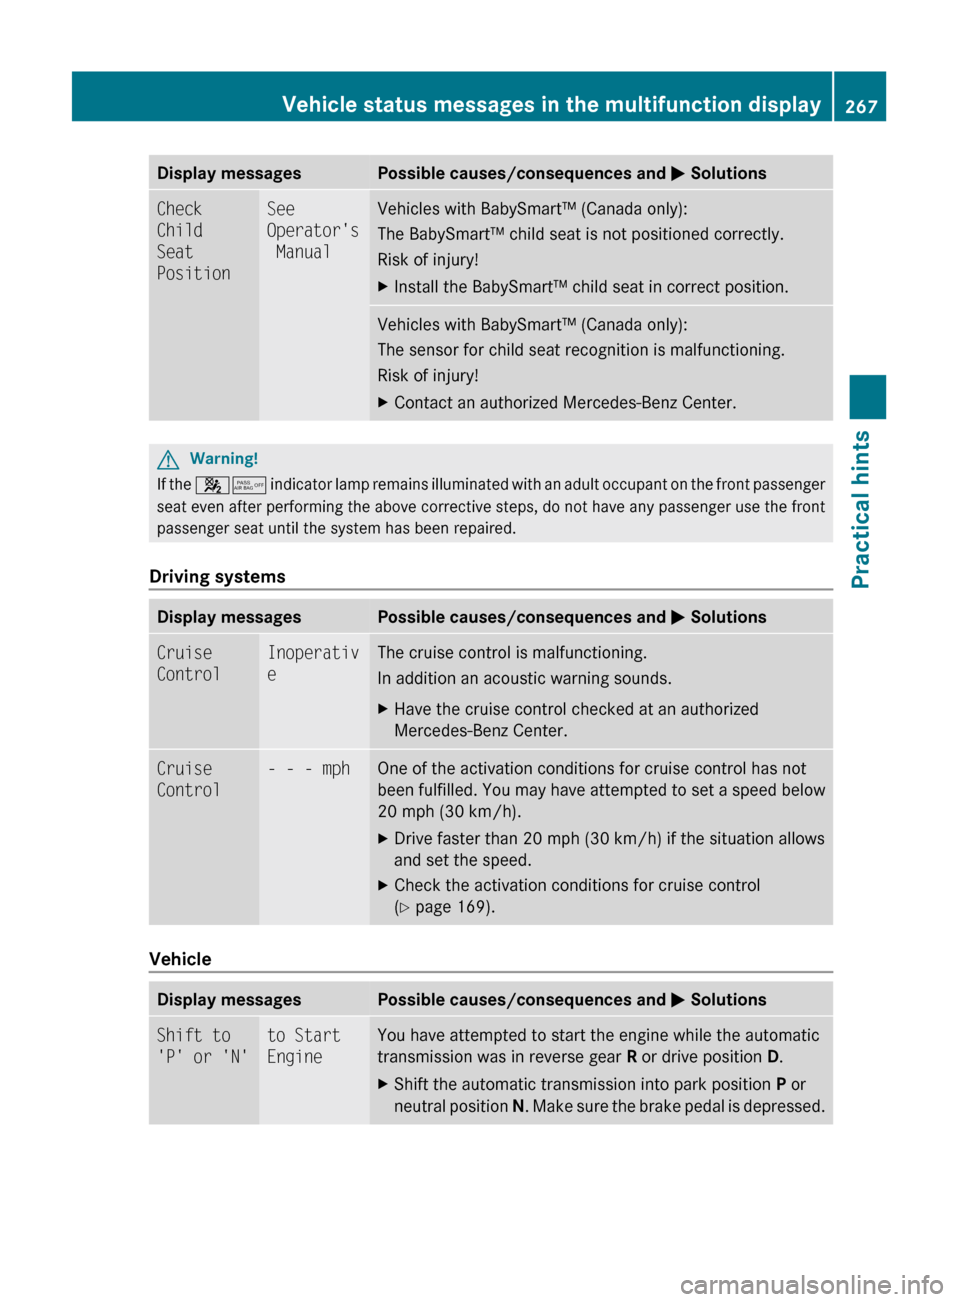
Display messagesPossible causes/consequences and M SolutionsCheck
Child
Seat
PositionSee
Operator's
ManualVehicles with BabySmart™ (Canada only):
The BabySmart™ child seat is not positioned correctly.
Risk of injury!XInstall the BabySmart™ child seat in correct position.Vehicles with BabySmart™ (Canada only):
The sensor for child seat recognition is malfunctioning.
Risk of injury!XContact an authorized Mercedes-Benz Center.GWarning!
If the 45 indicator lamp remains illuminated with an adult occupant on the front passenger
seat even after performing the above corrective steps, do not have any passenger use the front
passenger seat until the system has been repaired.
Driving systems
Display messagesPossible causes/consequences and M SolutionsCruise
ControlInoperativ
eThe cruise control is malfunctioning.
In addition an acoustic warning sounds.XHave the cruise control checked at an authorized
Mercedes-Benz Center.Cruise
Control- - - mphOne of the activation conditions for cruise control has not
been fulfilled. You may have attempted to set a speed below
20 mph (30 km/h).XDrive faster than 20 mph (30 km/h) if the situation allows
and set the speed.XCheck the activation conditions for cruise control
( Y page 169).
Vehicle
Display messagesPossible causes/consequences and M SolutionsShift to
'P' or 'N'to Start
EngineYou have attempted to start the engine while the automatic
transmission was in reverse gear R or drive position D.XShift the automatic transmission into park position P or
neutral position N. Make sure the brake pedal is depressed.Vehicle status messages in the multifunction display267Practical hintsX204_AKB; 3; 23, en-USd2ureepe,Version: 2.11.8.12009-07-16T19:16:58+02:00 - Seite 267Z
Page 270 of 344
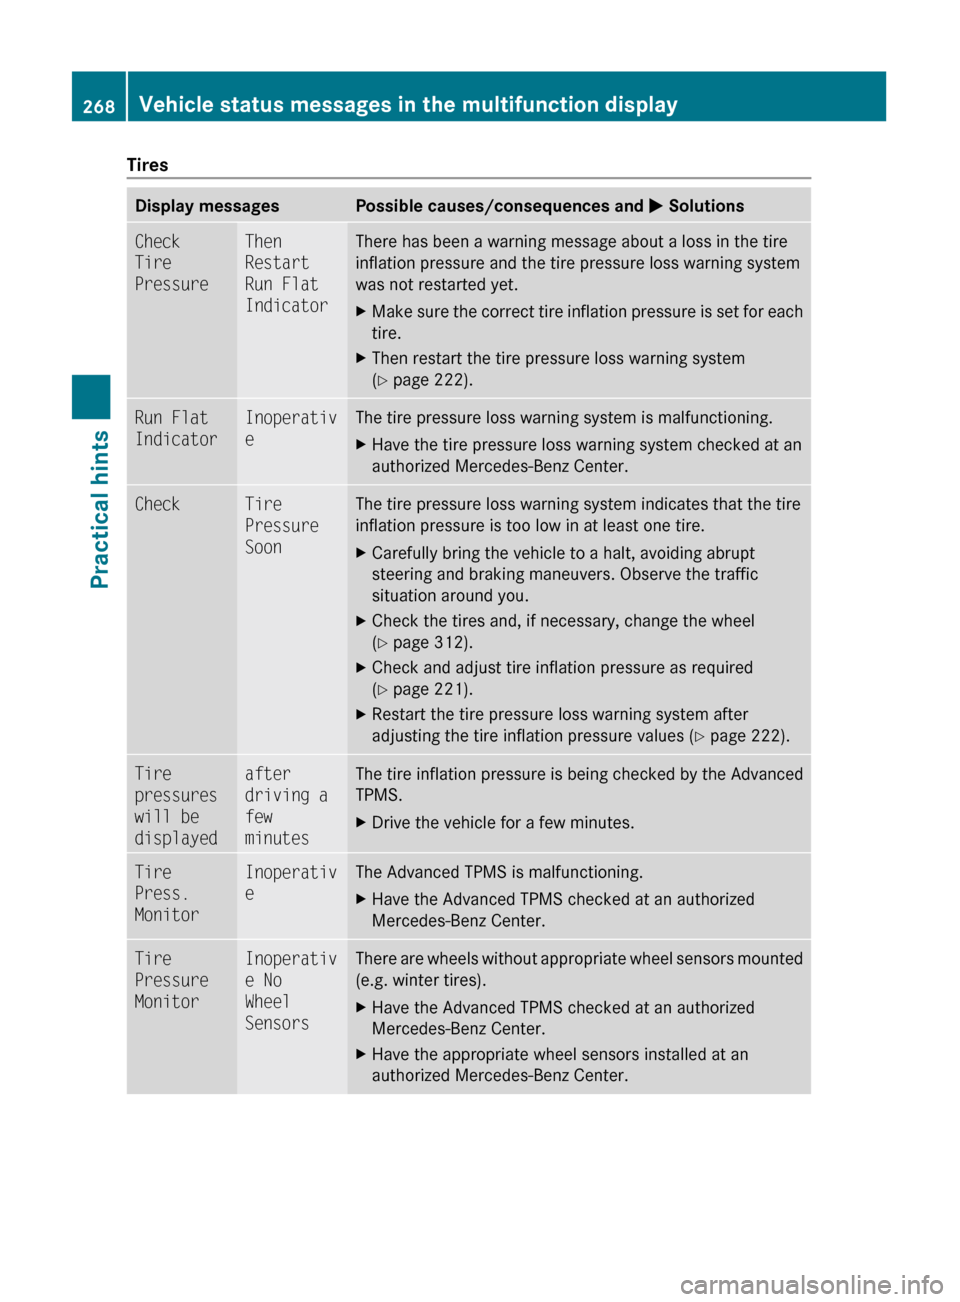
TiresDisplay messagesPossible causes/consequences and M SolutionsCheck
Tire
PressureThen
Restart
Run Flat
IndicatorThere has been a warning message about a loss in the tire
inflation pressure and the tire pressure loss warning system
was not restarted yet.XMake sure the correct tire inflation pressure is set for each
tire.XThen restart the tire pressure loss warning system
( Y page 222).Run Flat
IndicatorInoperativ
eThe tire pressure loss warning system is malfunctioning.XHave the tire pressure loss warning system checked at an
authorized Mercedes-Benz Center.CheckTire
Pressure
SoonThe tire pressure loss warning system indicates that the tire
inflation pressure is too low in at least one tire.XCarefully bring the vehicle to a halt, avoiding abrupt
steering and braking maneuvers. Observe the traffic
situation around you.XCheck the tires and, if necessary, change the wheel
( Y page 312).XCheck and adjust tire inflation pressure as required
( Y page 221).XRestart the tire pressure loss warning system after
adjusting the tire inflation pressure values ( Y page 222).Tire
pressures
will be
displayedafter
driving a
few
minutesThe tire inflation pressure is being checked by the Advanced
TPMS.XDrive the vehicle for a few minutes.Tire
Press.
MonitorInoperativ
eThe Advanced TPMS is malfunctioning.XHave the Advanced TPMS checked at an authorized
Mercedes-Benz Center.Tire
Pressure
MonitorInoperativ
e No
Wheel
SensorsThere are wheels without appropriate wheel sensors mounted
(e.g. winter tires).XHave the Advanced TPMS checked at an authorized
Mercedes-Benz Center.XHave the appropriate wheel sensors installed at an
authorized Mercedes-Benz Center.268Vehicle status messages in the multifunction displayPractical hints
X204_AKB; 3; 23, en-USd2ureepe,Version: 2.11.8.12009-07-16T19:16:58+02:00 - Seite 268