fuel type MERCEDES-BENZ GLS 2019 Owners Manual
[x] Cancel search | Manufacturer: MERCEDES-BENZ, Model Year: 2019, Model line: GLS, Model: MERCEDES-BENZ GLS 2019Pages: 398, PDF Size: 7.3 MB
Page 20 of 398
Display in the multimedia syste
m.. 197
Function/note s............................. 196
Switching on/of f........................... 197
Rear window defroster
Problem (malfunction) ................... 135
Switching on/of f........................... 134
Rear window wiper
Replacing the wiper blad e.............. 124
Switching on/of f........................... 123
Rear-view mirror
Anti-glare (manual) ........................ 110
Dipping (automatic) ....................... 112
Reflective safety jacket .................... 334
Refrigerant (air-conditioning sys-
tem)
Important safety notes .................. 388
Refueling
Fuel gaug e....................................... 37
Important safety notes .................. 155
Refueling process .......................... 156
see Fuel
Remote control
Garage door opener ....................... 316
Replacing bulbs
General notes ................................ 120
High-beam headlamp s................... 121
Important safety notes .................. 120
Installing/removing the cover
(front wheel arch) .......................... 121
Low-beam headlamp s.................... 121
Overview of bulb types .................. 120
Turn signals (front) ......................... 122
Reporting safety defects .................... 32
Rescue card ......................................... 32
Reserve (fuel tank)
see Fuel
Reserve fuel
Display message ............................ 260
Warning lamp ................................. 282
Residual heat (climate control) ........ 135
Restraint system
Display message ............................ 253
Introduction ..................................... 44
Warning lamp ................................. 282
Warning lamp (function) ................... 45
Reversing feature
Panorama sliding sunroo f................ 93
Roller sunblind s............................... 95 Side windows ................................... 89
Sliding sunroof ................................. 93
Tailgate ............................................ 85
Reversing lamps (display mes-
sage) ................................................... 257
Roadside Assistance (breakdown) .... 29
Roller sunblind
Panorama roof with power tilt/
sliding panel ..................................... 94
Rear side window s......................... 306
Roof carrier ........................................ 303
Roof lining and carpets (cleaning
guidelines) ......................................... 333
Roof load (maximum) ........................ 389
Route (navigation)
see Route guidance (navigation)
Route guidance
see also Digital Operator's Man-
ual .................................................. 287
Route guidance (navigation) ............ 234
Route guidance active ...................... 235 S
Safety Children in the vehicle ..................... 59
see Occupant safety
see Operating safety
Safety system
see Driving safety systems
SD card
Inserting ........................................ 293
Inserting/removing ........................ 293
Removing ....................................... 293
SD memory card
see also Digital Operator's Man-
ual .................................................. 287
Selecting ........................................ 236
Search & Send
see also Digital Operator's Man-
ual .................................................. 287
Seat
Correct driver's seat position ........... 97
Seat belts
Adjusting the driver's and front-
passenger seat belt ......................... 48
Adjusting the height ......................... 48
Cleaning ......................................... 333 18
Index
Page 23 of 398
Tailgate
Display message ............................ 271
Emergency unlocking ....................... 88
Important safety notes .................... 84
Limiting the opening angle ............... 88
Opening dimensions ...................... 389
Opening/closing (automatically
from inside) ...................................... 87
Opening/closing (automatically
from outside) ................................... 86
Opening/closing (from outside) ....... 85
Power closing .................................. 84
Tank
see Fuel tank
Tank content
Fuel gaug e....................................... 37
Technical data
Capacities ...................................... 384
Drawbar load (maximum) ............... 392
Information .................................... 382
Tires/wheels ................................. 377
Trailer load s................................... 392
Vehicle data ................................... 389
Telephone
Accepting a call (multifunction
steering wheel) .............................. 237
Authorizing a mobile phone (con-
necting) ......................................... 291
Authorizing a mobile phone via the device manager (connecting) ......... 292
Connecting a mobile phone
(device manager )........................... 292
Connecting a mobile phone (gen-
eral information) ............................ 291
Display message ............................ 272
Menu (on-board computer) ............ 237
Number from the phone book ........ 237
Redialing ........................................ 237
Rejecting/ending a call ................. 237
see also Digital Operator's Man-
ua l.................................................. 287
Temperature
Coolant (display in the instrument
cluster) .......................................... 231
Coolant (on-board computer,
Mercedes-AMG vehicles) ............... 242
Engine oil (on-board computer,
Mercedes-AMG vehicles) ............... 242 Outside temperature ...................... 230
Setting (climate control
)................ 132
Transmission oil (on-board com-
puter, Mercedes-AMG vehicles) ..... 242
Through-loading feature ................... 298
Timing (RACETIMER) ......................... 243
Tire pressure
Calling up (on-board computer) ..... 359
Checking manually ........................ 358
Display message ............................ 268
Maximum ....................................... 358
Not reached (TIREFIT) .................... 339
Note s............................................. 357
Reached (TIREFIT) .......................... 339
Recommended ............................... 355
Tire pressure loss warning system
General notes ................................ 358
Important safety notes .................. 359
Restarting ...................................... 359
Tire pressure monitor
Checking the tire pressure elec-
tronically ........................................ 361
Function/note s............................. 359
General notes ................................ 359
Important safety notes .................. 360
Radio type approval for the tire
pressure monitor ........................... 362
Restarting ...................................... 362
Warning lamp ................................. 286
Warning message .......................... 361
Tire pressure table ............................ 356
TIREFIT kit
Important safety notes .................. 337
Storage location ............................ 335
Tire pressure not reached .............. 339
Tire pressure reached .................... 339
Using ............................................. 338
Tires
Aspect ratio (definition) ................. 372
Average weight of the vehicle
occupants (definition) .................... 370
Bar (definition) ............................... 370
Changing a whee l.......................... 372
Characteristics .............................. 370
Checking ........................................ 352
Curb weight (definition) ................. 371
Definition of terms ......................... 370
Direction of rotation ...................... 373 Index
21
Page 26 of 398
Towing away ..................................3
46
Transporting .................................. 348
Unlocking (in an emergency) ........... 84
Unlocking (SmartKey) ..................... .77
Vehicle data ................................... 389
Vehicle battery
see Battery (vehicle)
Vehicle data ....................................... 389
Vehicle data (off-road driving)
Approach/departure angle ............ 391
Maximum gradient climbing abil-
ity .................................................. 392
Maximum water depth ................... 390
Vehicle dimensions ........................... 389
Vehicle emergency locking ................ 84
Vehicle identification number
see VIN
Vehicle identification plate .............. 383
Vehicle level
AIRMATIC ...................................... 187
Vehicle level (display message) ....... 261
Vehicle tool kit .................................. 335
Video
Operating the DVD .........................2 36
see also Digital Operator's Man-
ual ................................................. .287
VIN ...................................................... 383
Seat ............................................... 384
Type plate ...................................... 383 W
Warning and indicator lamps ABS ................................................ 277
Brakes .......................................... .276
Coolant .......................................... 283
Distance warning ........................... 285
Engine diagnostics ......................... 282
ESP ®
.............................................. 279
ESP ®
OFF ....................................... 280
Fuel tank ........................................ 282
Overview .......................................... 37
Parking brake ................................ 282
PASSENGER AIR BAG ..................... .45
Reserve fuel .................................. .282
Restraint system ............................ 282
Seat belt ........................................ 275
Tire pressure monitor .................... 286 Warranty
.............................................. 28
Washer fluid
Display message ............................ 273
Weather display (COMAND)
see also Digital Operator's Man-
ual.................................................. 287
Wheel and tire combinations
Tires ............................................... 377
Wheel bolt tightening torque ........... 377
Wheel chock ...................................... 374
Wheels
Changing a whee l.......................... 372
Checking ........................................ 352
Cleaning ......................................... 329
Emergency spare wheel ................. 378
Important safety notes .................. 352
Information on driving .................... 352
Interchanging/changing ................ 372
Mounting a new whee l................... 376
Mounting a whee l.......................... 373
Overview ........................................ 352
Removing a whee l.......................... 375
Snow chains .................................. 354
Storing ........................................... 373
Tightening torque ........................... 377
Wheel size/tire size ....................... 377
Window curtain air bag
Display message ............................ 254
Operation ......................................... 51
Windows
see Side windows
Windshield
Defrosting ...................................... 133
Infrared reflective .......................... 320
Windshield washer fluid
see Windshield washer system
Windshield washer system
Adding washer fluid ....................... 324
Important safety notes .................. 388
Windshield wipers
Problem (malfunction) ................... 124
Rear window wipe r........................ 123
Replacing the wiper blades ............ 123
Switching on/of f........................... 122
Winter driving
Slippery road surfaces ................... 165
Winter operation
Overview ........................................ 354 24
Index
Page 61 of 398
If the seat belt pre-tensioning is not reduced:
X Move the seat backrest or seat back slightly
when the vehicle is stationary.
The seat belt pre-tensioning is reduced and
the locking mechanism is released.
The seat-belt adjustment is an integral part of
the PRE-SAFE ®
convenience function. Informa-
tion about the convenience function can be
found under "Belt adjustment" (Y page 48).PRE-SAFE
®
PLUS (anticipatory occu-
pant protection system PLUS)
Introduction PRE-SAFE
®
PLUS is only available in vehicles
with the Driving Assistance PLUS package.
Using the radar sensor system, PRE-SAFE ®
PLUS is able to detect that a head-on or rear-end
collision is imminent. In certain hazardous sit-
uations, PRE-SAFE ®
PLUS takes pre-emptive
measures to protect the vehicle occupants.
Important safety notes The intervention of PRE-SAFE
®
PLUS cannot
prevent an imminent collision.
The driver is not warned about the intervention
of PRE-SAFE ®
PLUS.
PRE-SAFE ®
PLUS does not intervene if the vehi-
cle is backing up.
When driving, or when parking or exiting a park-
ing space using Active Parking Assist, PRE-
SAFE ®
PLUS will not apply the brakes.
Function PRE-SAFE
®
PLUS intervenes in certain situa-
tions if the radar sensor system detects an
imminent head-on or rear-end collision. PRE-SAFE
®
PLUS takes the following measures
depending on the hazardous situation detected:
R if the radar sensor system detects that a
head-on collision is imminent, the seat belts
are pre-tensioned.
R if the radar sensor system detects that a rear-
end collision is imminent:
- the brake pressure is increased if the driver
applies the brakes when the vehicle is sta- tionary.
- the seat belts are pre-tensioned.
The PRE-SAFE ®
PLUS braking application is can-
celed:
R if the accelerator pedal is depressed when a
gear is engaged
R if the risk of a collision passes or is no longer
detected
R if Active Distance Assist DISTRONIC indicates
an intention to intervene
If the hazardous situation passes without result- ing in an accident, the original settings are
restored. Automatic measures after an acci-
dent
Immediately after an accident, the following
measures are implemented, depending on the
type and severity of the impact:
R the hazard warning lamps are switched on
R the emergency lighting is activated
R the vehicle doors are unlocked
R the front side windows are lowered
R vehicles with a memory function: the electri-
cally adjustable steering wheel is raised when
the driver's door is opened
R the engine is switched off and the fuel supply
is cut off
R vehicles with Mercedes me connect: auto-
matic emergency call Children in the vehicle
Important safety notes
Accident statistics show that children secured
in the rear seats are safer than children secured
in the front-passenger seat. For this reason,
Mercedes-Benz strongly advises that you install Children in the vehicle
59Safety Z
Page 158 of 398
G
WARNING
Fuels are toxic and harmful to health. There is a risk of injury.
You must avoid fuels coming into contact with
skin, eyes and clothes or being swallowed.
Do not inhale the fuel vapors. Keep children
away from fuels.
Keep doors and windows closed during the
refueling process.
If you or others come into contact with fuel,
observe the following points:
R Immediately rinse the fuel off your skin with
soap and water.
R If you get fuel into your eyes, immediately
rinse your eyes throughly with clean water.
Seek medical attention immediately.
R Seek medical attention immediately if fuel
has been swallowed. Do not induce vomit-
ing.
R Immediately change out of clothing which
has come into contact with fuel. G
WARNING
Electrostatic charging can lead to the creation
of sparks and ignite fuel vapor. There is a risk of fire and explosion.
Touch the metallic body of the vehicle before
you open the fuel filler cap or handle the pump nozzle. Any possible electrostatic charge
present will in this way be depleted.
Do not get into the vehicle again during the
refueling process. Otherwise, electrostatic
charge could build up again.
! Do not use diesel to refuel vehicles with a
gasoline engine. Do not switch on the ignition if you accidentally refuel with the wrong fuel.
Otherwise, the fuel will enter the fuel system. Even small amounts of the wrong fuel could
result in damage to the fuel system and the
engine. Notify a qualified specialist workshop
and have the fuel tank and fuel lines drained
completely.
! Overfilling the fuel tank could damage the
fuel system. !
Take care not to spill any fuel on painted
surfaces. You could otherwise damage the
paintwork.
! Use a filter when adding fuel from a fuel can.
The fuel lines and/or the fuel injection system could otherwise be blocked by particles fromthe fuel can.
Do not get into the vehicle again during the refu-
eling process. Otherwise, electrostatic charge
could build up again.
If you overfill the fuel tank, fuel could spray out
when the fuel pump nozzle is removed.
For further information on fuel and fuel quality
(Y page 385). Refueling
General information Pay attention to the important safety notes
(Y
page 155).
The fuel filler flap is unlocked or locked auto-
matically when you unlock or lock the vehicle
with the SmartKey or using KEYLESS-GO.
The position of the fuel filler cap is displayed
00B6 in the instrument cluster. The arrow next
to the filling pump indicates the side of the vehi- cle.
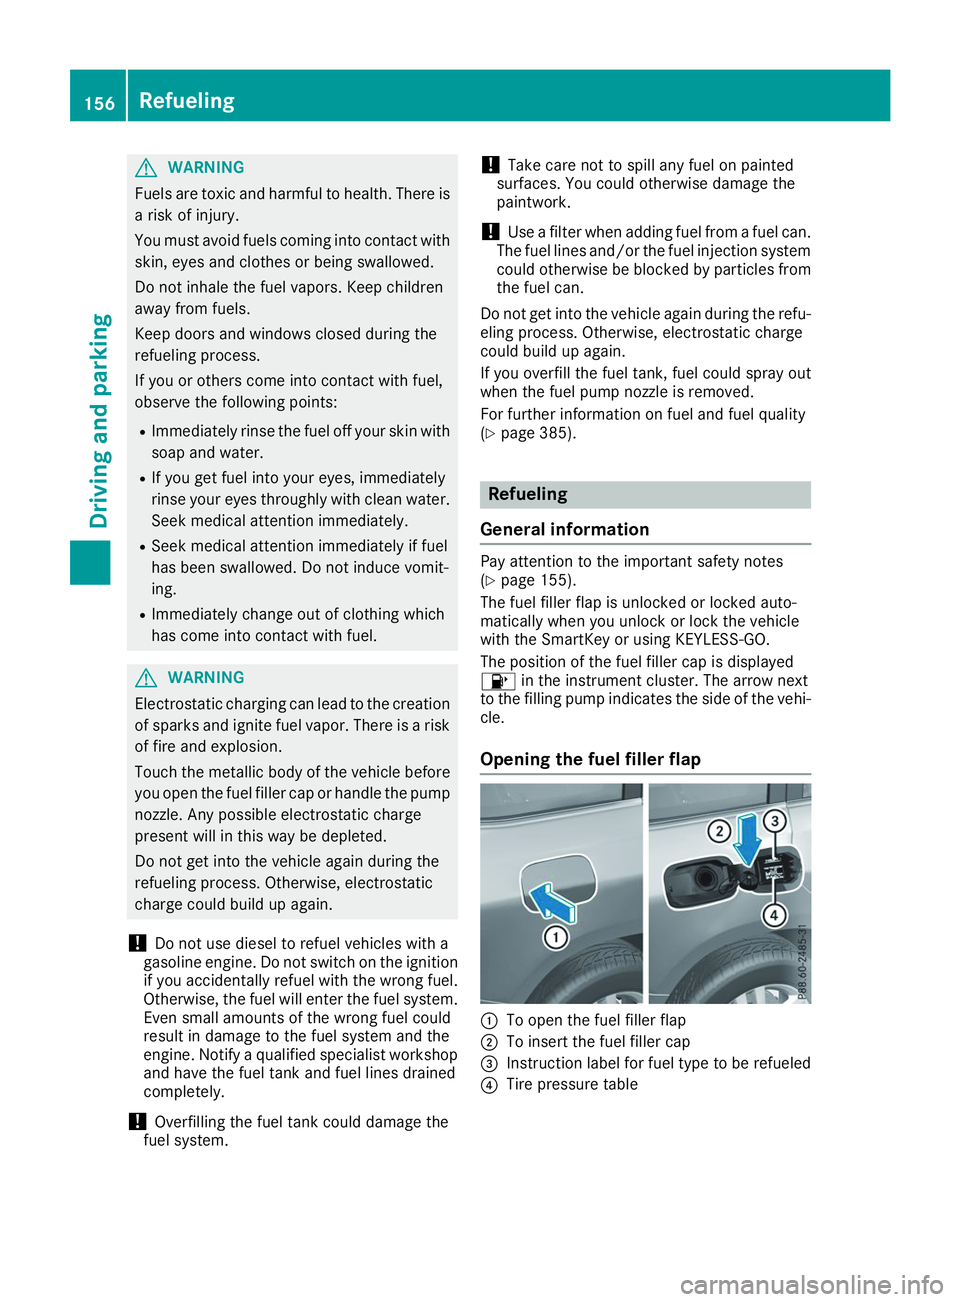
Opening the fuel filler flap 0043
To open the fuel filler flap
0044 To insert the fuel filler cap
0087 Instruction label for fuel type to be refueled
0085 Tire pressure table 156
RefuelingDriving and parking
Page 189 of 398
Vehicle level
Important safety notes
G
WARNING
When the vehicle is being lowered, people
could become trapped if their limbs are
between the vehicle body and the wheels or
underneath the vehicle. There is a risk of
injury.
Make sure no one is underneath the vehicle or in the immediate vicinity of the wheel arches
when the vehicle is being lowered. G
WARNING
When you drive with the vehicle raised, the
driving characteristics could be impaired by
the vehicle's raised center of gravity. The vehi- cle could rollover more easily, for example on
a bend. There is a risk of an accident.
Always select as low a vehicle level as possi-
ble and adjust your driving style. G
WARNING
When you drive with the chassis lowered or
raised, the vehicle's braking and driving char-
acteristics can be significantly impaired. You
could also exceed the permissible vehicle
height if the chassis is raised. There is a risk of an accident.
Adjust the vehicle level before pulling away. G
WARNING
Due to the high center of gravity, the vehicle
may start to skid and roll over in the event of
an abrupt steering maneuver and/or when
the vehicle's speed is not adapted to the road conditions. There is a risk of an accident.
Always adapt your speed and driving style to
the vehicle's driving characteristics and to the prevailing road and weather conditions.
! When driving on extremely rough terrain,
select a high vehicle level in good time. Make
sure there is always sufficient ground clear-
ance. You will otherwise damage the vehicle.
R Utility vehicles have a significantly higher roll-
over rate than other types of vehicles. Failure to operate this vehicle safely may
result in an accident, rollover of the vehicle,
and severe or fatal injury.
R In a rollover crash, an unbelted person is sig-
nificantly more likely to die than a person
wearing a seat belt.
You and all vehicle occupants should always
wear your seat belts.
General notes
Only select raised level if this is appropriate for
the road conditions. Otherwise, fuel consump-
tion may increase and handling may be affected.
Make changes to the vehicle level while the
vehicle is in motion. This enables the vehicle to adjust to the new level as quickly as possible.
The vehicle level may change visibly if you park
the vehicle and the outside temperature
changes. If the temperature drops, the vehicle
level is lower; with an increase in temperature,
the vehicle level rises.
If you unlock the vehicle or open a door, the
vehicle begins to compensate for load discrep-
ancies while still parked. However, for signifi-
cant level changes, such as after the vehicle has
been stationary for a long period, the engine
must be on. For safety reasons, the vehicle is
only lowered when the doors are closed. Low-
ering is interrupted if a door is opened, and it
continues once the door has been closed.
Vehicles with no trailer coupled: below a
speed of 37 mph (60 km/h) you can choose
between the normal and raised vehicle level.
Select the normal vehicle level for normal road
surfaces and the raised vehicle level for driving
with snow chains or on particularly poor road
surfaces. Your selection remains stored even if
you remove the SmartKey from the ignition lock.
If you try to select raised level at a speed above
37 mph (60 km/h), the Drive More Slowly
Drive More Slowly
message appears in the multifunction display.
Vehicles with a trailer coupled: below a speed
of 19 mph (30 km/h), you can choose between
the normal and raised vehicle level. Driving systems
187Driving and parking Z
Page 224 of 398
R
is affected more by strong crosswinds
R demands more sensitive steering
R has a larger turning circle
This could impair the handling characteristics.
When towing a trailer, always adjust your speed to the current road and weather conditions. Do
not exceed the maximum permissible speed for
your vehicle/trailer combination. Notes on towing a trailer
General notes !
If you have a trailer tow hitch retrofitted,
changes to the cooling system and drive train may be necessary, depending on the vehicle
type.
If you have a trailer tow hitch retrofitted,
observe the anchorage points on the chassis
frame.
R Do not exceed the legally prescribed maxi-
mum speed for vehicle/trailer combinations
in the relevant country.
This lowers the risk of an accident.
R Only install an approved trailer coupling on
your vehicle.
More information on availability and installa-
tion can be obtained at any qualified special-
ist workshop.
R The bumpers of your vehicle are not suitable
for installing detachable trailer couplings.
R Do not install hired trailer couplings or other
detachable trailer couplings on the bumpers
of your vehicle.
R If you no longer need the ball coupling,
remove it from the ball coupling recess. This
will reduce the risk of damage to the ball cou-
pling.
When towing a trailer, set the tire pressure on
the rear axle of the towing vehicle for the max-
imum load. You will find the values in the tire
pressure table in the fuel filler flap of the vehicle (Y page 371).
Please note that when towing a trailer, the fol-
lowing driving systems have limited availability
or are not available at all:
R Parking Assist PARKTRONIC (Y page 189)
R Blind Spot Assist (Y page 207)
R Active Lane Keeping Assist (Y page 212)On vehicles without level control, the height of
the ball coupling will alter according to the load
placed on the vehicle. If necessary, use a trailer
with a height-adjustable drawbar.
You will find installing dimensions and loads
under "Technical data" (Y page 392).
Driving tips Also observe the notes on pulling away with a
trailer (Y
page 143).
The maximum permissible speed for vehicle/
trailer combinations depends on the type of
trailer. Before beginning the journey, check the
trailer's documents to see what the maximum
permissible speed is for your trailer. Observe the
legally permissible maximum speed in the rele-
vant country.
For certain Mercedes-Benz vehicles, the maxi-
mum permissible rear axle load is increased
when towing a trailer. See "Technical data" to
find out whether this applies to your vehicle
(Y page 392). If you utilize any of the added
maximum rear axle load when towing a trailer,
the vehicle/trailer combination may not exceed
a maximum speed of 60 mph (100 km/h) for
reasons concerning the operating permit. This
also applies in countries in which the maximum
permissible speed for car/trailer combinations
is greater than 60 mph (100 km/h).
When towing a trailer, your vehicle's handling
characteristics will be different in comparison
with when driving without a trailer.
Use the left-hand steering wheel paddle shifter
to shift into a lower gear in good time on long
and steep downhill gradients.
This also applies if you have activated cruise
control or Active Distance Assist DISTRONIC.
This will use the braking effect of the engine, so that less braking will be required to maintain the
speed. This relieves the load on the brake sys-
tem and prevents the brakes from overheating
and wearing too quickly. If you need additional
braking, depress the brake pedal repeatedly
rather than continuously.
Driving tips If the trailer swings from side to side:
X Do not accelerate.
X Do not counter-steer.
X Brake if necessary. 222
Towing a trailerDriving and parking
Page 284 of 398
Warning/
indicator
lamp
0051
0051 Signal type
Possible causes/consequences and 0050 0050Solutions 00490024
0051
0049 (USA only), 0024(Canada only): the red indicator lamp for the electric
parking brake flashes or is lit and/or the yellow warning lamp for the electric
parking brake is lit.
X Observe the additional display messages in the multifunction display. 0075
0051
The red restraint system warning lamp is lit while the engine is running.
The restraint system is malfunctioning.
G WARNING
The air bags or Emergency Tensioning Devices may either be triggered uninten-
tionally or, in the event of an accident, may not be triggered.
There is an increased risk of injury.
X Observe the additional display messages in the multifunction display.
X Drive on carefully.
X Contact a qualified specialist workshop and have the restraint system checked.
For further information about the restraint system, see (Y page 44).Engine
Warning/
indicator
lamp
0051
0051 Signal type
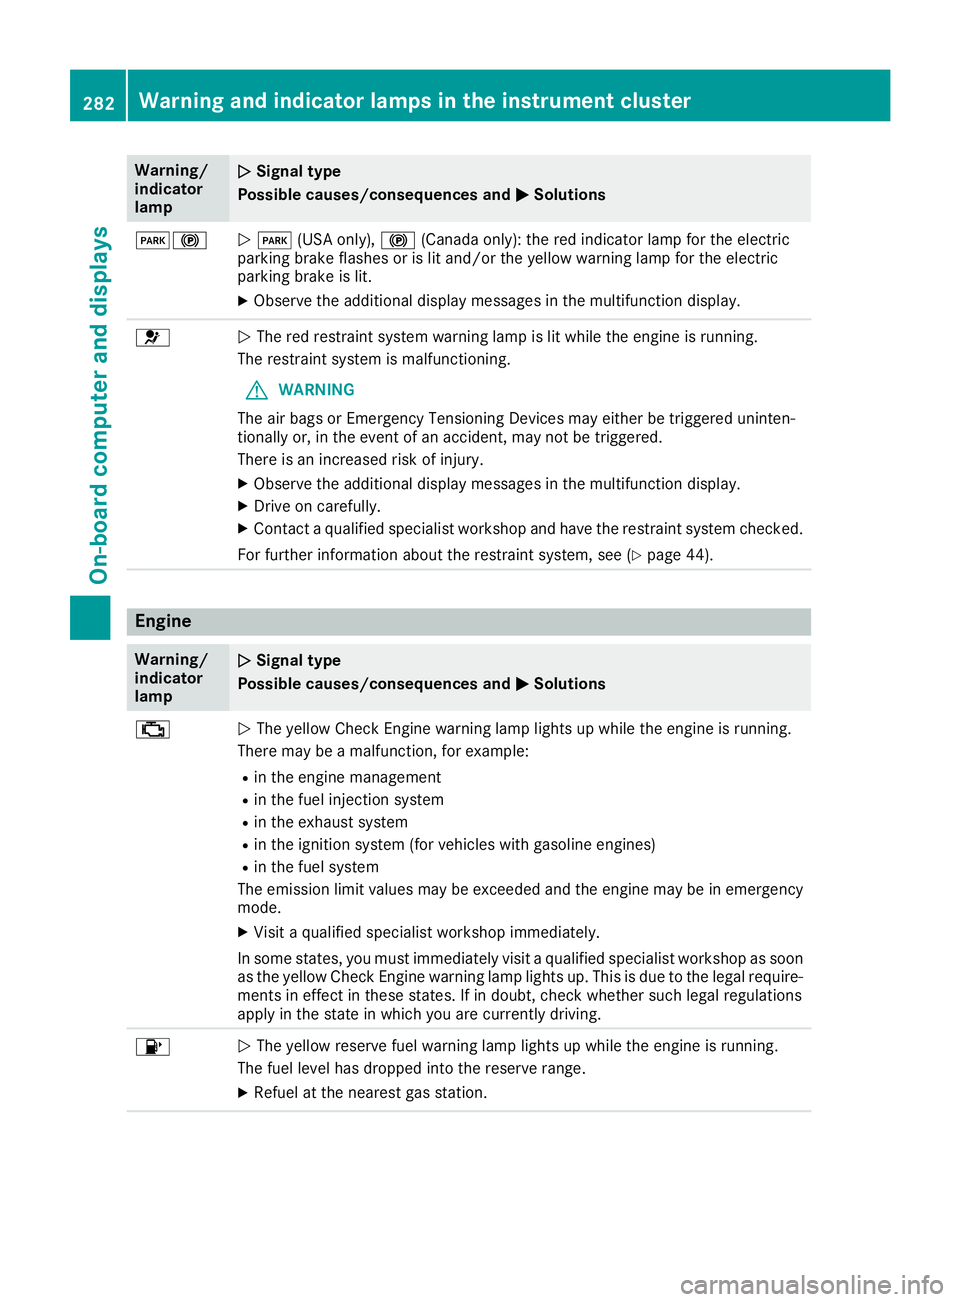
Possible causes/consequences and 0050 0050Solutions 00B9
0051
The yellow Check Engine warning lamp lights up while the engine is running.
There may be a malfunction, for example:
R in the engine management
R in the fuel injection system
R in the exhaust system
R in the ignition system (for vehicles with gasoline engines)
R in the fuel system
The emission limit values may be exceeded and the engine may be in emergency mode.
X Visit a qualified specialist workshop immediately.
In some states, you must immediately visit a qualified specialist workshop as soon as the yellow Check Engine warning lamp lights up. This is due to the legal require-
ments in effect in these states. If in doubt, check whether such legal regulations
apply in the state in which you are currently driving. 00B6
0051
The yellow reserve fuel warning lamp lights up while the engine is running.
The fuel level has dropped into the reserve range.
X Refuel at the nearest gas station. 282
Warning and indicator lamps in the instrument clusterOn-board computer and displays
Page 285 of 398
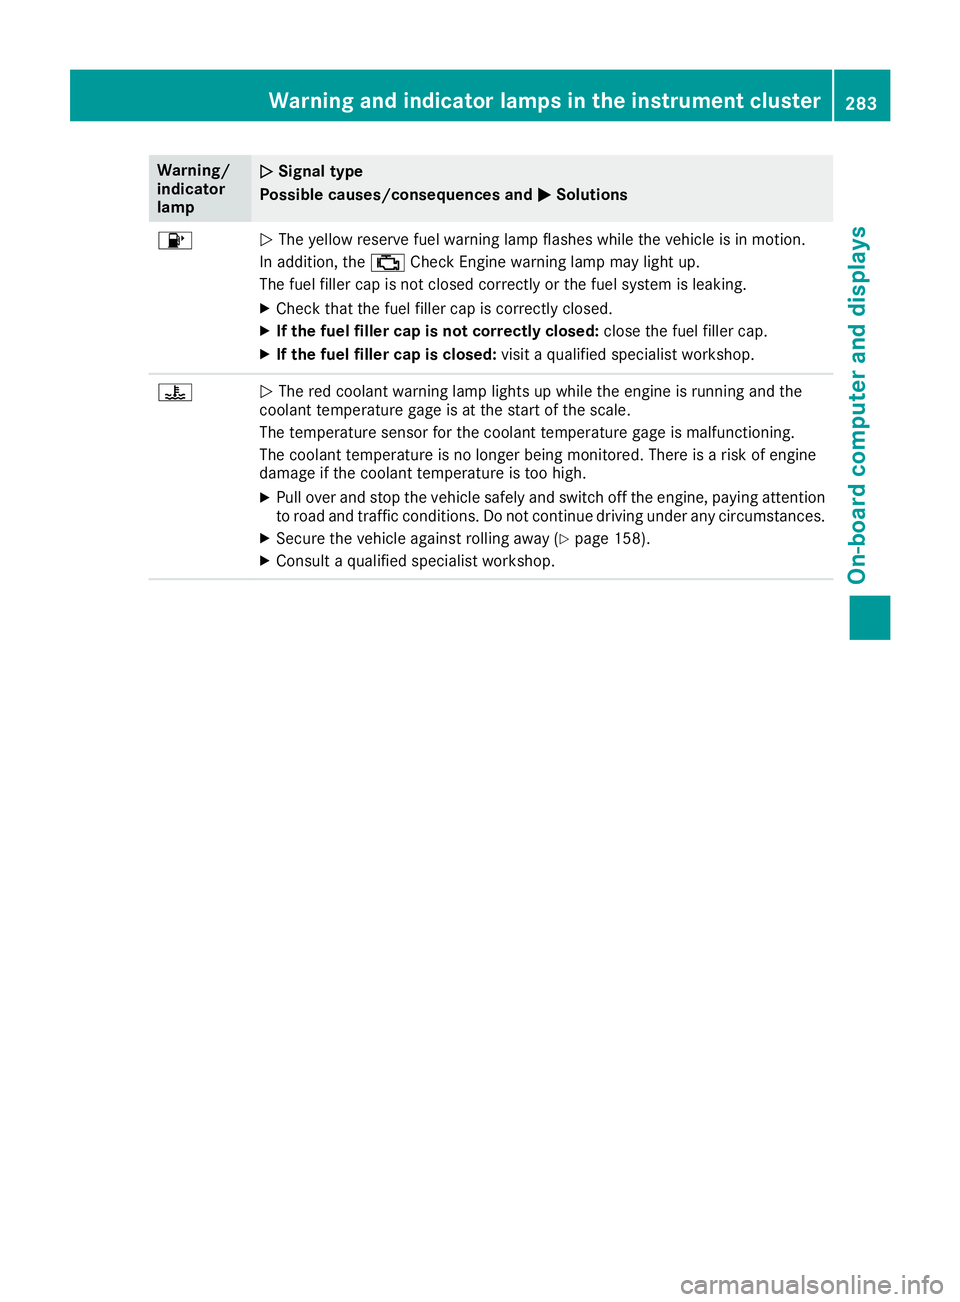
Warning/
indicator
lamp
0051 0051
Signal type
Possible causes/consequences and 0050
0050Solutions 00B6
0051
The yellow reserve fuel warning lamp flashes while the vehicle is in motion.
In addition, the 00B9Check Engine warning lamp may light up.
The fuel filler cap is not closed correctly or the fuel system is leaking.
X Check that the fuel filler cap is correctly closed.
X If the fuel filler cap is not correctly closed: close the fuel filler cap.
X If the fuel filler cap is closed: visit a qualified specialist workshop.00AC
0051
The red coolant warning lamp lights up while the engine is running and the
coolant temperature gage is at the start of the scale.
The temperature sensor for the coolant temperature gage is malfunctioning.
The coolant temperature is no longer being monitored. There is a risk of engine
damage if the coolant temperature is too high.
X Pull over and stop the vehicle safely and switch off the engine, paying attention
to road and traffic conditions. Do not continue driving under any circumstances.
X Secure the vehicle against rolling away (Y page 158).
X Consult a qualified specialist workshop. Warning and indicator lamps in the instrument cluster
283On-board computer and displays Z
Page 330 of 398
Move the power washer nozzle around when
cleaning your vehicle.
The water temperature of the power washer
must not exceed 140 ‡ (60 †).
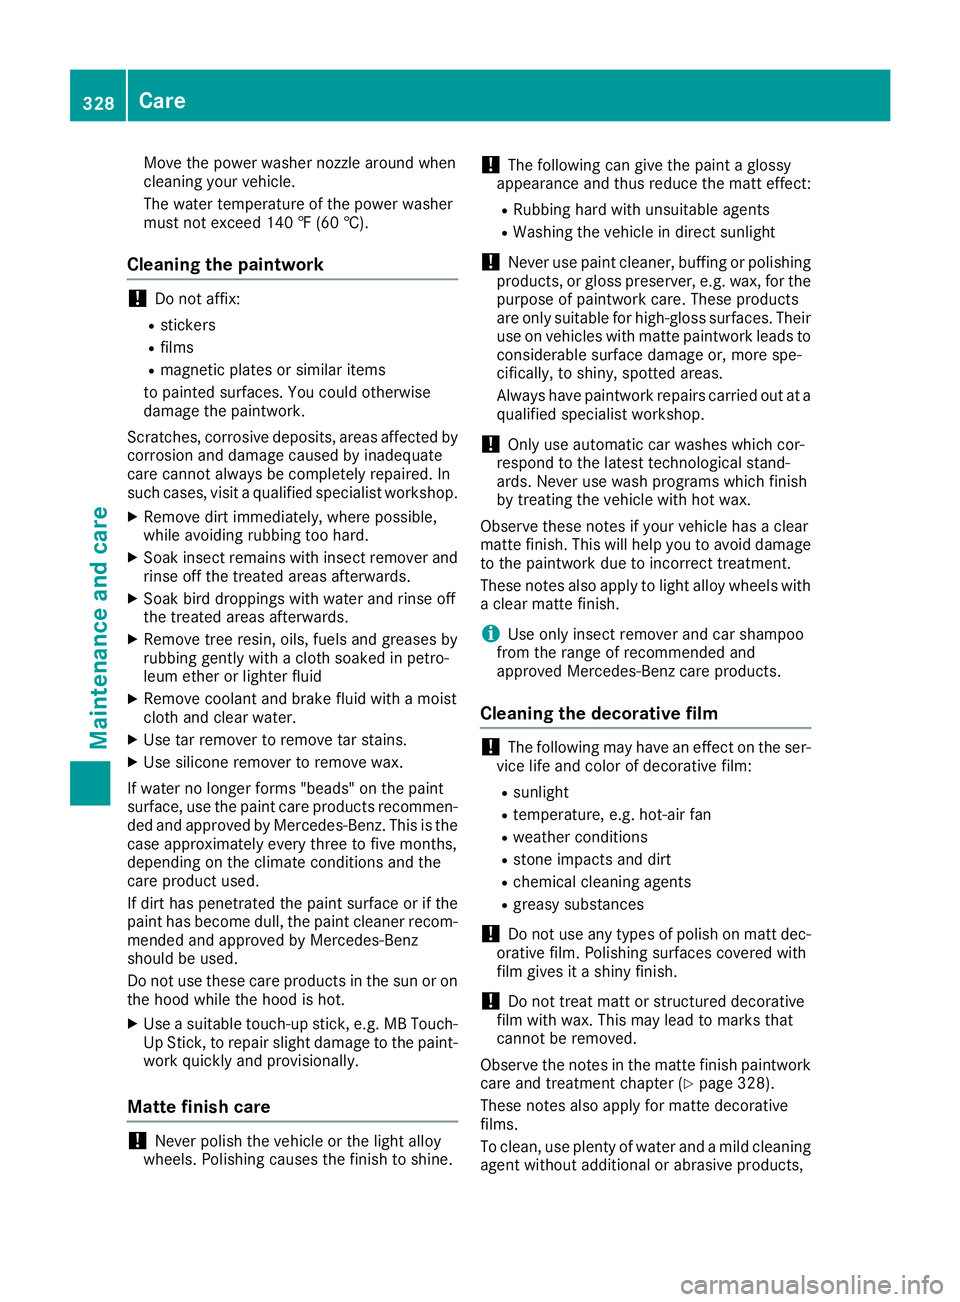
Cleaning the paintwork !
Do not affix:
R stickers
R films
R magnetic plates or similar items
to painted surfaces. You could otherwise
damage the paintwork.
Scratches, corrosive deposits, areas affected by
corrosion and damage caused by inadequate
care cannot always be completely repaired. In
such cases, visit a qualified specialist workshop.
X Remove dirt immediately, where possible,
while avoiding rubbing too hard.
X Soak insect remains with insect remover and
rinse off the treated areas afterwards.
X Soak bird droppings with water and rinse off
the treated areas afterwards.
X Remove tree resin, oils, fuels and greases by
rubbing gently with a cloth soaked in petro-
leum ether or lighter fluid
X Remove coolant and brake fluid with a moist
cloth and clear water.
X Use tar remover to remove tar stains.
X Use silicone remover to remove wax.
If water no longer forms "beads" on the paint
surface, use the paint care products recommen- ded and approved by Mercedes-Benz. This is the
case approximately every three to five months,
depending on the climate conditions and the
care product used.
If dirt has penetrated the paint surface or if the
paint has become dull, the paint cleaner recom-
mended and approved by Mercedes-Benz
should be used.
Do not use these care products in the sun or on the hood while the hood is hot.
X Use a suitable touch-up stick, e.g. MB Touch-
Up Stick, to repair slight damage to the paint- work quickly and provisionally.
Matte finish care !
Never polish the vehicle or the light alloy
wheels. Polishing causes the finish to shine. !
The following can give the paint a glossy
appearance and thus reduce the matt effect:
R Rubbing hard with unsuitable agents
R Washing the vehicle in direct sunlight
! Never use paint cleaner, buffing or polishing
products, or gloss preserver, e.g. wax, for the purpose of paintwork care. These products
are only suitable for high-gloss surfaces. Their
use on vehicles with matte paintwork leads to
considerable surface damage or, more spe-
cifically, to shiny, spotted areas.
Always have paintwork repairs carried out at a
qualified specialist workshop.
! Only use automatic car washes which cor-
respond to the latest technological stand-
ards. Never use wash programs which finish
by treating the vehicle with hot wax.
Observe these notes if your vehicle has a clear
matte finish. This will help you to avoid damage
to the paintwork due to incorrect treatment.
These notes also apply to light alloy wheels with
a clear matte finish.
i Use only insect remover and car shampoo
from the range of recommended and
approved Mercedes-Benz care products.
Cleaning the decorative film !
The following may have an effect on the ser-
vice life and color of decorative film:
R sunlight
R temperature, e.g. hot-air fan
R weather conditions
R stone impacts and dirt
R chemical cleaning agents
R greasy substances
! Do not use any types of polish on matt dec-
orative film. Polishing surfaces covered with
film gives it a shiny finish.
! Do not treat matt or structured decorative
film with wax. This may lead to marks that
cannot be removed.
Observe the notes in the matte finish paintwork
care and treatment chapter (Y page 328).
These notes also apply for matte decorative
films.
To clean, use plenty of water and a mild cleaning
agent without additional or abrasive products, 328
CareMaintenance and care