MERCEDES-BENZ GLS-Class SUV 2017 X166 Owner's Manual
Manufacturer: MERCEDES-BENZ, Model Year: 2017, Model line: GLS-Class SUV, Model: MERCEDES-BENZ GLS-Class SUV 2017 X166Pages: 390, PDF Size: 9.71 MB
Page 151 of 390
ANeutral
Do not shift the transmission toN
while driving. Otherwise, the auto-
matic transmission could be dam-
aged.
No power is transmitted from the
engine to the drive wheels.
Releasing the brakes will allow you to
move the vehicle freely, e.g. to push
it or tow it.
If ESP
®is deactivated or faulty: shift
the transmission to position Nif the
vehicle is in danger of skidding, e.g.
on icy roads.
If you switch the engine off with the
transmission in position Ror D, the
automatic transmission shifts to N
automatically.
!Rolling in neutral Ncan damage
the drive train.
7Drive
The automatic transmission changes
gear automatically. All forward gears
are available.
Driving tips
Changing gear
The automatic transmission shifts to the indi-
vidual gears automatically when it is in trans-
mission position D. This automatic gear shifting
behavior is determined by:
Rthe selected drive program
Rthe position of the accelerator pedal
Rthe road speed
Accelerator pedal position
Your style of driving influences how the auto-
matic transmission shifts gear:
Rlittle throttle: early upshifts
Rmore throttle: late upshifts
Kickdown
Use kickdown for maximum acceleration.
XDepress the accelerator pedal beyond the
pressure point.
The automatic transmission shifts to a lower
gear depending on the engine speed.
XEase off the accelerator pedal once the
desired speed is reached.
The automatic transmission shifts back up.
Rocking the vehicle free
Shifting the transmission repeatedly between
gears Dand Rmay help to free the vehicle if it
has become stuck in slush or snow. The vehi-
cle's engine management system limits the
speed to a maximum of 5 mph (9 km/h) when
shifting back and forth. To shift back and forth
between transmission positions Dand R, move
the DIRECT SELECT lever up and down past the
point of resistance.
Towing a trailer
XDrive in the middle of the engine speed range
on uphill gradients.
XDepending on the uphill or downhill gradient,
use the left-hand steering wheel paddle
shifter (
Ypage 150) to select a lower gear,
even if cruise control or Distance Pilot
DISTRONIC are activated.
Drive programs
Slippery drive program
The Slippery drive program has the following
characteristics:
Rreduced engine and transmission settings for
optimum propulsion on slippery or snow-cov-
ered roads.
Roptimized ESP®stability control on slippery or
snow-covered roads.
Rthe vehicle has improved driving stability on
slippery or snow-covered roads, for example.
Automatic transmission149
Driving an d parking
Z
Page 152 of 390
Comfort drive program
TheComfort drive program has the following
characteristics:
Rcomfort-oriented engine and transmission
settings.
Roptimal fuel consumption resulting from the
automatic transmission shifting up sooner.
Rthe vehicle pulling away more gently in
forward and reverse gears, unless the accel-
erator pedal is depressed fully.
Rthe automatic transmission shifting up
sooner. This results in the vehicle being driven
at lower engine speeds and the wheels being
less likely to spin.
Sport drive program
The Sport drive program has the following char-
acteristics:
Rsporty engine and transmission settings.
Rthe automatic transmission shifting up later.
the fuel consumption possibly being higher as
a result of the later automatic transmission
shift points.
Rthe suspension exhibits sporty damping (vehi-
cles with AIRMATIC).
Drive program Sport Plus (Mercedes-
AMG vehicles)
The Sport Plus drive program has the following
characteristics:
Rthe vehicle exhibits particularly sporty driving
characteristics.
Rthe vehicle pulling away in first gear.
Rthe automatic transmission shifting up later.
the fuel consumption possibly being higher as
a result of the later automatic transmission
shift points.
Rthe suspension exhibits particularly firm
springing and damping settings (vehicles with AIRMATIC).
Rthe ECO start/stop function is deactivated, it
can, however, be activated again using the
ECO button (
Ypage 143).
Individual drive program
In the Individual drive program, the following
properties of the drive program can be selected:
Rthe drive (engine and transmission manage-
ment)
Rthe transmission
Rthe suspension
Rall vehicles (except Mercedes-AMG vehicles):
the steering
Rall vehicles (except Mercedes-AMG vehicles):
availability of the ECO start/stop function
To select the gears in the Individualdrive pro-
gram permanently using the steering wheel pad-
dle shifters, select the permanent manual gear-
shift program.
Information about configuring the Individual
drive program with the multimedia system can
be found in the Digital Operator's Manual.
Manual gear shifting
General notes
You can change gear yourself using the steering
wheel paddle shifters. The transmission must be
in position D.
Depending on which steering wheel paddle
shifter is pulled, the automatic transmission
immediately shifts into the next gear down or
up, if permitted.
To use manual shifting, you have two options:
Rtemporary setting
Rpermanent setting
If you activate manual gearshifting, the multi-
function display will show the current gear
instead of transmission position D.
If manual gearshifting is deactivated, the gears
will be selected automatically.
150Automatic transmission
Driving and parking
Page 153 of 390
Temporary setting
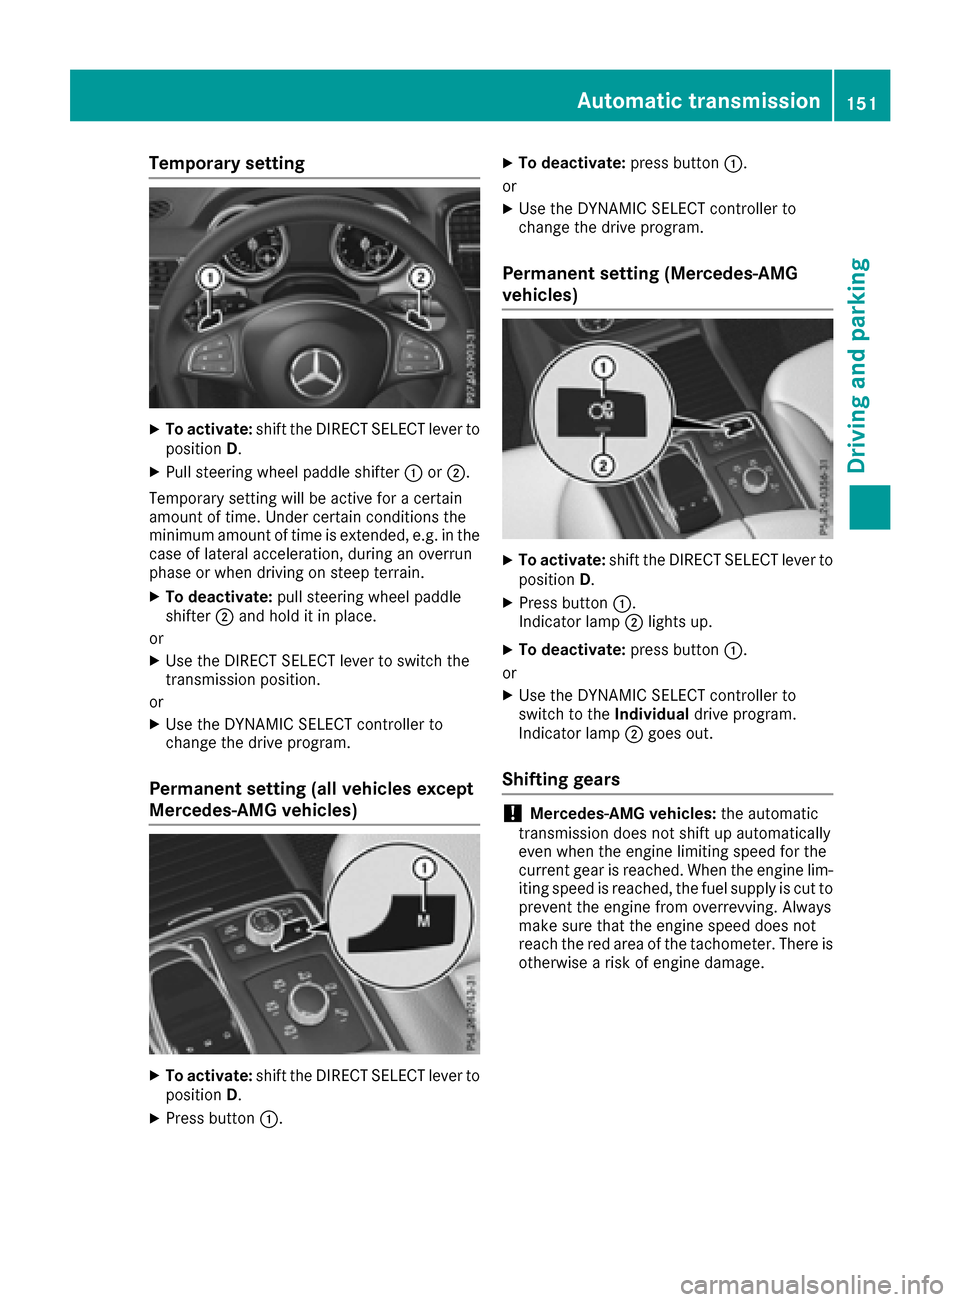
XTo activate:shift the DIRECT SELECT lever to
position D.
XPull steering wheel paddle shifter :or;.
Temporary setting will be active for a certain
amount of time. Under certain conditions the
minimum amount of time is extended, e.g. in the case of lateral acceleration, during an overrun
phase or when driving on steep terrain.
XTo deactivate: pull steering wheel paddle
shifter ;and hold it in place.
or
XUse the DIRECT SELECT lever to switch the
transmission position.
or
XUse the DYNAMIC SELECT controller to
change the drive program.
Permanent setting (all vehicles except
Mercedes-AMG vehicles)
XTo activate: shift the DIRECT SELECT lever to
position D.
XPress button :.
XTo deactivate: press button:.
or
XUse the DYNAMIC SELECT controller to
change the drive program.
Permanent setting (Mercedes-AMG
vehicles)
XTo activate: shift the DIRECT SELECT lever to
position D.
XPress button :.
Indicator lamp ;lights up.
XTo deactivate: press button:.
or
XUse the DYNAMIC SELECT controller to
switch to the Individualdrive program.
Indicator lamp ;goes out.
Shifting gears
!Mercedes-AMG vehicles: the automatic
transmission does not shift up automatically
even when the engine limiting speed for the
current gear is reached. When the engine lim-
iting speed is reached, the fuel supply is cut to
prevent the engine from overrevving. Always
make sure that the engine speed does not
reach the red area of the tachometer. There is
otherwise a risk of engine damage.
Automatic transmission151
Driving an d parking
Z
Page 154 of 390
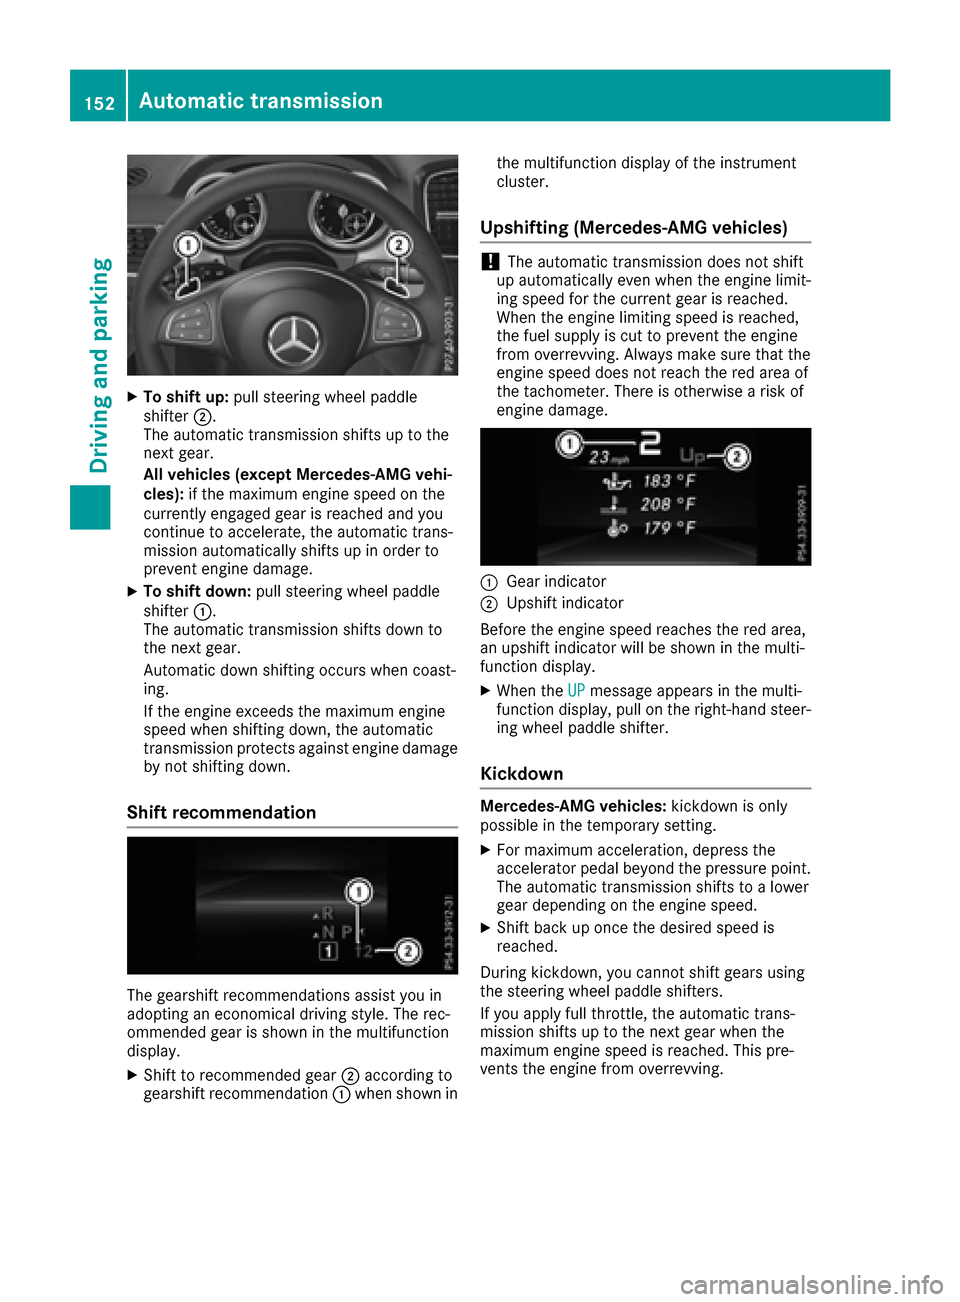
XTo shift up:pull steering wheel paddle
shifter ;.
The automatic transmission shifts up to the
next gear.
All vehicles (except Mercedes-AMG vehi-
cles): if the maximum engine speed on the
currently engaged gear is reached and you
continue to accelerate, the automatic trans-
mission automatically shifts up in order to
prevent engine damage.
XTo shift down: pull steering wheel paddle
shifter :.
The automatic transmission shifts down to
the next gear.
Automatic down shifting occurs when coast-
ing.
If the engine exceeds the maximum engine
speed when shifting down, the automatic
transmission protects against engine damage
by not shifting down.
Shift recommendation
The gearshift recommendations assist you in
adopting an economical driving style. The rec-
ommended gear is shown in the multifunction
display.
XShift to recommended gear ;according to
gearshift recommendation :when shown in the multifunction display of the instrument
cluster.
Upshifting (Mercedes-AMG vehicles)
!The automatic transmission does not shift
up automatically even when the engine limit-
ing speed for the current gear is reached.
When the engine limiting speed is reached,
the fuel supply is cut to prevent the engine
from overrevving. Always make sure that the
engine speed does not reach the red area of
the tachometer. There is otherwise a risk of
engine damage.
:Gear indicator
;Upshift indicator
Before the engine speed reaches the red area,
an upshift indicator will be shown in the multi-
function display.
XWhen the UPmessage appears in the multi-
function display, pull on the right-hand steer-
ing wheel paddle shifter.
Kickdown
Mercedes-AMG vehicles: kickdown is only
possible in the temporary setting.
XFor maximum acceleration, depress the
accelerator pedal beyond the pressure point.
The automatic transmission shifts to a lower
gear depending on the engine speed.
XShift back up once the desired speed is
reached.
During kickdown, you cannot shift gears using
the steering wheel paddle shifters.
If you apply full throttle, the automatic trans-
mission shifts up to the next gear when the
maximum engine speed is reached. This pre-
vents the engine from overrevving.
152Automatic transmission
Driving an d parking
Page 155 of 390
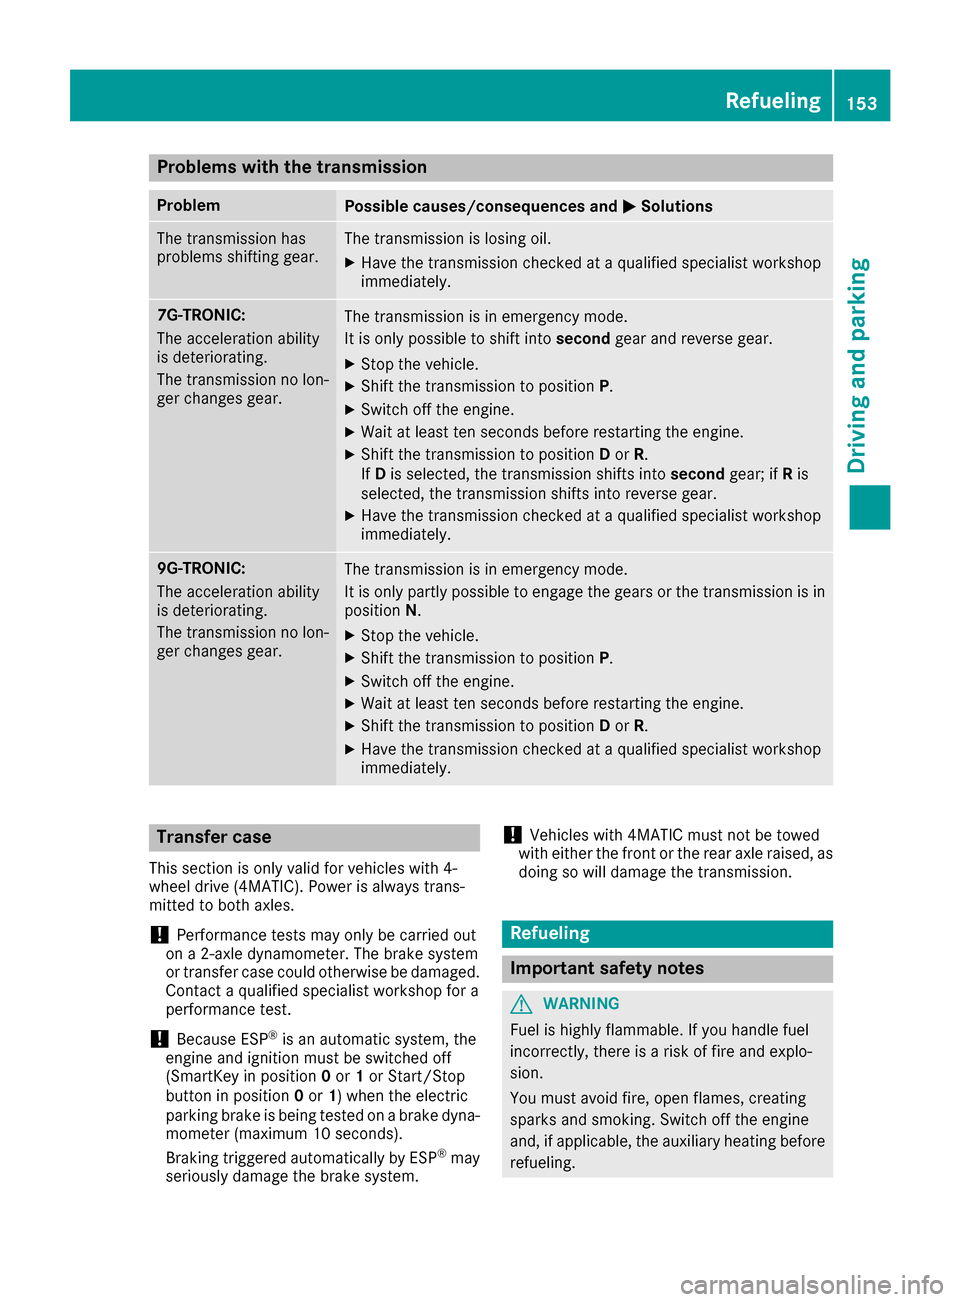
Problems with the transmission
ProblemPossible causes/consequences andMSolutions
The transmission has
problems shifting gear.The transmission is losing oil.
XHave the transmission checked at a qualified specialist workshop
immediately.
7G-TRONIC:
The acceleration ability
is deteriorating.
The transmission no lon-
ger changes gear.The transmission is in emergency mode.
It is only possible to shift intosecondgear and reverse gear.
XStop the vehicle.
XShift the transmission to position P.
XSwitch off the engine.
XWait at least ten seconds before restarting the engine.
XShift the transmission to positionDor R.
If D is selected, the transmission shifts into secondgear; ifRis
selected, the transmission shifts into reverse gear.
XHave the transmission checked at a qualified specialist workshop
immediately.
9G-TRONIC:
The acceleration ability
is deteriorating.
The transmission no lon-
ger changes gear.The transmission is in emergency mode.
It is only partly possible to engage the gears or the transmission is in
position N.
XStop the vehicle.
XShift the transmission to position P.
XSwitch off the engine.
XWait at least ten seconds before restarting the engine.
XShift the transmission to positionDor R.
XHave the transmission checked at a qualified specialist workshop
immediately.
Transfer case
This section is only valid for vehicles with 4-
wheel drive (4MATIC). Power is always trans-
mitted to both axles.
!Performance tests may only be carried out
on a 2-axle dynamometer. The brake system
or transfer case could otherwise be damaged. Contact a qualified specialist workshop for a
performance test.
!Because ESP®is an automatic system, the
engine and ignition must be switched off
(SmartKey in position 0or 1or Start/Stop
button in position 0or 1) when the electric
parking brake is being tested on a brake dyna-
mometer (maximum 10 seconds).
Braking triggered automatically by ESP
®may
seriously damage the brake system.
!Vehicles with 4MATIC must not be towed
with either the front or the rear axle raised, as
doing so will damage the transmission.
Refueling
Important safety notes
GWARNING
Fuel is highly flammable. If you handle fuel
incorrectly, there is a risk of fire and explo-
sion.
You must avoid fire, open flames, creating
sparks and smoking. Switch off the engine
and, if applicable, the auxiliary heating before refueling.
Refueling153
Driving and parking
Z
Page 156 of 390
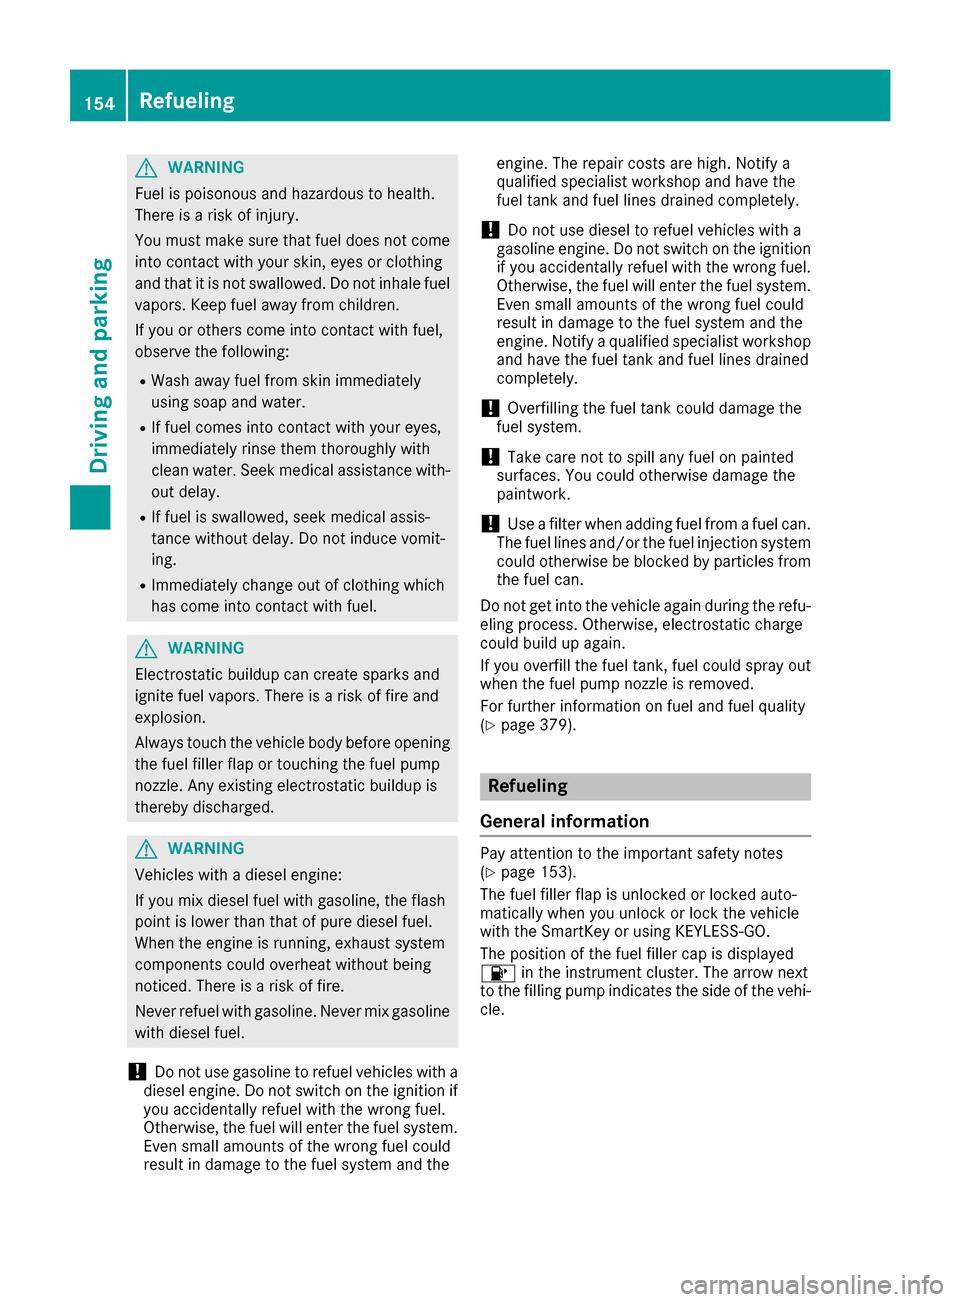
GWARNING
Fuel is poisonous and hazardous to health.
There is a risk of injury.
You must make sure that fuel does not come into contact with your skin, eyes or clothing
and that it is not swallowed. Do not inhale fuel
vapors. Keep fuel away from children.
If you or others come into contact with fuel,
observe the following:
RWash away fuel from skin immediately
using soap and water.
RIf fuel comes into contact with your eyes,
immediately rinse them thoroughly with
clean water. Seek medical assistance with-
out delay.
RIf fuel is swallowed, seek medical assis-
tance without delay. Do not induce vomit-
ing.
RImmediately change out of clothing which
has come into contact with fuel.
GWARNING
Electrostatic buildup can create sparks and
ignite fuel vapors. There is a risk of fire and
explosion.
Always touch the vehicle body before opening
the fuel filler flap or touching the fuel pump
nozzle. Any existing electrostatic buildup is
thereby discharged.
GWARNING
Vehicles with a diesel engine:
If you mix diesel fuel with gasoline, the flash
point is lower than that of pure diesel fuel.
When the engine is running, exhaust system
components could overheat without being
noticed. There is a risk of fire.
Never refuel with gasoline. Never mix gasoline with diesel fuel.
!Do not use gasoline to refuel vehicles with a
diesel engine. Do not switch on the ignition if
you accidentally refuel with the wrong fuel.
Otherwise, the fuel will enter the fuel system. Even small amounts of the wrong fuel could
result in damage to the fuel system and the engine. The repair costs are high. Notify a
qualified specialist workshop and have the
fuel tank and fuel lines drained completely.
!Do not use diesel to refuel vehicles with a
gasoline engine. Do not switch on the ignition
if you accidentally refuel with the wrong fuel.
Otherwise, the fuel will enter the fuel system. Even small amounts of the wrong fuel could
result in damage to the fuel system and the
engine. Notify a qualified specialist workshop
and have the fuel tank and fuel lines drained
completely.
!Overfilling the fuel tank could damage the
fuel system.
!Take care not to spill any fuel on painted
surfaces. You could otherwise damage the
paintwork.
!Use a filter when adding fuel from a fuel can.
The fuel lines and/or the fuel injection system
could otherwise be blocked by particles from
the fuel can.
Do not get into the vehicle again during the refu-
eling process. Otherwise, electrostatic charge
could build up again.
If you overfill the fuel tank, fuel could spray out
when the fuel pump nozzle is removed.
For further information on fuel and fuel quality
(
Ypage 379).
Refueling
General information
Pay attention to the important safety notes
(Ypage 153).
The fuel filler flap is unlocked or locked auto-
matically when you unlock or lock the vehicle
with the SmartKey or using KEYLESS-GO.
The position of the fuel filler cap is displayed
8 in the instrument cluster. The arrow next
to the filling pump indicates the side of the vehi-
cle.
154Refueling
Driving and parking
Page 157 of 390
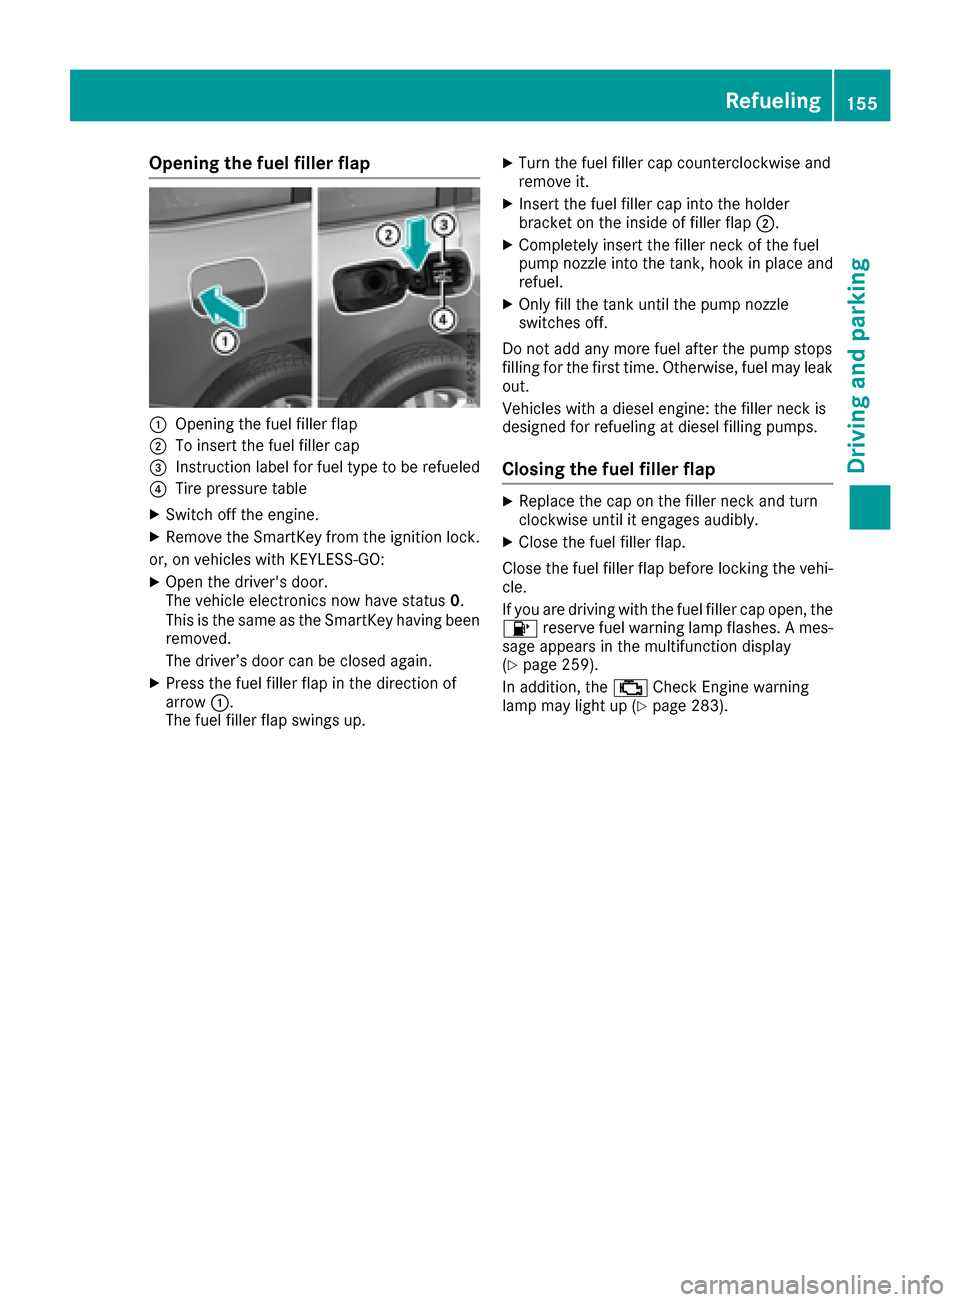
Opening the fuel filler flap
:Opening the fuel filler flap
;To insert the fuel filler cap
=Instruction label for fuel type to be refueled
?Tire pressure table
XSwitch off the engine.
XRemove the SmartKey from the ignition lock.
or, on vehicles with KEYLESS ‑GO:
XOpen the driver's door.
The vehicle electronics now have status 0.
This is the same as the SmartKey having been
removed.
The driver’s door can be closed again.
XPress the fuel filler flap in the direction of
arrow :.
The fuel filler flap swings up.
XTurn the fuel filler cap counterclockwise and
remove it.
XInsert the fuel filler cap into the holder
bracket on the inside of filler flap ;.
XCompletely insert the filler neck of the fuel
pump nozzle into the tank, hook in place and
refuel.
XOnly fill the tank until the pump nozzle
switches off.
Do not add any more fuel after the pump stops
filling for the first time. Otherwise, fuel may leak
out.
Vehicles with a diesel engine: the filler neck is
designed for refueling at diesel filling pumps.
Closing the fuel filler flap
XReplace the cap on the filler neck and turn
clockwise until it engages audibly.
XClose the fuel filler flap.
Close the fuel filler flap before locking the vehi-
cle.
If you are driving with the fuel filler cap open, the
8 reserve fuel warning lamp flashes. A mes-
sage appears in the multifunction display
(
Ypage 259).
In addition, the ;Check Engine warning
lamp may light up (
Ypage 283).
Refueling155
Driving and parking
Z
Page 158 of 390
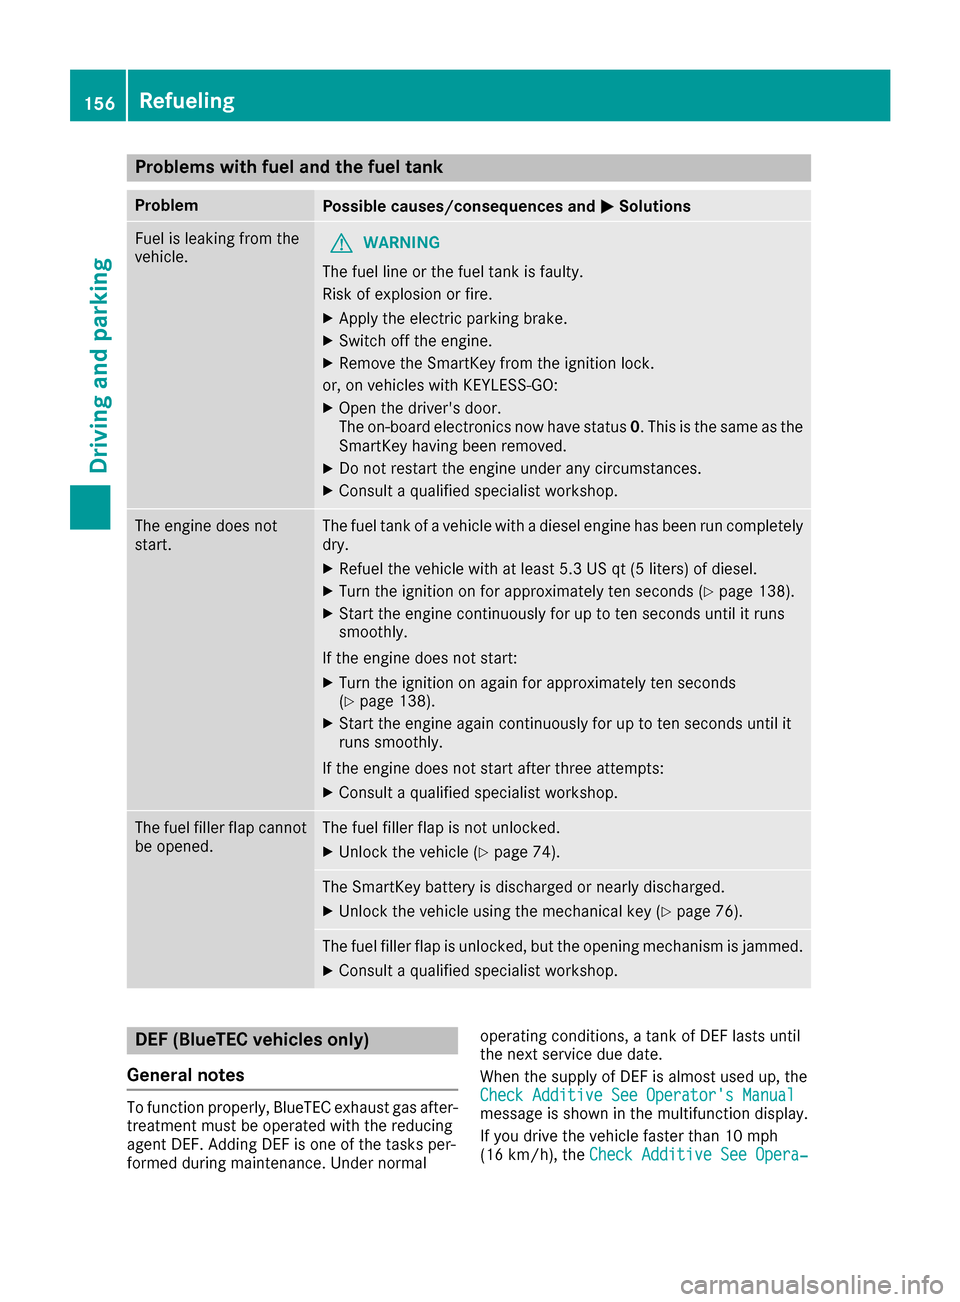
Problems with fuel and the fuel tank
ProblemPossible causes/consequences andMSolutions
Fuel is leaking from the
vehicle.GWARNING
The fuel line or the fuel tank is faulty.
Risk of explosion or fire.
XApply the electric parking brake.
XSwitch off the engine.
XRemove the SmartKey from the ignition lock.
or, on vehicles with KEYLESS‑GO:
XOpen the driver's door.
The on-board electronics now have status 0. This is the same as the
SmartKey having been removed.
XDo not restart the engine under any circumstances.
XConsult a qualified specialist workshop.
The engine does not
start.The fuel tank of a vehicle with a diesel engine has been run completely
dry.
XRefuel the vehicle with at least 5.3 US qt (5 liters) of diesel.
XTurn the ignition on for approximately ten seconds (Ypage 138).
XStart the engine continuously for up to ten seconds until it runs
smoothly.
If the engine does not start:
XTurn the ignition on again for approximately ten seconds
(Ypage 138).
XStart the engine again continuously for up to ten seconds until it
runs smoothly.
If the engine does not start after three attempts:
XConsult a qualified specialist workshop.
The fuel filler flap cannot
be opened.The fuel filler flap is not unlocked.
XUnlock the vehicle (Ypage 74).
The SmartKey battery is discharged or nearly discharged.
XUnlock the vehicle using the mechanical key (Ypage 76).
The fuel filler flap is unlocked, but the opening mechanism is jammed.
XConsult a qualified specialist workshop.
DEF (BlueTEC vehicles only)
General notes
To function properly, BlueTEC exhaust gas after-
treatment must be operated with the reducing
agent DEF. Adding DEF is one of the tasks per-
formed during maintenance. Under normal operating conditions, a tank of DEF lasts until
the next service due date.
When the supply of DEF is almost used up, the
Check Additive See Operator's Manualmessage is shown in the multifunction display.
If you drive the vehicle faster than 10 mph
(16 km/h), the
Check Additive See Opera‐
156Refueling
Driving and parking
Page 159 of 390
tor's Manualmessage goes out after approx-
imately one minute.
When the DEF supply drops to a minimum, the
Remaining Starts: 16
message is shown in
the multifunction display.
If the Remaining Starts: 16
message
appears in the multifunction display, you can
start the engine another 16 times. If DEF is not
refilled, you will subsequently be unable to
start the engine.
XAdd at least 1 gal (3.8 l)of DEF.
XSwitch on the ignition for at least 60 seconds.
XStart the engine.
iHave the DEF tank refilled at a qualified spe-
cialist workshop.
Use the special DEF refill bottle when adding
DEF between maintenance intervals. You can
obtain further information from an authorized
Mercedes-Benz Center or, if necessary, contact
Roadside Assistance (
Ypage 27).
If the outside temperature is below 12 ‡(Ò11 †)
it may be difficult to top up. If DEF is frozen and
there is an active warning indicator, it may not
be possible to add DEF. Park the vehicle in a
warmer place, e.g. in a garage, until DEF has
become fluid again. It will then be possible to
add DEF again. Alternatively, have the DEF tank
refilled at a qualified specialist workshop.
Further information about BlueTEC exhaust gas aftertreatment and DEF is available at any
authorized Mercedes-Benz Center.
Important safety notes
DEF is a water-soluble fluid for the exhaust gas
aftertreatment of diesel engines. It is:
Rnot poisonous
Rcolorless and odorless
Rnot flammable
When you open the DEF container, small
amounts of ammonia vapor may be released.
Ammonia vapors have a pungent odor and are
particularly irritating to the skin, to mucous
membranes and to the eyes. You may experi-
ence a burning sensation in your eyes, nose and
throat. Coughing and watering of the eyes are
possible.
Do not inhale ammonia vapors. Fill the DEF tank
only in well-ventilated areas. DEF must not come into contact with your skin,
eyes or clothing and must not be swallowed.
Keep DEF away from children.
If you or other persons come into contact with
DEF, observe the following:
RRinse DEF from your skin immediately with
soap and water.
RIf DEF comes into contact with your eyes,
immediately rinse them thoroughly with clean
water. Seek medical assistance without
delay.
RIf DEF has been swallowed, rinse your mouth
out immediately. Drink plenty of water. Seek
medical assistance without delay.
RChange out of clothing contaminated with
DEF immediately.
!Only use DEF in accordance with
ISO 22241. Do not mix any additives with
DEF, and do not dilute DEF with water. This
may destroy the BlueTEC exhaust gas after-
treatment system.
!The vehicle must be parked on level ground
to fill the DEF tank. The DEF tank can only be
filled as intended with the vehicle parked on a
level surface. This avoids false level readings.
Filling the tank is not permitted if the vehicle
is not parked on a level surface. There is a
danger of overfil
ling, which could result in
damage to components of the BlueTEC
exhaust gas aftertreatment.
!Rinse surfaces that have come into contact
with DEF immediately with water or remove
DEF using a damp cloth and cold water. If the
DEF has already crystallized, use a sponge
and cold water to clean it. DEF residues crys-
tallize after time and contaminate the affec-
ted surfaces.
!DEF is not a fuel additive and must not be
added to the fuel tank. If DEF is added to the
fuel tank, this can lead to engine damage.
For further information on DEF, see
(
Ypage 381).
Refueling157
Driving and parking
Z
Page 160 of 390
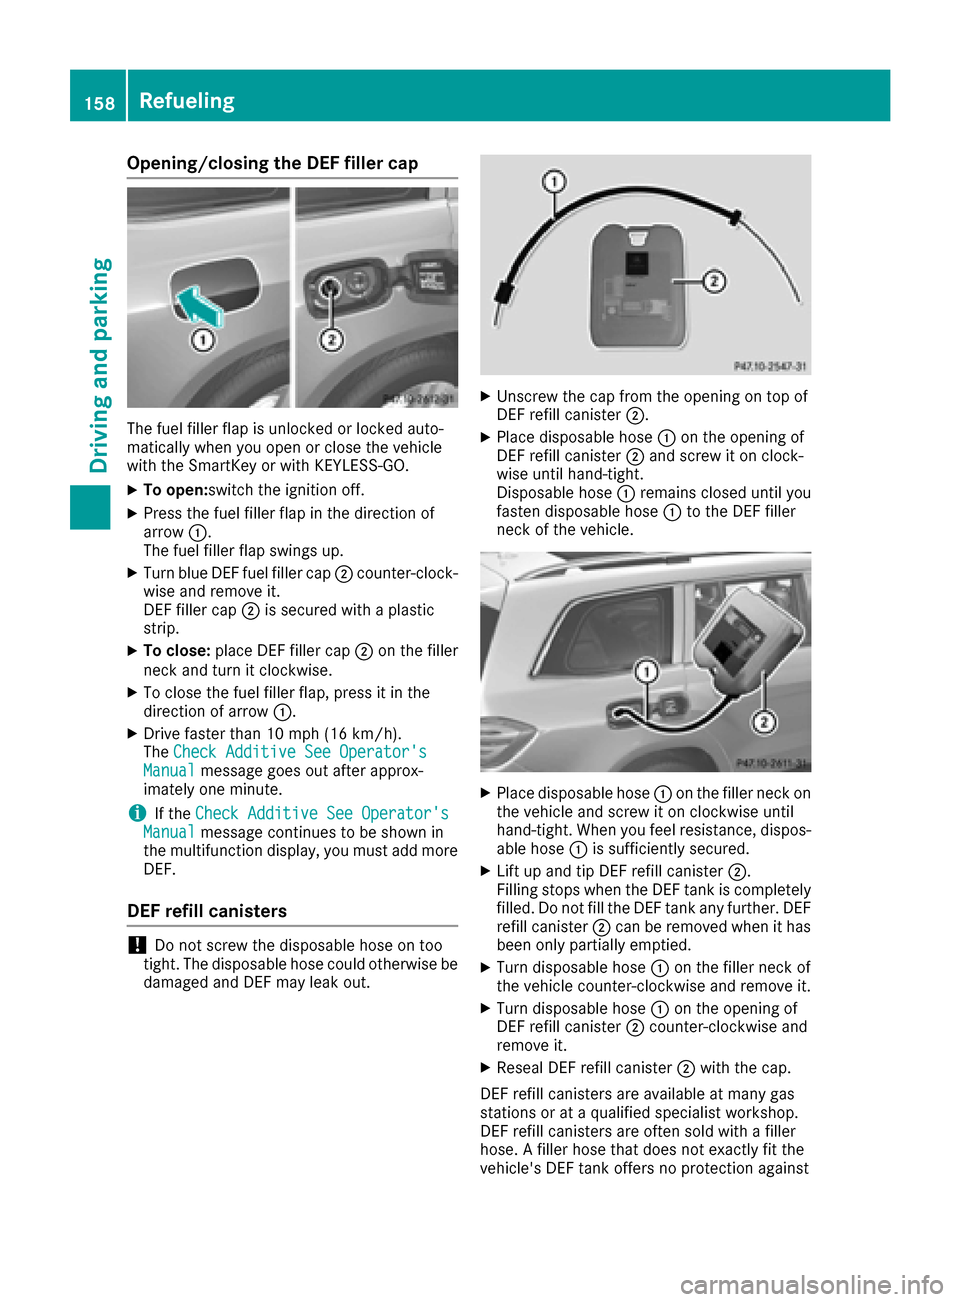
Opening/closing the DEF filler cap
The fuel filler flap is unlocked or locked auto-
matically when you open or close the vehicle
with the SmartKey or with KEYLESS-GO.
XTo open:switch the ignition off.
XPress the fuel filler flap in the direction of
arrow:.
The fuel filler flap swings up.
XTurn blue DEF fuel filler cap ;counter-clock-
wise and remove it.
DEF filler cap ;is secured with a plastic
strip.
XTo close: place DEF filler cap ;on the filler
neck and turn it clockwise.
XTo close the fuel filler flap, press it in the
direction of arrow :.
XDrive faster than 10 mph (16 km/h).
TheCheck Additive See Operator's
Manualmessage goes out after approx-
imately one minute.
iIf the Check Additive See Operator'sManualmessage continues to be shown in
the multifunction display, you must add more
DEF.
DEF refill canisters
!Do not screw the disposable hose on too
tight. The disposable hose could otherwise be damaged and DEF may leak out.
XUnscrew the cap from the opening on top of
DEF refill canister ;.
XPlace disposable hose :on the opening of
DEF refill canister ;and screw it on clock-
wise until hand-tight.
Disposable hose :remains closed until you
fasten disposable hose :to the DEF filler
neck of the vehicle.
XPlace disposable hose :on the filler neck on
the vehicle and screw it on clockwise until
hand-tight. When you feel resistance, dispos-
able hose :is sufficiently secured.
XLift up and tip DEF refill canister ;.
Filling stops when the DEF tank is completely
filled. Do not fill the DEF tank any further. DEF
refill canister ;can be removed when it has
been only partially emptied.
XTurn disposable hose :on the filler neck of
the vehicle counter-clockwise and remove it.
XTurn disposable hose :on the opening of
DEF refill canister ;counter-clockwise and
remove it.
XReseal DEF refill canister ;with the cap.
DEF refill canisters are available at many gas
stations or at a qualified specialist workshop.
DEF refill canisters are often sold with a filler
hose. A filler hose that does not exactly fit the
vehicle's DEF tank offers no protection against
158Refueling
Driving and parking