tire pressure MERCEDES-BENZ M-Class 2011 W164 Owner's Manual
[x] Cancel search | Manufacturer: MERCEDES-BENZ, Model Year: 2011, Model line: M-Class, Model: MERCEDES-BENZ M-Class 2011 W164Pages: 372, PDF Size: 16.23 MB
Page 6 of 372
1, 2, 3 ...
115 V socket ...................................... 269
12 V socket ........................................ 268
4ETS see ETS/4ETS
4MATIC (permanent four-wheel
drive) .................................................. 191
A
ABS (Anti-lock Braking System) Display message ............................ 228
Function/notes ................................ 65
Warning lamp ................................. 249
Accident (notes) ................................ 297
Active light function (display
message) ............................................ 233
Active service system see Service interval display
Adaptive Damping System (ADS) ..... 184
AdBlue ®
Adding ........................................... 156
Display message ............................ 236
Additional functions (on-board
computer) .......................................... 219
ADS (Adaptive Damping System) ..... 184
Air bags Display message ............................ 225
Front air bag (driver, front
passenger) ....................................... 39
Important safety information ...........38
PASSENGER AIRBAG OFF
indicator lamp (only Canada) ...........48
PASSENGER AIRBAG OFF
indicator lamp (only USA) ................42
Safety guidelines ............................. 37
Side impact air bag ..........................40
Window curtain air bag ....................41
Air-conditioning system
see Climate control
Air dehumidification
Activating/deactivating with
cooling ........................................... 129
Air distribution
Setting ........................................... 132
Air filter (display message) .............. 236
Airflow
Setting ........................................... 132
AIRMATIC package ............................ 183
Air nozzles see Air vents .................................. 135
Air pressure
see Tire pressure
Air-recirculation mode
Activating/deactivating .................133
Air vents ............................................. 135
Important safety information .........134
Rear ............................................... 135
Setting the center air vents ...........135
Setting the side air vents ...............135
Alarm system
see ATA
Ambient lighting (on-board
computer) .......................................... 216
AMG menu (on-board computer) ..... 209
Anti-lock Braking System see ABS
Anti-Theft Alarm system
see ATA
Anti-theft system
ATA (Anti-Theft Alarm system) .........69
Approach/departure angle .............. 170
Ashtray ............................................... 267
ATA (Anti-Theft Alarm system) Activating/deactivating ...................69
Function ........................................... 69
Switching off the alarm ....................69
Audio menu (on-board computer) .... 211
AUTO lights see Light sensor
Automatic car wash .......................... 288
Automatic transmission DIRECT SELECT lever .....................144
Display message ............................ 243
Driving tips .................................... 147
Emergency running mode ..............151
Kickdown ....................................... 147
Malfunction .................................... 151
Program selector button ................147
Pulling away ................................... 141
Starting .......................................... 141
Trailer towing ................................. 1474IndexBA 164.1 USA, CA Edition B 2011; 1; 2, en-USd2mskotVersion: 3.0.3.52010-04-21T17:25:06+02:00 - Seite 4
Page 12 of 372
Adjusting (rear) ................................ 96
Installing/removing (rear) ................96
Luxury .............................................. 95
see NECK-PRO head restraints
Heating
see Climate control
High beam flasher ............................. 109
Hill start assist .................................. 142
Hood Closing ........................................... 283
Opening ......................................... 282
Hydroplaning ..................................... 163
I
Immobilizer .......................................... 69
Indicator and warning lamps ABS ................................................ 249
Brakes ........................................... 247
DISTRONIC .................................... 253
Engine diagnostics .........................252
ESP ®
.............................................. 250
Fuel tank ........................................ 252
Reserve fuel ................................... 252
Seat belt ........................................ 248
SRS ................................................ 251
Tire pressure monitor ....................253
Insect protection on the radiator .... 283
Instrument cluster Overview .......................................... 28
Selecting the language (on-board
computer) ...................................... 214
Submenu (on-board computer) ......214
Warning and indicator lamps ...........29
Instrument cluster lighting ................ 28
Instrument lighting see Instrument cluster lighting
Interior lighting
Automatic control ..........................111
Delayed switch-off (on-board
computer) ...................................... 217
Emergency lighting ........................111
Manual control ............................... 111
Reading lamp ................................. 110
Setting ambient lighting (on-board
computer) ...................................... 216
ISOFIX (LATCH-type child seat
securing system) ................................. 61
J
Jack Storage location ............................ 298
Using ............................................. 306
Jump-starting ..................................... 315
K
Key Convenience closing feature ............86
Convenience opening feature ..........86
Display message ............................ 245
Starting the engine ........................141
KEYLESS-GO
Button ............................................ 139
Convenience closing feature ............86
Locking ............................................ 73
Starting the engine ........................141
Unlocking ......................................... 73
Key positions
KEYLESS-GO .................................. 139
SmartKey ....................................... 139
Kickdown ................................... 147, 149
L
Lane-change assistant see Blind Spot Assist
Language (on-board computer) ........ 214
Level control ...................................... 181
Level control (display message) ...... 237
Level setting Basic settings ................................ 182
License plate lamp (display
message) ............................................ 232
Light Setting ambient lighting (on-board
computer) ...................................... 216
Lights
Activating/deactivating the
interior lighting delayed switch-off
(on-board computer) ......................217
Automatic headlamp mode ............107
Cornering light function .................110
Daytime running lamps ..................107
Driving abroad ............................... 106
Fog lamps ...................................... 108
Hazard warning lamps ...................109
10IndexBA 164.1 USA, CA Edition B 2011; 1; 2, en-USd2mskotVersion: 3.0.3.52010-04-21T17:25:06+02:00 - Seite 10
Page 18 of 372
Telescopic rod (EASY-PACK load-
securing kit) ....................................... 264
Temperature Coolant (on-board computer) ......... 208
Displaying the outside
temperature ................................... 208
Engine oil (on-board computer) ...... 209
Outside temperature ...................... 204
Setting ........................................... 131
Theft deterrent locking system
Immobilizer ...................................... 69
Tilt/sliding sunroof
Opening/closing .............................. 89
Resetting ......................................... 89
Time (on-board computer) ................ 215
Timer (on-board computer) .............. 209
TIREFIT kit .......................................... 301
Tire pressure Calling up (on-board computer) .....331
Checking manually ........................329
Display message ............................ 241
Maximum ....................................... 334
Notes ............................................. 327
Not reached (TIREFIT) ....................303
Pressure loss warning ....................329
Reached (TIREFIT) ..........................304
Recommended ............................... 326
Tire pressure monitor
Warning lamp ................................. 253
Tire pressure monitoring system
Function/notes ............................. 331
Restarting ...................................... 333
Tires
Aspect ratio (definition) .................346
Average weight of the vehicle
occupants (definition) ....................344
Bar (definition) ............................... 344
Characteristics .............................. 344
Checking ........................................ 325
Cleaning ......................................... 326
Definition of terms .........................344
Direction of rotation ......................338
Distribution of the vehicle
occupants (definition) ....................347
DOT, Tire Identification Number
(TIN) ............................................... 343
DOT (Department of
Transportation) (definition) ............344Flat tire .......................................... 300
GAWR (Gross Axle Weight Rating)
(definition) ..................................... 345
GTW (Gross Trailer Weight)
(definition) ..................................... 345
Guidelines to be observed .............325
GVW (Gross Vehicle Weight)
(definition) ..................................... 345
GVWR (Gross Vehicle Weight
Rating) (definition) .........................345
Increased vehicle weight due to
optional equipment (definition) ......345
Kilopascal (kPa) (definition) ...........345
Labeling (overview) ........................340
Load bearing index (definition) ......346
Load index ..................................... 343
Load index (definition) ...................345
Maximum loaded vehicle weight
(definition) ..................................... 345
Maximum load on a tire
(definition) ..................................... 346
Maximum permissible tire
pressure (definition) ....................... 346
Maximum tire load .........................338
Maximum tire loading (definition) ..346
Optional equipment weight
(definition) ..................................... 346
PSI (pounds per square inch)
(definition) ..................................... 346
Replacing ....................................... 340
Service life ..................................... 325
Sidewall (definition) .......................346
Speed index (definition) .................345
Storing ........................................... 326
Structure and characteristics
(definition) ..................................... 344
Temperature .................................. 339
TIN (Tire Identification Number)
(definition) ..................................... 346
Tire bead (definition) ......................346
Tire pressure (definition) ................346
Tire pressures (recommended) ......344
Tire quality classes ........................338
Tire size (data) ............................... 347
Tire size designation, load-bearing
capacity, speed index ....................341
Tire tread ....................................... 325
Tire tread (definition) .....................34616IndexBA 164.1 USA, CA Edition B 2011; 1; 2, en-USd2mskotVersion: 3.0.3.52010-04-21T17:25:06+02:00 - Seite 16
Page 31 of 372

Warning and indicator lampsFunctionPage:Brakes (USA only)247;ESP®250=Distance warning lamp 4253?Turn signal109ATurn signal109BDiesel engine: preglow141CSRS251DLow-beam headlamps107EEngine diagnostics (Canada
only)
252
FEngine diagnostics (USA
only)
252
FunctionPageGHigh-beam headlamps109HReserve fuel252ISeat belt248JBrakes (Canada only)247KTire pressure monitor (USA
only)
253
LABS249MThe lamp lights up briefly,
but has no function.4 On vehicles without DISTRONIC, the lamp lights up briefly but has no function.Instrument cluster29At a glanceBA 164.1 USA, CA Edition B 2011; 1; 2, en-USd2mskotVersion: 3.0.3.52010-04-21T17:25:06+02:00 - Seite 29
Page 67 of 372
2. This device must withstand any
interference received, including
interference that may cause undesired
operation of the device.
Any unauthorized modification to this
device could void the user's authority to
operate the equipment.
Driving safety systems
Overview of driving safety systems
In this section, you will find information about
the following driving safety systems:
R ABS ( Anti-lock Braking System)
R BAS ( Brake Assist System)
R ESP ®
(E lectronic Stability Program)
R EBD ( Electronic Brake-power Distribution)
Important safety guidelines
GWarning
The following factors increase the risk of
accidents:
R Excessive speed, especially in turns
R Wet and slippery road surfaces
R Following another vehicle too closely
The driving safety systems described in this
section cannot reduce these risks or prevent
the natural laws of physics from acting on the
vehicle. They cannot increase braking or
steering efficiency beyond that afforded by
the condition of the vehicle brakes and tires
or the traction afforded.
Only a safe, attentive, and skillful driver can
prevent accidents.
The capabilities of a vehicle equipped with the
driving safety systems described in this
section must never be exploited in a reckless
or dangerous manner which could jeopardize
the user's safety or the safety of others.
Always adjust your driving style to the
prevailing road and weather conditions and
keep a safe distance to other road users and
objects on the street.
If a driving system malfunctions, other driving
safety systems may also switch off. Observe
indicator and warning lamps that may come
on as well as messages in the multifunction
display that may appear.GWarning!
HYBRID vehicles: It is imperative that you read
the HYBRID Supplemental Operating
Instructions included in your vehicle literature
portfolio. You may otherwise not receive all
necessary safety information and warning for
the operation of your vehicle.
i In wintry driving conditions, always use
winter tires (M+S tires) and if necessary,
snow chains. Only in this way will the
driving safety systems described in this
section work as effectively as possible.
ABS (Anti-lock Braking System)
Important safety information
GWarning
Observe "Important safety instructions"
( Y page 65).
GWarning!
Do not pump the brake pedal. Use firm, steady
brake pedal pressure instead. Pumping the
brake pedal reduces the braking effect.
ABS regulates brake pressure in such a way
that the wheels do not lock when you brake.
This allows you to continue steering the
vehicle when braking.
ABS works from a speed of about
5 mph (8 km/h) upwards, regardless of road-
surface conditions. ABS works on slippery
surfaces, even when you only brake gently.
The ! warning lamp in the instrument
cluster lights up when the ignition is switched
on. It goes out when the engine is running.
Driving safety systems65SafetyBA 164.1 USA, CA Edition B 2011; 1; 2, en-USd2mskotVersion: 3.0.3.52010-04-21T17:25:06+02:00 - Seite 65Z
Page 155 of 372
Diesel fuel with improved cold flow properties
is available during the winter months. Further
information on fuel properties can be
obtained from oil companies, e.g. at filling
stations.
Refueling
Fuel filler flap
The fuel filler flap is unlocked or locked
automatically when you open or close the
vehicle with the SmartKey or using KEYLESS-
GO.
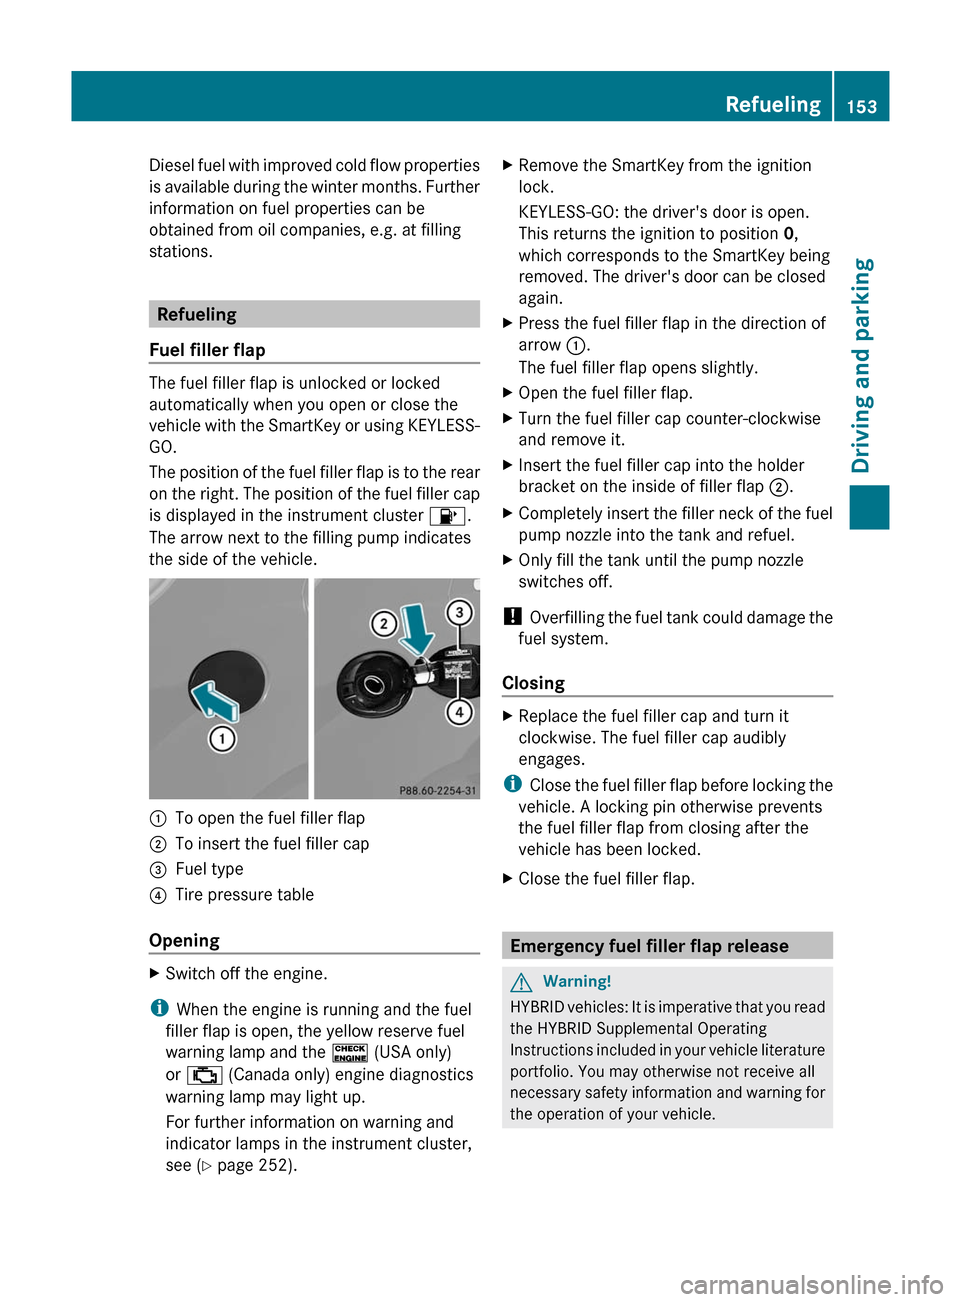
The position of the fuel filler flap is to the rear
on the right. The position of the fuel filler cap
is displayed in the instrument cluster 8.
The arrow next to the filling pump indicates
the side of the vehicle.
:To open the fuel filler flap;To insert the fuel filler cap=Fuel type?Tire pressure table
Opening
XSwitch off the engine.
i When the engine is running and the fuel
filler flap is open, the yellow reserve fuel
warning lamp and the ! (USA only)
or ; (Canada only) engine diagnostics
warning lamp may light up.
For further information on warning and
indicator lamps in the instrument cluster,
see ( Y page 252).
XRemove the SmartKey from the ignition
lock.
KEYLESS-GO: the driver's door is open.
This returns the ignition to position 0,
which corresponds to the SmartKey being
removed. The driver's door can be closed
again.XPress the fuel filler flap in the direction of
arrow :.
The fuel filler flap opens slightly.XOpen the fuel filler flap.XTurn the fuel filler cap counter-clockwise
and remove it.XInsert the fuel filler cap into the holder
bracket on the inside of filler flap ;.XCompletely insert the filler neck of the fuel
pump nozzle into the tank and refuel.XOnly fill the tank until the pump nozzle
switches off.
! Overfilling the fuel tank could damage the
fuel system.
Closing
XReplace the fuel filler cap and turn it
clockwise. The fuel filler cap audibly
engages.
i Close the fuel filler flap before locking the
vehicle. A locking pin otherwise prevents
the fuel filler flap from closing after the
vehicle has been locked.
XClose the fuel filler flap.
Emergency fuel filler flap release
GWarning!
HYBRID vehicles: It is imperative that you read
the HYBRID Supplemental Operating
Instructions included in your vehicle literature
portfolio. You may otherwise not receive all
necessary safety information and warning for
the operation of your vehicle.
Refueling153Driving and parkingBA 164.1 USA, CA Edition B 2011; 1; 2, en-USd2mskotVersion: 3.0.3.52010-04-21T17:25:06+02:00 - Seite 153Z
Page 162 of 372
Driving tips
General driving tips
Important safety instructions
GWarning!
Please do not forget that your primary
responsibility is to drive the vehicle. A driver’s
attention to the road must always be his/her
primary focus when driving. For your safety
and the safety of others, we recommend that
you pull over to a safe location and stop
before placing or taking a telephone call.
If you choose to use the telephone 26
while
driving, please use the hands-free device and
only use the telephone when road, weather
and traffic conditions permit. Some
jurisdictions prohibit the driver from using a
mobile telephone while driving a vehicle.
Only operate the COMAND 26
(Cockpit
Management and Data System) if road,
weather and traffic conditions permit.
Otherwise, you may not be able to observe
traffic conditions and could endanger yourself
and others.
Bear in mind that at a speed of just 30 mph
(approximately 50 km/h), your vehicle is
covering a distance of 44 feet (approximately
14 m) every second.
Drive sensibly – save fuel
To save fuel, observe the following notes:
XKeep tires at the recommended inflation
pressures.XRemove unnecessary cargo.XRemove the roof carrier when not in use.XMaintain a low engine speed until the
engine is warm.XAvoid frequent acceleration and
deceleration.XHave all maintenance work performed at
the service intervals specified in theService Booklet or indicated by the service
interval indicator.
Fuel consumption is also increased by driving
in cold weather, in stop-and-go traffic, on
short trips and in mountainous areas.
Drinking and driving
GWarning
Drinking and driving and/or taking drugs and
driving are very dangerous combinations.
Even a small amount of alcohol or drugs can
affect your reflexes, perceptions and
judgment.
The possibility of a serious or even fatal
accident are greatly increased when you drink
or take drugs and drive.
Do not drink or take drugs and drive or allow
anyone to drive who has been drinking or
taking drugs.
Pedals
GWarning
Make sure absolutely no objects are
obstructing the pedals' range of movement.
Keep the driver's footwell clear of all
obstacles. If there are any floormats or
carpets in the footwell, make sure that the
pedals still have sufficient clearance.
During sudden driving or braking maneuvers,
the objects could get caught between the
pedals. You could then no longer brake or
accelerate. This could lead to accidents and
injury.
Coasting with the engine switched off
GWarning!
There is no power assistance for the steering
and the brake when the engine is not running.
Steering and braking requires significantly
more effort and you could lose control of the
vehicle and cause an accident as a result.
26 Observe all legal requirements.160Driving tipsDriving and parking
BA 164.1 USA, CA Edition B 2011; 1; 2, en-USd2mskotVersion: 3.0.3.52010-04-21T17:25:06+02:00 - Seite 160
Page 165 of 372
! Vehicles with 4MATIC: as the ESP®
system operates automatically, the engine
and the ignition must be switched off
(SmartKey in position 0 or 1 in the ignition
lock or Start/Stop button in position 0 or
1 ) while the parking brake is being tested
on a brake dynamometer (maximum 10
seconds).
Braking maneuvers triggered automatically
by ESP ®
may seriously damage the brake
system.
If your brake system is only subjected to
moderate loads, you should regularly test
your brake system's function by forcefully
depressing the brake pedal when driving at
high speed. This also improves the brake
pads' friction.GWarning
Make sure that you do not endanger other
road users when you apply the brakes.
You can find a description of Brake Assist
(BAS) on ( Y page 66).
High-performance brake system for
AMG vehicles
The high-performance brake system is only
installed on the ML 63 AMG.
GWarning
New vehicle brake pads and discs, and
replacement brake pads and discs may take
several hundred miles of driving until they
provide optimum braking efficiency. Until that
time, you may need to use increased brake
pedal pressure while braking. Please be aware
of this and adjust your driving and braking
accordingly during this break-in period.
Excessive high-demand braking will cause
correspondingly high brake wear. Please be
attentive to the brake warning lamp in the
instrument cluster and brake condition
messages in the multifunction display.
Especially for high performance driving, it is
important to maintain and have the brake
system checked regularly.
The high-performance brake system is
designed for heavy loads. This may lead to
noise when braking. This will depend on:
R speed
R braking force
R environmental conditions, such as
temperature and humidity
The wear of individual components of the
brake system, such as the brake pads/linings
or brake discs, depends on the individual
driving style and operating conditions.
Parking brake
If you drive on wet roads or dirt-covered
surfaces, road salt and/or dirt could get into
the parking brake.
In order to prevent corrosion and a reduction
in the braking power of the parking brake,
observe the following:
R gently depress the parking brake from time
to time before beginning the journey.
R drive approximately 110 yd (100 m)
without exceeding a speed of 12 mph
(20 km/h).
GWarning!
While performing this procedure please
assure that the vehicle is stopped before
applying the parking brake. Otherwise the
rear wheels could lock up. You could lose
control of the vehicle and cause an accident.
In addition, the vehicle’s brake lights do not
light up when the parking brake is engaged.
Make sure not to endanger any other road
users when you engage the parking brake.
Driving on wet roads
Hydroplaning
If water has accumulated to a certain depth
on the road surface, there is a danger of
hydroplaning occurring, even if:
R you drive at low speeds
R the tires have adequate tread depth
Driving tips163Driving and parkingBA 164.1 USA, CA Edition B 2011; 1; 2, en-USd2mskotVersion: 3.0.3.52010-04-21T17:25:06+02:00 - Seite 163Z
Page 167 of 372
iVehicles with a diesel engine: do not
cover the radiator, e.g. with a protective
cover. The measuring function of the
Onboard Diagnosis System may otherwise
provide inaccurate values. Some of these
values are required by law and must
therefore always be accurate.
Winter tires
Use winter tires at temperatures below
45 ‡ (7 †) and on snow or ice-covered roads.
Only winter tires also bearing the i
snowflake symbol next to the M+S marking
provide the best-possible grip in wintry road
conditions. Only these tires will allow the ABS
and ESP ®
driving systems to function
optimally in winter, as these tires have been
designed specifically for driving on snow.
Use M+S tires of the same make and tread on
all wheels to maintain safe handling
characteristics.
GWarning
M+S tires with a tread depth of less than 1
/ 6
inch (4 mm) must be replaced. They are no
longer suitable for winter operation.
Always observe the maximum permissible
speed specified for the M+S tires you have
installed.
Once you have installed the winter tires:
XCheck the tire pressures ( Y page 329).XRestart the tire pressure monitor
( Y page 331).GWarning
If you use your spare wheel when M+S tires
are fitted on the other wheels, be aware that
the difference in tire characteristics may very
well impair turning stability and that overall
driving stability may be reduced. Adapt your
driving style accordingly.
Have the spare wheel replaced by a regular
road wheel with an M+S tire at the nearest
authorized Mercedes-Benz Center.
Snow chains
For safety reasons, Mercedes-Benz
recommends that you only use snow chains
which have been specially approved for your
vehicle by Mercedes-Benz, or are of a
corresponding standard of quality.
! Vehicles with the Adaptive Damping
System (ADS): do not drive in ADS SPORT
mode if snow chains have been mounted.
The vehicle may otherwise be damaged.
! There is not enough space for snow
chains on some wheel sizes. Observe the
information under "Tires and wheels" in the
"Technical Data" section to avoid damage
to the vehicle or the wheels.
R Only use snow chains when driving on an
area completely covered by snow. Do not
exceed the maximum permissible speed of
30 mph (50 km/h). Remove the snow
chains as soon as possible when you are no
longer driving on snow-covered roads.
R Local regulations may restrict the use of
snow chains. Applicable regulations must
be observed if you wish to mount snow
chains.
R Snow chains must not be mounted on
emergency spare wheels.
If you intend to mount snow chains, please
bear the following points in mind:
R you may not attach snow chains to all
wheel-tire combinations; see the "Tires and
wheels" section in the "Technical data"
chapter.
R mount snow chains only in pairs and only
on the rear wheels. Observe the
manufacturer's installation instructions.
! If snow chains are mounted on the front
wheels, the snow chains could grind
against the bodywork or components of the
chassis. This could result in damage to the
vehicle or the tires.
! Vehicles with steel wheels
If you wish to mount snow chains to steel
wheels, make sure that you remove the
Driving tips165Driving and parkingBA 164.1 USA, CA Edition B 2011; 1; 2, en-USd2mskotVersion: 3.0.3.52010-04-21T17:25:06+02:00 - Seite 165Z
Page 169 of 372
GWarning!
Vehicles with air suspension program: Please
be aware that by raising the vehicle level, the
center of gravity also rises. Therefore, always
ensure that the vehicle level is as low as
possible. With higher ride height the ESP ®
may activate earlier in certain situations.
GWarning!
Do not reduce the tire inflation pressure
before driving through sand. However, if you
do so, remember to correct the tire inflation
pressure before continuing your trip. Driving
with reduced tire inflation pressure increases
the risk of losing control of the vehicle and
rolling over.
General information
Read this section before driving your vehicle
off-road. Practice by traveling over more
gentle off-road terrain first.
Familiarize yourself with the characteristics
of your vehicle and the gear change process
before driving through difficult terrain.
The following driving systems are specially
adapted to off-road driving:
R off-road drive program ( Y page 193)
R off-road ABS ( Y page 66)
R off-road 4ETS ( Y page 67)
R off-road ESP ®
(Y page 68)
R hill start assist
R AIRMATIC package ( Y page 183)
R DSR (Downhill Speed Regulation)
( Y page 192)
Observe the following notes:
R stop your vehicle and, if necessary, select
the off-road drive program ( Y page 193)
before driving off-road.
R vehicles with the AIRMATIC package:
select a vehicle level that is suitable for the
terrain. Make sure there is always sufficient
ground clearance to prevent damage to the
vehicle.
R make sure that items of luggage and cargo
are stowed safely and are well secured
( Y page 260).
R always keep the engine running and in gear
when driving on a downhill gradient.
Activate DSR ( Y page 192).
R always keep the doors, tailgate, windows
and the tilt/sliding sunroof closed while the
vehicle is in motion.
R adapt the speed to suit the terrain
conditions. The more uneven, worn or
steeper the terrain is, the slower you should
drive.
R drive slowly and at an even speed through
the water. Ensure that a bow wave does not
form as you drive.
R drive with extreme care on unfamiliar off-
road routes where visibility is poor. For
safety reasons, get out of the vehicle first
and survey the off-road route.
R look out for obstacles, such as rocks, holes,
tree stumps and furrows.
R check the depth of water before fording
rivers and streams.
R do not stop in water and do not switch the
engine off.
R drive quickly on sand to overcome the
rolling resistance. Otherwise, the vehicle
could dig itself into the sand.
R do not jump with the vehicle. This
interrupts the vehicle's traction.
R always keep the engine running and in gear
when driving on slopes.
R do not shift the automatic transmission to
transmission position N.
Check list before driving off-roadXEngine oil level: check the engine oil and
top it up if necessary.
The oil supply can only be guaranteed on
steep slopes if the engine oil level is
sufficient.
! If the engine oil warning lamp lights up
while the vehicle is in motion, stop the
Driving tips167Driving and parkingBA 164.1 USA, CA Edition B 2011; 1; 2, en-USd2mskotVersion: 3.0.3.52010-04-21T17:25:06+02:00 - Seite 167Z