MERCEDES-BENZ METRIS 2016 MY16 Operator’s Manual
Manufacturer: MERCEDES-BENZ, Model Year: 2016, Model line: METRIS, Model: MERCEDES-BENZ METRIS 2016Pages: 310, PDF Size: 7.28 MB
Page 101 of 310
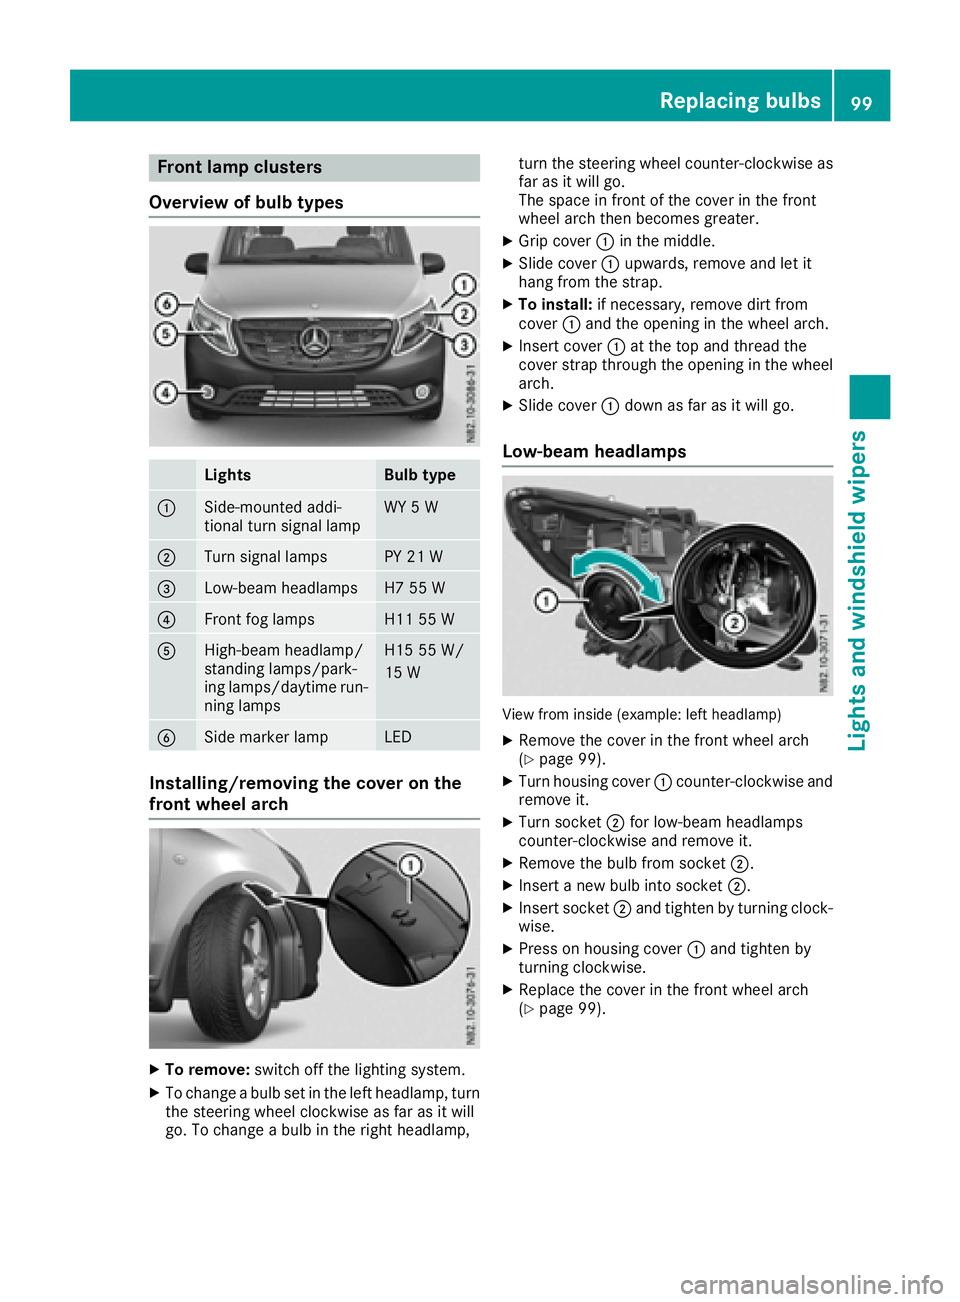
Frontlam pclusters
Overview of bul btypes
LightsBulb type
:Side-mounte daddi-
tional tur nsignal lampWY 5W
;Turn signal lamp sPY 21W
=Low-beam headlampsH7 55 W
?Frontfog lamp sH1155W
AHigh-beam headlamp/
standing lamps/park -
ing lamps/daytime run -
nin glamp sH1555W /
15 W
BSidem arke rlampLE D
Installing/removing th ecover on the
front wheel arch
XTo remove: switch off thelighting system.
XTo chang eabulb set in th elefth eadlamp, tur n
th es teering whee lclockwise as far as it will
go. To chang eabulb in th eright headlamp, tur
nthe steering whee lcou nter-clockwise as
far as it will go.
The spac einfrontof thecover in th efront
whee larcht henb ecome sgreater.
XGrip cover :in th emiddle.
XSlide cover :upwards, remove and let it
han gfromt hestrap.
XTo install: if necessary, remove dirt from
cover :and th eopening in th ewhee larch.
XInser tcover : at th etop and thread th e
cover strap throug hthe opening in th ewhee l
arch.
XSlide cover :down as far as it will go.
Low-beam headlamps
View from inside (example: lef theadlamp )
XRemove th ecover in th efront whee larch
(Ypage 99).
XTurn housing cover :counter-clockwise and
remove it .
XTurn socke t; for low-beam headlamps
counter-clockwise and remove it .
XRemove thebulb from socke t;.
XInser tanewbulb int osocke t;.
XInser tsocke t; and tighten by turnin gclock -
wise.
XPress on housing cover :and tighten by
turnin gclockwise.
XReplac ethe cover in th efront whee larch
(Ypage 99).
Replacingb ulbs99
Lightsand windshield wipers
Z
Page 102 of 310
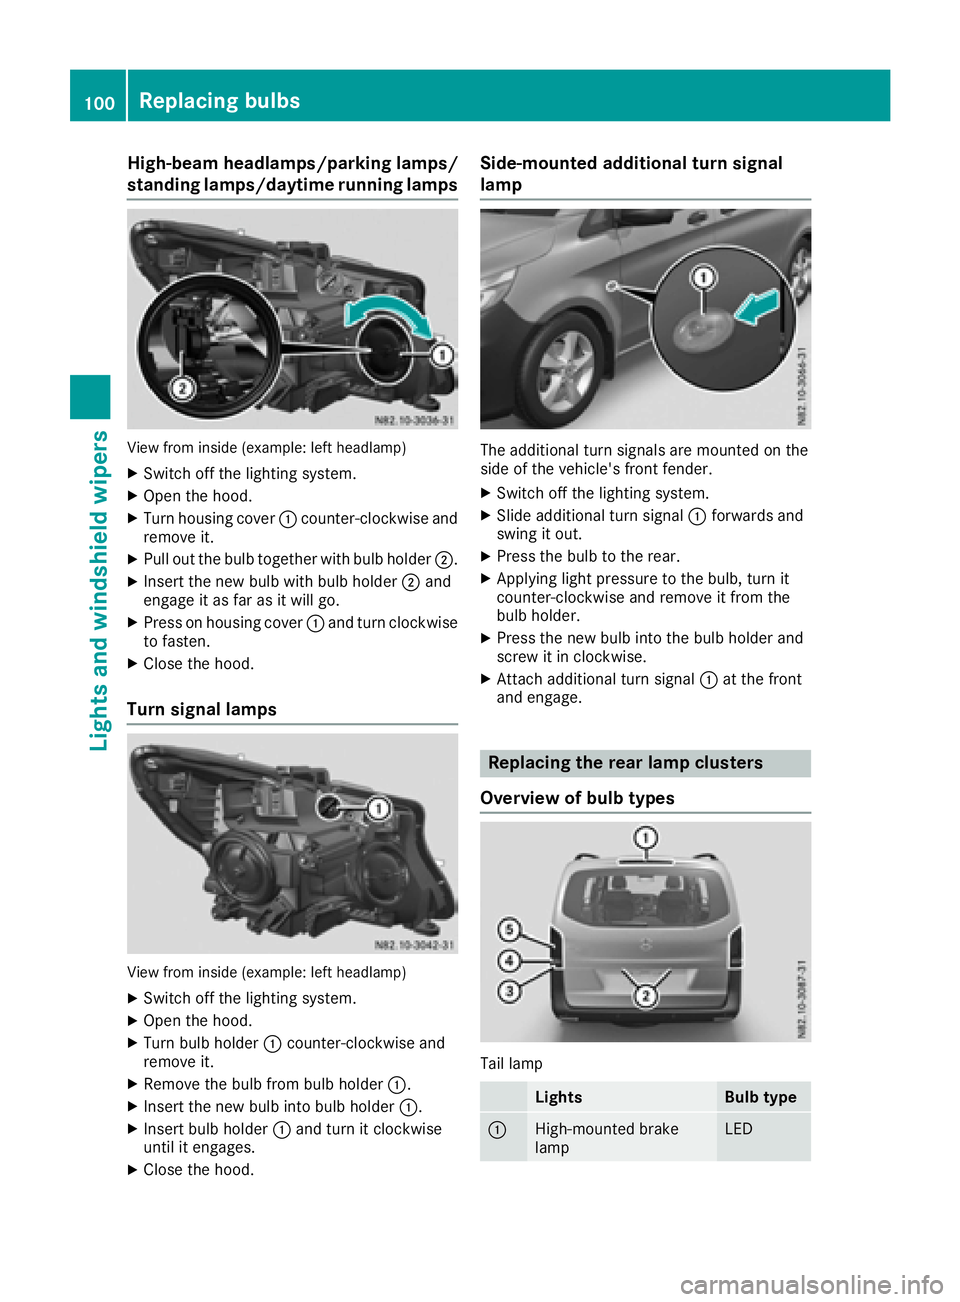
High-beam headlamps/parkinglamps/
standing lamps/daytime running lamps
View from insid e(example: left headlamp)
XSwitch off the lighting system.
XOpen the hood.
XTurn housing cover :counter-clockwise and
remove it.
XPul lout the bul btogether with bul bholder ;.
XInsert the new bul bwith bul bholder ;and
engag eitasf ar as it wil lgo.
XPress on housing cover :and turn clockwise
to fasten.
XClose the hood.
Turn signal lamps
View from insid e(example: left headlamp)
XSwitch off the lighting system.
XOpen the hood.
XTurn bul bholder :counter-clockwise and
remove it.
XRemove the bul bfrom bul bholder :.
XInsert the new bul binto bul bholder :.
XInsert bul bholder :and turn it clockwise
until it engages.
XClose the hood.
Side-mounted additional turn signal
lamp
The additiona lturn signals are mounted on the
side of the vehicle's front fender.
XSwitch off the lighting system.
XSlide additiona lturn signal :forwards and
swing it out.
XPress the bul btothe rear.
XApplying light pressure to the bulb, turn it
counter-clockwise and remove it from the
bulbh older.
XPress the new bul binto the bul bholder and
screw it in clockwise.
XAttach additiona lturn signal :at the front
and engage.
Replacing the rear lamp clusters
Overview of bulb types
Tai llamp
LightsBulb type
:High-mounted brake
lampLED
100Replacing bulbs
Lights and windshield wipers
Page 103 of 310
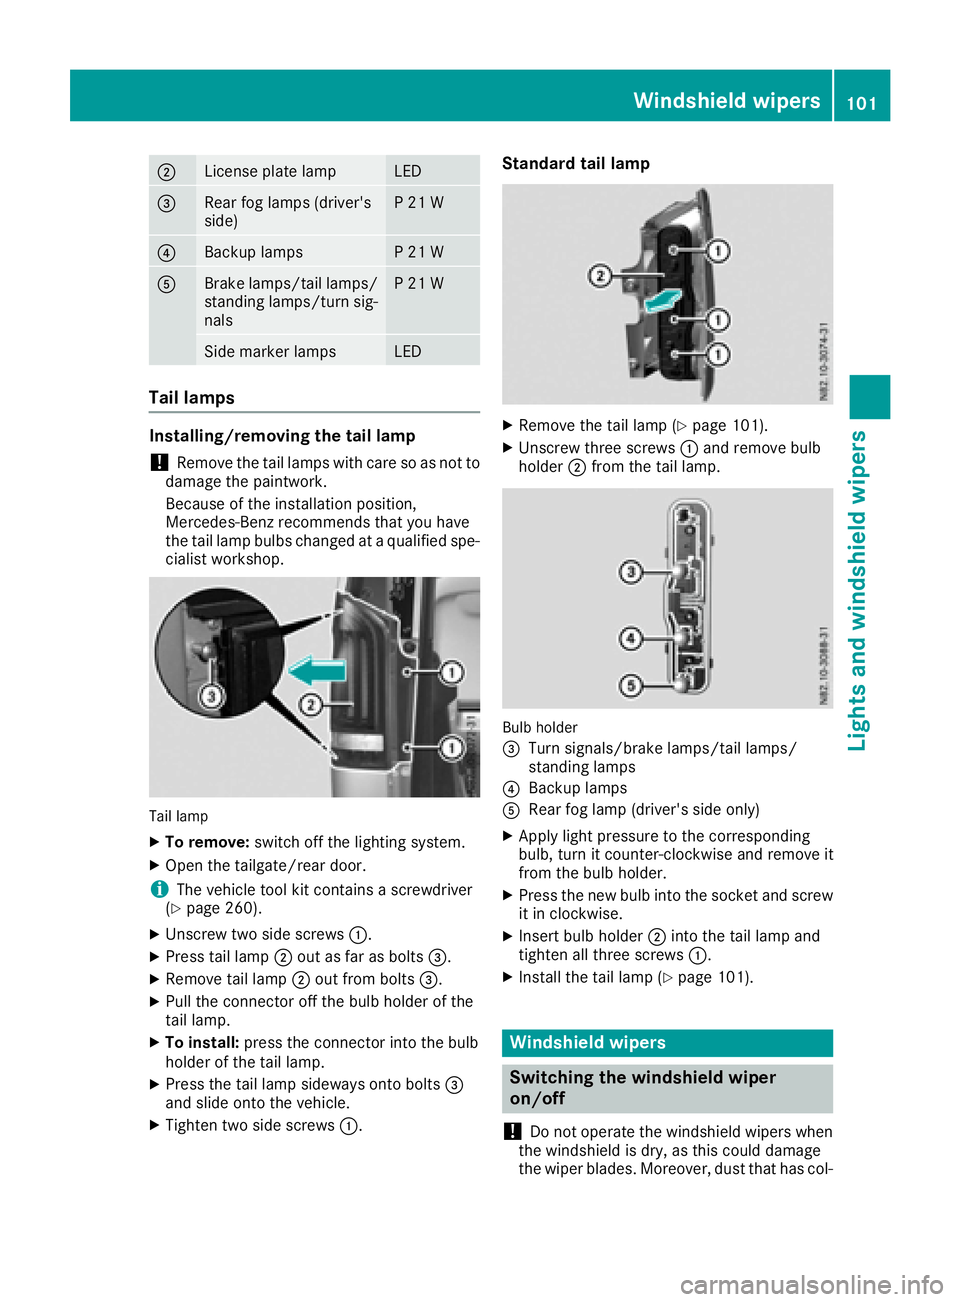
;License plate lampLED
=Rearfog lamp s(driver's
side)P21W
?Backup lampsP21W
ABrake lamps/tail lamps/
standing lamps/turn sig-
nalsP21W
Side marker lampsLED
Tail lamps
Installing/removing the tail lamp
!Remove the tail lamp swith care so as not to
damage the paintwork.
Because of the installation position,
Mercedes-Benz recommends that you have
the tail lamp bulbs changed at aqualifieds pe-
cialist workshop.
Tail lamp
XTo remove: switch off the lighting system.
XOpen the tailgate/rear door.
iThe vehicle tool kit contains ascrewdriver
(Ypage 260).
XUnscrew two side screws :.
XPress tail lamp;out as far as bolts =.
XRemove tail lamp;out from bolts =.
XPullthe connector off the bul bholderoft he
tail lamp.
XTo install: press the connector into the bulb
holderoft he tail lamp.
XPress the tail lamp sideways onto bolts =
and slideo nto the vehicle.
XTighten two side screws :.
Standard tail lamp
XRemove the tail lamp (Ypage 101).
XUnscrew three screws:and remove bulb
holder ;from the tail lamp.
Bulb holder
=
Turn signals/brake lamps/tail lamps/
standing lamps
?Backup lamps
ARea rfog lamp (driver's side only)
XApply lightp ressure to the corresponding
bulb, turn it counter-clockwise and remove it
from the bul bholder.
XPress the new bul binto the socket and screw
it in clockwise.
XInsert bul bholder ;into the tail lamp and
tighten all three screws :.
XInstall the tail lamp (Ypage 101).
Windshield wipers
Switching the windshieldw iper
on/off
!
Do not operate the windshield wipers when
the windshield is dry, as this could damage
the wiper blades. Moreover, dust that has col-
Windshield wipers101
Lights and windshield wipers
Z
Page 104 of 310
lected on the windshield can scratchthe glass
if wiping takes place when the windshield is
dry.
If it is necessary to switc honthe windshield
wipers in dry weathe rconditions, always use
washer fluid when operating the windshield
wipers.
!If the windshield wipers leave smearsont he
windshield after the vehicle has been washed
in an automatic car wash, wax or other resi-
dues may be the reason for this .Clean the
windshield using washer fluid after washing
the vehicle in an automatic car wash.
!Intermitten twiping with rain sensor: due to
optical influences and the windshield becom-
ing dirtyind ry weatherconditions, the wind-
shield wipers may be activate dinadvertently.
This could the ndamage the windshield wiper
blades or scratc hthe windshield.
For this reason,y ou should always switc hoff
the windshield wipers in dry weather.
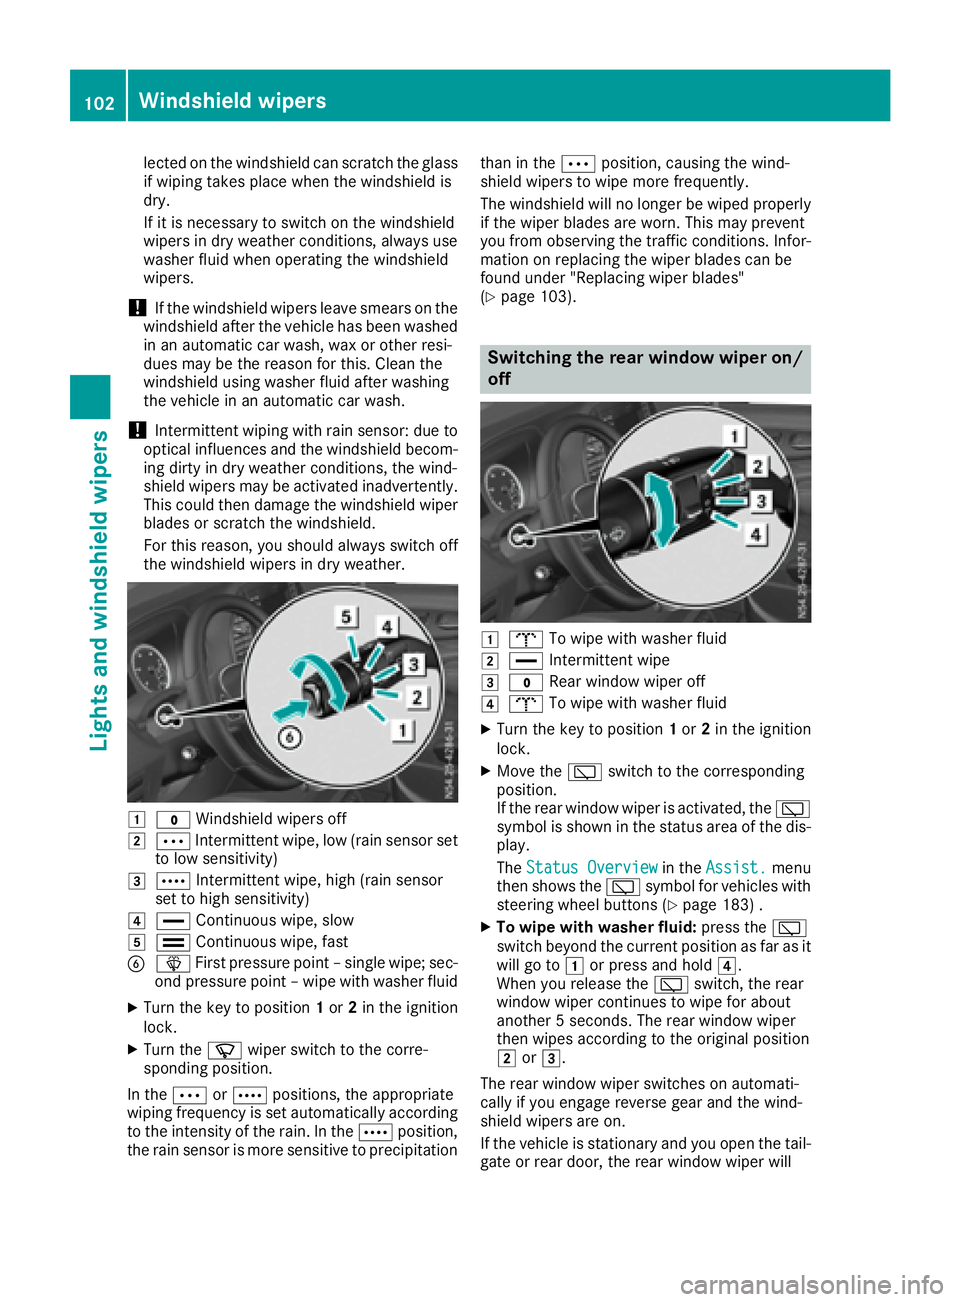
1$ Windshield wipers off
2ÄIntermitten twipe, low (rain sensor set
to low sensitivity)
3Å Intermitten twipe, high (rain sensor
set to high sensitivity)
4° Continuous wipe, slow
5¯Continuous wipe, fast
BîFirstpressure point –single wipe; sec-
ond pressure point –wipe with washer fluid
XTurn the key to position 1or 2in the ignition
lock.
XTurn the íwiper switc htothe corre-
sponding position.
In the ÄorÅ positions ,the appropriate
wiping frequenc yisset automatically according
to the intensity of the rain. In the Åposition,
the rain sensor is more sensitiv etoprecipitation than in the
Äposition, causin gthe wind-
shield wipers to wipe more frequently.
The windshield will no longer be wiped properly
if the wiper blades are worn.T his may prevent
you fromo bservingthe traffic conditions. Infor-
matio nonr eplacing the wiper blades can be
foundu nder "Replacingw iper blades"
(
Ypage 103).
Switchin gthe rea rwindow wiper on/
off
1b To wipe with washer fluid
2°Intermitten twipe
3$ Rear window wiper off
4bTo wipe with washer fluid
XTurn the key to position 1or 2in the ignition
lock.
XMove the èswitchtot he corresponding
position.
If the rear window wiper is activated, the è
symbol is shown in the status area of the dis-
play.
The Status Overview
in the Assist.menu
the nshows the èsymbol for vehicles with
steeringw heel buttons (
Ypage 183) .
XTo wipe with washer fluid: press theè
switc hbeyond the current position as far as it
will go to 1or press and hold 4.
When you release the èswitch, the rear
window wiper continues to wipe for about
another 5seconds. The rear window wiper
the nw ipes accordingtot he original position
2 or3.
The rear window wiper switches on automati-
cally if you engag ereverse gear and the wind-
shield wipers are on.
If the vehicle is stationar yand you open the tail-
gate or rear door, the rear window wiper will
102Windshield wipers
Lightsa nd windshield wipers
Page 105 of 310
stop automatically.The rear window wiper will
only resume wiping againw hen the tailgate and
rear door are closed and you pull awaya gain.
The rear window will no longer be wiped properly
if the wiper blade is worn. This may prevent you
from observing the traffic conditions. Informa-
tion on replacing the wiper blade can be found
under "Replacing wiper blades" (
Ypage 103).
Replacing the wiper blades
Important safety notes
GWARNING
If the windshieldw ipers begin to move while
you are changing the wiper blades, you could be trapped by the wiper arm. There is arisk of
injury.
Always switch off the windshieldw ipers and
ignition before changing the wiper blades.
!Never open the hood/tailgate or rear doors
if aw indshieldw iper arm has been folded
awayf rom the windshield/rear window.
Never fold awindshieldw iper arm without a
wiper blade back onto the windshield/rear
window.
Hold the windshieldw iper arm firmly when
you change the wiper blade.Ify ou release the
windshieldw iper arm without awiper blade
and it falls onto the windshield/rear window,
the windshield/rear window may be damaged
by the force of the impact.
Mercedes-Benz recommends that you have
the wiper bladesc hanged ataqualified spe-
cialist workshop.
!Only hold the wiper blade by the wiper arm.
You could otherwise damage the wiper rub-
ber.
Wiper bladesa re wear parts. The windshieldw ill
no longer be wiped properly if the wiper blades
are worn. This may prevent you from observing
the traffic conditions.
Please observe the service indicator after
changing the wiper bladesoft he windshield
wiper.
Service indicator
Replacement wiper bladesf or the windshield
wiper have aservice indicator on the tip of the
wiper blade.
Depending on the amount of use, the service
indicator will change color from black to yellow.
Change the wiper blade if:
Rthe wiper blade is damaged
Rthe service indicator has turned yellow
In order to activate the service indicator, you
have to remove the protective film
(
Ypage 103).
Windshield wiper
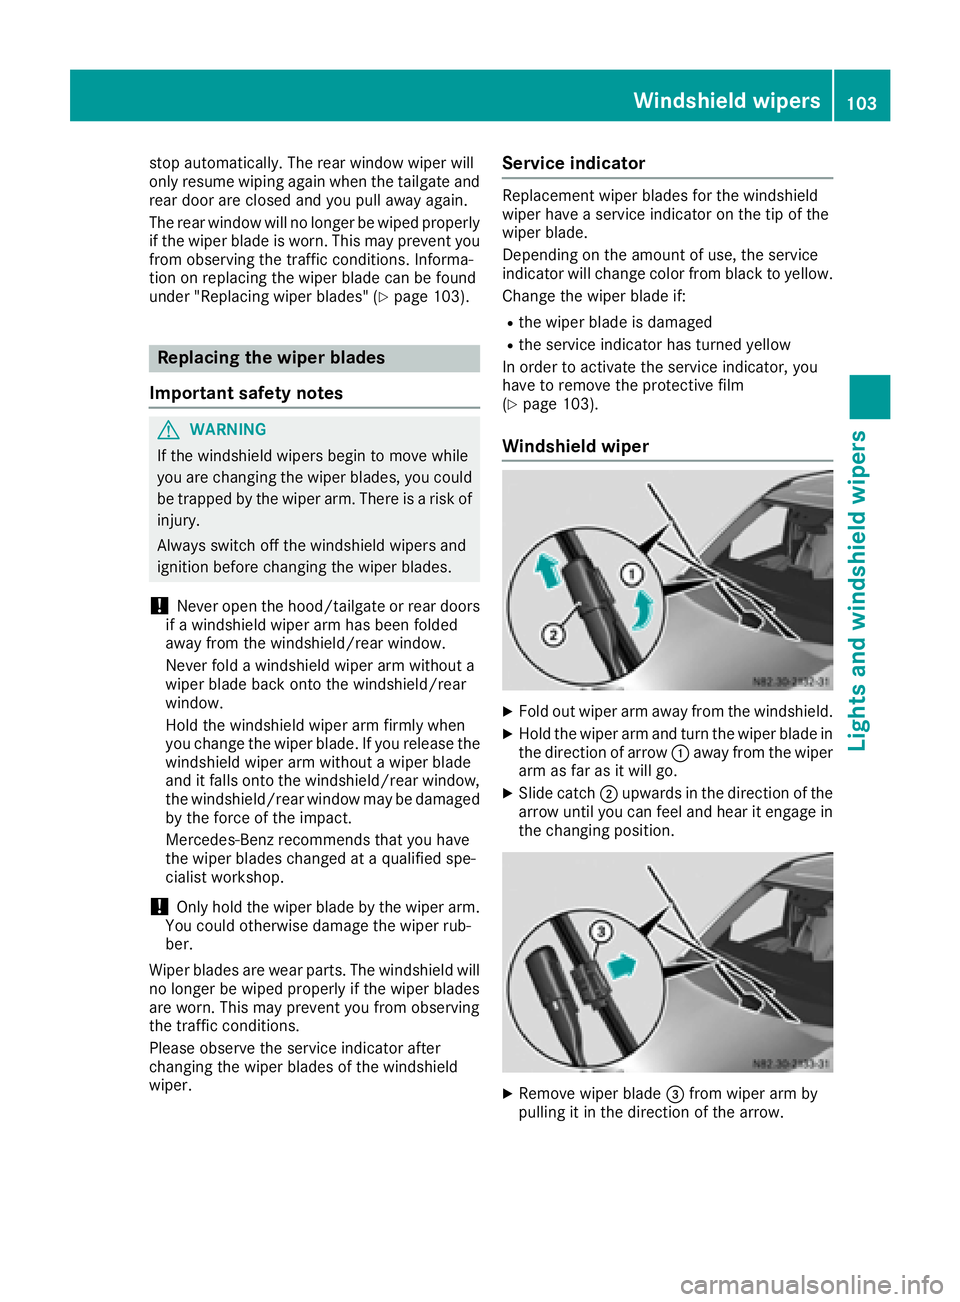
XFold out wiper arm awayf rom the windshield.
XHold the wiper arm and turn the wiper blade in
the direction of arrow:awayf rom the wiper
arm as far as it will go.
XSlide catch ;upwards in the direction of the
arrow until you can feel and hear it engage in
the changing position.
XRemove wiper blade =from wiper arm by
pulling it in the direction of the arrow.
Windshield wipers103
Lights and windshield wipers
Z
Page 106 of 310
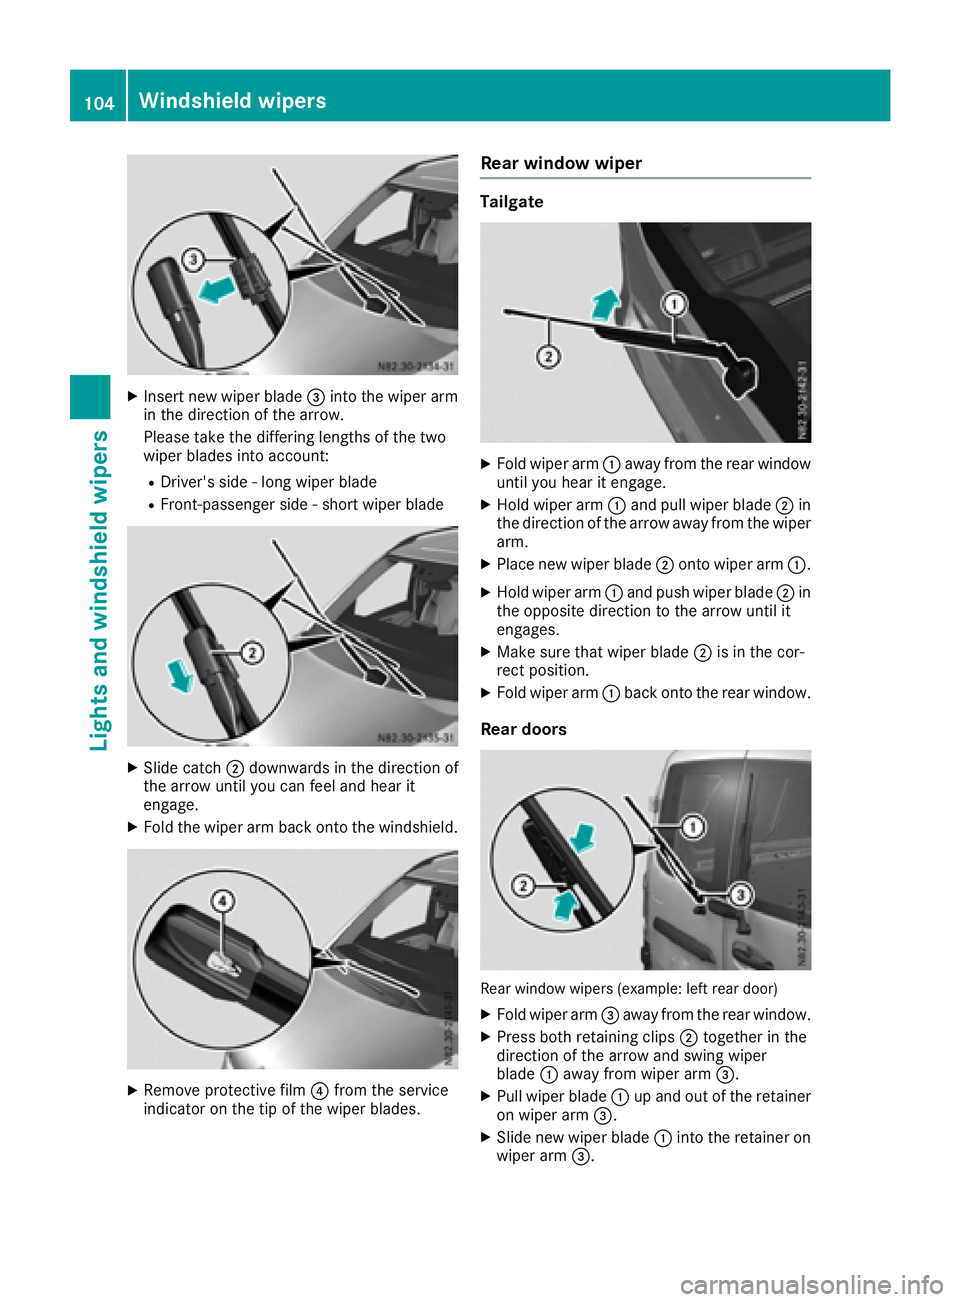
XInsert new wiper blade=into the wiper arm
in the direction of the arrow.
Please take the differing lengths of the two
wiper blades into account:
RDriver's side -long wiper blade
RFront-passenger side -short wiper blade
XSlide catch ;downwards in the direction of
the arrow until you can feel and hear it
engage.
XFold the wiper arm back onto the windshield.
XRemove protective film ?from the service
indicator on the tip of the wiper blades.
Rear window wiper
Tailgate
XFold wiper arm :awa yfrom the rear window
until you hear it engage.
XHold wiper arm :and pul lwiper blade ;in
the direction of the arrow awa yfrom the wiper
arm.
XPlace new wiper blade ;onto wiper arm :.
XHold wiper arm:and push wiper blade ;in
the opposite direction to the arrow until it
engages.
XMake sure that wiper blade ;is in the cor-
rect position.
XFold wiper arm :back onto the rear window.
Rear doors
Rea rwindow wipers (example: left rear door)
XFold wiper arm =awa yfrom the rear window.
XPress both retaining clips ;together in the
direction of the arrow and swing wiper
blade :awa yfrom wiper arm =.
XPullwiper blade :up and out of the retainer
on wiper arm =.
XSlide new wiper blade :into the retainer on
wiper arm =.
104Windshield wipers
Lights and windshield wipers
Page 107 of 310
XPress new wiper blade:ontow iper arm =
until you hear retainin gclips ;engage.
XFold wiper arm =back ont othe rear window.
Windshield wipers105
Lights and windshield wipers
Z
Page 108 of 310
Problems with the windshield wipers
ProblemPossible causes/consequences andMSolutions
The windshield wiper
jams.Leaves or snow, for example, may be obstructing the windshield wiper
movement.The wiper motor has switched off.
XStop the vehicle as soon as possible, paying attention to road and
traffic conditions.
XFor safety reasons, you should remove the key from the ignition
lock.
XRemove the cause of the obstruction.
XSwitch on the windshield wipers again.
The windshield wiper
does not move at all.There isamalfunction in the windshield wiper drive.
XSelect another wiper speed on the combination switch.
XHave the windshield wipers checked at aqualified specialist work-
shop.
The windshield washer
fluid from the spray noz-
zles no longer hits the
center of the wind-
shield/rear window.The spray nozzles are misaligned.
XHave the spray nozzles checked at aqualified specialist workshop.
106Windshield wipers
Lights and windshieldw ipers
Page 109 of 310
Useful information
This Operator's Manual describes all models as
well as standard and optional equipment of your
vehicle that were available at the time of going
to print.Country-specific variation sare possi-
ble. Note that your vehicle may not be equipped
with all of the described functions. This also
applies to system sand function srelevantt o
safety.
Read the information on qualified specialist
workshops (
Ypage 29).
Overview of climat econtrol systems
Important safetyn otes
Observethe recommende dsettings on the fol-
lowing pages. Otherwise, the windows could fog
up.
To preventt he windows from foggingu p:
Ronly switchoff climatec ontrolbriefly
Ronly switc honair-recirculation mode briefly
Rfor vehicles with TEMPMATIC air-conditioning
or automatic climatec ontrol, switchonthe
"Cooling with air dehumidification "function.
Rfor vehicles with automatic climatec ontrol,
switc hont he windshield defrostin gfunction
briefly, if required
Climate contro lregulates the temperature and
the humidity in the vehicle interior and filters
undesirable substances from the air.
Climate contro lisonly operational when the
engin eisrunning. The system only functions
optimally when the side windows are closed.
Ventilate the vehicle for abrief period during
warm weather. In order to cool the vehicle more
rapidly, switc hclimat econtro ltoair-recircula-
tion mode briefly. This will speed up the cooling
process and the desired interior temperature
will be reached more quickly.
The integrated filter can filter out most particles
of dust and completely filter sout pollen. In vehi-
cles with automatic climatec ontrol, gaseous
pollutant sand odors will also be reduced. A
clogged filter reduces the airflow int othe vehi-
cle interior. For this reason,y ou should always
observet he interval for replacin gthe filter,
which is specified in the Maintenance Booklet.
As the interval between changes depends on
environmental conditions, e.g. heavy air pollu- tion
,the interval may be shorter than stated in
the Maintenance Booklet.
Overview of climat econtrol systems107
Climat econtrol
Page 110 of 310
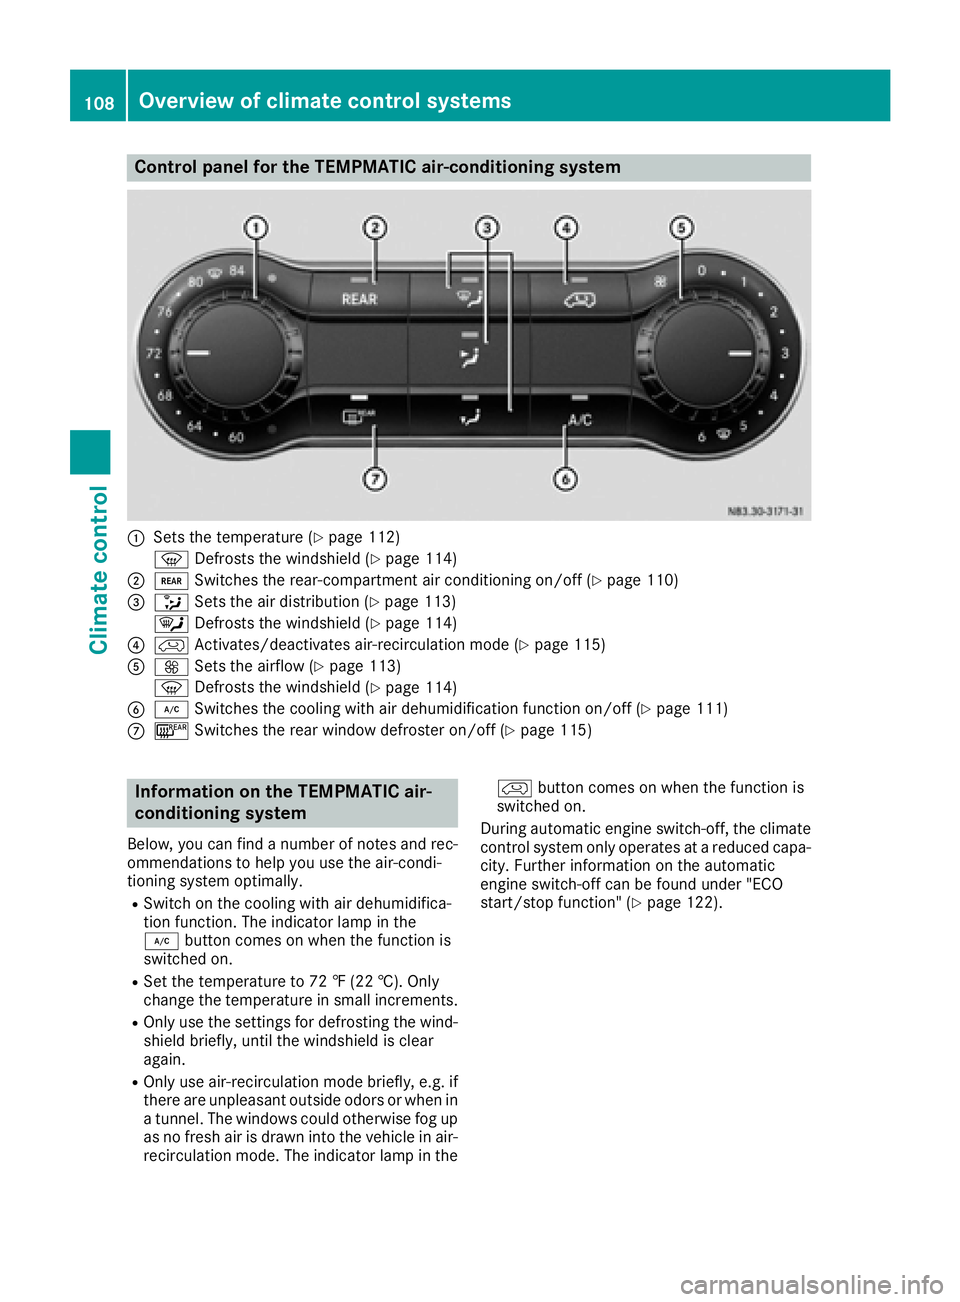
Control panel for theTEMPMATIC air-conditioning system
:Set sthe temperatur e(Ypage 112)
z Defrostst hewindshield (
Ypage 114)
;/ Switches th erear-compartmen tair conditioning on/of f(Ypage 110)
=_Setsthe air distribution (Ypage 113)
¯ Defrostst hewindshield (
Ypage 114)
?h Activates/deactivate sair-recirculation mod e(Ypage 115)
AKSetsthe airflow (Ypage 113)
z Defrostst hewindshield (
Ypage 114)
B¿ Switches th ecoolingw ithair dehumidification function on/of f(Ypage 111)
C¤Switches th erear window defroste ron/off(Ypage 115)
Information on th eTEMPMATIC air-
conditioning system
Below, you can fin danumber of note sand rec-
ommendationstoh elp you use theair-condi-
tionin gsystem optimally.
RSwitch on th ecoolingw ithair dehumidifica-
tio nfunction.T he indicator lamp in the
¿ buttoncomes on when th efunction is
switched on.
RSet th etem peratur eto72‡( 22 †). Only
chang ethe temperatur einsmallincrements.
ROnly use th esettings for defrostin gthe wind-
shield briefly, until th ewindshield is clear
again.
ROnly use air-recirculation mod ebriefly, e.g .if
there are unpleasanto utside odorsorwhen in
at unnel. The windows coul dotherwise fog up
as no fresh air is drawn int othe vehicle in air-
recirculation mode. The indicator lamp in the h
buttoncomes on when th efunction is
switched on.
During automatic engines witch-off,the climate
control system only operate satareduced capa-
city. Further informatio nontheautomatic
engines witch-off can be foun dunde r"ECO
start/sto pfunction"(
Ypage 122).
108Overview of climatec ontrol systems
Climate control