MERCEDES-BENZ METRIS 2016 MY16 Operator’s Manual
Manufacturer: MERCEDES-BENZ, Model Year: 2016, Model line: METRIS, Model: MERCEDES-BENZ METRIS 2016Pages: 310, PDF Size: 7.28 MB
Page 61 of 310
restraint system. You willalsof ind the state-
ment in the instruction manua lprovided with the
child restraint system.
Observe the warning labels in the vehicl einte-
rior and on the child restraint system.
LATCH-type (ISOFIX) chil dseat secur-
ing system
GWARNING
LATCH-type (ISOFIX) child restraint systems
do not offer sufficient protective effect for
children whose weight is greater than 48 lbs
(22 kg )who are secure dusing the safety belt
integrated in the child restraint system. In the
event of an accident, achild might not be
restrained correctly. This poses an increased
risk of injury or even fatal injury.
If the child weighs more than 48 lbs (22 kg),
only use LATCH-type (ISOFIX) child restraint
systems with which the child is als osecured
with the vehicl eseat belt. Also secure the
child restraint system with the Top Tether
belt, if available.
Make sure you observe the manufacturer's
installation and operating instructions of the
child restraint system used.
Before each journey ,make sure that the LATCH-
type (ISOFIX) child restraint system is properly
engage dinboth LATCH-type (ISOFIX) securing
rings.
!When fitting the child restraint system in
vehicles with arear bench seat, make sure
that the seat belt for the center seat does not
get trapped. Otherwise, the seat belt could be
damaged.
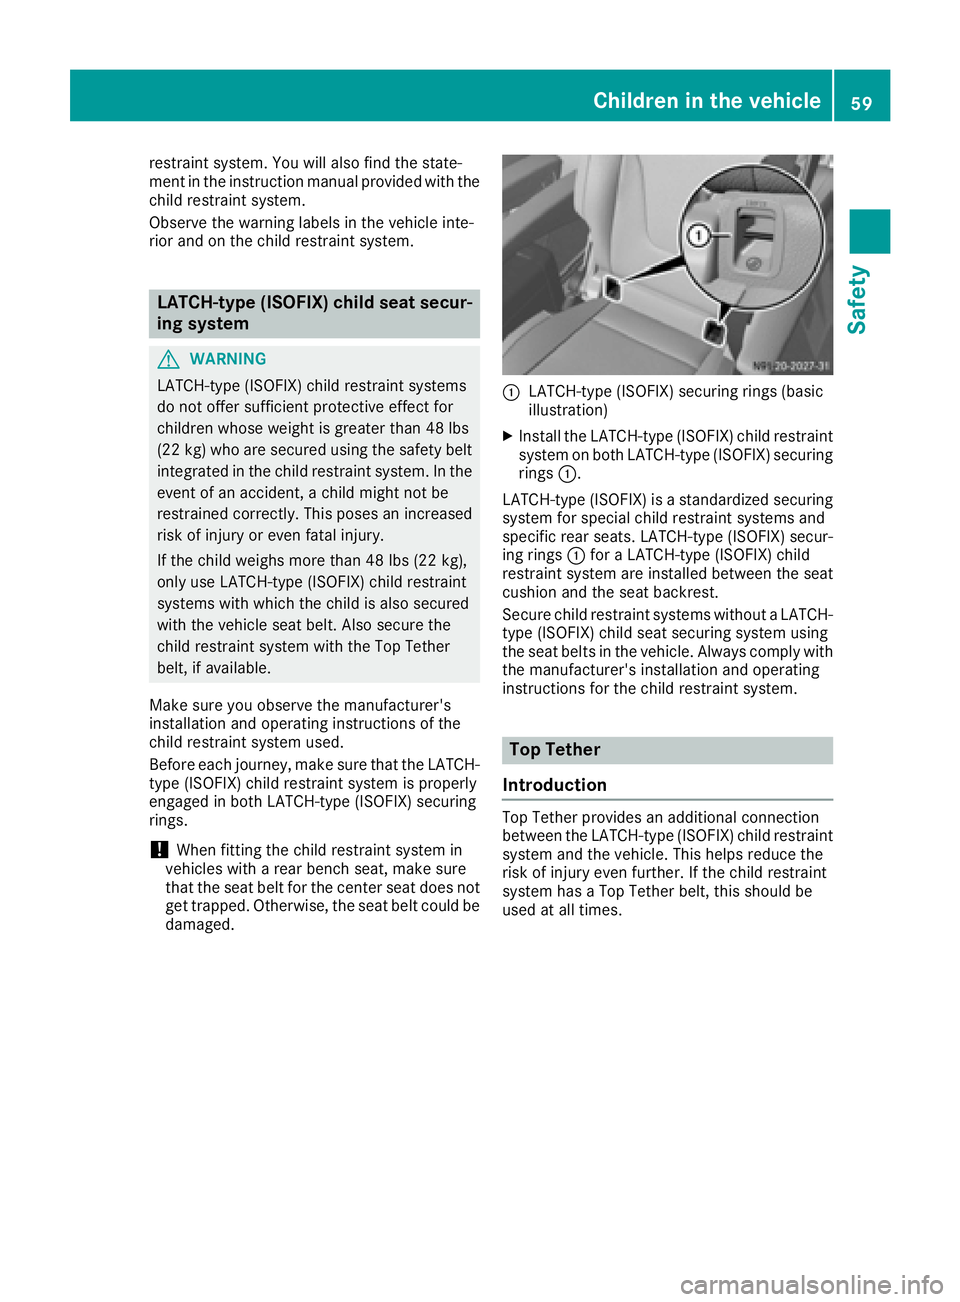
:LATCH-type (ISOFIX) securing rings (basic
illustration)
XInstall the LATCH-type (ISOFIX) child restraint system on both LATCH-type (ISOFIX) securing
rings :.
LATCH-type (ISOFIX) is astandardized securing
system for specia lchild restraint systems and
specifi crear seats. LATCH-type (ISOFIX) secur-
ing rings :for aLATCH-type (ISOFIX) child
restraint system are installed between the seat
cushion and the seat backrest.
Secure child restraint systems withou taLATCH-
type (ISOFIX) child seat securing system using
the seat belts in the vehicle. Always comply with
the manufacturer's installation and operating
instructions for the child restraint system.
Top Tether
Introduction
Top Tether provides an additional connection
between the LATCH-type (ISOFIX) child restraint system and the vehicle. This help sreduce the
risk of injury even further. If the child restraint
system has aTop Tether belt, this should be
used at all times.
Children in the vehicle59
Safety
Z
Page 62 of 310
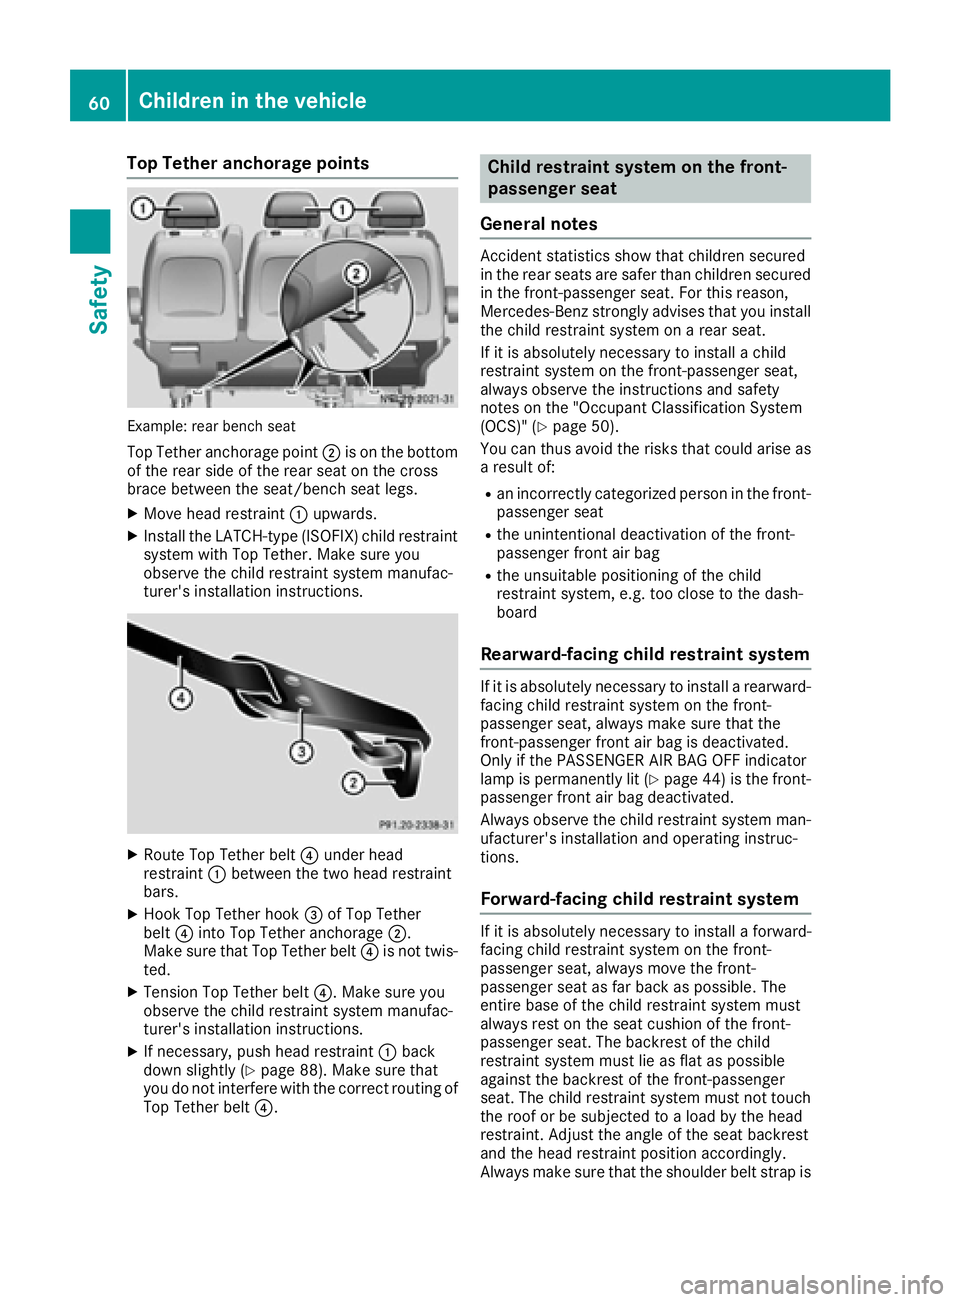
Top Tether anchorage points
Example: rearbench seat
TopT ethera nchorage point ;is on the bottom
of the rea rsideoft he rea rseatont he cross
brace between the seat/bench sea tleg s.
XMov eheadr estraint :upwards.
XInstall the LATCH-type (ISOFIX )child restraint
system with To pTether. Make sure you
observe the child restraint system manufac-
turer' sinstallatio ninstructions.
XRoute To pTetherb elt? under head
restraint :between the two head restraint
bars.
XHoo kTop Tetherh ook=of To pTether
belt ?into To pTethera nchorage ;.
Make sure thatT opTetherb elt? is not twis-
ted.
XTension To pTetherb elt?.M akesurey ou
observe the child restraint system manufac-
turer' sinstallatio ninstructions.
XIf necessary,p ushh eadr estraint :back
down slightly(Ypage 88). Make sure that
yo udon ot interfere with the correct routing of
To pT etherb elt?.
Chil drestrain tsystem on the front-
passenge rseat
General notes
Accident statistics sho wthatc hildren secured
in the rea rseats ar esafer thanc hildren secured
in the front-passenge rseat. For thisr eason,
Mercedes-Benz strongl yadvises thaty ouinstall
the child restraint system on arears eat.
If it is absolutely necessary to instal lachild
restraint system on the front-passenge rseat,
always observe the instructions and safety
note sont he "Occupant Classification System
(OCS) "(
Ypage 50).
Yo uc an thusa voidthe risks thatc ould ariseas
ar esul tof:
Ran incorrectly categorize dperso nint he front-
passenge rseat
Rthe unintentiona ldeactivatio nofthe front-
passenge rfront ai rbag
Rthe unsuitable positioning of the child
restraint system ,e.g.t oo close to the dash-
board
Rearward-facin gchild restrain tsystem
If it is absolutely necessary to instal larearward-
facing child restraint system on the front-
passenge rseat, always make sure thatt he
front-passenge rfront ai rbag is deactivated.
Onlyift he PASSENGER AIR BAG OFF indicator
lamp is permanentl ylit(
Ypage 44 )isthe front-
passenger front air bag deactivated.
Always observe the child restraint system man-
ufacturer's installation and operating instruc-
tions.
Forward-facing child restraint system
If it is absolutely necessary to install aforward-
facing child restraint system on the front-
passenger seat, always move the front-
passenger seat as far back as possible.T he
entire base of the child restraint system must
always rest on the seat cushion of the front-
passenger seat. The backrest of the child
restraint system must lie as flat as possible
against the backrest of the front-passenger
seat. The child restraint system must not touch
the roof or be subjected to aload by the head
restraint. Adjust the angle of the seat backrest
and the head restraint position accordingly.
Always make sure that the shoulderb elt strap is
60Children in the vehicle
Safety
Page 63 of 310
correctly routed from the vehicle beltoutlet to
the shoulder bel tguide on the chil drestraint
system. The shoulder bel tstrapm ustb erouted
forward sand downwards from the vehicle belt
outlet. If necessary, adjust the vehicle bel tout-
le ta nd the front-passenger seata ccordingly.
Alway sobserve the chil drestraint system man-
ufacturer's installation and operating instruc-
tions.
Override features/Child-proof locks
Important safety notes
GWARNING
If childre nare traveling in the vehicle ,they
could:
Rope ndoors, thus endangering otherp eople
or roadu sers
Rexit the vehicle and be caught by oncoming
traffic
Roperate vehicle equipment and become
trapped
There is ariskofana ccident and injury.
Alway sactivate the child-proof locks and
overrid efeature if childre nare traveling in the
vehicle .Whenl eaving the vehicle ,alway stake
the key with yo uand lock the vehicle .Never
leave childre nunattende dinthe vehicle.
Child-proof lock/override feature for:
RSliding doors (Ypage 61)
GWARNING
If yo ulea ve childre nunsupervised in the vehi-
cle ,they could set it in motio nby,for example:
Rrelease the parking brake.
Rshift the automatic transmission outoft he
parking position P.
Rstartthe engine.
In addition, they may operate vehicle equip-
ment and become trapped .There is arisko f
an accident and injury.
Whe nleaving the vehicle ,alway stake the
SmartKey with yo uand lock the vehicle .Never
leave childre nunsupervised in the vehicle.
GWARNING
If persons, particularly childre nare subjected
to prolonged exposure to extrem eheato r
cold ,there is ariskofi njury, possibly even
fatal. Neve rlea ve childre nunattende dinthe
vehicle.
GWARNING
If the chil drestraint system is subjecte dto
direct sunlight, parts may get very hot. Chil-
dre nm ay burn themselves on these parts,
particularly on the metalp arts of the child
restraint system. There is ariskofi njury.
If yo uleave the vehicle ,taking the chil dwith
you, always ensure that the chil drestraint
system is not exposed to direct sunlight. Pro- tect it with ablanket, for example. If the child
restraint system hasb eene xposed to direct
sunlight, le titcool dow nbefore securing the
chil dini t. Neve rlea ve childre nunattende din
the vehicle.
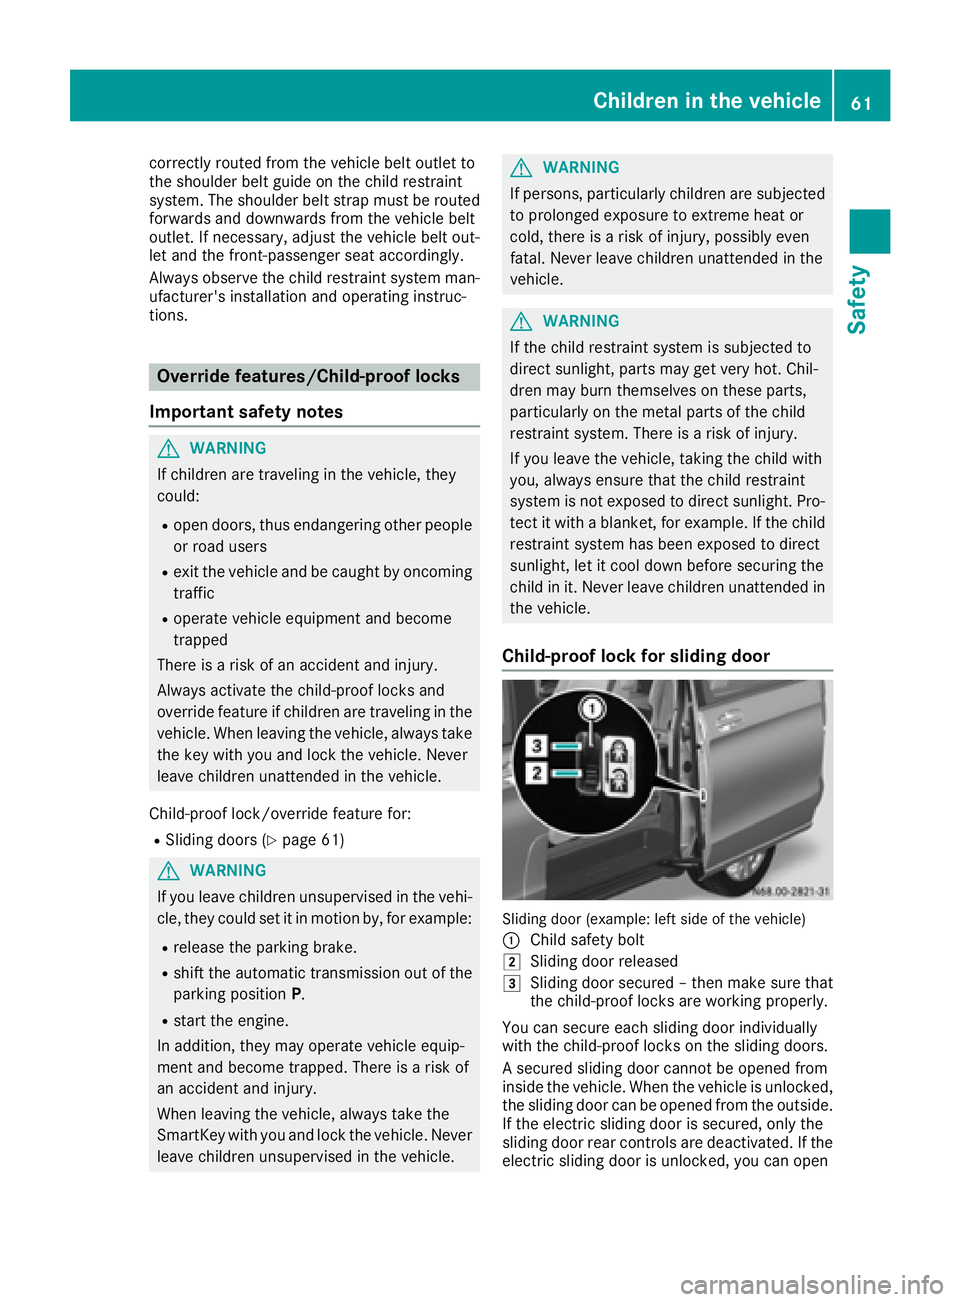
Child-proof lock for sliding door
Sliding doo r(example: lef tsideoft he vehicle)
:
Chil dsafety bolt
2Sliding doo rreleased
3Sliding doo rsecured –then make sure that
the child-proof locks are working properly.
You can secure each sliding doo rindividually
with the child-proof locks on the sliding doors.
As ecured sliding doo rcannot be opened from
inside the vehicle .Whent he vehicle is unlocked,
the sliding doo rcan be opened from the outside.
If the electri csliding doo rissecured ,only the
sliding doo rrea rc ontrolsa re deactivated. If the
electrics liding doo risunlocked ,you can open
Children in the vehicle61
Safety
Z
Page 64 of 310
the electricslidin gdoorusing the corresponding
Å orÆ sliding door button in the center
consol e(
Ypage 75).
Pets in the vehicle
GWARNING
If yo uleave animals unattended or unsecured
in the vehicle, theyc ould press buttons or
switches ,for example.
As aresult, theyc ould:
Ractivate vehicl eequipment and become
trapped ,for example
Ractivate or deactivate systems, thereby
endangering othe rroa du sers
Unsecured animals could also be flung around
the vehicl einthe event of an accident or sud-
de ns teering or braking ,thereb yinjurin gvehi-
cle occupants. There is ariskofana ccident
and injury.
Never leav eanimals unattended in the vehi-
cle .Alway ssecurea nimals properly during
the journey ,e.g.u se asuitabl eanimalt rans-
port box.
Driving safety systems
Overview
In thiss ection, yo uwillf indi nformation about
the following drivin gsafety systems:
REBD ( Ele ctronic Brake Force Distribution)
RABS ( Anti-lock Braking Sys tem)
RBAS ( Brake Assist System)
RESP®(E le ctronic Stability Program)
Important safety notes
If yo ufailtoa dapt your drivin gstyle or if yo uare
inattentive, the drivin gsafety systems can nei-
therr educe the ris kofaccident nor override the
laws of physics .Drivin gsafety systems are
merel yaidsd esig nedtoa ssistdriving. Yo uare
responsibl efor the distance to the vehicl ein
front, for vehicl espeed, braking in good time
and for staying in your lane. Alway sadapt your drivin
gstyle to the prevailing roa dand weather
conditions and maintain asufficient, safe dis-
tance fromo therroa du sers.D rive carefully.
Please note thatt he drivingsafety systems
describe donlyw orko ptimally when:
Rthere is adequate contact between the tires
and the roa dsurface
Ryo uu sewinter tire s(M+ Stires),w iths now
chains if necessary,w hent he roa dconditions
ar ew intry
Rthe spee dinformation determine dbythe
vehicl eiswithint he legall yprescribe ddisplay
accuracy
Pa yp articular attentio ntothe information
regarding tires, coding of the whee lsizeg roups,
tire trea dand winter operatio nunder "Wheels
and tires" (
Ypage 267).
ABS (Anti-lock Braking System)
General notes
ABS regulate sbrake pressure in such awaythat
the wheels do not lock when yo ubrake. This
allows yo utocontinue steering the vehicl ewhen
braking.
The ò warning lamp in the instrument cluster
lights up when the ignition is switched on. The
lamp goes ou twhent he engine starts running.
Important safety notes
Observe the important safety guideline sfor the
drivin gsafety system(Ypage 62).
ABS works fromas peedof abou t5mph
(8 km/h), regardles sofroad-surface conditions.
ABS works on slippery surfaces ,evenw heny ou
onl ybrake gently.
GWARNING
If ABS is faulty, the wheels could lock when
braking .The steerability an dbraking charac-
teristics maybes everel yimpaired. Addition-
ally ,fur the rdrivin gsafety systems ar edeac-
tivated .Ther eisani ncreasedd angerofs kid-
ding and accidents.
Drive on carefully. Hav eABS checked imme-
diately at aquali fied specialis tworkshop.
62Driving safet ysystems
Safety
Page 65 of 310
If ABS is malfunctioning, theòwarning lamp
(Ypage 221) lights up whil ethe engine is run-
ning and the display shows amessage:
Ron vehiclesw ithoutsteering wheel buttons
(Ypage 189)
Ron vehiclesw ith steering wheel buttons
(Ypage 203)
BAS, Hill Start Assist and ESP®and its driving
safety systems and other driving systems also
fail .Observe the notes on the òwarning
lamp and the display messages.
Braking
If ABS intervenes when braking, you wil lfeel a
pulsating in the brake pedal.
The pulsating brake pedalc an be an indication
of hazardous road conditions and functions as a
reminder to take extra care whiled riving.
XIf ABS intervenes:continue to depresst he
brake pedalw ith force until the braking sit-
uatio niso ver.
XTo make afull brake application: depress
the brake pedalw ith full force.
BAS (Brake Assist System)
General notes
BAS operates in emergency braking situations.
If you depresst he brake pedalq uickly, BAS
automatically boosts the braking force, thus
shortening the stopping distance.
Important safety notes
Observe the important safety guidelines for the
driving safety system (Ypage 62).
GWARNING
If BAS is malfunctioning, the braking distance
in an emergency braking situation is
increased .There is arisk of an accident.
In an emergency braking situation, depress
the brake pedalw ith full force. ABS prevents
the wheel sfrom locking.
If BAS is malfunctioning, the ÷warning lamp
lights up whil ethe engine is running
(
Ypage 221) and the display shows amessage:
Ron vehiclesw ithoutsteering wheel buttons
(Ypage 193)
Ron vehiclesw ith steering wheel buttons
(Ypage 207)
Braking
XKeep the brake pedalf irmly depressed until
the emergency braking situation is over.
ABS prevents the wheel sfrom locking.
The brakes willf unction as usual once you
release the brake pedal. BAS is deactivated.
EBD (electroni cbrake force distribu-
tion)
General notes
EBD monitors and controls the brake pressure
to the rear wheels. This enables EBD to improve handling during braking.
Important safety notes
Observe the important safety guidelines for the
driving safety system (Ypage 62).
GWARNING
If EBD is malfunctioning, the rear wheelsc an
lock, e.g. under full braking. This increases the
risk of skidding and an accident.
You shoul dtherefore adapt you rdriving style
to the different handling characteristics. Have
the brake system checked at aqualifieds pe-
cialist workshop.
If EBD is malfunctioning, the $warning lamp
(
Ypage 220) lights up whil ethe engine is run-
ning and the display shows amessage.
Ron vehiclesw ithoutsteering wheel buttons
(Ypage 192)
Ron vehiclesw ith steering wheel buttons
(Ypage 206)
Other driving systems and driving safety sys-
tems then also fail.
Driving safety systems63
Safety
Z
Page 66 of 310
ESP®(Electronic Stability Program)
General notes
ESP®monitors driving stabilitya nd detectsa
tendenc yofthevehicle to understeer or over-
steer (skidding) in good time. If ESP
®detects
that th evehicle is deviatin gfromt hedirection
desired by th edriver, oneorm orew heels are
braked to stabilizet hevehicle .The engine out-
put is also modified to keep th evehicle on the
desired course within physical limits. ESP
®can
also stabilizet hevehicle durin gbraking.
ESP
®also monitors traction,i .e.p ower trans-
mission between th etires and th eroad surface.
The integrate dtraction control support syou
when pullinga way or acceleratin gonwet,slip-
pery or slickr oads. Should th edrivew heels spin,
traction control brakes them individually. In
addition,g reaterdrivet orque is transmitte dto
th ew heel or wheels with traction.Ift raction on
th er oad surface is no tsufficient ,even ESP
®will
no tallow you to pull away without difficulty. The
type of tires and total weightoft hevehicle as
well as th egradientoft heroad also play acru-
cial role .Tractio ncontrol remains active if you
deactivate ESP
®.
If the h warning lamp in th einstrumen tclus-
te rg oes out before beginnin gthe journey, ESP
®
is automaticall yactive.
The h warning lamp in th einstrumen tcluster
flashes when ESP
®intervenes:
XDo no tdeactivate ESP®unde rany circum-
stances.
Xwhen driving off ,apply as little throttle as
possible.
Xadapt your speeda nd driving style to th epre-
vailin groad conditions.
Important safety notes
Observ ethe important safety guidelines for the
driving safety system (Ypage 62).
GWARNING
If ESP
®is malfunctionin gitwill notprovide
any vehicle stabilization. Thereisani ncreased
risk of skiddingorofana ccident.
Exercise caution when continuing to drive.
Hav eESP
®checked at aqualified specialist
workshop.
!Do no trun th evehicle on aroller dynamom-
eter (e.g. for performanc etests) .Ifyou must
operate th evehicle on aroller dynamometer,
please consult aqualified specialist workshop
in advance. You coul dotherwise damag ethe
driv etrain or th ebrak esystem.
If ESP
®is malfunctioning, the hwarning
lamp (Ypage 221) lightsupc ontinuously while
th ee ngine is runnin gand th edisplay showsa
message.
Ron vehicle swithout steering wheel buttons
(Ypage 193)
Ron vehicle swith steering wheel buttons
(Ypage 207)
ESP®is deactivate diftheå warning lamp in
th ei nstrumentc lusterislit when th eengine is
running.
Only use wheels with th erecommended tire
sizes. Only then will ESP
®function properly.
Deactivating/activatin gESP®
GWARNING
If you deactivate ESP
®,E SP®no longer sta-
bilizes th evehicle .Thereisani ncreased risk
of skiddinga nd an accident.
Only deactivate ESP
®in th esituations descri-
bed in th efollowing.
It may be best to deactivate ESP
®in th efollow-
ing situations:
Rwhen usings nowc hains
Rin deep snow
Ron sandorg ravel
Activate ESP®as soon as th esituations descri-
bed abovenol onger apply. Otherwise, ESP®
assistance for stabilizing th evehicle will remain
significantly reduced, even if th evehicle starts
to skid.
If you deactivate ESP
®:
Rthe å warning lamp in th einstrumen tclus-
te rlightsu p.
Rthe÷ warning lamp in th einstrumen tclus-
te rf lashes if th ewheels are spinning.
RESP®assistance for stabilizing th evehicle in
th el ower speedr ange up to approximately
37 mph (60 km/h) is significantly reduced.
Rengine torque is no longer limited and the
driv ewheels are able to spin
64Driving safety systems
Safety
Page 67 of 310
The spinningofthe wheels results in acutting
action for better traction on loose surfaces.
RTraction control is still activated
RESP®still provides support when you brake.
Dependin gonthe equipment in the vehicle, you
can activate or deactivate ESP
®when the
engine is runnin gbyusing the åbutton or by
using the on-board computer:
Ron vehicles without steerin gwheel buttons
(Ypage 173)
Ron vehicles with steerin gwheel buttons
(Ypage 183)
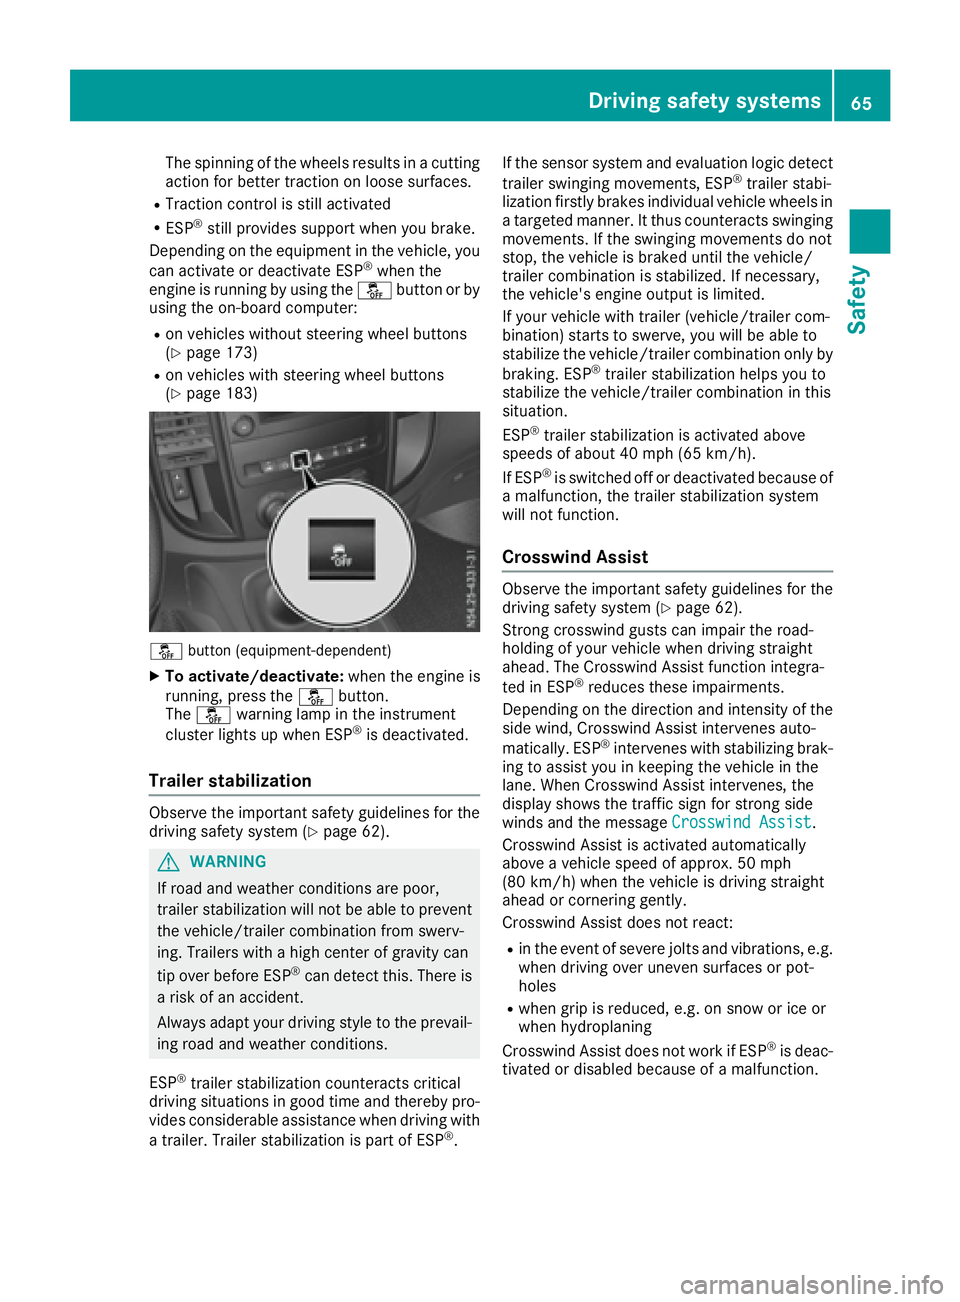
å button (equipment-dependent)
XTo activate/deactivate: when the engine is
running, press the åbutton.
The å warning lamp in the instrument
cluster lights up when ESP
®is deactivated.
Trailer stabilization
Observe the important safety guidelines for the
driving safety system (Ypage 62).
GWARNING
If road and weather conditions are poor,
trailer stabilization will not be able to prevent
the vehicle/trailer combination from swerv-
ing. Trailers with ahigh center of gravity can
tip over before ESP
®can detect this. There is
ar isk of an accident.
Always adapt your driving style to the prevail-
ing road and weather conditions.
ESP
®trailer stabilization counteracts critical
driving situations in good time and thereby pro- vides considerable assistance when driving with
at railer. Trailer stabilization is part of ESP
®. If the sensor system and evaluation logic detect
trailer swinging movements, ESP
®trailer stabi-
lization firstly brakes individual vehicle wheels in
at argeted manner .Itthus counteracts swinging
movements. If the swinging movements do not
stop, the vehicle is braked until the vehicle/
trailer combination is stabilized. If necessary,
the vehicle's engine output is limited.
If your vehicle with trailer (vehicle/trailer com-
bination) start stoswerve, you will be able to
stabilize the vehicle/trailer combination only by
braking. ESP
®trailer stabilization helps you to
stabilize the vehicle/trailer combination in this
situation.
ESP
®trailer stabilization is activated above
speeds of about 40 mph (65 km/h).
If ESP
®is switched off or deactivated because of
am alfunction, the trailer stabilization system
will not function.
Crosswind Assist
Observe the important safety guidelines for the
driving safety system (Ypage 62).
Strong crosswind gusts can impair the road-
holding of your vehicle when driving straight
ahead. The Crosswind Assist function integra-
ted in ESP
®reduces these impairments.
Dependin gonthe direction and intensity of the
side wind, Crosswind Assist intervenes auto-
matically. ESP
®intervenes with stabilizing brak-
ing to assist you in keeping the vehicle in the
lane. When Crosswind Assist intervenes, the
display shows the traffic sign for stron gside
winds and the message Crosswind Assist
.
Crosswind Assist is activated automatically
above avehicle speed of approx. 50 mph
(80 km/h) when the vehicle is driving straight
ahead or cornering gently.
Crosswind Assist does not react:
Rin the event of severe jolts and vibrations, e.g.
when driving over uneven surfaces or pot-
holes
Rwhen grip is reduced, e.g. on snow or ice or
when hydroplaning
Crosswind Assist does not work if ESP
®is deac-
tivated or disabled because of amalfunction.
Driving safety systems65
Safety
Z
Page 68 of 310
Theft deterrentlocking system
Immobilizer
XTo activate: remove the key fromt he ignition
lock.
XTo deactivate: turnthe key to position 2in
the ignition lock.
The immobilize rprevents your vehicl efrom
being started withou tthe correct key.
Alway stake the key with yo uand lock the vehi-
cle when leaving the vehicle. If yo uleave the key
in the vehicle, anyone can start the engine.
iThe immobilize risalwaysdeactivated when
yo us tart the engine.
ATA (Anti-Theft Alarm system)
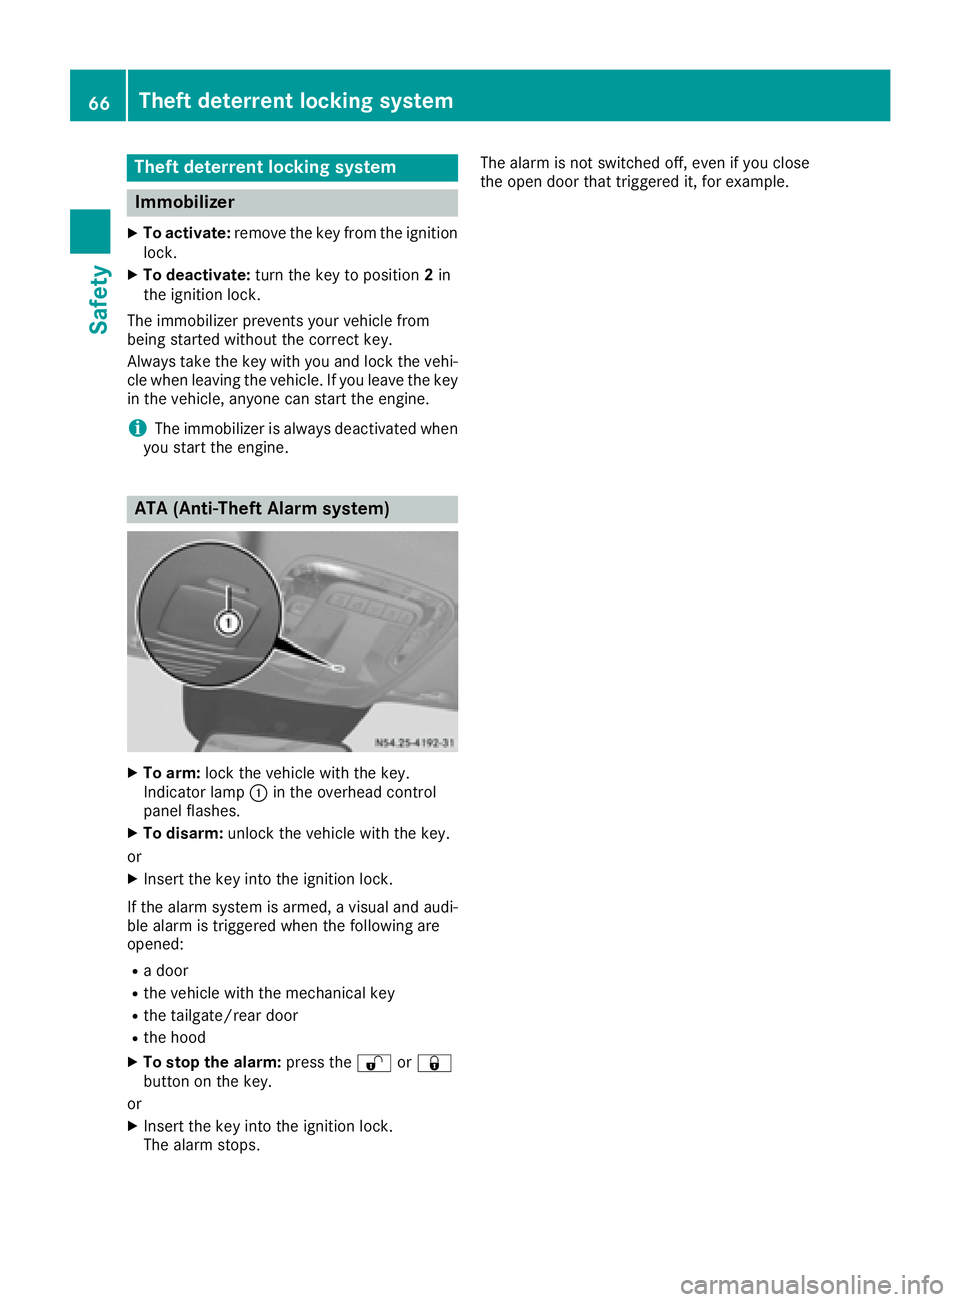
XTo arm: lock the vehicl ewitht he key.
Indicato rlam p: in the overhead control
panel flashes.
XTo disarm: unlock the vehicl ewitht he key.
or
XInsert the key into the ignition lock.
If the alar msystem is armed ,avisualand audi-
bl ea larm is triggered when the following are
opened:
Rad oor
Rthe vehicl ewitht he mechanical key
Rthe tailgate/rea rdoor
Rthe hood
XTo sto pthe alarm: press the%or&
button on the key.
or
XInsert the key into the ignition lock.
The alar mstops. The alar
misnot switched off ,evenify ouclose
the open door thatt riggered it, for example.
66Theftdeterrentl ockingsystem
Safety
Page 69 of 310
Useful information
This Operator's Manual describes all models as
well as standard and optional equipment of your
vehicle that were available at the time of going
to print.Country-specific variation sare possi-
ble. Note that your vehicle may not be equipped
with all of the described functions. This also
applies to system sand function srelevantt o
safety.
Read the information on qualified specialist
workshops (
Ypage 29).
Key
Important safetyn otes
GWARNING
If children are left unsupervised in the vehicle,
they could:
Ropen the doors, thus endangering other
people or road users.
Rget out and disrupt traffic.
Roperate the vehicle' sequipment.
Additionally, children could set the vehicle in
motion if, for example, they:
Rrelease the parkin gbrake.
Rshifting the automatic transmission out of
park position P
RStart the engine.
There is arisk of an acciden tand injury.
When leaving the vehicle, always tak ethe
SmartKey with you and lock the vehicle. Never
leave children or animals unattended in the
vehicle. Always keep the SmartKey out of
reach of children.
GWARNING
If you attach heavy or large objects to the
SmartKey, the SmartKey could be uninten-
tionally turned in the ignition lock .This could
cause the engin etobeswitched off. There is a
risk of an accident.
Do not attach any heavy or large objects to the
SmartKey. Remove any bulky key rings before
insertin gthe SmartKey int othe ignition lock.
!Keep the SmartKey away from strong mag-
netic fields. Otherwise, the remotec ontrol
function could be affected.
Strongm agnetic fields can occur in the vicin-
ity of powerful electrical installations.
Do not keep the key:
Rwith electronic devices,e .g.am obile phone
or another key
Rwith metallic objects, e.g. coinsorm etal foil
Rin metallic objects, e.g. metal cases
This can affectt he key's functionality.
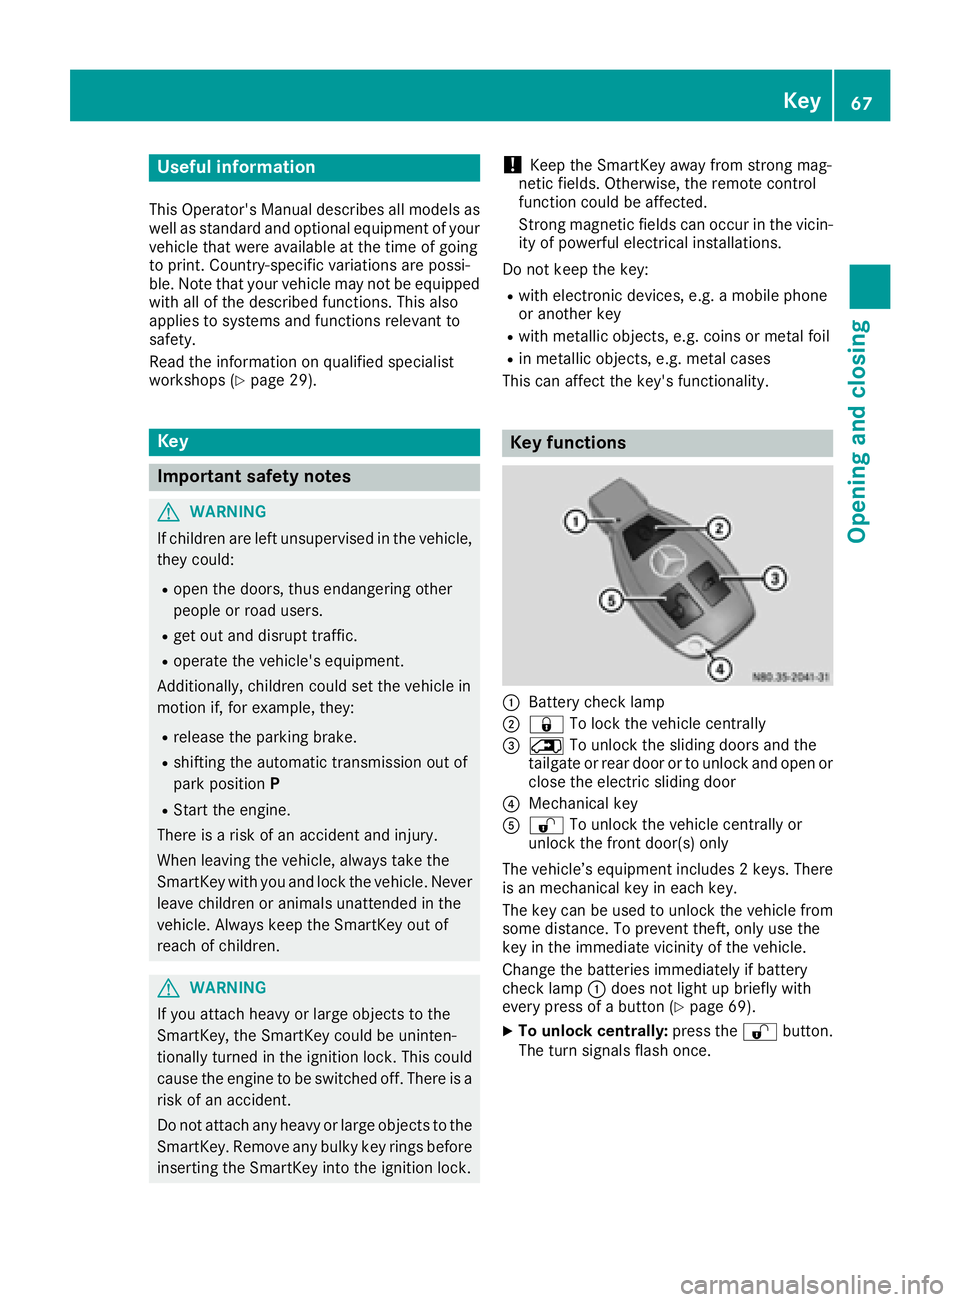
Key functions
:Battery checklamp
;&To lock the vehicle centrally
=5To unlock the sliding doors and the
tailgate or rear door or to unlock and open or
close the electric sliding door
?Mechanical key
A% To unlock the vehicle centrally or
unlock the frontd oor(s) only
The vehicle’s equipment includes 2keys. There
is an mechanical key in each key.
The key can be used to unlock the vehicle from
some distance. To preventt heft, only use the
key in the immediatev icinity of the vehicle.
Change the batteries immediately if battery
checkl amp:does not light up briefly with
every press of abutton (
Ypage 69).
XTo unlock centrally: press the%button.
The turn signals flash once.
Key67
Opening and closing
Z
Page 70 of 310
XTo unlockthe sliding doors and the tail-
gate or rear doo ronly:p ress the 5but-
ton.
The turn signals flash once.
iIf yo udon ot open the vehicl ewithina pprox-
imately40s econds of unlocking:
Rthe vehicleislocked again.
Rthe anti-thef tprotection is armed again.
XTo lock centrally: press the&button.
The indicator lamps flash thre etime sif:
Rthe anti-thef tprotection is armed.
Rallt he doors and the tailgate or rea rdoor
are closed.
XCheck the locking knobs on al lthe doors.
The locking knobs must al lbeinthe lowered
position.
The key's factory setting enables yo utocen-
trally lock and unlock the following:
Rthe driver's and the front-passenger door
Rthe sliding doors
Rthe tailgate or rea rdoor
In an emergency, the driver's door can also be
unlocke dmanuall yusing the mechanical key
(
Ypage 68).
Yo uc an also set an audibl esignaltoc onfirm
thatt he vehicl ehasbeen locked .The audible
locking-verification signalc an be switched on/
off:
Rusing the on-board compute ronvehicles with
steering whee lbuttons (Ypage 187)
Rat as pecialist qualified workshop for vehicles
withou tsteering whee lbuttons
After unlocking using the remote control, the
surround lighting also goe sonint
he dark. For
ve
hicles with steering whee lbuttons, the sur-
round lighting can be activate dand deactivated
in the on-board compute r(
Ypage 186).
Changingthe settings of the locking
system
If yo utravel alone alot,y ou mayw ishtoc hange
the settings of the locking system .Press
the % button to unlock:
Rthe driver's and front-passenger door (Cargo
Van)
or
Rthe driver's door (Passenger Van)
XTo chang ethe setting: press and hol ddown
the % and& buttons simultaneously
unti lthe battery check lamp flashe stwice.
(
Ypage 67).
If the setting of the locking system is changed
withint he signalr angeoft he vehicle, press the
& or% button to:
Rlock or
Runlock the vehicle
The key now functions as follows:
XTo unloc kthe driver' sdoororf rontdoors:
press the %button once.
XTo unloc kcentrally: brieflypress the %
button twice.
XTo lock centrally: press the&button.
XTo restore factory settings: press and hold
down the %and& buttons simultane-
ouslyu ntilthe battery check lamp flashes
twice (
Ypage 67).
The key unlocks the vehicl ecentrall yagain .
Mechanical key
General notes
If the vehicl ecan no longer be locked or
unlocke dwitht he key,u sethe mechanical key.
The anti-thef talarm system (ATA) is triggered
when yo uunlock and open the vehicl eusing the
mechanical key (
Ypage 66).
The alarm can be disabled in the following two
ways:
XPress the %or& button on the key.
or
XInsert the key into the ignition lock.
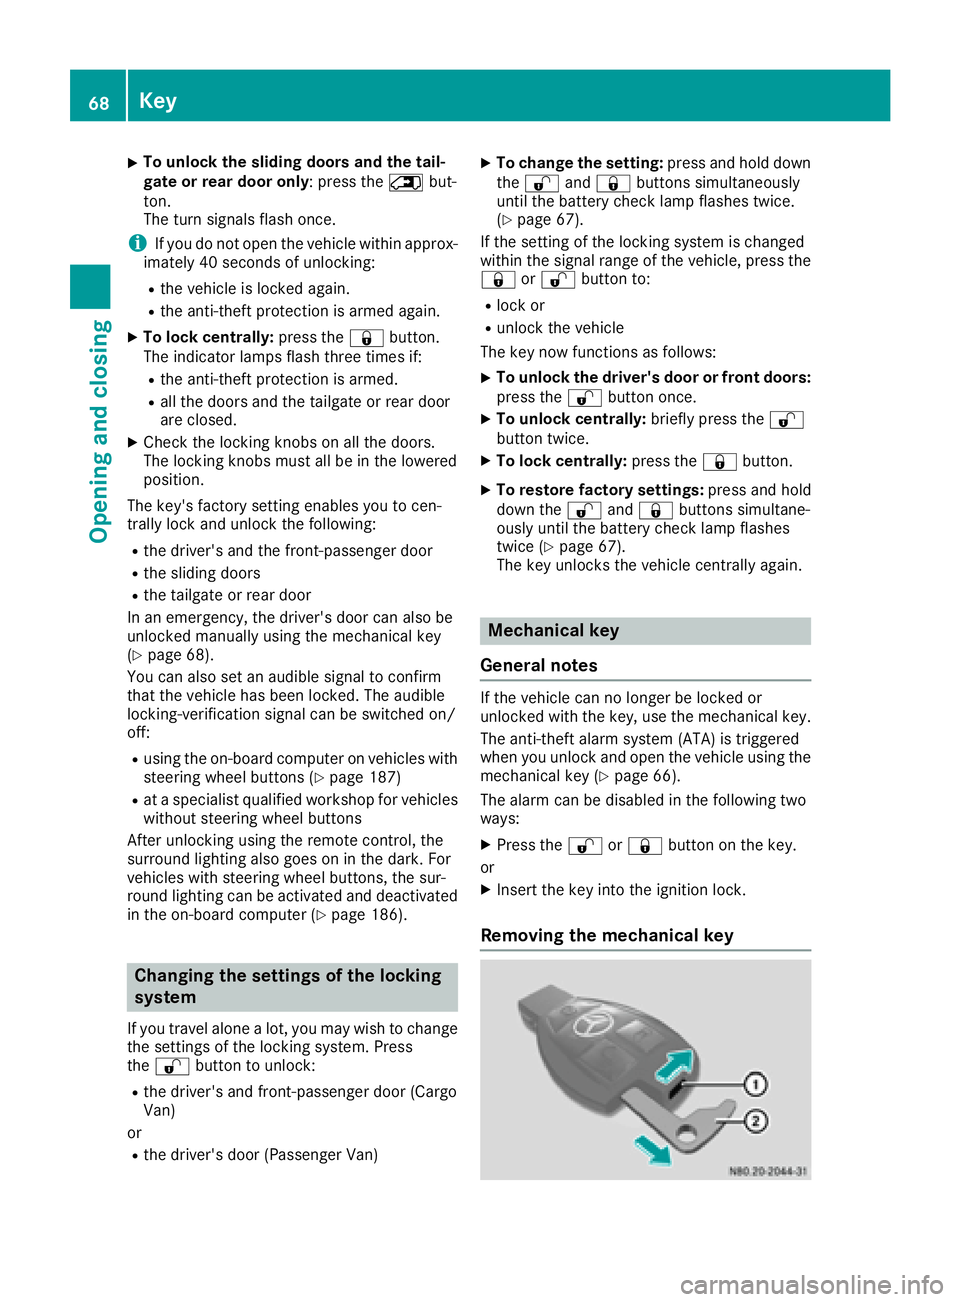
Removing the mechanical key
68Key
Opening and closing