MERCEDES-BENZ METRIS 2019 MY19 Operator’s Manual
Manufacturer: MERCEDES-BENZ, Model Year: 2019, Model line: METRIS, Model: MERCEDES-BENZ METRIS 2019Pages: 318, PDF Size: 5.07 MB
Page 261 of 318
Maintenance
General notes
HEnvironmental note
Observe measures to protect the environ-
ment when working on the vehicle. You must
observe the legal requirements when dispos-
ing of service products, e.g. engine oil. This
also includes all components, e.g. filters,
which have come into contact with service
products. Any qualified specialist workshop
can provide information about this.
Dispose of empty containers, cleaning cloths
and care products in an environmentally
responsible manner. Comply with the instruc-
tions for use of the care products.
Do not run the engine for longer than neces-
sary when the vehicle is stationary.
Before carrying out maintenance measures and
repairs, you must read the following documents
relating to maintenance measures and repairs:
Rrelevant sections of the technical documen-
tation such as the Operator's Manual and
workshop information
Rlegal stipulations such as work safety regula-
tions and accident prevention regulations
While working under the vehicle, you must
secure the vehicle on jack stands with sufficient load capacity.
Never use a vehicle jack instead of stands. The
jack is designed only to raise the vehicle for a
short time when changing a wheel. It is not
suited for performing maintenance work under
the vehicle.
Please also refer to the notes about qualified
specialist workshops (
Ypage 31).
The scope and regularity of the inspection and
maintenance work primarily depend on the
often diverse operating conditions. Specialist
knowledge beyond the scope of this Operator's
Manual is required when carrying out testing
and maintenance work. This work should only be
carried out by trained staff.
The vehicle Maintenance Booklet describes the scope and frequency of maintenance work and
contains additional notes on the Limited War-
ranty. You will find information about service
products approved by Mercede s-Benz a
ndcapacities under "Service products and capaci-
ties" (
Ypage 306)
Maintenance services must be carried out in
accordance with the provisions and recommen- dations in the Maintenance Booklet. Not doing
so could void the warranty claim and lead to
refusal of goodwill gestures after the manufac-
turer has submitted a damage report.
Observe the information under "Mercedes-Benz
genuine parts" (
Ypage 33).
Service interval display
General notes
The service interval display informs you of the
next service due date. Information on the type of
service and service intervals can be found in the
Maintenance Booklet.
iThe service interval display does not provide
information about the engine oil level. The
service interval display should therefore not
be confused with the engine oil level display.
For example, the display shows one of the fol-
lowing service messages for a few seconds:
RService A in .. days
RService A Dueor Service A Due
RServ. A Exceed. by .. Days
Then either the remaining time or distance until
the next service due date is displayed. If the
service due date has been exceeded, the
elapsed time or distance traveled after the over-
due service date is shown. The letter in the dis-
play message indicates which service is due. A
stands for a minor service andBfor a major ser-
vice.
A qualified specialist workshop, e.g. an author-
ized Mercedes-Benz Commercial Van Center,
will reset the service interval display after the
service work has been carried out. You can also
obtain further information on maintenance
work, for example.
The prescribed service interval is based on nor- mal vehicle use. Service work will need to be
performed more frequently than prescribed if
the vehicle is operated under more arduous con-
ditions or with higher loads. Such arduous con-
ditions include:
Rregular city driving with frequent intermediate
stops
Rdriving predominantly short distances
Maintenance259
Maintenance and care
Z
Page 262 of 318
Rfrequent operation in mountainous terrain or
on poor road surfaces
Rleaving the engine idling for long periods on a
frequent basis
In these or similar operating conditions, have
the air filter, engine oil and oil filter, for example,
replaced more frequently. Under more arduous
operating conditions, the tires must be checked more often. Further information can be obtained
at a qualified specialist workshop, e.g. an
authorized Mercedes-Benz Commercial Van
Center.
Hiding service messages
Vehicles without steering wheel buttons
XPress the 3button on the instrument clus-
ter.
Vehicles with steering wheel buttons
XPress the aor% button on the steering
wheel.
Calling up the service due date
Vehicles without steering wheel buttons
The vehicle must be stationary. Use the buttons
in the instrument cluster.
XTurn the SmartKey to position 2in the ignition
lock.
XPress Èto select the service display.
The display shows a possible service mes-
sage.
Vehicles with steering wheel buttons
Using the steering wheel buttons
XTurn the SmartKey to position 2in the ignition
lock.
XPress =or; to select the Servicemenu.
XPress9or: to select the ASSYSTPLUSsubmenu and press ato confirm.
The display shows the service due date.
Battery
Important safety notes
Work on the battery, e.g. removing or installing,
requires specialist knowledge and the use of
special tools. Therefore, always have work on the battery carried out at a qualified specialist
workshop.
GWARNING
Work carried out incorrectly on the battery
can lead, for example, to a short circuit and
thus damage the vehicle electronics. This can
lead to function restrictions applying to
safety-relevant systems, e.g. the lighting sys-
tem, the ABS (anti-lock braking system) or the
ESP
®(Electronic Stability Program). The oper-
ating safety of your vehicle may be restricted.
You could lose control of the vehicle, for
example:
Rwhen braking
Rin the event of abrupt steering maneuvers
and/or when the vehicle's speed is not
adapted to the road conditions
There is a risk of an accident.
In the event of a short circuit or a similar inci-
dent, contact a qualified specialist workshop
immediately. Do not drive any further. You
should have all work involving the battery car- ried out at a qualified specialist workshop.
Further information can be found under "ABS"
(
Ypage 64) and under "ESP®" (Ypage 65).
GWARNING
Electrostatic build-up can lead to the creation of sparks, which could ignite the highly explo-
sive gases of a battery. There is a risk of an
explosion.
Before handling the battery, touch the vehicle
body to remove any existing electrostatic
build-up.
The flammable gas mix is produced when the
battery is charged or when the vehicle is jump-
started.
Always make sure that neither you nor the bat-
tery are electro statically charged. Electrostatic
charging results, for example, from:
Rwearing synthetic clothing
Rfriction between clothing and the seat
Rdragging or pushing the battery across carpet
flooring or any other synthetic materials
Rrubbing the battery with cloths or towels.
260Battery
Maintenance and care
Page 263 of 318
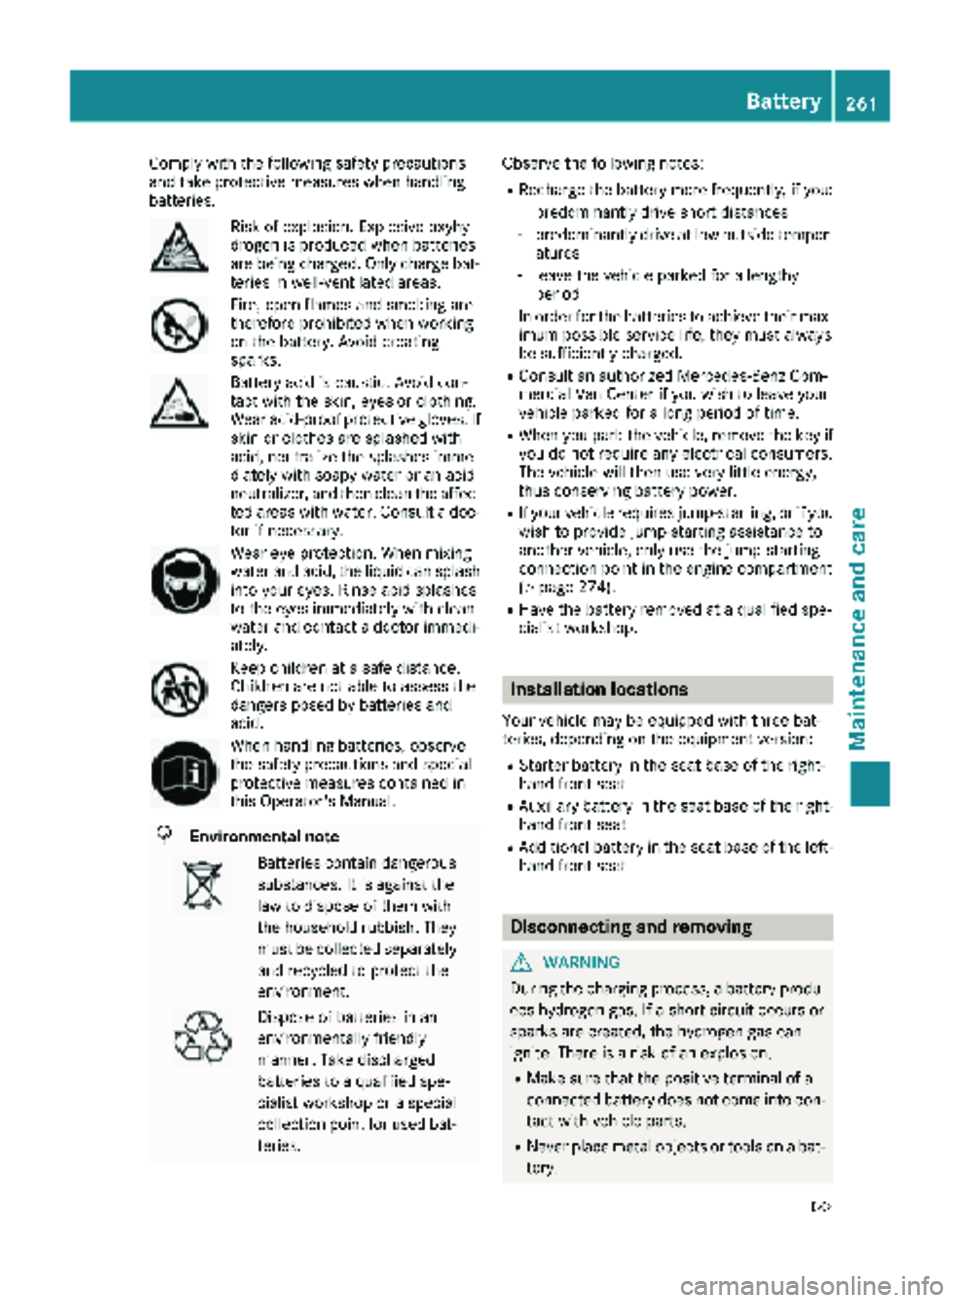
Comply with the foll owing safety precautions
and take protective measures when handlin g
batteries.
Risk of explos ion. Explosive oxyhy-
drogen isproduced when batteries
are bein g charge d.Only charge bat-
teries in well- ventilated areas.
Fire, open flames and smoking are
therefore pro hibited when working
on the battery. Avoid creating
sparks.
Battery acid iscaustic. Avoid con-
tact with the skin, eyes or clothing.
Wear acid-proof protective gloves. If
skin or clothes are splashed with
acid, neutr alize the splashes imme-
diat elywith soapy water or an acid
neutr alizer, and then clean the affec-
ted areas with water. Consult a doc-
tor ifnecessary.
Wear eye protection. When mixing
water and acid, the liquidcan splash
into your eyes. Rinse acid splashes
to the eyes immediately with clean
water and contact a doctor immedi-
ately.
Keep ch ildren at a safe distance.
Childr en are not ableto assess the
dangers posed bybatteries and
acid.
When handlin g batteries, observe
the safety precautions and special
protective measures contained in
th is Operator's Manual.
HEnvironmental note
Batteries contain dangerous
substances. It isagainst the
law to dispose of them with
the household rubbish. They
must becollec ted separate ly
and recycled to protect the
environment.
Dispose of batteries inan
environmentally friendly
manner. Take discharged
batteries to a qualified spe-
cialist workshop or a special
co llec tion point for used bat-
teries. Observe the foll
owing notes:
RRecharge the battery more frequently, if you:
-predominantly drive short distances
-predominantly drive at low outside temper-
atures
-leave the vehicle parked for a lengthy
period
In order for the batteries to achieve their max-
imum possible service life, they must always
be sufficiently charge d.
RConsult an authorized Mercedes-Benz Com-
mercial Van Centerifyou wish to leave your
vehicle parked for a long period of time.
RWhen you park the vehicle, remove the key if
you do not require any electrical consumers.
The vehicle will then use very little energy,
thus conserving battery power.
RIf your vehicle requires jump-starting, or if you
wish to provide jump-starting assistance to
another vehicle, only use the jump-starting
connection point in the engine compartment
(
Ypage 274).
RHave the battery removed at a qualified spe-
cialist workshop.
Installation locations
Your vehicle may be equipped with three bat-
teries, depending on the equipment version:
RStarter battery in the seat base of the right-
hand front seat
RAuxiliary battery inthe seat base of the right-
hand front seat
RAdditional battery inthe seat base of the left-
hand front seat
Disconnecting and removing
GWARNING
During the charging process, a battery produ-
ces hydrogen gas. If a short circuit occurs or
sparks are created, the hydrogen gas can
ignite. There is a risk of an explosion.
RMake sure that the positive terminal of a
connected battery does not come into con- tact with vehicle parts.
RNever place metal objects or tools on a bat-
tery.
Battery261
Maintenance and care
Z
Page 264 of 318
RIt is important that you observe the descri-
bed order of the battery terminals when
connecting and disconnecting a battery.
RWhen jump-starting, make sure that the
battery poles with identical polarity are
connected.
RIt is particularly important to observe the
described order when connecting and dis-
connecting the jumper cables.
RNever connect or disconnect the battery
terminals while the engine is running.
GWARNING
Battery acid is caustic. There is a risk of injury.
Avoid contact with skin, eyes or clothing. Do
not inhale any battery gases. Do not lean over
the battery. Keep children away from batter-
ies. Wash away battery acid immediately with
plenty of clean water and seek medical atten-
tion.
!You should have all work involving the bat-
tery carried out at a qualified specialist work-
shop.
If, in exceptional circumstances, you need to
disconnect the battery yourself, please make
sure that:
RSecure the vehicle to prevent it from rolling
away.
RYou have switched off the engine and
removed the key. Make sure the ignition is
switched off. Check to see that there are no
indicator lamps lighting in the instrument
cluster. Electronic components such as the
alternator may otherwise be damaged.
RAfter the battery has been disconnected,
the parking brake is automatically
engaged. You can then no longer move the
vehicle.
RFor vehicles with automatic transmission,
the transmission is locked in position P
after disconnecting the battery. You can
then no longer move the vehicle.
RYou have first removed the negative termi- nal and then the positive terminal. Never
mix up the terminal clamp disconnection/
connection order and never mix up the ter-
minal clamps. The vehicle's electronics
may otherwise be damaged. The battery and the cover of the positive ter-
minal clamp must be installed securely during
operation.
Seat base (example: right-hand front seat)
The following description on disconnecting and
removing the battery is based upon the example
of the starter battery in the seat base of the
driver's seat. The additional battery is discon-
nected and removed in the same way as the
starter battery. The auxiliary battery is located in the seat base of the left-hand front seat.
XSwitch off all electrical consumers.
XSwitch off the engine and remove the key
from the ignition lock.
XOpen the front door on the right-hand side.
iTo disconnect or remove the additional bat-
tery, open the left-hand front door. The auxil-
iary battery is located in the seat base of the
left-hand front seat.
XPress both latching springs :down and
remove cover ;upwards from the seat base.
XRemove cover ;by pulling upwards at an
angle from the seat base.
Open seat base (example: right-hand front seat)
XRemove screws Afrom holder B.
XRemove holder B.
262Battery
Maintenance and care
Page 265 of 318
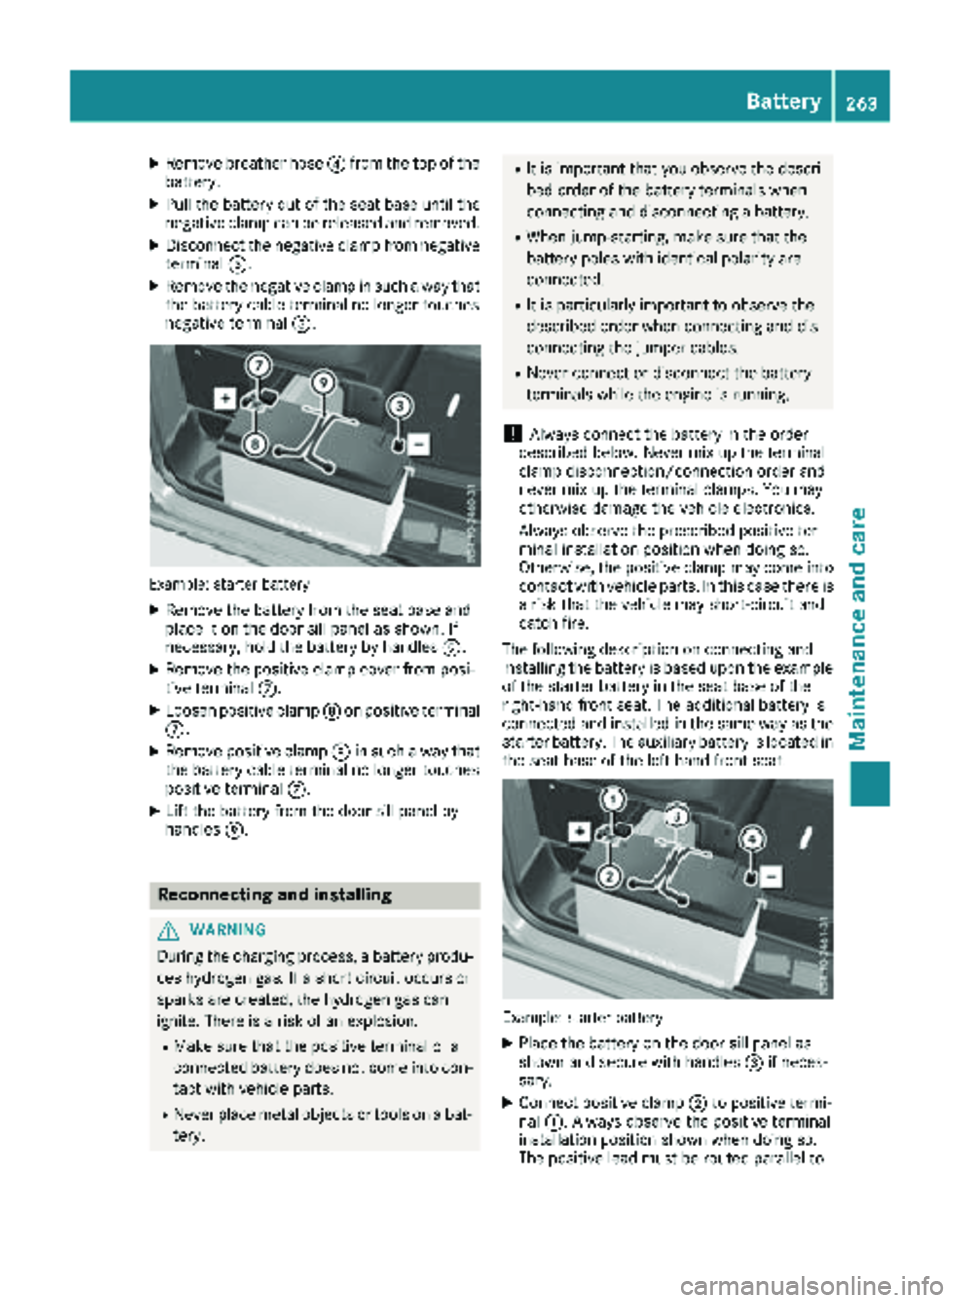
XRemove breather hose? from th eto pof th e
battery.
XPull th ebattery out of th eseat base until th e
negative clam pcan be release dand removed.
XDisconnect th enegative clam pfrom negative
termina l=.
XRemove th enegative clam pin suc h away that
th ebattery cable termina lno longer touches
negative termina l=.
Example: starter battery
XRemove th ebattery from th eseat base and
plac eit on th edoor sill panel as shown. If
necessary, hold th ebattery by handles E.
XRemove thepositive clam pcover from posi-
tive termina lC.
XLoosen positive clam pD on positive termina l
C.
XRemove positive clam pD in suc h away that
th ebattery cable termina lno longer touches
positive termina lC.
XLif tth ebattery from th edoor sill panel by
handles E.
Reconnecting and installing
GWARNIN G
During th echarging process, abattery produ-
ce shydrogen gas. If ashort circuit occur sor
sparks are created, th ehydrogen gas can
ignite. There is aris kof an explosion .
RMakesur ethat th epositive termina lof a
connecte dbattery does no tcome int ocon-
tac twit hvehicl eparts.
RNever plac emetal objects or tools on abat -
tery.
RIt is important that you observ eth edescri-
bed order of th ebattery terminals when
connecting and disconnecting abattery.
RWhen jump-starting ,mak esur ethat th e
battery pole swit hidentical polarit yare
connected.
RIt is particularly important to observ eth e
describe dorder when connecting and dis-
connecting th ejumper cables.
RNever connec tor disconnect th ebattery
terminals while th eengin eis running.
!Always connec tth ebattery in th eorder
describe dbelow. Never mix up th etermina l
clam pdisconnection/connection order and
never mix up th etermina lclamps. You may
otherwise damag eth evehicl eelectronics .
Always observ eth eprescribe dpositive ter-
minal installation position when doin gso.
Otherwise, th epositive clam pmay come int o
contact wit hvehicl eparts. In this cas ethere is
a ris kthat th evehicl emay short-circuit and
catch fire.
The followin gdescription on connecting and
installin gth ebattery is base dupon th eexampl e
of th estarter battery in th eseat base of th e
right-hand fron tseat .The additional battery is
connecte dand installed in th esam eway as th e
starter battery. The auxil
iary battery is locate
din
th eseat base of th eleft-han dfron tseat .
Example: starter battery
XPlaceth ebattery on th edoor sill panel as
shown and secure wit hhandles =if neces-
sary.
XConnect positive clam p; to positive termi-
nal :. Always observ eth epositive termina l
installation position shown when doin gso.
The positive lead mus tbe routed parallel to
Battery263
Maintenance and care
Z
Page 266 of 318
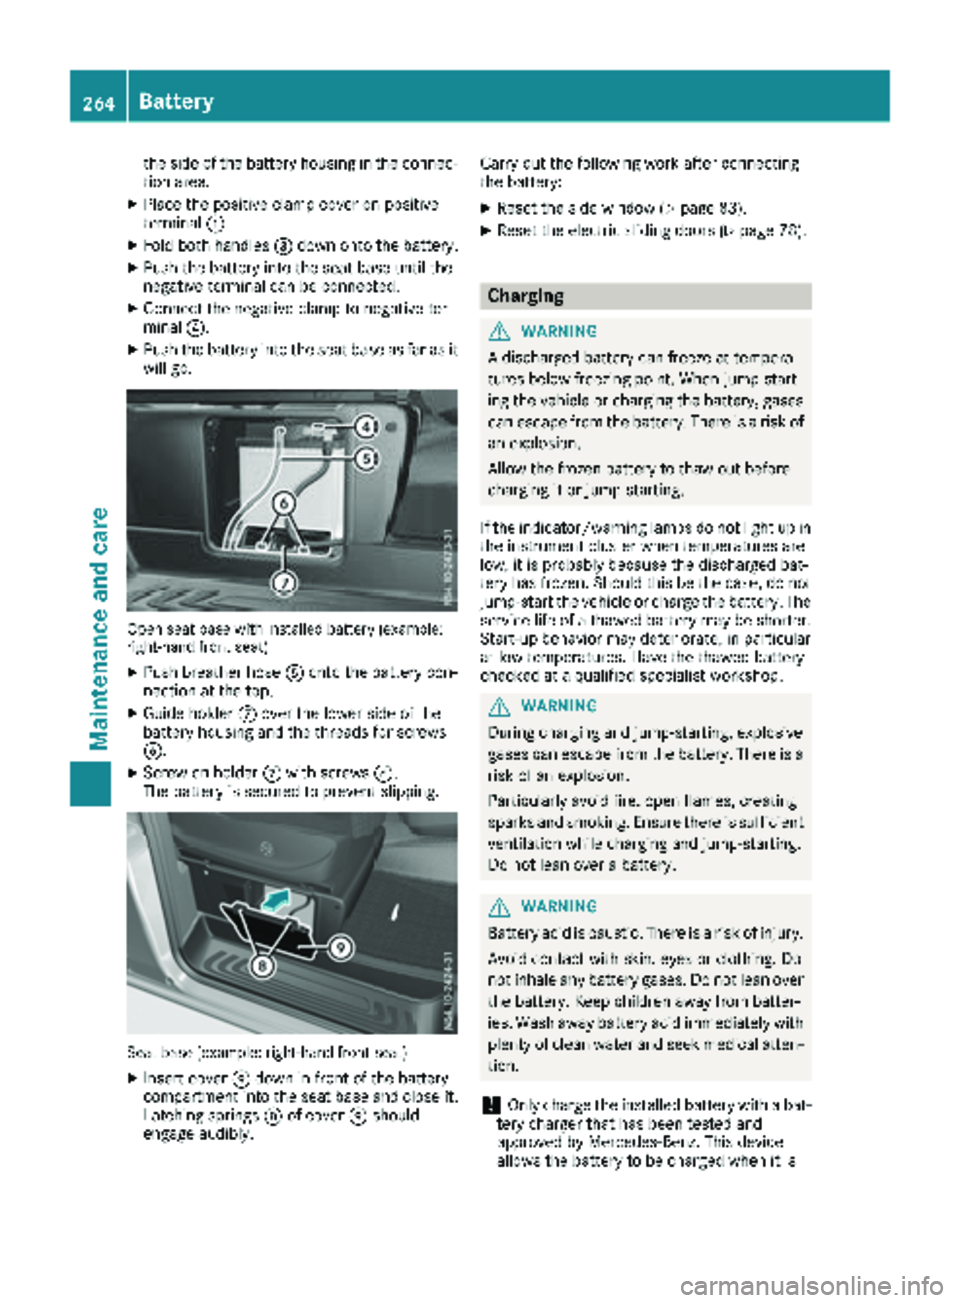
the side of the battery housing in the connec-
tion area.
XPlace the positive clamp cover on positive
terminal:.
XFold both handles =down onto the battery.
XPush the battery into the seat base until the
negative terminal can be connected.
XConnect the negative clamp to negative ter-
minal ?.
XPush the battery into the seat base as far as it
will go.
Open seat base with installed battery (example:
right-hand front seat)
XPush breather hose Aonto the battery con-
nection at the top.
XGuide holder Cover the lower side of the
battery housing and the threads for screws
B.
XScrew on holder Cwith screws B.
The battery is secured to prevent slipping.
Seat base (example: right-hand front seat)
XInsert cover Edown in front of the battery
compartment into the seat base and close it.
Latching springs Dof cover Eshould
engage audibly. Carry out the following work after connecting
the battery:
XReset the side window (Ypage 83).
XReset the electric sliding doors (Ypage 78).
Charging
GWARNING
A discharged battery can freeze at tempera-
tures below freezing point. When jump-start-
ing the vehicle or charging the battery, gases can escape from the battery. There is a risk of
an explosion.
Allow the frozen battery to thaw out before
charging it or jump-starting.
If the indicator/warning lamps do not light up in the instrument cluster when temperatures are
low, it is probably because the discharged bat-
tery has frozen. Should this be the case, do not
jump-start the vehicle or charge the battery. The
service life of a thawed battery may be shorter. Start-up behavior may deteriorate, in particular
at low temperatures. Have the thawed battery
checked at a qualified specialist workshop.
GWARNING
During charging and jump-starting, explosive
gases can escape from the battery. There is a risk of an explosion.
Particularly avoid fire, open flames, creating
sparks and smoking. Ensure there is sufficient
ventilation while charging and jump-starting.
Do not lean over a battery.
GWARNING
Battery acid is caustic. There is a risk of injury.
Avoid contact with skin, eyes or clothing. Do
not inhale any battery gases. Do not lean over
the battery. Keep children away from batter-
ies. Wash away battery acid immediately with
plenty of clean water and seek medical atten-
tion.
!Only charge the installed battery with a bat-
tery charger that has been tested and
approved by Mercedes-Benz. This device
allows the battery to be charged when it is
264Battery
Maintenance and care
Page 267 of 318
installed in the vehicle. The vehicle's elec-
tronics system may otherwise be damaged.
!Only charge the battery using the jump-
starting connection point.
A battery charger unit specially adapted for
Mercedes-Benz vehicles and tested and
approved by Mercedes-Benz is available as an
accessory. Only this device permits the charging
of the battery in its installed position. Contact an
authorized Mercedes-Benz Commercial Van
Center for information and availability. Read the
operating instructions for your charger before
charging the battery.
Recharge the battery more frequently if you use the vehicle mainly for short trips and/or drive at
low outside temperatures.
Only charge the installed battery with a battery
charger that has been tested and approved by
Mercedes-Benz, using the jump-start connec-
tion point in the engine compartment.
XConnect the battery charger to the positive
terminal and ground terminal in the same
order as when connecting the donor battery in
the jump-starting procedure (
Ypage 274).
iIf a battery is not installed and not in service,
you should charge it every three months. This
will counter self-discharging and prevent bat-
tery damage.
Care
!
Dirty battery clamps and battery surfaces
cause leak currents which lead to the batter-
ies discharging.
!Do not use cleaning agents containing fuel.
Cleaning agents containing fuel corrode the
battery housing.
!If dirt gets into the battery cell, battery self-
discharge will increase and the battery may
be damaged.
The following points on battery care must be
observed:
XRegularly check the battery terminals and the
fastening of the negative cable to the chassis
to ensure that they are firmly seated.
XAlways keep the battery terminals and battery
surfaces clean and dry.
XLightly grease the undersides of the battery
terminals with acid-resistant grease.
XOnly clean the battery casing with a commer-
cially available cleaning product.
Care
Notes on care
GWARNING
If you use openings in the bodywork or
detachable parts as steps, you could:
Rslip and/or fall
Rdamage the vehicle and cause yourself to
fall.
There is a risk of injury.
Always use secure climbing aids, e.g. a suita-
ble ladder.
!Do not use the lower sliding door guide (car-
riage) as a step. Otherwise, you could damage
the paneling and/or the sliding door mecha-
nism.
!For cleaning your vehicle, do not use any of
the following:
Rdry, rough or hard cloths
Rabrasive cleaning agents
Rsolvents
Rcleaning agents containing solvents
Do not scrub.
Do not touch the surfaces or protective films
with hard objects, e.g. a ring or ice scraper.
You could otherwise scratch or damage the
surfaces and protective film.
!Do not park your vehicle for a long period of
time directly after cleaning, particularly after
cleaning the wheel rim with wheel cleaner.
Wheel cleaner can lead to the increased cor-
rosion of the brake discs and pads. Therefore,
drive for a few minutes after cleaning. By
heating up the brakes, the brake discs and
pads dry. The vehicle can then be parked for a
long period of time.
HEnvironmental note
Only clean your vehicle at specially designed
wash bays. Dispose of empty containers and
Care265
Maintenance and care
Z
Page 268 of 318
used cleaning productsinan environmentally
responsible manner.
HEnvironmental note
Dispose of empty packaging and cleaning
cloths inan environmentally responsible man-
ner.
Regular care of your veh icle isa condition for
retaining the qualityin the long term.
Use care products and cleaning agents recom-
mended and approved byMercedes-Benz.
Washing the vehicle and cleaning the
paintwork
Automatic car wash
GWAR NING
Braking eff iciency isreduced after washing
the veh icle. There isa risk of an acc ident.
After the veh iclehas been washed, brake
carefully whilepaying attention to the traff ic
conditions unt ilfull braking power isrestored.
!Make sure that the automat iccar wash is
suitable for the size of the veh icle.
Before washing the veh icle inan automat ic
car wash, fold inthe exterior mirrors and
remove any additional antennas. Otherwise,
the exterior mirror, antenna or the veh icle
itself could bedamaged.
Make sure that the exterior mirrors are fully
folded out again and that any additional
antennas are re-installed when you leave the
automat iccar wash.
!Make sure that:
Rthe side wind ows and the roof are com-
plet ely closed
Rthe clim ate control blower is swit ched off
Rthewind shield wiper swit chisat position 0
The veh iclecould otherwise be damaged.
You can wash the veh icle inan automat iccar
wash from the very start.
Wash off excess dirtbefore cleaning the veh icle
in an automat iccar wash. After putting the vehicle through an automat
ic
car wash, wipeoff wax from:
Rthe windshield
Rthewind shield wiperblades
This will prevent smears and reduce wiping
noises caused byresidue on the windshield.
Ron vehicles with rear doors, from the rear view
c
amera lens inthe top of the license plate
molding (
Ypage 269)
Washing by hand
In some countries, washing by hand is only
allowed at specially equipped washing bays.
Observe the legal requirements of the country
you are currently in when washing by hand.
XDo not use hot water and donot wash the
vehicle in direct sunlight.
XUse a soft car sponge.
XUse a mildcleaning agent, e.g. a Mercedes-
Benz approved car shampoo.
XThoroughly hose down the vehicle with a gen-
tle jet of water.
XDo not point the water jet directly towards the
air inlet grilles.
XUse plenty of water and rinse out the sponge
frequently.
XRinse the vehicle with clean water and dry
thoroughly with a chamois.
XDo not let the cleaning agents dry on the
paintwork.
When using the vehicle inwinter, remove all
traces of road salt deposits carefully and as
soon as possible.
Power washers
GWARNING
The water jet from a circular jet nozz le(dirt
blasters) can cause invisible exterior damage
to the tires or chassis components. Compo-
nents damaged in this way may fail unexpect-
edly. There is a risk of an accident.
Do not use power washers with circular jet
nozzles to clean the vehicle. Have damaged
tires or chassis components replaced imme-
diat ely.
!Under no circumstances use power washers
in the vehicle interior. The pressurized water
266Care
Maintenance and care
Page 269 of 318
and associated spray produced by the power
washer could cause extensive damage to thevehicle.
!When using high-pressure cleaning equip-
ment, maintain a minimum distance of
approx. 1 ft (30 cm)betwee nthe spra ynozzle
and th evehicl eparts. Do no tuse apowe r
washer wit h around-jet nozzle. You could
damage th evehicl eor engin eparts.
!Kee pth ewater je tmovin gconstantl ywhile
cleaning .This will avoid causin gdamage to
th evehicle.
Do no tpoin tth ewater je tat:
Rdoo rjoints
Rrear vie wcamera
Rair bellows
Rbrak ehoses
Rwhee lbalance weights
Relectrica lcomponent s
Relectricalconnection s
Rseals
Rdrive train ,especially no tat th eintermedi-
ate bearin gof th epropelle rshaf t
Cleaning the engine
!Water mus tno tente rintak eor ventilation
openings. Whe ncleaning wit hhigh pressur e
water or steam cleaners ,th espray mus tno t
be aime ddirectl yat electrica lcomponent sor
th eterminals of electrica llines.
Preserve th eengin eafter th eengin ehas been
cleaned. Protect th ebelt drive system from
exposure to th epreservative agent.
Also observ eth einformation under "Powe r
washers " (
Ypage 266).
Cleaning the paintwork
!Do notaffix:
Rstickers
Rfilm s
Rmagneti cplates or similar items
to painte dsurfaces. You could otherwise
damage th epaintwork .
Scratches, corrosiv edeposits, area saffecte dby
corrosio nand damage caused by inadequate
car ecanno talways be completely repaired. In
suc hcases, visit aqualified specialist workshop .
XRemove impurities immediately, wher epos -
sible, whils tavoidin grubbin gto ohard.
XSoak insec tremain swit hinsec tremove rand
rinse off th etreated area safterwards .
XSoak birddroppings wit hwater and rinse off
th etreated area safterwards .
XRemove coolant, brak efluid, tree resin ,oils ,
fuel sand greases by rubbin ggentl ywit h a
cloth soaked in petroleum ether or lighte r
fluid.
XUse tar remove rto remove tar stains.
XUse silicon eremove rto remove wax .
Cleaning the windows
GWARNING
You could become trapped by th ewindshield
wiper sif they start movin gwhile cleaning th e
windshield or wiper blades. There is aris kof
injury.
Always switch off th ewindshield wiper sand
th eignition before cleaning th ewindshield or
wiper blades.
!Do no tfol dth ewindshield wiper saway from
th ewindshield unless th ehoo dis closed .Oth-
erwise, you could damage th ehood.
!Hold th ewiper arm securel ywhen foldin g
back. The windshield could be damaged if th e
wiper arm smack sagainst it suddenly.
!Do no tuse dry cloths, abrasiv eproducts ,
solvents or cleaning agents containin gsol-
vents to clean th einside of th ewindows .Do
no ttouch th einside sof th ewindows wit h
har dobjects ,e.g. an ice scrape ror ring. There
is otherwise aris kof damagin gth ewindows .
!Clean thewater drainag echannels of th e
windshield and th erear window at regular
intervals. Deposit ssuc has leaves, petals and
pollen may under certain circumstances pre -
ven twater from draining away. This can lead
to corrosio ndamage and damage to elec -
tronic components.
XClean th einside and outside of th ewindows
wit h a damp cloth and acleaning agen tthat is
recommended and approve dby Mercedes -
Benz .
Care267
Maintenance and care
Z
Page 270 of 318
Exterior
Cleaning the wheels
!Do not use any acidic or alkaline cleaning
agents. They can cause corrosion on the
wheel bolts or the retainer springs for the
wheel-balancing weights.
!Do not park your vehicle for a long period of
time directly after cleaning, particularly after
cleaning the wheel rim with wheel cleaner.
Wheel cleaner can lead to the increased cor-
rosion of the brake discs and pads. Therefore,
drive for a few minutes after cleaning. By
heating up the brakes, the brake discs and
pads dry. The vehicle can then be parked for a
long period of time.
If you clean the wheels with a power washer,
observe the safety notes for the power washer
(
Ypage 266). You could otherwise damage the
tires.
Cleaning the wiper blades
GWARNING
You could become trapped by the windshield wipers if they start moving while cleaning the
windshield or wiper blades. There is a risk of
injury.
Always switch off the windshield wipers and
the ignition before cleaning the windshield or
wiper blades.
!Do not fold the windshield wipers away from
the windshield unless the hood is closed. Oth-
erwise, you could damage the hood.
!Do not pull the wiper blade. Otherwise, the
wiper blade could be damaged.
!Do not clean wiper blades too often and do
not rub them too hard. Otherwise, the graph-
ite coating could be damaged. This could
cause wiper noise.
!Hold the wiper arm securely when folding
back. The windshield could be damaged if the
wiper arm smacks against it suddenly.
XTurn the SmartKey to position 0in the ignition
lock or remove the SmartKey.
XFold the windshield wiper arms away from the
windshield until you feel them engage.
XCarefully clean the wiper blades with a damp
cloth.
XFold back the wiper arms before switching on
the ignition.
Cleaning the exterior lighting
!Only use cleaning agents or cleaning cloths
which are suitable for plastic light lenses.
Unsuitable cleaning agents or cleaning cloths
could scratch or damage the plastic light len- ses.
XClean the plastic covers of the exterior light-
ing with a damp sponge and a mild cleaning
agent, e.g. Mercedes-Benz car shampoo, or
with cleaning cloths.
Cleaning the sensors
!Do not use dry, coarse or hard cloths and do
not scrub. You will otherwise scratch or dam-
age the sensors.
If you clean the sensors with a power washer
or steam cleaner, observe the information
provided by the manufacturer regarding the
distance to be maintained between the vehi-
cle and the nozzle of the power washer.
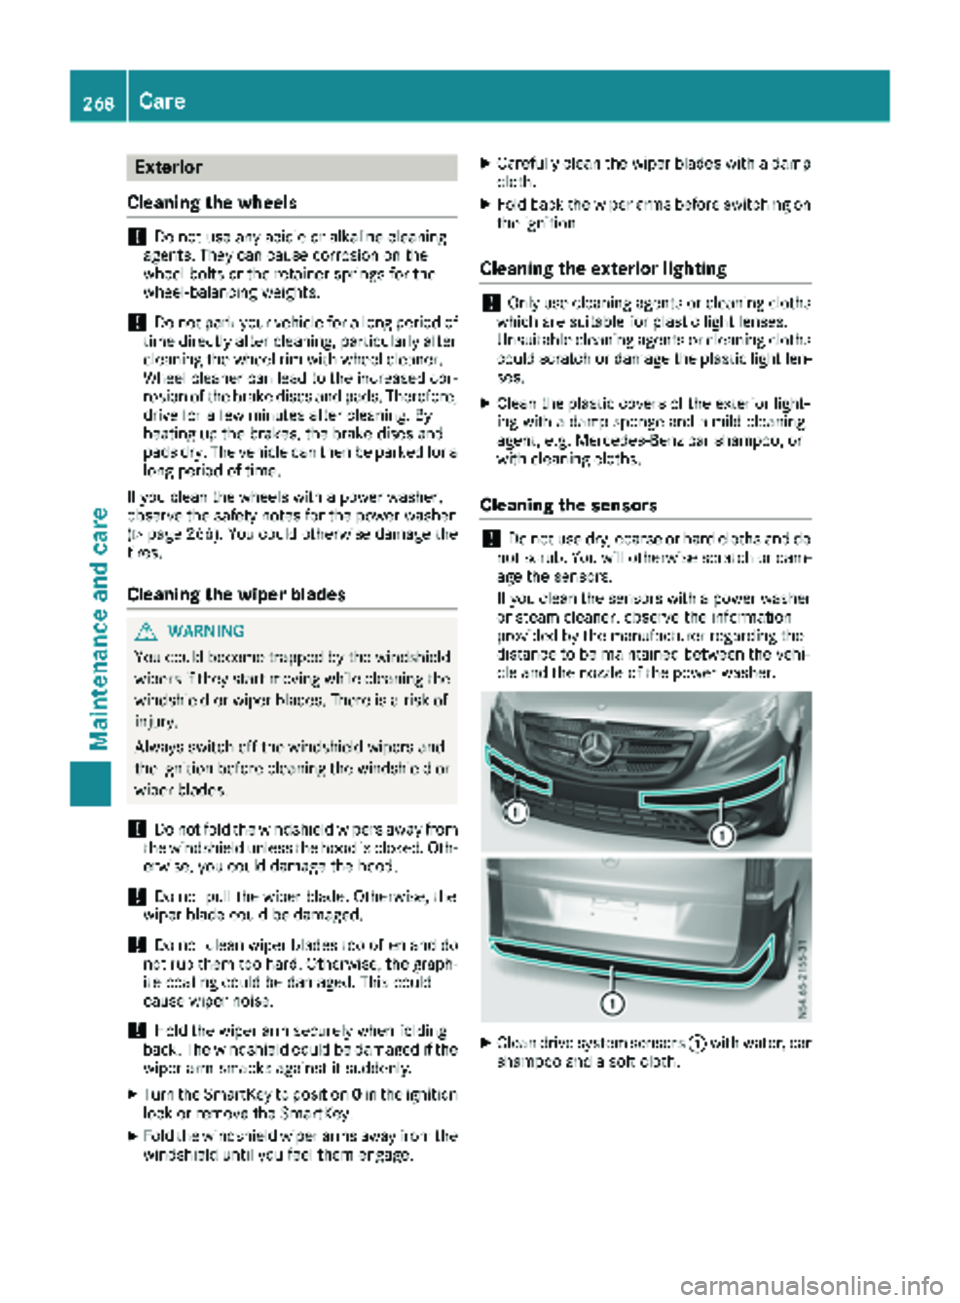
XClean drive system sensors :with water, car
shampoo and a soft cloth.
268Care
Maintenance and care