MERCEDES-BENZ METRIS 2020 MY20 Operator’s Manual
Manufacturer: MERCEDES-BENZ, Model Year: 2020, Model line: METRIS, Model: MERCEDES-BENZ METRIS 2020Pages: 320, PDF Size: 26.38 MB
Page 111 of 320

Bulb holder
=
Turn signals/brake lamps/tail lamps/
standing lamps
? Backup lamp
A Rear fog lamp (driver's side only)
X Apply light pressure to the corresponding
bulb, turn it counter-clockwise and remove
it from the bulb holder.
X Press the new bulb into the socket and
screw it in clockwise.
X Insert bulb holder ; into the tail lamp and
tighten all three screws :.
X Install the tail lamp (Y page 108).Windshield wipers
Switching the windshield wiper
on/off
! Do not operate the windshield wipers
when the windshield is dry, as this could
damage the wiper blades. Moreover, dust
that has collected on the windshield can
scratch the glass if wiping takes place when
the windshield is dry.
If it is necessary to switch on the windshield
wipers in dry weather conditions, always use
washer fluid when operating the windshield
wipers.
! If the windshield wipers leave smears on
the windshield after the vehicle has been
washed in an automatic car wash, wax or
other residues may be the reason for this.
Clean the windshield using washer fluid
after washing the vehicle in an automatic
car wash.
! Intermittent wiping with rain sensor: due
to optical influences and the windshield becoming dirty in dry weather conditions,
the windshield wipers may be activated
inadvertently. This could then damage the
windshield wiper blades or scratch the wind-
shield.
For this reason, you should always switch
off the windshield wipers in dry weather. 1
$ Windshield wipers off
2 Ä Intermittent wipe, low (rain sensor
set to low sensitivity)
3 Å Intermittent wipe, high (rain sensor
set to high sensitivity)
4 ° Continuous wipe, slow
5 ¯ Continuous wipe, fast
B î 1st pressure point – single wipe; 2nd
pressure point – wipe with washer fluid
X Turn the key to position 1 or 2 in the igni-
tion lock.
X Turn the í wiper switch to the corre-
sponding position.
In the Ä or Å
positions, the appropriate
wiping frequency is set automatically accord-
ing to the intensity of the rain. In the Å
position, the rain sensor is more sensitive to
precipitation than in the Ä position, caus-
ing the windshield wipers to wipe more fre-
quently.
The windshield will no longer be wiped prop-
erly if the wiper blades are worn. This may pre-
vent you from observing the traffic conditions.
Information on replacing the wiper blades can
be found under "Replacing wiper blades"
( Y page 110). Windshield wipers
109
Lights and windshield wipers Z
Page 112 of 320

Switching the rear window wiper
on/off
1
b To wipe with washer fluid
2 ° Intermittent wipe
3 $ Rear window wiper off
4 b To wipe with washer fluid
X Turn the key to position 1 or 2 in the igni-
tion lock.
X Move the è switch to the corresponding
position.
If the rear window wiper is activated, the
è symbol is shown in the status area of
the display.
The Status Overview in the Assist.
menu then also shows the è symbol for
vehicles with steering wheel buttons
(Y page
189).
X To wipe with washer fluid: press the è
switch beyond the current position as far as
it will go to 1 or press and hold 4.
When you release the è switch, the rear
window wiper continues to wipe for about
another five seconds. The rear window
wiper then wipes according to the original
position 2 or 3.
The rear window wiper switches on automati-
cally if you engage reverse gear and the wind-
shield wipers are on.
If the vehicle is stationary and you open the
tailgate or rear-end door, the rear window
wiper will stop automatically. The rear window
wiper will only resume wiping again when the
tailgate and rear-end door are closed and you
pull away again.
The rear window will no longer be wiped prop-
erly if the wiper blade is worn. This may pre-
vent you from observing the traffic conditions.
Information on replacing the wiper blade can be found under "Replacing wiper blades"
(
Y page
110). Replacing the wiper blades
Important safety notes G
WARNING
If the windshield wipers begin to move while
you are changing the wiper blades, you
could be trapped by the wiper arm. There is
a risk of injury.
Always switch off the windshield wipers and
ignition before changing the wiper blades.
! Never open the hood/tailgate or rear
doors if a windshield wiper arm has been
folded away from the windshield/rear win-
dow.
Never fold a windshield wiper arm without a
wiper blade back onto the windshield/rear
window.
Hold the windshield wiper arm firmly when
you change the wiper blade. If you release
the windshield wiper arm without a wiper
blade and it falls onto the windshield/rear
window, the windshield/rear window may
be damaged by the force of the impact.
Mercedes-Benz recommends that you have
the wiper blades changed at a qualified spe-
cialist workshop.
! Only hold the wiper blade by the wiper
arm. You could otherwise damage the wiper
rubber.
Wiper blades are wear parts. The windshield
will no longer be wiped properly if the wiper
blades are worn. This may prevent you from
observing the traffic conditions.
Please observe the service indicator after
changing the wiper blades of the windshield
wiper.
Service indicator Replacement wiper blades for the windshield
wiper have a service indicator on the tip of the
wiper blade.
Depending on the amount of use, the service
indicator will change color from black to yel-
low.110
Windshield wipers
Lights and windshield wipers
Page 113 of 320
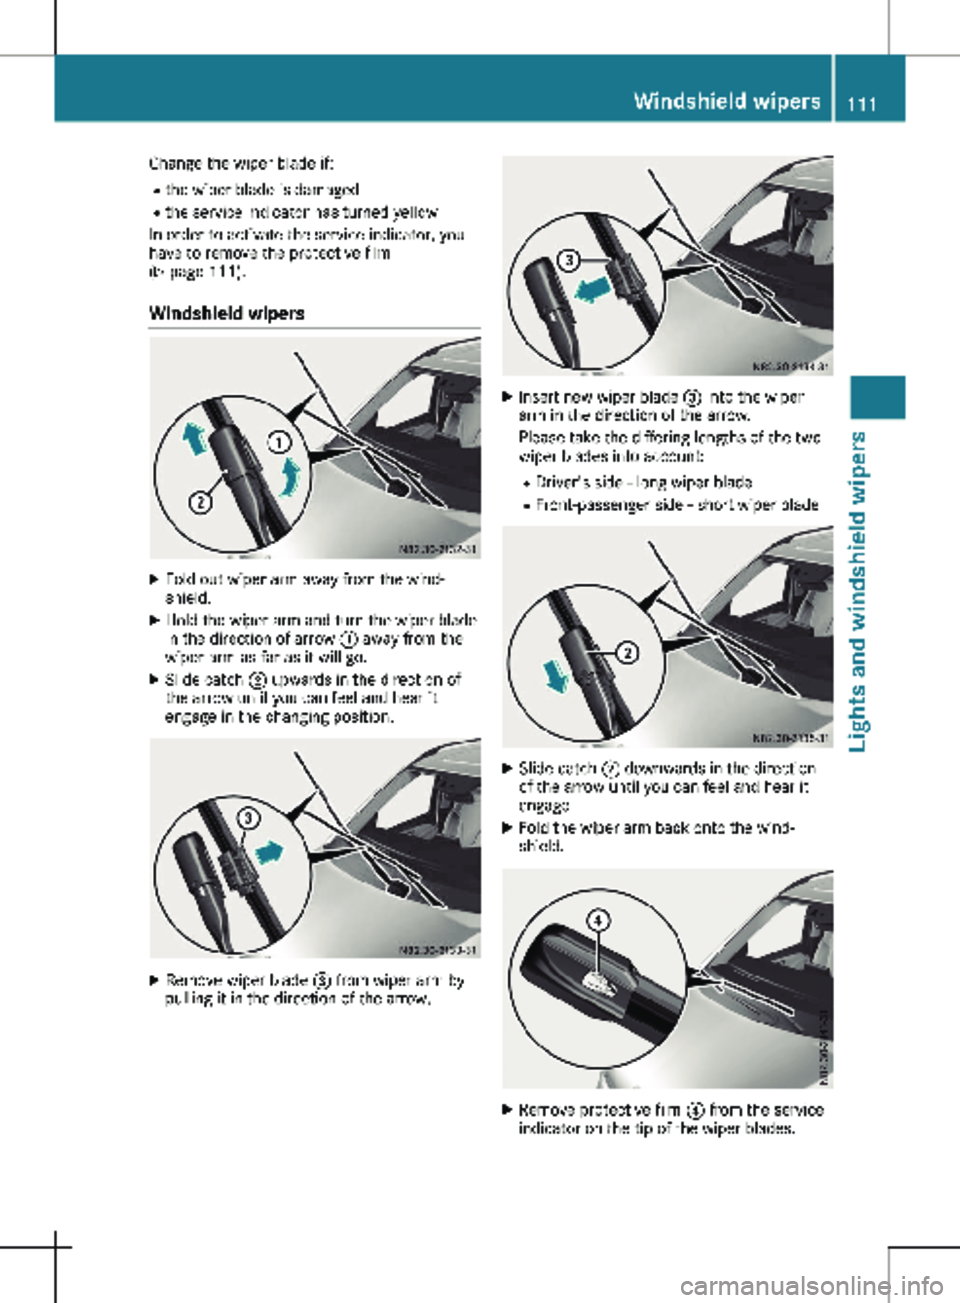
Change the wiper blade if:
R the wiper blade is damaged
R the service indicator has turned yellow
In order to activate the service indicator, you
have to remove the protective film
( Y page
111).
Windshield wipers X
Fold out wiper arm away from the wind-
shield.
X Hold the wiper arm and turn the wiper blade
in the direction of arrow : away from the
wiper arm as far as it will go.
X Slide catch ; upwards in the direction of
the arrow until you can feel and hear it
engage in the changing position. X
Remove wiper blade = from wiper arm by
pulling it in the direction of the arrow. X
Insert new wiper blade = into the wiper
arm in the direction of the arrow.
Please take the differing lengths of the two
wiper blades into account:
R Driver's side - long wiper blade
R Front-passenger side - short wiper blade X
Slide catch ; downwards in the direction
of the arrow until you can feel and hear it
engage.
X Fold the wiper arm back onto the wind-
shield. X
Remove protective film ? from the service
indicator on the tip of the wiper blades. Windshield wipers
111
Lights and windshield wipers Z
Page 114 of 320
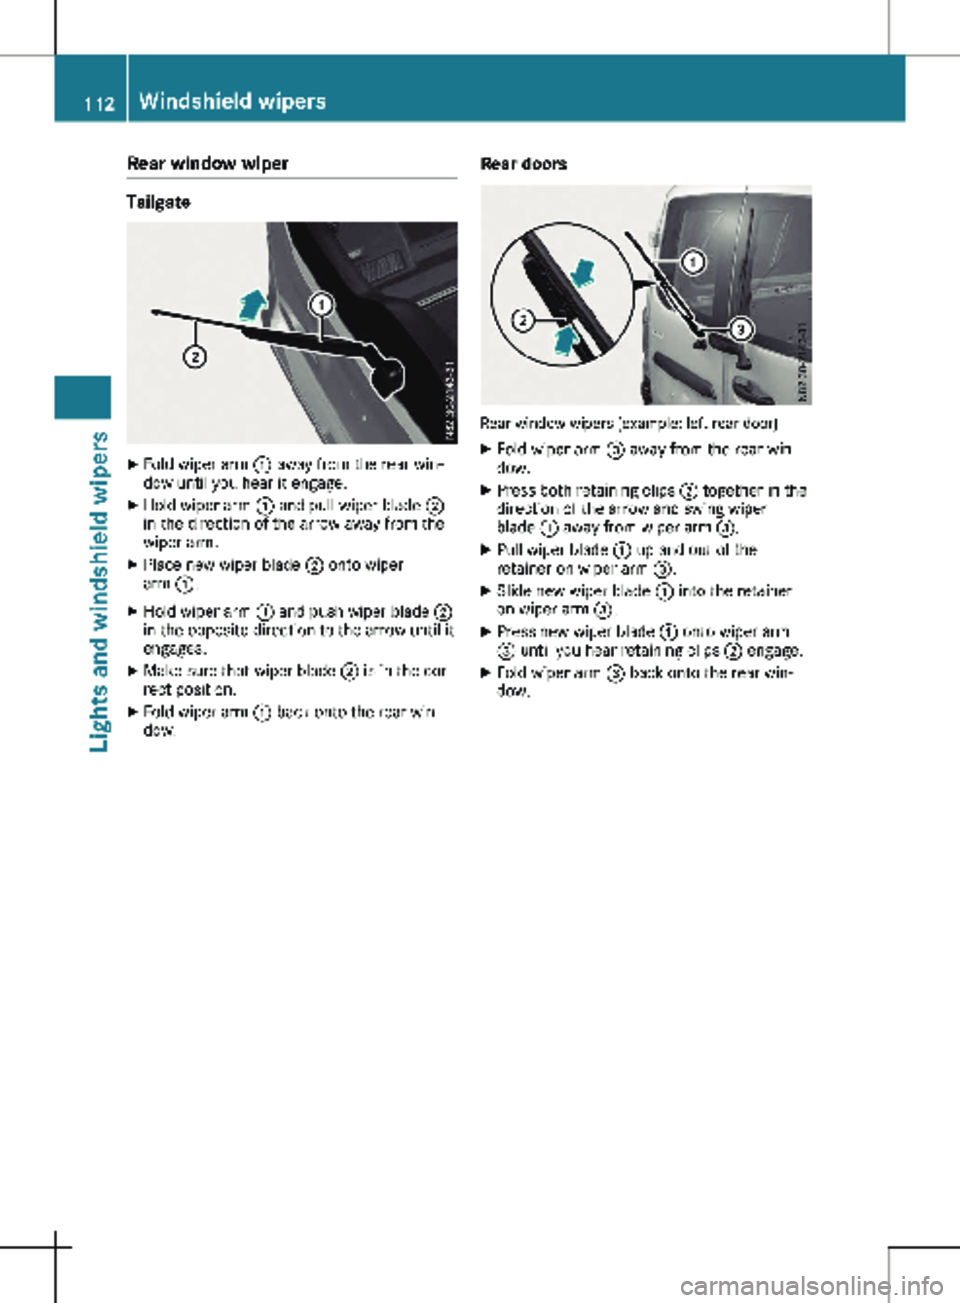
Rear window wiper
Tailgate
X
Fold wiper arm : away from the rear win-
dow until you hear it engage.
X Hold wiper arm : and pull wiper blade ;
in the direction of the arrow away from the
wiper arm.
X Place new wiper blade ; onto wiper
arm :.
X Hold wiper arm : and push wiper blade ;
in the opposite direction to the arrow until it
engages.
X Make sure that wiper blade ; is in the cor-
rect position.
X Fold wiper arm : back onto the rear win-
dow. Rear doors Rear window wipers (example: left rear door)
X Fold wiper arm = away from the rear win-
dow.
X Press both retaining clips ; together in the
direction of the arrow and swing wiper
blade : away from wiper arm =.
X Pull wiper blade : up and out of the
retainer on wiper arm =.
X Slide new wiper blade : into the retainer
on wiper arm =.
X Press new wiper blade : onto wiper arm
= until you hear retaining clips ; engage.
X Fold wiper arm = back onto the rear win-
dow. 112
Windshield wipersLights and windshield wipers
Page 115 of 320
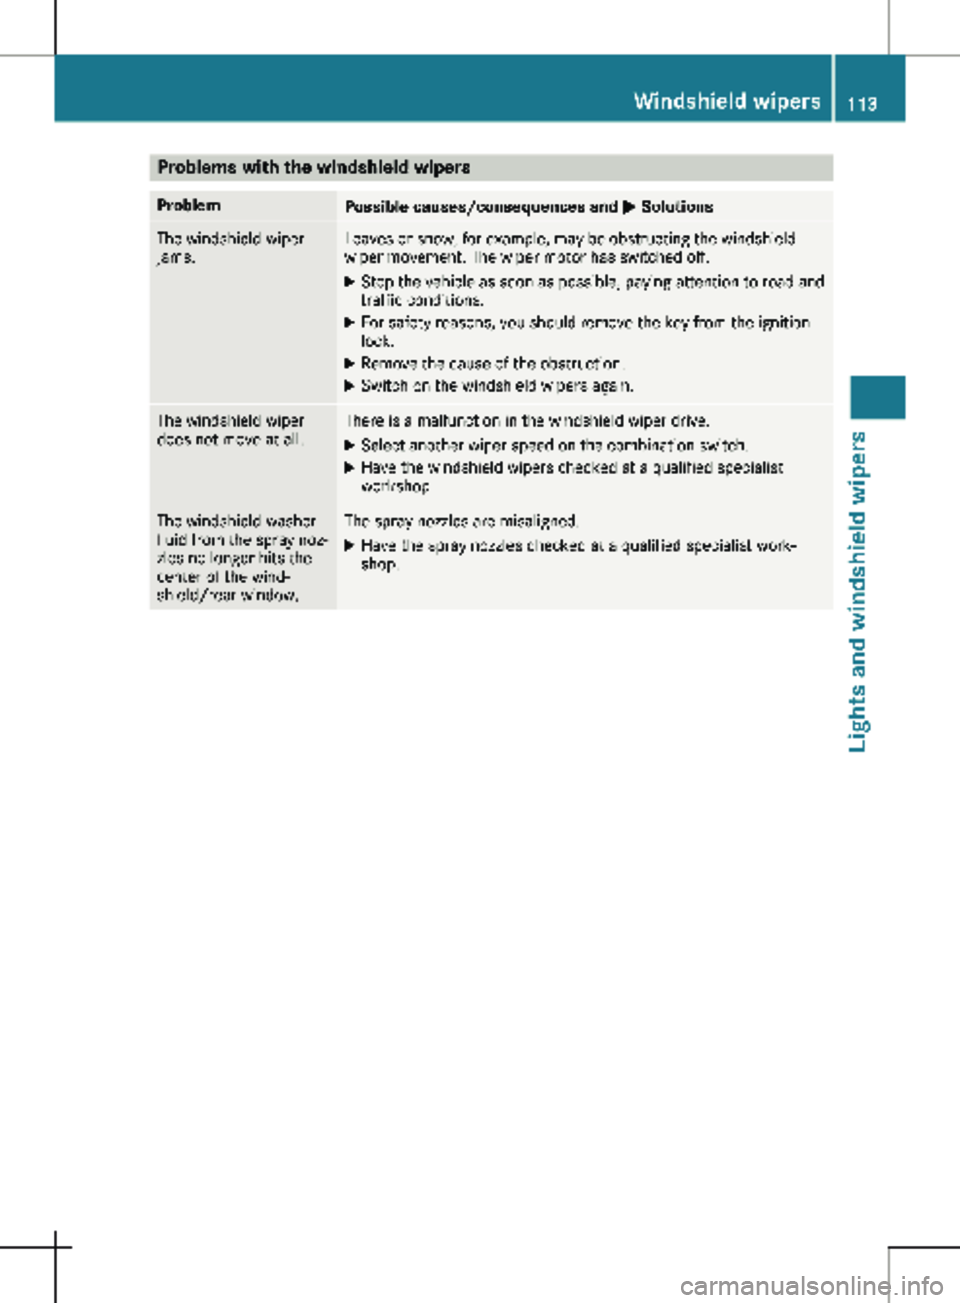
Problems with the windshield wipers
Problem
Possible causes/consequences and
M SolutionsThe windshield wiper
jams. Leaves or snow, for example, may be obstructing the windshield
wiper movement. The wiper motor has switched off.
X Stop the vehicle as soon as possible, paying attention to road and
traffic conditions.
X For safety reasons, you should remove the key from the ignition
lock.
X Remove the cause of the obstruction.
X Switch on the windshield wipers again. The windshield wiper
does not move at all. There is a malfunction in the windshield wiper drive.
X Select another wiper speed on the combination switch.
X Have the windshield wipers checked at a qualified specialist
workshop. The windshield washer
fluid from the spray noz-
zles no longer hits the
center of the wind-
shield/rear window. The spray nozzles are misaligned.
X Have the spray nozzles checked at a qualified specialist work-
shop. Windshield wipers
113Lights and windshield wipers Z
Page 116 of 320
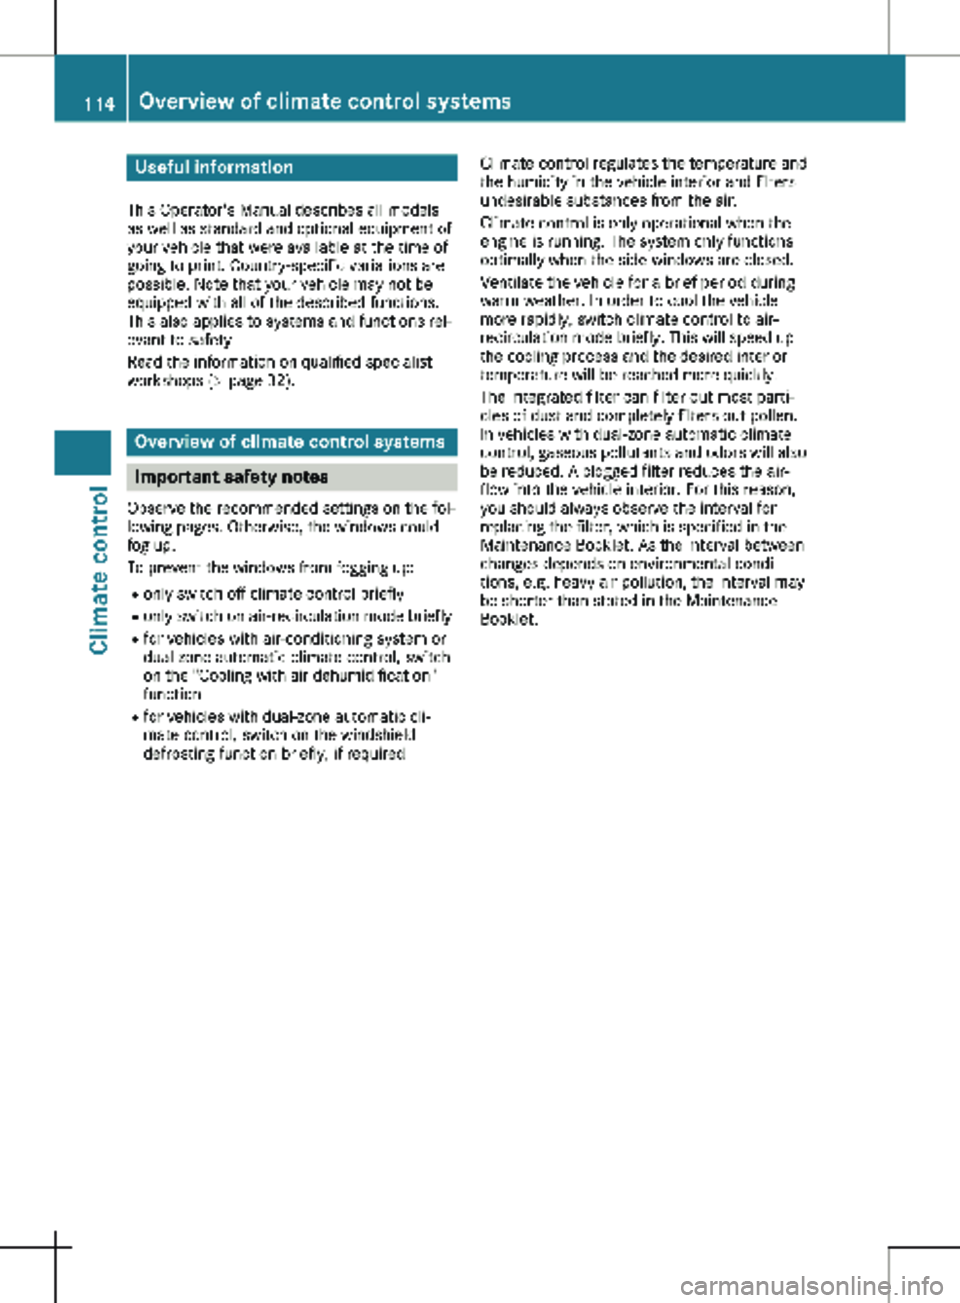
Useful information
This Operator's Manual describes all models
as well as standard and optional equipment of
your vehicle that were available at the time of
going to print. Country-specific variations are
possible. Note that your vehicle may not be
equipped with all of the described functions.
This also applies to systems and functions rel-
evant to safety.
Read the information on qualified specialist
workshops (Y page
32).Overview of climate control systems
Important safety notes
Observe the recommended settings on the fol-
lowing pages. Otherwise, the windows could
fog up.
To prevent the windows from fogging up:
R only switch off climate control briefly
R only switch on air-recirculation mode briefly
R for vehicles with air-conditioning system or
dual-zone automatic climate control, switch
on the "Cooling with air dehumidification"
function
R for vehicles with dual-zone automatic cli-
mate control, switch on the windshield
defrosting function briefly, if required Climate control regulates the temperature and
the humidity in the vehicle interior and filters
undesirable substances from the air.
Climate control is only operational when the
engine is running. The system only functions
optimally when the side windows are closed.
Ventilate the vehicle for a brief period during
warm weather. In order to cool the vehicle
more rapidly, switch climate control to air-
recirculation mode briefly. This will speed up
the cooling process and the desired interior
temperature will be reached more quickly.
The integrated filter can filter out most parti-
cles of dust and completely filters out pollen.
In vehicles with dual-zone automatic climate
control, gaseous pollutants and odors will also
be reduced. A clogged filter reduces the air-
flow into the vehicle interior. For this reason,
you should always observe the interval for
replacing the filter, which is specified in the
Maintenance Booklet. As the interval between
changes depends on environmental condi-
tions, e.g. heavy air pollution, the interval may
be shorter than stated in the Maintenance
Booklet. 114
Overview of climate control systems
Climate control
Page 117 of 320
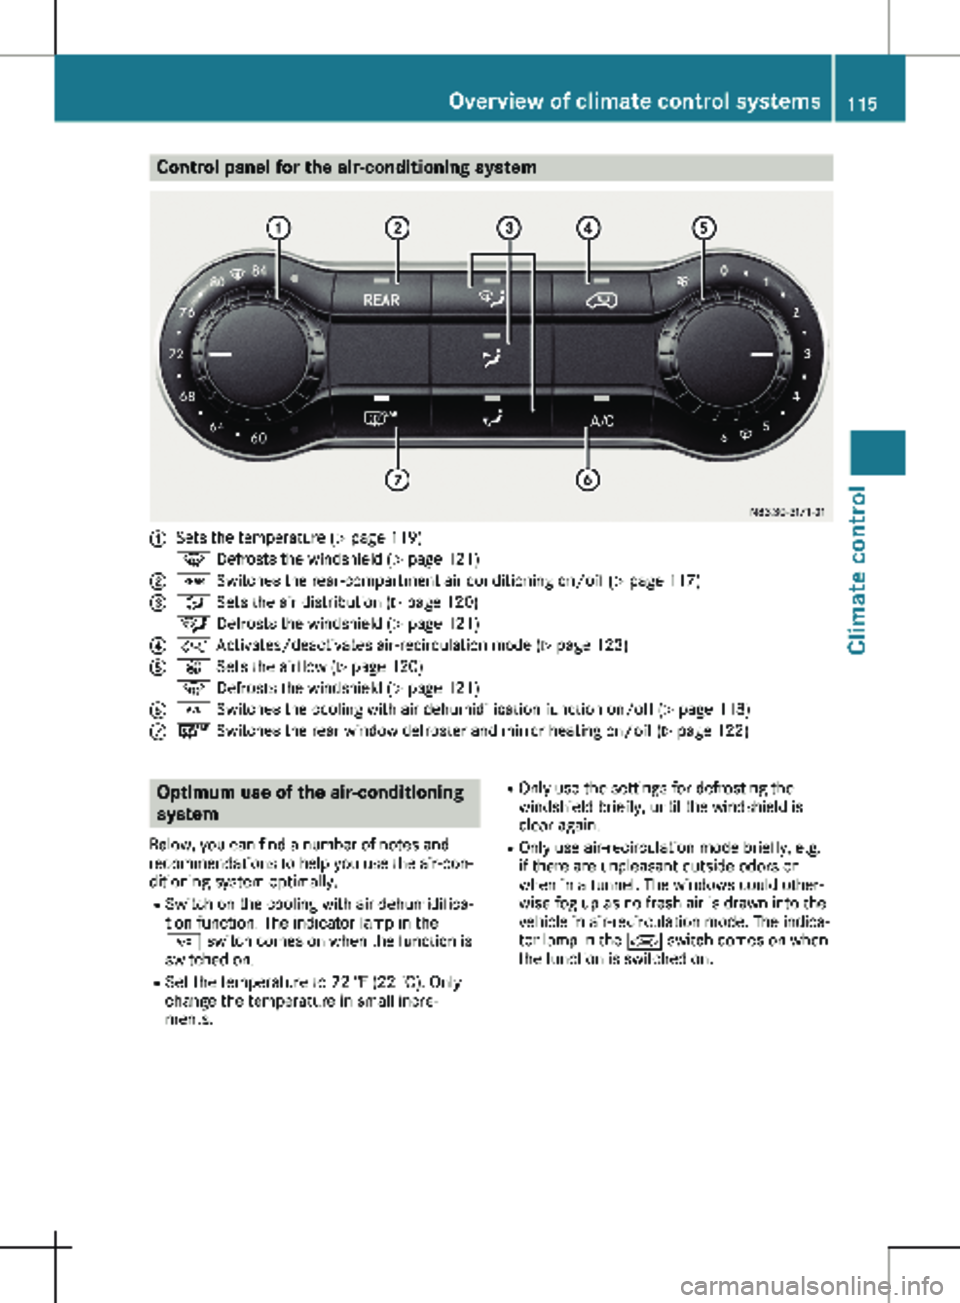
Control panel for the air-conditioning system
:
Sets the temperature (Y page 119)
z Defrosts the windshield (Y page
121)
; / Switches the rear-compartment air conditioning on/off
(Y page 117)
= _ Sets the air distribution (Y page
120)
¯ Defrosts the windshield (Y page
121)
? h Activates/deactivates air-recirculation mode (Y page
123)
A K Sets the airflow ( Y page
120)
z Defrosts the windshield (Y page
121)
B ¿ Switches the cooling with air dehumidification function on/off (Y page
118)
C ¤ Switches the rear window defroster and mirror heating on/off
(Y page 122) Optimum use of the air-conditioning
system
Below, you can find a number of notes and
recommendations to help you use the air-con-
ditioning system optimally. R Switch on the cooling with air dehumidifica-
tion function. The indicator lamp in the
¿ switch comes on when the function is
switched on.
R Set the temperature to
72 ‡ (22 †). Only
change the temperature in small incre-
ments. R
Only use the settings for defrosting the
windshield briefly, until the windshield is
clear again.
R Only use air-recirculation mode briefly, e.g.
if there are unpleasant outside odors or
when in a tunnel. The windows could other-
wise fog up as no fresh air is drawn into the
vehicle in air-recirculation mode. The indica-
tor lamp in the h switch comes on when
the function is switched on. Overview of climate control systems
115
Climate control
Page 118 of 320
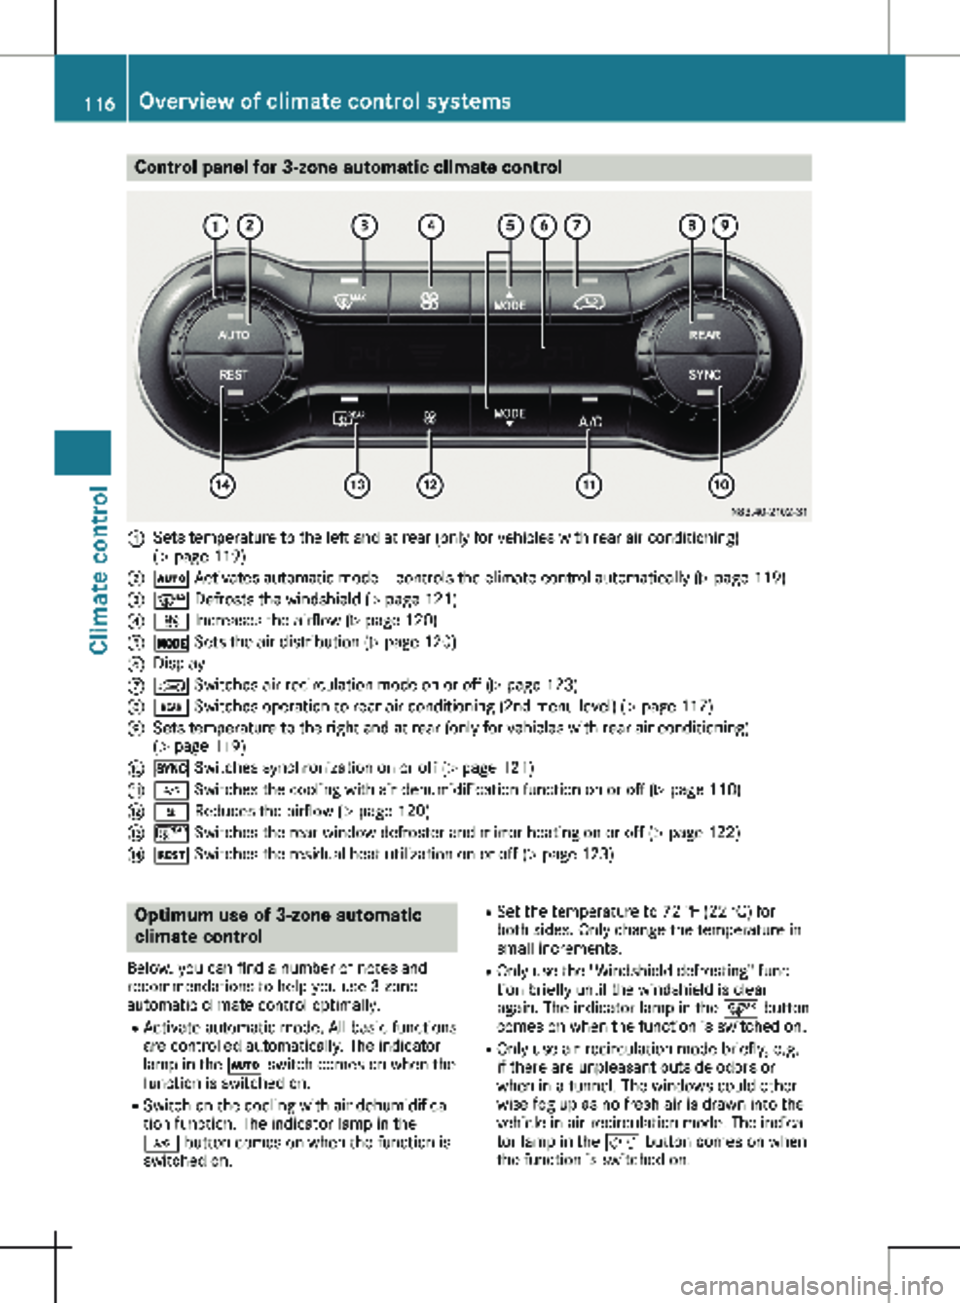
Control panel for 3-zone automatic climate control
:
Sets temperature to the left and at rear (only for vehicles with rear air conditioning)
(Y page 119)
; Ã Activates automatic mode – controls the climate control automatically
(Y page 119)
= ¬ Defrosts the windshield
(Y page 121)
? K Increases the airflow
(Y page 120)
A Ä Sets the air distribution (Y page
120)
B Display
C h Switches air-recirculation mode on or off
(Y page 123)
D / Switches operation to rear air conditioning (2nd menu level) ( Y page
117)
E Sets temperature to the right and at rear (only for vehicles with rear air conditioning)
( Y page
119)
F 0 Switches synchronization on or off
(Y page 121)
G ¿ Switches the cooling with air dehumidification function on or off ( Y page 118)
H I Reduces the airflow
(Y page 120)
I ¤ Switches the rear window defroster and mirror heating on or off (Y page
122)
J Ì Switches the residual heat utilization on or off ( Y page
123)Optimum use of 3-zone automatic
climate control
Below, you can find a number of notes and
recommendations to help you use 3-zone
automatic climate control optimally. R Activate automatic mode. All basic functions
are controlled automatically. The indicator
lamp in the à switch comes on when the
function is switched on.
R Switch on the cooling with air dehumidifica-
tion function. The indicator lamp in the
¿ button comes on when the function is
switched on. R
Set the temperature to
72 ‡ (22 †) for
both sides. Only change the temperature in
small increments.
R Only use the "Windshield defrosting" func-
tion briefly until the windshield is clear
again. The indicator lamp in the ¬ button
comes on when the function is switched on.
R Only use air-recirculation mode briefly, e.g.
if there are unpleasant outside odors or
when in a tunnel. The windows could other-
wise fog up as no fresh air is drawn into the
vehicle in air-recirculation mode. The indica-
tor lamp in the h button comes on when
the function is switched on. 116
Overview of climate control systems
Climate control
Page 119 of 320
R
If you wish to use the driver's side settings
on the co-driver's side and, for vehicles with
rear-compartment air conditioning, for the
rear compartment as well, use the "Synchro-
nization" function. The indicator lamp in the
0 button comes on when the function is
switched on.
R After long journeys, you can use the residual
heat of the engine to heat the stationary
vehicle. The residual heat utilization can
only be switched on or off while the ignition
is switched off. The indicator lamp in the
Ì button comes on when the function is
switched on.
Approximately 60 minutes after parking the
vehicle, 3-zone automatic climate control can
switch on automatically, depending on the out-
side temperature. The vehicle is then ventila-
ted for about 30 minutes at low fan setting
and 3-zone automatic climate control is dried
out. Optimum use of the rear compart-
ment air conditioning
Vehicles with air-conditioning system
Switch the rear-compartment air-conditioning
system on and off using the air-conditioning
system control panel. When you switch on the
rear-compartment air conditioning, your set-
tings for temperature, airflow and air distribu-
tion are automatically adopted on the control
panel for the rear-compartment air condition-
ing.
The indicator lamp in the / button comes
on when the rear-compartment air-condition-
ing is switched on
(Y page 115).
Vehicles with dual-zone automatic climate
control
To operate the rear-compartment air condi-
tioning, use the control panel of the dual-zone
automatic climate control system. When you
switch on the rear-compartment air condition-
ing, you can set the temperature and airflow
separately on the control panel. The airflow
setting is automatically adopted for the rear-
compartment air conditioning. When dual-zone
automatic climate control is in à automatic
mode, the air distribution of the rear-compart-
ment air conditioning is also automatically
adjusted.
When you set the temperature and airflow of
the rear-compartment air conditioning, the indicator lamp of the / button
(Y page
116) flashes. When the rear-compart-
ment air conditioning is switched on, the indi-
cator lamp on the / button lights up.
For optimum climate control, set the tempera-
ture to 72 ‡ (22 †) and switch on à auto-
matic mode. Only change the temperature in
small increments. Operating the climate control sys-
tem
Switching the climate control on/off
Important safety notes When the climate control is switched off, air
intake and air circulation also stop. Only use
this setting for a brief period. Otherwise, the
windows could fog up.
Air-conditioning system X
Turn the key to position 2 in the ignition
lock.
X To switch on: turn airflow control A clock-
wise to at least level 1 – (Y page
115).
X To switch off: turn airflow control A coun-
ter-clockwise to position 0.
Dual-zone automatic climate control X
Turn the key to position 2 in the ignition
lock.
X To switch on: press the à button.
The indicator lamp in the à button and
the display are switched on. The climate
control is automatically adjusted depending
on the set temperature
(Y page 119).
or
X Press the K button and set blower set-
ting 1 or above.
The blower settings are shown in the display
as a bar graph.
X To switch off: press the I button and,
after reaching the lowest blower speed,
press it again.
The control panel display goes off.
Preferably switch on climate control using the
à button. Operating the climate control system
117
Climate control
Page 120 of 320
Rear-compartment air-conditioning
system
Vehicles with air-conditioning system
X Switch on air-conditioning system.
X To activate/deactivate: press the /
button on the air-conditioning system con-
trol panel.
The indicator lamp in the / button
comes on when the rear-compartment air
conditioning is switched on. The settings for
temperature, airflow and, in the case of
rear-compartment air conditioning, air distri-
bution are adopted for the rear-compart-
ment air conditioning.
Vehicles with dual-zone automatic cli-
mate control
X Switch on dual-zone automatic climate con-
trol.
X To switch on: press the / button on the
control panel.
The indicator lamp in the / button
flashes. The control panel display shows the
second menu level for the temperature and
airflow setting of the rear-compartment air
conditioning.
X Press the K button and set blower set-
ting 1 or above for the rear-compartment air
conditioning.
The blower settings are shown in the display
as a bar graph. The rear-compartment air
conditioning is switched on.
X If necessary set the temperature for the
rear-compartment air conditioning using
temperature control : or E (Y page
116).
The display shows the selected rear-com-
partment temperature.
If you do not make any more settings for
approximately ten seconds, the control
panel display shows menu level 1 again for
the automatic climate control settings. The
indicator lamp in the / button remains
lit.
i The air distribution setting applies both to
automatic climate control and to the rear-
compartment air conditioning and cannot be
set separately for the two.
X To switch off: press the / button on the
control panel.
The indicator lamp in the / button
flashes. The control panel display shows the second menu level for the temperature and
airflow setting of the rear-compartment air
conditioning.
X Press the I button and, after reaching
the lowest blower speed, press it again.
The control panel display goes off and the
rear-compartment air conditioning is
switched off.
If you do not make any more settings for
approximately ten seconds, the control
panel display shows menu level 1 again for
the automatic climate control settings. The
indicator lamp in the / button goes out. Switching the cooling with air dehu-
midification function on/off
Important safety notes The cooling with air dehumidification function
of the air conditioning or automatic climate
control is only available when the engine is
running. The air inside the vehicle is cooled
and dehumidified according to the tempera-
ture selected.
Condensation may appear on the underside of
the vehicle when in cooling mode. This is nor-
mal and not a sign that there is a malfunction.
If you switch off the "Cooling with air dehumid-
ification" function, the air inside the vehicle
will not be cooled (in warm weather) or dehu-
midified. Therefore, only switch off the "Cool-
ing with air dehumidification" function briefly.
Otherwise, the windows will fog up more
quickly.
Switching on and off For dual-zone automatic climate control, the
function for automatic climate control settings
can only be activated or deactivated on the
first menu level. If you do not set a new value
for the rear-compartment climate control in
the second menu level within approx. ten sec-
onds, the control panel display goes back to
the first menu level.
X Press the ¿ button.
The indicator lamp in the ¿ switch
comes on when the function is switched on.
i The cooling with air dehumidification func-
tion has a delayed switch-off feature. 118
Operating the climate control system
Climate control