sensor MERCEDES-BENZ METRIS 2020 MY20 Operator’s Manual
[x] Cancel search | Manufacturer: MERCEDES-BENZ, Model Year: 2020, Model line: METRIS, Model: MERCEDES-BENZ METRIS 2020Pages: 320, PDF Size: 26.38 MB
Page 154 of 320
Important safety notes
G
WARNING
Blind Spot Assist does not react to:
R vehicles overtaken too closely on the side,
placing them in the blind spot area
R vehicles which approach with a large
speed differential and overtake your vehi-
cle
As a result, Blind Spot Assist may not give
warnings in such situations. There is a risk
of an accident.
Always observe the traffic conditions care-
fully, and maintain a safe lateral distance.
Blind Spot Assist is only an aid. It may fail to
detect some vehicles and is no substitute for
attentive driving. Always ensure that there is
sufficient distance to the side for other road
users and obstacles.
In particular, the detection of obstacles can be
impaired in the case of:
R dirt on the sensors or anything else covering
the sensors
R fog, heavy rain or snow
R narrow vehicles, e.g. motorcycles or bicy-
cles
R very wide lanes
R narrow lanes
R vehicles not driving in the middle of their
lane
R barriers or other road boundaries
Vehicles in the monitoring range are then not
indicated.
i USA only:
This device has been approved by the FCC
as a "Vehicular Radar System". The radar
sensor is intended for use in an automotive
radar system only. Removal, tampering, or
altering of the device will void any warran-
ties, and is not permitted by the FCC. Do
not tamper with, alter, or use in any non-
approved way.
Any unauthorized modification to this device
could void the user’s authority to operate
the equipment. Monitoring range of the sensors
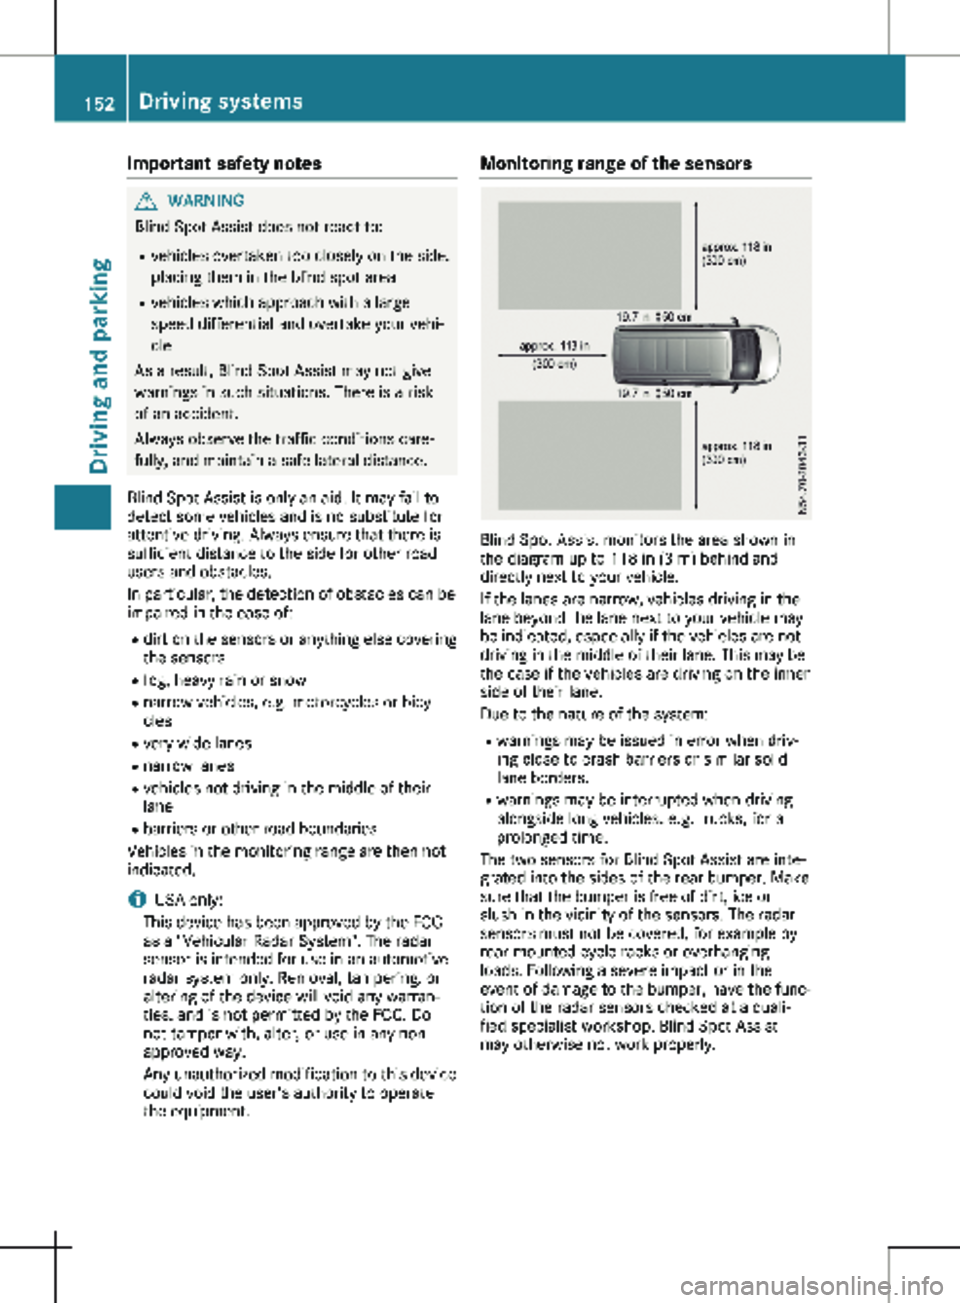
Blind Spot Assist monitors the area shown in
the diagram up to
118 in (3 m) behind and
directly next to your vehicle.
If the lanes are narrow, vehicles driving in the
lane beyond the lane next to your vehicle may
be indicated, especially if the vehicles are not
driving in the middle of their lane. This may be
the case if the vehicles are driving on the inner
side of their lane.
Due to the nature of the system:
R warnings may be issued in error when driv-
ing close to crash barriers or similar solid
lane borders.
R warnings may be interrupted when driving
alongside long vehicles, e.g. trucks, for a
prolonged time.
The two sensors for Blind Spot Assist are inte-
grated into the sides of the rear bumper. Make
sure that the bumper is free of dirt, ice or
slush in the vicinity of the sensors. The radar
sensors must not be covered, for example by
rear-mounted cycle racks or overhanging
loads. Following a severe impact or in the
event of damage to the bumper, have the func-
tion of the radar sensors checked at a quali-
fied specialist workshop. Blind Spot Assist
may otherwise not work properly. 152
Driving systems
Driving and parking
Page 158 of 320
For vehicles with steering wheel buttons you
can have the current ATTENTION ASSIST
(Attention Level) assessment displayed.
X Select Status Overview in the Assist.
menu and display the attention level
(Y page
189).
The following information is displayed: R the length of the journey since the last
break.
R the attention level determined by ATTEN-
TION ASSIST, displayed in a bar display in
five levels from low to high.
R if ATTENTION ASSIST is unable to calculate
the attention level and cannot output a
warning, the System Passive message
appears in the display. The bar display is
then dimmed. This is the case, for example,
if you are predominantly driving at a speed
below
40 mph (60 km/h) or above 125 mph
(200 km/h).
Activating ATTENTION ASSIST X
Activating ATTENTION ASSIST with the on-
board computer:
R on vehicles without steering wheel but-
tons
(Y page 180)
R on vehicles with steering wheel buttons
(Y page 190)
For vehicles with steering wheel buttons,
the system determines the attention level of
the driver depending on the setting selec-
ted:
Standard: the sensitivity with which the
system determines the attention level is set
to normal.
Sensitive: the sensitivity is set higher. The
driver is warned earlier.
When ATTENTION ASSIST is switched on and
the vehicle engine is running: R on vehicles without steering wheel buttons,
the À indicator lamp in the instrument
cluster lights up
R on vehicles with steering-wheel buttons, the
display shows the À symbol:
- in the status area
- in the Status Overview of the Assist.
menu (Y page
189)
For vehicles with steering wheel buttons, if you
deactivate ATTENTION ASSIST, the system is
automatically re-activated when you start the engine. The system sensitivity then corre-
sponds to the last selection activated – stand-
ard or sensitive.
If you switch off ATTENTION ASSIST in a vehi-
cle without steering wheel buttons, the system
remains switched off even after you start the
engine. The status of the system after switch-
ing on the engine always corresponds to the
status last selected.
Warning in the display If the system detects tiredness or increasing
lapses in concentration, the warning
Atten‐
tion Assist: Take a Break! or Attent.
Asst: Take Break!is shown in the display.
An additional warning tone sounds.
X If necessary, take a break.
X Confirm the message by pressing the a
button on the steering wheel.
On long journeys, take regular breaks in good
time to allow yourself to rest. If you do not
take a break and ATTENTION ASSIST contin-
ues to detect increasing lapses in concentra-
tion, you will be warned again after
15 minutes
at the earliest. This will only happen if ATTEN-
TION ASSIST still detects typical indicators of
fatigue or increasing lapses in concentration. PARKTRONIC
General notes PARKTRONIC is an electronic parking aid. The
system is equipped with ultrasonic sensors in
the front and rear bumpers to monitor the area
around your vehicle. PARKTRONIC indicates
visually and audibly the distance between your
vehicle and an object.
Your vehicle features two separate sound
emitters with different frequencies for the
warning tones. The warning ranges in front of
and behind the vehicle are indicated by differ-
ent warning tones.
PARKTRONIC is activated automatically when
you:
R turn the key to position 2 in the ignition lock
R release the parking brake and
R move the selector lever to position D, N or R156
Driving systems
Driving and parking
Page 159 of 320
PARKTRONIC is deactivated at speeds above
11 mph (18 km/h
). PARKTRONIC is reactiva-
ted at speeds below 10 mph (16 km/h).
Important safety notes PARKTRONIC is only an aid. It cannot replace
your own awareness of the immediate sur-
roundings. You are responsible for safe
maneuvering, parking and pulling away. Make
sure that there are no persons, animals or
objects in the maneuvering area while maneu-
vering and parking in/leaving parking spaces.
! Pay particular attention to obstacles above
or below the sensors when parking, such as
flower pots or trailer towbars. PARKTRONIC
does not recognize such objects when they
are in the immediate vicinity of the vehicle.
You could damage the vehicle or objects.
PARKTRONIC can suffer interference from:
R ultrasonic sources such as a truck's
compressed-air brakes, an automatic car
wash or a pneumatic drill
R attachments to the vehicle, e.g. rear
mounted racks
R number plates (vehicle license plates)
that are not affixed flat against the
bumper
R dirty or icy sensors
Remove a detachable trailer coupling if it is no
longer required. PARKTRONIC measures the
minimum detection range to an obstacle from
the bumper, not the ball coupling.
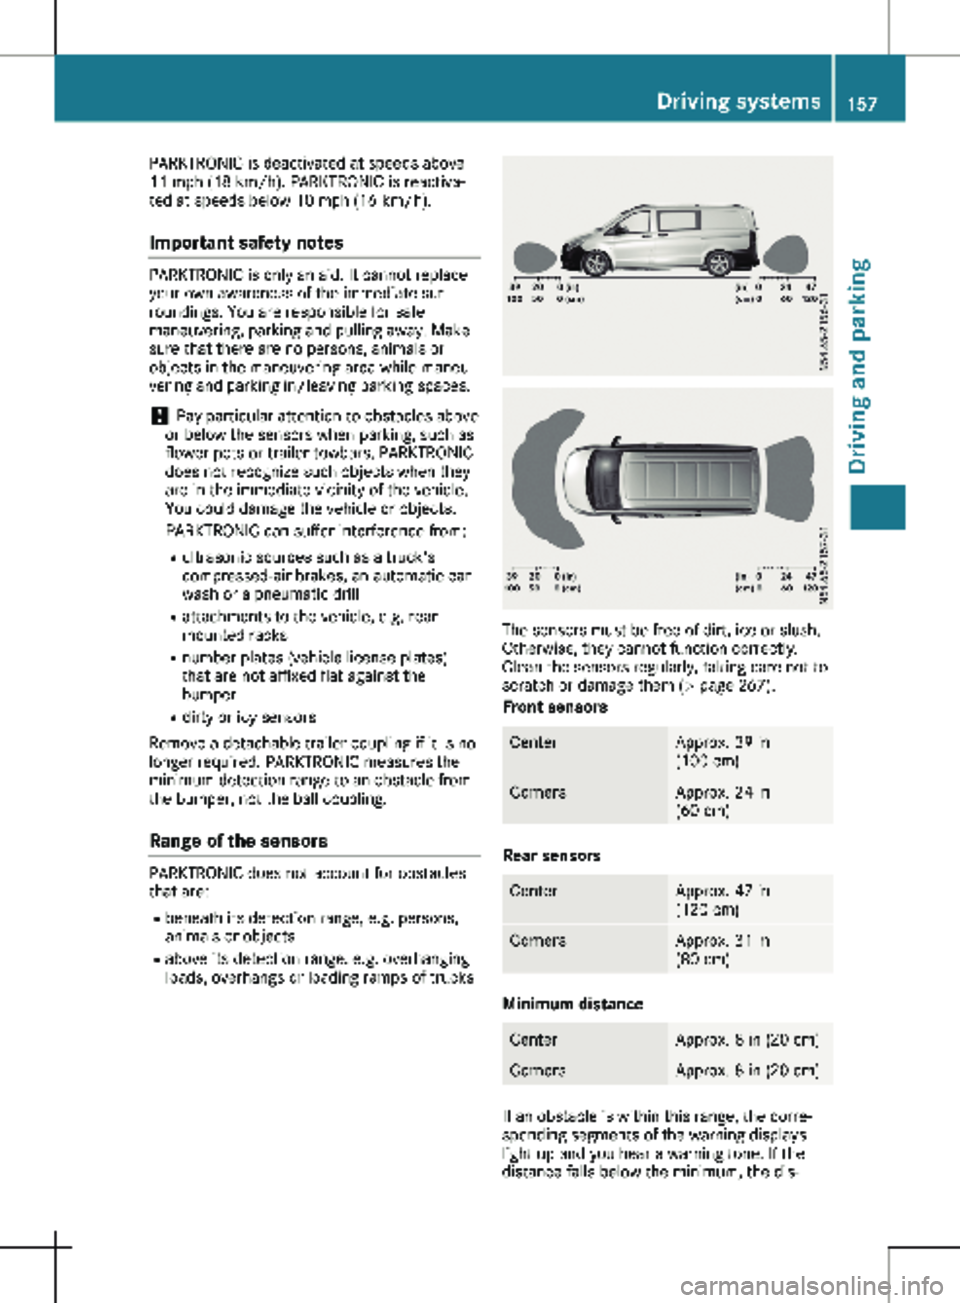
Range of the sensors PARKTRONIC does not account for obstacles
that are:
R beneath its detection range, e.g. persons,
animals or objects
R above its detection range, e.g. overhanging
loads, overhangs or loading ramps of trucks The sensors must be free of dirt, ice or slush.
Otherwise, they cannot function correctly.
Clean the sensors regularly, taking care not to
scratch or damage them (Y page
267).
Front sensors Center Approx. 39 in
(100 cm
) Corners Approx. 24 in
(60 cm
) Rear sensors
Center Approx. 47 in
(120 cm
) Corners Approx. 31 in
(80 cm
) Minimum distance
Center Approx. 8 in (20 cm)
Corners Approx. 8 in (20 cm)
If an obstacle is within this range, the corre-
sponding segments of the warning displays
light up and you hear a warning tone. If the
distance falls below the minimum, the dis- Driving systems
157
Driving and parking Z
Page 160 of 320
tance from an obstacle may no longer be
shown.
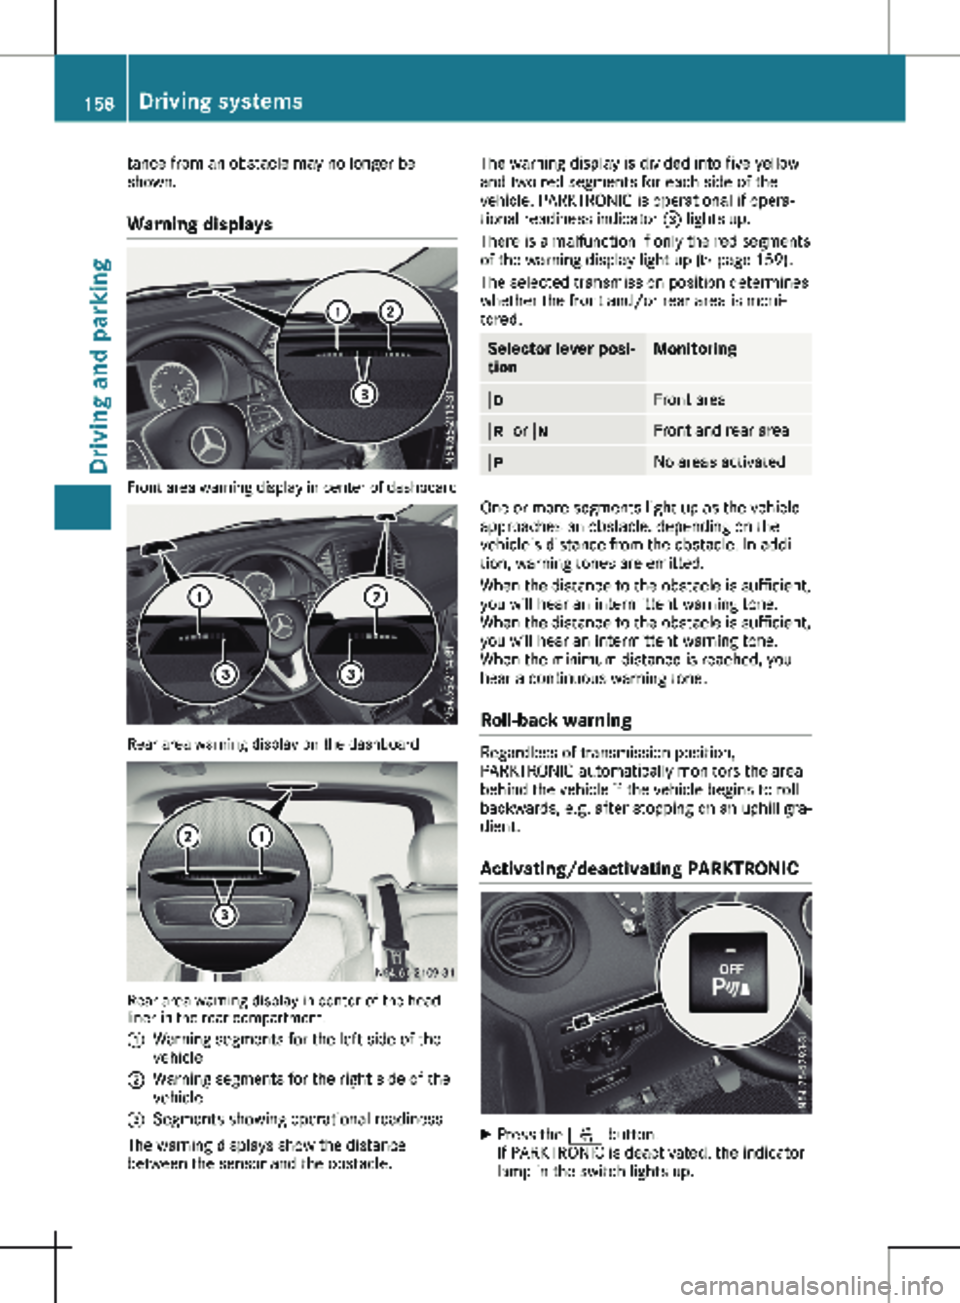
Warning displays Front area warning display in center of dashboard
Rear area warning display on the dashboard
Rear area warning display in center of the head-
liner in the rear compartment.
:
Warning segments for the left side of the
vehicle
; Warning segments for the right side of the
vehicle
= Segments showing operational readiness
The warning displays show the distance
between the sensor and the obstacle. The warning display is divided into five yellow
and two red segments for each side of the
vehicle. PARKTRONIC is operational if opera-
tional readiness indicator = lights up.
There is a malfunction if only the red segments
of the warning display light up
(Y page 159).
The selected transmission position determines
whether the front and/or rear area is moni-
tored. Selector lever posi-
tion Monitoring
h
Front area
k or i Front and rear area
j
No areas activated
One or more segments light up as the vehicle
approaches an obstacle, depending on the
vehicle's distance from the obstacle. In addi-
tion, warning tones are emitted.
When the distance to the obstacle is sufficient,
you will hear an intermittent warning tone.
When the distance to the obstacle is sufficient,
you will hear an intermittent warning tone.
When the minimum distance is reached, you
hear a continuous warning tone.
Roll-back warning Regardless of transmission position,
PARKTRONIC automatically monitors the area
behind the vehicle if the vehicle begins to roll
backwards, e.g. after stopping on an uphill gra-
dient.
Activating/deactivating PARKTRONIC X
Press the f button.
If PARKTRONIC is deactivated, the indicator
lamp in the switch lights up.158
Driving systems
Driving and parking
Page 161 of 320
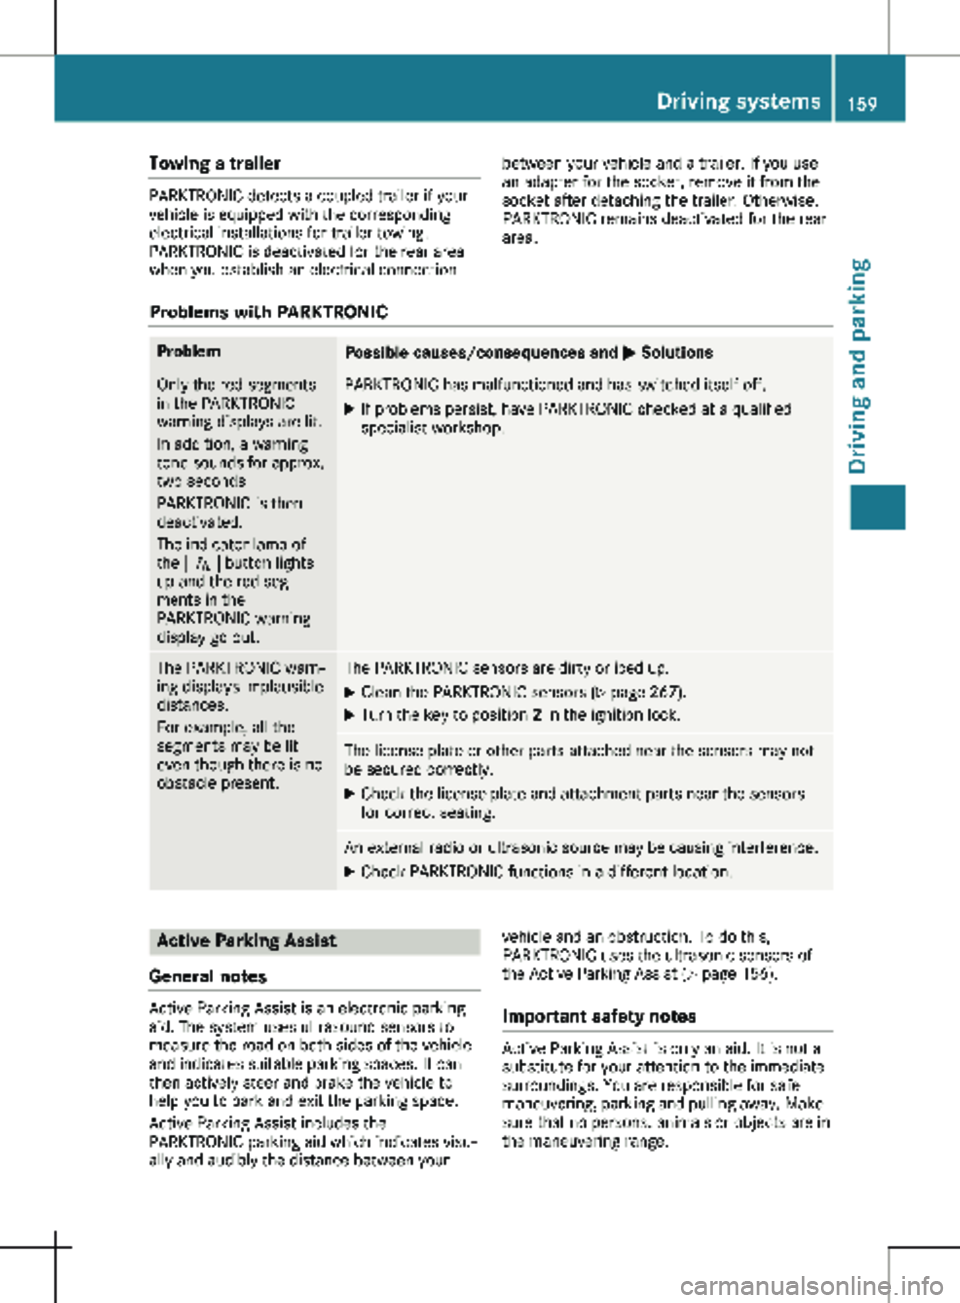
Towing a trailer
PARKTRONIC detects a coupled trailer if your
vehicle is equipped with the corresponding
electrical installations for trailer towing.
PARKTRONIC is deactivated for the rear area
when you establish an electrical connection
between your vehicle and a trailer. If you use
an adapter for the socket, remove it from the
socket after detaching the trailer. Otherwise,
PARKTRONIC remains deactivated for the rear
area.
Problems with PARKTRONIC Problem
Possible causes/consequences and
M SolutionsOnly the red segments
in the PARKTRONIC
warning displays are lit.
In addition, a warning
tone sounds for approx.
two seconds
PARKTRONIC is then
deactivated.
The indicator lamp of
the f button lights
up and the red seg-
ments in the
PARKTRONIC warning
display go out. PARKTRONIC has malfunctioned and has switched itself off.
X
If problems persist, have PARKTRONIC checked at a qualified
specialist workshop. The PARKTRONIC warn-
ing displays implausible
distances.
For example, all the
segments may be lit
even though there is no
obstacle present. The PARKTRONIC sensors are dirty or iced up.
X Clean the PARKTRONIC sensors ( Y page 267).
X Turn the key to position 2 in the ignition lock. The license plate or other parts attached near the sensors may not
be secured correctly.
X Check the license plate and attachment parts near the sensors
for correct seating. An external radio or ultrasonic source may be causing interference.
X Check PARKTRONIC functions in a different location. Active Parking Assist
General notes Active Parking Assist is an electronic parking
aid. The system uses ultrasound sensors to
measure the road on both sides of the vehicle
and indicates suitable parking spaces. It can
then actively steer and brake the vehicle to
help you to park and exit the parking space.
Active Parking Assist includes the
PARKTRONIC parking aid which indicates visu-
ally and audibly the distance between your vehicle and an obstruction. To do this,
PARKTRONIC uses the ultrasonic sensors of
the Active Parking Assist
(Y page 156).
Important safety notes Active Parking Assist is only an aid. It is not a
substitute for your attention to the immediate
surroundings. You are responsible for safe
maneuvering, parking and pulling away. Make
sure that no persons, animals or objects are in
the maneuvering range. Driving systems
159
Driving and parking Z
Page 177 of 320

In daylight, the displays in the instrument clus-
ter are illuminated. A dimming function is not
possible in daylight.
On vehicles with steering wheel buttons, the
light sensor in the instrument cluster automat-
ically controls the brightness of the display
lighting.
While the lights are on, the brightness is
dependent upon the brightness of the ambient
light. You can also adjust the brightness of the
instrument lighting and the display lighting:
R by pressing the f and g buttons on the
instrument cluster on vehicles without
steering wheel buttons (not in the Settings
menu)
R by turning brightness control knob : on
vehicles with steering wheel buttons Speedometer
If you change the wheel size on your vehicle,
make sure it is assigned to the correct wheel
size category ( Y page
278). If you change
wheel size category without recoding the con-
trol unit, the speedometer indication will be
inaccurate. The current vehicle speed may
then be higher than the speed displayed in the
speedometer.
The speed can also be shown in the display in
the form of a digital speedometer:
R on vehicles without steering wheel buttons
(Y page 178)
R on vehicles with steering wheel buttons
(Y page 185)
i In some countries, a warning sounds
and/or the display shows a message when
the vehicle reaches the maximum legally
permissible speed limit, e.g. at 75 mph
(120 km/h). Tachometer
! Do not drive in the overrevving range, as
this could damage the engine. H
Environmental note
Avoid driving at high engine speeds. This
unnecessarily increases the fuel consump-
tion of your vehicle and harms the environ-
ment as a result of increased emissions. The red band in the tachometer indicates the
engine's overrevving range.
To protect the engine, the fuel supply is inter-
rupted when the red band is reached.
Outside temperature display
You should pay special attention to road con-
ditions when temperatures are around freezing
point.
Please bear in mind that the outside tempera-
ture display shows the air temperature meas-
ured and not the road temperature.
The display shows the outside temperature in
the header:
R on vehicles without steering wheel buttons
(Y page
176)
R on vehicles with steering wheel buttons
(Y page 183)
Changes in the outside temperature are dis-
played after a short delay. Coolant temperature gauge
G
WARNING
Opening the hood when the engine is over-
heated or when there is a fire in the engine
compartment could expose you to hot gases
or other service products. There is a risk of
injury.
Let an overheated engine cool down before
opening the hood. If there is a fire in the
engine compartment, keep the hood closed
and contact the fire department.
On vehicles without steering wheel buttons,
you can have the coolant temperature shown
in the display
(Y page 178).
On vehicles with steering wheel buttons, an
analog coolant temperature gauge is located
in the tachometer in the instrument cluster
(Y page 40). Under normal driving conditions and at the
correct coolant level, the display may rise to
the letter H or to the red mark. Display and operation
175
On-board computer and displays Z
Page 181 of 320
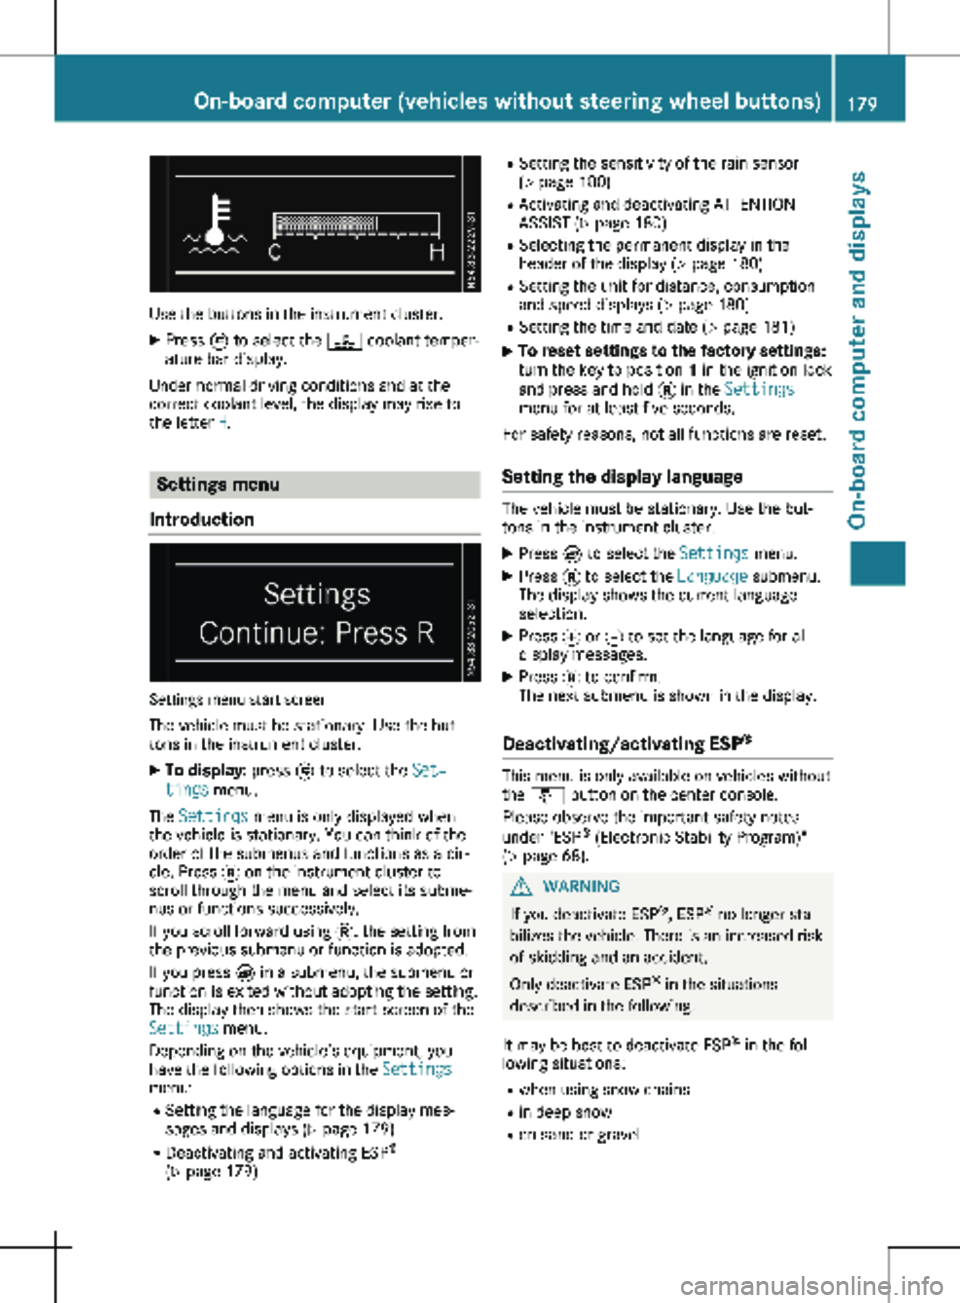
Use the buttons in the instrument cluster.
X Press È to select the ? coolant temper-
ature bar display.
Under normal driving conditions and at the
correct coolant level, the display may rise to
the letter H. Settings menu
Introduction Settings menu start screen
The vehicle must be stationary. Use the but-
tons in the instrument cluster. X To display: press È to select the Set‐
tings menu.
The Settings menu is only displayed when
the vehicle is stationary. You can think of the
order of the submenus and functions as a cir-
cle. Press 3 on the instrument cluster to
scroll through the menu and select its subme-
nus or functions successively.
If you scroll forward using 3, the setting from
the previous submenu or function is adopted.
If you press È in a submenu, the submenu or
function is exited without adopting the setting.
The display then shows the start screen of the
Settings menu.
Depending on the vehicle’s equipment, you
have the following options in the Settings
menu:
R Setting the language for the display mes-
sages and displays
(Y page 179)
R Deactivating and activating ESP ®
( Y page 179) R
Setting the sensitivity of the rain sensor
( Y page
180)
R Activating and deactivating ATTENTION
ASSIST (Y page 180)
R Selecting the permanent display in the
header of the display ( Y page 180)
R Setting the unit for distance, consumption
and speed displays (Y page 180)
R Setting the time and date ( Y page 181)
X To reset settings to the factory settings:
turn the key to position 1 in the ignition lock
and press and hold 3 in the Settings
menu for at least five seconds.
For safety reasons, not all functions are reset.
Setting the display language The vehicle must be stationary. Use the but-
tons in the instrument cluster.
X Press È to select the Settings menu.
X Press 3 to select the Language submenu.
The display shows the current language
selection.
X Press f or g to set the language for all
display messages.
X Press 3 to confirm.
The next submenu is shown in the display.
Deactivating/activating ESP ® This menu is only available on vehicles without
the å button on the center console.
Please observe the important safety notes
under "ESP ®
(Electronic Stability Program)"
(Y page
68). G
WARNING
If you deactivate ESP ®
, ESP ®
no longer sta-
bilizes the vehicle. There is an increased risk
of skidding and an accident.
Only deactivate ESP ®
in the situations
described in the following.
It may be best to deactivate ESP ®
in the fol-
lowing situations:
R when using snow chains
R in deep snow
R on sand or gravel On-board computer (vehicles without steering wheel buttons)
179
On-board computer and displays Z
Page 182 of 320
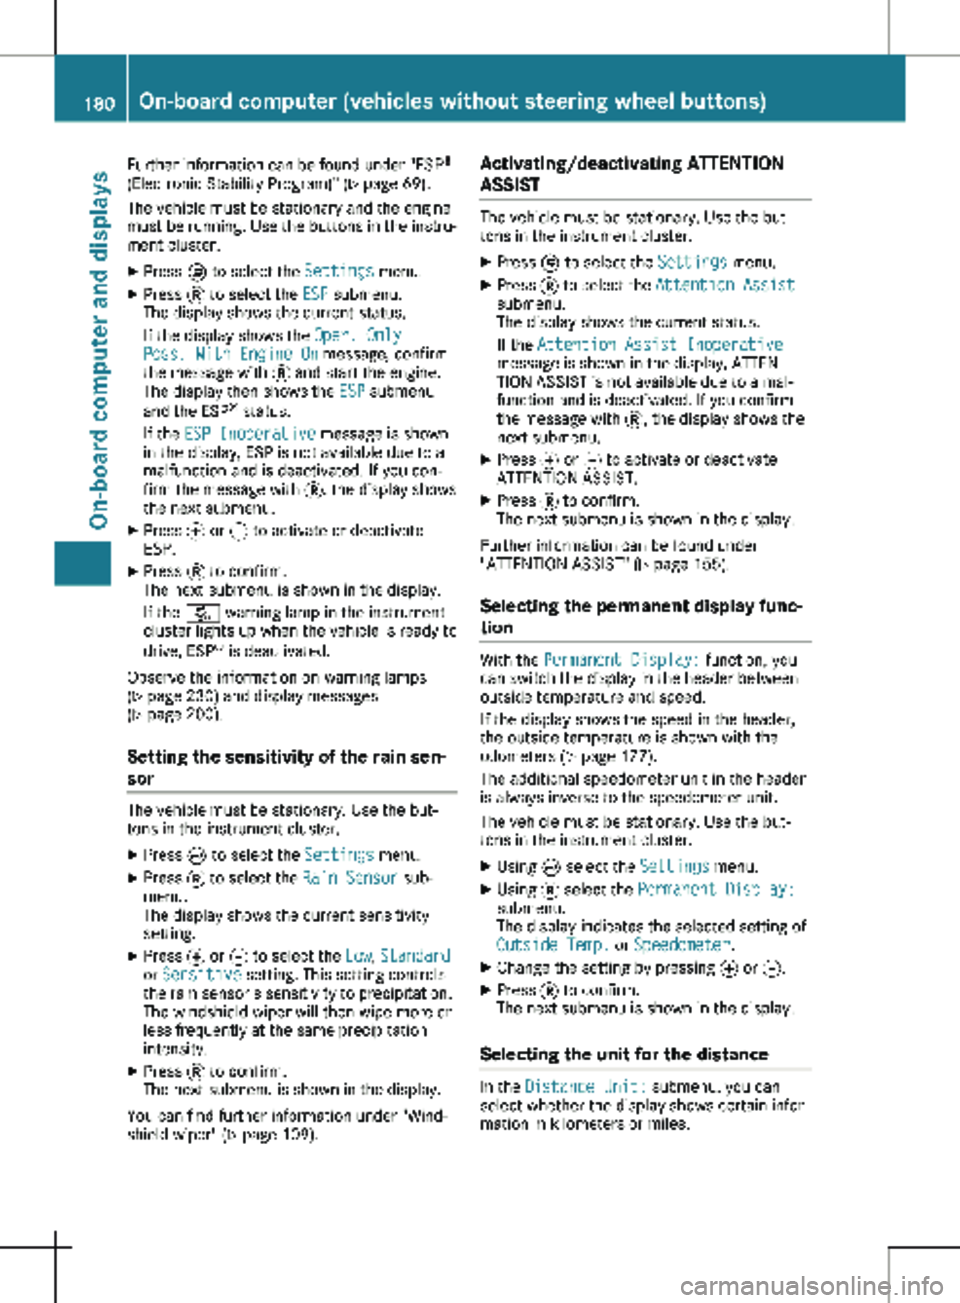
Further information can be found under "ESP
®
(Electronic Stability Program)" ( Y page
69).
The vehicle must be stationary and the engine
must be running. Use the buttons in the instru-
ment cluster.
X Press È to select the Settings menu.
X Press 3 to select the ESP submenu.
The display shows the current status.
If the display shows the Oper. Only
Poss. With Engine On message, confirm
the message with 3 and start the engine.
The display then shows the ESP submenu
and the ESP ®
status.
If the ESP Inoperative message is shown
in the display, ESP is not available due to a
malfunction and is deactivated. If you con-
firm the message with 3, the display shows
the next submenu.
X Press f or g to activate or deactivate
ESP.
X Press 3 to confirm.
The next submenu is shown in the display.
If the å warning lamp in the instrument
cluster lights up when the vehicle is ready to
drive, ESP ®
is deactivated.
Observe the information on warning lamps
( Y page
230) and display messages
( Y page 200).
Setting the sensitivity of the rain sen-
sor The vehicle must be stationary. Use the but-
tons in the instrument cluster.
X Press È to select the Settings menu.
X Press 3 to select the Rain Sensor sub-
menu.
The display shows the current sensitivity
setting.
X Press f or g to select the Low, Standard
or Sensitive setting. This setting controls
the rain sensor's sensitivity to precipitation.
The windshield wiper will then wipe more or
less frequently at the same precipitation
intensity.
X Press 3 to confirm.
The next submenu is shown in the display.
You can find further information under "Wind-
shield wiper"
(Y page 109). Activating/deactivating ATTENTION
ASSIST The vehicle must be stationary. Use the but-
tons in the instrument cluster.
X Press È to select the Settings menu.
X Press 3 to select the Attention Assist
submenu.
The display shows the current status.
If the Attention Assist Inoperative
message is shown in the display, ATTEN-
TION ASSIST is not available due to a mal-
function and is deactivated. If you confirm
the message with 3, the display shows the
next submenu.
X Press f or g to activate or deactivate
ATTENTION ASSIST.
X Press 3 to confirm.
The next submenu is shown in the display.
Further information can be found under
"ATTENTION ASSIST"
(Y page 155).
Selecting the permanent display func-
tion With the Permanent Display: function, you
can switch the display in the header between
outside temperature and speed.
If the display shows the speed in the header,
the outside temperature is shown with the
odometers (Y page
177).
The additional speedometer unit in the header
is always inverse to the speedometer unit.
The vehicle must be stationary. Use the but-
tons in the instrument cluster.
X Using È select the Settings menu.
X Using 3 select the Permanent Display:
submenu.
The display indicates the selected setting of
Outside Temp. or Speedometer.
X Change the setting by pressing f or g.
X Press 3 to confirm.
The next submenu is shown in the display.
Selecting the unit for the distance In the
Distance Unit: submenu, you can
select whether the display shows certain infor-
mation in kilometers or miles. 180
On-board computer (vehicles without steering wheel buttons)
On-board computer and displays
Page 195 of 320

X
Press : or 9 to select the Date:
function.
The display shows the current date.
X To set the date: press a again.
X Press = or ; to switch between day,
month and year.
X Press : or 9 to set the day, month or
year.
X Then press a to confirm.
The display shows the updated date.
Lights submenu Activating/deactivating the surround
lighting and exterior lighting delayed
switch-off
If you activate the Locator Lighting func-
tion and the light switch is turned to the Ã
position, the following functions are activated
when it is dark:
R surround lighting: the exterior lighting
remains on for
40 seconds after the doors
are unlocked. When you start the engine,
the surround lighting is deactivated and the
automatic headlamp feature is activated
(Y page 100).
R exterior lighting delayed switch-off: the
exterior lighting remains lit for 60 seconds
after the engine is switched off. When you
close all the doors and the tailgate/rear
doors, the exterior lighting switches off after
15 seconds.
Using the steering wheel buttons
X Use the = or ; button to select the
Settings. menu.
X Use : or 9 to select Lights.
X Press a to confirm.
X Use : or 9 to select the Locator
Lighting function.
The current status appears.
X To switch on/off: press a again.
If you change the setting, conversion does
not take place until the next time the vehicle
is stationary. Deactivating exterior lighting delayed switch-
off temporarily:
X Before leaving the vehicle, turn the key to
position g in the ignition lock.
X Turn the key to position 2 in the ignition
lock.
The exterior lighting delayed switch-off is
deactivated until the next time the engine is
started.
With surround lighting and exterior lighting
delayed switch-off, the following light up
depending on the vehicle's equipment:
R Parking lamps
R Fog lamps
R Low-beam headlamps
R Daytime running lamps
Activating/deactivating interior lighting
delayed switch-off If you activate the Interior Lighting
Delay: function, the interior lighting remains
lit for a further 20 seconds.
Using the steering wheel buttons
X Use the = or ; button to select the
Settings. menu.
X Use : or 9 to select Lights.
X Press a to confirm.
X Use : or 9 to select the Interior
Lighting Delay function.
The current status appears.
X To switch on/off: press a again.
Vehicle submenu Setting the sensitivity of the rain sensor
Using the steering wheel buttons
X Press = or ; to select the Settings
menu.
X Press : or 9 to select Vehicle.
X Press a to confirm.
X Press : or 9 to select the Rain
Sensor Sensitivity function.
The display shows the current setting.
X Press a to change the setting.
X Press : or 9 to select the High,
Standard or Low setting. This setting con-
trols the rain sensor's sensitivity to precipi-
tation. The windshield wiper then wipes On-board computer (vehicles with steering wheel buttons)
193
On-board computer and displays Z
Page 204 of 320
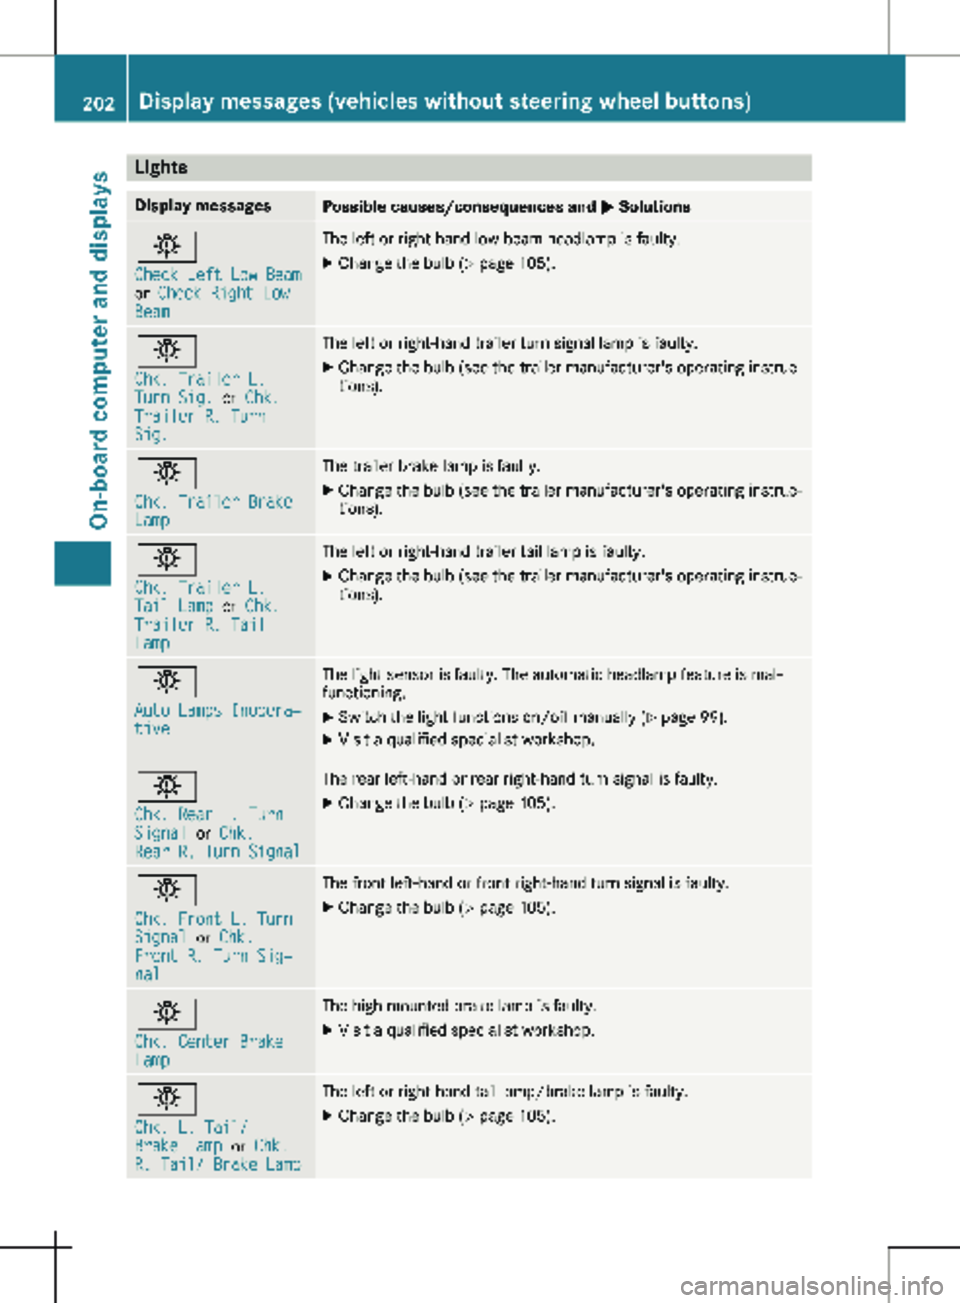
Lights
Display messages
Possible causes/consequences and
M Solutionsb
Check Left Low Beam
or
Check Right Low
Beam The left or right-hand low-beam headlamp is faulty.
X
Change the bulb ( Y page 105).b
Chk. Trailer L.
Turn Sig.
or Chk.
Trailer R. Turn
Sig. The left or right-hand trailer turn signal lamp is faulty.
X
Change the bulb (see the trailer manufacturer's operating instruc-
tions). b
Chk. Trailer Brake
Lamp The trailer brake lamp is faulty.
X Change the bulb (see the trailer manufacturer's operating instruc-
tions). b
Chk. Trailer L.
Tail Lamp
or Chk.
Trailer R. Tail
Lamp The left or right-hand trailer tail lamp is faulty.
X Change the bulb (see the trailer manufacturer's operating instruc-
tions). b
Auto Lamps Inopera‐
tive The light sensor is faulty. The automatic headlamp feature is mal-
functioning.
X
Switch the light functions on/off manually (Y page
99).
X Visit a qualified specialist workshop. b
Chk. Rear L. Turn
Signal
or Chk.
Rear R. Turn Signal The rear left-hand or rear right-hand turn signal is faulty.
X Change the bulb (Y page 105).b
Chk. Front L. Turn
Signal
or Chk.
Front R. Turn Sig‐
nal The front left-hand or front right-hand turn signal is faulty.
X Change the bulb (Y page 105).b
Chk. Center Brake
Lamp The high-mounted brake lamp is faulty.
X
Visit a qualified specialist workshop. b
Chk. L. Tail/
Brake Lamp
or Chk.
R. Tail/ Brake Lamp The left or right-hand tail lamp/brake lamp is faulty.
X Change the bulb (Y page 105).202
Display messages (vehicles without steering wheel buttons)
On-board computer and displays