MERCEDES-BENZ ML SUV 2008 Owners Manual
Manufacturer: MERCEDES-BENZ, Model Year: 2008, Model line: ML SUV, Model: MERCEDES-BENZ ML SUV 2008Pages: 381, PDF Size: 7.18 MB
Page 231 of 381
Tyres and wheels
228
R
you adopt a very sporty driving style (cor-
nering at high speeds or driving with high
rates of acceleration)
R you are towing a very heavy or large trailer
R you are driving with a heavy load (in the
vehicle or on the roof)
Restarting the tyre pressure loss warn-
ing system Restart the tyre pressure loss warning system
if you have:
R changed the tyre pressure
R changed the wheels or tyres
R fitted new wheels or tyres
X Before restarting, consult the table of tyre
pressures on the inside of the fuel filler flap
to ensure that the tyre pressure in all four
tyres is set correctly for the operating con-
ditions concerned.
X Also observe the notes in the section on
tyre pressures (Y page 226). G
Risk of accident
The tyre pressure loss warning system can
only give reliable warnings if you have set
the correct tyre pressure. If an incorrect tyre pressure is set, these
incorrect values will be monitored.
A tyre with insufficient pressure results in
vehicle instability when driving, thus
increasing the risk of an accident.
X Make sure that the key is in position
2(Y page 75) in the ignition lock.
The standard display appears in the multi-
function display (Y page 117).
X Press korj to select the tyre pres-
sure function:
Run Flat Indicator active
Menu: R-Buttonæ
X Press the reset button on the left of the
instrument cluster.
The following message appears in the
multi-function display:
Restart Run Flat Indicator?
Yes Cancel
If you wish to confirm the restart:
X Press the æbutton.
The following message appears in the
multi-function display:
Run Flat Indicator restarted
After a teach-in period, the tyre pressure
loss warning system will monitor the set
tyre pressures of all four tyres. If you wish to cancel the restart:
X
Press the çbutton.
or
X Wait until the message
Restart Run Flat Indicator?
Yes Cancel disappears.
The tyre pressure values stored at the last
restart will continue to be monitored. Checking the tyre pressure electroni-
cally*
The tyre pressure monitor only functions if
the correct wheel electronics are fitted to all
wheels. These monitor the pressure in all four
tyres, which you have set when restarting the
tyre pressure monitor. The monitor warns you
when the pressure drops in one or more of
the tyres. G
Risk of accident
The tyre pressure monitor does not warn
you of an incorrectly set tyre pressure. The
table on the inside of the fuel filler flap will
help you decide whether the tyre pressures
should be corrected.
The tyre pressure monitor is not able to
warn you of a sudden loss of pressure, e.g. Operation
* optional
164_AKB; 5; 5, en-GB
wobuchh
,V ersion: 2.10.6
2008-05-11T11:55:12+02:00 - Seite 228 Dateiname: 6515_4293_02_buchblock.pdf; preflight
Page 232 of 381
Tyres and wheels
229if the tyre is penetrated by a foreign object.
In the event of a sudden loss of pressure,
bring the vehicle to a halt by braking care-
fully. Do not make any sudden steering
movements when doing so.
i The operation of the tyre pressure moni-
tor can be affected by interference from
radio transmitting equipment (e.g. radio
headphones, two-way radios) that may be
being operated in or near the vehicle.
i If you are carrying a deflated tyre in the
vehicle, you may only reactivate the tyre
pressure monitor if:
R the deflated tyre is no longer in the vehi-
cle
R you have adjusted the tyre pressure cor-
rectly
Calling up the tyre pressure using the
on-board computer X
Make sure that the key is in posi-
tion 2(Y page 75) in the ignition lock.
X Press the jork button to select the
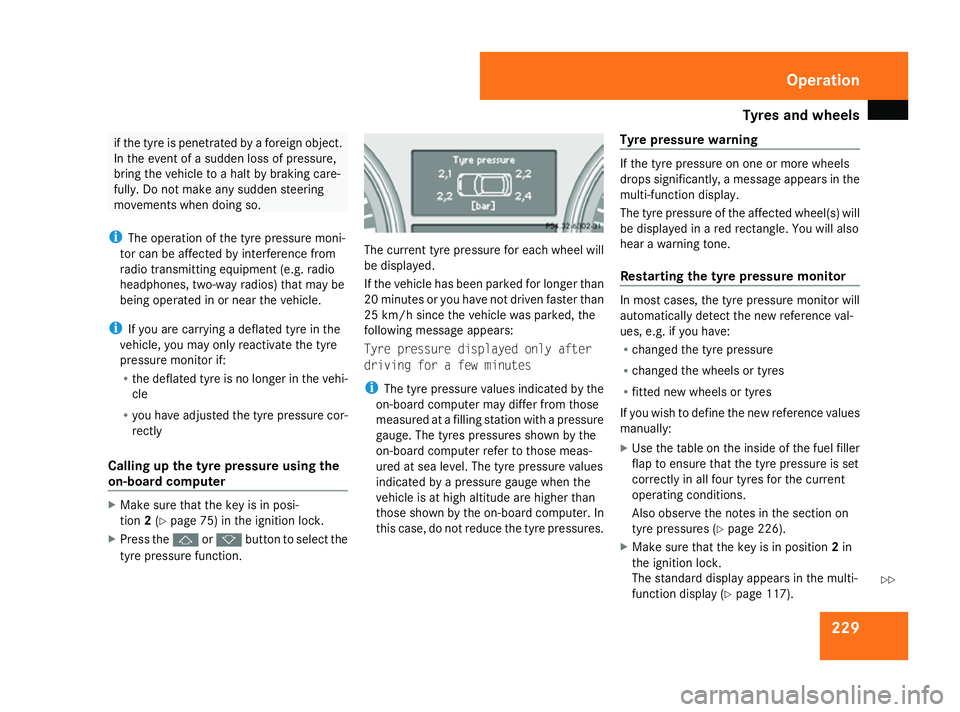
tyre pressure function. The current tyre pressure for each wheel will
be displayed.
If the vehicle has been parked for longer than
20 minutes or you have not driven faster than
25 km/h since the vehicle was parked, the
following message appears:
Tyre pressure displayed only after
driving for a few minutes
i
The tyre pressure values indicated by the
on-board computer may differ from those
measured at a filling station with a pressure
gauge. The tyres pressures shown by the
on-board computer refer to those meas-
ured at sea level. The tyre pressure values
indicated by a pressure gauge when the
vehicle is at high altitude are higher than
those shown by the on-board computer. In
this case, do not reduce the tyre pressures. Tyre pressure warning If the tyre pressure on one or more wheels
drops significantly, a message appears in the
multi-function display.
The tyre pressure of the affected wheel(s) will
be displayed in a red rectangle. You will also
hear a warning tone.
Restarting the tyre pressure monitor In most cases, the tyre pressure monitor will
automatically detect the new reference val-
ues, e.g. if you have:
R changed the tyre pressure
R changed the wheels or tyres
R fitted new wheels or tyres
If you wish to define the new reference values
manually:
X Use the table on the inside of the fuel filler
flap to ensure that the tyre pressure is set
correctly in all four tyres for the current
operating conditions.
Also observe the notes in the section on
tyre pressures (Y page 226).
X Make sure that the key is in position 2in
the ignition lock.
The standard display appears in the multi-
function display (Y page 117). Operation
164_AKB; 5; 5, en-GB
wobuchh
,V ersion: 2.10.6
2008-05-11T11:55:12+02:00 - Seite 229 ZDateiname: 6515_4293_02_buchblock.pdf; preflight
Page 233 of 381
Tyres and wheels
230
X
Press the jork button to select the
Tyre pressure function or wait until the
following message appears:
Tyre pressure displayed only after
driving for a few minutes
X Press the reset button on the left of the
multi-function steering wheel
(Y page 246).
The Restart Tyre pressure monitor
Yes Cancel message appears in the multi-
function display.
X Press the æbutton.
The following message appears in the
multi-function display:
Tyre pressure monitor restarted
The tyre pressure monitor has stored the
pressure of the tyres as a new reference
value.
If you wish to cancel the restart:
X Press the çbutton. Interchanging the wheels
G
Risk of accident
Interchange the front and rear wheels only
if they have the same dimensions: for exam-
ple size, offset, etc.
After every wheel interchange/change,
have the tightening torque checked at a
qualified specialist workshop that has the
necessary specialist knowledge and tools
to carry out the work required. Mercedes-
Benz recommends that you use a
Mercedes-Benz Service Centre for this pur-
pose. In particular, work relevant to safety
or on safety-related systems must be car-
ried out at a qualified specialist workshop.
The wheels could work loose if they are not
tightened to a torque of 150 Nm.
For safety reasons, Mercedes-Benz recom-
mends that you only use wheel bolts of the
correct size which have been approved for
Mercedes-Benz vehicles.
The wear patterns on the front and rear tyres
differ depending on the operating conditions.
Interchange the wheels before a clear wear
pattern has formed on the tyres. Front tyres
typically wear more on the shoulders and the
rear tyres in the centre. Interchange the wheels every 5,000 km to
10,000 km depending on the degree of tyre
wear, provided that the vehicle has the same
size front and rear tyres. Do not reverse the
direction of tyre rotation.
Clean the contact surfaces of the wheel and
the brake disc thoroughly every time a wheel
is interchanged. Check the tyre pressure and,
if necessary, restart the tyre pressure loss
warning system or the tyre pressure moni-
tor*.
! On vehicles fitted with a tyre pressure
monitor*, electronic components are loca-
ted in the wheel.
Tyre fitting tools should not be applied in
the area of the valve, as this could damage
the electronic components.
Always have the wheels interchanged/
changed at a qualified specialist workshop,
e.g. a Mercedes-Benz Service Centre.
i Vehicles with a tyre pressure monitor*
If the positions of the wheels on the vehicle
are changed, the tyre pressure may be tem-
porarily displayed at the wrong position.
This is rectified after a few minutes of driv-
ing, and the tyre pressures are displayed
for the correct positions. Operation
* optional
164_AKB; 5; 5, en-GB
wobuchh
,V ersion: 2.10.6
2008-05-11T11:55:12+02:00 - Seite 230 Dateiname: 6515_4293_02_buchblock.pdf; preflight
Page 234 of 381
Winter driving
231Winter driving
Points to remember
Have your vehicle winterproofed at a qualified
specialist workshop, e.g. at a Mercedes-Benz
Service Centre, at the onset of winter. Winter tyres
In temperatures below +7 °C, always use all-
weather tyres or winter tyres and always use
winter tyres in wintry road conditions.
Only winter tyres displaying the snowflake
symbol in addition to the M+S marking pro-
vide optimum grip in wintry road conditions.
Only these tyres will allow the ABS and ESP
driving systems to function optimally in win-
ter, as these tyres have been designed spe-
cifically for driving on snow.
Use winter tyres of the same make and tread
on all wheels to maintain safe handling char-
acteristics. G
Risk of accident
Winter tyres with a tread depth of less than
4 mm must be replaced immediately. They
are no longer suitable for winter use, can
no longer provide sufficient grip. This could cause you to lose control of your vehicle
and cause an accident.
Always observe the maximum permitted
speed specified for the winter tyres you have
fitted. If you fit winter tyres which have a
lower maximum permitted speed than that of
the vehicle, affix an appropriate warning sign
in the driver's field of vision. This can be
obtained at a qualified specialist workshop,
e.g. from a Mercedes-Benz Service Centre.
Under these circumstances, you should also
restrict the maximum speed of the vehicle
using permanent Speedtronic 25
to the maxi-
mum permissible speed for the winter tyres
(Y page 156).
Once you have fitted the winter tyres:
X Check the tyre pressures (Y page 226).
X Restart the tyre pressure moni-
tor* (Y page 228). G
Risk of accident
If you fit the spare wheel* when driving with
winter tyres, bear in mind that driving sta-
bility will be impaired owing to unstable
cornering characteristics caused by the dif-
ferent tyres. You should therefore adapt
your driving style and drive carefully. Have the spare wheel* replaced at the
nearest qualified specialist workshop
which has the necessary specialist knowl-
edge and tools to carry out the work
required. Mercedes-Benz recommends
that you use a Mercedes-Benz Service
Centre for this purpose. In particular, work
relevant to safety or on safety-related sys-
tems must be carried out at a qualified
specialist workshop. Snow chains
For safety reasons, Mercedes-Benz recom-
mends that you only use snow chains which
have been specially approved for your vehicle
by Mercedes-Benz, or are of a corresponding
standard of quality.
! Information about the use of snow chain-
compatible AMG winter tyres is applicable
for AMG tyres. Use of snow chains is only
permissible with these tyres.
! Vehicles with the Off-Road Pro engineer-
ing package*, AIRMATIC package* or
ML 63 AMG: do not drive in ADS SPORT
mode when driving with snow chains fitted.
25 Only available for certain countries. Operation
* optional
164_AKB; 5; 5, en-GB
wobuchh,
Version: 2.10.6 2008-05-11T11:55:12+02:00 - Seite 231 ZDateiname: 6515_4293_02_buchblock.pdf; preflight
Page 235 of 381
Driving
tips 232
If you intend to fit snow chains, please bear
the following points in mind:
R Snow chains cannot be fitted to all wheel/
tyre combinations.
R Snow chains must not be fitted to emer-
gency spare wheels, e.g. the "Minispare" or
collapsible emergency spare wheel.
R Fit snow chains only in pairs and only to the
rear wheels. Comply with the manufactur-
er's installation instructions.
On vehicles with the AIRMATIC package*, you
may only drive at raised vehicle level if snow
chains have been fitted (Y page 156).
Do not exceed the maximum permissible
speed of 50 km/h.
i You may wish to deactivate ESP ®
when
pulling away with snow chains fitted
(Y page 58). This way you can allow the
wheels to spin in a controlled manner, ach-
ieving an increased driving force (cutting
action). Winter driving
G
Risk of accident
Do not shift down for additional engine
braking on a slippery road surface. This
could cause the drive wheels to lose their
grip and the vehicle could skid.
You should drive particularly carefully on slip-
pery road surfaces. Avoid sudden accelera-
tion, steering and braking manoeuvres.
If the vehicle threatens to skid or cannot be
stopped when moving at low speed:
X Shift the selector lever to N.
X Try to bring the vehicle under control using
corrective steering. Driving tips
Rolling with the engine switched off
G
Risk of accident
Do not switch off the engine while the vehi-
cle is in motion.
There is no power assistance for the steer-
ing or the service brake when the engine is
not running.
Steering and braking require significantly
more effort and you could lose control of
the vehicle and cause an accident as a
result. Braking
G
Risk of accident
Do not change down for additional engine
braking on a slippery road surface. This
could cause the drive wheels to lose their
grip and the vehicle could skid. G
Risk of accident
Make sure that other road users are not
endangered by your braking. Operation
164_AKB; 5; 5, en-GB
wobuchh
,V ersion: 2.10.6
2008-05-11T11:55:12+02:00 - Seite 232 Dateiname: 6515_4293_02_buchblock.pdf; preflight
Page 236 of 381
Driving
tips 233
Downhill gradients On long and steep downhill gradients, espe-
cially if the vehicle is laden or towing a trailer,
you must select shift range
1,2or 3in good
time.
i This also applies if you have activated
cruise control, Speedtronic or Distronic*.
This uses the braking effect of the engine and
you will not have to brake to such an extent
to maintain the same speed. This relieves the
load on the brake system and prevents the
brakes from overheating and wearing too
quickly. If you need additional braking,
depress the brake pedal repeatedly rather
than continuously.
Heavy and light loads If the brakes have been subjected to a heavy
load, do not stop the vehicle immediately, but
drive on for a short while. This allows the air-
flow to cool the brakes more quickly.
G
Risk of accident
Never depress the brake pedal continu-
ously while the vehicle is in motion, e.g.
never cause the brakes to rub by applying
constant slight pedal pressure. This causes
the brake system to overheat, increases the braking distance and can lead to the
brakes failing completely.
If the brakes have been used only moderately,
you should occasionally test their effective-
ness. To do this, brake more firmly from a
higher speed. This improves the grip of the
brakes.
Wet roads If driving in heavy rain for a prolonged period
of time without braking, there may be a
delayed reaction from the brakes, when brak-
ing for the first time. You must brake harder.
You must therefore maintain a greater dis-
tance from the vehicle in front.
Brake firmly after driving on a wet road. This
way the brake discs will become warm, drying
more quickly, which will protect them against
corrosion.
Limited braking performance on salted
roads
G
Risk of accident
The layer of salt on the brake discs and the
brake pads/linings may cause a delay in
the braking effect, resulting in a signifi- cantly longer braking distance, which could
lead to an accident.
To avoid this danger, you should:
R
occasionally brake carefully, without put-
ting other road users at risk, when you
are driving on salted roads. This helps to
remove any salt that may have started to
build up on the brake discs and the brake
pads/linings.
R maintain a greater distance to the vehicle
ahead and drive with particular care.
R carefully apply the brakes at the end of a
trip and immediately after commencing a
new trip, so that salt residues are
removed from the brake disc.
New brake pads/linings For safety reasons, Mercedes-Benz recom-
mends that you only have brake pads/linings
fitted to your vehicle that have been approved
for Mercedes-Benz vehicles or which corre-
spond to an equivalent quality standard.
Brake pads/linings which have not been
approved for Mercedes-Benz or which are not
of an equivalent quality could affect your vehi-
cle's operating safety. Operation
* optional
164_AKB; 5; 5, en-GB
wobuchh
,V ersion: 2.10.6
2008-05-11T11:55:12+02:00 - Seite 233 ZDateiname: 6515_4293_02_buchblock.pdf; preflight
Page 237 of 381
Driving
tips 234 G
Risk of accident
New brake pads/linings only reach their
optimum braking effect after several hun-
dred kilometres of driving. Before this opti-
mum braking effect is reached, you should
compensate for the reduced braking effect
by applying greater pressure when braking.
This also applies after the brake discs or the
brake pads/linings have been replaced.
High-performance brake system for
AMG vehicles The high-performance brake system is
designed for heavy loads. Braking can there-
fore cause noises. This will depend on:
R speed
R braking force
R environmental conditions, such as temper-
ature and humidity
The wear of individual components of the
brake system, such as the brake pads/linings
or brake discs, depends on the individual driv-
ing style and operating conditions.
Because of this, it is impossible to state a
mileage that will be valid under all circum- stances. An aggressive driving style will lead
to high wear. Tyre grip
G
Risk of accident
Whereas the vehicle can be fully controlled
at a certain speed on dry roads, you must
reduce your speed on wet or icy roads to
achieve the same road safety. Otherwise
you could cause an accident.
Pay particular attention to the road condi-
tions at temperatures around freezing
point.
If ice has formed on the road surface (e.g.
from fog), a light film of water rapidly forms
on the ice when you brake, considerably
reducing tyre grip. Drive with particular
care in such weather conditions. Driving on wet roads
If water has accumulated to a certain depth
on the road surface, there is a danger of aqua-
planing occurring, even if:
R you drive at low speeds
R the tyres have adequate tread depth
For this reason, do not drive in tyre ruts, and
brake carefully. Driving on flooded roads
If you have to drive on stretches of road on
which water has collected, please bear in
mind that:
R the maximum permitted still water depth
depends on the vehicle equipment
(Y page 239)
R you should drive no faster than at walking
pace
! Bear in mind that vehicles travelling in
front or in the opposite direction create
waves. This may cause the maximum per-
missible water depth to be exceeded.
You must observe these notes, otherwise
damage may occur to the engine, electrics
and transmission. Operation
164_AKB; 5; 5, en-GB
wobuchh
,V ersion: 2.10.6
2008-05-11T11:55:12+02:00 - Seite 234 Dateiname: 6515_4293_02_buchblock.pdf; preflight
Page 238 of 381
Off-road driving
235Off-road driving
Points to remember
G
Risk of accident
Drive slowly in rough terrain with which you
are unfamiliar. This will allow you to detect
unexpected obstacles more easily and to
therefore reduce the risk of an accident.
Do not make U-turns on mountain roads.
The vehicle could otherwise tip over. If a
slope is too steep for the vehicle, drive back
in reverse gear.
Do not drive at an angle up steep inclines.
The vehicle could otherwise tip over. If you
drive up a steep incline at an angle and the
vehicle threatens to overturn, steer into the
line of fall immediately.
Never allow the vehicle to roll backwards.
The braking effect of the engine cannot be
utilised in neutral. If you only use the
service brake, you could lose control of the
vehicle. G
Risk of accident
Grains of sand, particles of dirt and other
abrasive materials can enter the brake sys-
tem. This can lead to excessive wear and
unpredictable braking efficiency. After the brakes have been exposed to dirty
conditions, have them checked and
cleaned at a qualified specialist workshop,
e.g. a Mercedes-Benz Service Centre.
There is otherwise a risk that braking power
may be insufficient in the event of an emer-
gency, or that braking efficiency may be
unpredictable.
Read this section before driving your vehicle
off-road. Practise by travelling over more gen-
tle off-road terrain first.
The following driving systems are specially
adapted to off-road driving:
R off-road drive program (Y page 140)
R LOW RANGE* off-road gear (Y page 141)
R off-road ABS (Y page 57)
R off-road 4-ETS (Y page 61)
R off-road ESP ®
(Y page 60)
R differential locks (Y page 143)
R AIRMATIC package (vehicle level)
(Y page 156)
R DSR (Downhill Speed Regulation)
(Y page 139) Off-road driving
G
Risk of accident
Damage to the vehicle creates the risk of
an accident for yourself and other road
users. If in doubt, have your vehicle
checked at a qualified specialist workshop
which has the necessary specialist knowl-
edge and tools to carry out the work
required. Mercedes-Benz recommends
that you use a Mercedes-Benz Service
Centre for this purpose. H
Environmental note
Protection of the environment is of primary
importance. Treat nature with respect.
Observe all prohibiting signs.
General information R
Stop your vehicle and, if necessary, select
the off-road drive program* (Y page 140)
or the LOW RANGE* off-road gear
(Y page 141) before driving off-road.
R Select a vehicle level* suitable for the off-
road terrain. Make sure there is always
sufficient ground clearance to prevent
damage to the vehicle. Operation
* optional
164_AKB; 5; 5, en-GB
wobuchh,
Version: 2.10.6 2008-05-11T11:55:12+02:00 - Seite 235 ZDateiname: 6515_4293_02_buchblock.pdf; preflight
Page 239 of 381
Off-road driving
236
R
Check that items of luggage and loads are
stowed safely and are well secured
(Y page 193).
R Always keep the engine running and in gear
when driving on a downhill gradient. Acti-
vate DSR.
R Drive slowly and evenly, if necessary at a
walking pace.
R Ensure that the wheels are in contact with
the ground at all times.
R Drive with extreme care on unknown off-
road routes where visibility is poor. For
safety reasons, get out of the vehicle first
and survey the off-road route.
R Check the depth of water before fording
rivers and streams.
R Look out for obstacles such as rocks, holes,
tree stumps and furrows.
R Always keep the side windows and the slid-
ing /tilting sunroof* closed during the jour-
ney.
R Do not stray from marked routes or paths.
i Information about retrofitting special all-
terrain tyres is available from any
Mercedes-Benz Service Centre. Checklist before driving off-road X
Engine oil level: check the engine oil and
top it up if necessary.
X Vehicle toolkit: check that the jack is
working and make sure you have the wheel-
brace, a robust tow cable and a folding
spade in the vehicle.
X Wheels and tyres: check the tyre tread
depth and tyre pressure.
X Check for damage and remove foreign
objects, e.g. small stones, from the
wheels/tyres.
X Replace any missing valve caps.
X Replace dented or damaged wheels.
Checklist after driving off-road Driving over rough terrain places greater
demands on your vehicle than driving on nor-
mal roads. After driving off-road, check the
vehicle. This allows you to detect damage
promptly and reduce the risk of an accident
to yourself and other road users.
X
Deactivate the LOW RANGE* off-road gear
(Y page 141).
X Deactivate DSR (Y page 139).
X Set the differential lock setting to AUTO on
the selector wheel (Y page 143). X
Lower the vehicle level* again to a level
suitable to the road conditions, e.g. to the
highway/high-speed level.*
X Clean the headlamps and rear lights and
check for damage.
X Clean the front and rear licence plates.
X Clean the wheels/tyres with a water jet and
remove any foreign objects.
X Clean the wheels, wheel arches and the
vehicle underside with a water jet; check
for foreign objects and damage.
X Check whether twigs or other parts of
plants have become trapped. These
increase the risk of fire and can damage
fuel pipes, brake hoses or the rubber bel-
lows of the axle joints and propeller shafts.
X After the trip, examine without fail the
entire undercarriage, wheels, tyres, brakes,
bodywork structure, steering, chassis and
exhaust system for damage.
X After driving for extended periods across
sand, mud, gravel, water or in similarly dirty
conditions, have the brake discs, wheels,
brake pads /linings and axle joints checked
and cleaned.
X If you detect strong vibrations after off-road
travel, check for foreign objects in the
wheels and drive train and remove them if Operation
* optional
164_AKB; 5; 5, en-GB
wobuchh,
Version: 2.10.6 2008-05-11T11:55:12+02:00 - Seite 236Dateiname: 6515_4293_02_buchblock.pdf; preflight
Page 240 of 381
Off-road driving
237
necessary. Foreign objects can disturb the
balance and cause vibrations. Travelling uphill
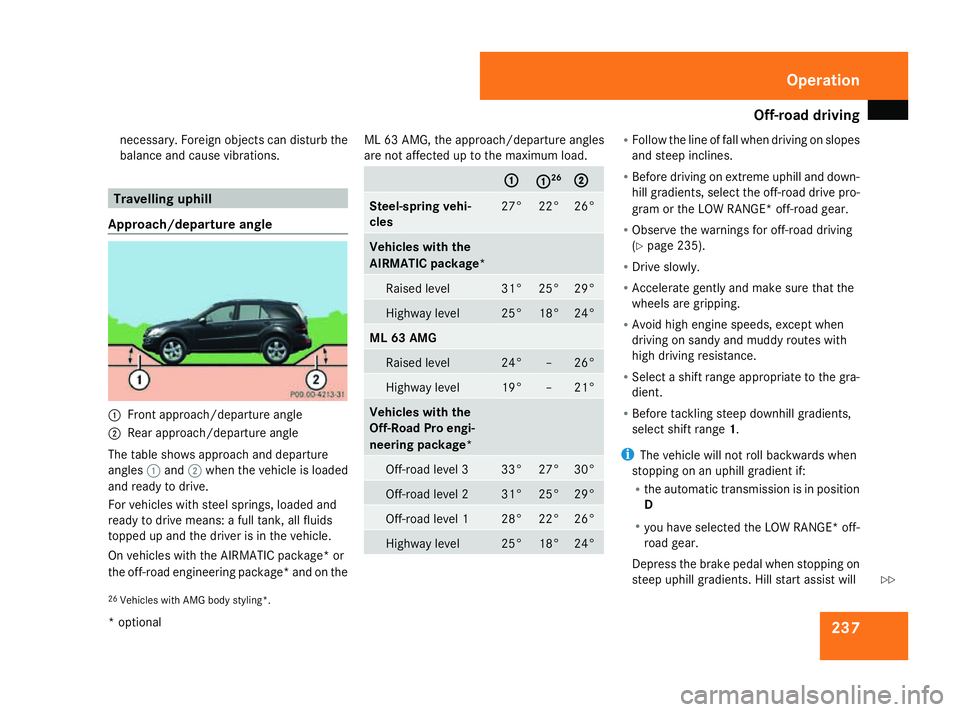
Approach/departure angle 1
Front approach/departure angle
2 Rear approach/departure angle
The table shows approach and departure
angles 1and 2when the vehicle is loaded
and ready to drive.
For vehicles with steel springs, loaded and
ready to drive means: a full tank, all fluids
topped up and the driver is in the vehicle.
On vehicles with the AIRMATIC package* or
the off-road engineering package* and on the ML 63 AMG, the approach/departure angles
are not affected up to the maximum load. 1
1 1 1
26 2
2 Steel-spring vehi-
cles 27° 22° 26°
Vehicles with the
AIRMATIC package*
Raised level 31° 25° 29°
Highway level 25° 18° 24°
ML 63 AMG
Raised level 24° – 26°
Highway level 19° – 21°
Vehicles with the
Off-Road Pro engi-
neering package*
Off-road level 3 33° 27° 30°
Off-road level 2 31° 25° 29°
Off-road level 1 28° 22° 26°
Highway level 25° 18° 24° R
Follow the line of fall when driving on slopes
and steep inclines.
R Before driving on extreme uphill and down-
hill gradients, select the off-road drive pro-
gram or the LOW RANGE* off-road gear.
R Observe the warnings for off-road driving
(Y page 235).
R Drive slowly.
R Accelerate gently and make sure that the
wheels are gripping.
R Avoid high engine speeds, except when
driving on sandy and muddy routes with
high driving resistance.
R Select a shift range appropriate to the gra-
dient.
R Before tackling steep downhill gradients,
select shift range 1.
i The vehicle will not roll backwards when
stopping on an uphill gradient if:
R the automatic transmission is in position
D
R you have selected the LOW RANGE* off-
road gear.
Depress the brake pedal when stopping on
steep uphill gradients. Hill start assist will
26 Vehicles with AMG body styling*. Operation
* optional
164_AKB; 5; 5, en-GB
wobuchh,
Version: 2.10.6 2008-05-11T11:55:12+02:00 - Seite 237 ZDateiname: 6515_4293_02_buchblock.pdf; preflight