instrument panel MERCEDES-BENZ ML500 1997 Complete Repair Manual
[x] Cancel search | Manufacturer: MERCEDES-BENZ, Model Year: 1997, Model line: ML500, Model: MERCEDES-BENZ ML500 1997Pages: 4133, PDF Size: 88.89 MB
Page 1952 of 4133
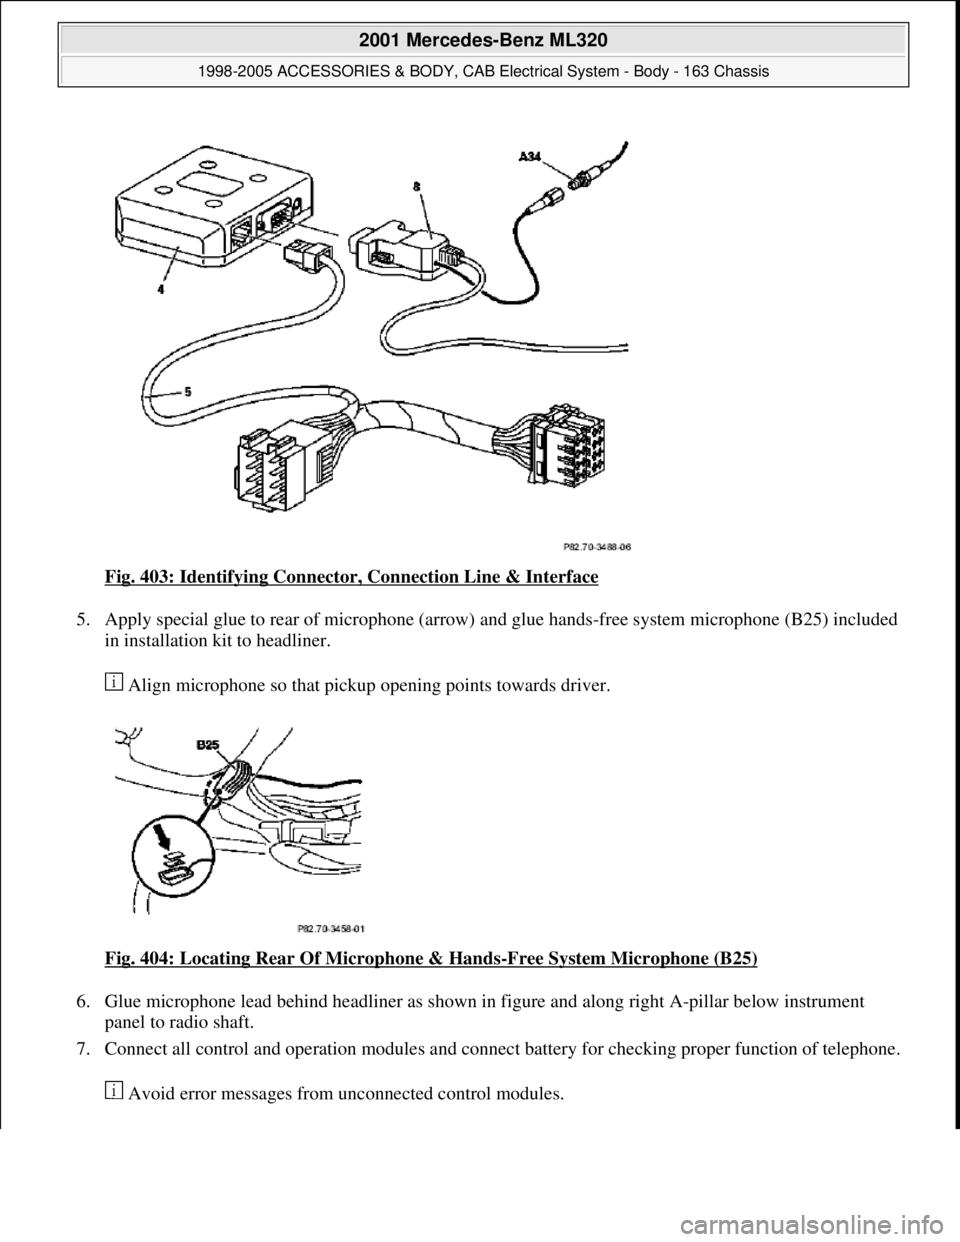
Fig. 403: Identifying Connector, Connection Line & Interface
5. Apply special glue to rear of microphone (arrow) and glue hands-free system microphone (B25) included
in installation kit to headliner.
Align microphone so that pickup opening points towards driver.
Fig. 404: Locating Rear Of Microphone & Hands
-Free System Microphone (B25)
6. Glue microphone lead behind headliner as shown in figure and along right A-pillar below instrument
panel to radio shaft.
7. Connect all control and operation modules and connect battery for checking proper function of telephone.
Avoid error messa
ges from unconnected control modules.
2001 Mercedes-Benz ML320
1998-2005 ACCESSORIES & BODY, CAB Electrical System - Body - 163 Chassis
me
Saturday, October 02, 2010 3:30:14 PMPage 457 © 2006 Mitchell Repair Information Company, LLC.
Page 2035 of 4133
2001-04 STARTING & CHARGING SYSTEMS
Generators & Regulators - 163 Chassis
IDENTIFICATION
CHASSIS & ENGINE IDENTIFICATION
DESCRIPTION
Bosch generators are available in various amp ratings depending on engine application. Voltage regulators are
transistorized and internal to generator. See GENERATOR APPLICATION
table.
GENERATOR APPLICATION
ADJUSTMENTS
DRIVE BELT ROUTING
For drive belt routing, see Fig. 1 . WARNING:Vehicles are equipped with air bag supplemental restraint system. Before
attempting any repairs involving steering column, instrument panel or
related components, see SERVICE PRECAUTIONS (or AIR BAG SAFETY
PRECAUTIONS) and DISABLING & ACTIVATING AIR BAG SYSTEM in
appropriate AIR BAG RESTRAINT SYSTEMS article.
NOTE: When the battery is disconnected, vehicle computer and memory system may
lose data. Driveability problems may exist until computer systems have
completed a relearn cycle.
Model (Year)ChassisEngine
ML55 AMG (2001-03)163.174113.981
ML320 (2001-02)163.154112.942
ML350 (2003-04)163.157112.970
ML430 (2001)163.172113.942
ML500 (2002-04)163.175113.965
ApplicationAmp Rating
V6115
V8150
NOTE: Vehicles have automatic belt tensioners. No adjustment is necessary.
2001 Mercedes-Benz ML320
2001-04 STARTING & CHARGING SYSTEMS Generators & Regulators - 163 Chassis
2001 Mercedes-Benz ML320
2001-04 STARTING & CHARGING SYSTEMS Generators & Regulators - 163 Chassis
me
Saturday, October 02, 2010 3:20:31 PMPage 1 © 2006 Mitchell Repair Information Company, LLC.
me
Saturday, October 02, 2010 3:20:35 PMPage 1 © 2006 Mitchell Repair Information Company, LLC.
Page 2042 of 4133

3. Normalize side power windows. See NORMALIZING POWER WINDOWS .
4. Start engine and run at idle. Turn steering wheel from one lock position to the other to activate steering
angle sensor. Center steering wheel. Message "EI. STAB. PROGRAM GO TO GARAGE" should erase
from multifunction display panel.
5. If equipped, normalize tilting/sliding roof. See NORMALIZING TILTING/SLIDING ROOF
.
6. If equipped, normalize memory power seats, steering column and outside mirror if components are
installed. See NORMALIZING MEMORY POWER SEATS, STEERING COLUMN & OUTSIDE
MIRROR .
Normalizing Power Windows
1. Completely close each window with manual switch. Hold switch in closed position for .3 second.
2. Repeat procedure for each power window.
Normalizing Memory Power Seats, Steering Column & Outside Mirror
1. Using manual switch, move seat to each end position and hold for .3 second. Repeat procedure for each
switch except rear stop of backrest.
2. Repeat procedure for end positions of steering wheel and outside mirrors.
Normalizing Tilting/Sliding Roof
Open roof with SR switch until mechanical stop is reached. Continue to press switch for .5 seconds.
Setting Time
1. Use bottom left button on steering wheel to scroll through menus on instrument cluster to "Settings"
menu.
2. Move selection marker with + or - button to "Time" submenu.
3. Press up or down arrows to "Clock, hours" setting. Confirm selection marker is on the hour setting.
4. Press + or - to set hour. Press reset knob in instrument cluster to confirm.
5. Move selection marker with + or - button to "Time" submenu.
6. Press up or down arrows to "Clock, minutes" setting. Confirm selection marker is on the minutes setting.
7. Press + or - to set minute. Press reset knob in instrument cluster to confirm.
TESTING
If generator malfunctions, check for Diagnostic Trouble Codes (DTCs) in Motor Electronics Sequential Fuel
Injection (ME-SFI) system. See appropriate SELF-DIAGNOSTICS article in ENGINE PERFORMANCE. If
cause of generator malfunction is not engine performance related, replace generator.
RETRIEVING & ERASING DIAGNOSTIC TROUBLE CODES
NOTE: Before replacing any component that scan tool suggests are faulty, ensure that
all wiring connections and harness connectors are okay. Ensure that power and
2001 Mercedes-Benz ML320
2001-04 STARTING & CHARGING SYSTEMS Generators & Regulators - 163 Chassis
me
Saturday, October 02, 2010 3:20:32 PMPage 8 © 2006 Mitchell Repair Information Company, LLC.
Page 2511 of 4133
AR54.21-P-1200GH
Remove/install Extended-Activity-Module (EAM)
11.7.00
MODEL
163.136 /154 /172 #A as of 145273,
163.136 /154 /172 #X as of 708319,
163.113 /128 /157 /174 /175
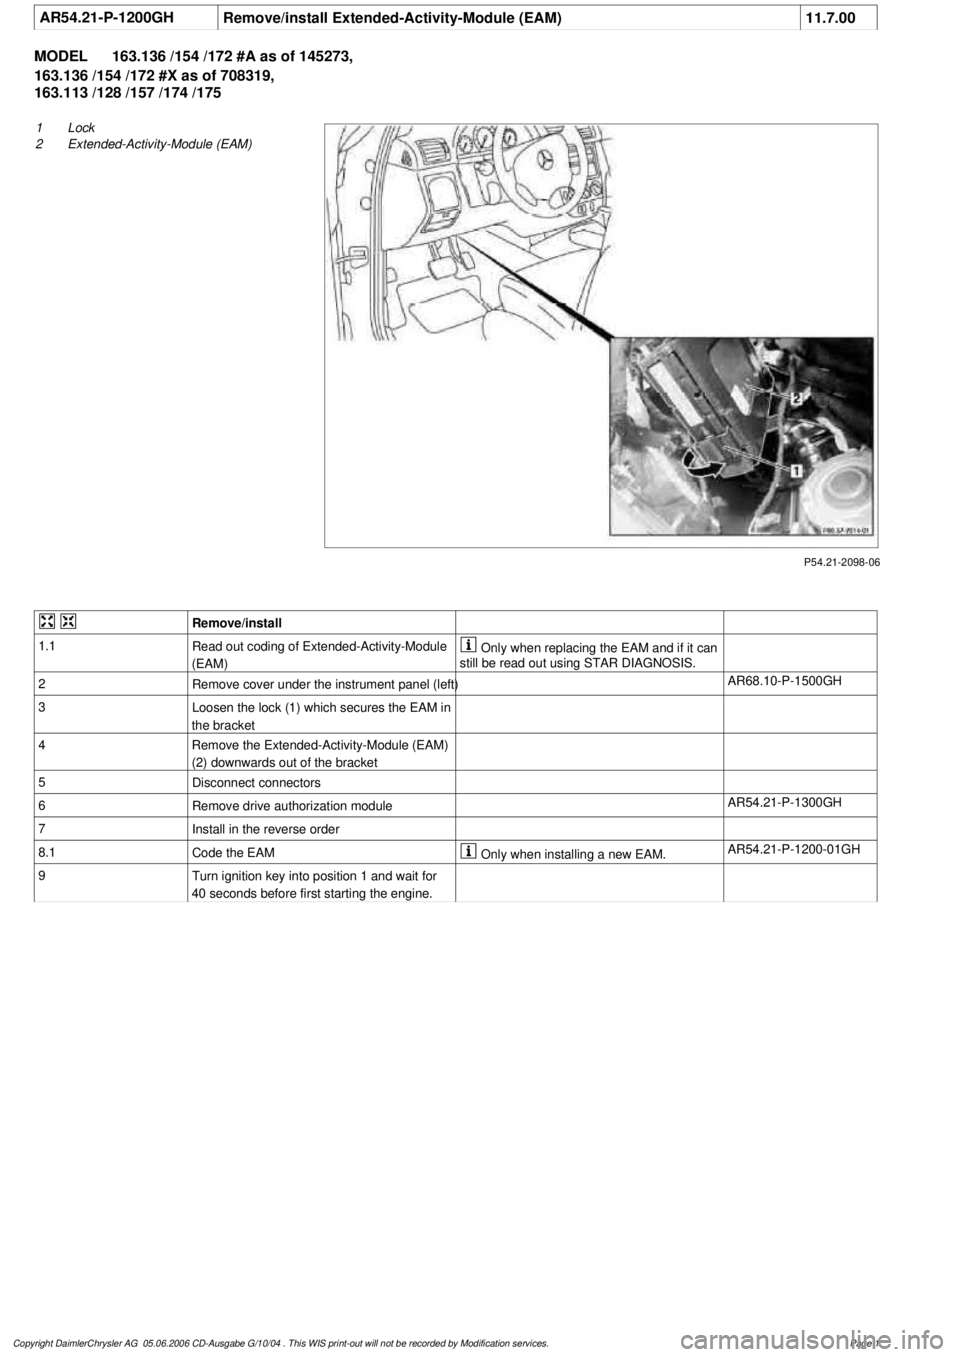
P54.21-2098-06
1
Lock
2
Extended-Activity-Module (EAM)
Remove/install
1.1
Read out coding of Extended-Activity-Module
(EAM)
Only
when replacing the EAM and if it can
still be read out using STAR DIAGNOSIS.
2
Remove cover under the instrument panel (left)
AR68.10-P-1500GH
3
Loosen the lock (1) which secures the EAM in
the bracket
4
Remove the Extended-Activity-Module (EAM)
(2) downwards out of the bracket
5
Disconnect connectors
6
Remove drive authorization module
AR54.21-P-1300GH
7
Install in the reverse order
8.1
Code the EAM
Only
when installing a new EAM.
AR54.21-P-1200-01GH
9
Turn ignition key into position 1 and wait for
40 seconds before first starting the engine.
Copyright DaimlerChrysler AG 05.06.2006 CD-Ausgabe G/10/04 . This WIS print-out will not be recorde
d by Modification services.
Page 1
Page 2845 of 4133
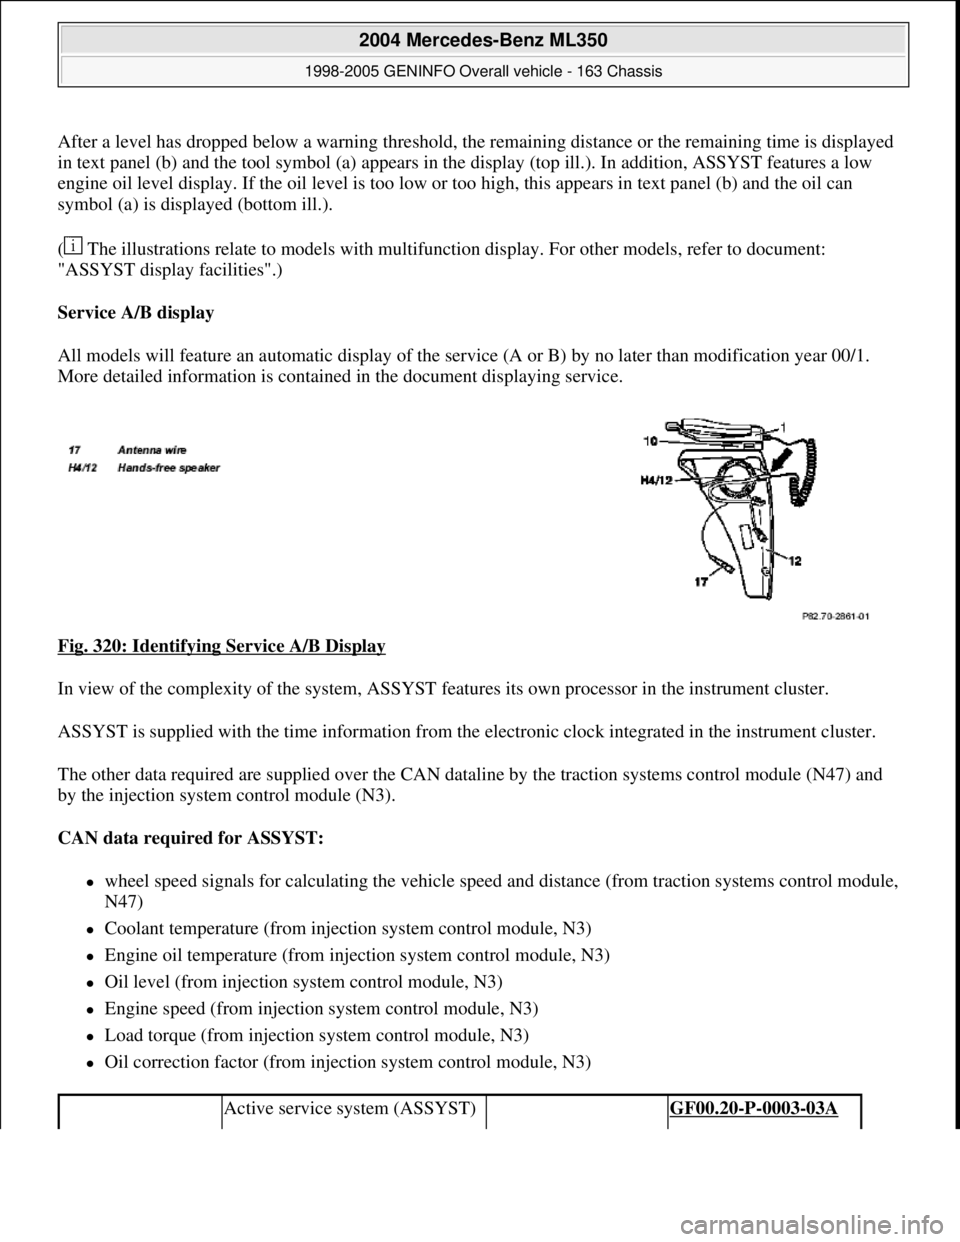
After a level has dropped below a warning threshold, the remaining distance or the remaining time is displayed
in text panel (b) and the tool symbol (a) appears in the display (top ill.). In addition, ASSYST features a low
engine oil level display. If the oil level is too low or too high, this appears in text panel (b) and the oil can
symbol (a) is displayed (bottom ill.).
( The illustrations relate to models with multifunction display. For other models, refer to document:
"ASSYST display facilities".)
Service A/B display
All models will feature an automatic display of the service (A or B) by no later than modification year 00/1.
More detailed information is contained in the document displaying service.
Fig. 320: Identifying Service A/B Display
In view of the complexity of the system, ASSYST features its own processor in the instrument cluster.
ASSYST is supplied with the time information from the electronic clock integrated in the instrument cluster.
The other data required are supplied over the CAN dataline by the traction systems control module (N47) and
by the injection system control module (N3).
CAN data required for ASSYST:
wheel speed signals for calculating the vehicle speed and distance (from traction systems control module,
N47)
Coolant temperature (from injection system control module, N3)
Engine oil temperature (from injection system control module, N3)
Oil level (from injection system control module, N3)
Engine speed (from injection system control module, N3)
Load torque (from injection system control module, N3)
Oil correction factor (from injection system control module, N3)
Active service system (ASSYST) GF00.20-P-0003-03A
2004 Mercedes-Benz ML350
1998-2005 GENINFO Overall vehicle - 163 Chassis
me
Saturday, October 02, 2010 3:47:47 PMPage 200 © 2006 Mitchell Repair Information Company, LLC.
Page 3178 of 4133
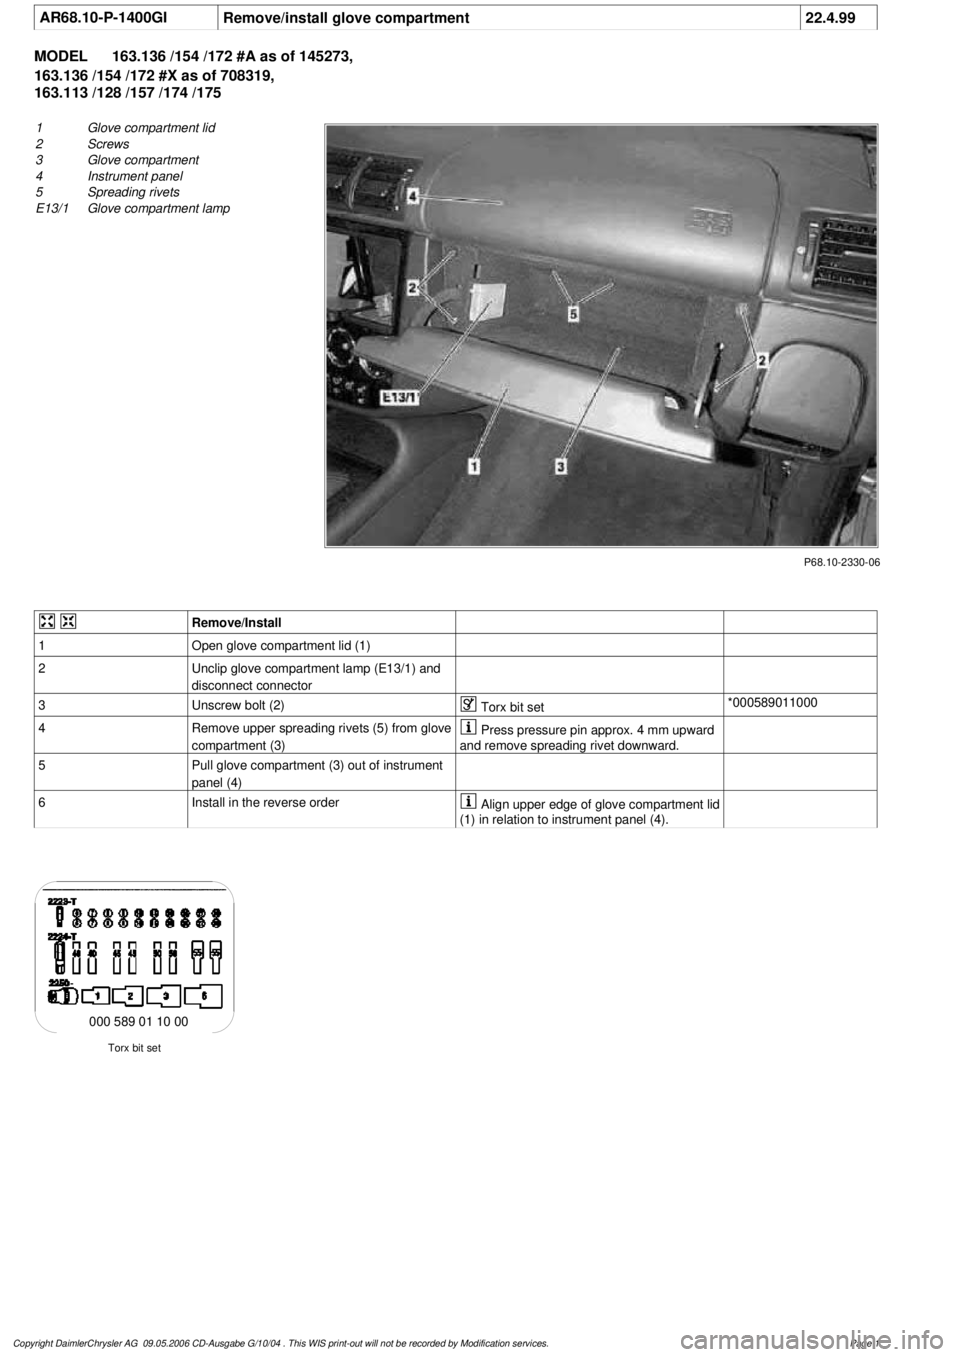
AR68.10-P-1400GI
Remove/install glove compartment
22.4.99
MODEL
163.136 /154 /172 #A as of 145273,
163.136 /154 /172 #X as of 708319,
163.113 /128 /157 /174 /175
P68.10-2330-06
1
Glove compartment lid
2
Screws
3
Glove compartment
4
Instrument panel
5
Spreading rivets
E13/1
Glove compartment lamp
Remove/Install
1
Open glove compartment lid (1)
2
Unclip glove compartment lamp (E13/1) and
disconnect connector
3
Unscrew bolt (2)
Torx bit set
*000589011000
4
Remove upper spreading rivets (5) from glove
compartment (3)
Press pressure pin approx. 4 mm upward
and remove spreading rivet downward.
5
Pull glove compartment (3) out of instrument
panel (4)
6
Install in the reverse order
Align upper edge of glove compartment lid
(1) in relation to instrument panel (4).
Torx bit set
000 589 01 10 00
Copyright DaimlerChrysler AG 09.05.2006 CD-Ausgabe G/10/04 . This WIS print-out will not be recorde
d by Modification services.
Page 1
Page 3179 of 4133
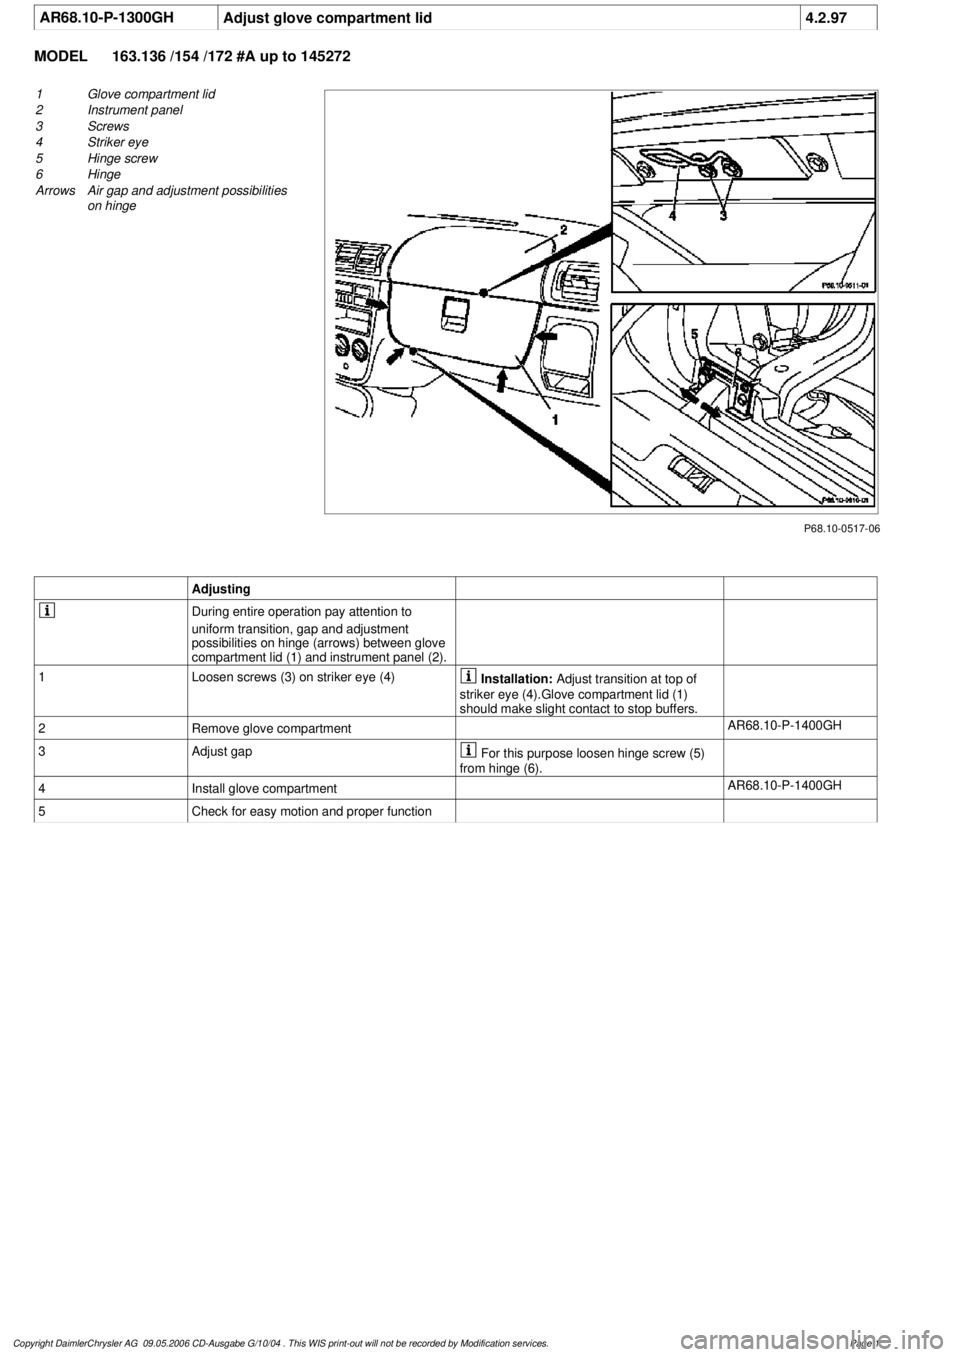
AR68.10-P-1300GH
Adjust glove compartment lid
4.2.97
MODEL
163.136 /154 /172 #A up to 145272
P68.10-0517-06
1
Glove compartment lid
2
Instrument panel
3
Screws
4
Striker eye
5
Hinge screw
6
Hinge
Arrows
Air gap and adjustment possibilities
on hinge
Adjusting
During entire operation pay attention to
uniform transition, gap and adjustment
possibilities on hinge (arrows) between glove
compartment lid (1) and instrument panel (2).
1
Loosen screws (3) on striker eye (4)
Installation:
Adjust transition at top of
striker eye (4).Glove compartment lid (1)
should make slight contact to stop buffers.
2
Remove glove compartment
AR68.10-P-1400GH
3
Adjust gap
For this purpose loosen hinge screw (5)
from hinge (6).
4
Install glove compartment
AR68.10-P-1400GH
5
Check for easy motion and proper function
Copyright DaimlerChrysler AG 09.05.2006 CD-Ausgabe G/10/04 . This WIS print-out will not be recorde
d by Modification services.
Page 1
Page 3180 of 4133
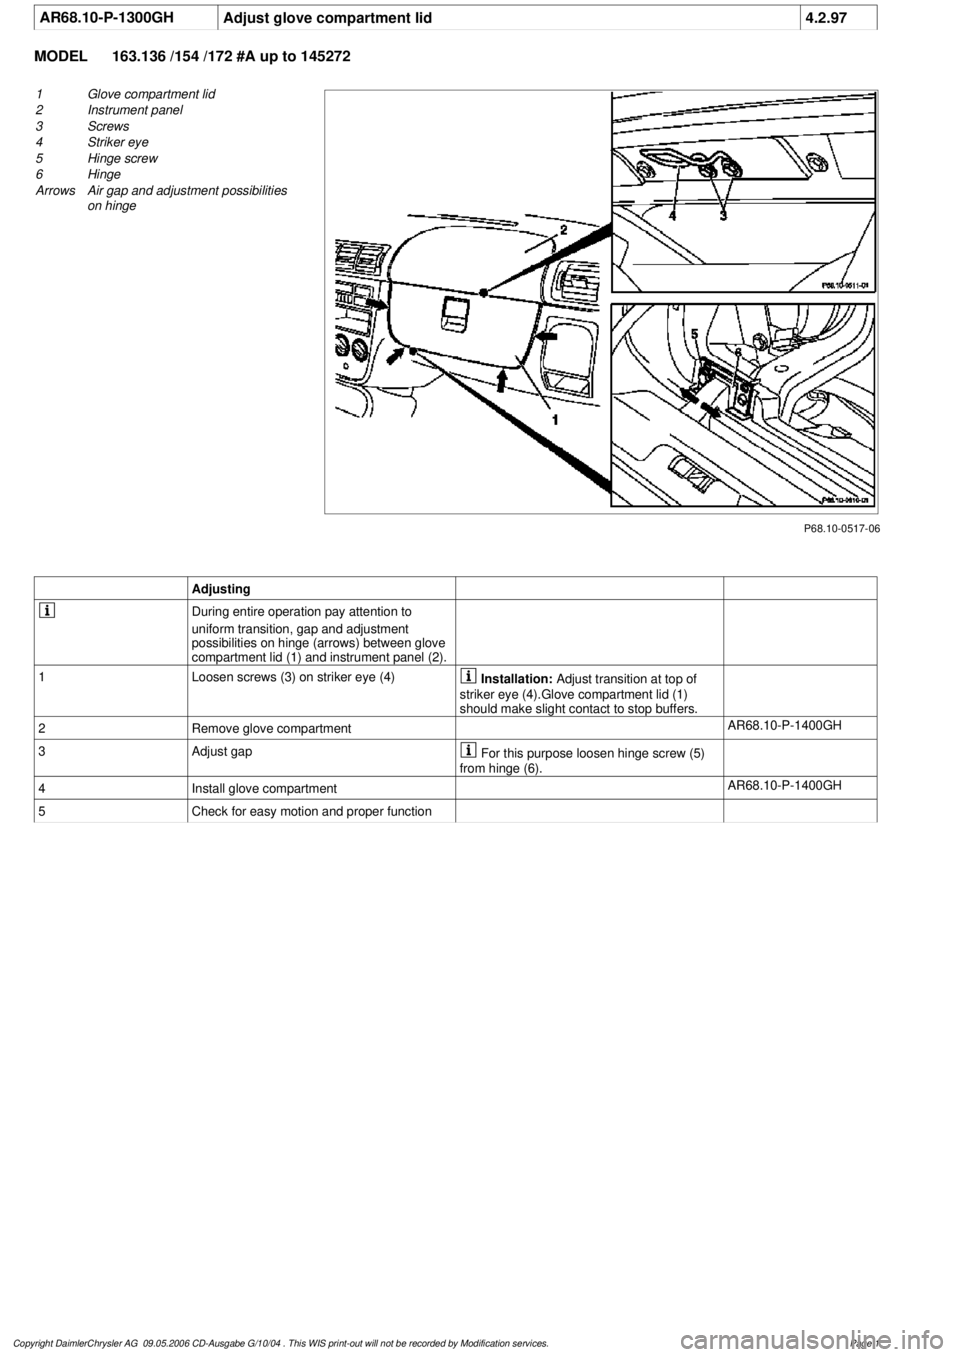
AR68.10-P-1300GH
Adjust glove compartment lid
4.2.97
MODEL
163.136 /154 /172 #A up to 145272
P68.10-0517-06
1
Glove compartment lid
2
Instrument panel
3
Screws
4
Striker eye
5
Hinge screw
6
Hinge
Arrows
Air gap and adjustment possibilities
on hinge
Adjusting
During entire operation pay attention to
uniform transition, gap and adjustment
possibilities on hinge (arrows) between glove
compartment lid (1) and instrument panel (2).
1
Loosen screws (3) on striker eye (4)
Installation:
Adjust transition at top of
striker eye (4).Glove compartment lid (1)
should make slight contact to stop buffers.
2
Remove glove compartment
AR68.10-P-1400GH
3
Adjust gap
For this purpose loosen hinge screw (5)
from hinge (6).
4
Install glove compartment
AR68.10-P-1400GH
5
Check for easy motion and proper function
Copyright DaimlerChrysler AG 09.05.2006 CD-Ausgabe G/10/04 . This WIS print-out will not be recorde
d by Modification services.
Page 1
Page 3197 of 4133
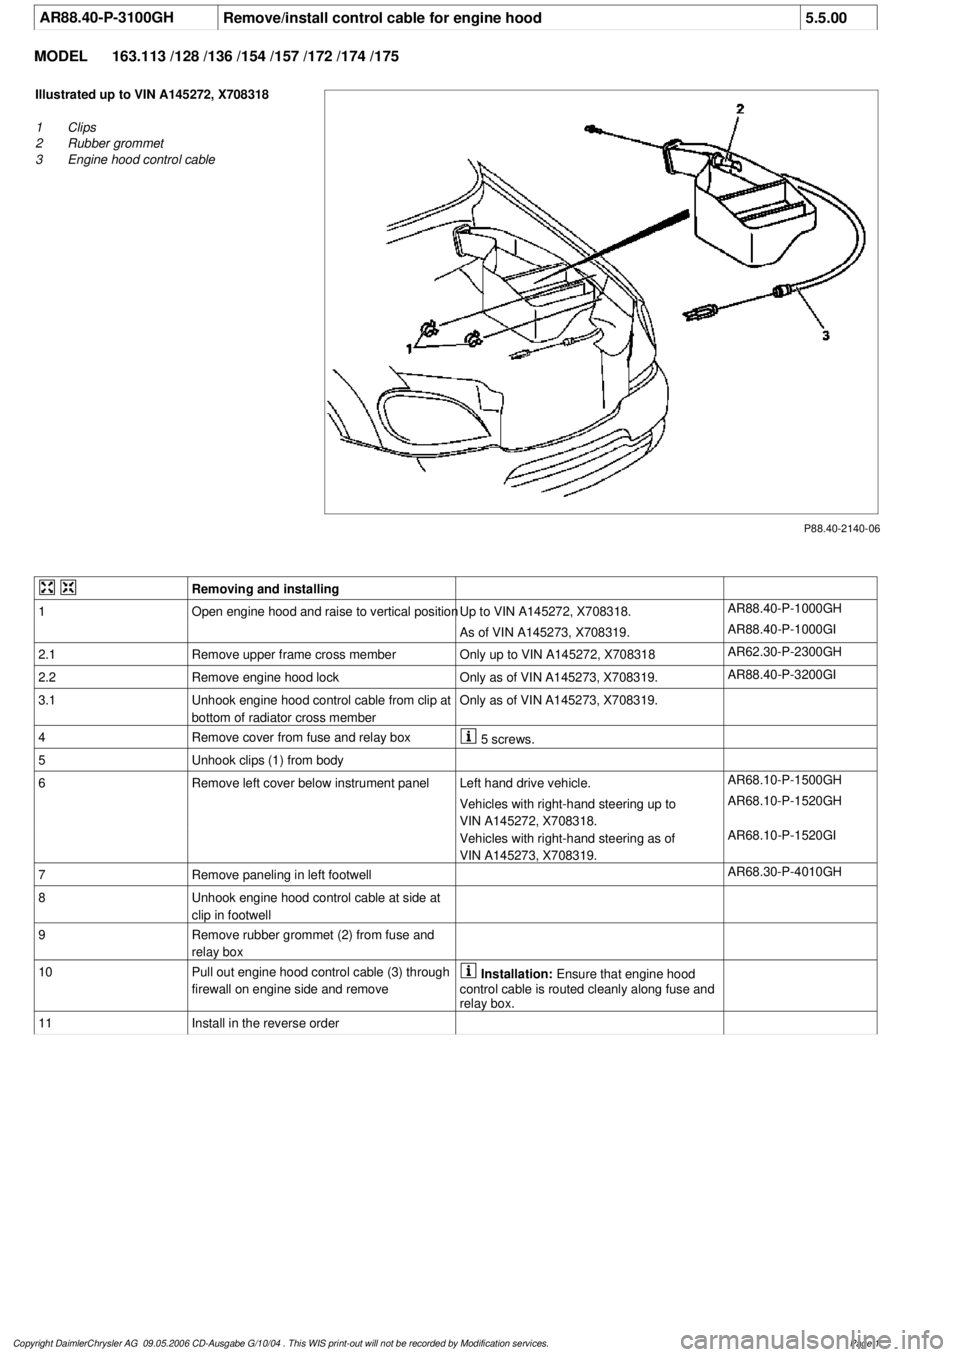
AR88.40-P-3100GH
Remove/install control cable for engine hood
5.5.00
MODEL
163.113 /128 /136 /154 /157 /172 /174 /175
P88.40-2140-06
Illustrated up to VIN A145272, X708318
1
Clips
2
Rubber grommet
3
Engine hood control cable
Removing and installing
1
Open engine hood and raise to vertical position
Up to VIN A145272, X708318.
AR88.40-P-1000GH
As of VIN A145273, X708319.
AR88.40-P-1000GI
2.1
Remove upper frame cross member
Only up to VIN A145272, X708318
AR62.30-P-2300GH
2.2Remove engine hood lock
Only as of VIN A145273, X708319.
AR88.40-P-3200GI
3.1
Unhook engine hood control cable from clip at
bottom of radiator cross member
Only as of VIN A145273, X708319.
4
Remove cover from fuse and relay box
5 screws.
5
Unhook clips (1) from body
6
Remove left cover below instrument panel
Left hand drive vehicle.
AR68.10-P-1500GH
Vehicles with right-hand steering up to
VIN A145272, X708318.
AR68.10-P-1520GH
Vehicles with right-hand steering as of
VIN A145273, X708319.
AR68.10-P-1520GI
7
Remove paneling in left footwell
AR68.30-P-4010GH
8
Unhook engine hood control cable at side at
clip in footwell
9
Remove rubber grommet (2) from fuse and
relay box
10
Pull out engine hood control cable (3) through
firewall on engine side and remove
Installation:
Ensure that engine hood
control cable is routed cleanly along fuse and
relay box.
11
Install in the reverse order
Copyright DaimlerChrysler AG 09.05.2006 CD-Ausgabe G/10/04 . This WIS print-out will not be recorde
d by Modification services.
Page 1
Page 3201 of 4133
Danger!
Risk of explosion
from explosive gas.
Risk
of poisoning and caustic burns from
swallowing battery electrolyte.
Risk of injury
through burns to skin and eyes from battery
acid or when handling damaged lead-acid
batteries
No fire, sparks, naked flames or smoking.
Wear protective gloves, acid-resistant
clothing and safety glasses. Pour battery
electrolyte only into suitable and appropriately
marked containers.
AS54.10-Z-0001-01A
4
Remove battery
AR54.10-P-0005GH
5
Press out template (6) and adapt the size to
the correct dimensions (a, b)Determine ACTUAL dimension (a) from the
drawing.
Divide the SPECIFIED dimension (a) by the
determined ACTUAL dimension (a) and copy
the template to the original size with the
corresponding factor.
Check dimensions for both axles.
6
Cut out template
7
Cut out holes (7, 8) for engine hood hinge
studs
8
Position template in the engine hood hinge
support using the stud holes
The template is drawn for the left side.
Turn over to obtain the right side.
9
Center the engine hood hinge support on the
template using the markings (9, 10, 11)
10
Remove template
11
Drill a hole at each center punch mark (3, 4, 5)
Only drill through the 2 upper panels. Do
not drill through the reinforcement panel (3rd
panel).
*201589005100
12
Cover windshield, paint surface and adjacent
components adequately in order to avoid
damage due to welding work
Cover apertures in the body in order to
prevent flying sparks: the foam in the
instrument panel burns easily.
c
General information on repairs to body
AH60.00-N-0001-01A
Danger!
The high voltage used for arc welding
presents a lethal hazard
.
Explosion hazard
when welding in area of materials easily
inflammable.
Injury hazard
from welding
spatter and UV-light while welding.
Risk of
poisoning
when inhaling welding vapors.
Use insulating mats. Wear protective clothing,
safety glasses, and protective mask.
Remove
highly inflammable materials from the danger
zone. Use air extractor.
AS00.00-Z-0007-01A
13
Plug weld each hole
*WE58.40-Z-1005-02A
14
Plug welds should be flat and ground smooth
15
Remove covers and clean the repair area
16
Prime untreated points in the area of the
engine hood hinge support
17
Prime the underside of the reinforcement
panel of the engine hood hinge
Access to underside of engine hood hinge
support through the recess for the wiper motor.
18
Spray the underside of the reinforcement
panel of the engine hood hinge support with
wax preservative
Access to underside of engine hood hinge
support through the recess for the wiper motor.
19
Install in the reverse order
Weld spot miller
201 589 00 51 00
Workshop equipment/MB testers
(see Workshop Equipment Manual)
WE58.40-Z-1005-02A
MIG inert gas welding equipment, aluminum weldable, sold by company Wieländer & Schill
Repair products
Number
Designation
Order number
BR00.45-Z-1004-01A
MB body sealant for sealing seams (suitable for painting)
001 989 63 20
Copyright DaimlerChrysler AG 09.05.2006 CD-Ausgabe G/10/04 . This WIS print-out will not be recorde
d by Modification services.
Page 2