instrument panel MERCEDES-BENZ ML500 1997 Complete Repair Manual
[x] Cancel search | Manufacturer: MERCEDES-BENZ, Model Year: 1997, Model line: ML500, Model: MERCEDES-BENZ ML500 1997Pages: 4133, PDF Size: 88.89 MB
Page 3435 of 4133
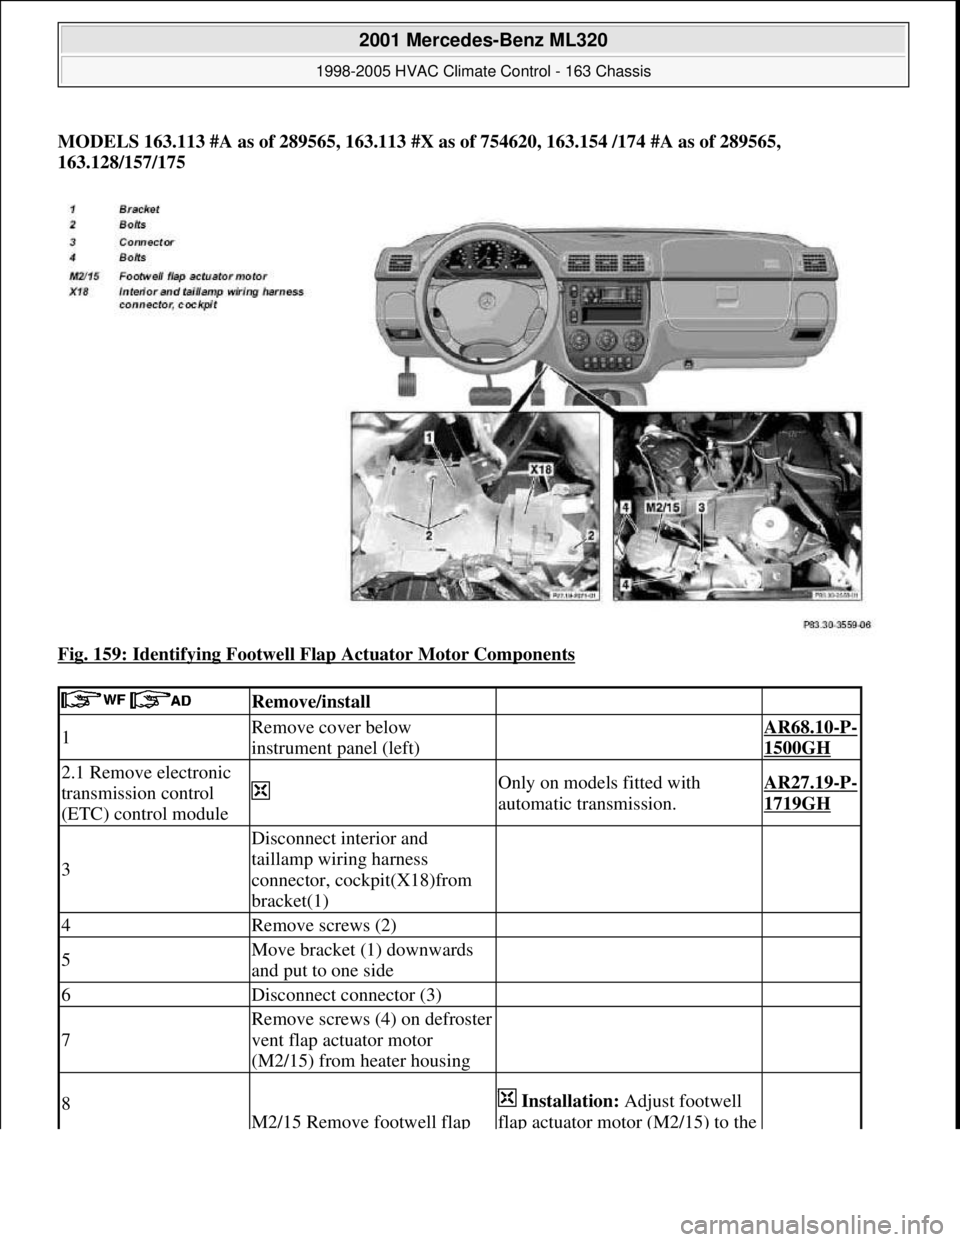
MODELS 163.113 #A as of 289565, 163.113 #X as of 754620, 163.154 /174 #A as of 289565,
163.128/157/175
Fig. 159: Identifying Footwell Flap Actuator Motor Components
Remove/install
1Remove cover below
instrument panel (left) AR68.10-P-
1500GH
2.1 Remove electronic
transmission control
(ETC) control module
Only on models fitted with
automatic transmission.AR27.19-P-
1719GH
3
Disconnect interior and
taillamp wiring harness
connector, cockpit(X18)from
bracket(1)
4Remove screws (2)
5Move bracket (1) downwards
and put to one side
6Disconnect connector (3)
7
Remove screws (4) on defroster
vent flap actuator motor
(M2/15) from heater housing
8
M2/15 Remove footwell flap
Installation: Adjust footwell
flap actuator motor (M2/15) to the
2001 Mercedes-Benz ML320
1998-2005 HVAC Climate Control - 163 Chassis
me
Saturday, October 02, 2010 3:23:18 PMPage 191 © 2006 Mitchell Repair Information Company, LLC.
Page 3436 of 4133
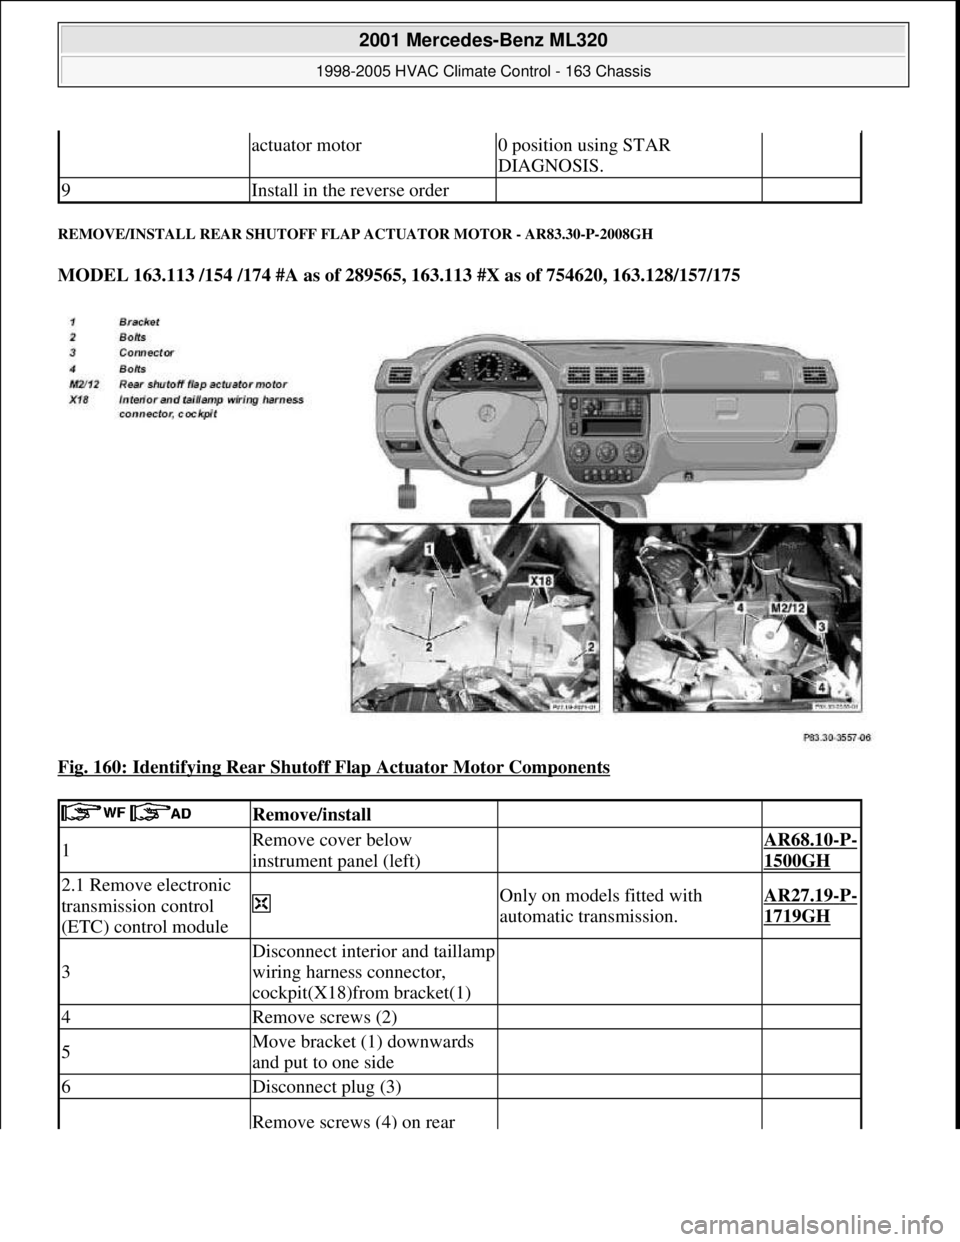
REMOVE/INSTALL REAR SHUTOFF FLAP ACTUATOR MOTOR - AR83.30-P-2008GH
MODEL 163.113 /154 /174 #A as of 289565, 163.113 #X as of 754620, 163.128/157/175
Fig. 160: Identifying Rear Shutoff Flap Actuator Motor Components
actuator motor0 position using STAR
DIAGNOSIS.
9Install in the reverse order
Remove/install
1Remove cover below
instrument panel (left) AR68.10-P-
1500GH
2.1 Remove electronic
transmission control
(ETC) control module
Only on models fitted with
automatic transmission.AR27.19-P-
1719GH
3
Disconnect interior and taillamp
wiring harness connector,
cockpit(X18)from bracket(1)
4Remove screws (2)
5Move bracket (1) downwards
and put to one side
6Disconnect plug (3)
Remove screws (4) on rear
2001 Mercedes-Benz ML320
1998-2005 HVAC Climate Control - 163 Chassis
me
Saturday, October 02, 2010 3:23:18 PMPage 192 © 2006 Mitchell Repair Information Company, LLC.
Page 3437 of 4133
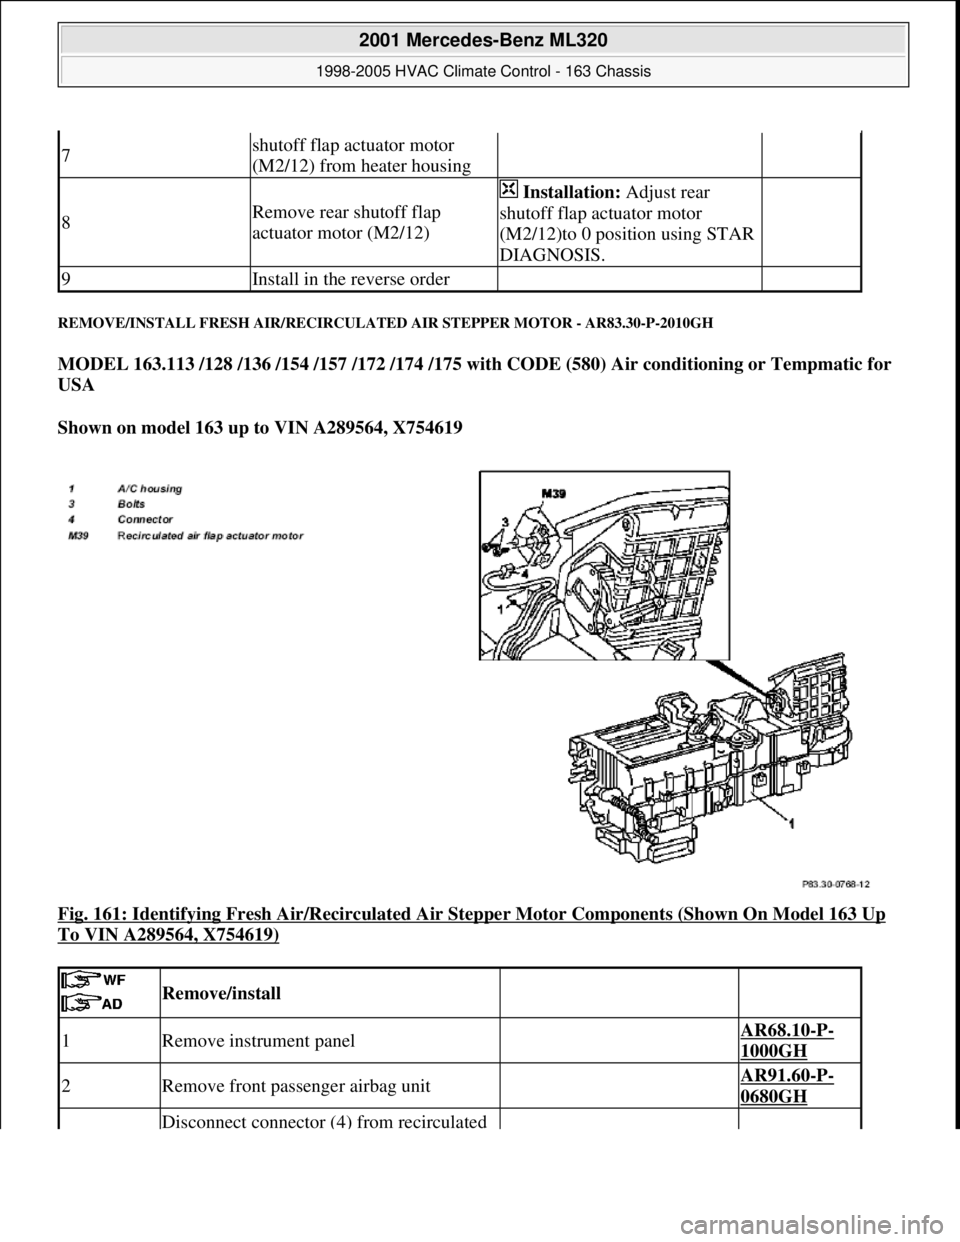
REMOVE/INSTALL FRESH AIR/RECIRCULATED AIR STEPPER MOTOR - AR83.30-P-2010GH
MODEL 163.113 /128 /136 /154 /157 /172 /174 /175 with CODE (580) Air conditioning or Tempmatic for
USA
Shown on model 163 up to VIN A289564, X754619
Fig. 161: Identifying Fresh Air/Recirculated Air Stepper Motor Components (Shown On Model 163 Up
To VIN A289564, X754619)
7shutoff flap actuator motor
(M2/12) from heater housing
8Remove rear shutoff flap
actuator motor (M2/12)
Installation: Adjust rear
shutoff flap actuator motor
(M2/12)to 0 position using STAR
DIAGNOSIS.
9Install in the reverse order
Remove/install
1Remove instrument panel AR68.10-P-
1000GH
2Remove front passenger airbag unit AR91.60-P-
0680GH
Disconnect connector (4) from recirculated
2001 Mercedes-Benz ML320
1998-2005 HVAC Climate Control - 163 Chassis
me
Saturday, October 02, 2010 3:23:18 PMPage 193 © 2006 Mitchell Repair Information Company, LLC.
Page 3438 of 4133
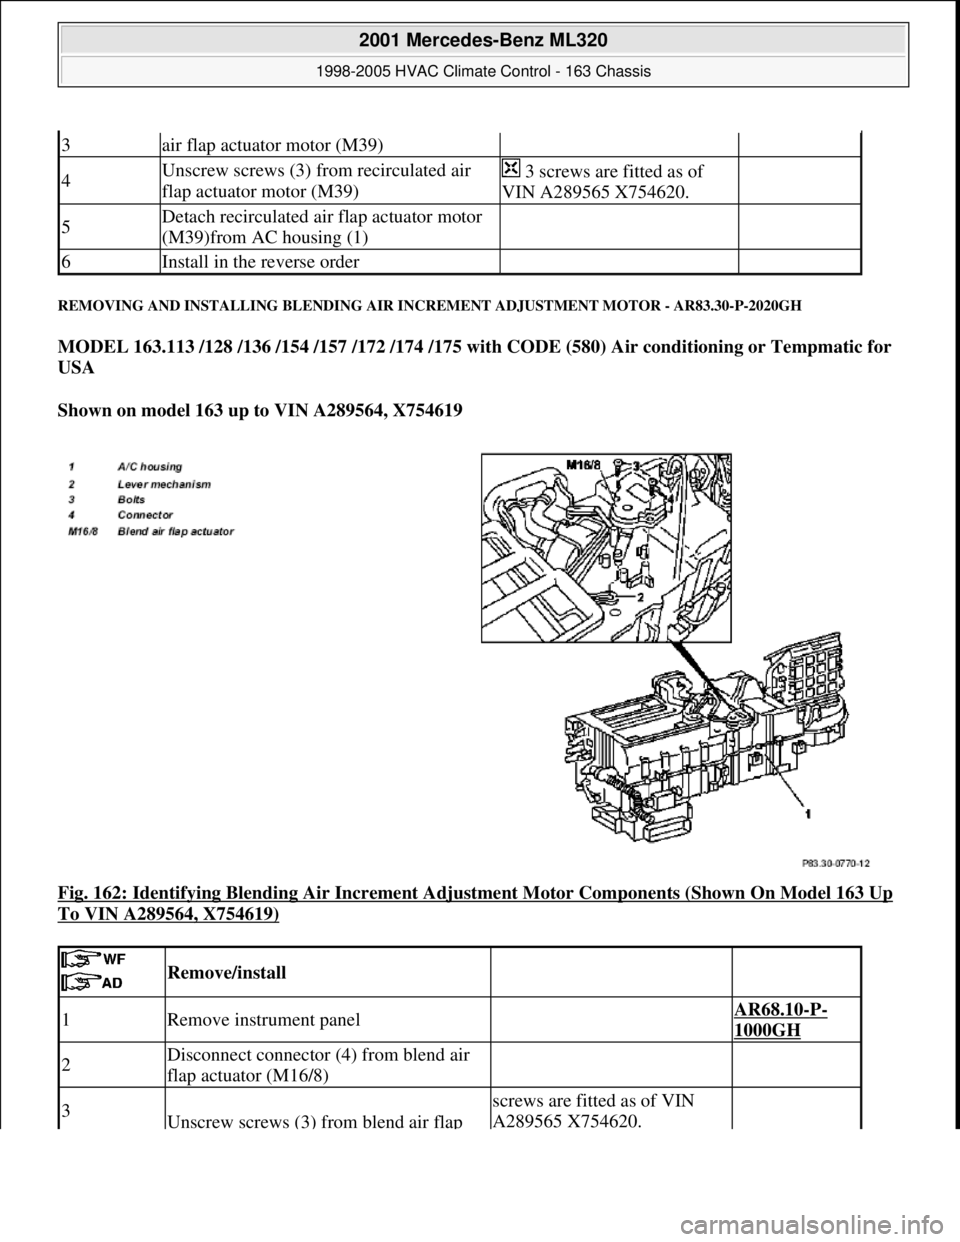
REMOVING AND INSTALLING BLENDING AIR INCREMENT ADJUSTMENT MOTOR - AR83.30-P-2020GH
MODEL 163.113 /128 /136 /154 /157 /172 /174 /175 with CODE (580) Air conditioning or Tempmatic for
USA
Shown on model 163 up to VIN A289564, X754619
Fig. 162: Identifying Blending Air Increment Adjustment Motor Components (Shown On Model 163 Up
To VIN A289564, X754619)
3air flap actuator motor (M39)
4Unscrew screws (3) from recirculated air
flap actuator motor (M39) 3 screws are fitted as of
VIN A289565 X754620.
5Detach recirculated air flap actuator motor
(M39)from AC housing (1)
6Install in the reverse order
Remove/install
1Remove instrument panel AR68.10-P-
1000GH
2Disconnect connector (4) from blend air
flap actuator (M16/8)
3Unscrew screws (3) from blend air flap
screws are fitted as of VIN
A289565 X754620.
2001 Mercedes-Benz ML320
1998-2005 HVAC Climate Control - 163 Chassis
me
Saturday, October 02, 2010 3:23:18 PMPage 194 © 2006 Mitchell Repair Information Company, LLC.
Page 3441 of 4133
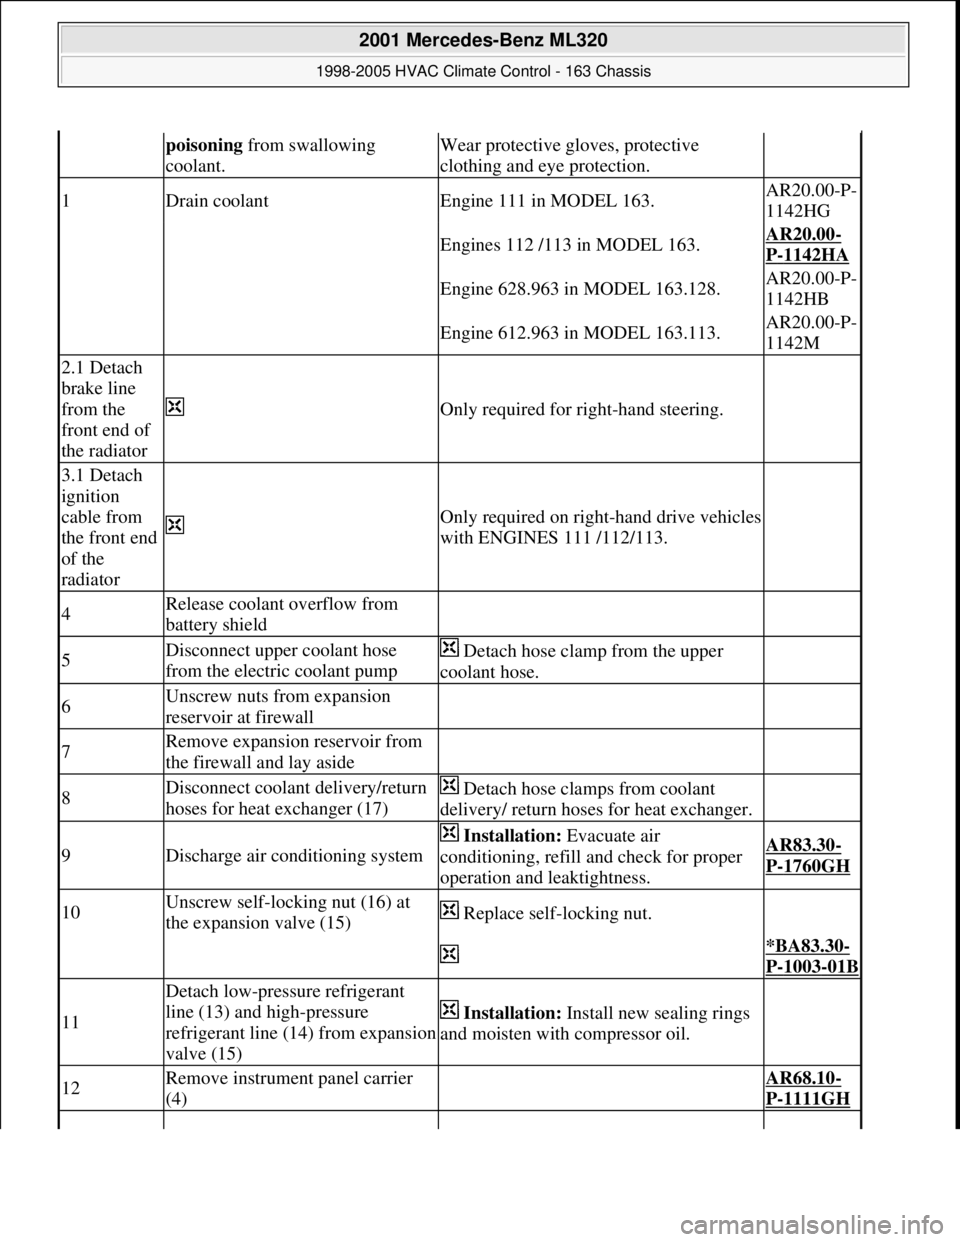
poisoning from swallowing
coolant.Wear protective gloves, protective
clothing and eye protection.
1Drain coolantEngine 111 in MODEL 163.AR20.00-P-
1142HG
Engines 112 /113 in MODEL 163.AR20.00-
P-1142HA
Engine 628.963 in MODEL 163.128.AR20.00-P-
1142HB
Engine 612.963 in MODEL 163.113.AR20.00-P-
1142M
2.1 Detach
brake line
from the
front end of
the radiator
Only required for right-hand steering.
3.1 Detach
ignition
cable from
the front end
of the
radiator
Only required on right-hand drive vehicles
with ENGINES 111 /112/113.
4Release coolant overflow from
battery shield
5Disconnect upper coolant hose
from the electric coolant pump Detach hose clamp from the upper
coolant hose.
6Unscrew nuts from expansion
reservoir at firewall
7Remove expansion reservoir from
the firewall and lay aside
8Disconnect coolant delivery/return
hoses for heat exchanger (17) Detach hose clamps from coolant
delivery/ return hoses for heat exchanger.
9Discharge air conditioning system
Installation: Evacuate air
conditioning, refill and check for proper
operation and leaktightness.AR83.30-
P-1760GH
10Unscrew self-locking nut (16) at
the expansion valve (15) Replace self-locking nut.
*BA83.30-
P-1003-01B
11
Detach low-pressure refrigerant
line (13) and high-pressure
refrigerant line (14) from expansion
valve (15)
Installation: Install new sealing rings
and moisten with compressor oil.
12Remove instrument panel carrier
(4) AR68.10-
P-1111GH
2001 Mercedes-Benz ML320
1998-2005 HVAC Climate Control - 163 Chassis
me
Saturday, October 02, 2010 3:23:18 PMPage 197 © 2006 Mitchell Repair Information Company, LLC.
Page 3453 of 4133
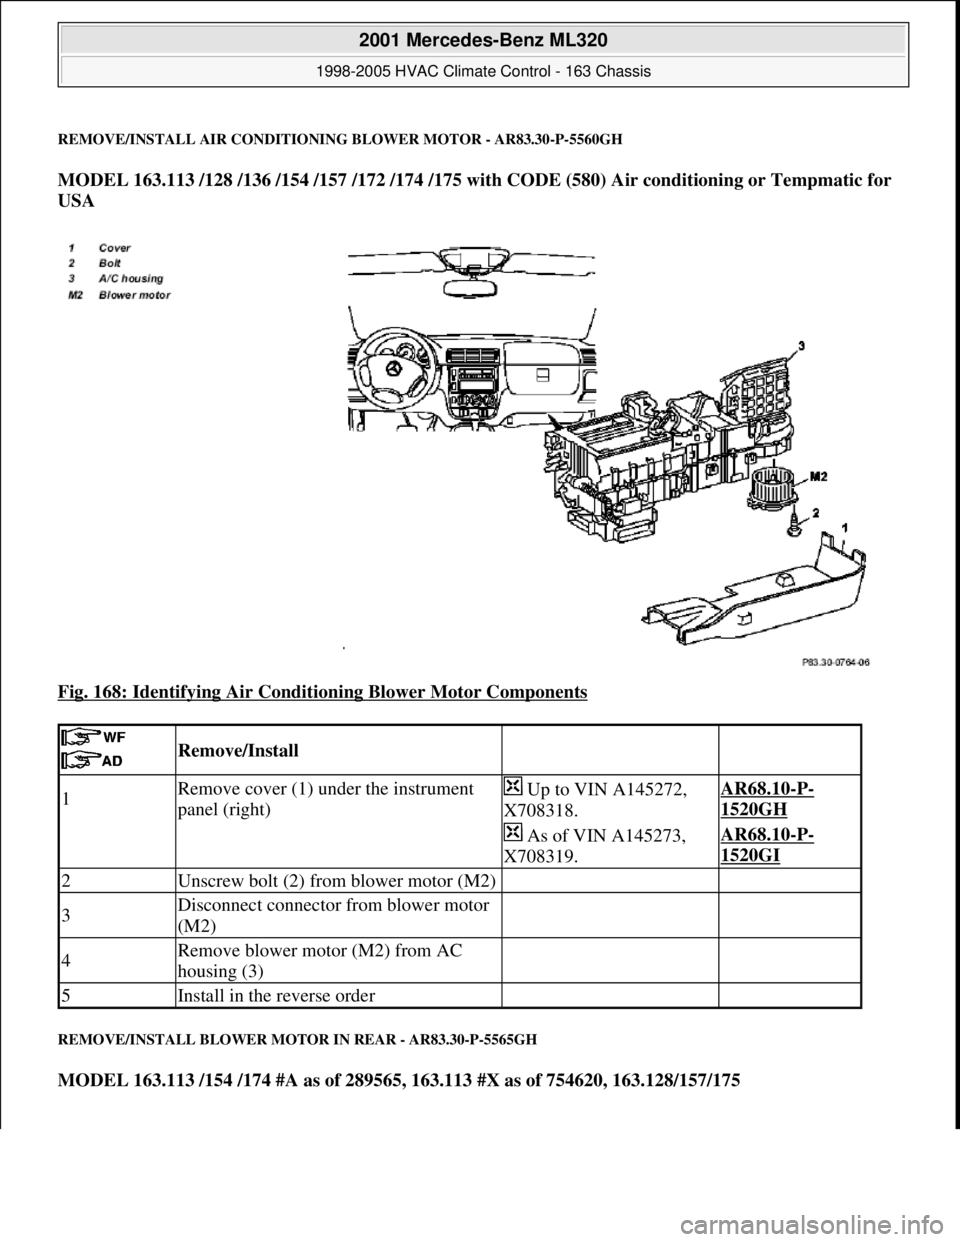
REMOVE/INSTALL AIR CONDITIONING BLOWER MOTOR - AR83.30-P-5560GH
MODEL 163.113 /128 /136 /154 /157 /172 /174 /175 with CODE (580) Air conditioning or Tempmatic for
USA
Fig. 168: Identifying Air Conditioning Blower Motor Components
REMOVE/INSTALL BLOWER MOTOR IN REAR - AR83.30-P-5565GH
MODEL 163.113 /154 /174 #A as of 289565, 163.113 #X as of 754620, 163.128/157/175
Remove/Install
1Remove cover (1) under the instrument
panel (right) Up to VIN A145272,
X708318.AR68.10-P-
1520GH
As of VIN A145273,
X708319.AR68.10-P-
1520GI
2Unscrew bolt (2) from blower motor (M2)
3Disconnect connector from blower motor
(M2)
4Remove blower motor (M2) from AC
housing (3)
5Install in the reverse order
2001 Mercedes-Benz ML320
1998-2005 HVAC Climate Control - 163 Chassis
me
Saturday, October 02, 2010 3:23:18 PMPage 209 © 2006 Mitchell Repair Information Company, LLC.
Page 3465 of 4133
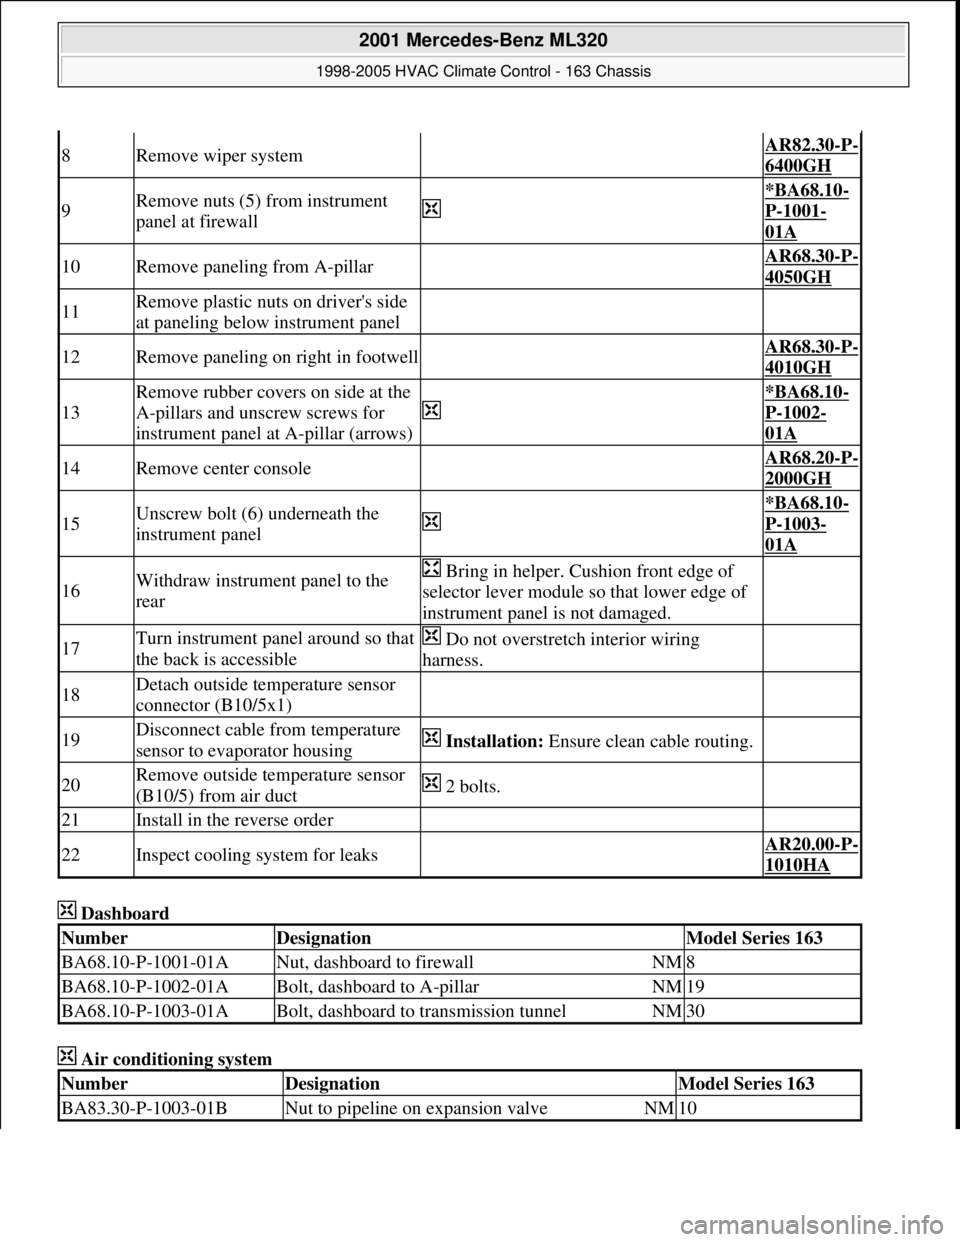
Dashboard
Air conditioning system
8Remove wiper system AR82.30-P-
6400GH
9Remove nuts (5) from instrument
panel at firewall
*BA68.10-
P-1001-
01A
10Remove paneling from A-pillar AR68.30-P-
4050GH
11Remove plastic nuts on driver's side
at paneling below instrument panel
12Remove paneling on right in footwell AR68.30-P-
4010GH
13
Remove rubber covers on side at the
A-pillars and unscrew screws for
instrument panel at A-pillar (arrows)
*BA68.10-
P-1002-
01A
14Remove center console AR68.20-P-
2000GH
15Unscrew bolt (6) underneath the
instrument panel
*BA68.10-
P-1003-
01A
16Withdraw instrument panel to the
rear Bring in helper. Cushion front edge of
selector lever module so that lower edge of
instrument panel is not damaged.
17Turn instrument panel around so that
the back is accessible Do not overstretch interior wiring
harness.
18Detach outside temperature sensor
connector (B10/5x1)
19Disconnect cable from temperature
sensor to evaporator housing Installation: Ensure clean cable routing.
20Remove outside temperature sensor
(B10/5) from air duct 2 bolts.
21Install in the reverse order
22Inspect cooling system for leaks AR20.00-P-
1010HA
NumberDesignationModel Series 163
BA68.10-P-1001-01ANut, dashboard to firewallNM8
BA68.10-P-1002-01ABolt, dashboard to A-pillarNM19
BA68.10-P-1003-01ABolt, dashboard to transmission tunnelNM30
NumberDesignationModel Series 163
BA83.30-P-1003-01BNut to pipeline on expansion valveNM10
2001 Mercedes-Benz ML320
1998-2005 HVAC Climate Control - 163 Chassis
me
Saturday, October 02, 2010 3:23:19 PMPage 221 © 2006 Mitchell Repair Information Company, LLC.
Page 3466 of 4133
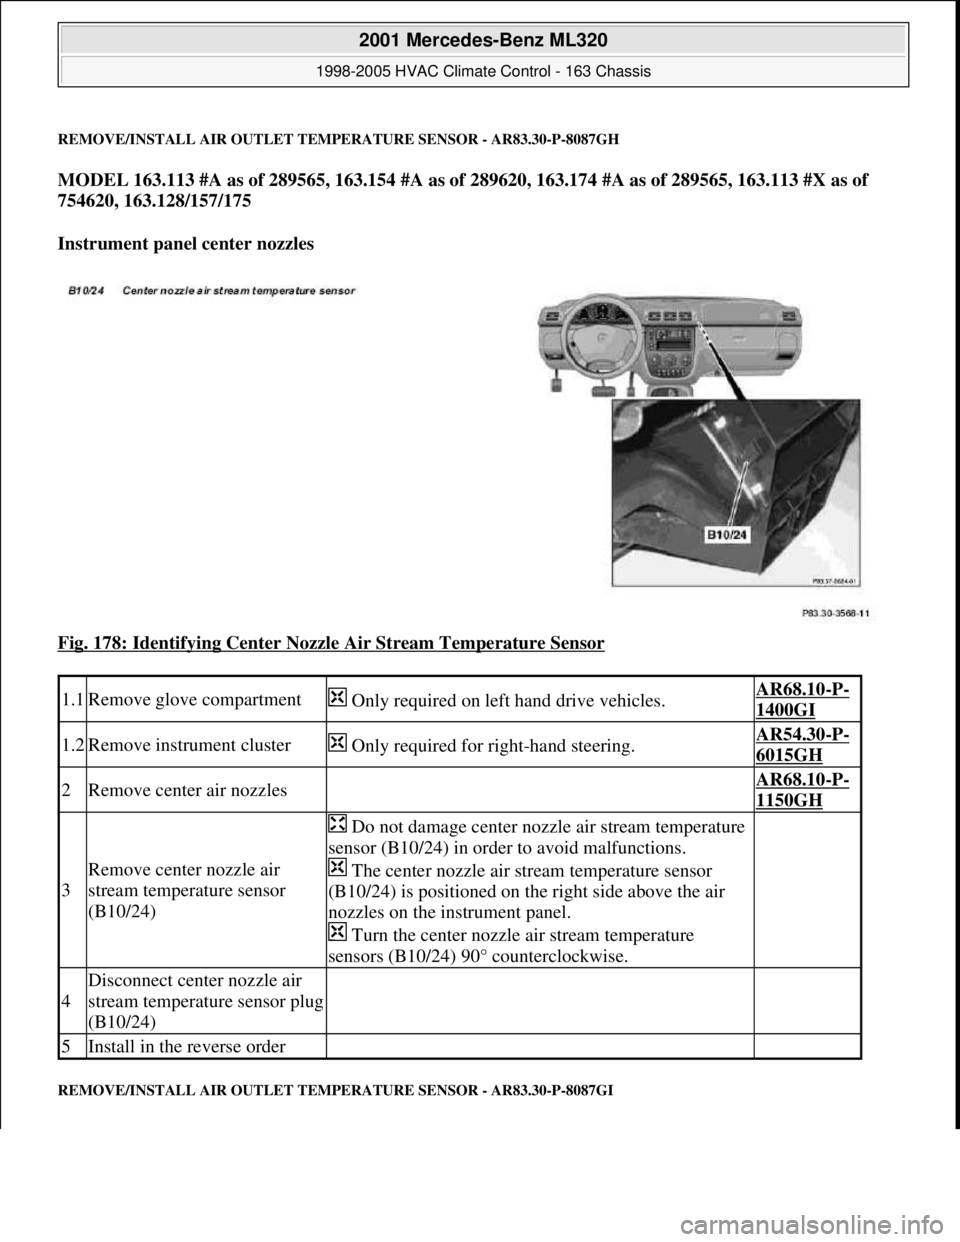
REMOVE/INSTALL AIR OUTLET TEMPERATURE SENSOR - AR83.30-P-8087GH
MODEL 163.113 #A as of 289565, 163.154 #A as of 289620, 163.174 #A as of 289565, 163.113 #X as of
754620, 163.128/157/175
Instrument panel center nozzles
Fig. 178: Identifying Center Nozzle Air Stream Temperature Sensor
REMOVE/INSTALL AIR OUTLET TEMPERATURE SENSOR - AR83.30-P-8087GI
1.1Remove glove compartment Only required on left hand drive vehicles.AR68.10-P-
1400GI
1.2Remove instrument cluster Only required for right-hand steering.AR54.30-P-
6015GH
2Remove center air nozzles AR68.10-P-
1150GH
3
Remove center nozzle air
stream temperature sensor
(B10/24)
Do not damage center nozzle air stream temperature
sensor (B10/24) in order to avoid malfunctions.
The center nozzle air stream temperature sensor
(B10/24) is positioned on the right side above the air
nozzles on the instrument panel.
Turn the center nozzle air stream temperature
sensors (B10/24) 90° counterclockwise.
4
Disconnect center nozzle air
stream temperature sensor plug
(B10/24)
5Install in the reverse order
2001 Mercedes-Benz ML320
1998-2005 HVAC Climate Control - 163 Chassis
me
Saturday, October 02, 2010 3:23:19 PMPage 222 © 2006 Mitchell Repair Information Company, LLC.
Page 3467 of 4133
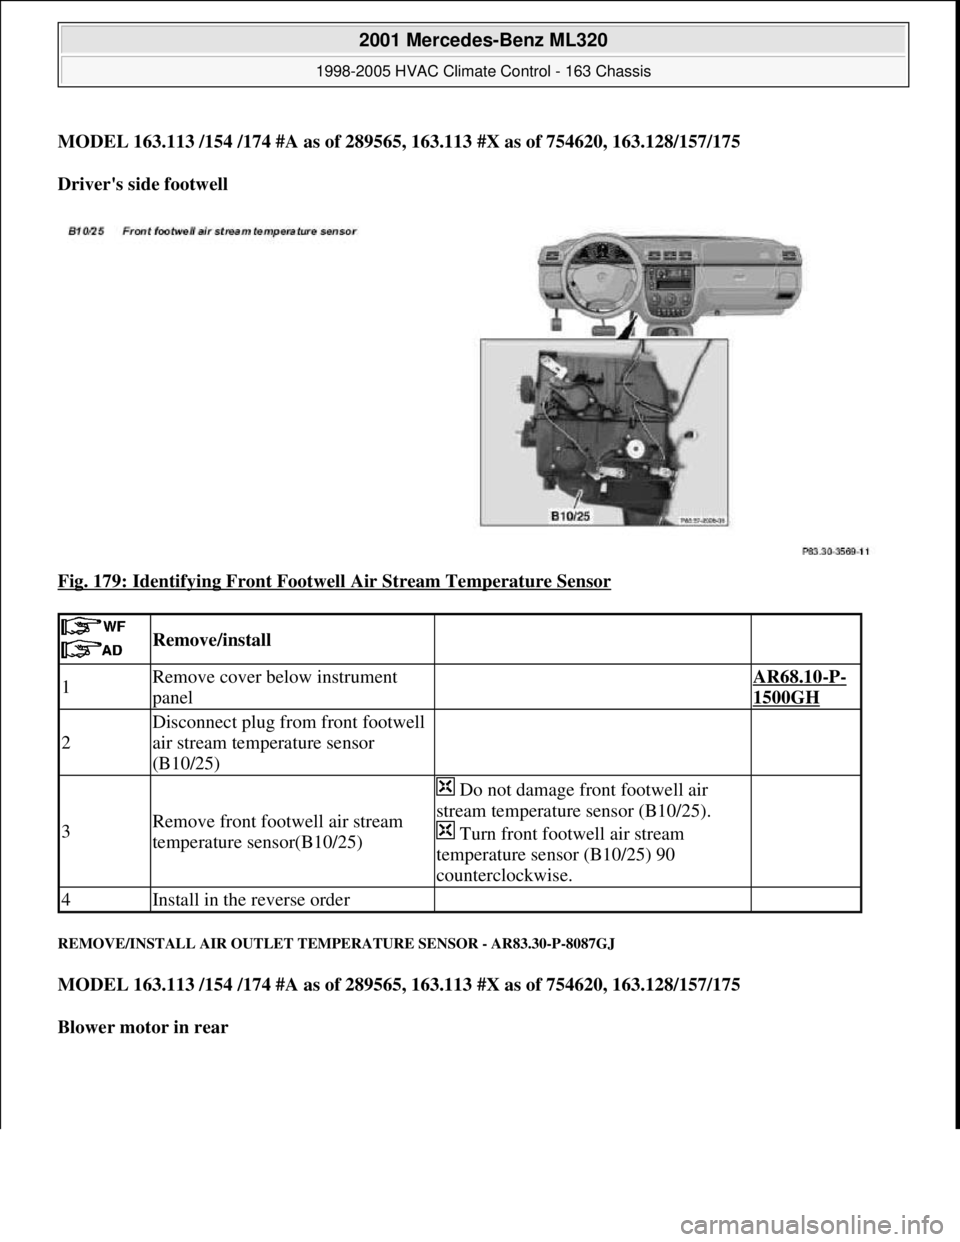
MODEL 163.113 /154 /174 #A as of 289565, 163.113 #X as of 754620, 163.128/157/175
Driver's side footwell
Fig. 179: Identifying Front Footwell Air Stream Temperature Sensor
REMOVE/INSTALL AIR OUTLET TEMPERATURE SENSOR - AR83.30-P-8087GJ
MODEL 163.113 /154 /174 #A as of 289565, 163.113 #X as of 754620, 163.128/157/175
Blower motor in rear
Remove/install
1Remove cover below instrument
panel AR68.10-P-
1500GH
2
Disconnect plug from front footwell
air stream temperature sensor
(B10/25)
3Remove front footwell air stream
temperature sensor(B10/25)
Do not damage front footwell air
stream temperature sensor (B10/25).
Turn front footwell air stream
temperature sensor (B10/25) 90
counterclockwise.
4Install in the reverse order
2001 Mercedes-Benz ML320
1998-2005 HVAC Climate Control - 163 Chassis
me
Saturday, October 02, 2010 3:23:19 PMPage 223 © 2006 Mitchell Repair Information Company, LLC.
Page 3469 of 4133
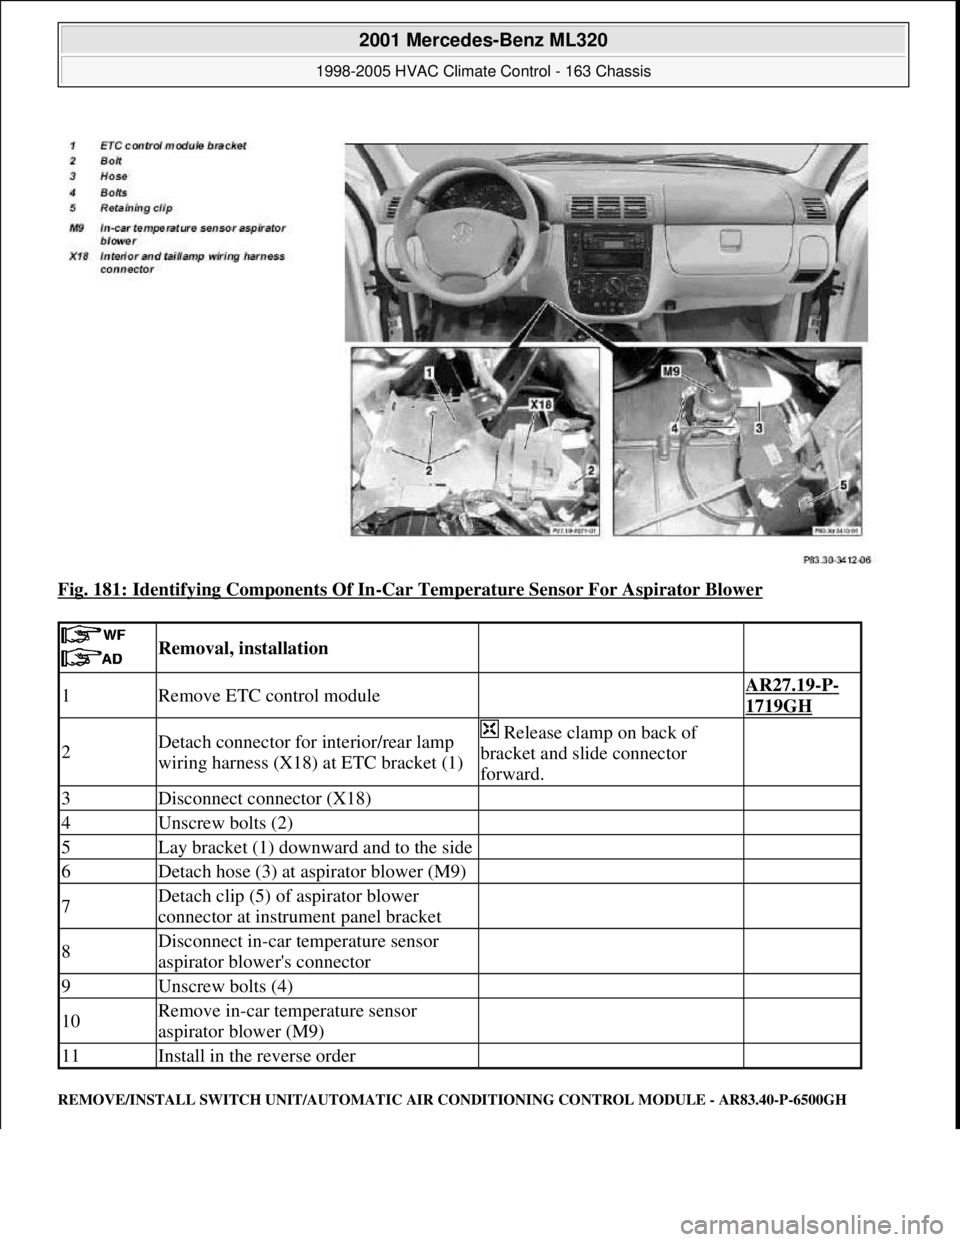
Fig. 181: Identifying Components Of In-Car Temperature Sensor For Aspirator Blower
REMOVE/INSTALL SWITCH UNIT/AUTOMATIC AIR CONDITIONING CONTROL MODULE - AR83.40-P-6500GH
Removal, installation
1Remove ETC control module AR27.19-P-
1719GH
2Detach connector for interior/rear lamp
wiring harness (X18) at ETC bracket (1) Release clamp on back of
bracket and slide connector
forward.
3Disconnect connector (X18)
4Unscrew bolts (2)
5Lay bracket (1) downward and to the side
6Detach hose (3) at aspirator blower (M9)
7Detach clip (5) of aspirator blower
connector at instrument panel bracket
8Disconnect in-car temperature sensor
aspirator blower's connector
9Unscrew bolts (4)
10Remove in-car temperature sensor
aspirator blower (M9)
11Install in the reverse order
2001 Mercedes-Benz ML320
1998-2005 HVAC Climate Control - 163 Chassis
me
Saturday, October 02, 2010 3:23:19 PMPage 225 © 2006 Mitchell Repair Information Company, LLC.