display MERCEDES-BENZ R-Class 2010 R171 Comand Manual
[x] Cancel search | Manufacturer: MERCEDES-BENZ, Model Year: 2010, Model line: R-Class, Model: MERCEDES-BENZ R-Class 2010 R171Pages: 224, PDF Size: 7 MB
Page 158 of 224
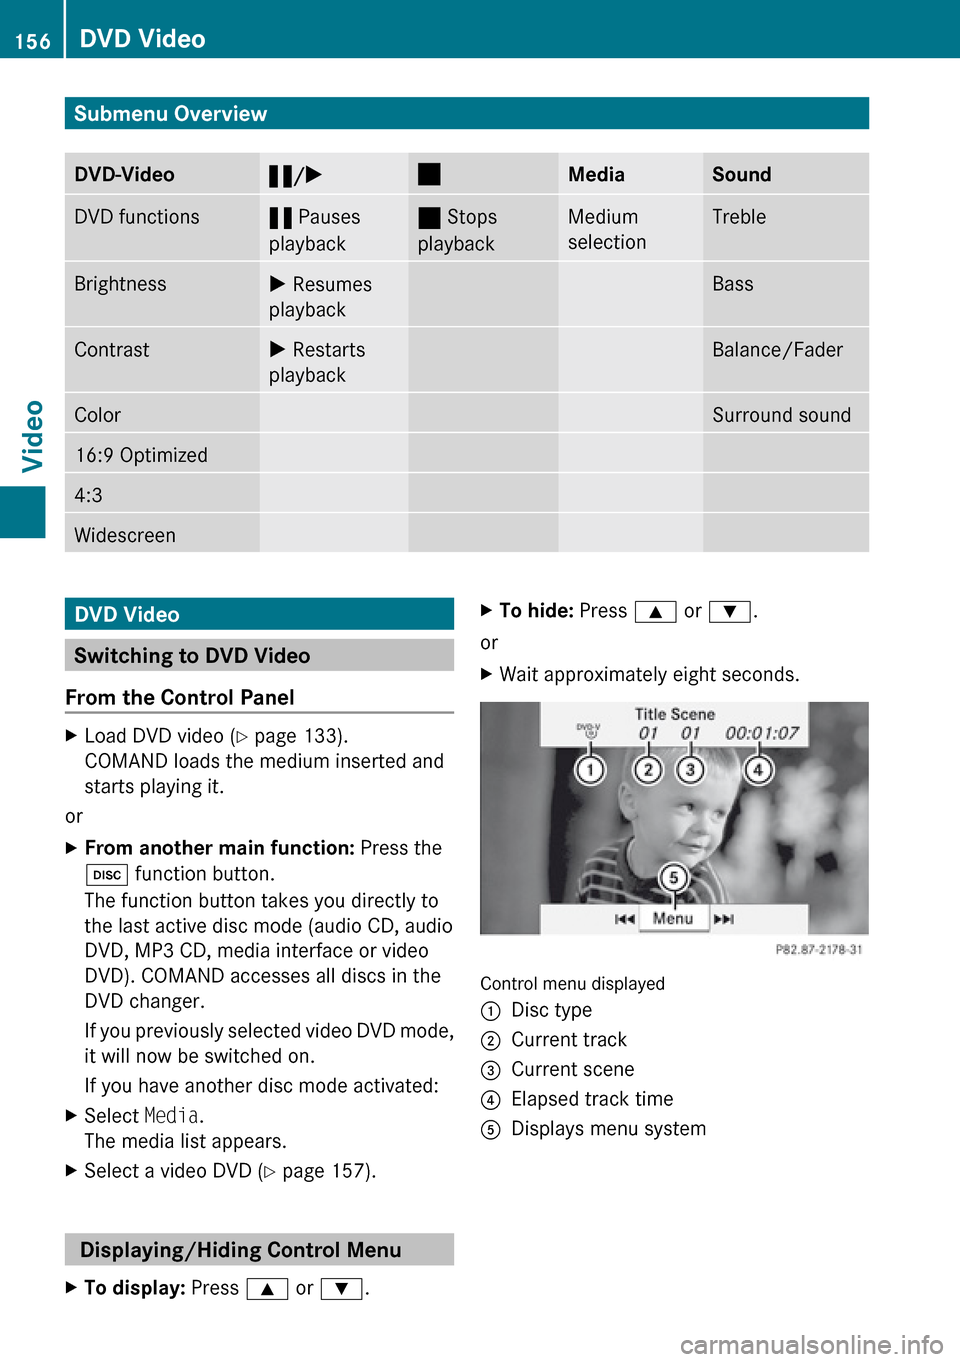
Submenu OverviewDVD-Video«/X±MediaSoundDVD functions« Pauses
playback± Stops
playbackMedium
selectionTrebleBrightnessX Resumes
playbackBassContrastX Restarts
playbackBalance/FaderColorSurround sound16:9 Optimized4:3WidescreenDVD Video
Switching to DVD Video
From the Control Panel
XLoad DVD video ( Y page 133).
COMAND loads the medium inserted and
starts playing it.
or
XFrom another main function: Press the
h function button.
The function button takes you directly to
the last active disc mode (audio CD, audio
DVD, MP3 CD, media interface or video
DVD). COMAND accesses all discs in the
DVD changer.
If you previously selected video DVD mode,
it will now be switched on.
If you have another disc mode activated:XSelect Media.
The media list appears.XSelect a video DVD ( Y page 157).
Displaying/Hiding Control Menu
XTo display: Press 9 or : .XTo hide: Press 9 or : .
or
XWait approximately eight seconds.
Control menu displayed
1Disc type2Current track3Current scene4Elapsed track time5Displays menu system156DVD VideoVideo
Page 159 of 224
Displaying/Hiding Menu System XTo show: Press 9.
or
XWhen the control menu is shown, select
Menu .XTo hide: Press 9 and select Full
screen .
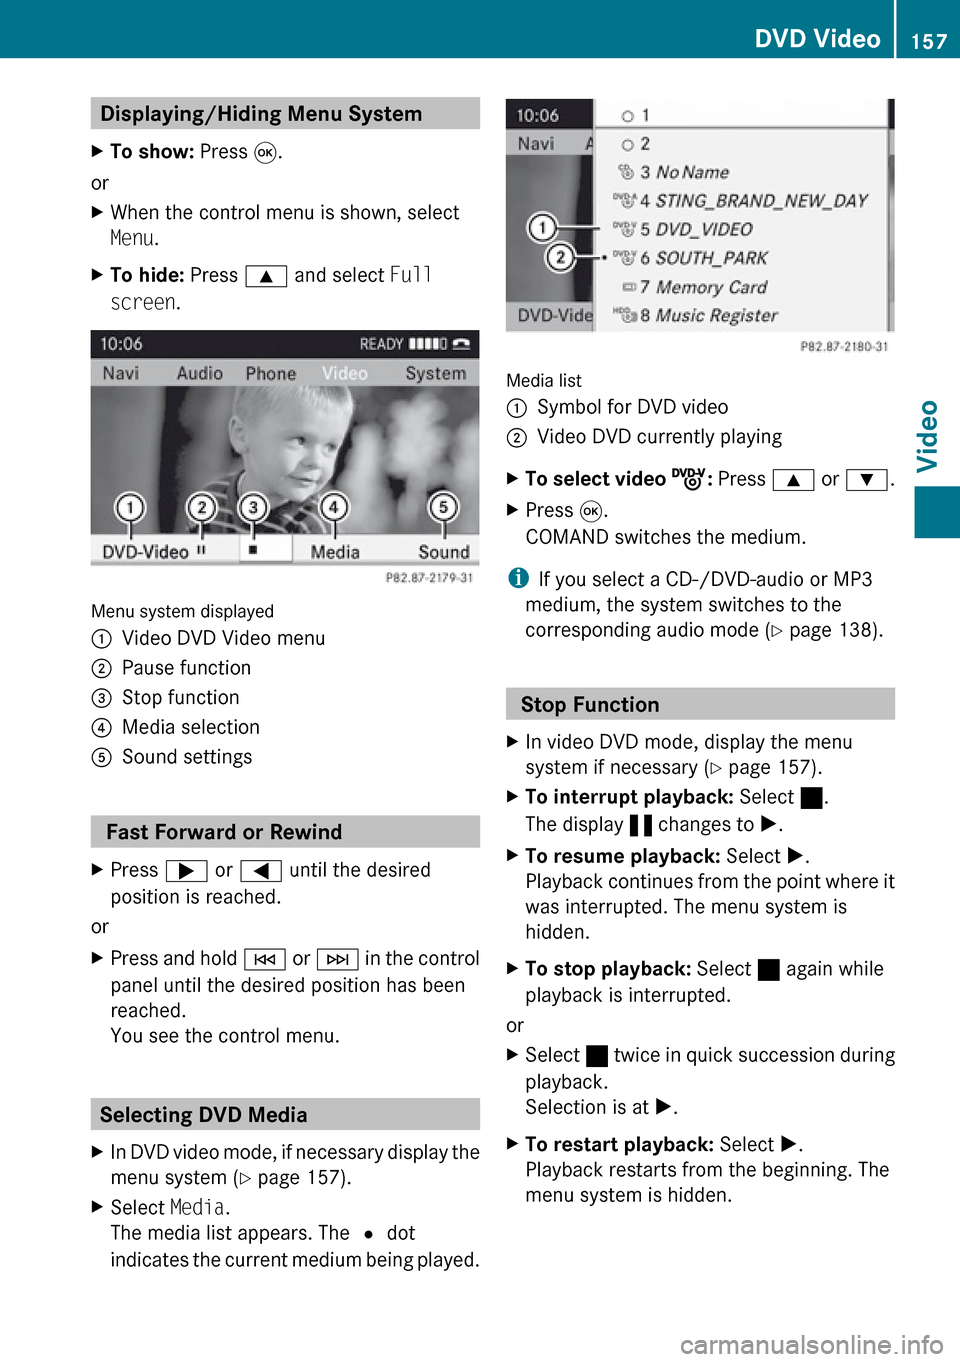
Menu system displayed
1Video DVD Video menu2Pause function3Stop function4Media selection5Sound settings
Fast Forward or Rewind
XPress ; or = until the desired
position is reached.
or
XPress and hold E or F in the control
panel until the desired position has been
reached.
You see the control menu.
Selecting DVD Media
XIn DVD video mode, if necessary display the
menu system ( Y page 157).XSelect Media.
The media list appears. The R dot
indicates the current medium being played.
Media list
1Symbol for DVD video2Video DVD currently playingXTo select video ý: Press 9 or : .XPress 9.
COMAND switches the medium.
i If you select a CD-/DVD-audio or MP3
medium, the system switches to the
corresponding audio mode ( Y page 138).
Stop Function
XIn video DVD mode, display the menu
system if necessary ( Y page 157).XTo interrupt playback: Select ±.
The display « changes to X.XTo resume playback: Select X.
Playback continues from the point where it
was interrupted. The menu system is
hidden.XTo stop playback: Select ± again while
playback is interrupted.
or
XSelect ± twice in quick succession during
playback.
Selection is at X.XTo restart playback: Select X.
Playback restarts from the beginning. The
menu system is hidden.DVD Video157VideoZ
Page 160 of 224
Pause Function XIn video DVD mode, display the menu
system if necessary ( Y page 157).XTo pause playback: Select «.
The display « changes to X.XTo resume playback: Select X.
The menu system is hidden.
Selecting a Scene/Chapter
XTo skip forwards or backwards:
Press ; or = .
orXPress the E or F button on the
control panel.
The control menu (Y page 156) appears for
approximately 8 seconds.
Selecting a Film/Track
i This function is only available if the DVD
is divided into several films/tracks.
XDisplay the menu system if necessary
( Y page 157).XSelect DVD-V£DVD Functions .
A menu appears.
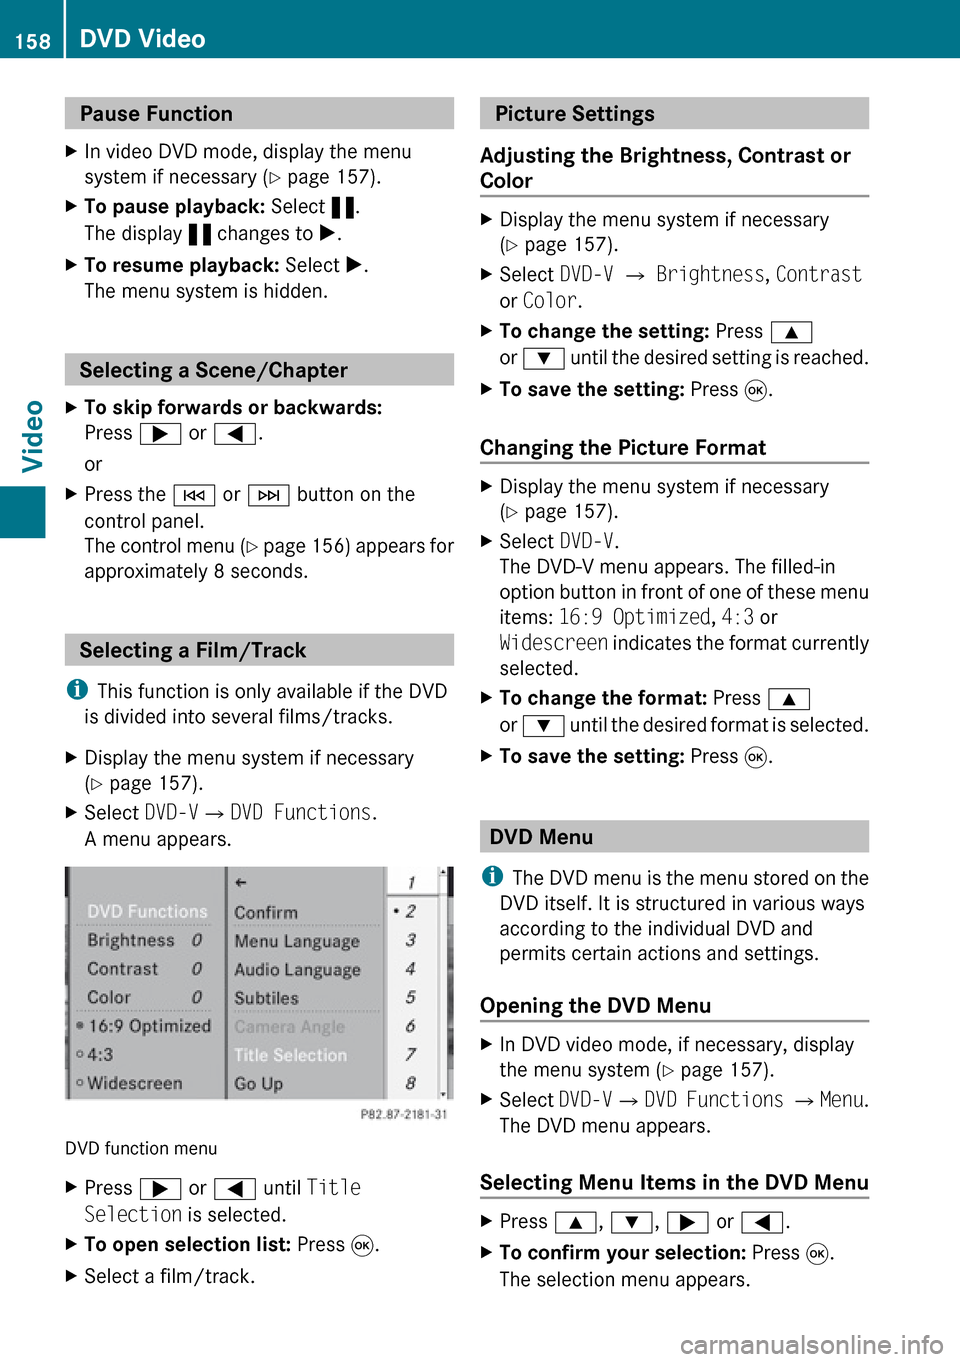
DVD function menu
XPress ; or = until Title
Selection is selected.XTo open selection list: Press 9.XSelect a film/track. Picture Settings
Adjusting the Brightness, Contrast or
ColorXDisplay the menu system if necessary
( Y page 157).XSelect DVD-V £ Brightness , Contrast
or Color .XTo change the setting: Press 9
or : until the desired setting is reached.XTo save the setting: Press 9.
Changing the Picture Format
XDisplay the menu system if necessary
( Y page 157).XSelect DVD-V.
The DVD-V menu appears. The filled-in
option button in front of one of these menu
items: 16:9 Optimized , 4:3 or
Widescreen indicates the format currently
selected.XTo change the format: Press 9
or : until the desired format is selected.XTo save the setting: Press 9.
DVD Menu
i The DVD menu is the menu stored on the
DVD itself. It is structured in various ways
according to the individual DVD and
permits certain actions and settings.
Opening the DVD Menu
XIn DVD video mode, if necessary, display
the menu system ( Y page 157).XSelect DVD-V£DVD Functions £ Menu .
The DVD menu appears.
Selecting Menu Items in the DVD Menu
XPress 9, : , ; or = .XTo confirm your selection: Press 9.
The selection menu appears.158DVD VideoVideo
Page 161 of 224
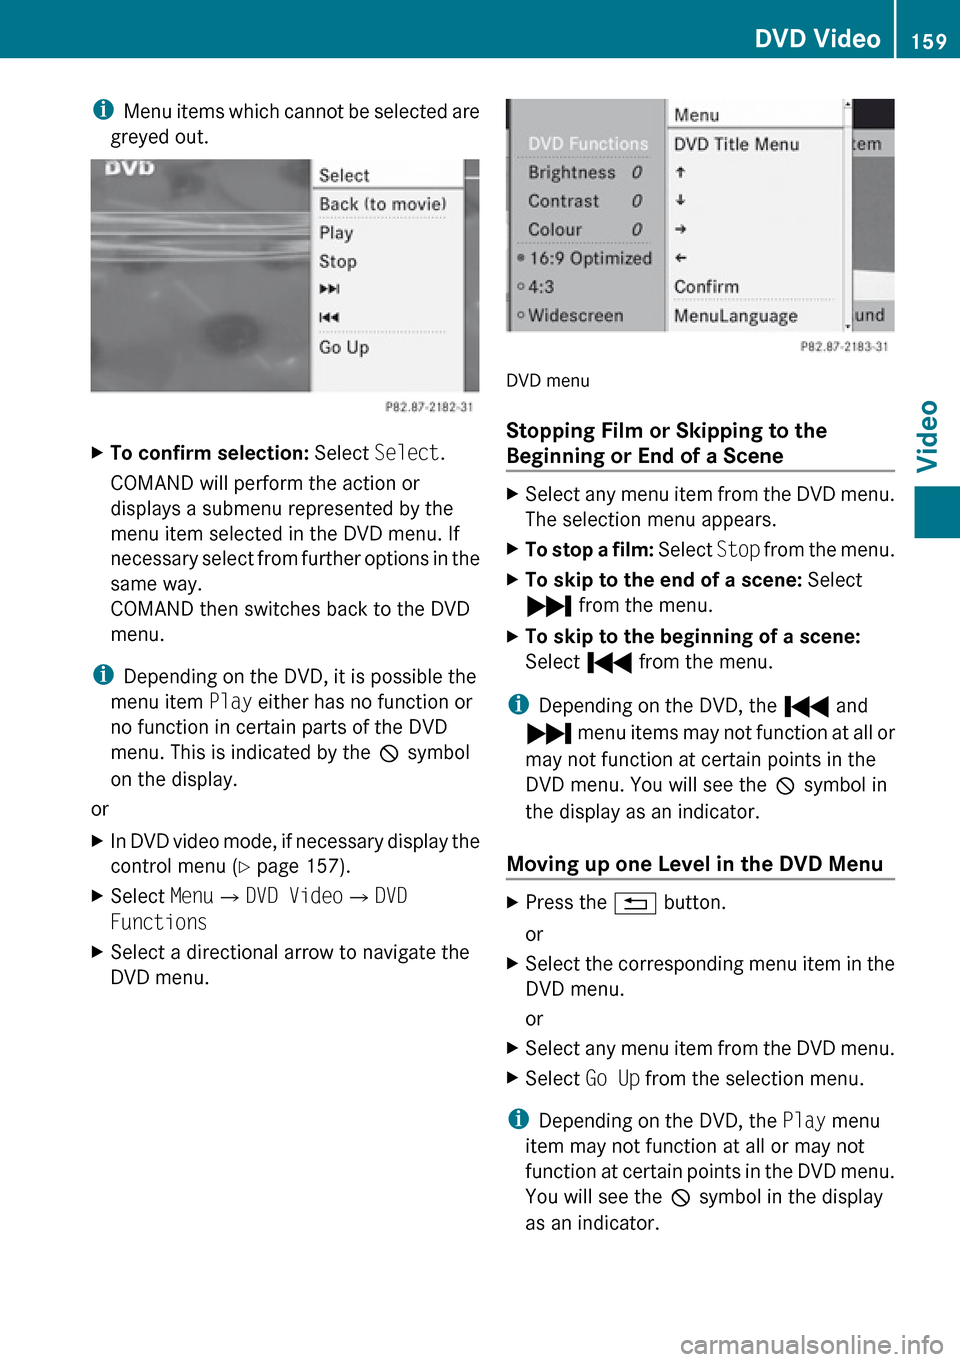
iMenu items which cannot be selected are
greyed out.XTo confirm selection: Select Select.
COMAND will perform the action or
displays a submenu represented by the
menu item selected in the DVD menu. If
necessary select from further options in the
same way.
COMAND then switches back to the DVD
menu.
i Depending on the DVD, it is possible the
menu item Play either has no function or
no function in certain parts of the DVD
menu. This is indicated by the 7 symbol
on the display.
or
XIn DVD video mode, if necessary display the
control menu ( Y page 157).XSelect Menu£DVD Video £DVD
FunctionsXSelect a directional arrow to navigate the
DVD menu.
DVD menu
Stopping Film or Skipping to the
Beginning or End of a Scene
XSelect any menu item from the DVD menu.
The selection menu appears.XTo stop a film: Select Stop from the menu.XTo skip to the end of a scene: Select
Ô from the menu.XTo skip to the beginning of a scene:
Select Ó from the menu.
i
Depending on the DVD, the Ó and
Ô menu items may not function at all or
may not function at certain points in the
DVD menu. You will see the 7 symbol in
the display as an indicator.
Moving up one Level in the DVD Menu
XPress the % button.
orXSelect the corresponding menu item in the
DVD menu.
orXSelect any menu item from the DVD menu.XSelect Go Up from the selection menu.
i
Depending on the DVD, the Play menu
item may not function at all or may not
function at certain points in the DVD menu.
You will see the 7 symbol in the display
as an indicator.
DVD Video159VideoZ
Page 162 of 224
Back to the MovieXPress the % button repeatedly until you
see the film.
orXSelect the corresponding menu item in the
DVD menu.XSelect the Back (to movie) menu item
from the selection menu.
i Depending on the DVD, the Back (to
movie) menu item may not function in
general or may not function at certain
points in the DVD menu.
Setting the Language and Audio
Format
i This function is not available on all DVDs.
Where available, you can set the DVD menu
language and the audio language or audio
format. The number of possible settings is
dependent on the DVD content. It is
possible that the settings may also be
accessed in the DVD menu ( Y page 158).
XDisplay the menu system if necessary
( Y page 157).XSelect DVD-V£DVD Functions .XSelect Menu Language or Audio
Language .
Both of these will bring up a selection menu
after a few seconds. The R dot in front of
an entry indicates the currently selected
language.XTo change the setting: Press 9
or : until the desired setting is reached.XTo save the setting: Press 9.
Subtitles and Camera Angle
i These functions are not available on all
DVDs. The number of subtitle languages
and camera angles available depends on
the content of the DVD. The settings may
also be accessed in the DVD menu
( Y page 158).XDisplay the menu system if necessary
( Y page 157).XSelect DVD-V £ DVD Functions .XSelect Subtitles or Camera Angle .
Both of these will bring up a selection
menu. The R dot in front of an entry
indicates the current setting.XTo change the setting: Press 9
or : until the desired setting is reached.XTo save the setting: Press 9.
Interactive Content
DVDs may have interactive content (e.g. a
video game).
In a video game, for example, you can control
the play by selecting or triggering actions. The
type and number of actions is dependent on
the DVD.
XTo select an action: Press 9 or : .XTo trigger an action: Press 9.
A menu appears and the first entry,
Select , is highlighted.XPress 9.
or
XIn DVD video mode, if necessary, display
the control menu ( Y page 157).XSelect Menu£DVD-Video £DVD
Functions .XSelect a directional arrow to select or
trigger an action.160DVD VideoVideo
Page 166 of 224
General Information
Vehicle Equipment
i This Operator’s Manual describes all
features, standard or optional, potentially
available for your vehicle at the time of
purchase. Please be aware that your
vehicle might not be equipped with all
features described in this manual.
Overview
This chapter describes the RSE (Rear Seat
Entertainment) system:
R Basic functions ( Y page 168)
R System settings ( Y page 169)
R CD/DVD audio and MP3 operation
R DVD Video operation ( Y page 174)
R AUX operation ( Y page 179)
Safety Instructions
GWarning
The RSE CD/DVD player is a Class 1 laser
product. There is a danger of invisible laser
radiation when you open or damage the cover.
Do not remove the cover. The RSE CD/DVD
player does not contain any parts which can
be serviced by the user. For safety reasons,
have any necessary service work performed
by qualified personnel.
GWarning
The driver should not wear a Rear Seat
Entertainment headset while operating the
vehicle under any circumstances. The use of
a headset while driving the vehicle could
drastically impair the ability to react to audible
traffic conditions (e.g. emergency sirens from
police/fire/ambulance, another car’s horn,
etc.).GWarning
When not in use, headsets or external video
sources should be stored in a safe location
(e.g. one of the vehicle’s storage
compartments) so that they are not loose
within the passenger compartment during
braking, vehicle maneuvers or a traffic
accident. Objects moving within the
passenger compartment could cause serious
personal injury to vehicle occupants.
GWarning
Due to a potential choking hazard, wired
headset usage by children should only occur
with adult supervision.
Rear Seat Entertainment
Components
The rear-seat entertainment system consists
of:
R two display screens behind the head rests
of front-seats
R a remote control
R a CD/DVD drive
R Aux connectors on the drive and display
screens for connecting external devices
R two wireless headsets
164General InformationRear Seat Entertainment
Page 167 of 224
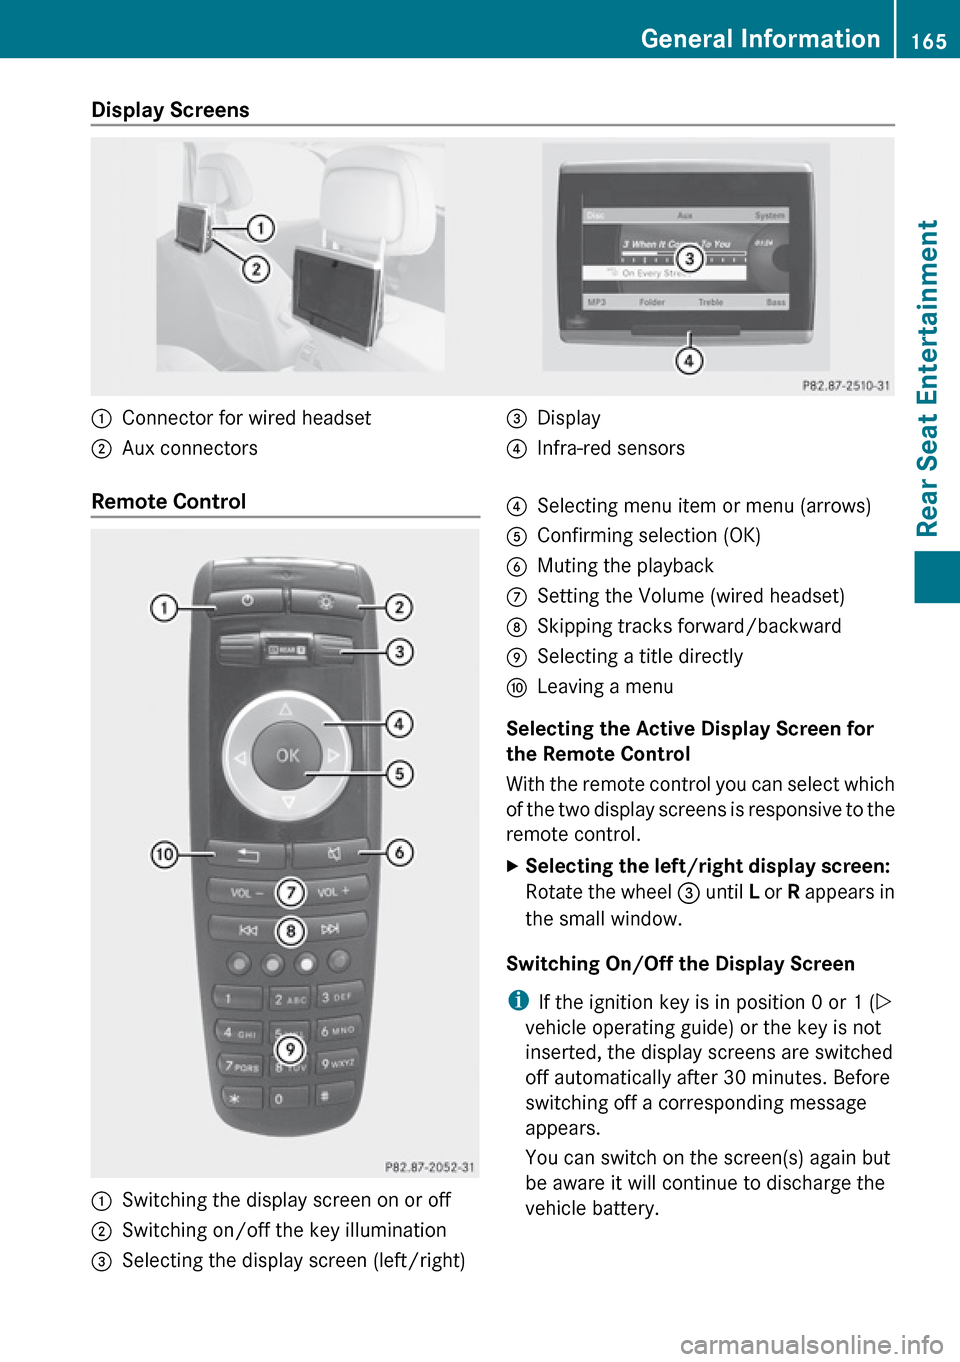
Display Screens :Connector for wired headset;Aux connectors=Display?Infra-red sensorsRemote Control :Switching the display screen on or off;Switching on/off the key illumination=Selecting the display screen (left/right)?Selecting menu item or menu (arrows)AConfirming selection (OK)BMuting the playbackCSetting the Volume (wired headset)DSkipping tracks forward/backwardESelecting a title directlyFLeaving a menu
Selecting the Active Display Screen for
the Remote Control
With the remote control you can select which
of the two display screens is responsive to the
remote control.
XSelecting the left/right display screen:
Rotate the wheel = until L or R appears in
the small window.
Switching On/Off the Display Screen
i If the ignition key is in position 0 or 1 ( Y
vehicle operating guide) or the key is not
inserted, the display screens are switched
off automatically after 30 minutes. Before
switching off a corresponding message
appears.
You can switch on the screen(s) again but
be aware it will continue to discharge the
vehicle battery.
General Information165Rear Seat EntertainmentZ
Page 168 of 224
XPoint the remote control to the active
screen and press the On/Off : button on
the remote control.
The display screen is switched on or off.
i Switching on with the remote control is
only possible if the ignition is on.
Muting the Audio Playback (Only Wired
Headset)
XPress the button B on the remote control.
Depending on the previous state the sound
is switched on or off.
Selecting a Menu Item and Confirming the
Selection
XSelecting the menu item: Press the arrow
buttons ? on the remote control.XConfirming the selection: Press the OK
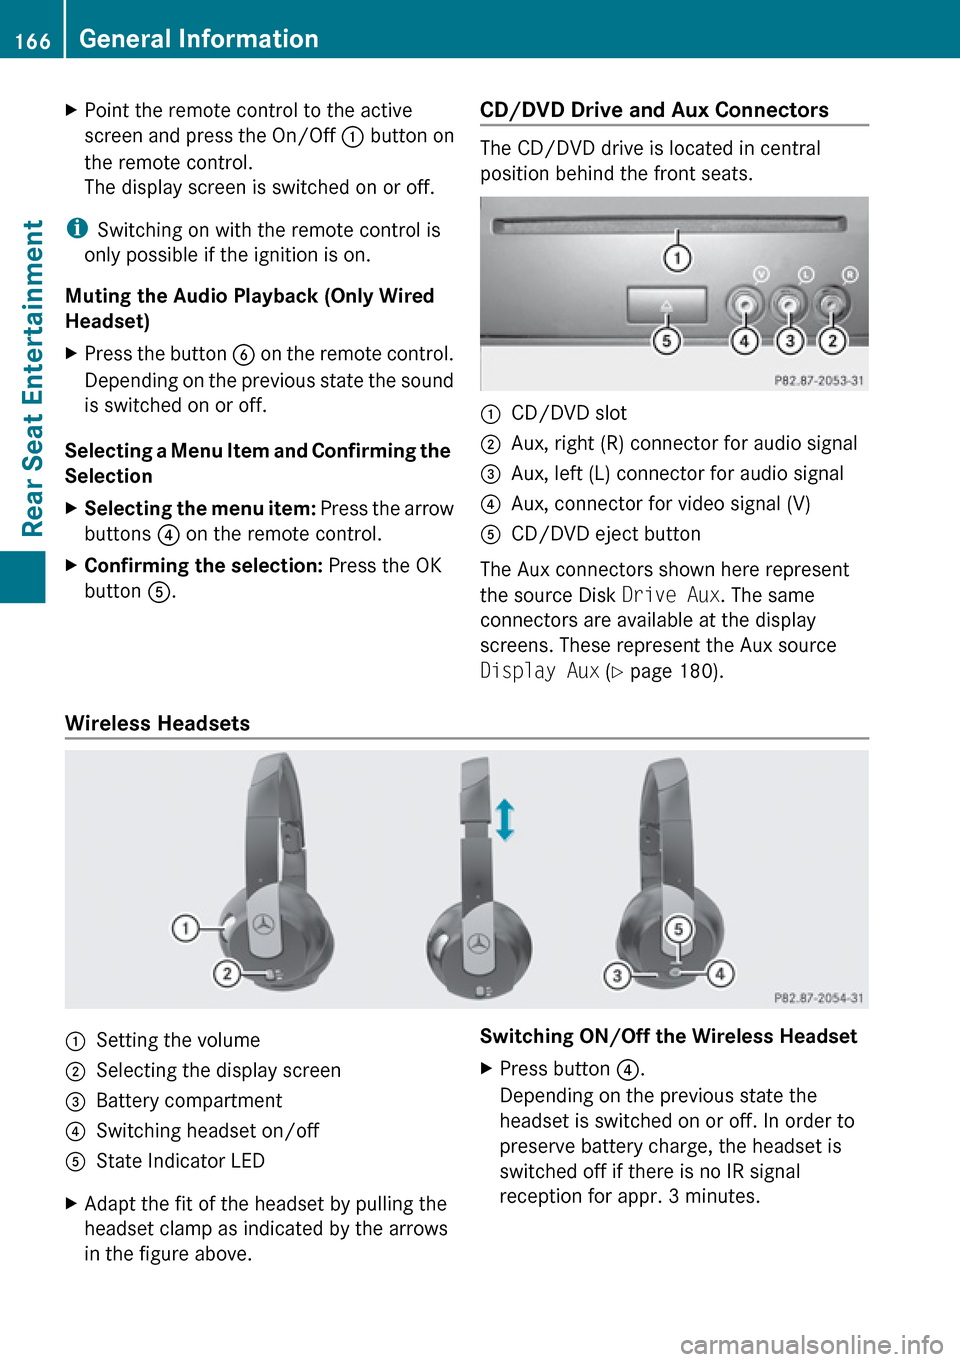
button A.CD/DVD Drive and Aux Connectors
The CD/DVD drive is located in central
position behind the front seats.
:CD/DVD slot;Aux, right (R) connector for audio signal=Aux, left (L) connector for audio signal?Aux, connector for video signal (V)ACD/DVD eject button
The Aux connectors shown here represent
the source Disk Drive Aux. The same
connectors are available at the display
screens. These represent the Aux source
Display Aux (Y page 180).
Wireless Headsets
:Setting the volume;Selecting the display screen=Battery compartment?Switching headset on/offAState Indicator LEDXAdapt the fit of the headset by pulling the
headset clamp as indicated by the arrows
in the figure above.Switching ON/Off the Wireless HeadsetXPress button ?.
Depending on the previous state the
headset is switched on or off. In order to
preserve battery charge, the headset is
switched off if there is no IR signal
reception for appr. 3 minutes.166General InformationRear Seat Entertainment
Page 169 of 224
Setting the Wireless Headset Volume XTurn the Thumb wheel : to set the desired
volume.
i If you have connected a wired headset to
a display screen, you can set the volume
with the button : of the remote control
( Y page 165).
Selecting the Display Screen for the
Headset
XRotate the wheel = until L or R appears in
the small window.
State Indicator LED
The color of the LED indicates:
R if the headset is switched on or off
R the battery condition
ColorStateGreenHeadset is switched on and the
batteries are full.DarkHeadset is switched off or the
batteries are empty or not
inserted.RedHeadset is switched on and the
batteries are almost empty.
Connecting Additional Headsets
You can connect wired headsets to both of
the display screens. The socket is suitable for
headsets with 1/8“ stereo jacks and 32 Ohm
impedance ( Y page 165).
Replacing the Batteries
You need batteries for the remote control and
the wireless headset.
GWarning
Keep batteries out of the reach of children.
Immediately seek medical help if a child
swallows a battery. Batteries are not to be
short-circuited, dismantled or thrown into
fire.
HEnvironmental Note
Batteries contain materials that can harm the
environment if disposed of improperly.
Recycling of batteries is the preferred method
of disposal. Many states require sellers of
batteries to accept old batteries for recycling.
Remote Control Batteries
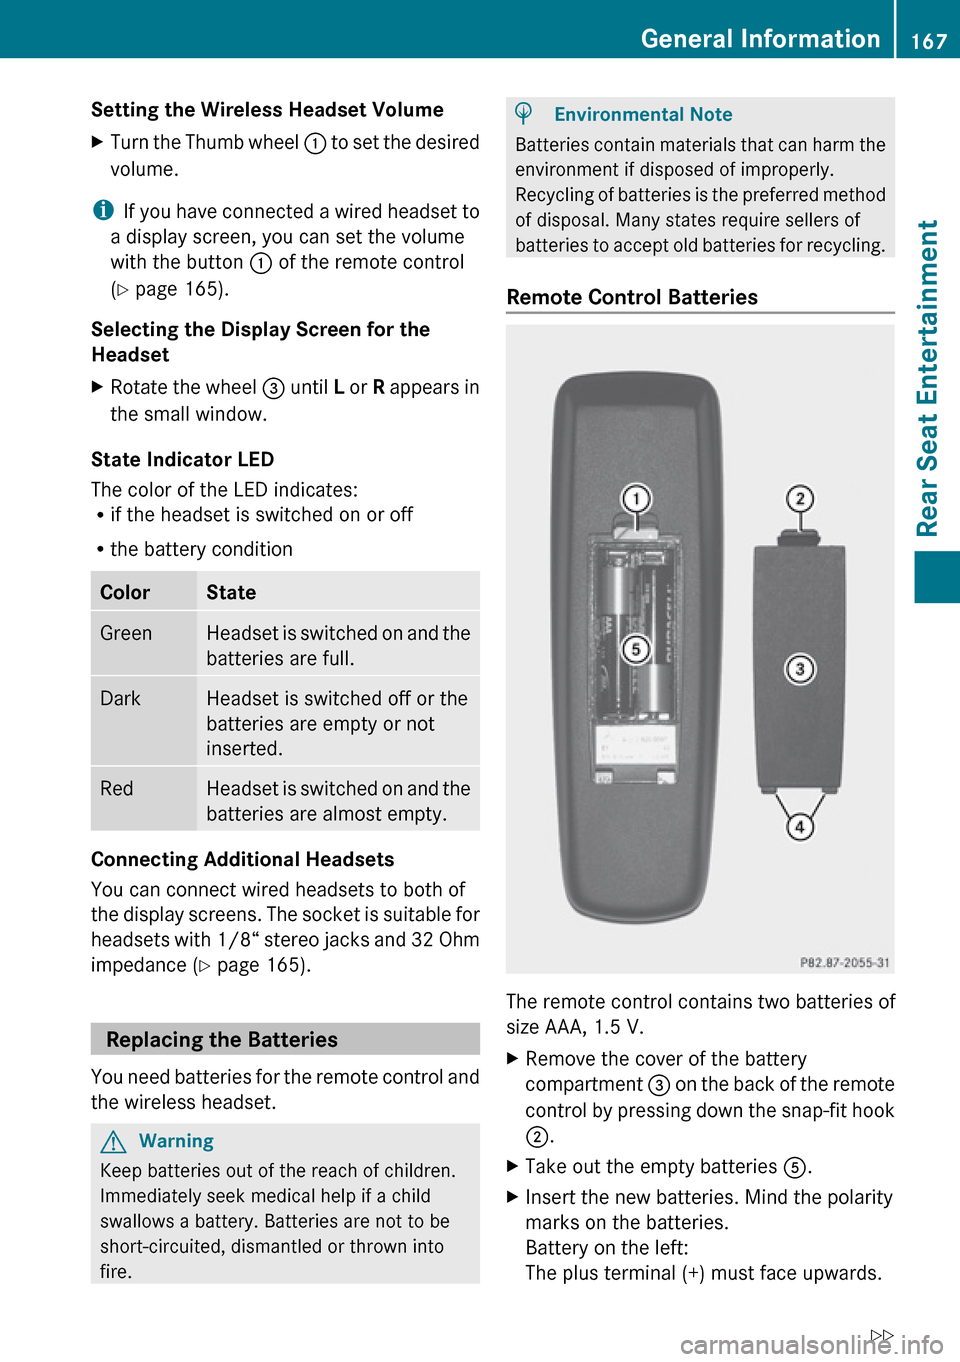
The remote control contains two batteries of
size AAA, 1.5 V.
XRemove the cover of the battery
compartment 3 on the back of the remote
control by pressing down the snap-fit hook
2 .XTake out the empty batteries 5.XInsert the new batteries. Mind the polarity
marks on the batteries.
Battery on the left:
The plus terminal (+) must face upwards.General Information167Rear Seat EntertainmentZ
Page 170 of 224
Battery on the right:
The plus terminal (+) must face downwards.XPut the cover with the engagement
hooks ? first onto the battery
compartment and let the snap-fit hook 2
snap in.
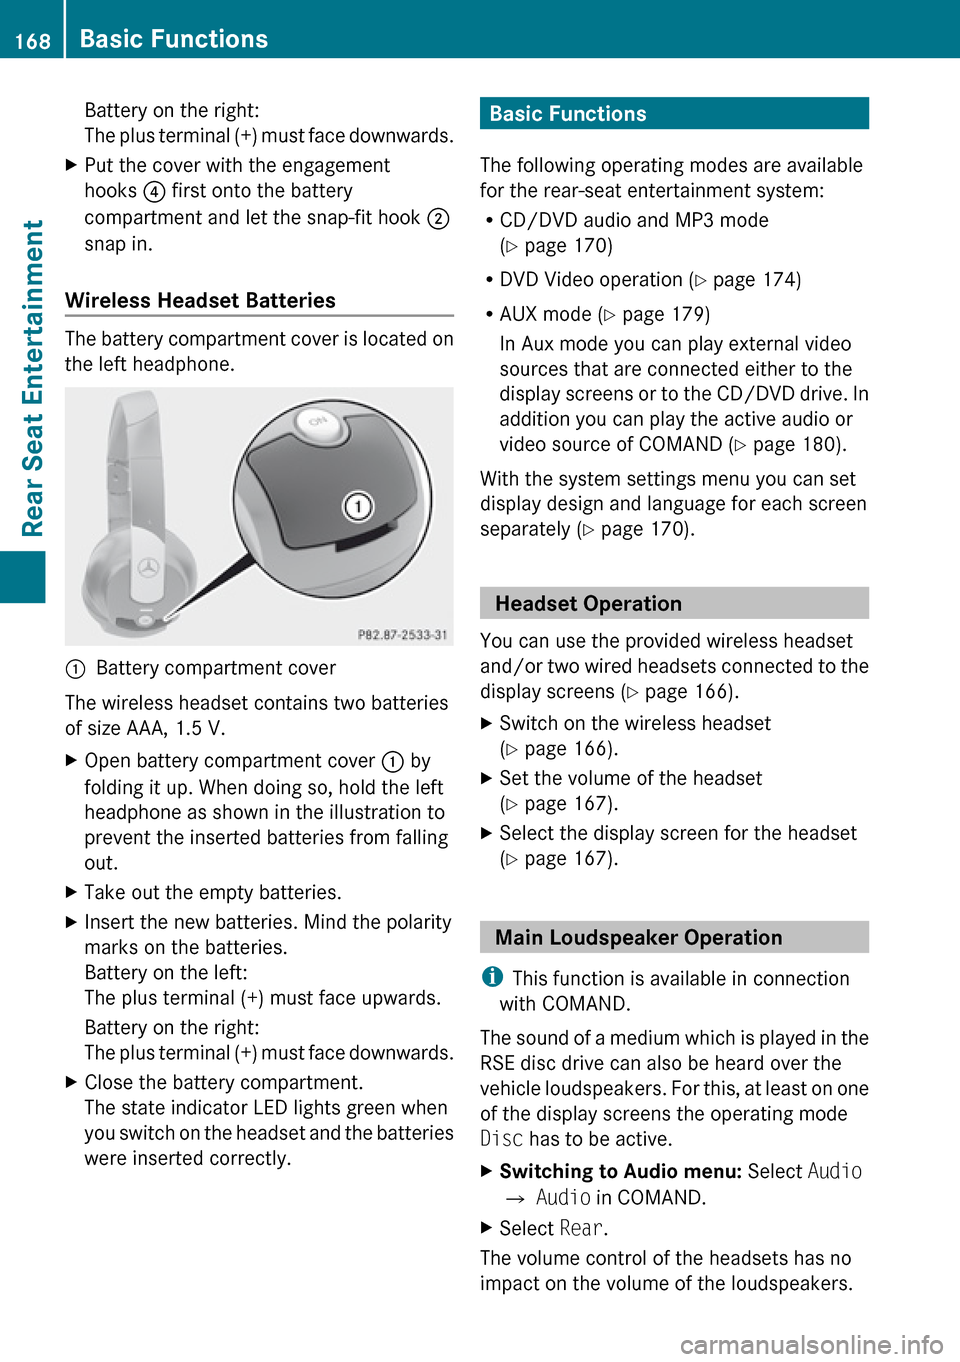
Wireless Headset Batteries
The battery compartment cover is located on
the left headphone.
1Battery compartment cover
The wireless headset contains two batteries
of size AAA, 1.5 V.
XOpen battery compartment cover : by
folding it up. When doing so, hold the left
headphone as shown in the illustration to
prevent the inserted batteries from falling
out.XTake out the empty batteries.XInsert the new batteries. Mind the polarity
marks on the batteries.
Battery on the left:
The plus terminal (+) must face upwards.
Battery on the right:
The plus terminal (+) must face downwards.XClose the battery compartment.
The state indicator LED lights green when
you switch on the headset and the batteries
were inserted correctly.Basic Functions
The following operating modes are available
for the rear-seat entertainment system:
R CD/DVD audio and MP3 mode
( Y page 170)
R DVD Video operation ( Y page 174)
R AUX mode ( Y page 179)
In Aux mode you can play external video
sources that are connected either to the
display screens or to the CD/DVD drive. In
addition you can play the active audio or
video source of COMAND ( Y page 180).
With the system settings menu you can set
display design and language for each screen
separately ( Y page 170).
Headset Operation
You can use the provided wireless headset
and/or two wired headsets connected to the
display screens ( Y page 166).
XSwitch on the wireless headset
( Y page 166).XSet the volume of the headset
( Y page 167).XSelect the display screen for the headset
( Y page 167).
Main Loudspeaker Operation
i This function is available in connection
with COMAND.
The sound of a medium which is played in the
RSE disc drive can also be heard over the
vehicle loudspeakers. For this, at least on one
of the display screens the operating mode
Disc has to be active.
XSwitching to Audio menu: Select Audio
£ Audio in COMAND.XSelect Rear.
The volume control of the headsets has no
impact on the volume of the loudspeakers.
168Basic FunctionsRear Seat Entertainment