ECU MERCEDES-BENZ R-Class 2011 W251 Comand Manual
[x] Cancel search | Manufacturer: MERCEDES-BENZ, Model Year: 2011, Model line: R-Class, Model: MERCEDES-BENZ R-Class 2011 W251Pages: 214, PDF Size: 4.69 MB
Page 85 of 214
Map
display
Setting themap orientation Map
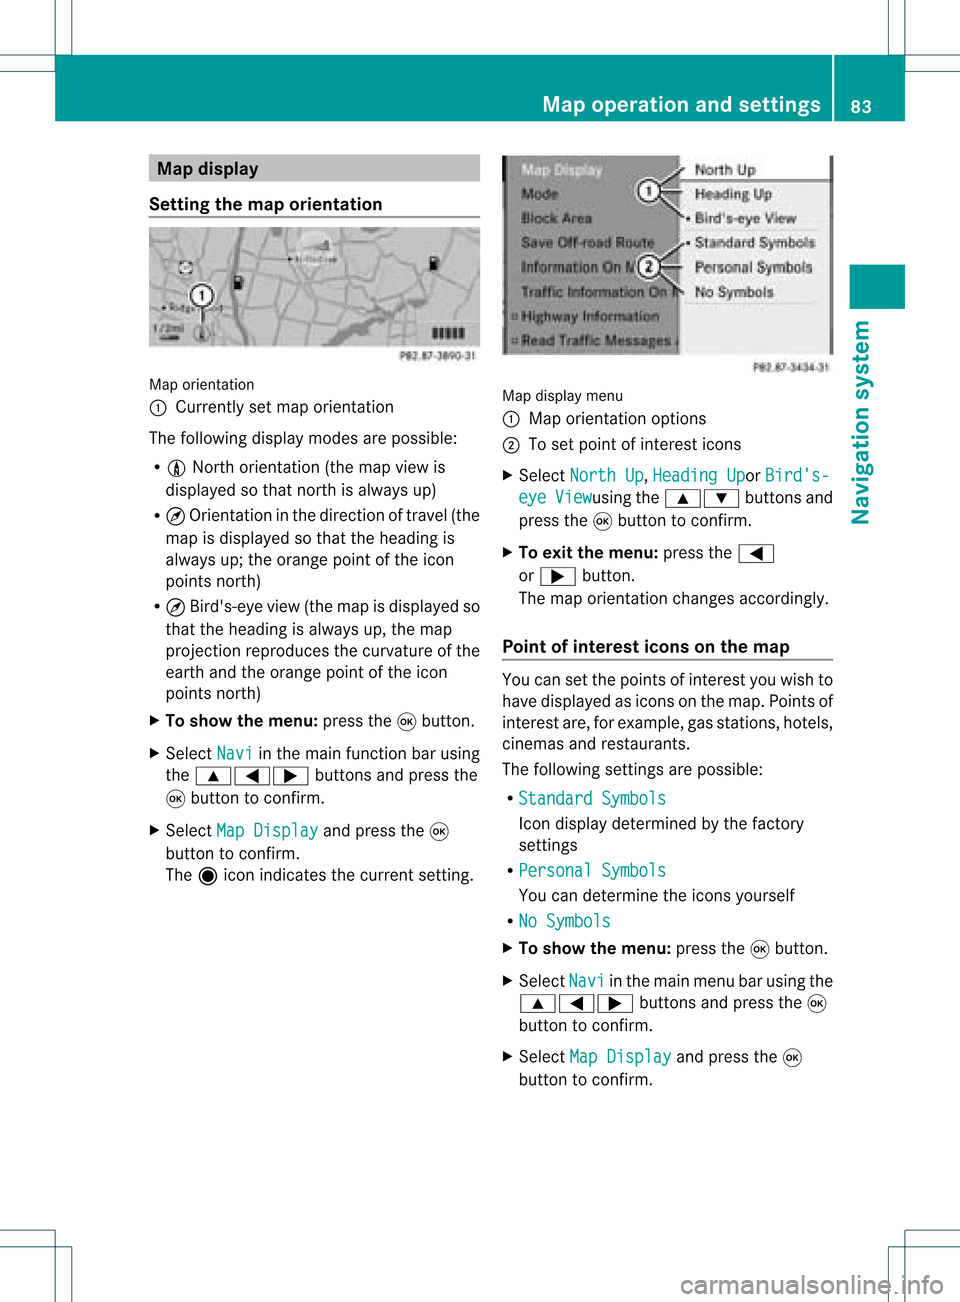
orientati on
: Currently setmap orientati on
The followi ngdisp laymodes arepossi ble:
R 0 North orientati on(the map view is
disp layed sothat north isalw aysup)
R ¤ Orientati oninthe dire ction oftravel (the
map isdisp layed sothat theheading is
alw aysup; the orange pointofthe icon
poi nts north)
R ¤ Bird's-e yeview (themap isdisp layed so
that theheading isalw aysup, the map
projection reproducesthecurvatu reofthe
earth andtheorange pointofthe icon
poi nts north)
X To show themenu: pressthe9button.
X Select Navi in
the mainfunction barusing
the 9=; buttonsandpress the
9 button toconfirm.
X Select MapDisplay and
press the9
button toconfirm.
The äicon indica testhe current setting. Map
displaymenu
: Map orientati onoptions
; Toset pointofinterest icons
X Select North Up ,
Heading Up or
Bird's- eye View usi
ng the 9: buttonsand
press the9button toconfirm.
X To exitthe menu: pressthe=
or ; button.
The map orientati onchanges accordingly.
Poi ntofintere stico nson the map You
cansetthe points ofinterest youwishto
have displayed asicons onthe map. Points of
interest are,forexampl e,gas stations, hotels,
cinemas andrestau rants.
The followi ngsettings arepossi ble:
R Standar dSymbols Icon
displaydetermi nedbythe factory
settings
R Persona lSymbols You
candetermi nethe icons yourself
R No Symbols X
To show themenu: pressthe9button.
X Select Navi in
the mainmenu barusing the
9=; buttonsand press the9
button tocon firm.
X Select MapDisplay and
press the9
button tocon firm. Map
opera tionandsettings
83Navigation system Z
Page 86 of 214
X
Sel ect StandardSymbols ,
Per sonal Sym
bols or
No Sym bols .
If yo usel ect Per sonal Sym
bols ,
the list of
poi nts ofinter estappe ars .
X To switchthe ico ndisplay on/off:select
the pointofinterest using the 9:
buttons andpress the9button toconfirm.
Dependi ngon the previ oussetting, the
icons willbe swi tched onO oroff ª.Y ou
can switch onthe icon display sfor more
than onepoint ofinter est.
i The listshows allicons thatarecont ained
on the digital mapacross allcount ries.
However, notallpoints ofinter estare
availa bleinall count ries.Asaresult, certain
point ofinter esticons maynotbedisplay ed
on the map, evenifthe icon display is
switched on.
X To exit themenu: pressthe=
or ; button . Map
informa tioninthe display
Displaying mapinforma tion During
routeguidance, youcan have map
inform ationdisplay edatthe bottom edgeof
the display .
X To show themenu: pressthe9button .
X Select Navi in
the main menu barusing the
9=; buttonsand press the9
button toconf irm.
X Select Information On Map and
press the
9 button toconf irm.
The äicon indicates thecurrent setting.
X Select Arrival Time/Distance ,
Current Street ,
Geo-coordina tes or
None and
press the9button toconf irm.
X To exit themenu: pressthe=
or ; button . Arrival
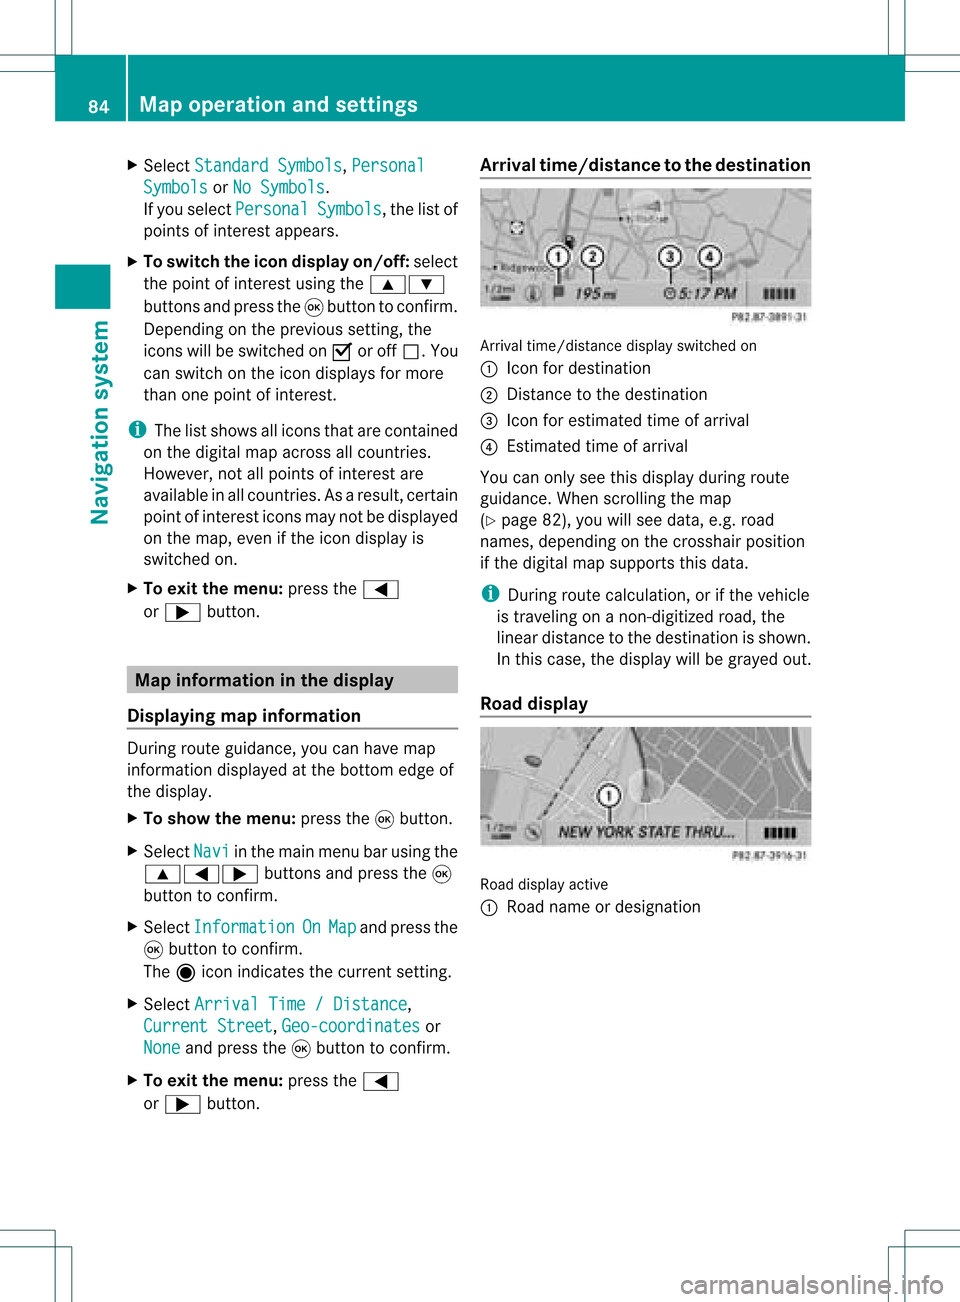
time/dist ancetothe destinat ion Arrival
time/dist ancedisplay switched on
: Icon fordestination
; Distan cetothe destination
= Icon forestimated timeofarrival
? Estimated timeofarrival
You canonly seethis display duringroute
guidance. Whenscrolling themap
(Y page 82),youwillsee data, e.g.road
names, depending onthe crosshair position
if the digital mapsupports thisdata.
i During routecalculation, orifthe vehicle
is traveling onanon- digitized road,the
linear distance tothe destination isshown.
In this case, thedisplay willbegrayed out.
Road display Road
display active
: Road name ordesignation 84
Map
operat ionand settingsNavigation system
Page 91 of 214
Comp
assfunct ion
You canseethecur ren tvehicle position and
direct ionoftravel inthe compass view.
X To switch onnavigat ionmode: pressthe
Ø function button .
X To show themenu: pressthe9button .
X Select Positio n in
the navigation menu
bar using the:=; buttonsand
press the9button tocon firm.
X Select Compass and
press the9button to
con firm.
Depen dingonthe previous state,switch
the option onO oroff ª. Ex
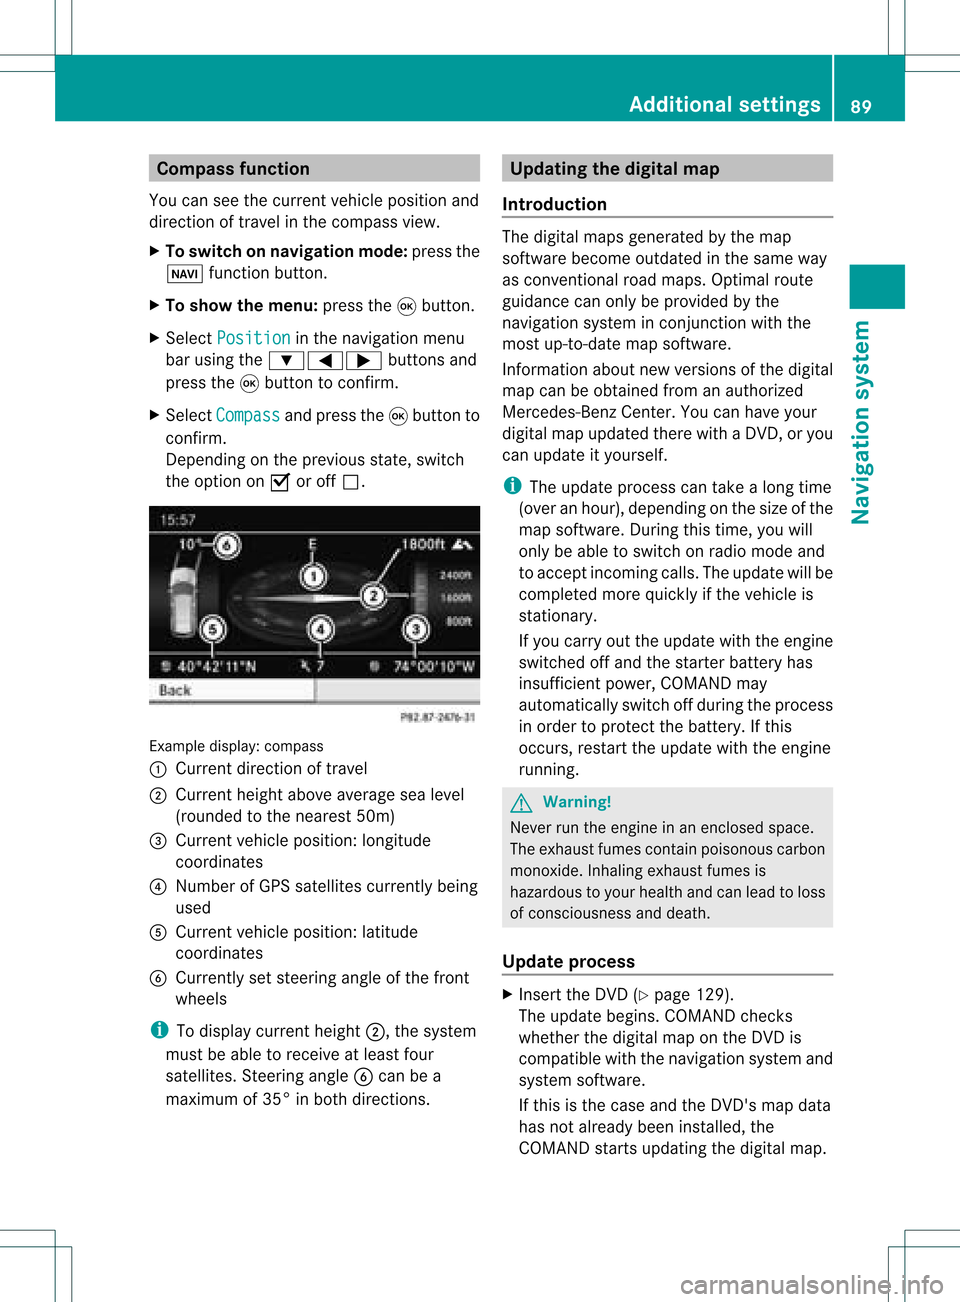
ample display: compass
: Current directionoftravel
; Current heightaboveaverage sealevel
(rounded tothe nearest 50m)
= Current vehicleposition :longitude
coordinat es
? Number ofGPS satellites currentlybeing
used
A Current vehicleposition: latitude
coordinat es
B Currently setsteerin gangle ofthe front
wheels
i Todisplay current height;,thesystem
must beable toreceive atleast four
satellites. Steeringangle Bcan bea
maximum of35° inboth direction s. Upda
tingthedigital map
Introdu ction The
digital mapsgenerated bythe map
software becomeoutdated inthe same way
as conv ention alroad maps. Optimal route
guidance canonly beprovided bythe
navigation systeminconj unct ionwith the
most up-to- datemapsoftware.
Infor mation aboutnewversions ofthe digital
map canbeobtained fromanauthorized
Mercedes-B enzCenter. Youcanhave your
digital mapupdated therewithaDVD ,or you
can update ityourself.
i The update process cantake along time
(over anhour), depending onthe size ofthe
map software. Duringthistime, youwill
only beable toswitch onradio mode and
to accept incomin gcalls. Theupdate willbe
completed morequickly ifthe vehicle is
station ary.
If you carry outtheupdate withtheengine
switched offand thestart erbattery has
insufficient power,COMAND may
automatically switchoffduring theprocess
in order toprotec tthe battery. Ifthis
occurs, restarttheupdate withtheengine
runnin g. G
War
ning!
Never runtheengine inan enclosed space.
The exhaust fumescontainpoisonous carbon
monox ide.Inhaling exhaustfumesis
hazardous toyour health andcanlead toloss
of consc iousness anddeath.
Upda teprocess X
Insert theDVD (Ypage 129).
The update begins. COMAND checks
whether thedigital maponthe DVD is
compatible withthenavigation systemand
system software.
If this isthe case andtheDVD 'smap data
has notalready beeninstalled, the
COMAND startsupdating thedigital map. Additional
settings
89Navigation system Z
Page 99 of 214
Aut
horizing (regist ering) amobile
ph one X
Sele ctas yet unaut horizedmobi lephon e
= intheBluet ooth®
telepho nelist usin g
th e9: buttons.
X Sele ctOpt ions usin
gth e; buttonand
pres sth e9 butt ontocon firm.
X Sele ctAut horize and
pres sth e9 butt on
to con firm.
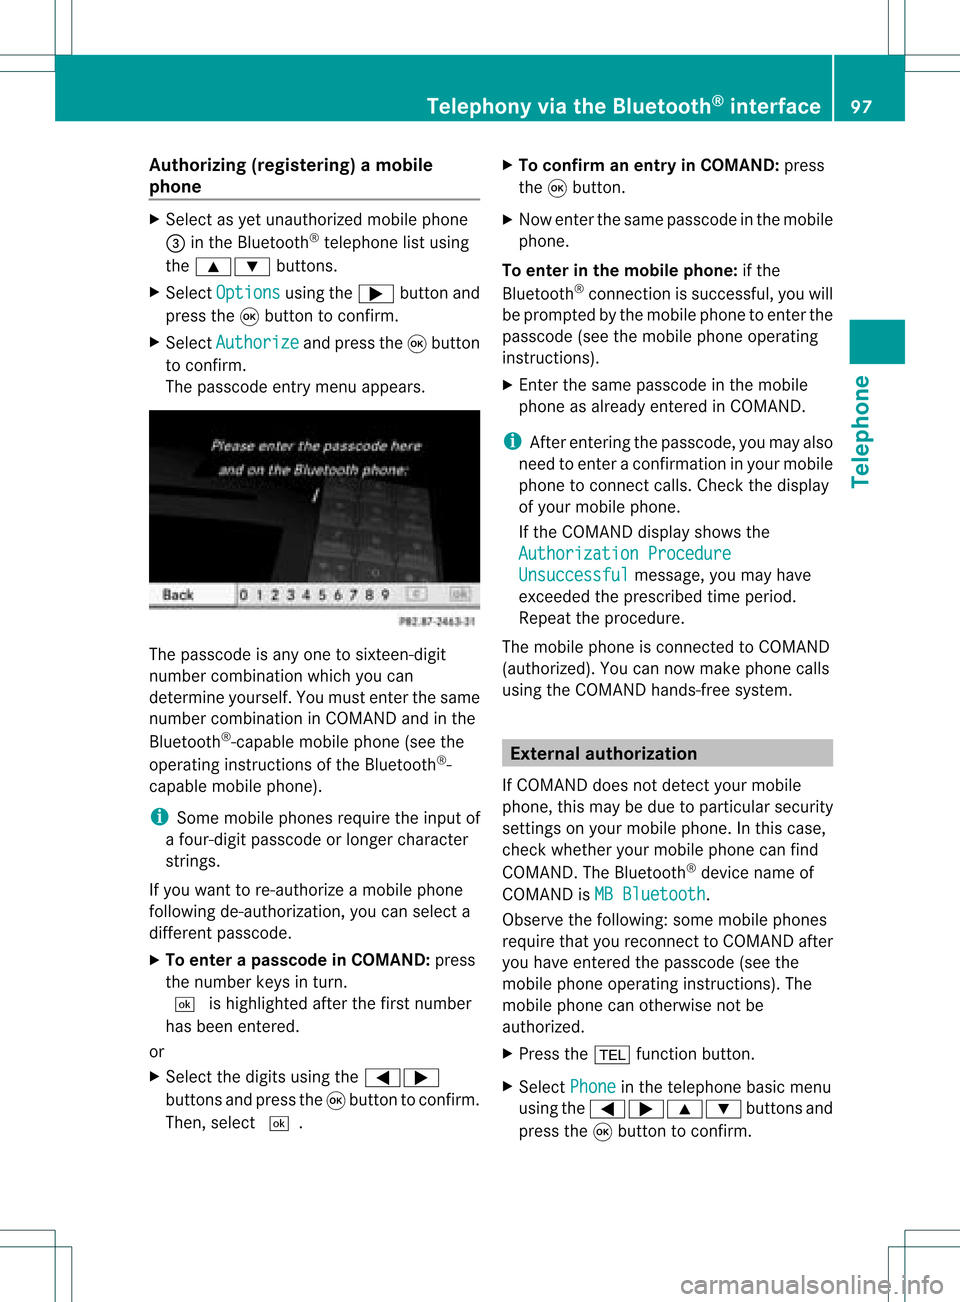
The passc odeentrymen uappears . The
passc odeisany oneto six teen- digit
num bercom binatio nwhich youcan
determine yourself.Youmust enter thesame
number combination inCOMAND andinthe
Bluetooth ®
-capable mobilephone(seethe
operating instructionsofthe Bluetooth ®
-
capable mobilephone).
i Some mobile phones requiretheinput of
a four-digit passcode orlonger character
strings.
If you want tore-authorize amobile phone
following <0004000500270001001500140008000F00120009001E000100140009000F000E
0035> youcan select a
different passcode.
X To enter apassc odeinCOMA ND:press
the numbe rkeys inturn.
¬ ishigh lighted after thefirst numbe r
has beenentere d.
or
X Sel ect the digits using the =;
bu ttons andpressthe 9button toconfi rm.
The n,sel ect ¬. X
To confi rm anentry inCO MA ND: press
the 9button.
X Now enterthe same passcode inthe mobile
phone.
To enter inthe mobile phone:ifthe
Bluetooth ®
conn ection issuccessful, youwill
be prompted bythe mobile phonetoenter the
passcode (seethemobile phoneoperating
instruct ions).
X Ent erthe same passcode inthe mobile
phone asalready entered inCOMAND.
i Afterenterin gthe passcode, youmay also
need toenter aconfirm ationinyour mobile
phone toconn ectcalls. Check thedispla y
of your mobile phone.
If the COMAND displayshows the
Authorization Procedure Unsuccessful message,
youmay have
exceeded theprescribed timeperiod.
Repea tthe procedure.
The mobile phoneisconn ected toCOMAND
(authorized). Youcannow make phone calls
using theCOMAND hands-free system. External
authorizat ion
If COMAND doesnotdetect yourmobile
phone, thismay bedue toparticular security
settin gson your mobile phone. Inthis case,
check whether yourmobile phonecanfind
COMAND. TheBluetooth ®
device nameof
COMAND isMB Bluetooth .
Observe thefollowing: somemobile phones
require thatyoureconn ecttoCOMAND after
you have entered thepasscode (seethe
mobile phoneoperating instructions).The
mobile phonecanotherwise notbe
authorized.
X Press the% functionbutton.
X Select Phone in
the telephone basicmenu
using the=;9: buttonsand
press the9button toconfirm . Telephony
viathe Bluetooth ®
interface 97Telephone Z
Page 100 of 214
X
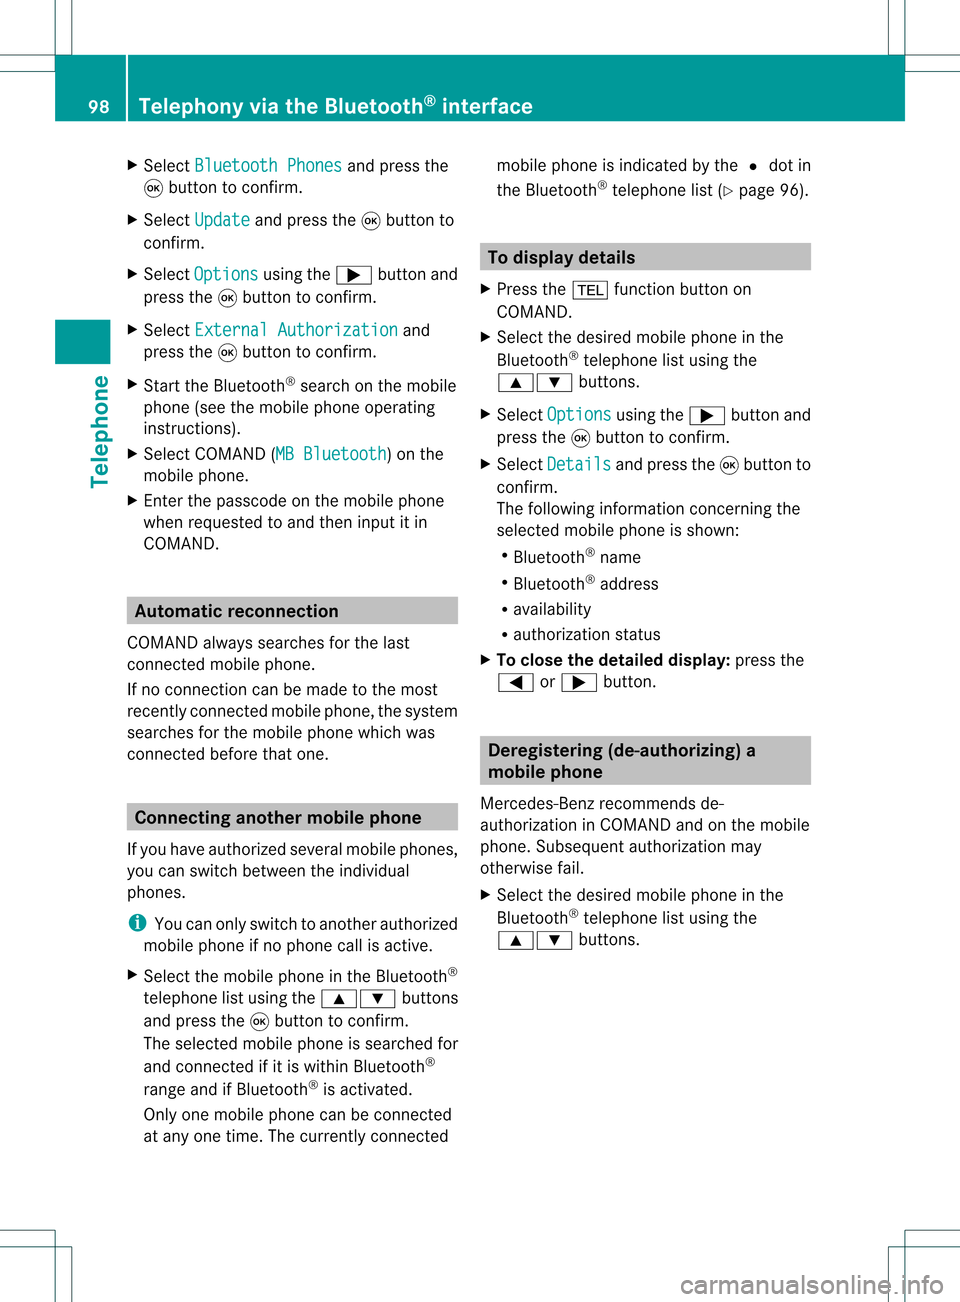
Sel ect Bluetooth Phones and
pressthe
9 button toconfi rm.
X Sel ect Update and
pressthe 9button to
confi rm.
X Sel ect Opt ions us
ing the ; button and
pre ssthe 9button toconfi rm.
X Sel ect ExternalAuthorization and
pre ssthe 9button toconfi rm.
X Start theBluetoo th®
sea rch onthe mob ile
pho ne(seethe mob ile pho neope rating
instr uctions) .
X Sel ect COMAND (MB Bluetooth )
on the
mob ile pho ne.
X Enter thepassco deon the mob ile pho ne
wh en req uested toand then inputitin
CO MAND. Auto
matic reconnecti on
CO MAND alwa yssea rche sfor the last
connecte dmob ile pho ne.
If no connecti oncan bemad eto the mos t
rece ntlyconnecte dmob ilep hone, thesystem
searches forthe mobile phonewhichwas
conn ected before thatone. Conne
ctinganother mobilephone
If you have authorized severalmobilephones,
you can switch between theindividua l
phones.
i You canonly switch toanother authorized
mobile phoneifno phone callisactive.
X Select themobile phoneinthe Bluetooth ®
telephone listusing the9: buttons
and press the9button toconfirm .
The selected mobilephoneissearched for
and conn ected ifit is within Bluetooth ®
range andifBluetooth ®
is activated.
Only onemobile phonecanbeconn ected
at any one time. Thecurrent lyconn ected mobile
phoneisindicated bythe #dot in
the Bluetooth ®
telephone list(Ypage 96). To
display details
X Press the% functionbutton on
COMAND.
X Select thedesired mobilephoneinthe
Bluetooth ®
telephone listusing the
9: buttons.
X Select Options using
the; button and
press the9button toconfirm .
X Select Details and
press the9button to
confirm .
The following information concerning the
selected mobilephoneisshown:
R Bluetooth ®
name
R Bluetooth ®
address
R availa bility
R authorization status
X To close thedetailed display:pressthe
= or; button. Deregis
tering(de-aut horizing) a
mobile phone
Mercedes-Ben zrecomm endsde-
authoriz ationinCOMAND andonthe mobile
phone. Subsequent authorizationmay
other wisefail.
X Select thedesired mobilephoneinthe
Bluetoot h®
telephon elist using the
9: buttons. 98
Telephony viatheBluet ooth®
interf aceTelephone
Page 101 of 214
X
Sel ect Opt ions us
ing the ; button and
pre ssthe 9button toconfi rm.
X Sel ect De-Aut horize and
pressthe 9
bu tton toconfi rm.
Ap rompt appears asking whethe ryou
really wishtorevoke authorization forthis
mobile phone.
X Select Yes or
No .
If you select Yes ,
the mobile phonewillbe
deleted fromtheBluetooth ®
telephone list.
If you select No ,
the process willbe
canceled.
i Before re-authoriz ingthe mobile phone,
you should alsodelete thedevice nameMB Bluetooth from
yourmobile phone's
Bluetooth ®
list. Telephone
basicmenu (Bluetooth ®
interfa ce)
X Press the% functionbutton .
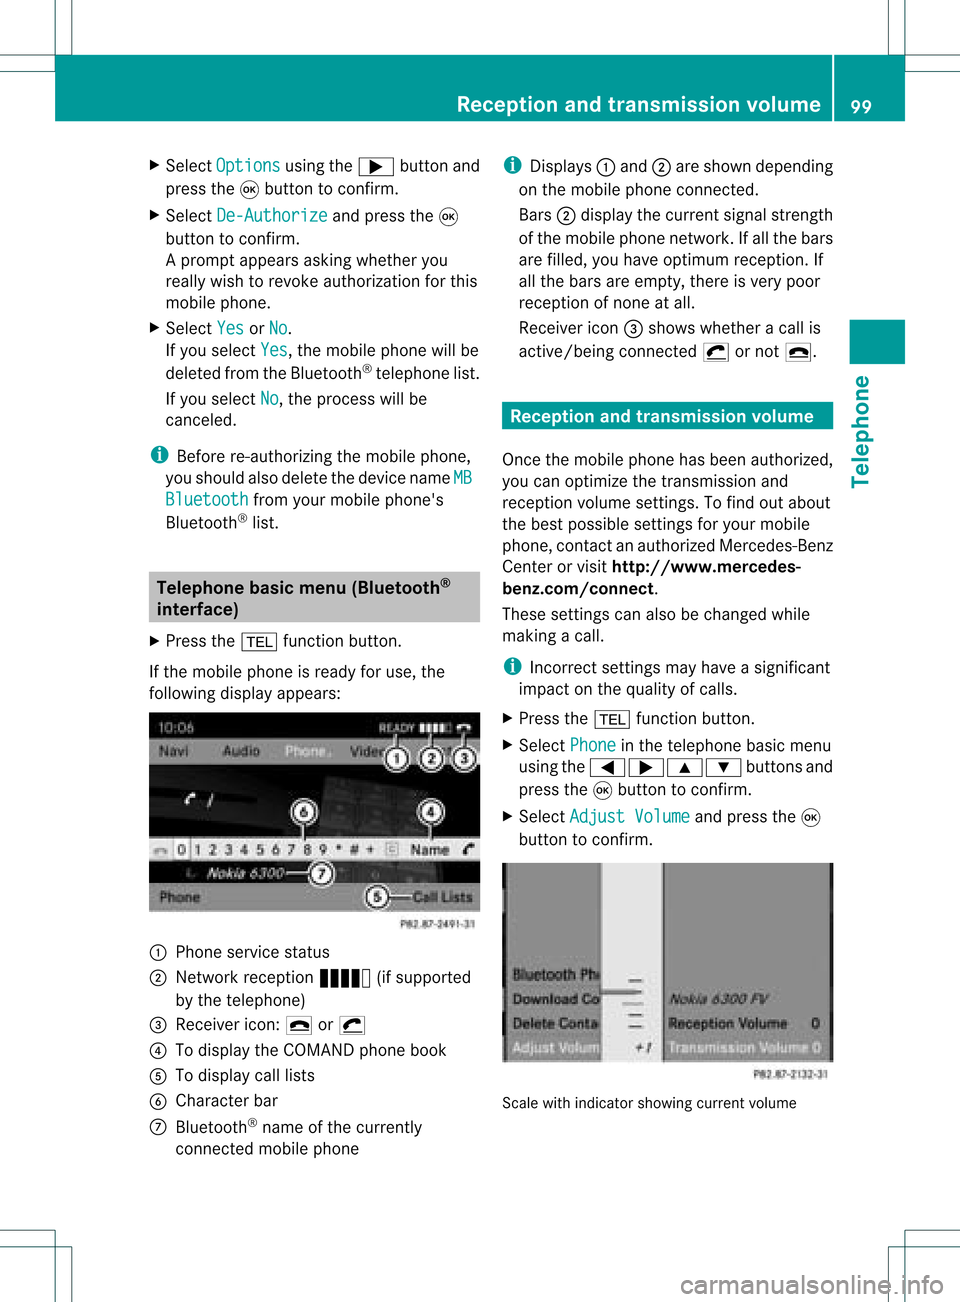
If the mobile phoneisready foruse, the
following displayappears: 1
Phone service status
2 Network reception Ä(ifsupported
by the telephone)
3 Receiver icon:¢or¡
4 Todisplay theCOMAND phonebook
5 Todisplay calllists
6 Character bar
7 Bluetooth ®
name ofthe current ly
conn ected mobile phone i
Displays :and ;are shown depending
on the mobile phoneconnected.
Bars ;display thecurrent signalstrength
of the mobile phonenetwork .Ifa llthe bars
are filled, youhave optimum receptio n.If
all the bars areempt y,the reisvery poor
rec eptio nofnone atall.
Receiver icon=shows whether acall is
active/ beingconnected ¡ornot ¢. Reception
andtransmission volume
Once themobile phonehasbeen authorized,
you can optimize thetrans mission and
reception volumesettings. Tofind outabout
the best possible settings foryour mobile
phone, contactanauthorized Mercedes-B enz
Center orvisit htt<0010002E002200220017001700170021000D0005001200030005000400050013
0025F
benz.com/connect .
These settings canalso bechanged while
making acall.
i Incorrect settings may have asignificant
impact onthe quali tyof calls.
X Press the% functionbutton .
X Select Phone in
the telephone basicmenu
using the=;9: buttonsand
press the9button toconf irm.
X Select Adjust Volume and
press the9
button toconf irm. Scale
withindicator showingcurrentvolume Reception
andtransmission volume
99Telephone Z
Page 121 of 214
Switching
wavebands
Option 1 You
canswitch theradio between theFM, AM
and WBwaveband.
X Press the$ functionbutton repeatedly
until thedesired waveband isselected.
Option 2 X
Press :tohighlight thesubmenu.
X To selec tawaveband: press the; or
= button repeatedlyuntil thecurrently
sel ected waveba ndishig hlighted (FM ,
AM ,
or WB ).
X Press 9.
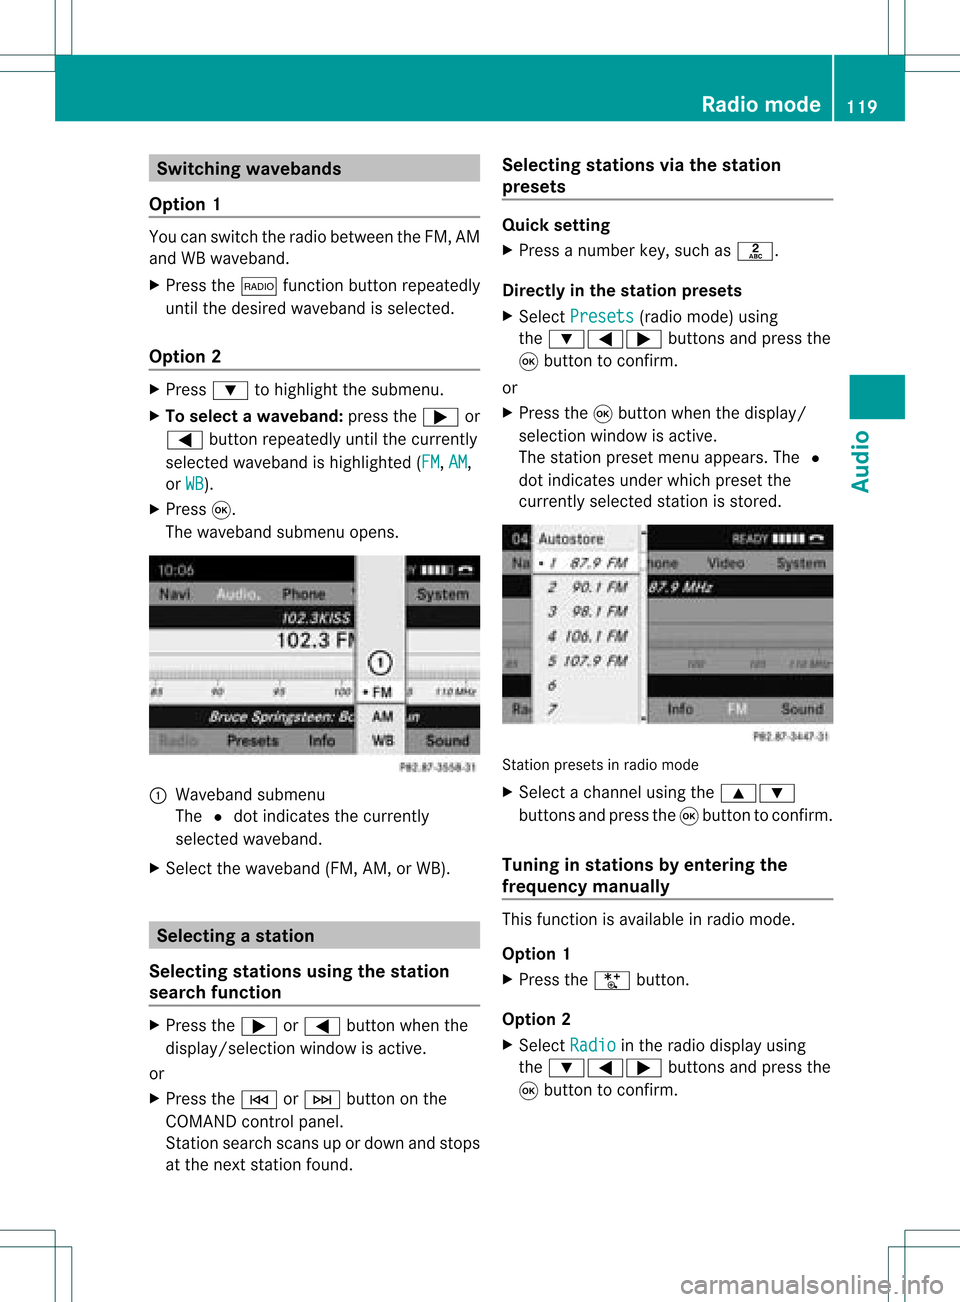
The waveba ndsub menu opens. 1
Wave band submenu
The #dot indicates thecurrently
sel ected waveba nd.
X Sele ctthe waveba nd(FM, AM,orWB). Sel
ecting astatio n
Se lecti ng stati onsusi ng the stati on
se arc hfuncti on X
Press the; or= button whenthe
disp lay/se lectio nwindow isact ive.
or
X Press theE orF buttononthe
COMA NDcontrol panel.
St ation searchscan sup ordown andstops
at the nextst ation found. Selecting
stations viathesta tion
pr esets Quick
setting
X Press anumb erkey, such asl.
Direct lyin thesta tion presets
X Selec tPres ets (radio
mode) using
the :=; buttons and press the
9 butt ontocon firm .
or
X Press the9butt onwhen thedisplay/
selec tionwindow isact ive.
The station presetmenu appears. The#
dot indicat esunder which preset the
curren tlyselect edstat ionisstor ed. St
ation preset sin radio mode
X Select achann elusing the9:
button sand press the9button tocon firm.
Tuning instat ions byentering the
freq uency manually This
function isavailable inradio mode.
Opt ion 1
X Press theU button .
Opt ion 2
X Select Radio in
the radio display using
the :=; buttonsand press the
9 button tocon firm. Rad
iomod e
119Audio
Page 129 of 214

Memory
functions i
There areten prese tsava ilable .
The followi ngfunctions areavailable toyou :
R storing channels
R sele cting channels fromthesatel lite
prese ts
Storing channels
X Press 9when thedisp lay/sele ction
wind owisactive.
or
X Select Presets in
the SatRa diosubmenu
bar.
In both cases ,the channel presetsapp ear.
The Rdot infront ofaprese tentry
indica testhat thecurrently selected
station isstored underthisprese t. Cha
nnel prese ts
X To selectap reset:pressthe 9
or : button.
X To sto reach ann elunde ra se lecte d
pres et:pressand hold9 unti la tone
sou nds .
or
X Pre ssand holdanum berk ey, e.g. 4,until
you hear aton e.
The chann elisstor ed. Selecting
achanne lfrom thepreset list
X To call upthe chann ellis t:press ;or
= inthe submenu repeatedl yuntil
Presets is
high lighted.
The channel presetlist appears.
X To select achanne l:press the9
or : button.
X To tune inthe selected chann el:
press 9.
or
X Press anumbe rkey on the control panel,
e.g. 4.
Displaying information X
Press ;or= inthe submenu
repeatedly untilInfo is
highlighted.
X Press 9.
Inf ormat iononthe curren tlyreceived
program isdisplayed. 1
Category
2 Channel
3 Artist
4 Name ofthe song
If available, youwillsee:
R the fullname
R additional information
X To retu rntothe SatR adio main displa y:
press ;or=. Sat
ellite radio
127Audio
Page 131 of 214
i
Ifamediu mcontains other filesin
addition tomusic files,theloading time
before thefirst track startsto play may be
longer.
Inserting discsintotheDVD changer The
DVD changer hasafixed magazine with
six trays.
Inserting asingle CD/DVD intoa
ma gaz ine tray
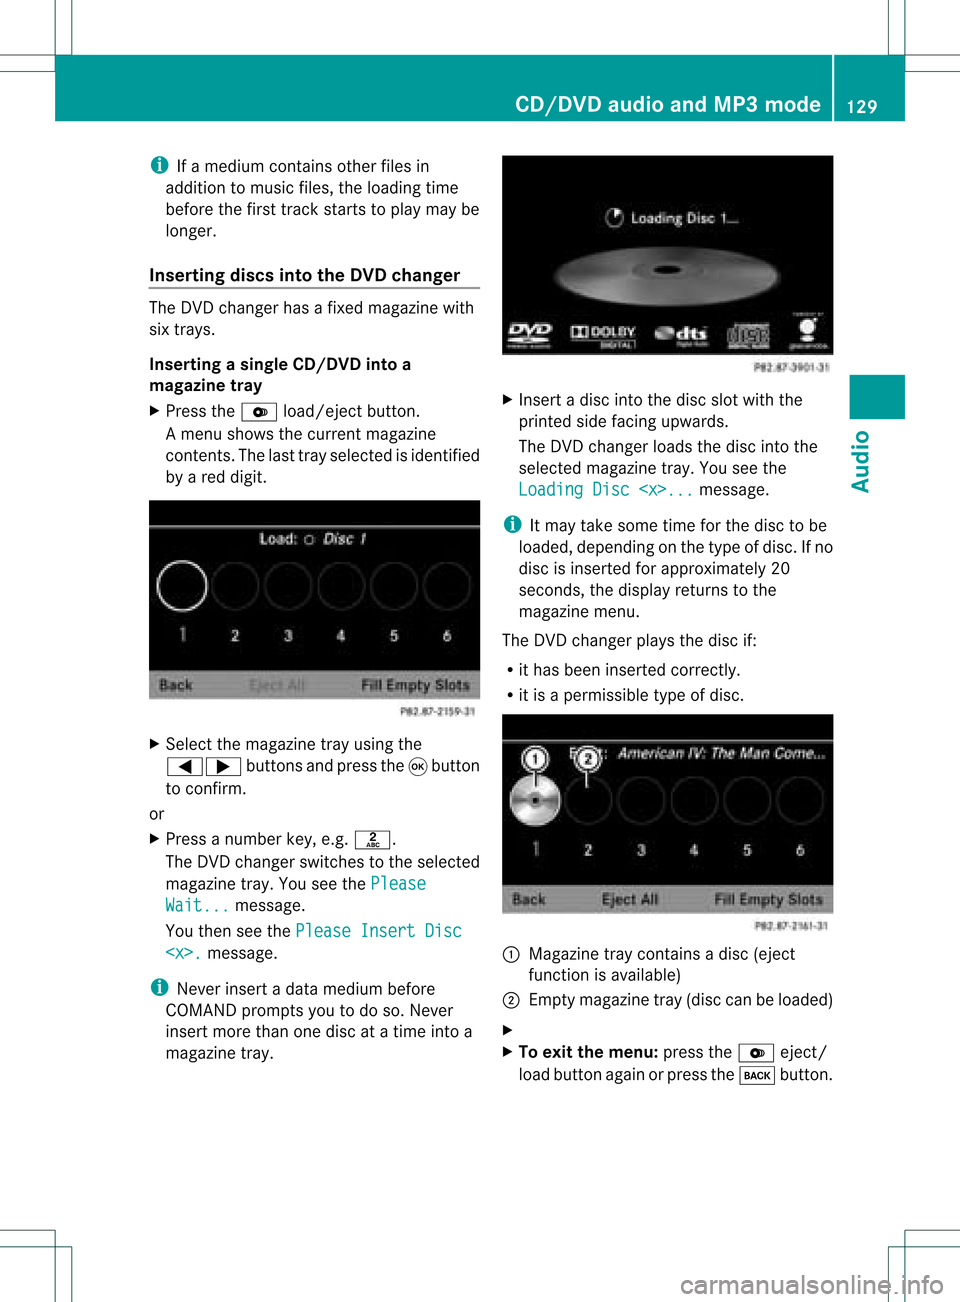
X Press theV load/ej ectbutt on.
A men ushows thecurr entmagazin e
con tents.The lasttray select edisident ified
by ared digit. X
Selec tthe magazine trayusing the
=; buttonsandpress the9button
to confirm .
or
X Press anumber key,e.g.l.
The DVD changer switches tothe selected
magazine tray.YouseethePlease Wait... message.
You then seethePlease InsertDisc
i Never insertadata medium before
COMAND promptsyoutodo so. Never
insert morethanonedisc atatime intoa
magazine tray. X
Insert adisc intothedisc slotwith the
printed sidefacing upwards.
The DVD changer loadsthedisc intothe
selected magazine tray.Youseethe
Loading Disc
i Itmay take some timeforthe disc tobe
loaded, depending onthe type ofdisc. Ifno
disc isinserted forapproximately 20
seconds, thedispla yreturns tothe
magazine menu.
The DVD changer playsthe disc if:
R ithas been inserted correctly.
R itis apermissible typeofdisc. :
Magazine traycontains adisc (eject
funct ionisavaila ble)
; Empt ymagazine tray(disc canbeloaded)
X
X To exit themenu: presstheV eject/
load button againorpress thek button. CD/
DVD audioand MP3 mode
129Audio Z
Page 136 of 214
X
To sto pplay back:wh ile play ba ck is
inte rrupte d,sel ect ±againa nd pre ssthe
9 button toconfi rm.
M ishighl ighted .
X To res tart playback:sel ect Mand press
the 9button toconfi rm.
Pl ay ba ck sta rts atthe beginning ofthe
DVD. Se
lecti ng CD/au dioDVD /MP3 discs
Se lecti ng viat he media list X
In audio CD/DVD and MP3 mode: select
Media or
Change r usi
ng
the :=; buttonsandpress the
9 button toconfirm.
or
X In audio CD/DVD mode only:press the
9 button whenthe displa y/selection
window isactive.
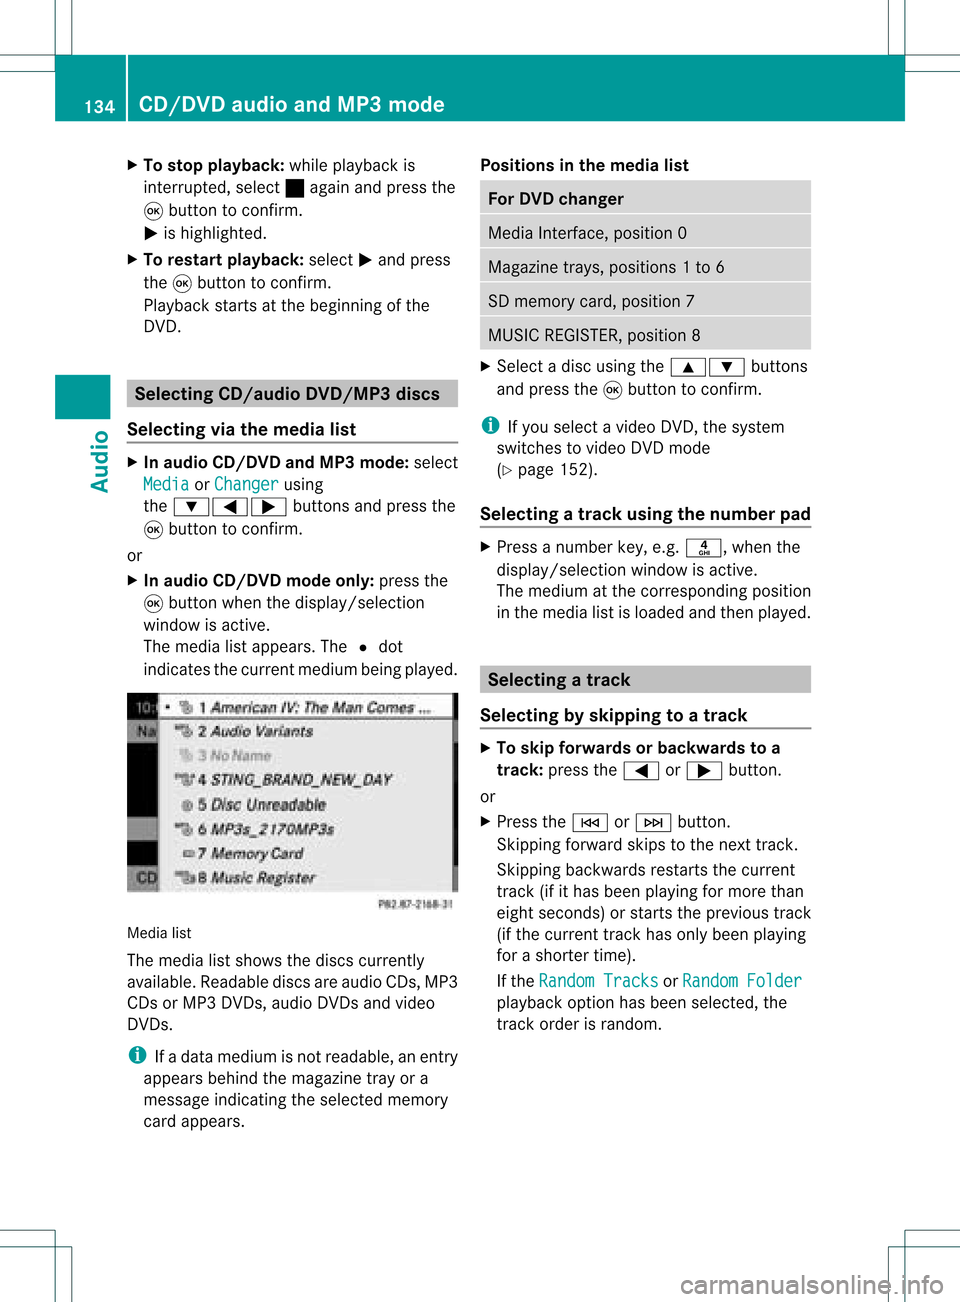
The media listappea rs.The #dot
indicates thecurrent medium beingplayed. Media
list
The media listshows thediscs current ly
availa ble.Reada blediscs areaudi oCDs, MP3
CDs orMP3 DVDs,audi oDVD sand video
DVD s.
i Ifadata medium isnot readabl e,an entr y
appea rsbehind themagazine trayora
message indicating theselected memory
card appea rs. Positions
inthe media list For
DVD changer Media
Interface, position 0 Magazine
trays,positions 1to6 SD
memory card,position 7 MUSIC
REGISTER, position8 X
Select adisc using the9: buttons
and press the9button toconf irm.
i Ifyou select avideo DVD,the system
switches tovideo DVDmode
(Y page 152).
Selecting atrac kusing thenumber pad X
Press anumber key,e.g.n, whenthe
<0004000900130010000C0001001C002400130005000C0005000300140009000F
000E> windowisactive.
The medium atthe corr espondin gposition
in the media listisloaded andthen played. Selecting
atrac k
Se lecti ng byskippin gto atrac k X
To skipfo rwa rds orbac kwards toa
trac k:pre ssthe = or; button.
or
X Pre ssthe E orF button.
Skip ping forwa rdski ps tothe next track.
Skip ping backw ards res tartsthe curre nt
tra ck (ifi th as been playin gfor mor eth an
eigh tsecon ds)orstart sthe previous track
(if the curren ttrack hasonly been playing
for ashorter time).
If the Random Tracks or
Random Folder
pla
yba ckoption hasbeen selected, the
track order israndom. 134
CD
/DVD audio andMP3 modeAudio