ECU MERCEDES-BENZ R-Class 2011 W251 Comand Manual
[x] Cancel search | Manufacturer: MERCEDES-BENZ, Model Year: 2011, Model line: R-Class, Model: MERCEDES-BENZ R-Class 2011 W251Pages: 214, PDF Size: 4.69 MB
Page 19 of 214
COMAN
Ddis pla y
Disp layover view The
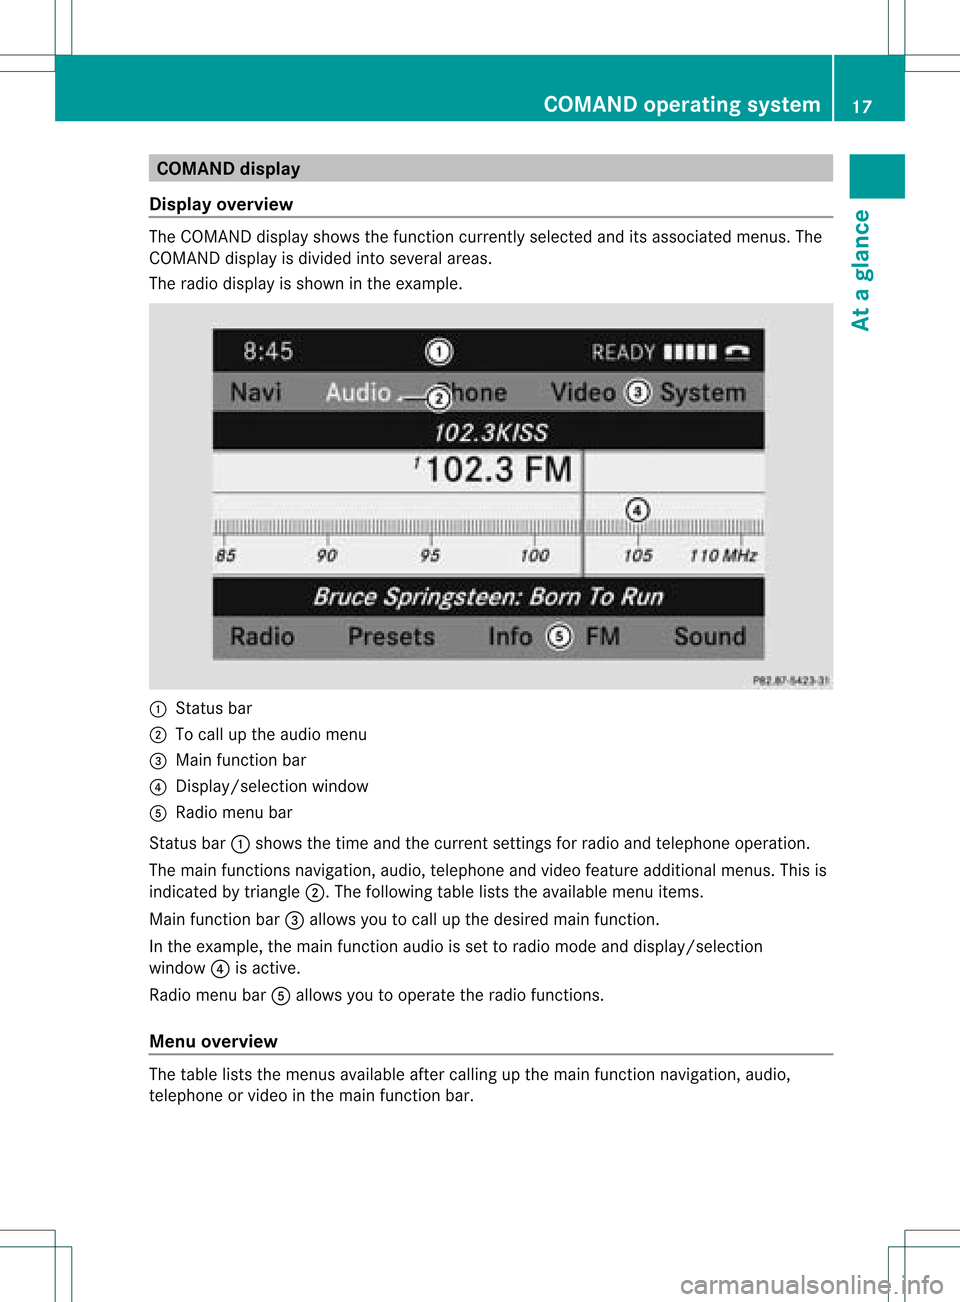
COMA NDdispl aysho wsthefun ction curren tlyselec teda nd itsassoci atedmenu s.The
CO MAND displ ayisdivid ed into severalar ea s.
The radio displ ayissho wninthe exampl e. :
Statu sba r
; Tocallup the audio menu
= Mainfunctio nbar
? Display/s electionw indow
A Radio menubar
St atus bar:shows thetimeand thecurr entsettings for radio andtelep honeoperat ion.
The main functionsnavig ation,audio, telephoneand video feature additio nalmen us.This is
indic ated bytriangle ;.Thefollowing tableliststheavaila blemenu items.
Main functionbar =allow syou tocall upthe desired mainfunction.
In the example, themain functionaudi ois set toradio mode anddispla y/selection
window ?isactive.
Radi omenu barAallow syou tooperate theradio functions.
Menu overview The
table liststhemenus availableafter calling upthe main functionnavigation, audio,
telephone orvideo inthe main functionbar. COMAND
operatingsystem
17Ataglance
Page 22 of 214
X
To sho wthe men u:pre ssthe 9button.
X Sel ect Destination us
ing
the :=; buttons andpressthe
9 button toconfi rm.
X Sel ect AddressEnt ry and
pressthe 9
bu tton toconfi rm.
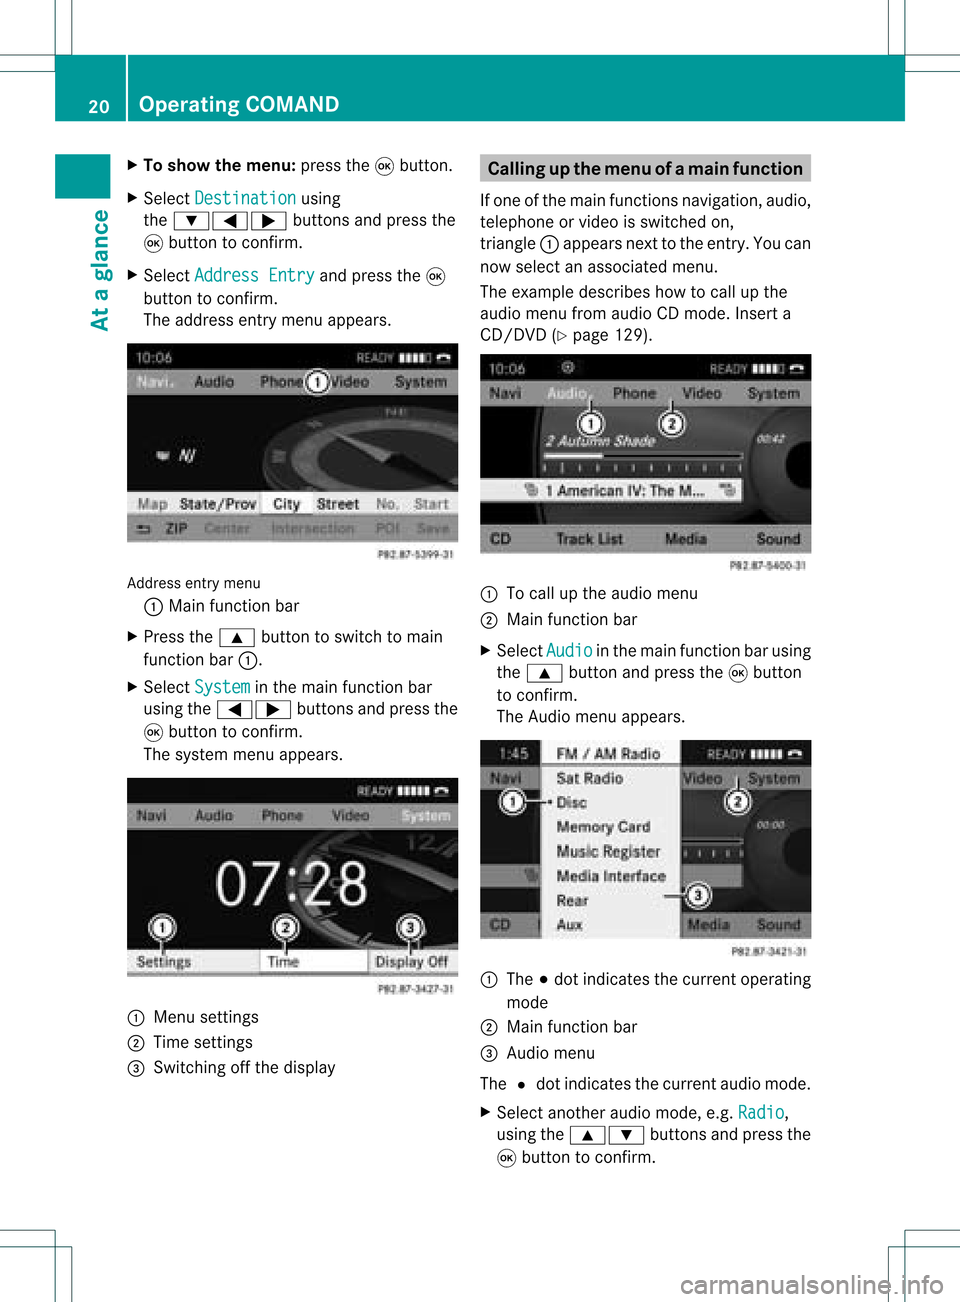
The addre ssentry menu appe ars. Add
ressentry menu
: Mainfunctio nba r
X Pre ssthe 9 button tosw itch toma in
fu nctio nba r:.
X Sel ect System in
the mainfunctio nba r
us ing the =; buttons andpressthe
9 button toconfi rm.
The system menu appe ars. 1
Menu settings
2 Time setti ngs
= Switchi ngoff the displ ay Cal
ling up the men uofam ainfunc tion
If one ofthe mainfunc tion snav igat ion,audio,
te leph oneor vide ois swit ched on,
tr iang le: appear sne xtto theen try. You can
no wsele ctan asso ciatedmen u.
The example describeshow tocall upthe
audio menufrom audio CDmod e.Inser ta
CD/ DVD(Y page 129). :
Tocall uptheaudio menu
; Main function bar
X Se lec tAud io in
themain function bar usin g
th e9 buttona nd pre ssthe 9button
to confi rm.
The Audiomenu appe ars. :
The #do tindi cate sthe current opera ting
mod e
; Mainfunctio nbar
= Audi omen u
The #dot indicat esthecur ren taudio mode.
X Se lec tanothe raudio mode,e.g. Rad io ,
usin gth e9: buttons and pressthe
9 buttonto confirm . 20
Op
era ting COMAN DAtaglan ce
Page 28 of 214
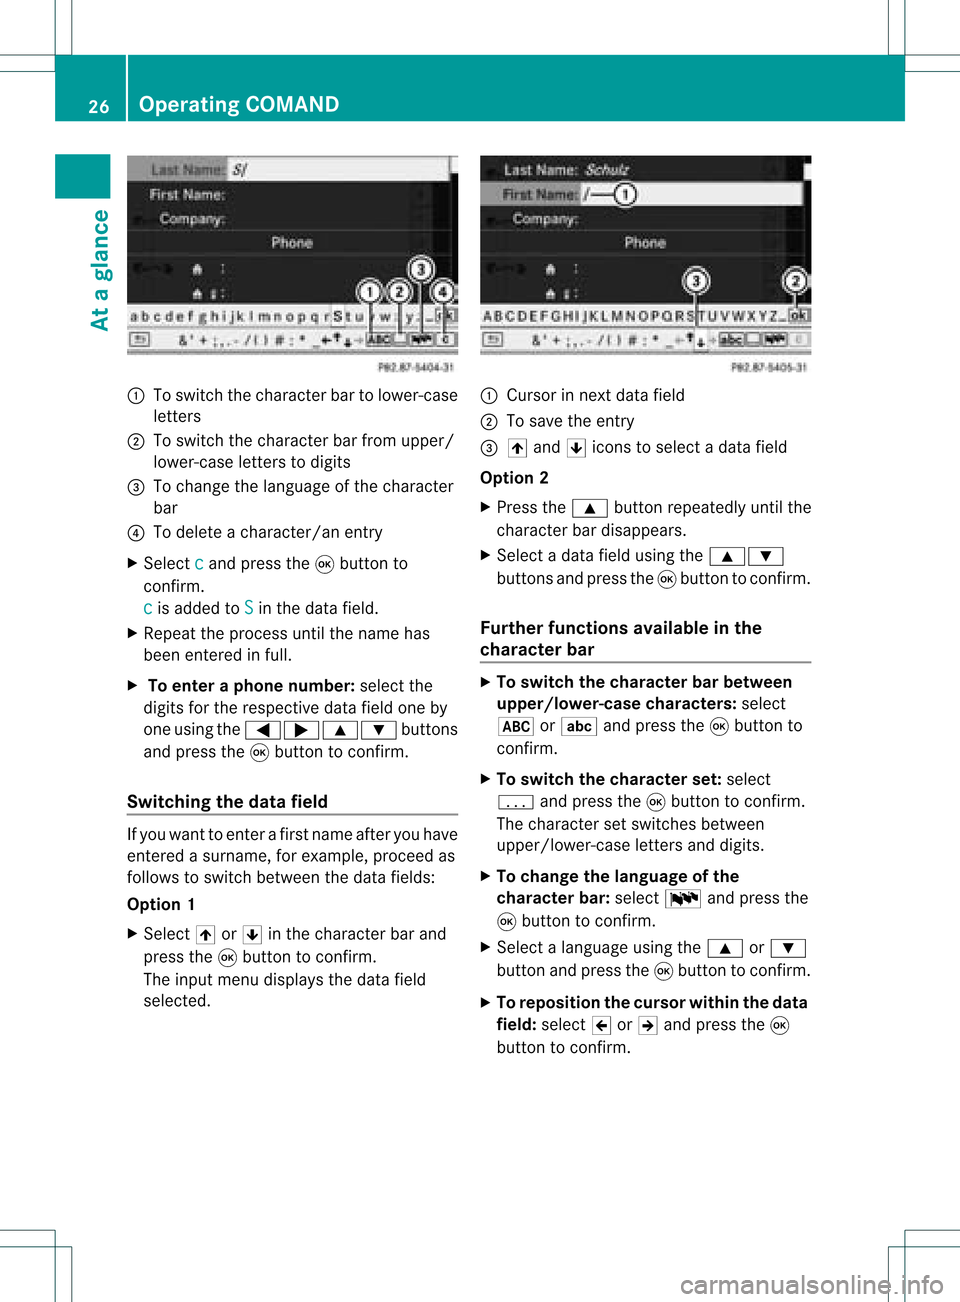
:
Toswitch thecharact erbar tolower-case
letter s
; Toswitch thecharact erbar from upper/
lower-case lettersto digits
= Tochange thelanguage ofthe charact er
bar
? Todelete acharact er/anentry
X Select c and
press the9button to
conf irm.
c is
added toS in
the data field.
X Repeat theprocess untilthename has
been entered infull.
X To enter aphone number :select the
digits forthe respect ivedata fieldoneby
one using the=;9: buttons
and press the9button toconf irm.
Switching thedatafield If
you want toent erafirst name afteryouhave
ent ered asurname, forexample, proceedas
follows toswitch between thedata fields:
Option 1
X Select 4or5 inthe charact erbar and
press the9button toconf irm.
The input menu display sthe data field
selected. :
Cursor innext data field
; Tosave theentry
= 4 and 5icons toselect adata field
Option 2
X Press the9 button repeatedly untilthe
charact erbar disappears.
X Select adata fieldusing the9:
button sand press the9button toconf irm.
Furt herfunctions availableinthe
chara cterbar X
To switch thechara cterbarbetween
upp er/lower-case characters: select
* orE andpress the9button to
conf irm.
X To switch thechara cterset:select
p andpress the9button toconf irm.
The charact erset switches between
upper/lower-case lettersand digits.
X To change thelanguage ofthe
chara cterbar:select Bandpress the
9 button toconf irm.
X Select alanguage usingthe9 or:
button andpress the9button toconf irm.
X To reposition thecursor withinthedata
field: select 2or3 and press the9
button toconf irm. 26
Opera
tingCOMANDAtaglance
Page 29 of 214
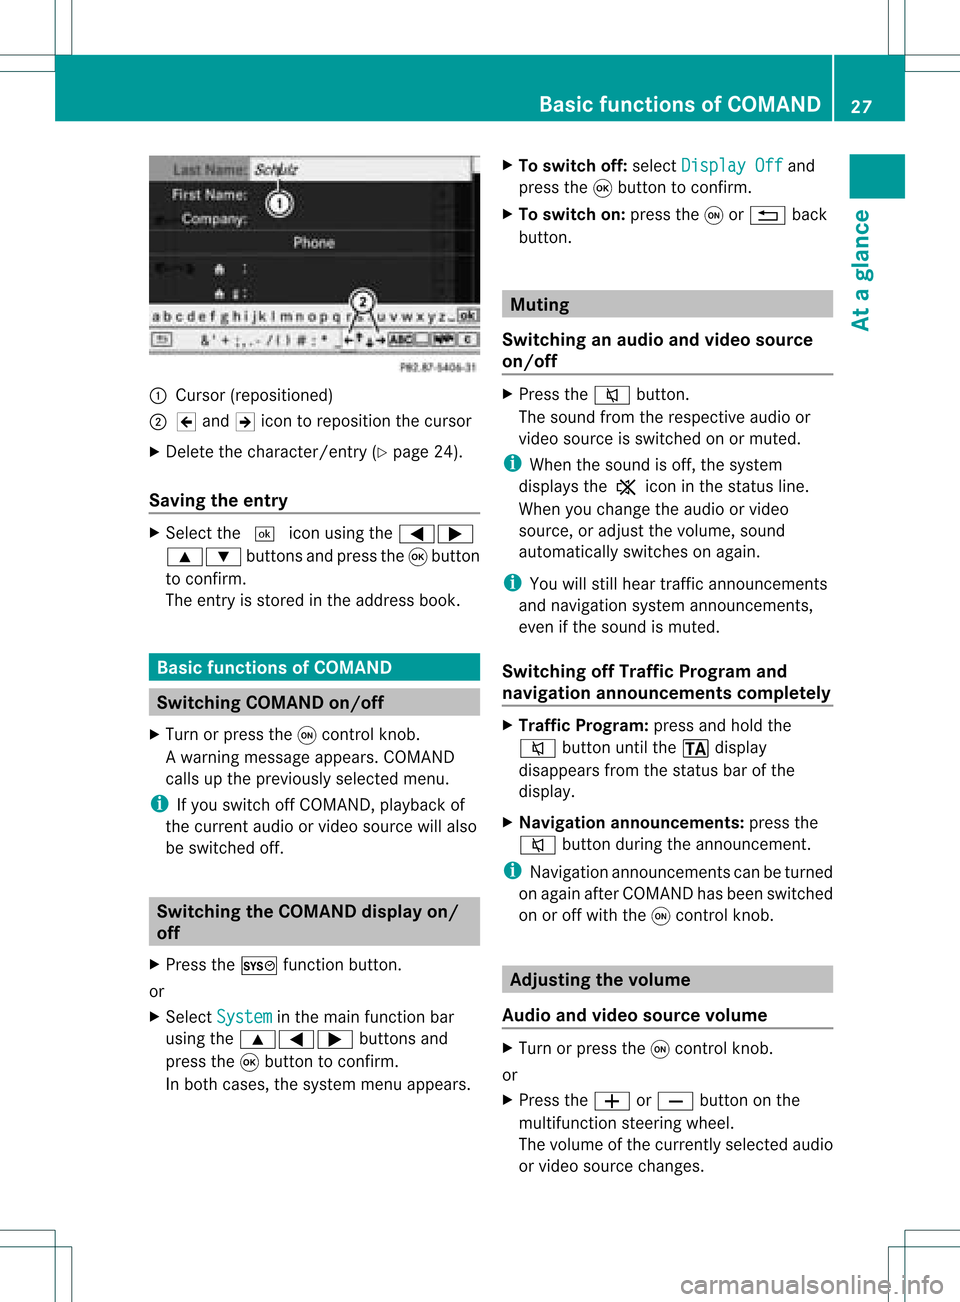
:
Curso r(reposi tioned)
; 2 and 3icon toreposi tionthecursor
X Delete thechara cter/entry (Ypag e24).
Saving theentry X
Select the¬ iconusing the =;
9: buttonsandpress the9button
to confirm.
The entry isstored inthe address book. Basic
functio nsofCOMA ND Swi
tching COMANDon/ off
X Turn orpress theqcontrol knob.
Aw arning mes sage appear s.COMA ND
calls uptheprev iously selectedmen u.
i Ifyou switchoff COMA ND,playbac kof
the curre ntaudio or vide os ource willalso
be switched off. Switching
theCOMAND displayon/
off
X Press theW functionbutton .
or
X Select System in
the main functionbar
using the9=; buttonsand
press the9button toconf irm.
In both cases, thesystem menuappears. X
To switch off:select Display Off and
press the9button toconf irm.
X To switch on:press theqor% back
button . Mut
ing
Switching anaudio andvideo source
on/off X
Press the8 button .
The sound fromtherespect iveaudio or
video source isswitched onormuted.
i When thesound isoff, thesystem
display sthe , icon inthe status line.
When youchange theaudio orvideo
source, oradjust thevolume, sound
automatically switchesonagain.
i You willstill hear traffic announc ements
and navigation systemannounc ements,
even ifthe sound ismuted.
Switching offTraffic Progra mand
navigation announcements completely X
Traffic Progra m:press andhold the
8 button untilthe. display
disappea rsfrom thestatus barofthe
display .
X Navigat ionannouncements: pressthe
8 button duringtheannounc ement.
i Navigation announcementscan beturned
on again afterCOMAND hasbeen switched
on oroff with theqcont rolknob. Adjust
ingthe volume
Audio andvideo source volume X
Turn orpress theqcont rolknob.
or
X Press theW orX button onthe
multifunct ionsteerin gwheel.
The volume ofthe current lyselected audio
or video source changes. Basic
functions ofCOMAND
27Ataglance Z
Page 38 of 214
Vehi
cle equi pmen t
i TheseOpe rating Instru ctionsdescri beall
sta nda rdand optio nal equipme ntava ilab le
for your veh icleat the time ofpurcha se.
Pl ea se note thatyour vehicle maynotbe
equipped withallfeatures described. Display
settings Setting
thebrightness
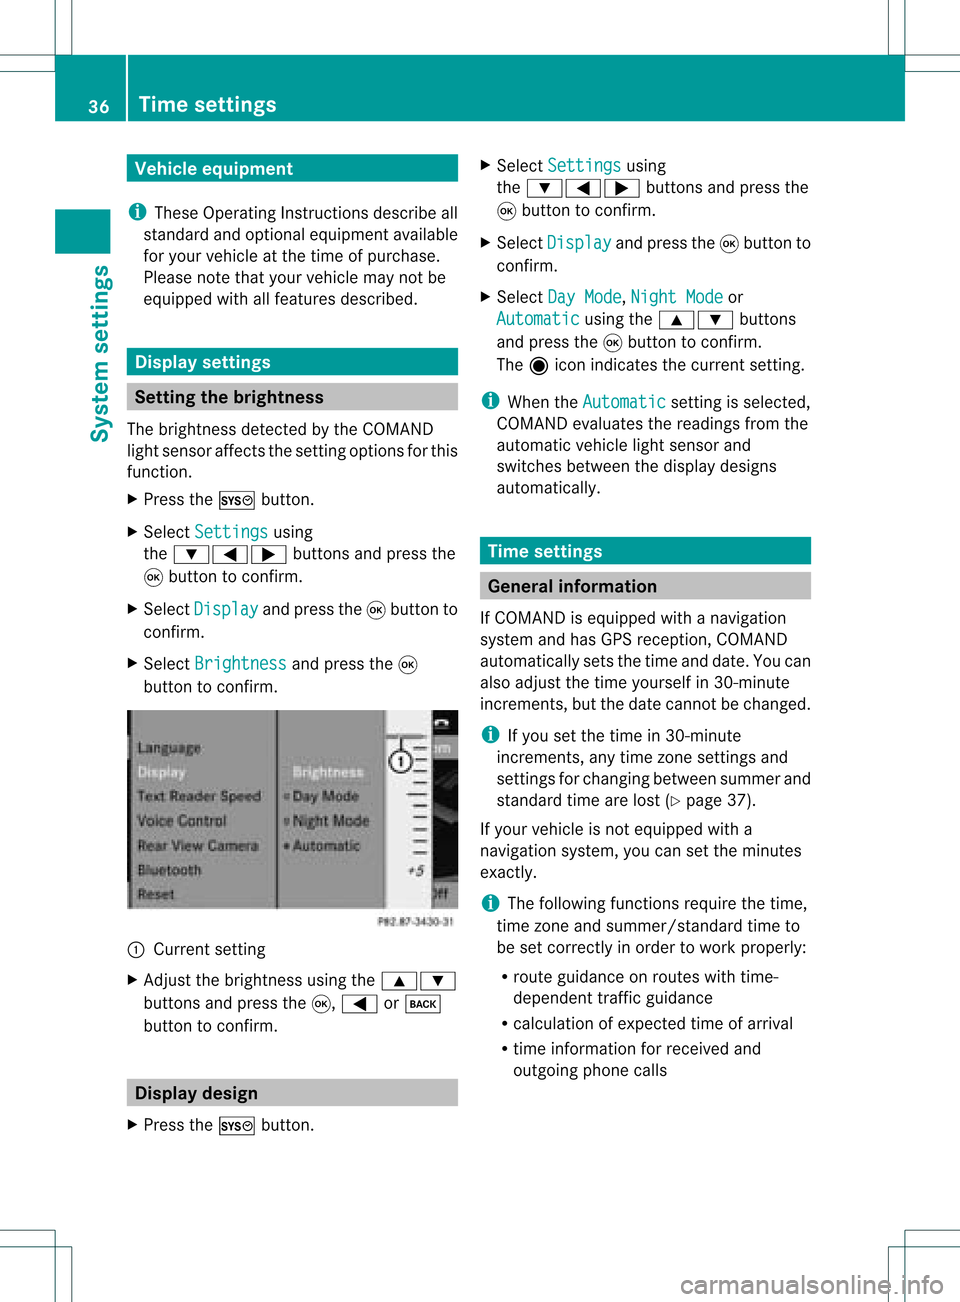
The brightn essdetect edbythe COMAND
light sensor affectsthe sett ingoptions forthis
funct ion.
X Press theW button .
X Select Settings using
the :=; buttonsand press the
9 button toconf irm.
X Select Display and
press the9button to
conf irm.
X Select Brightness and
press the9
button toconf irm. :
Current setting
X Adjust thebrightn essusing the9:
button sand press the9, = ork
button toconf irm. Display
design
X Press theW button . X
Select Settings using
the :=; buttonsand press the
9 button toconf irm.
X Select Display and
press the9button to
conf irm.
X Select DayMode ,
Night Mode or
Automatic using
the9: buttons
and press the9button toconf irm.
The äicon indicates thecurrent setting.
i When theAutomatic sett
ingisselected,
COMAND evaluatesthereadings fromthe
automatic vehiclelightsensor and
switches betweenthedisplay designs
automatically. Time
settings General
information
If COMAND isequipped withanavigation
system andhasGPS reception ,COMAND
automatically setsthetime anddate. Youcan
also adjust thetime yourself in30- minute
increm ents,but thedate cannotbe changed.
i Ifyou setthe time in30- minute
increm ents,any time zonesett ings and
sett ings forchanging betweensummerand
standard timearelost (Ypage 37).
If your vehicle isnot equipped witha
navigation system,youcan setthe minutes
exact ly.
i The following functionsrequire thetime,
time zoneand summer/st andardtimeto
be set correc tlyinorder towork properly:
R route guidance onroutes withtime-
dependent trafficguidance
R calculation ofexpect edtime ofarrival
R time informat ionforreceived and
outgoing phonecalls 36
Tim
esettingsSystem settings
Page 39 of 214
To
setthe time
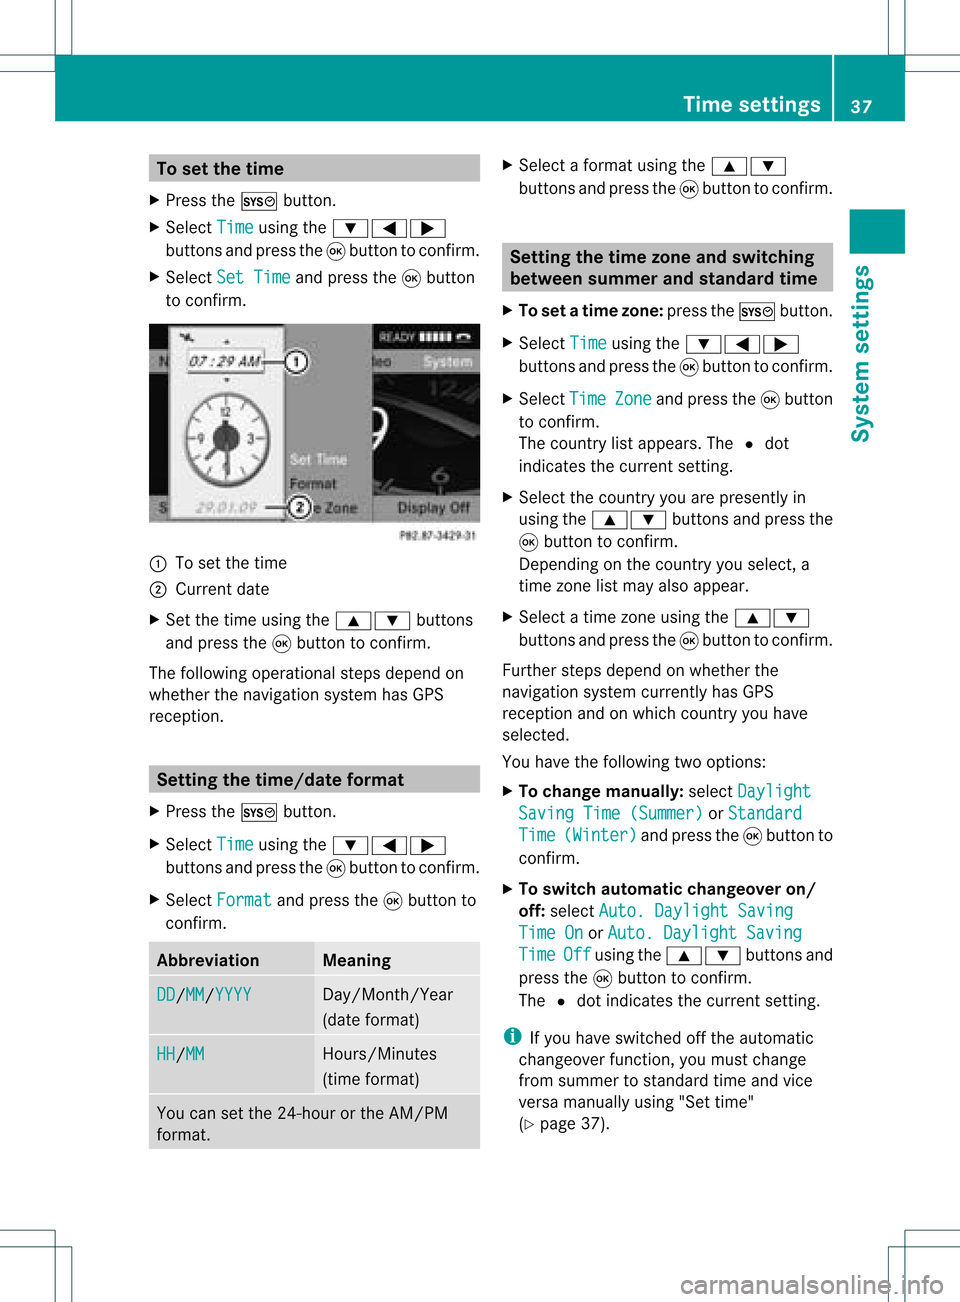
X Pre ssthe W button.
X Sel ect Time us
ing the :=;
bu ttons andpressthe 9button toconfi rm.
X Sel ect Set Time and
pressthe 9button
to confi rm. :
Tosetthe time
; Current date
X Set thetime using the9: buttons
and press the9button toconfirm .
The following operational stepsdepend on
whether thenavigation systemhasGPS
reception. Setting
thetime/dat eforma t
X Press theW button.
X Select Time using
the:=;
buttons andpress the9button toconfirm .
X Select Format and
press the9button to
confirm . Abbreviation Meaning
DD /MM /YYYY Day/Month/
Year
(date format) HH /MM Hours/Minutes
(time format) You
cansetthe 24-hour orthe AM/PM
format. X
Select aformat usingthe9:
buttons andpress the9button toconfirm . Setting
thetime zone andswitching
betwee nsumm erand standa rdtime
X To set atime zone: presstheW button.
X Selec tTime using
the:=;
butt onsand press the9butt ontocon firm .
X Selec tTime Zone and
press the9butt on
to con firm .
The coun try list appears. The#dot
indic ates thecurr entsetting.
X Selec tthe countr yyou arepresently in
using the9: buttonsandpress the
9 button toconfirm .
Depending onthe countr yyou select, a
time zonelist may alsoappear.
X Select atime zoneusing the9:
button sand press the9button toconf irm.
Further stepsdepend onwhether the
navigation systemcurrentlyhas GPS
reception andonwhich countryyou have
selected.
You have thefollowing twooptions:
X To change manually:select Daylight Saving
Time(Summer) or
Standard Time (Winter) and
press the9button to
conf irm.
X To switch automat icchangeover on/
off: select Auto. Daylight Saving Time
On or
Auto. Daylight Saving Time Off using
the9: buttonsand
press the9button toconf irm.
The #dot indicates thecurrent setting.
i Ifyou have switched offthe automatic
changeover function,youmust change
from summer tostandard timeandvice
versa manually using"Settime"
(Y page 37). Tim
esettings
37Systemsettings
Page 44 of 214
i
Ifyou want tore-authori zeadevice
follo wing de-au thorization (Ypage 42),
you can select adifferent passcode.
X To enter thepassco deinCOMA ND:
press thenumber keys,suchasl, one
after theother.
¬ ishighl ighted afterthefirst number
has been entered.
or
X Select thedigitsusing the=;
buttons andpress the9button toconfirm.
Then, select ¬.
X To con firm anentry inCOMA ND:press
the 9button.
X Ent erthe same passcod einto the
Bluetooth ®
device (seetheopera ting
instructions forthe respective device).
The device isauthori zed. External
authorization
If COMAND doesnotdetect your
Bluetooth ®
device, thismay bedue to
particul arsecurity settings onyou r
Bluetooth ®
device. Inthis case, check
whether yourBluetoo th®
devic ecan locat e
the COMA NDsyst em. TheBluet ooth®
devic e
name ofCOMA NDis"MB Bluet ooth".
X Selec tAuth orize in
the Bluet ooth®
devic e
list using the9: buttons.
X Selec tOpti ons using
the; buttonand
press the9butt ontocon firm .
X Selec tExte rnal Authorization and
press the9butt ontocon firm .
X Start the Bluet ooth®
scan processonthe
Bluet ooth®
devic e(see operat ing
inst ruct ions ofthe respe ctive devic e).
X Selec tCOMAND ("MBBluetooth").
X When prompted, enterthepasscode onthe
Bluetooth ®
device andthen onCOMAND. Displaying
thedetails ofa
Bluetooth ®
device
X Select thedesired deviceinthe
Bluetooth ®
device listusing the
9: buttons.
X Select Options using
the; button and
press the9button toconfirm.
X Select Details and
press the9button to
confirm.
The detailed displayfor this device
appea rs.
X To clos ethe detailed display:pressthe
= or; button. De-authorizing
(de-registering) a
Bluetooth ®
device
Mercedes-Benz recommendsthatyoude-
authorize devices,e.g.mobile phones, both
in COMAND andonthe respective
Bluetooth ®
device itself.Subseque nt
authorization mayotherwise fail.
X Select anauthorized deviceinthe
Bluetooth ®
device listusing the
9: buttons.
X Select Options using
the; button and
press the9button toconfirm.
X Select De-Authorize and
press the9
button toconfirm.
Ap rompt appears asking whethe ryou
really wishtorevoke authorization forthis
device.
X Select Yes or
No .
If you select Yes ,
the authorization forthe
device willberevoked.
If you select No ,
the process willbe
canceled.
i IfaBluetooth ®
device hasbeen de-
authorized andisno longer inrange, itwill
no longer beshown inthe Bluetooth ®
device listafter thenext search. 42
Bluetooth ®
settingsSystem settings
Page 60 of 214
The
inter mediate stopsarelisted accordin g
to increasin gdistanc efrom thecurren t
vehicle position.
i For inter mediate stopsthatarenot
located alongthecalculated route,the
linear distanc eis shown.
If COMAND doesnotfind anydestinat ions,
you willsee amessage tothis effect .
X Confirm OK by
pressing the9button .
X Select adifferent category.
X Select theinter mediate stopusing the
9: buttonsand press the9button
to conf irm.
The address entrymenu appears, showing
the destinat ionaddress.
X To star trout ecalculation: selectStart and
press the9button toconf irm.
Entering anotherdestinationasan
interm ediate stop X
To switch onnavigation mode:pressthe
Ø functionbutton .
X To show themenu: pressthe9button .
X Select Destinatio n in
the navigation
menu barusing the:=;
button sand press the9button toconf irm.
X Select Stopover and
press the9button
to conf irm.
X Select Other .
X Select Address Entry ,
From Memory ,
From LastDestinatio ns or
From POIs . Selection Step
Address
Entry X
En ter a
destinat ionby
address
(Y page 48). From
Memory X
Select a
destinat ionfrom
the destinat ion
memory
(Y page 54). From
Last Destinatio
ns X
Select a
destinat ionfrom
the listoflast
destinat ions
(Y page 55). From
POIs X
En ter aspecial
destinat ion
(Y page 60). X
To star trout ecalc ulatio n:once youhave
entered adesti nation, select Start and
press the9button toconfirm.
De leting aninte rmediate stop If
an intermed iate stop hasalread ybee n
entered ,you can delete it.
X To swi tch onnavig ation mode: pressthe
Ø function button.
X To show themenu: pressthe9button.
X Sele ctDestin ation in
the navig ation
menu barusing the =;:
buttons andpress the9button toconfirm.
X Sele ctStopov er and
press the9button
to confirm.
X Sele ctDelete Stopover and
press the
9 button toconfirm.
COM AND deletes theintermed iate stop
and recal culatesthe route tothe main
desti nation. 58
De
stinati onentryNavigatio nsyste m
Page 79 of 214
COMA
NDread sout therep ortsin seque nce.
i The MessagesOnRoute men
uitem has
no fun ction ifth ere arenorep ortsrelat ing
to therout e.
X To swit choff therea d-alou dfu nct ion:
use the9:= ;buttons to
sele ctCan cel Rea
d-Aloud Fun
ction and
pre ssthe9 buttonto confirm .
COMA NDread sth ecur ren treport aloud
and then exitsthe read-aloud function.
X To cancel theread -aloud function for
the curr entrepor t:press thex button .
COMAND cancelsthe read-aloud function
for the curren treport .Subsequent reports
will still beread out. Destination
memory Home
address (Myaddress)
Entering thehome address viaadd ress
entry X
En ter the home address asadestin ation,
e.g. asacity, street and house number
(Y page 48).Then, savethehome address
without startingroute guidance
(Y page 52).
Adopt inganadd ress book entry asa
home address X
To switch onnavigat ionmode: pressthe
Ø function button .
X To show themenu: pressthe9button .
X Select Destina tion in
the navigation
menu barusing the:=;
button sand press the9button tocon firm.
X Select FromMemory and
press the9
button tocon firm.
You willsee thedestin ationmemory list
either withthecharact erbar (option 1)or
as aselect ionlist(option 2).
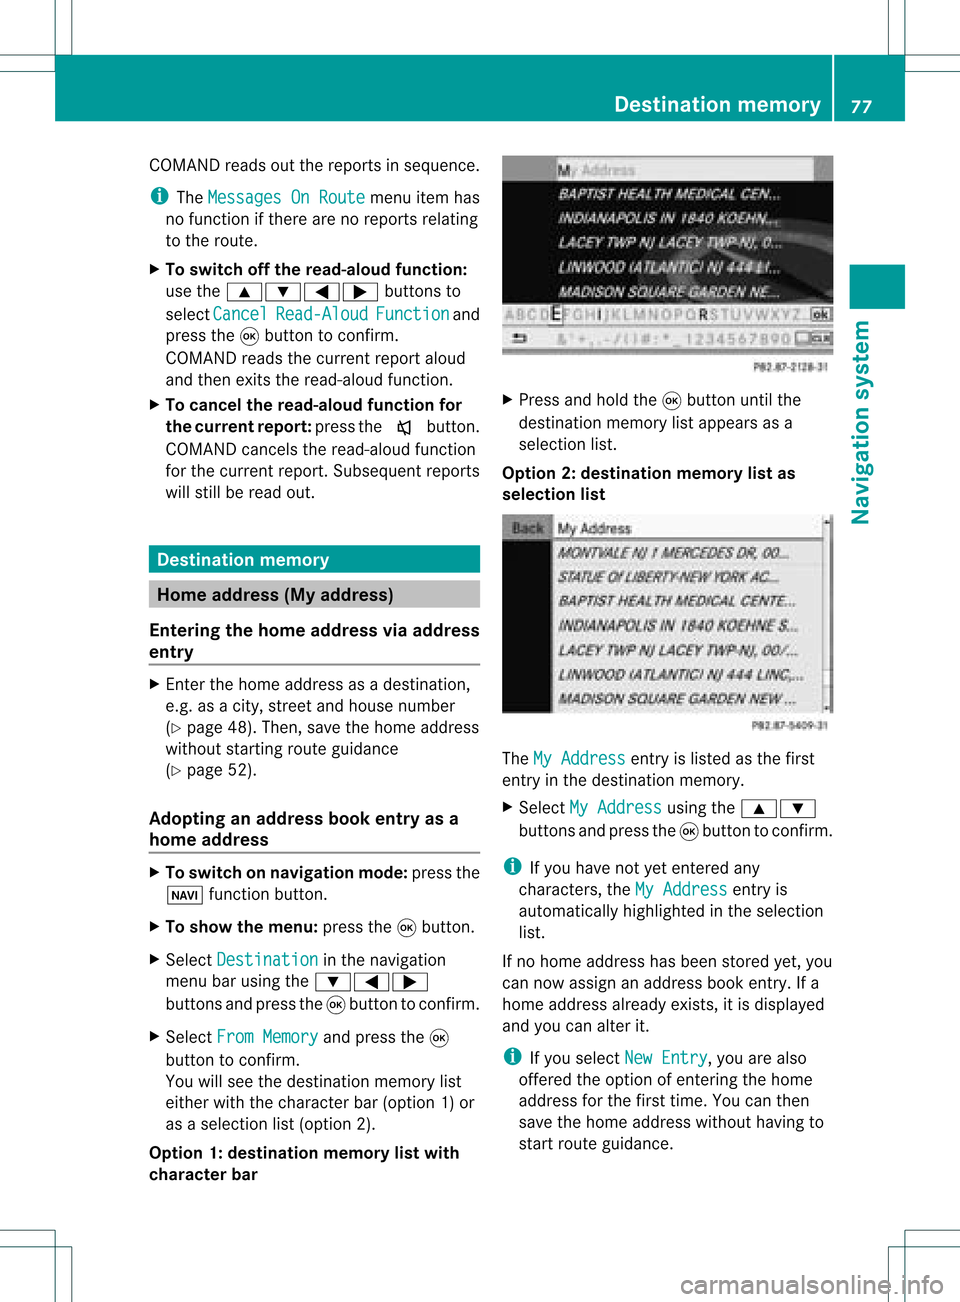
Opt ion 1:destina tionmem orylistwith
char acter bar X
Press andhold the9button untilthe
destin ationmemory listappears asa
select ionlist.
Opt ion 2:destina tionmem orylistas
selection list The
MyAddress ent
ryislisted asthe first
ent ryinthe destin ationmemory.
X Select MyAddress using
the9:
button sand press the9button tocon firm.
i Ifyou have notyetentered any
charact ers,theMyAddress ent
ryis
automatic allyhighlighted inthe select ion
list.
If no home address hasbeen storedyet, you
can now assign anaddress bookentry.Ifa
home address alreadyexists,itis displayed
and youcan alter it.
i Ifyou select NewEntry ,
you arealso
offer edthe option ofent ering thehome
address forthe first time. Youcanthen
save thehome address withouthavingto
start route guidance. Destination
memory
77Navigation system Z
Page 82 of 214
X
Sel ect Destination in
the navi gation
menu baru sing the:=;
buttons andpress the9button toconfirm.
X Select FromMemory and
press the9
button toconfirm.
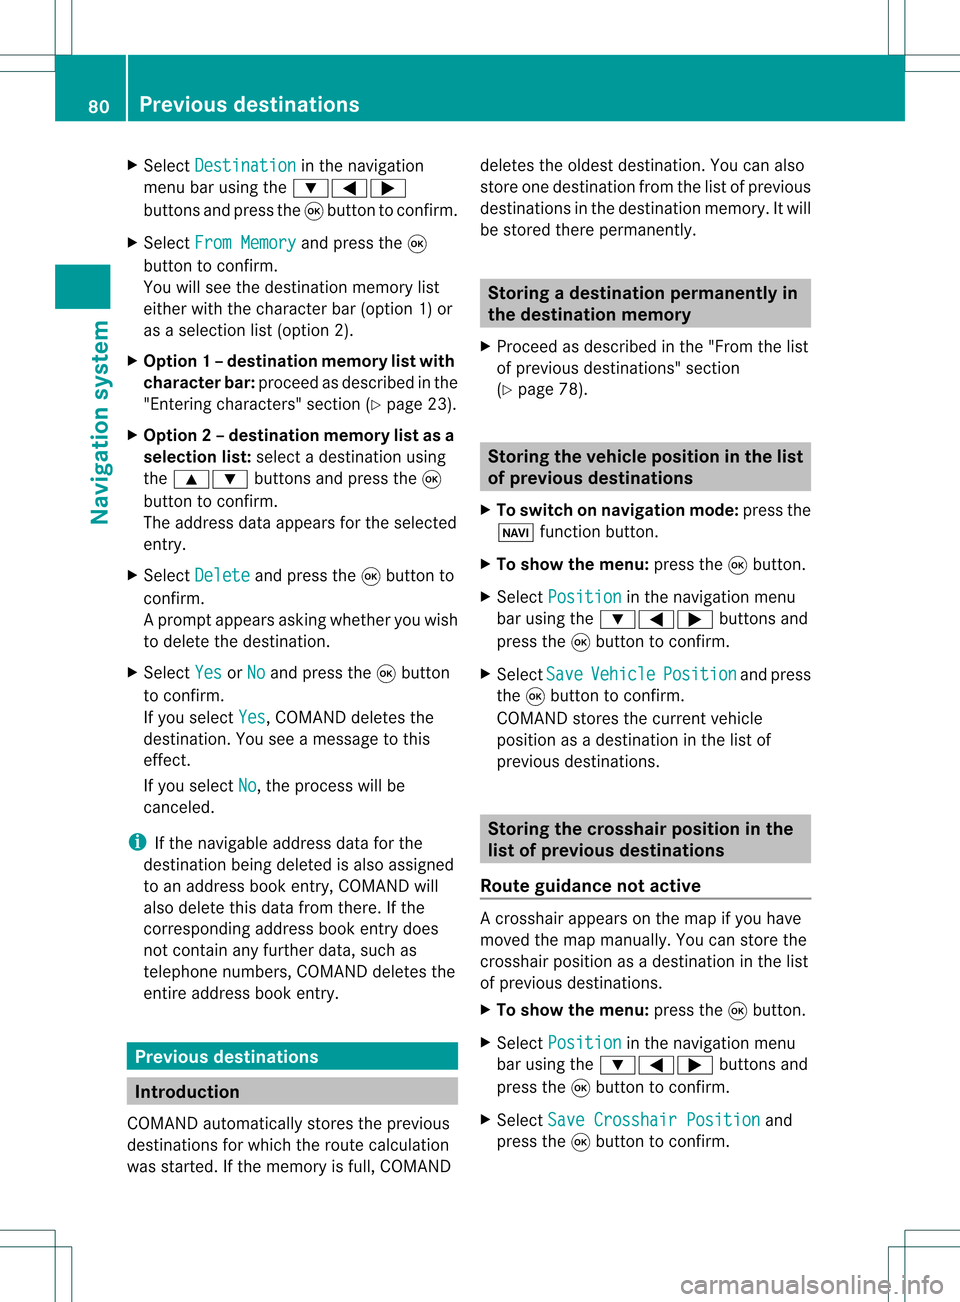
You willsee thedestination memorylist
either withthecharacter bar(option 1)or
as aselection list(option 2).
X Option 1–d esti nation mem orylistwith
char acterbar :proc eedasdesc ribed inthe
"En tering char acters" section(Y page 23).
X Opt ion2–d esti nation mem orylistasa
selecti onlist :selec tadestination using
the 9: buttons and press the9
butt ontocon firm.
The address dataappears forthe select ed
ent ry.
X Select Delete and
press the9butt onto
con firm.
Ap rompt appears asking whethe ryou wish
to delete thedestination .
X Select Yes or
No and
press the9button
to conf irm.
If you select Yes ,
COMAND deletesthe
destination .You see amessage tothis
effect .
If you select No ,
the process willbe
canceled.
i Ifthe navigable addressdataforthe
destinat ionbeing deleted isalso assigned
to an address bookentry,COMAND will
also delete thisdata from there. Ifthe
correspon dingaddress bookentrydoes
not cont ainany further data,suchas
telephone numbers,COMAND deletesthe
entir eaddress bookentry. Previous
destinations Introdu
ction
COMAND automatically storestheprevious
destinat ionsforwhich theroute calculation
was start ed.Ifthe memory isfull, COMAND deletes
theoldest destination .You can also
store onedestination fromthelistofprevious
destination sin the destination memory.Itwill
be stored therepermanent ly. Storing
adesti nation permanent lyin
th edest inationmem ory
X Proc eedasdesc ribed inthe"Fr om thelist
of prev ious destinations"sec tion
(Y page 78). St
orin gth evehicle positioninthelist
of previous destinations
X To switch onnav igat ionmod e:pres sth e
Ø function butt on.
X To show themen u:pres sth e9 butt on.
X Sele ctPos ition in
thenav igat ionmen u
bar usin gth e:=; buttonsand
pres sth e9 butt ontocon firm.
X Sele ctSav e Veh
icle Pos
ition and
pres s
th e9 butt ontocon firm.
COMA NDstores thecur ren tveh icle
posit ionasadest inationinthelist of
prev ious destinations. St
orin gth ecross hairposit ioninthe
list ofprevious destinations
Rou teguid ance notactive Ac
rossha irapp ears onthe map ifyou have
moved themap manua lly.Y ou can store the
crosshair positionasadestination inthe list
of previous destination s.
X To show themenu: pressthe9button .
X Select Position in
the navigation menu
bar using the:=; buttonsand
press the9button toconf irm.
X Select SaveCrosshair Position and
press the9button toconf irm. 80
Previous
destinationsNavigation system