phone MERCEDES-BENZ S CLASS 2010 Owner's Manual
[x] Cancel search | Manufacturer: MERCEDES-BENZ, Model Year: 2010, Model line: S CLASS, Model: MERCEDES-BENZ S CLASS 2010Pages: 548, PDF Size: 11.45 MB
Page 87 of 548
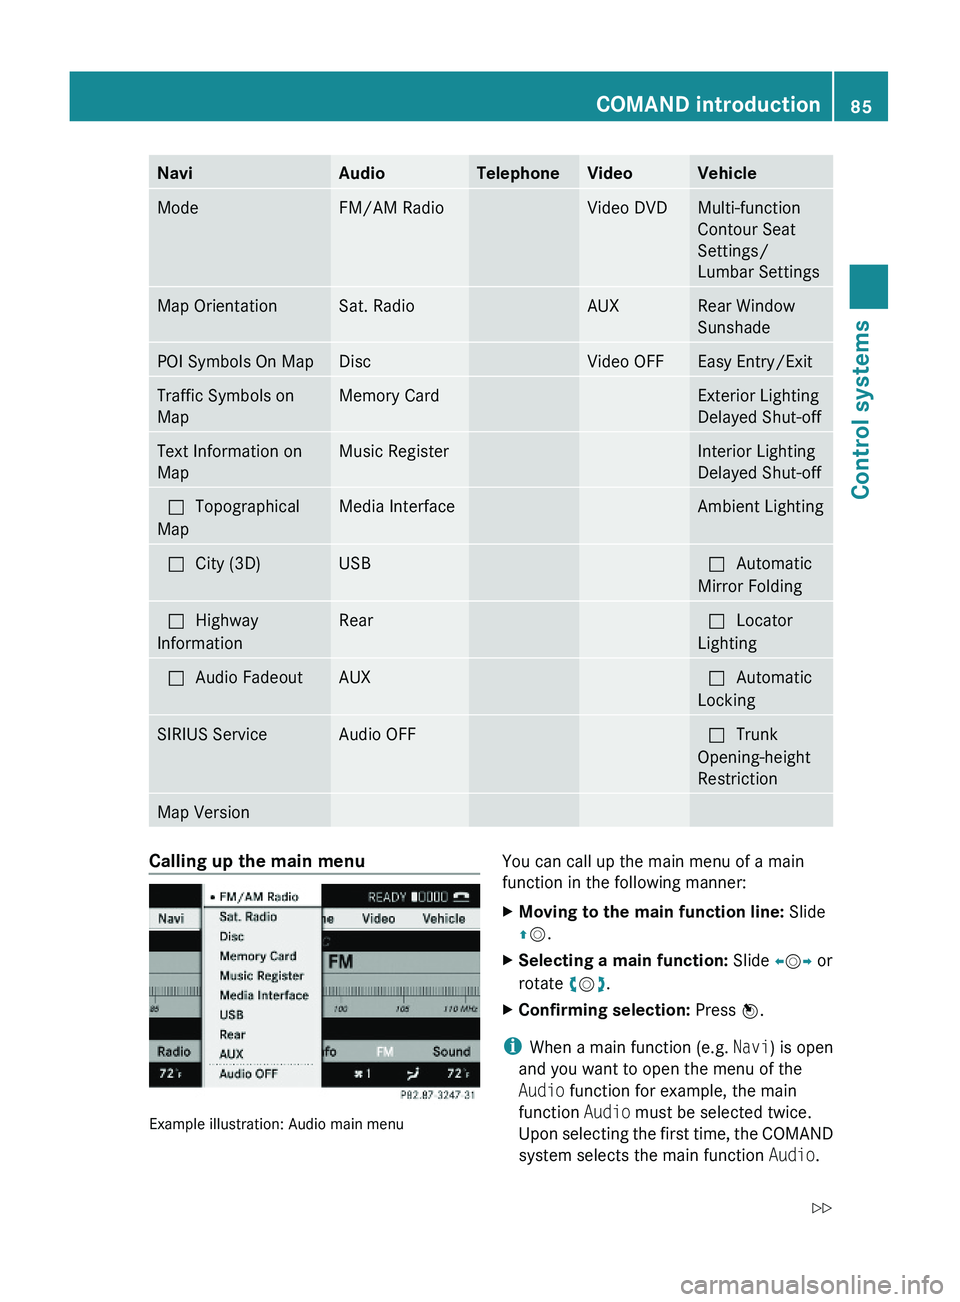
NaviAudioTelephoneVideoVehicleModeFM/AM RadioVideo DVDMulti-function
Contour Seat
Settings/
Lumbar Settings
Map OrientationSat. RadioAUXRear Window
Sunshade
POI Symbols On MapDiscVideo OFFEasy Entry/ExitTraffic Symbols on
Map
Memory CardExterior Lighting
Delayed Shut-off
Text Information on
Map
Music RegisterInterior Lighting
Delayed Shut-off
\000?Topographical
Map
Media InterfaceAmbient Lighting\000?City (3D)USB\000?Automatic
Mirror Folding
\000?Highway
Information
Rear\000?Locator
Lighting
\000?Audio FadeoutAUX\000?Automatic
Locking
SIRIUS ServiceAudio OFF\000?Trunk
Opening-height
Restriction
Map VersionCalling up the main menu
Example illustration: Audio main menu
You can call up the main menu of a main
function in the following manner:
XMoving to the main function line: Slide
\000
Page 90 of 548
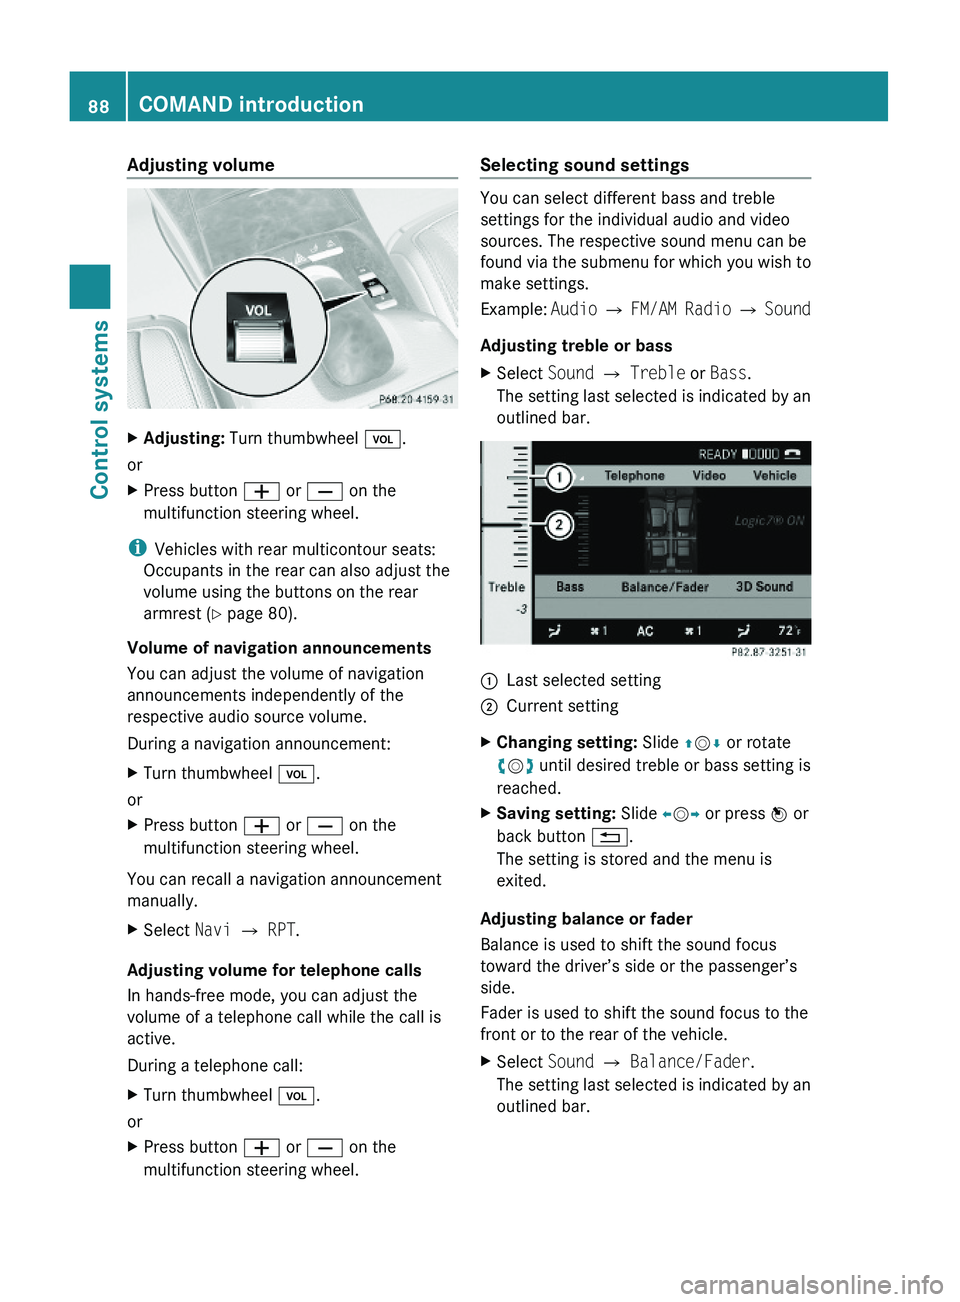
Adjusting volumeXAdjusting: Turn thumbwheel \000M.
or
XPress button \000Z or \000[ on the
multifunction steering wheel.
iVehicles with rear multicontour seats:
Occupants in the rear can also adjust the
volume using the buttons on the rear
armrest (Y page 80).
Volume of navigation announcements
You can adjust the volume of navigation
announcements independently of the
respective audio source volume.
During a navigation announcement:
XTurn thumbwheel \000M.
or
XPress button \000Z or \000[ on the
multifunction steering wheel.
You can recall a navigation announcement
manually.
XSelect Navi \000T RPT.
Adjusting volume for telephone calls
In hands-free mode, you can adjust the
volume of a telephone call while the call is
active.
During a telephone call:
XTurn thumbwheel \000M.
or
XPress button \000Z or \000[ on the
multifunction steering wheel.
Selecting sound settings
You can select different bass and treble
settings for the individual audio and video
sources. The respective sound menu can be
found via the submenu for which you wish to
make settings.
Example: Audio \000T FM/AM Radio \000T Sound
Adjusting treble or bass
XSelect Sound \000T Treble or Bass.
The setting last selected is indicated by an
outlined bar.
\000FLast selected setting\000GCurrent settingXChanging setting: Slide \000
Page 92 of 548
R3-D sound does not work for mono-signal
sources, such as on analog AM radio or
in Weather Band.
R In the event of poor radio reception
quality, e.g. inside a tunnel, you should
switch off Logic 7 ®
, as a dynamic switch
from Stereo to Mono could occur,
resulting in temporary sound distortion.
R With some stereo recordings, the
resulting sound may deviate from
conventional stereo playback.
Switching the audio/video source off/
on
i When you load a CD or DVD, the audio or
video source is activated automatically.
Active audio source
XSwitching off: Select Audio 0054 Audio
OFF .
Playback is paused and the audio source is
switched off; Audio OFF appears in the
COMAND display.XSwitching on: Select Audio, then the
desired audio source.
or
XLoad a CD/DVD ( Y page 179) or an SD
card ( Y page 180).
or
XConnect a USB storage device
( Y page 80) or media interface device
( Y page 200) to COMAND.
Active video source
XSwitching off: Select Video 0054 Video
OFF .
The audio source is switched off; Video
OFF appears in the COMAND display.XSwitching on: Select Video, then the
desired video source.
or
XLoad a DVD ( Y page 179).SPLITVIEW
SPLITVIEW enables the driver and front
passenger to use separate COMAND
functions at the same time. Two different
displays appear in the COMAND screen. For
example, a Navigation display is only viewable
form the driver’s seat while a DVD Video
display is only viewable from the front
passenger’s seat.
COMAND is operated via SPLITVIEW from the
front passenger seat using the SPLITVIEW
remote control and the special wireless,
infrared headphone. You may also use a wired
headphone via the 3.5 mm socket in the front
passenger footwell.
For information about using the remote
control, see ( Y page 81).
For information about using the headphone,
see ( Y page 82).
Depending on the production date of your
vehicle, it may be equipped with SPLITVIEW.
At the time of this printing, the use of
SPLITVIEW is NOT allowed in the following US
states (AL, AZ, CO, IL, LA, MA, MD, NH, PA,
VA, VT, WA, WI, and WV) or Canadian
provinces (Manitoba, Newfoundland, New
Brunswick, and Prince Edward Island).
SPLITVIEW must NOT be operated in these
states or provinces. The driver is responsible
for observing ALL local statutory provisions.
If your vehicle is registered in a non-approved
state or province, then the feature will need
to be deactivated. Contact your authorized
Mercedes-Benz dealer to verify if SPLITVIEW
is allowed in your state or province.
Notes
R The audio volume of the wireless
headphone for the front passenger side
must be adjusted on the headphone
directly. The audio volume of a wired
headphone can be adjusted via the remote
90COMAND introductionControl systems
221_AKB; 6; 20, en-USd2ugruen,Version: 2.11.8.12009-09-24T13:28:17+02:00 - Seite 90
Page 93 of 548
control. Make sure the volume is not set
too high before putting on a headphone.
RThe DVD changer can playback only one
media source at a time. Example: if the
driver is playing an audio CD, the front
passenger can not play a different medium
(e.g. DVD video) from the DVD changer.
However, it is possible for the front
passenger to play media from radio,
memory card, MUSIC REGISTER, media
interface, USB, AUX or Rear Seat
Entertainment System.
RWhen driver and front passenger are using
the same medium, each can select
individual settings for that medium.
RCOMAND transmits music and voice to the
wireless headphone for the front passenger
side via infrared signal. The headphone and
the display must have visual contact. This
provides best possible transmission of the
infrared signal to the headphone. Please
note that the headphone has a left and right
side and must be used accordingly.
RWhen SPLITVIEW is on, the front passenger
can operate audio or video functions only.
RThe multifunction steering wheel lets you
operate functions for the driver’s side only.
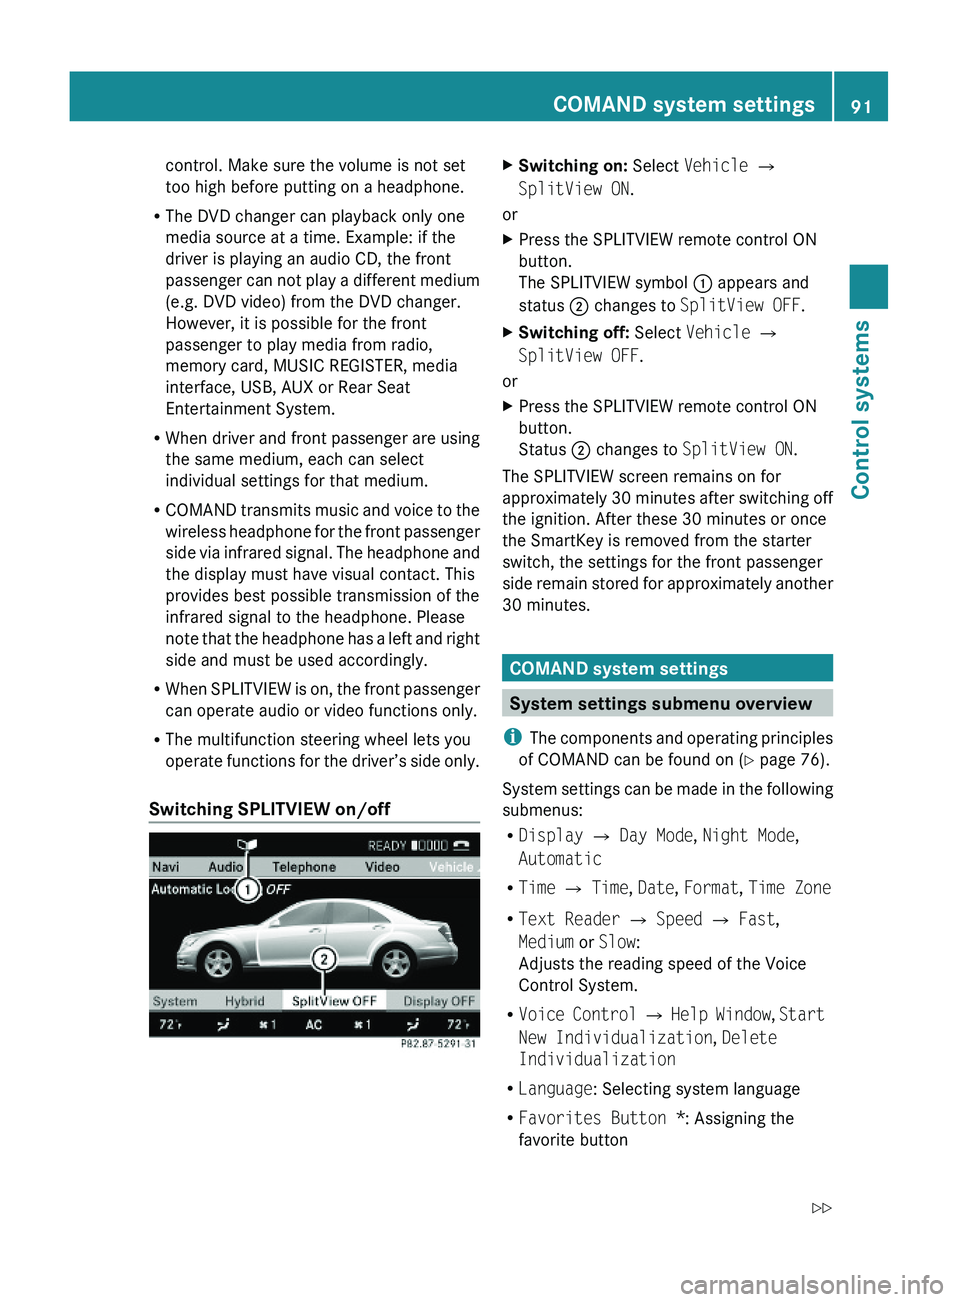
Switching SPLITVIEW on/off
XSwitching on: Select Vehicle \000T
SplitView ON.
or
XPress the SPLITVIEW remote control ON
button.
The SPLITVIEW symbol \000F appears and
status \000G changes to SplitView OFF.
XSwitching off: Select Vehicle \000T
SplitView OFF.
or
XPress the SPLITVIEW remote control ON
button.
Status \000G changes to SplitView ON.
The SPLITVIEW screen remains on for
approximately 30 minutes after switching off
the ignition. After these 30 minutes or once
the SmartKey is removed from the starter
switch, the settings for the front passenger
side remain stored for approximately another
30 minutes.
COMAND system settings
System settings submenu overview
iThe components and operating principles
of COMAND can be found on (Y page 76).
System settings can be made in the following
submenus:
RDisplay \000T Day Mode, Night Mode,
Automatic
RTime \000T Time, Date, Format, Time Zone
RText Reader \000T Speed \000T Fast,
Medium or Slow:
Adjusts the reading speed of the Voice
Control System.
RVoice Control \000T Help Window, Start
New Individualization, Delete
Individualization
RLanguage: Selecting system language
RFavorites Button *: Assigning the
favorite button
COMAND system settings 91Control systems221_AKB; 6; 20, en-USd2ugruen,Version: 2.11.8.12009-09-24T13:28:17+02:00 - Seite 91Z
Page 126 of 548
XSelect Navi \000T Destination \000T
Stopover \000T Change Stopover.
XEnter another destination as a stopover.
Deleting the stopover
If a stopover has already been entered, you
can delete it.
XSelect Navi \000T Destination \000T
Stopover \000T Delete Stopover.
COMAND deletes the stopover and
calculates the route to the main
destination.
Displaying stopovers on the map
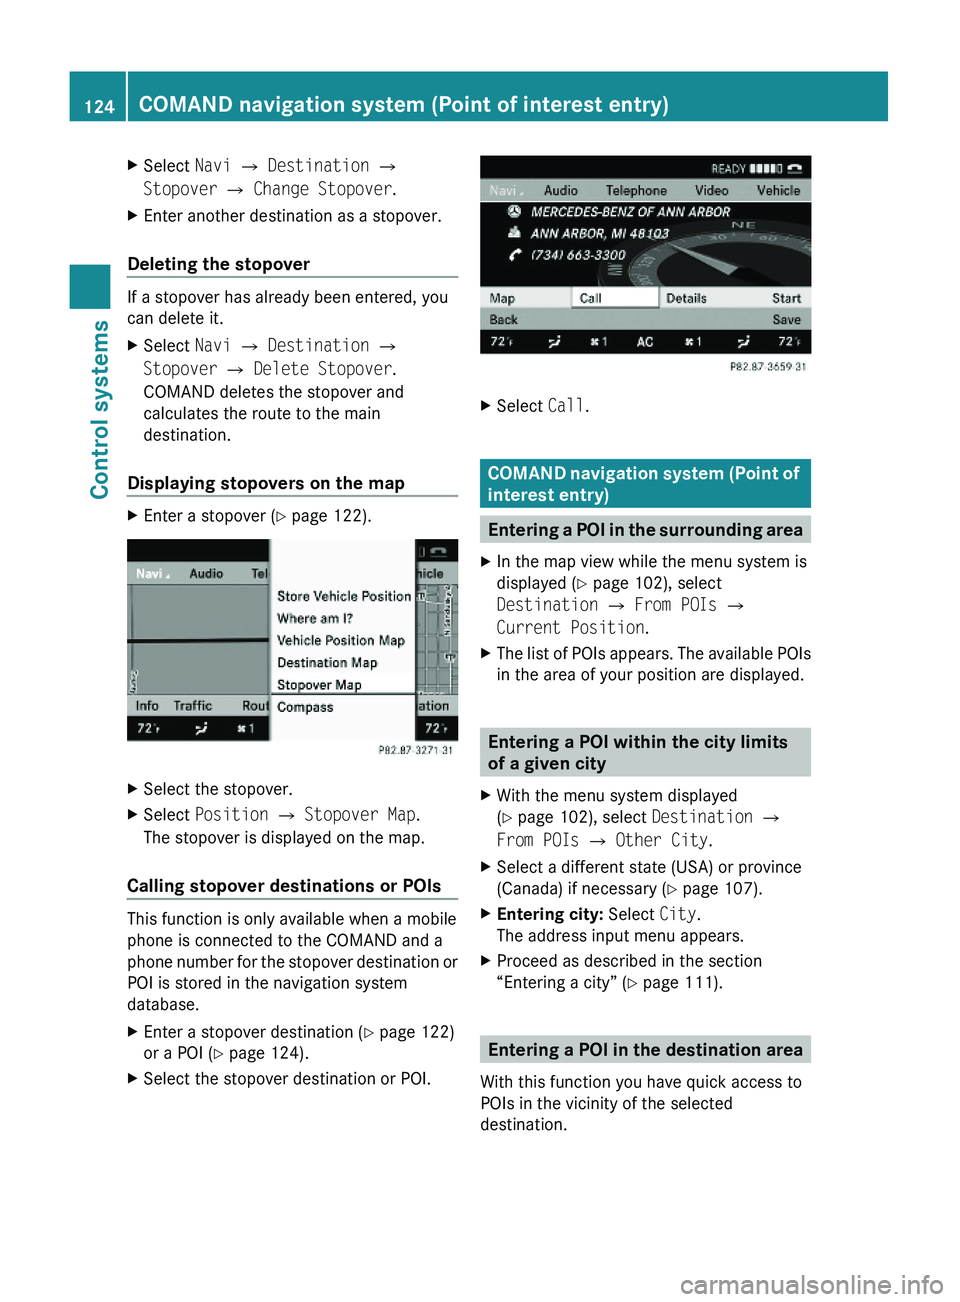
XEnter a stopover (Y page 122).XSelect the stopover.XSelect Position \000T Stopover Map.
The stopover is displayed on the map.
Calling stopover destinations or POIs
This function is only available when a mobile
phone is connected to the COMAND and a
phone number for the stopover destination or
POI is stored in the navigation system
database.
XEnter a stopover destination (Y page 122)
or a POI (Y page 124).
XSelect the stopover destination or POI.XSelect Call.
COMAND navigation system (Point of
interest entry)
Entering a POI in the surrounding area
XIn the map view while the menu system is
displayed (Y page 102), select
Destination \000T From POIs \000T
Current Position.
XThe list of POIs appears. The available POIs
in the area of your position are displayed.
Entering a POI within the city limits
of a given city
XWith the menu system displayed
(Y page 102), select Destination \000T
From POIs \000T Other City.
XSelect a different state (USA) or province
(Canada) if necessary (Y page 107).
XEntering city: Select City.
The address input menu appears.
XProceed as described in the section
“Entering a city” (Y page 111).
Entering a POI in the destination area
With this function you have quick access to
POIs in the vicinity of the selected
destination.
124COMAND navigation system (Point of interest entry)Control systems
221_AKB; 6; 20, en-USd2ugruen,Version: 2.11.8.12009-09-24T13:28:17+02:00 - Seite 124
Page 127 of 548
XWith the menu system displayed
( Y page 102), select Destination 0054
From POIs 0054 Destination area .
The list of POIs appears. The available POIs
in the vicinity of destination are displayed.
Entering a POI by name
With this function you can enter or select POIs
by the name of the POI.
XWith the menu system displayed
( Y page 102), select Destination 0054
From POIs 0054 By Name 0054 All POIs .
When selecting All POIs all POIs in the
navigation database are displayed sorted
by name.
You can also search for POIs in the vicinity of
your current position or a particular city.
XWith the menu system displayed
( Y page 102), select Destination 0054
From POIs 0054 By Name 0054 Current
Position or Other City .
Entering a POI by telephone number
With this function you can enter or select POIs
by the telephone number of the POI.
XWith the menu system displayed
( Y page 102), select Destination 0054
From POIs 0054 By Telephone Number .
The telephone numbers of all POIs that are
stored in the navigation database are
displayed.
Choosing a POI category and
selecting a POI
The available categories or POIs depend on
the selected search method.
R POI in the surrounding area:
categories sorted alphabetically and POIs
sorted by distance around the vehicle
position are available.
R POI within the city limits of a given city:
If you have only entered the state (USA) or
province (Canada) and the city,
alphabetically sorted categories and
alphabetically sorted POIs within the city
are available.
If you have entered more than the state
(USA) or province (Canada) and the city,
alphabetically sorted categories and POIs
sorted by distance around the address
entered are available.
R POI in the destination area:
categories sorted alphabetically and POIs
sorted by distance around the destination
area are available.
R POIs via name search:
Alphabetically sorted POIs are available.
R POIs via phone number:
Numerically sorted POIs are available.
Some search methods display a list of
available main categories. After selecting a
main category and, if available, a subcategory
a list of POIs appears.
i The main categories can have up to three
subcategories.
Other search methods provide a list of POIs
immediately.COMAND navigation system (Point of interest entry)125Control systems221_AKB; 6; 20, en-USd2ugruen,Version: 2.11.8.12009-09-24T13:28:17+02:00 - Seite 125Z
Page 137 of 548
The Off Road message and an arrow showing
the compass heading to the destination
appear on the display.
As soon as the system can allocate the
vehicle position to the map again, route
guidance continues in the usual way.
Navigation announcements
GWarning!
Navigation announcements are intended to
direct you while driving without diverting your
attention from the road and driving.
Please always use navigation announcements
instead of consulting the map display for
directions. Consulting the symbols or map
display for directions may cause you to divert
your attention from driving and increase your
risk of an accident.
i If Chinese is set as the system language,
the navigation announcements are in
English. For information on how to set the
system language see ( Y page 94).
Navigation announcements are muted
during telephone calls. You can, however,
call up a current announcement at any
time. You can also call up a current
announcement at any time if you have
missed an announcement.
Route guidance is active already.
XCalling up a current announcement:
Select Navi 0054 RPT .
or
XPress favorite button 0087 if the button has
been programmed with this function
( Y page 94).XSwitching off navigation messages:
Press button 006C during an
announcement.
You will see the message The driving
instructions have been muted. for a
short while.
i The announcements remain switched off
even if you start a new route guidance or if
COMAND is switched off/on with button
0094 .
If you switch COMAND off by removing the
SmartKey from the starter switch and then
switch the ignition back on after more than
3 minutes, the announcements are
automatically switched back on.
XSwitching navigation announcements
back on manually: Select Navi 0054 RPT .XAdjusting volume of the messages:
Adjust the volume during an automatic
announcement ( Y page 87).
or
XCall up an announcement manually using
Navi 0054 RPT and adjust the volume
( Y page 87).
i
You can use the function Audio
Fadeout (Y page 106) to reduce the
volume of audio sources during navigation
announcements.
COMAND navigation system (during
route guidance)
Cancel route guidance
XSelect Destination 0054 Cancel Route
Guidance in map view with the menu
system displayed ( Y page 102).
Continuing canceled route guidance
XSelect Destination 0054 Continue
Route Guidance in map view with the
menu system displayed ( Y page 102).
COMAND calculates the route.COMAND navigation system (during route guidance)135Control systems221_AKB; 6; 20, en-USd2ugruen,Version: 2.11.8.12009-09-24T13:28:17+02:00 - Seite 135Z
Page 149 of 548
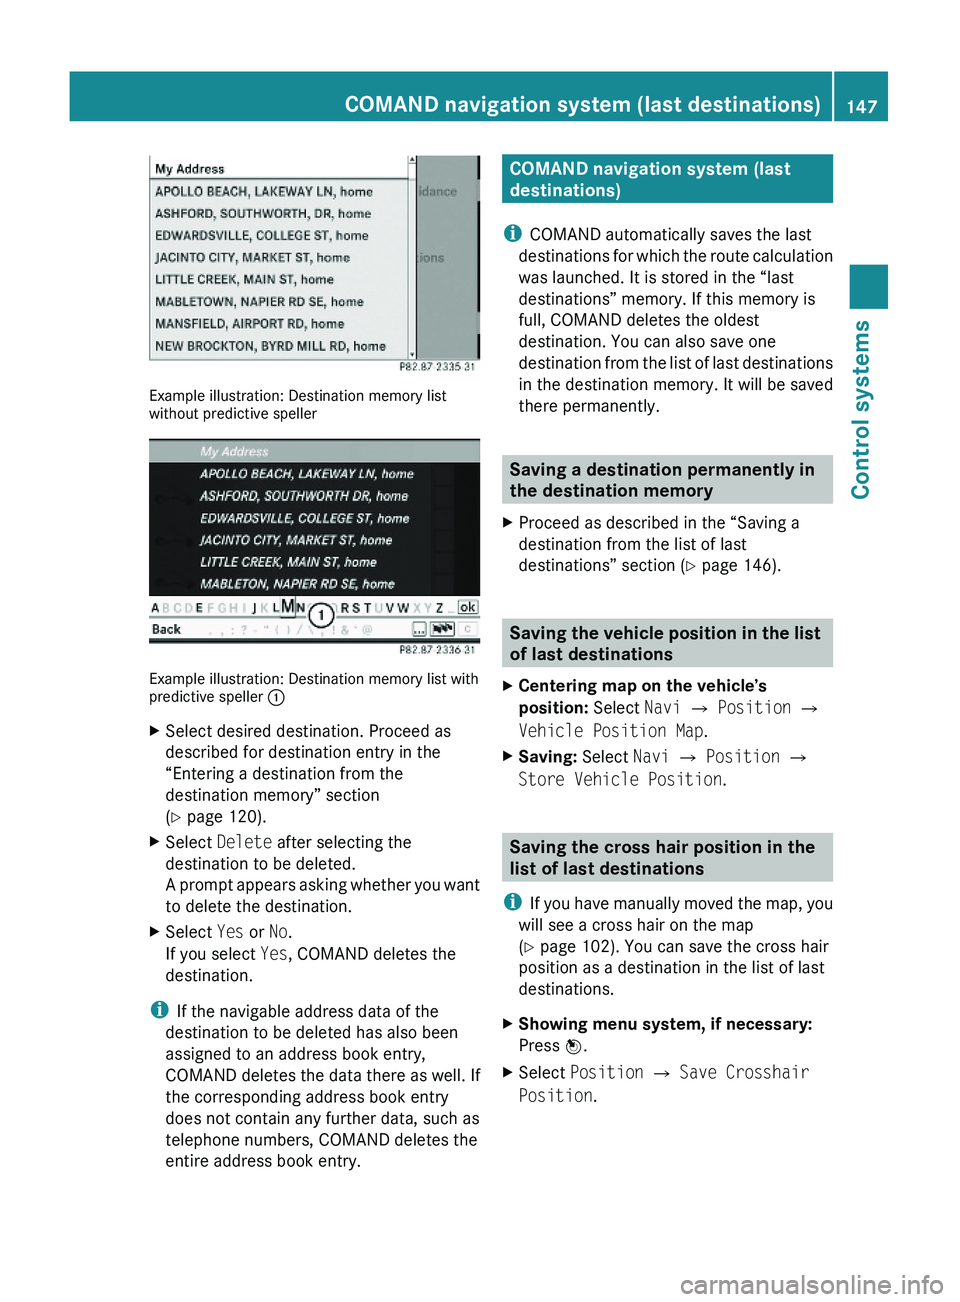
Example illustration: Destination memory listwithout predictive speller
Example illustration: Destination memory list withpredictive speller \000F
XSelect desired destination. Proceed as
described for destination entry in the
“Entering a destination from the
destination memory” section
(Y page 120).
XSelect Delete after selecting the
destination to be deleted.
A prompt appears asking whether you want
to delete the destination.
XSelect Yes or No.
If you select Yes, COMAND deletes the
destination.
iIf the navigable address data of the
destination to be deleted has also been
assigned to an address book entry,
COMAND deletes the data there as well. If
the corresponding address book entry
does not contain any further data, such as
telephone numbers, COMAND deletes the
entire address book entry.
COMAND navigation system (last
destinations)
iCOMAND automatically saves the last
destinations for which the route calculation
was launched. It is stored in the “last
destinations” memory. If this memory is
full, COMAND deletes the oldest
destination. You can also save one
destination from the list of last destinations
in the destination memory. It will be saved
there permanently.
Saving a destination permanently in
the destination memory
XProceed as described in the “Saving a
destination from the list of last
destinations” section (Y page 146).
Saving the vehicle position in the list
of last destinations
XCentering map on the vehicle’s
position: Select Navi \000T Position \000T
Vehicle Position Map.
XSaving: Select Navi \000T Position \000T
Store Vehicle Position.
Saving the cross hair position in the
list of last destinations
iIf you have manually moved the map, you
will see a cross hair on the map
(Y page 102). You can save the cross hair
position as a destination in the list of last
destinations.
XShowing menu system, if necessary:
Press \000
Page 150 of 548
Deleting one of the last destinationsXSelect Navi 0054 Destination 0054 From
Last Destinations .
The list of last destinations appears.XSelect desired destination.
The address of the destination appears.XSelect Delete .XSelect Yes or No.
COMAND telephone
Safety notes
GWarning!
Some jurisdictions prohibit the driver from
using a cellular telephone while driving.
Whether or not prohibited by law, for safety
reasons, the driver should not use the cellular
telephone while the vehicle is in motion. Stop
the vehicle in a safe location before placing or
answering a call.
If you nonetheless choose to use the mobile
phone 9
while driving, please use the
handsfree feature and be sure to pay
attention to the traffic situation at all times.
Use the mobile phone only when road,
weather and traffic conditions permit.
Otherwise, you may not be able to observe
traffic conditions and could endanger yourself
and others.
Bear in mind that at a speed of just 30 mph
(approximately 50 km/h), your vehicle is
covering a distance of 44 feet (approximately
14 m) every second.
General notes
i USA only:
This device complies with Part 15 of the
FCC Rules. Operation is subject to the
following two conditions:
1. This device may not cause harmful interference, and
2. this device must accept any interference received, including
interference that may cause undesired
operation.
Any unauthorized modification to this
device could void the user’s authority to
operate the equipment.
i Canada only:
This device complies with RSS-210 of
Industry Canada. Operation is subject to
the following two conditions:
1. This device may not cause interference,
and
2. this device must accept any interference received, including
interference that may cause undesired
operation of the device.
Any unauthorized modification to this
device could void the user’s authority to
operate the equipment.9 Observe all legal requirements148COMAND telephoneControl systems
221_AKB; 6; 20, en-USd2ugruen,Version: 2.11.8.12009-09-24T13:28:17+02:00 - Seite 148
Page 151 of 548
Using the Bluetooth®
interface
COMAND provides telephony via the
Bluetooth ®
interface by connecting a
Bluetooth ®
-compatible mobile phone. The
following functions can be used when a
suitable mobile phone is connected to the
Bluetooth ®
interface:
R Hands-free phone operation
R Phone book
R Reception of electronic business cards
(vCards 10
)
i For further information on suitable mobile
phones and connecting Bluetooth ®
-
enabled mobile phones to COMAND
R visit www.mbusa-mobile.com
R call the Mercedes-Benz Customer
Assistance Center at
1-800-FOR-MERCedes
(1-800-367-6372) (in the USA)
R call Customer Service at
1-800-387-0100 (in Canada)
Calls disconnected while the vehicle is
in motion
A call may be disconnected if
R there is insufficient network coverage
R you move from one transmitter/receiver
area (cell) into another and no channels are
free or the cell is full
Operating options
i The components and operating principles
of COMAND can be found on ( Y page 76).
You can operate the mobile phone using the
following:
R the keys on the mobile phone
R the COMAND telephone keypad in the
center console
R the COMAND controller
R the multifunction steering wheel
R the Voice Control System ( Y page 237)
Unless otherwise specified, the descriptions
and illustrations in this section apply to
COMAND or the telephone keypad in the
center console. Thus, in order to use the
described functions you always have to call
up the Telephone menu. The fastest way to
get to the Telephone menu is pressing
shortcut button 0058.
You can control other functions of the mobile
phone via the COMAND, instrument cluster
control system (Y page 230) or Voice Control
System ( Y page 237).
Caller ID
COMAND can display the telephone number
and the name of the caller, e.g. for an
incoming call and also in other menus or
displays.
For the telephone number to be displayed,
the caller must transmit his telephone
number.
This is also the case for name displays. For
this, the telephone number and the name of
the caller must also be saved in the mobile
phone book.
Functional restrictions
You will not be able to use the telephone, or
you may have to wait a while, in the following
situations:
R If the Bluetooth function in COMAND or
on the mobile phone is switched off.
R If the telephone has not yet logged into the
network.
The telephone tries to log into a network
automatically. If no network is available,
you will also not be able to make a “911”
emergency call. If you attempt to make an
10 vCards are electronic business cards used by e-mail applications, mobile phones, PDAs, etc. to exchange
contact information.COMAND telephone149Control systems221_AKB; 6; 20, en-USd2ugruen,Version: 2.11.8.12009-09-24T13:28:17+02:00 - Seite 149Z