sensor MERCEDES-BENZ S-Class 2011 W221 Owner's Guide
[x] Cancel search | Manufacturer: MERCEDES-BENZ, Model Year: 2011, Model line: S-Class, Model: MERCEDES-BENZ S-Class 2011 W221Pages: 524, PDF Size: 22.53 MB
Page 122 of 524
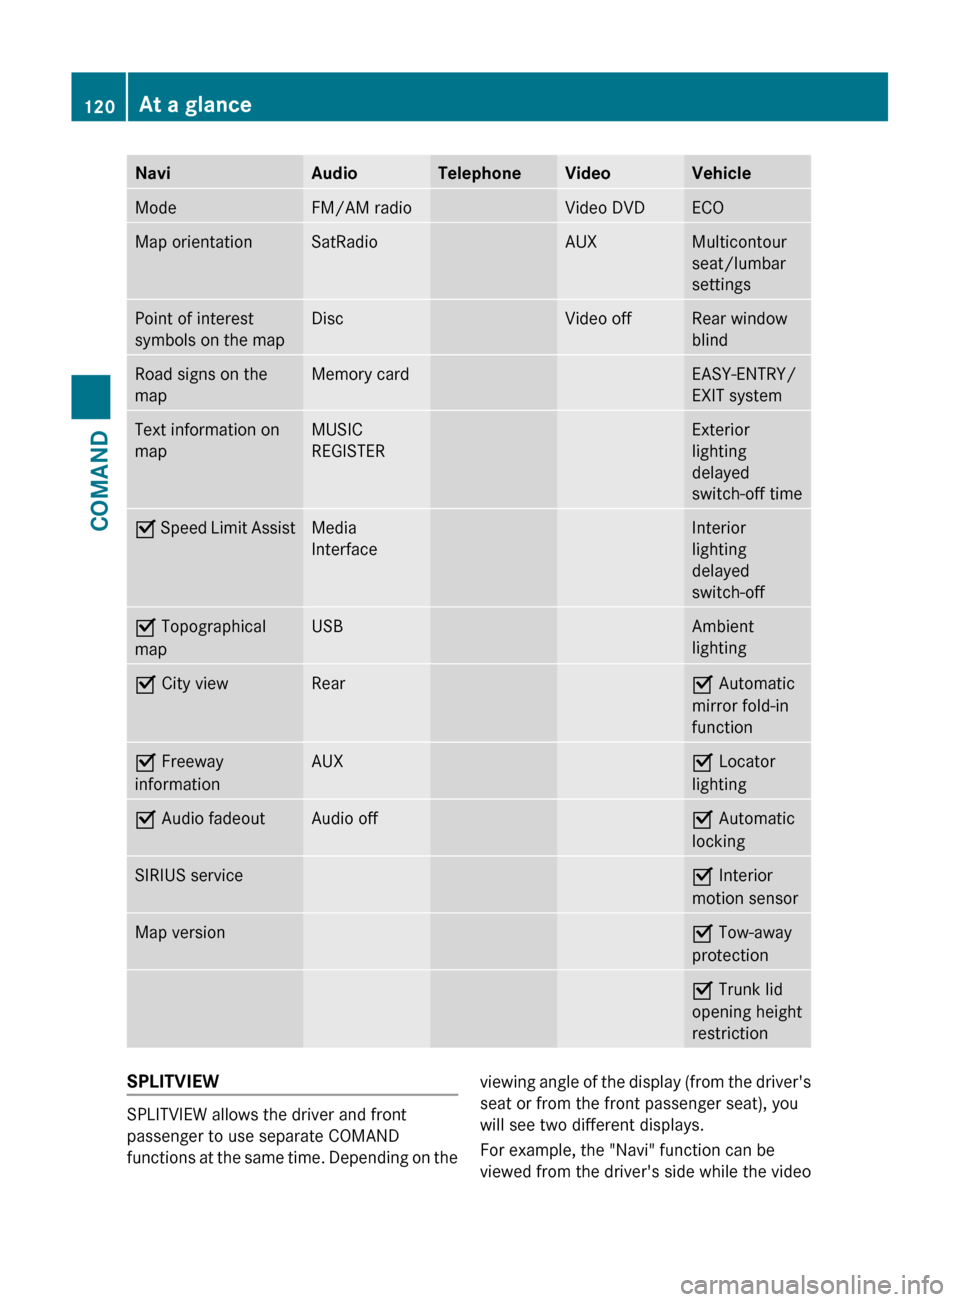
NaviAudioTelephoneVideoVehicleModeFM/AM radioVideo DVDECOMap orientationSatRadioAUXMulticontour
seat/lumbar
settingsPoint of interest
symbols on the mapDiscVideo offRear window
blindRoad signs on the
mapMemory cardEASY-ENTRY/
EXIT systemText information on
mapMUSIC
REGISTERExterior
lighting
delayed
switch-off timeO Speed Limit AssistMedia
InterfaceInterior
lighting
delayed
switch-offO Topographical
mapUSBAmbient
lightingO City viewRearO Automatic
mirror fold-in
functionO Freeway
informationAUXO Locator
lightingO Audio fadeoutAudio offO Automatic
lockingSIRIUS serviceO Interior
motion sensorMap versionO Tow-away
protectionO Trunk lid
opening height
restrictionSPLITVIEW
SPLITVIEW allows the driver and front
passenger to use separate COMAND
functions at the same time. Depending on the
viewing angle of the display (from the driver's
seat or from the front passenger seat), you
will see two different displays.
For example, the "Navi" function can be
viewed from the driver's side while the video120At a glanceCOMAND
Page 143 of 524
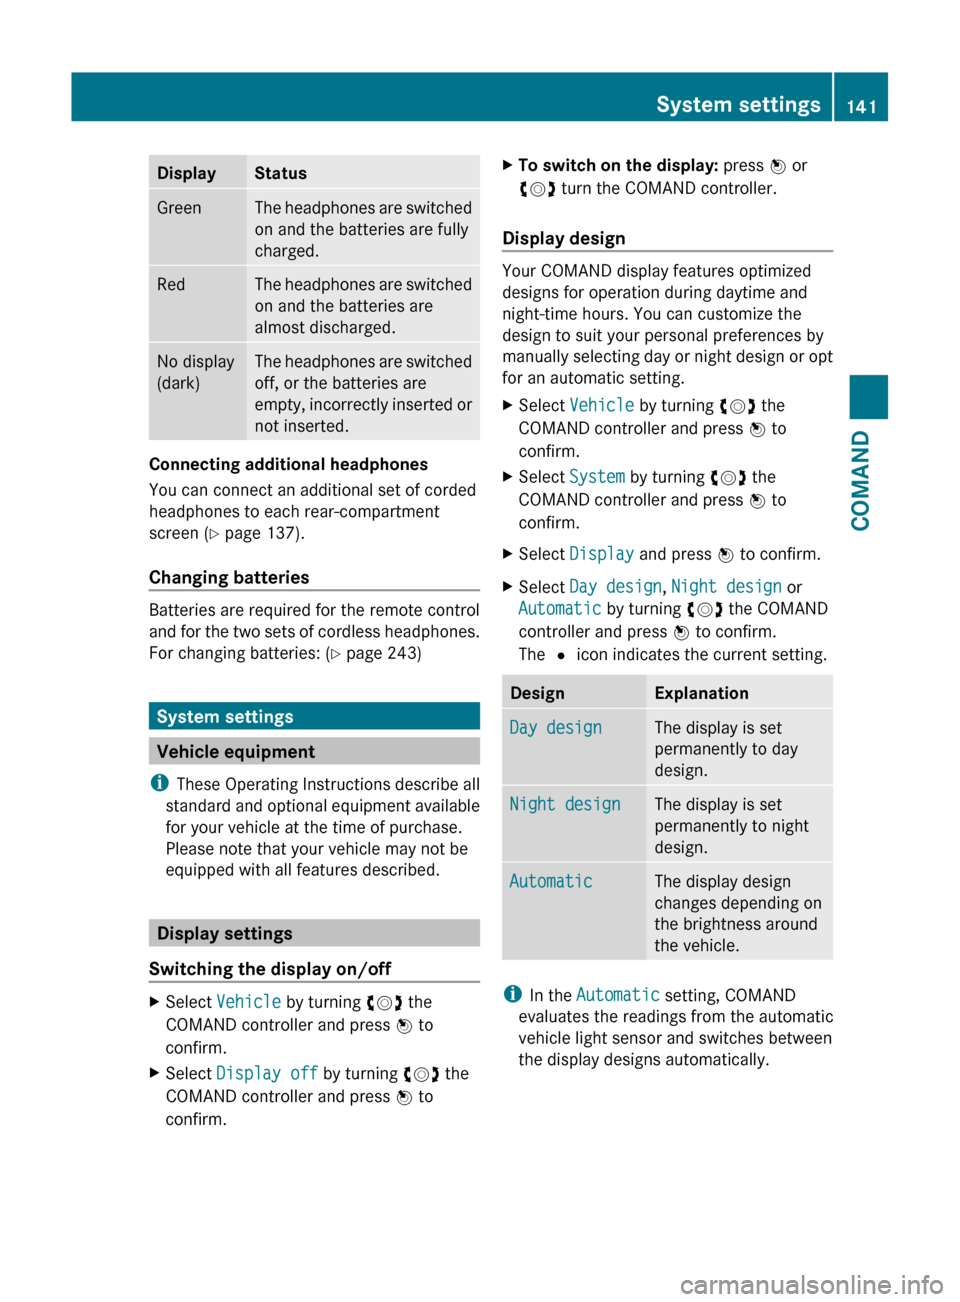
DisplayStatusGreenThe headphones are switched
on and the batteries are fully
charged.RedThe headphones are switched
on and the batteries are
almost discharged.No display
(dark)The headphones are switched
off, or the batteries are
empty, incorrectly inserted or
not inserted.
Connecting additional headphones
You can connect an additional set of corded
headphones to each rear-compartment
screen ( Y page 137).
Changing batteries
Batteries are required for the remote control
and for the two sets of cordless headphones.
For changing batteries: ( Y page 243)
System settings
Vehicle equipment
i These Operating Instructions describe all
standard and optional equipment available
for your vehicle at the time of purchase.
Please note that your vehicle may not be
equipped with all features described.
Display settings
Switching the display on/off
XSelect Vehicle by turning cVd the
COMAND controller and press W to
confirm.XSelect Display off by turning cVd the
COMAND controller and press W to
confirm.XTo switch on the display: press W or
cVd turn the COMAND controller.
Display design
Your COMAND display features optimized
designs for operation during daytime and
night-time hours. You can customize the
design to suit your personal preferences by
manually selecting day or night design or opt
for an automatic setting.
XSelect Vehicle by turning cVd the
COMAND controller and press W to
confirm.XSelect System by turning cVd the
COMAND controller and press W to
confirm.XSelect Display and press W to confirm.XSelect Day design , Night design or
Automatic by turning cVd the COMAND
controller and press W to confirm.
The # icon indicates the current setting.DesignExplanationDay designThe display is set
permanently to day
design.Night designThe display is set
permanently to night
design.AutomaticThe display design
changes depending on
the brightness around
the vehicle.
i In the Automatic setting, COMAND
evaluates the readings from the automatic
vehicle light sensor and switches between
the display designs automatically.
System settings141COMANDZ
Page 277 of 524
High-beam headlampsXTo switch on the high-beam headlamps:
turn the key in the ignition lock to position
2 or start the engine.
XTurn the light switch to L.XPress the combination switch beyond the
pressure point in the direction of
arrow :.
The K indicator lamp in the instrument
cluster lights up.
XTo switch off the high-beam
headlamps: move the combination switch
back to its normal position.
The K indicator lamp in the instrument
cluster goes out.
Adaptive Highbeam Assist
GWarning!
The Adaptive Highbeam Assist is only an aid
intended to support you while driving. The
driver is and remains responsible for proper
vehicle lighting in accordance with the
prevailing light, sight and traffic conditions.
The system may be impaired or unavailable
when
Rvisibility is poor, e.g. due to snow, rain, fog,
or heavy spray
Rthe optical sensor area of the windshield is
dirty, fogged up, or covered by a sticker for
example
The system cannot recognize the following
road users:
RRoad users without a lighting system of
their own, e.g. pedestrians
RRoad users with dim lighting of their own,
e.g. cyclists
RRoad users whose lighting is obstructed,
e.g. road users behind a guardrail
RIn some seldom cases, even road users with
a lighting system of their own may be
recognized too late or not at all.
The automatic high-beam headlamps will then
not be deactivated or it will be activated in
spite of preceding or oncoming road users.
This could endanger you and/or others and
cause an accident. Always pay close attention
to the traffic situation and switch off the high
beam manually if necessary.
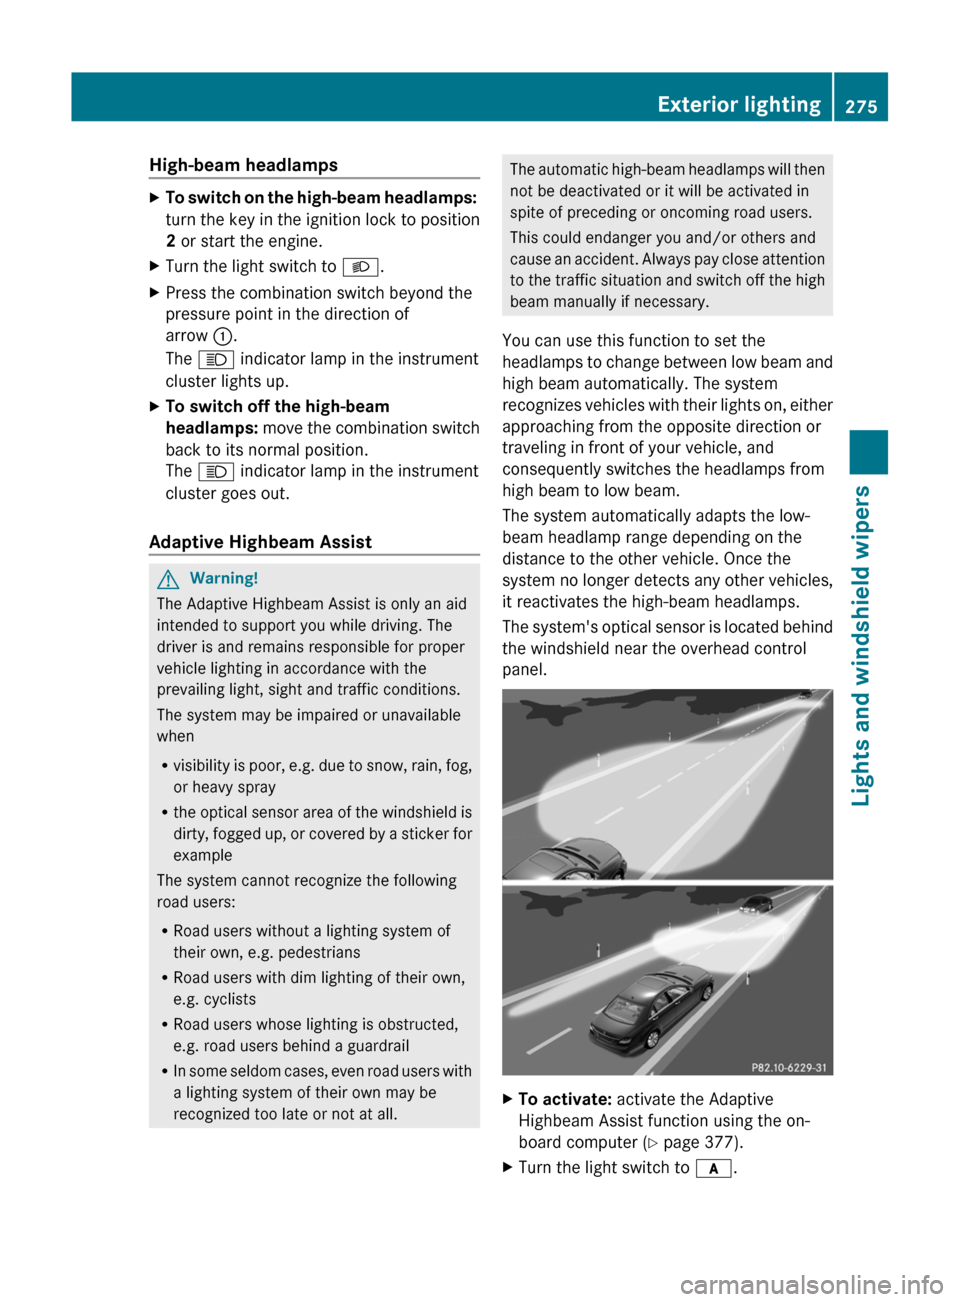
You can use this function to set the
headlamps to change between low beam and
high beam automatically. The system
recognizes vehicles with their lights on, either
approaching from the opposite direction or
traveling in front of your vehicle, and
consequently switches the headlamps from
high beam to low beam.
The system automatically adapts the low-
beam headlamp range depending on the
distance to the other vehicle. Once the
system no longer detects any other vehicles,
it reactivates the high-beam headlamps.
The system's optical sensor is located behind
the windshield near the overhead control
panel.
XTo activate: activate the Adaptive
Highbeam Assist function using the on-
board computer (Y page 377).
XTurn the light switch to c.Exterior lighting275Lights and windshield wipersZ
Page 283 of 524
Windshield wipers
Switching the windshield wipers on/
off
GWarning!
Wiper blades are components that are subject
to wear and tear. Replace the wiper blades
twice a year, preferably in the spring and fall.
Otherwise the windshield will not be wiped
properly. As a result, you may not be able to
observe surrounding traffic conditions and
could cause an accident.
! Do not operate the windshield wipers
when the windshield is dry, as this could
damage the wiper blades. Moreover, dust
that has collected on the windshield can
scratch the glass if wiping takes place when
the windshield is dry.
! If the windshield wipers leave smears on
the windscreen after the vehicle has been
washed in an automatic car wash, wax or
other residues may be the reason for this.
Clean the windshield using washer fluid
after washing the vehicle in an automatic
car wash.
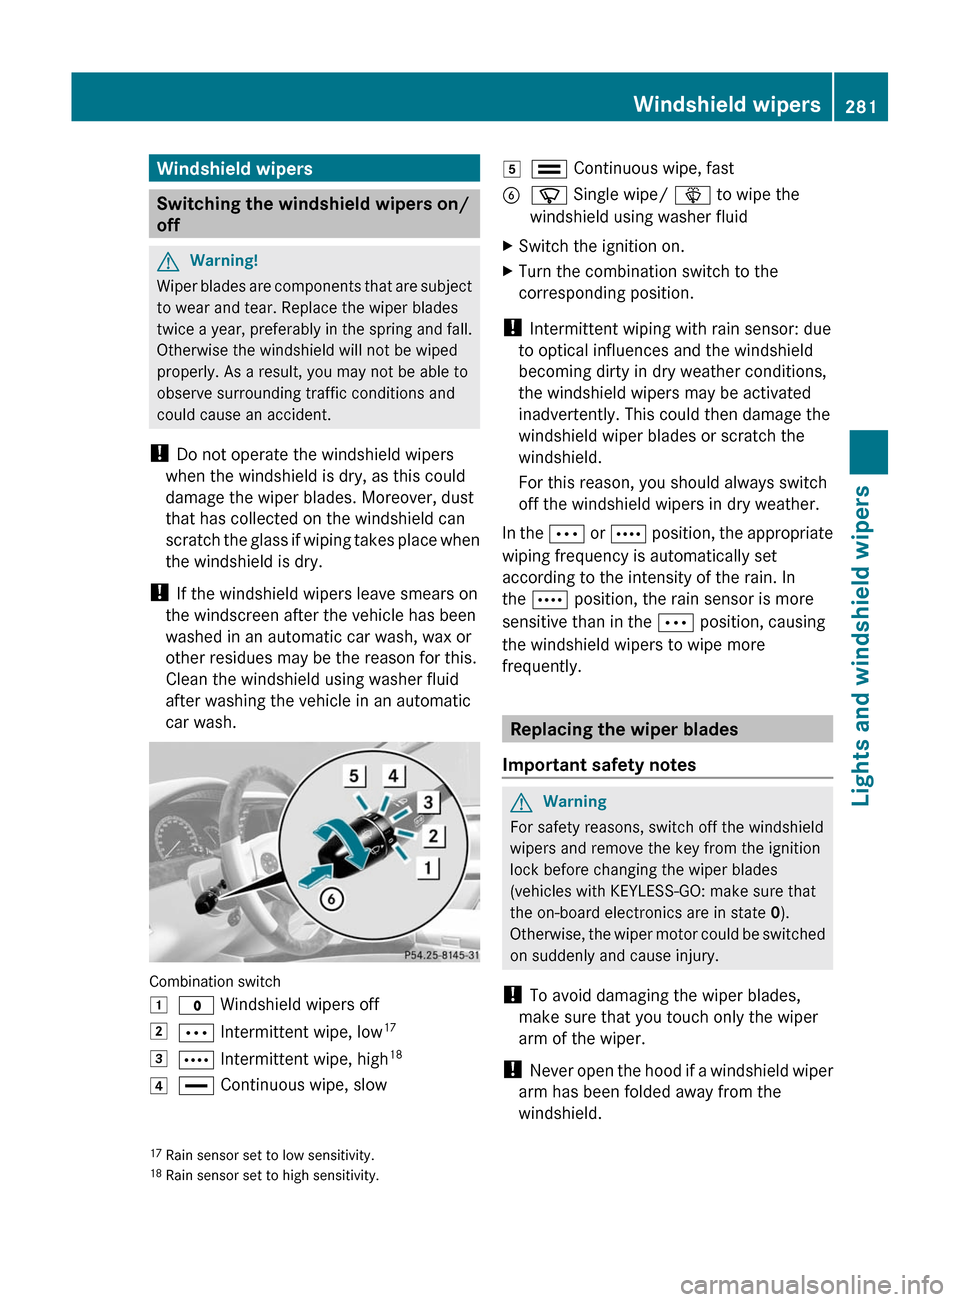
Combination switch
1$ Windshield wipers off2Ä Intermittent wipe, low173Å Intermittent wipe, high184° Continuous wipe, slow5¯ Continuous wipe, fastBí Single wipe/ î to wipe the
windshield using washer fluid
XSwitch the ignition on.XTurn the combination switch to the
corresponding position.
! Intermittent wiping with rain sensor: due
to optical influences and the windshield
becoming dirty in dry weather conditions,
the windshield wipers may be activated
inadvertently. This could then damage the
windshield wiper blades or scratch the
windshield.
For this reason, you should always switch
off the windshield wipers in dry weather.
In the Ä or Å position, the appropriate
wiping frequency is automatically set
according to the intensity of the rain. In
the Å position, the rain sensor is more
sensitive than in the Ä position, causing
the windshield wipers to wipe more
frequently.
Replacing the wiper blades
Important safety notes
GWarning
For safety reasons, switch off the windshield
wipers and remove the key from the ignition
lock before changing the wiper blades
(vehicles with KEYLESS-GO: make sure that
the on-board electronics are in state 0).
Otherwise, the wiper motor could be switched
on suddenly and cause injury.
! To avoid damaging the wiper blades,
make sure that you touch only the wiper
arm of the wiper.
! Never open the hood if a windshield wiper
arm has been folded away from the
windshield.
17Rain sensor set to low sensitivity.18Rain sensor set to high sensitivity.
Windshield wipers281Lights and windshield wipersZ
Page 328 of 524
Instructions included in your vehicle literature
portfolio. You may otherwise not receive all
necessary safety information and warning for
the operation of your vehicle.GWarning!
The DISTRONIC PLUS requires familiarity with
its operational characteristics. We strongly
recommend that you review the following
information carefully before operating the
system.
GWarning
When DISTRONIC brakes, the brake pedal is
pulled back (i.e. operated automatically). The
area around the pedal must not be blocked by
obstacles:
R do not place any objects in the footwell.
R ensure that floormats and carpets are fixed
securely. In particular, do not place several
floormats on top of one another.
R do not place your foot under the brake
pedal, as it could become trapped.
Non-compliance could lead you to cause an
accident in which you and/or others could be
seriously injured.
GWarning!
The DISTRONIC PLUS is a convenience
system. Its speed adjustment reduction
capability is intended to make cruise control
more effective and usable when traffic speeds
vary. It is not however, intended to, nor does
it, replace the need for extreme care.
The responsibility for the vehicle's speed,
distance to the preceding vehicle and, most
importantly, brake operation to ensure a safe
stopping distance, always remains with the
driver.
The DISTRONIC PLUS cannot take street and
traffic conditions into account.
Complex driving situations are not always
fully recognized by the DISTRONIC PLUS. This
could result in wrong or missing distance
warnings.
If you want DISTRONIC PLUS to assist you,
the radar sensor system must be activated
( Y page 378) and operational.
If there is no vehicle in front, DISTRONIC
PLUS operates in the same way as cruise
control in the speed range between
20 mph (Canada: 30 km/h) and
120 mph (Canada: 200 km/h). If there is a
vehicle in front, DISTRONIC PLUS is
operational in the speed range between
0 mph (Canada: 0 km/h) and
120 mph (Canada: 200 km/h).
Do not use DISTRONIC PLUS while driving on
roads with steep gradients.
As DISTRONIC PLUS emits radar waves, it can
simulate radar detectors used by police
authorities. You can refer to the applicable
chapter in the Operator's Manual if there is
any question concerning this.
i USA only:
This device has been approved by the FCC
as a “Vehicular Radar System”. The radar
sensor is intended for use in an automotive
radar system only. Removal, tampering, or
altering of the device will void any
warranties, and is not permitted by the
FCC. Do not tamper with, alter, or use in
any non-approved way.
Any unauthorized modification to this
device could void the user’s authority to
operate the equipment.GWarning!
The DISTRONIC PLUS adaptive cruise control
is not a substitute for active driving
involvement. It does not react to pedestrians
or on stationary objects, nor does it recognize
or predict the curvature and lane layout or the
movement of preceding vehicles. The
DISTRONIC PLUS can only apply a maximum
of 40% of the vehicle's braking power.
The DISTRONIC PLUS may not detect narrow
vehicles possibly driving in front of you, such
as motorcycles and vehicles driving in an
offset formation.
326Driving systemsDriving and parking
Page 329 of 524
It is the driver's responsibility at all times to
be attentive to the road, weather and traffic
conditions. Additionally, the driver must
provide the steering, braking and other driving
inputs necessary to remain in control of the
vehicle.
High-frequency sources such as toll stations,
speed measuring systems etc. can cause the
DISTRONIC PLUS system to temporarily
cease functioning.GWarning!
The DISTRONIC PLUS cannot take road and
traffic conditions into account. Only use the
DISTRONIC PLUS if the road, weather and
traffic conditions make it advisable to travel
at a constant speed.
GWarning!
Use of the DISTRONIC PLUS can be
dangerous on slippery roads. Rapid changes
in tire traction can result in wheel spin and
loss of control.
The DISTRONIC PLUS does not function in
adverse sight and distance conditions. Do not
use the DISTRONIC PLUS during conditions of
fog, heavy rain, snow or sleet.
GWarning!
The DISTRONIC PLUS cannot take weather
conditions into account. Switch off the
DISTRONIC PLUS or do not switch it on if:
R roads are slippery or covered with snow or
ice. The wheels could lose traction while
braking or accelerating, and the vehicle
could skid.
R the DISTRONIC PLUS system sensor covers
are dirty or visibility is diminished due to
snow, rain or fog, for example. The distance
control system functionality could be
impaired.
Always pay attention to surrounding traffic
conditions even while the DISTRONIC PLUS is
switched on. Otherwise, you may not be able
to recognize dangerous situations until it is
too late. This could cause an accident in which
you and/or others could be injured.GWarning!
The "Resume" function should only be
operated if the driver is fully aware of the
previously set speed and wishes to resume
this particular preset speed.
GWarning
Your undivided attention to street and traffic
conditions is necessary at all times whether
DISTRONIC PLUS is active or not.
The use of DISTRONIC PLUS can be
dangerous on winding roads or in heavy traffic
because conditions do not allow safe driving
at a constant speed.
DISTRONIC PLUS does not react to stationary
objects on the road (for example, a vehicle
stopped in traffic or an abandoned vehicle).
DISTRONIC PLUS likewise does not react to
oncoming vehicles.
Deactivate DISTRONIC PLUS:
R when changing to the right lane, if the
vehicles in the left lane are driving slower
R when driving into a filter lane or an
expressway exit
R in complex driving situations, for example
at roadworks on an expressway
In these situations DISTRONIC PLUS will
maintain the set speed if it is not deactivated.
DISTRONIC PLUS is intended only for
maintaining a set speed and a set distance
from the objects moving in front of the
vehicle.
GWarning!
An intermittent warning sounds and the
distance warning lamp · in the instrument
cluster is illuminated if the DISTRONIC PLUS
system calculates that the distance to the
vehicle ahead and your vehicle's current
speed indicate that the DISTRONIC PLUS will
not be capable of slowing the vehicle
sufficiently to maintain the preset following
Driving systems327Driving and parkingZ
Page 335 of 524
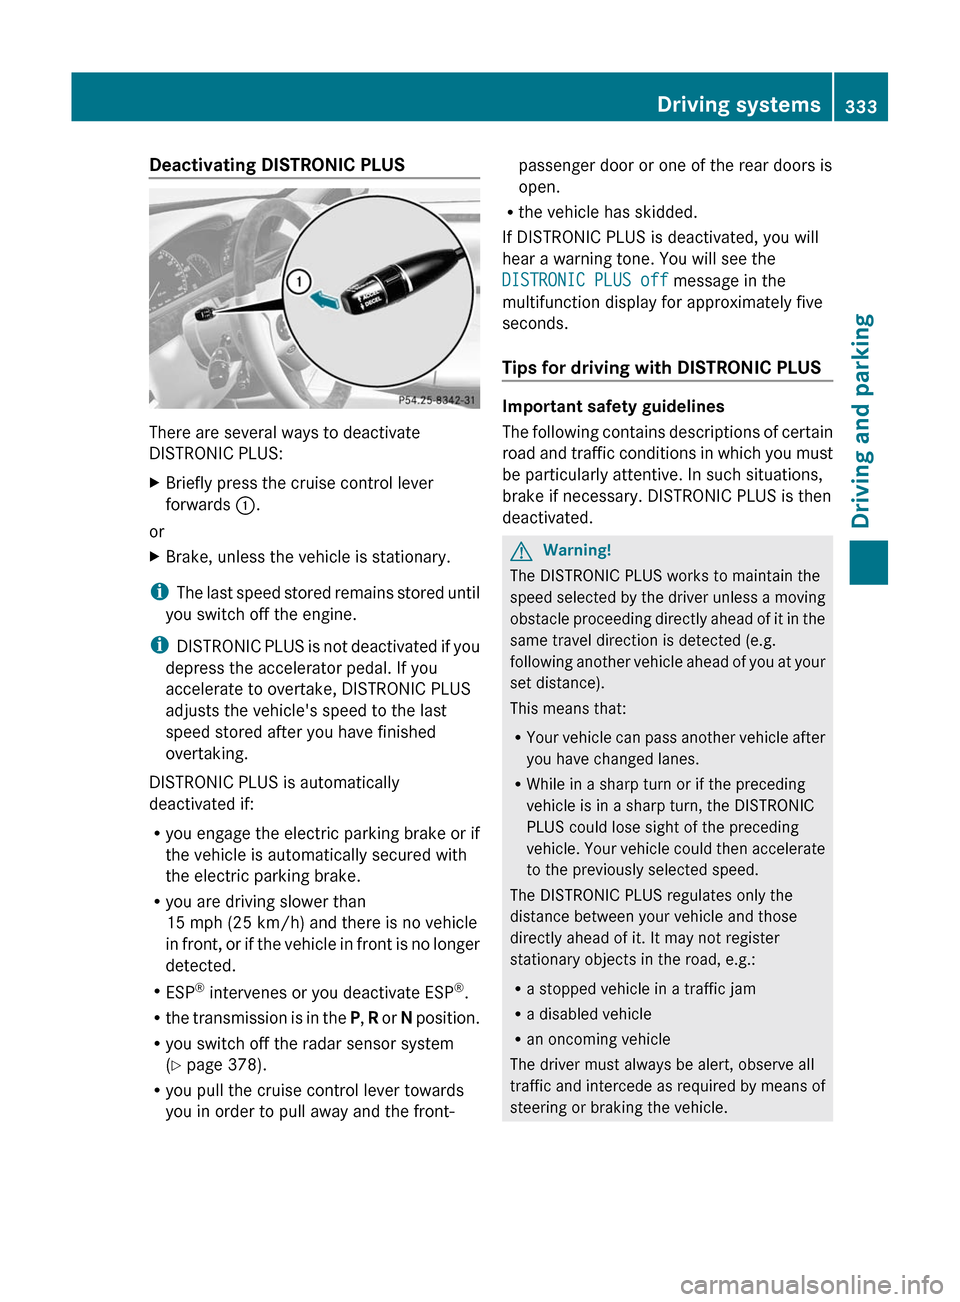
Deactivating DISTRONIC PLUS
There are several ways to deactivate
DISTRONIC PLUS:
XBriefly press the cruise control lever
forwards :.
or
XBrake, unless the vehicle is stationary.
iThe last speed stored remains stored until
you switch off the engine.
iDISTRONIC PLUS is not deactivated if you
depress the accelerator pedal. If you
accelerate to overtake, DISTRONIC PLUS
adjusts the vehicle's speed to the last
speed stored after you have finished
overtaking.
DISTRONIC PLUS is automatically
deactivated if:
Ryou engage the electric parking brake or if
the vehicle is automatically secured with
the electric parking brake.
Ryou are driving slower than
15 mph (25 km/h) and there is no vehicle
in front, or if the vehicle in front is no longer
detected.
RESP® intervenes or you deactivate ESP®.
Rthe transmission is in the P, R or N position.
Ryou switch off the radar sensor system
(Y page 378).
Ryou pull the cruise control lever towards
you in order to pull away and the front-
passenger door or one of the rear doors is
open.
Rthe vehicle has skidded.
If DISTRONIC PLUS is deactivated, you will
hear a warning tone. You will see the
DISTRONIC PLUS off message in the
multifunction display for approximately five
seconds.
Tips for driving with DISTRONIC PLUS
Important safety guidelines
The following contains descriptions of certain
road and traffic conditions in which you must
be particularly attentive. In such situations,
brake if necessary. DISTRONIC PLUS is then
deactivated.
GWarning!
The DISTRONIC PLUS works to maintain the
speed selected by the driver unless a moving
obstacle proceeding directly ahead of it in the
same travel direction is detected (e.g.
following another vehicle ahead of you at your
set distance).
This means that:
RYour vehicle can pass another vehicle after
you have changed lanes.
RWhile in a sharp turn or if the preceding
vehicle is in a sharp turn, the DISTRONIC
PLUS could lose sight of the preceding
vehicle. Your vehicle could then accelerate
to the previously selected speed.
The DISTRONIC PLUS regulates only the
distance between your vehicle and those
directly ahead of it. It may not register
stationary objects in the road, e.g.:
Ra stopped vehicle in a traffic jam
Ra disabled vehicle
Ran oncoming vehicle
The driver must always be alert, observe all
traffic and intercede as required by means of
steering or braking the vehicle.
Driving systems333Driving and parkingZ
Page 342 of 524
GWarning!
Make sure no persons or animals are in or
near the area in which you are parking/
maneuvering. Otherwise, they could be
injured.
PARKTRONIC is an electronic parking aid with
ultrasonic sensors. It indicates visually and
audibly the distance between your vehicle
and an object.
PARKTRONIC is activated automatically when
you:
Rswitch on the ignition.
Rshift the transmission to position D, R or
N.
Rrelease the electric parking brake.
PARKTRONIC is deactivated at speeds above
11 mph (18 km/h). It is reactivated at lower
speeds.
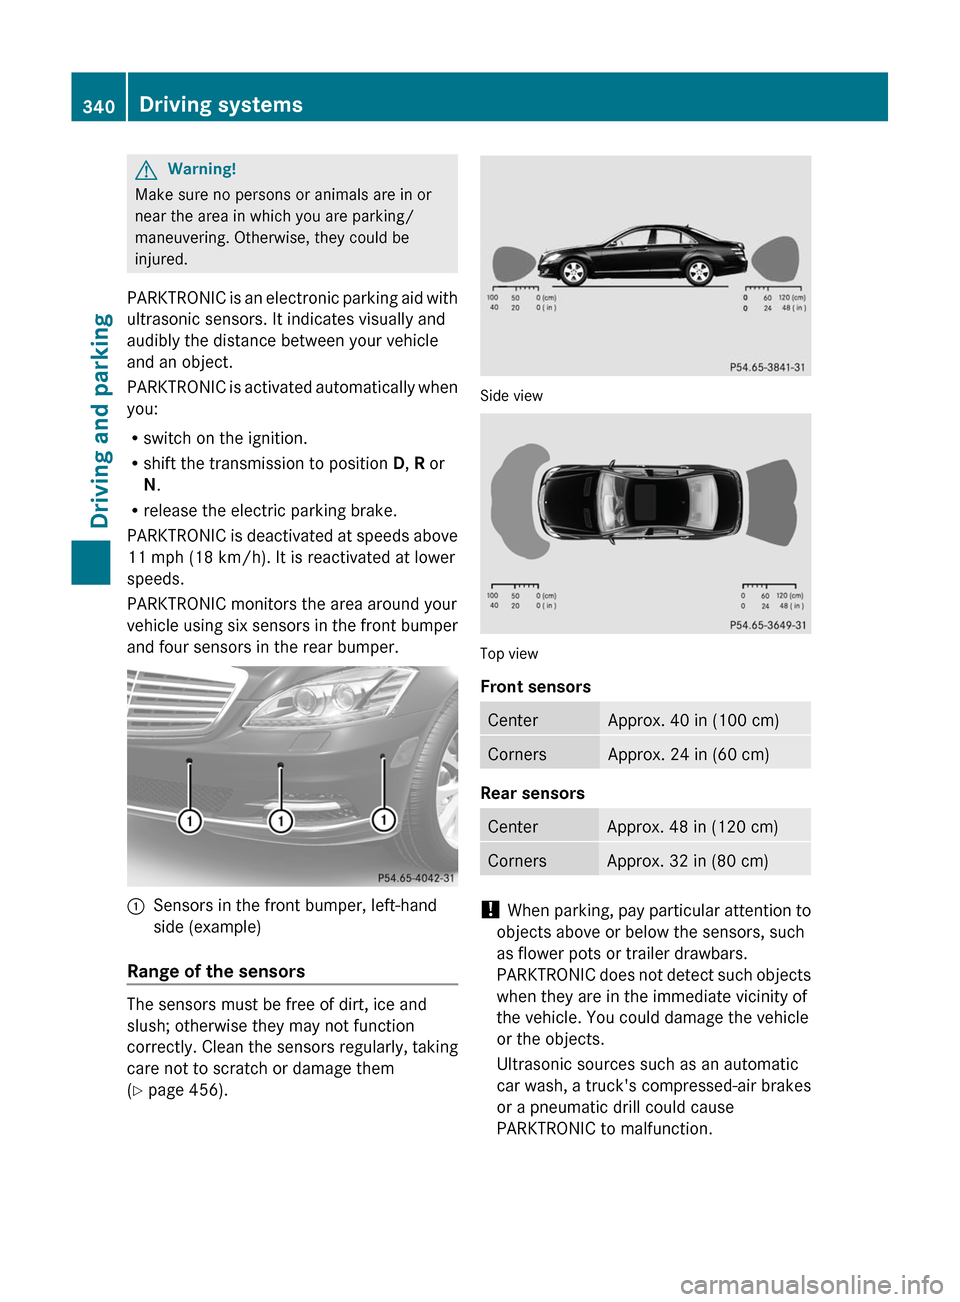
PARKTRONIC monitors the area around your
vehicle using six sensors in the front bumper
and four sensors in the rear bumper.
:Sensors in the front bumper, left-hand
side (example)
Range of the sensors
The sensors must be free of dirt, ice and
slush; otherwise they may not function
correctly. Clean the sensors regularly, taking
care not to scratch or damage them
(Y page 456).
Side view
Top view
Front sensors
CenterApprox. 40 in (100 cm)CornersApprox. 24 in (60 cm)
Rear sensors
CenterApprox. 48 in (120 cm)CornersApprox. 32 in (80 cm)
! When parking, pay particular attention to
objects above or below the sensors, such
as flower pots or trailer drawbars.
PARKTRONIC does not detect such objects
when they are in the immediate vicinity of
the vehicle. You could damage the vehicle
or the objects.
Ultrasonic sources such as an automatic
car wash, a truck's compressed-air brakes
or a pneumatic drill could cause
PARKTRONIC to malfunction.
340Driving systemsDriving and parking
Page 343 of 524
Minimum distanceCenterApprox. 8 in (20 cm)CornersApprox. 8 in (20 cm)
If there is an obstacle within this range, all
warning displays light up and a warning tone
sounds. If the distance falls below the
minimum, the distance may no longer be
shown.
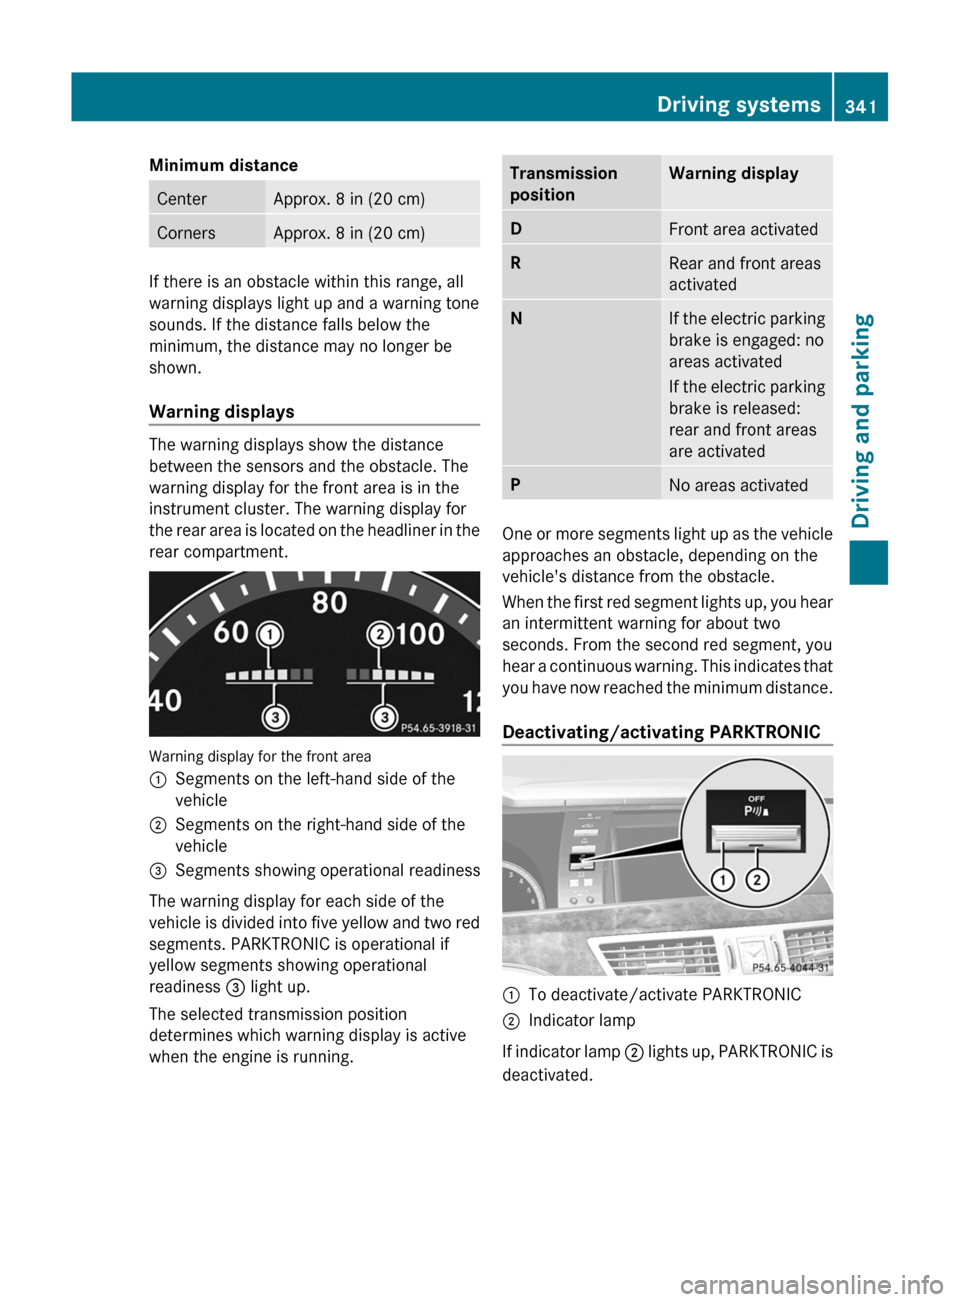
Warning displays
The warning displays show the distance
between the sensors and the obstacle. The
warning display for the front area is in the
instrument cluster. The warning display for
the rear area is located on the headliner in the
rear compartment.
Warning display for the front area
:Segments on the left-hand side of the
vehicle;Segments on the right-hand side of the
vehicle=Segments showing operational readiness
The warning display for each side of the
vehicle is divided into five yellow and two red
segments. PARKTRONIC is operational if
yellow segments showing operational
readiness = light up.
The selected transmission position
determines which warning display is active
when the engine is running.
Transmission
positionWarning displayDFront area activatedRRear and front areas
activatedNIf the electric parking
brake is engaged: no
areas activated
If the electric parking
brake is released:
rear and front areas
are activatedPNo areas activated
One or more segments light up as the vehicle
approaches an obstacle, depending on the
vehicle's distance from the obstacle.
When the first red segment lights up, you hear
an intermittent warning for about two
seconds. From the second red segment, you
hear a continuous warning. This indicates that
you have now reached the minimum distance.
Deactivating/activating PARKTRONIC
:To deactivate/activate PARKTRONIC;Indicator lamp
If indicator lamp ; lights up, PARKTRONIC is
deactivated.
Driving systems341Driving and parkingZ
Page 344 of 524
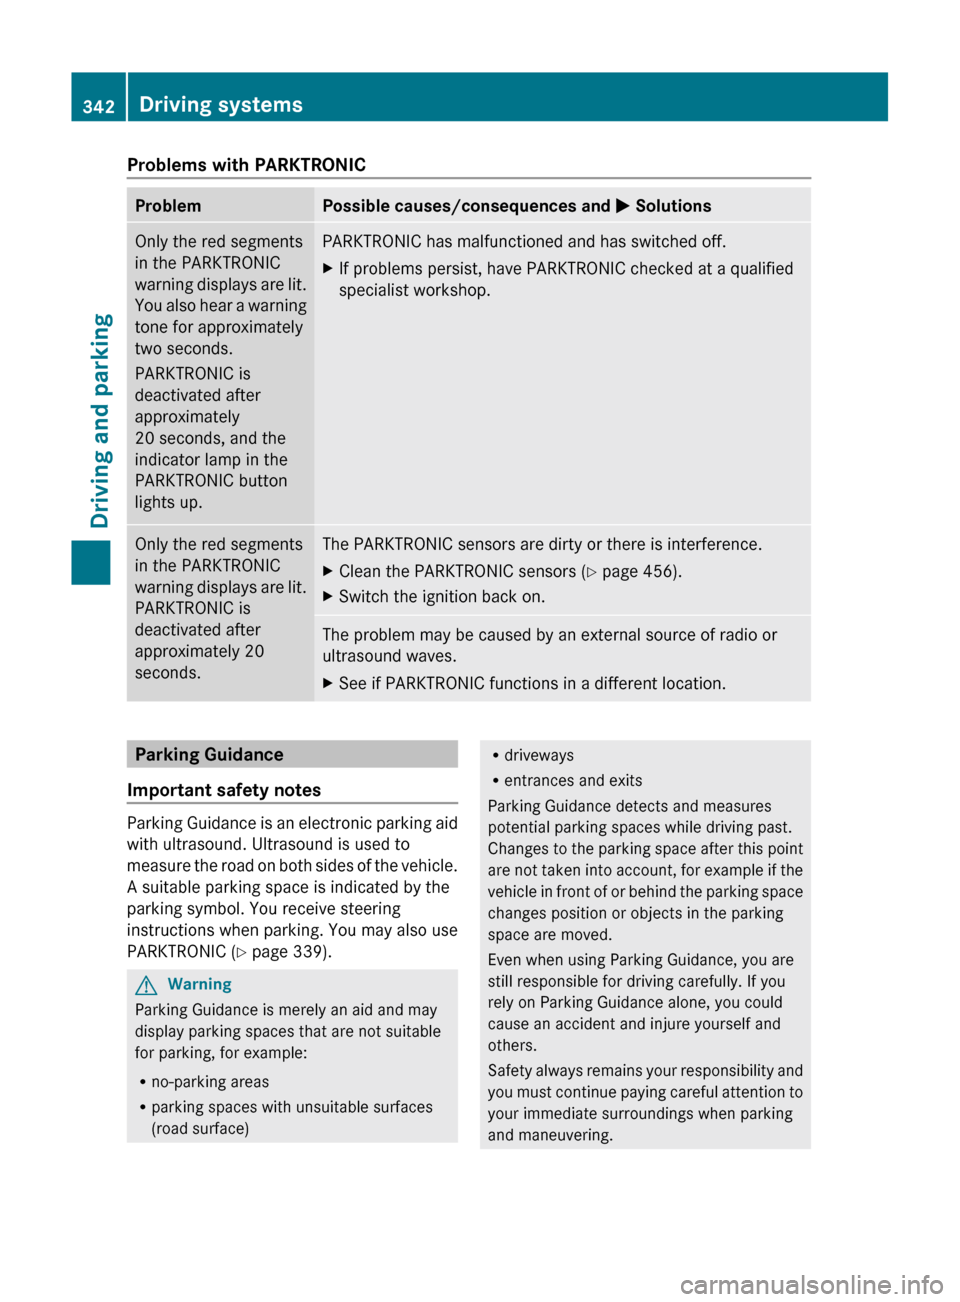
Problems with PARKTRONICProblemPossible causes/consequences and M SolutionsOnly the red segments
in the PARKTRONIC
warning displays are lit.
You also hear a warning
tone for approximately
two seconds.
PARKTRONIC is
deactivated after
approximately
20 seconds, and the
indicator lamp in the
PARKTRONIC button
lights up.PARKTRONIC has malfunctioned and has switched off.XIf problems persist, have PARKTRONIC checked at a qualified
specialist workshop.Only the red segments
in the PARKTRONIC
warning displays are lit.
PARKTRONIC is
deactivated after
approximately 20
seconds.The PARKTRONIC sensors are dirty or there is interference.XClean the PARKTRONIC sensors ( Y page 456).XSwitch the ignition back on.The problem may be caused by an external source of radio or
ultrasound waves.XSee if PARKTRONIC functions in a different location.Parking Guidance
Important safety notes
Parking Guidance is an electronic parking aid
with ultrasound. Ultrasound is used to
measure the road on both sides of the vehicle.
A suitable parking space is indicated by the
parking symbol. You receive steering
instructions when parking. You may also use
PARKTRONIC ( Y page 339).
GWarning
Parking Guidance is merely an aid and may
display parking spaces that are not suitable
for parking, for example:
R no-parking areas
R parking spaces with unsuitable surfaces
(road surface)
R driveways
R entrances and exits
Parking Guidance detects and measures
potential parking spaces while driving past.
Changes to the parking space after this point
are not taken into account, for example if the
vehicle in front of or behind the parking space
changes position or objects in the parking
space are moved.
Even when using Parking Guidance, you are
still responsible for driving carefully. If you
rely on Parking Guidance alone, you could
cause an accident and injure yourself and
others.
Safety always remains your responsibility and
you must continue paying careful attention to
your immediate surroundings when parking
and maneuvering.342Driving systemsDriving and parking