MOST MERCEDES-BENZ S-Class 2011 W221 Owner's Manual
[x] Cancel search | Manufacturer: MERCEDES-BENZ, Model Year: 2011, Model line: S-Class, Model: MERCEDES-BENZ S-Class 2011 W221Pages: 524, PDF Size: 22.53 MB
Page 44 of 524
Vehicle equipment
i This manual describes all the standard
and optional equipment of your vehicle
which was available at the time of
purchase. Country-specific differences are
possible. Bear in mind that your vehicle
may not feature all functions described
here. This also refers to safety-related
systems and functions.
Occupant safety
Overview of occupant safety
In this section you will learn the most
important facts about the restraint system
components of the vehicle.
The restraint systems are:
R Seat belts
R Child restraint systems
R LATCH-type (ISOFIX) child seat anchors
Additional protection is provided by:
R SRS (Supplemental Restraint System)
R NECK-PRO head restraints
R PRE-SAFE ®
R Air bag system components with:
- PASSENGER air bag OFF indicator lamp
- USA only: front passenger seat with
Occupant Classification System (OCS)
- Canada only: front passenger seat with
BabySmart™ air bag deactivation system
The different air bag systems work
independently of each other. The protective
functions of the systems work in conjunction
with each other. Not all air bags are deployed
in an accident.
GWarning
Modifications to or work improperly
conducted on restraint system components
or their wiring, as well as tampering with
interconnected electronic systems, can lead
to the restraint systems no longer functioning
as intended.
Air bags or Emergency Tensioning Devices
(ETDs), for example, could deploy
inadvertently or fail to deploy in accidents
although the deceleration threshold for air
bag deployment is exceeded. Therefore,
never modify the restraint systems. Do not
tamper with electronic components or their
software.
i See "Children in the vehicle"
( Y page 60) for more information on
infants and children traveling with you in
the vehicle and restraints for infants and
children.
SRS (Supplemental Restraint System)
Introduction
SRS reduces the risk of occupants coming
into contact with the vehicle's interior in the
event of an accident. It can also reduce the
effect of the forces to which occupants are
subjected during an accident.
SRS consists of:
R the 6 SRS warning lamp
R air bags
R air bag control unit (with crash sensors)
R belt tensioners
R belt force limiters
SRS warning lamps
SRS functions are checked regularly when
you switch on the ignition and when the
engine is running. Therefore, malfunctions
can be detected in good time.
The 6 SRS warning lamp in the instrument
cluster lights up when the ignition is switched
on. It goes out no later than a few seconds
after the engine is started.
The SRS components are in operational
readiness when the 6 SRS warning lamp
goes out while the engine is running.
42Occupant safetySafety
Page 59 of 524
RMake sure the seat belt is always routed
snugly. Take special care of this when
wearing loose clothing.
RNever use a seat belt for more than one
person at a time. Do not fasten a seat belt
around a person and another person or
other objects at the same time.
RSeat belts should not be worn twisted. In a
crash, you would not have the full width of
the seat belt to distribute impact forces.
The twisted seat belt against your body
could cause injuries.
RPregnant women should also always use a
lap-shoulder belt. The lap belt portion
should be positioned as low as possible on
the hips to avoid any possible pressure on
the abdomen.
RPlace the seat backrest in a position that is
as upright as possible.
RCheck your seat belt during travel to make
sure it is properly positioned.
RNever place your feet on the instrument
panel, dashboard, or on the seat. Always
keep both feet on the floor in front of the
seat.
RWhen using a seat belt to secure infant
restraints, toddler restraints, or children in
booster seats, always follow the child seat
manufacturer's instructions.
GWarning
Do not pass seat belts over sharp edges. They
could tear.
Do not allow the seat belt to get caught in the
door or in the seat adjustment mechanism.
This could damage the seat belt.
Never attempt to make modifications to seat
belts. This could impair the effectiveness of
the seat belts.
Fastening seat belts
GWarning
According to accident statistics, children are
safer when properly restrained on the rear
seats than on the front-passenger seat. Thus,
we strongly recommend that children be
placed in the rear seat whenever possible.
Regardless of seating position, children 12
years old and under must be seated and
properly secured in an appropriately sized
child restraint system or booster seat
recommended for the size and weight of the
child. For additional information, see the
"Children in the vehicle" section.
A child's risk of serious or fatal injuries is
significantly increased if the child restraints
are not properly secured in the vehicle and/
or the child is not properly secured in the child
restraint.
XAdjust the seat and move the backrest to
an almost vertical position (Y page 100).
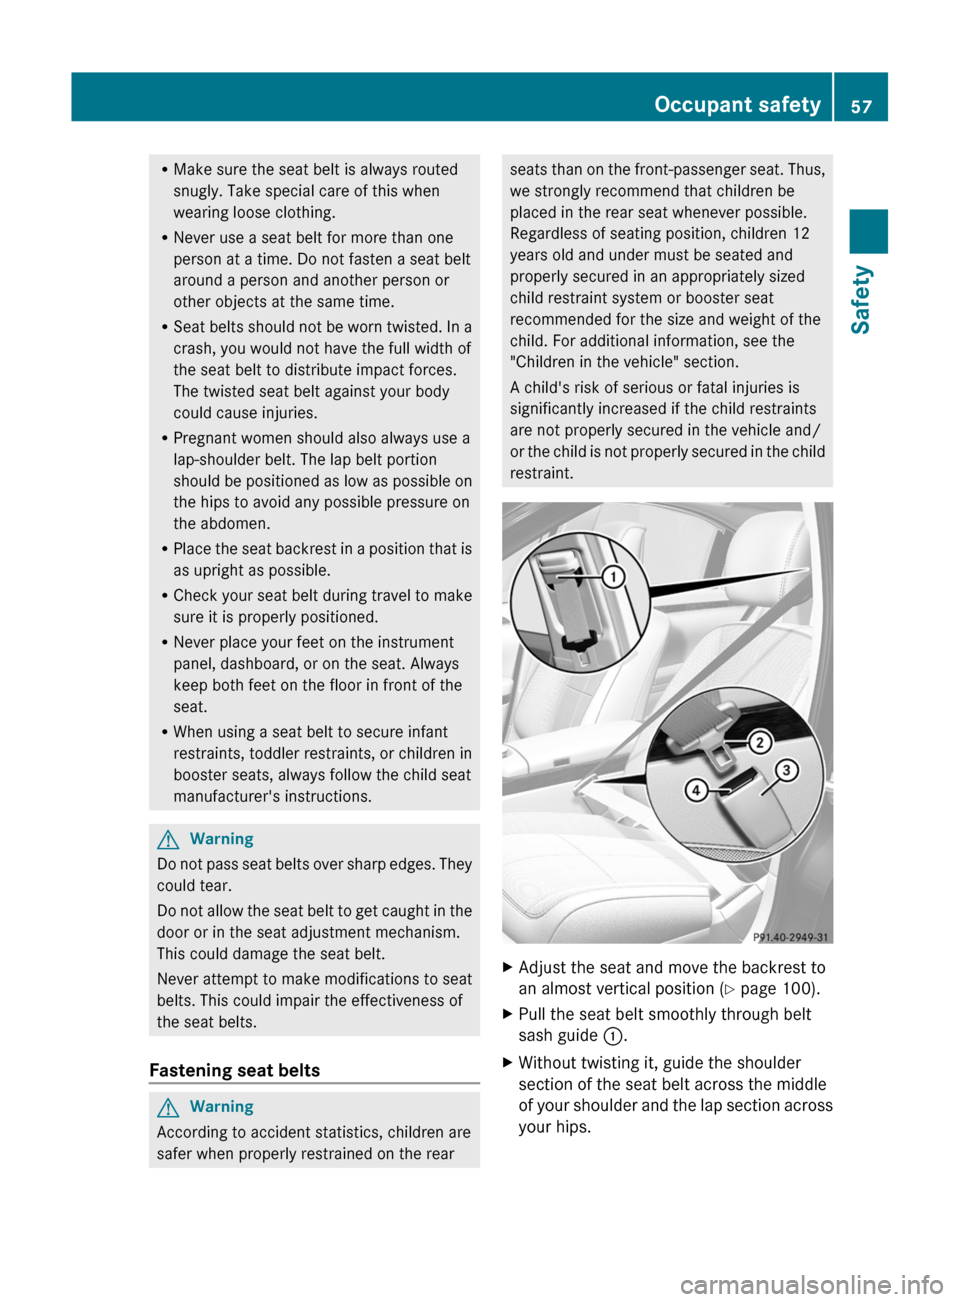
XPull the seat belt smoothly through belt
sash guide :.
XWithout twisting it, guide the shoulder
section of the seat belt across the middle
of your shoulder and the lap section across
your hips.
Occupant safety57SafetyZ
Page 70 of 524
The brakes will function as usual once you
release the brake pedal. BAS is deactivated.GWarning
If the BAS malfunctions, the brake system still
functions, but without the additional brake
boost available that the BAS would normally
provide in an emergency braking maneuver.
Therefore, the braking distance may increase.
BAS PLUS (Brake Assist PLUS)
GWarning
Observe "Important safety notes"
( Y page 66).
At speeds above approximately
20 mph (30 km/h), BAS PLUS assists you
when braking in hazardous situations and
uses the radar sensor system to evaluate the
traffic conditions.
GWarning!
BAS PLUS is a convenience system designed
to assist the driver during vehicle operation.
The responsibility for the vehicle speed and
the distance to the vehicle ahead, including
most importantly brake operation to assure
safe stopping distance, always remains with
the driver.
Always pay attention to traffic conditions
even while BAS PLUS is switched on.
Otherwise, you may not be able to recognize
dangerous situations until it is too late and
could cause an accident. Personal or fatal
injury to you or others may be the result.
i This equipment has been approved by the
FCC as a "Vehicular Radar System". The
radar sensor system is intended for use in
an automotive radar system only. Removal,
tampering, or altering of the device will void
any warranties, and is not permitted by the
FCC. Do not tamper with the device in any
way.
Any unauthorized modification to this
device could void the user's authority to
operate the equipment.
BAS PLUS can detect obstacles that are in the
path of your vehicle for an extended period of
time. Should you approach a detected
obstacle quickly, BAS PLUS calculates the
braking force necessary to avoid a rear-end
collision. Should you additionally apply the
brakes, BAS PLUS will automatically increase
the braking force to a level suitable for the
traffic conditions.
If BAS PLUS demands particularly high
braking force, PRE-SAFE ®
is activated
simultaneously.XKeep the brake pedal depressed until the
emergency braking situation is over.
ABS prevents the wheels from locking.
The brakes will work normally again when:
R you release the brake pedal
R no obstacle is detected in front of your
vehicle
R there is no longer any danger of a rear-end
collision
BAS PLUS is then deactivated.
At speeds up to approximately
40 mph (70 km/h), BAS PLUS can also detect
stationary obstacles, for example, stopped or
parked vehicles.
For BAS PLUS to assist you when driving, the
radar sensor system must be switched on and
operational. You can check this by activating
DISTRONIC PLUS ( Y page 325) or via the
"radar sensor" function in the on-board
computer( Y page 378).
GWarning!
BAS PLUS will only respond with brake
assistance if it has clearly detected an object.
Detection can be impeded by
R dirty or covered sensors
R snowfall or heavy rain
68Driving safety systemsSafety
Page 74 of 524
Immediately brake your vehicle to increase
the distance between your vehicle and the
vehicle driving in front of you. The warning
sound is intended as a final caution that you
have not interceded with your own braking
inputs to avoid a potentially dangerous
situation. Do not wait for the operation of the
warning signal to intercede with your own
braking, as that will result in potentially
dangerous emergency braking which will not
always result in an impact being avoided.
Tailgating increases the risk of an accident.GWarning!
The PRE-SAFE ®
Brake is a convenience
system designed to assist the driver during
vehicle operation. The responsibility for the
vehicle speed and the distance to the vehicle
ahead, including most importantly brake
operation to assure safe stopping distance,
always remains with the driver.
Always pay attention to traffic conditions
even while the PRE-SAFE ®
Brake is switched
on. Otherwise, you may not be able to
recognize dangerous situations until it is too
late and could cause an accident resulting in
personal or fatal injury to you or others.
i USA only: this device was approved as a
"Vehicular Radar System" by the FCC. The
radar sensor system is only intended for
use with radar systems in passenger
vehicles. Removing, tampering with, or
altering the device will void any warranties
and is not permitted by the FCC. Do not
tamper with the device in any way.
Any unauthorized modification to this
device could void the user's authority to
operate the equipment.
i Canada only: this device complies with
RSS-210 regulations of Industry Canada.
Operation is subject to the following two
conditions:
1. This device may not cause interference,
and
2. This device must withstand any
interference received, including
interference that may cause undesired
operation.
Removing, tampering with, or altering the
device will void any warranties and is not
permitted. Do not tamper with the device
in any way.
Any unauthorized modification to this
device could void the user's authority to
operate the equipment.
With the help of the radar sensor system,
PRE-SAFE ®
Brake can detect obstacles that
are in front of your vehicle for an extended
period of time. If you approach an obstacle
and PRE-SAFE ®
Brake detects a risk of a
collision, the system will initially alert you
both visually and acoustically. If you do not
brake or steer, the vehicle will at first
automatically brake slightly. In the event of
an increased risk of a collision, PRE-SAFE ®
is
activated ( Y page 53). If the risk of collision
remains and you do not brake, take evasive
action or accelerate significantly, the vehicle
may perform automatic emergency braking.GWarning!
The PRE-SAFE ®
Brake will only respond with
brake assistance if it has clearly detected an
object. Detection can be impeded by:
R dirty or covered sensors
R snowfall or heavy rain
R disturbance from other radar sources
R strong radar reflection such as in parking
garages
The PRE-SAFE ®
Brake uses radar signals that
are not reflected well by narrow objects and
absorptive materials. For this reason the PRE-
SAFE ®
Brake will not react to persons,
animals, and approaching traffic or cross-
traffic.
The PRE-SAFE ®
Brake may not detect narrow
vehicles driving in front of you, such as
motorcycles and vehicles driving offset from
your vehicle center.
72Driving safety systemsSafety
Page 102 of 524
Vehicle equipment
i This manual describes all the standard
and optional equipment of your vehicle
which was available at the time of
purchase. Country-specific differences are
possible. Bear in mind that your vehicle
may not feature all functions described
here. This also refers to safety-related
systems and functions.
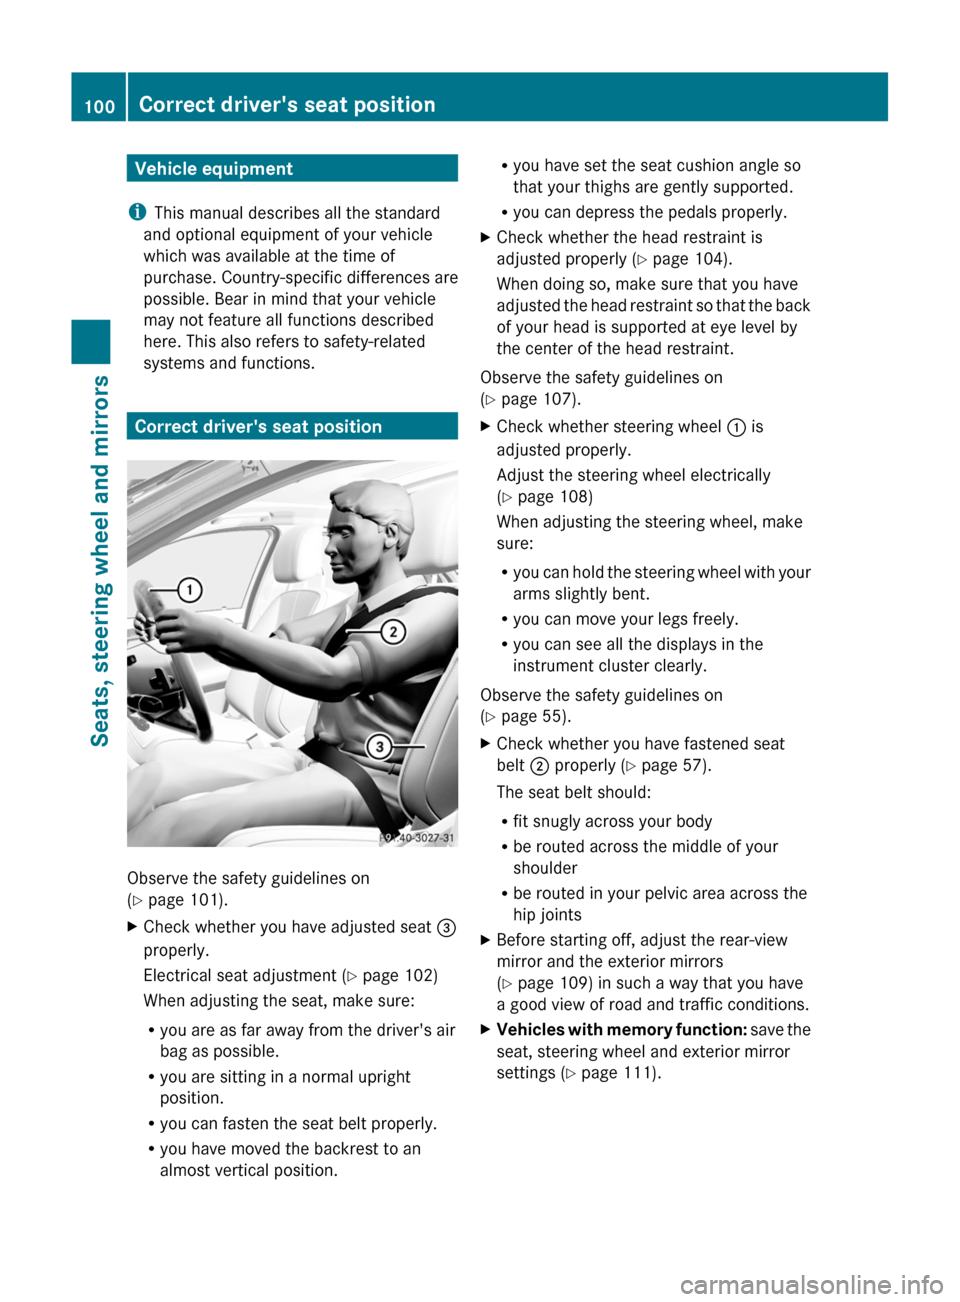
Correct driver's seat position
Observe the safety guidelines on
( Y page 101).
XCheck whether you have adjusted seat =
properly.
Electrical seat adjustment ( Y page 102)
When adjusting the seat, make sure:
R you are as far away from the driver's air
bag as possible.
R you are sitting in a normal upright
position.
R you can fasten the seat belt properly.
R you have moved the backrest to an
almost vertical position.R you have set the seat cushion angle so
that your thighs are gently supported.
R you can depress the pedals properly.XCheck whether the head restraint is
adjusted properly ( Y page 104).
When doing so, make sure that you have
adjusted the head restraint so that the back
of your head is supported at eye level by
the center of the head restraint.
Observe the safety guidelines on
( Y page 107).
XCheck whether steering wheel : is
adjusted properly.
Adjust the steering wheel electrically
( Y page 108)
When adjusting the steering wheel, make
sure:
R you can hold the steering wheel with your
arms slightly bent.
R you can move your legs freely.
R you can see all the displays in the
instrument cluster clearly.
Observe the safety guidelines on
( Y page 55).
XCheck whether you have fastened seat
belt ; properly ( Y page 57).
The seat belt should:
R fit snugly across your body
R be routed across the middle of your
shoulder
R be routed in your pelvic area across the
hip jointsXBefore starting off, adjust the rear-view
mirror and the exterior mirrors
( Y page 109) in such a way that you have
a good view of road and traffic conditions.XVehicles with memory function: save the
seat, steering wheel and exterior mirror
settings ( Y page 111).100Correct driver's seat positionSeats, steering wheel and mirrors
Page 111 of 524
To stop steering wheel and seat movement,
do one of the following:
R move the seat adjustment switch.
R move the steering column adjustment
switch.
R press one of the memory function position
buttons or memory button M.
Do not leave children unattended in the
vehicle, or with access to an unlocked vehicle.
Children could open the driver's door and
unintentionally activate the EASY-ENTRY/
EXIT feature. This could result in an accident
and/or serious personal injury.GWarning
Let the system complete the adjustment
procedure before setting the vehicle in
motion. All steering wheel adjustment must
be completed before setting the vehicle in
motion. Driving off with the steering wheel
still adjusting could cause the driver to lose
control of the vehicle.
! Do not activate the EASY-ENTRY/EXIT
feature, if the seat backrest is reclined too
far backwards. This can damage the front
or rear seats. You must first move the
backrest to a vertical position.
Position of the steering wheel and the
driver's seat when the EASY-ENTRY/
EXIT feature is active
The steering wheel tilts upwards and the
driver's seat moves backwards when you:
R remove the SmartKey from the ignition lock
R open the driver's door when the SmartKey
is in the ignition lock or KEYLESS-GO is in
position 1
i The steering wheel only moves upwards if
it has not already reached the upper end
stop. The driver's seat only moves
backwards if it is not already in the
rearmost position.
Position of the steering wheel and the
driver's seat for driving
If you insert the SmartKey into the ignition
lock with the driver's door closed, depending
on the setting, the position of the steering
wheel and the driver's seat will be changed to
the previously set position.
The last position of the steering wheel or seat
is stored when:
R the ignition is switched off or
R the setting is stored with the memory
function.
Crash-responsive EASY-EXIT feature
If the crash-responsive EASY-EXIT feature is
triggered in an accident, the steering column
will move upwards when the driver's door is
opened. This occurs irrespective of the
position of the SmartKey in the ignition lock.
This makes it easier to exit the vehicle and
rescue the occupants.
The crash-responsive EASY-EXIT feature is
only operational if the EASY-EXIT/ENTRY
feature is activated in the on-board computer.
Mirrors
Exterior mirrors
Adjusting the exterior mirrors
GWarning
Exercise care when using the passenger-side
exterior rear view mirror. The mirror surface
is convex (outwardly curved surface for a
wider field of view). Objects in mirror are
closer than they appear. Check your interior
rear view mirror and glance over your
shoulder before changing lanes.
The exterior mirrors are automatically heated
if the rear window heating is switched on and
the outside temperature is low.
Mirrors109Seats, steering wheel and mirrorsZ
Page 120 of 524
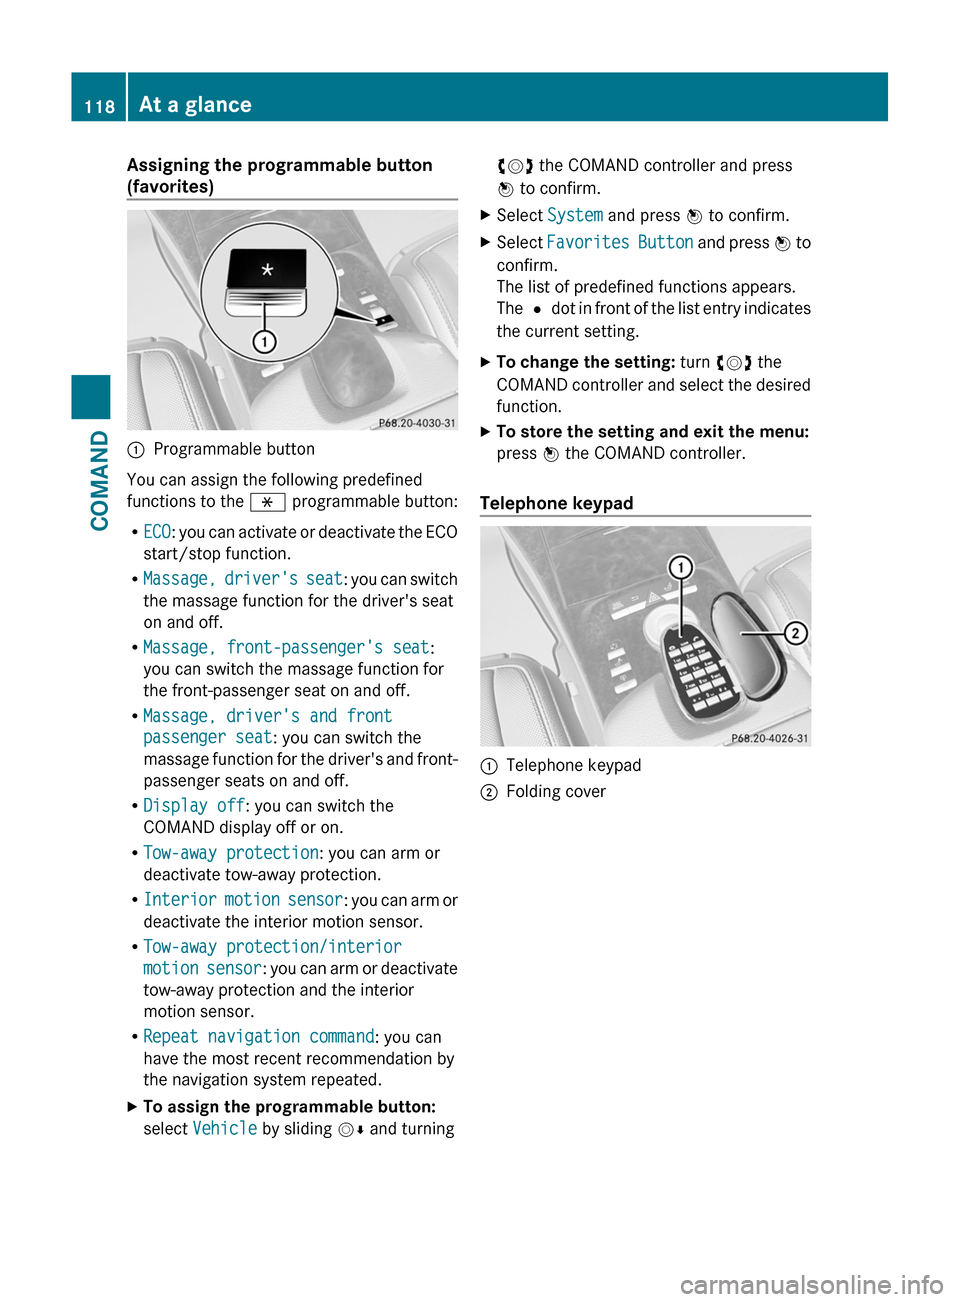
Assigning the programmable button
(favorites):Programmable button
You can assign the following predefined
functions to the h programmable button:
RECO: you can activate or deactivate the ECO
start/stop function.
RMassage, driver's seat: you can switch
the massage function for the driver's seat
on and off.
RMassage, front-passenger's seat:
you can switch the massage function for
the front-passenger seat on and off.
RMassage, driver's and front
passenger seat: you can switch the
massage function for the driver's and front-
passenger seats on and off.
RDisplay off: you can switch the
COMAND display off or on.
RTow-away protection: you can arm or
deactivate tow-away protection.
RInterior motion sensor: you can arm or
deactivate the interior motion sensor.
RTow-away protection/interior
motion sensor: you can arm or deactivate
tow-away protection and the interior
motion sensor.
RRepeat navigation command: you can
have the most recent recommendation by
the navigation system repeated.
XTo assign the programmable button:
select Vehicle by sliding VÆ and turning
cVd the COMAND controller and press
W to confirm.
XSelect System and press W to confirm.XSelect Favorites Button and press W to
confirm.
The list of predefined functions appears.
The # dot in front of the list entry indicates
the current setting.
XTo change the setting: turn cVd the
COMAND controller and select the desired
function.
XTo store the setting and exit the menu:
press W the COMAND controller.
Telephone keypad
:Telephone keypad;Folding cover118At a glanceCOMAND
Page 129 of 524
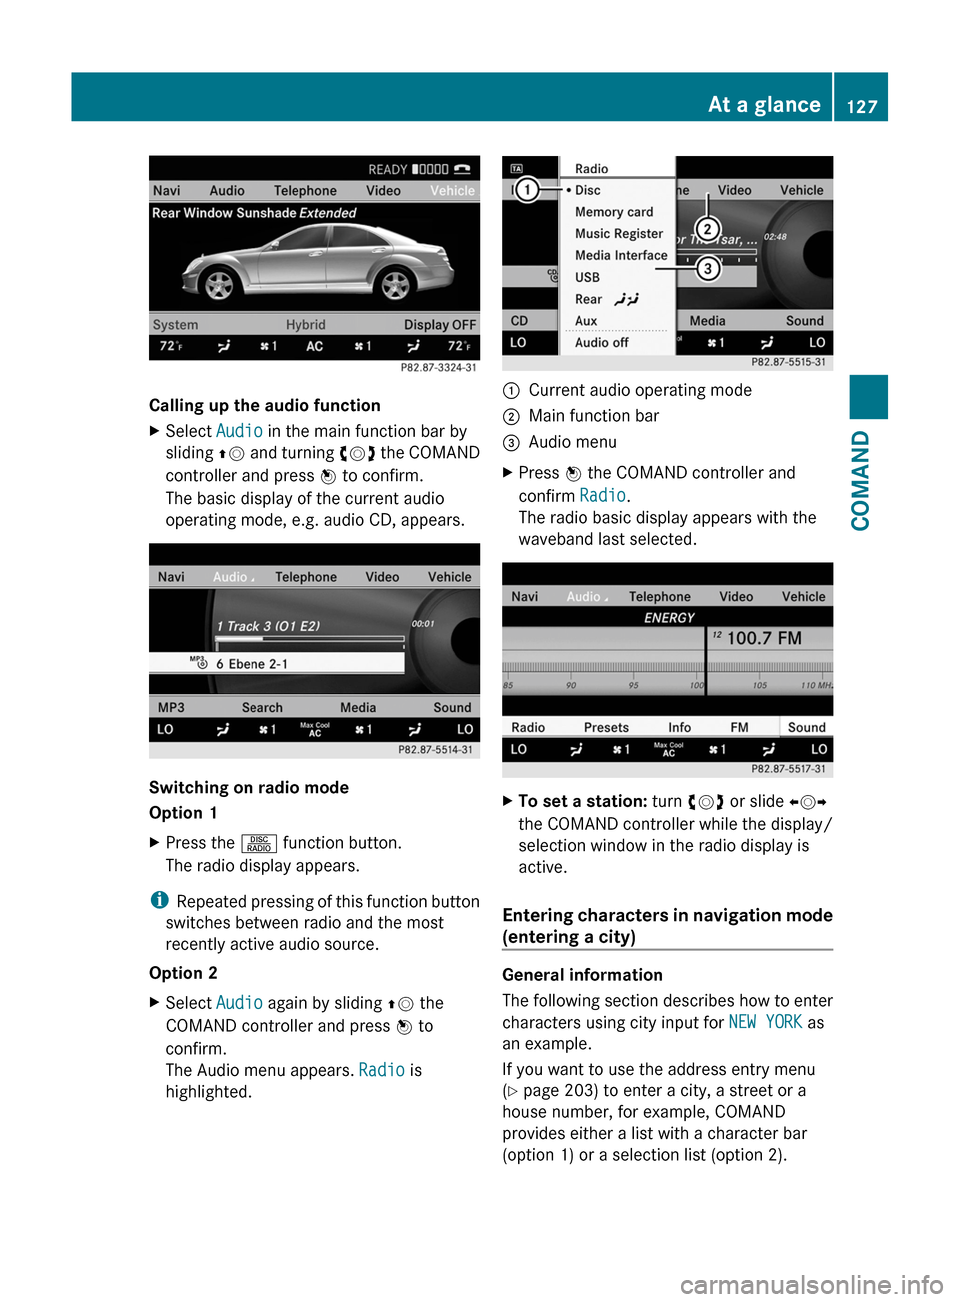
Calling up the audio function
XSelect Audio in the main function bar by
sliding ZV and turning cVd the COMAND
controller and press W to confirm.
The basic display of the current audio
operating mode, e.g. audio CD, appears.
Switching on radio mode
Option 1
XPress the R function button.
The radio display appears.
iRepeated pressing of this function button
switches between radio and the most
recently active audio source.
Option 2
XSelect Audio again by sliding ZV the
COMAND controller and press W to
confirm.
The Audio menu appears. Radio is
highlighted.
:Current audio operating mode;Main function bar=Audio menuXPress W the COMAND controller and
confirm Radio.
The radio basic display appears with the
waveband last selected.
XTo set a station: turn cVd or slide XVY
the COMAND controller while the display/
selection window in the radio display is
active.
Entering characters in navigation mode
(entering a city)
General information
The following section describes how to enter
characters using city input for NEW YORK as
an example.
If you want to use the address entry menu
(Y page 203) to enter a city, a street or a
house number, for example, COMAND
provides either a list with a character bar
(option 1) or a selection list (option 2).
At a glance127COMANDZ
Page 130 of 524
You can enter the characters using either the
character bar or the number keypad. In the
selection list, you select an entry to copy it to
the address entry menu.
Option 1: city list with character bar
XCall up the city list with character bar
(Y page 152).
The alphabetically sorted city list shows the
first available entries.
Entering characters using the character
bar
XSelect N by turning cVd COMAND
controller and press W to confirm.
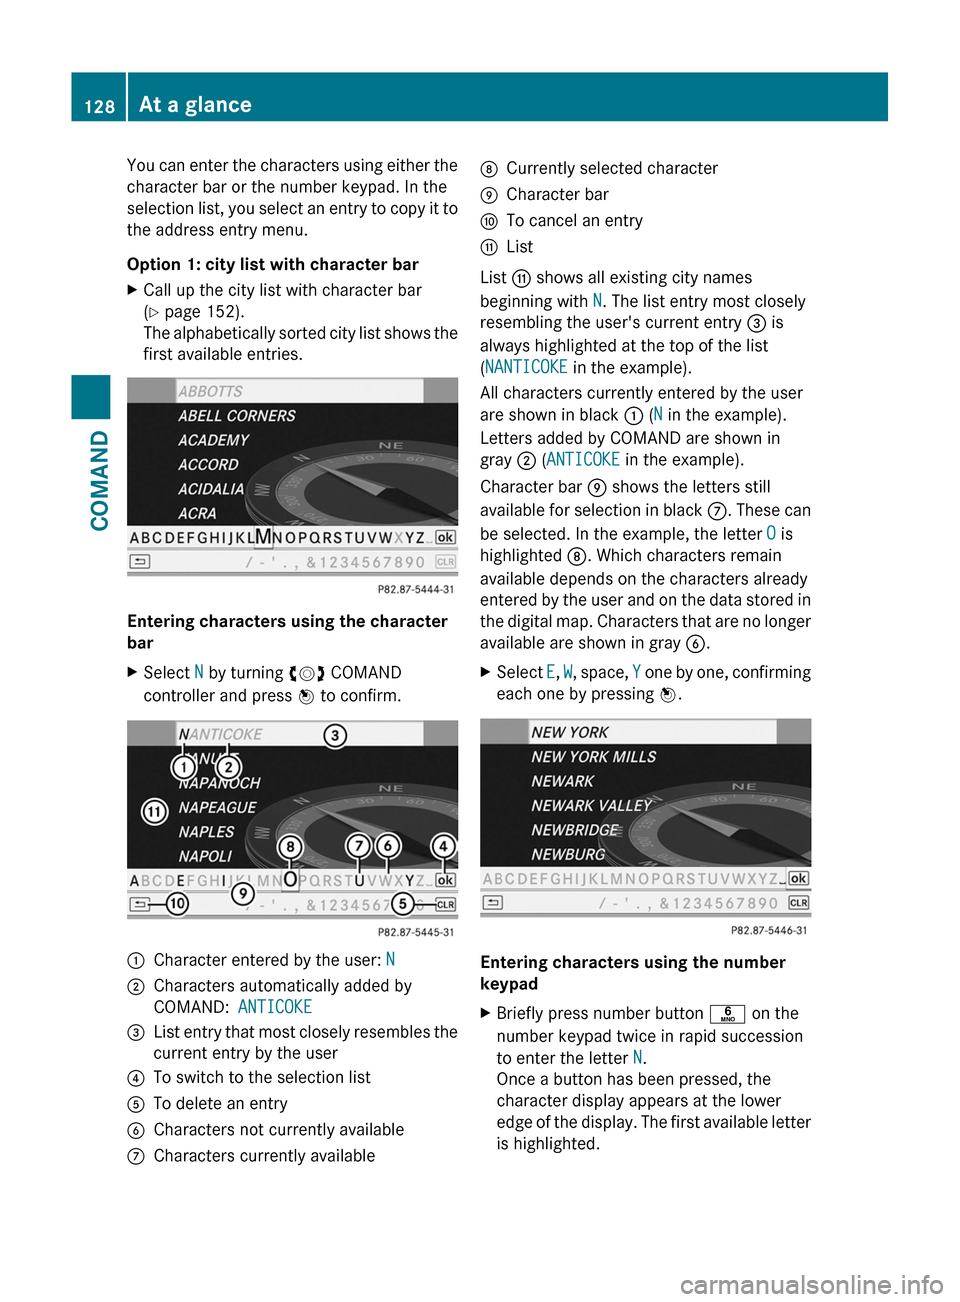
:Character entered by the user: N;Characters automatically added by
COMAND: ANTICOKE
=List entry that most closely resembles the
current entry by the user
?To switch to the selection listATo delete an entryBCharacters not currently availableCCharacters currently availableDCurrently selected characterECharacter barFTo cancel an entryGList
List G shows all existing city names
beginning with N. The list entry most closely
resembling the user's current entry = is
always highlighted at the top of the list
(NANTICOKE in the example).
All characters currently entered by the user
are shown in black : (N in the example).
Letters added by COMAND are shown in
gray ; (ANTICOKE in the example).
Character bar E shows the letters still
available for selection in black C. These can
be selected. In the example, the letter O is
highlighted D. Which characters remain
available depends on the characters already
entered by the user and on the data stored in
the digital map. Characters that are no longer
available are shown in gray B.
XSelect E, W, space, Y one by one, confirming
each one by pressing W.
Entering characters using the number
keypad
XBriefly press number button p on the
number keypad twice in rapid succession
to enter the letter N.
Once a button has been pressed, the
character display appears at the lower
edge of the display. The first available letter
is highlighted.
128At a glanceCOMAND
Page 143 of 524
DisplayStatusGreenThe headphones are switched
on and the batteries are fully
charged.RedThe headphones are switched
on and the batteries are
almost discharged.No display
(dark)The headphones are switched
off, or the batteries are
empty, incorrectly inserted or
not inserted.
Connecting additional headphones
You can connect an additional set of corded
headphones to each rear-compartment
screen ( Y page 137).
Changing batteries
Batteries are required for the remote control
and for the two sets of cordless headphones.
For changing batteries: ( Y page 243)
System settings
Vehicle equipment
i These Operating Instructions describe all
standard and optional equipment available
for your vehicle at the time of purchase.
Please note that your vehicle may not be
equipped with all features described.
Display settings
Switching the display on/off
XSelect Vehicle by turning cVd the
COMAND controller and press W to
confirm.XSelect Display off by turning cVd the
COMAND controller and press W to
confirm.XTo switch on the display: press W or
cVd turn the COMAND controller.
Display design
Your COMAND display features optimized
designs for operation during daytime and
night-time hours. You can customize the
design to suit your personal preferences by
manually selecting day or night design or opt
for an automatic setting.
XSelect Vehicle by turning cVd the
COMAND controller and press W to
confirm.XSelect System by turning cVd the
COMAND controller and press W to
confirm.XSelect Display and press W to confirm.XSelect Day design , Night design or
Automatic by turning cVd the COMAND
controller and press W to confirm.
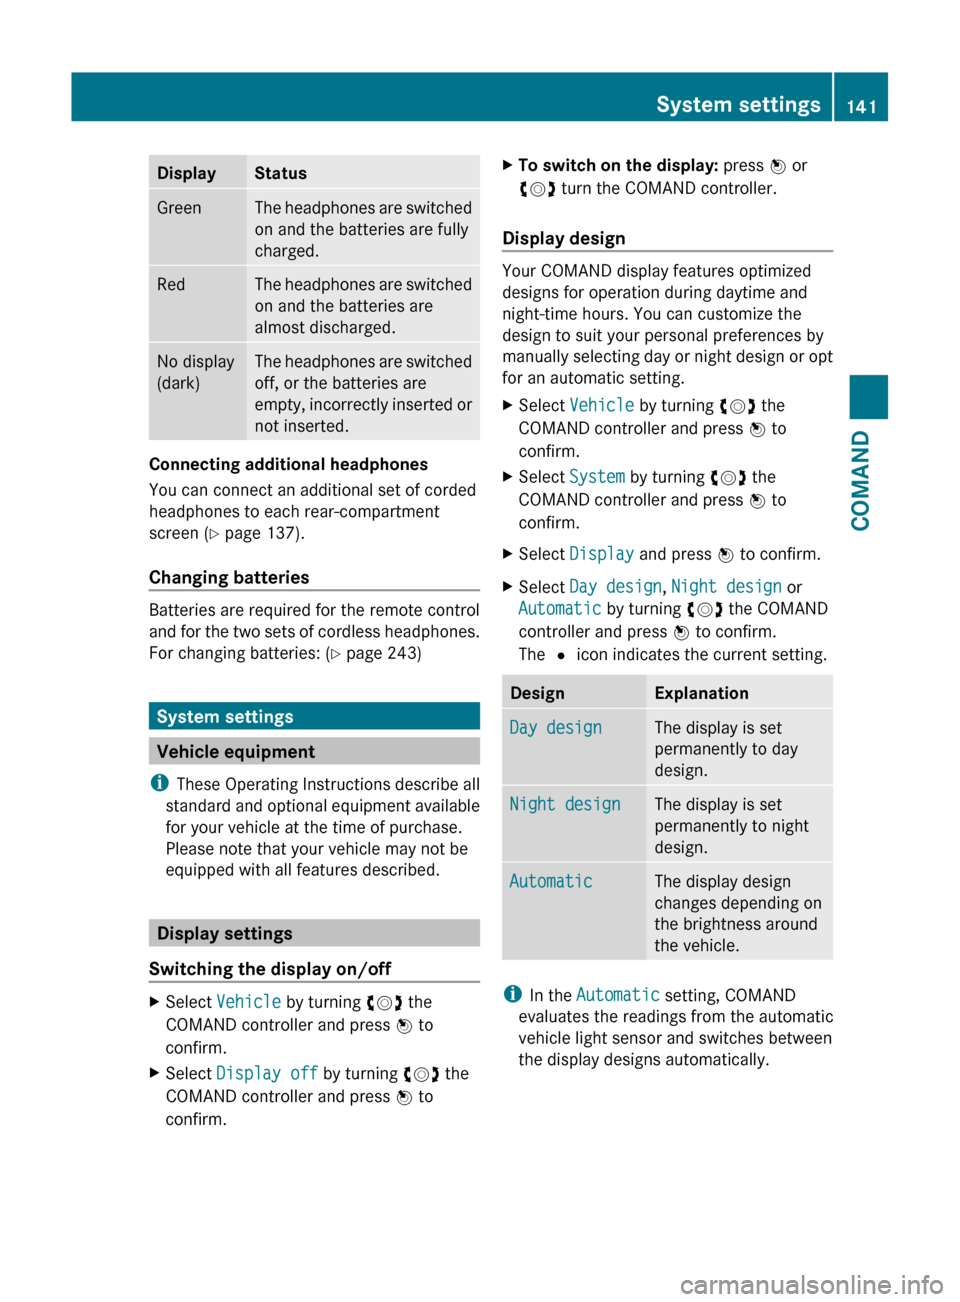
The # icon indicates the current setting.DesignExplanationDay designThe display is set
permanently to day
design.Night designThe display is set
permanently to night
design.AutomaticThe display design
changes depending on
the brightness around
the vehicle.
i In the Automatic setting, COMAND
evaluates the readings from the automatic
vehicle light sensor and switches between
the display designs automatically.
System settings141COMANDZ