MERCEDES-BENZ S-CLASS SALOON LONG 2020 Owners Manual
Manufacturer: MERCEDES-BENZ, Model Year: 2020, Model line: S-CLASS SALOON LONG, Model: MERCEDES-BENZ S-CLASS SALOON LONG 2020Pages: 609, PDF Size: 10.5 MB
Page 261 of 609
AIRM
ATIC Fu
nction of AIRMATIC
AIRMATIC is an air suspension sy stem with varia‐
ble damping for impr oved driving comfort. The
all-round le vel control sy stem ensures the best
possible suspension and const ant ground clear‐
ance, even wi tha laden vehicle. When driving at
speed, theve hicle is lo wered automatically to
impr ove driving saf ety and toreduce fuel con‐
sum ption. You also ha vethe option of manually
adjusting theve hicle le vel.
AIRMATIC includes thefo llowing components
and functions:
R air suspension with automatic all-round le vel
control
R speed-dependent lo wering toreduce fuel
consum ption
R increased vehicle le velfo r greater ground
clea rance, selected via the multimedia sys‐
tem
R ADS PLUS (Ada ptive Damping Sy stem with
const ant damping forc e adjustment) Suspension setting depending on
the drive
prog ram
Drive program CandB:
R The suspension setting is firm er.
R The vehicle is set tolow le vel -1.
R The vehicle is lo weredto low le vel -2 when
driving at speeds abo ve120 km/h.
R When driving at speeds bel ow80 km/h, the
ve hicle is raised again tolow le vel -1.
Drive prog ram A and;:
R The suspension setting is comfor table.
R The vehicle is set tothe normal le vel.
R The vehicle is lo weredto low le vel -1 when
driving at speeds abo ve120 km/h.
R The vehicle is lo weredto low le vel -2 when
driving at speeds abo ve160 km/h.
R When driving at speeds bel ow120 km/h, the
ve hicle is raised again tolow le vel -1.
R When driving at speeds below 80 km/h, the
ve hicle is raised again tothe normal le vel. %
Operation with a trailer or bicycle rack:if
transport equipment, such as a trailer or a
bicycle rack , is attached tothe trailer hitch
and the electrical connection has been cor‐
re ctly es tablished, theve hicle remains at
normal le vel ir respective of speed or the
drive prog ram selected.
Setting theve hicle le vel &
WARNING Risk of accident because
ve hicle le vel is too high
Driving characteristics may be impaired.
The vehicle can drift outwards, forex ample,
when steering or cornering. #
Choose a vehicle le vel which is suited
to the driving style and thero ad sur face
conditions. &
WARNING Risk of entrapment from vehi‐
cle lo wering
When lo wering theve hicle, other people
could become trapped if their limbs are 258
Driving and parking
Page 262 of 609
between
theve hicle body and the tyres or
underneath theve hicle. #
Make sure no one is underneath the
ve hicle or in the immediate vicinity of
th e wheel ar ches when theve hicle is
being lo wered. &
WARNING Risk of becoming trapped
due totheve hicle lo wering
Ve hicles with AIRMATIC or le vel control:
when you unload luggage or lea vetheve hi‐
cle, theve hicle firs trises slightly and then
re turns tothe set le vel shortly af terw ards.
Yo u or an yone else in the vicinity of the
wheel ar ches or the underbody could thus
become trapped.
The vehicle can also be lo wered af ter being
loc ked. #
When leaving theve hicle, make sure
th at nobody is in the vicinity of the
wheel ar ches or the underbody. *
NO
TEDama gedue tovehicle lo wering Pa
rts of the body could be damaged when
th eve hicle is lo wered. #
Make sure that there are no obs tacles
such as kerbs underneath or in the
immediate vicinity of the body when the
ve hicle is being lo wered. Re
quirements:
R The vehicle has been star ted.
R The vehicle is not moving fasterthan
60 km/h.
R When the trailer soc ket is contacted (trailer/
bicycle rack ):th eve hicle is not moving faster
th an 30 km/h.
Multimedia sy stem:
4 © 5
ß 5
y
Ra ising theve hicle #
Select t.
The indica tor lamp lights up continuously.
The vehicle is raised tooff-road le vel +1. Yo
ur selection is sa ved. The off-road le vel +1 set
re mains stored even af terth e ignition has been
switched off.
The vehicle is lo wered again in thefo llowing sit‐
uations:
R When driving fasterthan 80 km/h.
R When driving brief ly between 60 km/ h and
80 km/h.
R After selecting a dif fere nt drive program
using theDY NA MIC SELECT switch.
In this case, theve hicle is adjus tedto the
height of the active drive program.
R When the trailer soc ket is contacted (trailer/
bicycle rack ):th eve hicle is moving faster
th an 30 km/h.
Lo weri ngtheve hicle #
Select t.
The indica tor lamp goes out.
The vehicle is adjus tedto the height of the
active drive program. Driving and parking
259
Page 263 of 609
%
Inthe Sport drive program, only the normal
ve hicle le vel is possible when the trailer
soc ket is contacted (trailer/bicycle rack ). Re
versing camera Fu
nction of there ve rsing camera
The reve rsing camera monitors the area behind
yo ur vehicle. If this function is activated
(/ page 267), the image from there ve rsing
camera is automatically displa yed in the cent ral
display when reve rsege ar is selec ted.
The reve rsing camera is only an aid. It is not a
substitute foryo ur attention tothe sur roundings.
The responsibility for safe manoeuvring and
parking remains with you. Make sure that there
are no persons, animals or objects etc., in the
manoeuvring area while manoeuvring and park‐
ing.
% The area behind theve hicle is displa yed as a
mir ror image, as in the inside rearview mir‐
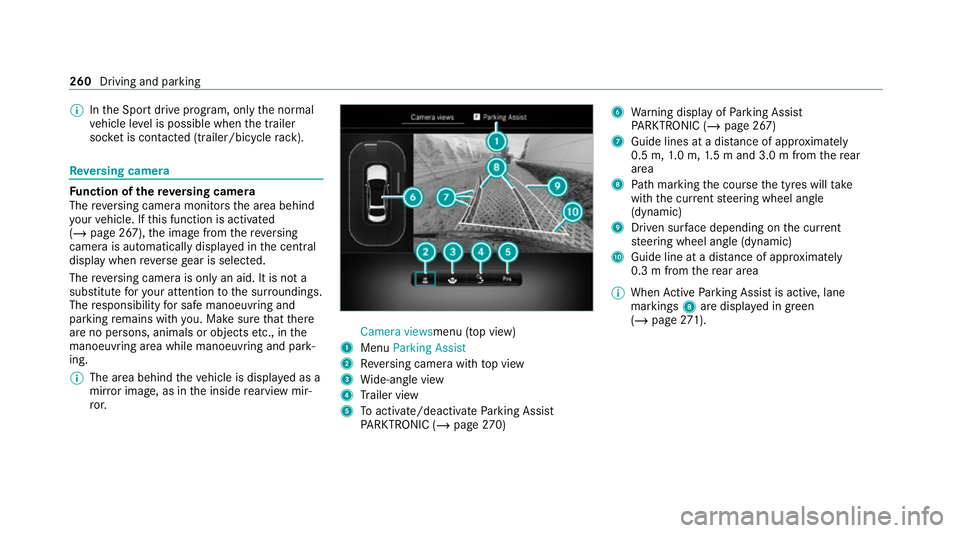
ro r. Camera views
menu (top view)
1 Menu Parking Assist
2 Reversing camera with top view
3 Wide-angle view
4 Trailer view
5 Toactivate/deactivate Parking Assist
PA RKTRONIC (/ page270) 6
Warning display of Parking Assist
PA RKTRONIC (/ page 267)
7 Guide lines at a dis tance of appr oximately
0.5 m, 1.0 m, 1.5 m and 3.0 m from there ar
area
8 Path marking the course the tyres will take
with the cur rent steering wheel angle
(dynamic)
9 Driven sur face depending on the cur rent
st eering wheel angle (dynamic)
A Guide line at a dis tance of appr oximately
0.3 m from there ar area
% When Active Parking Assist is active, lane
markings 8are displa yed in green
(/ page 271). 260
Driving and pa rking
Page 264 of 609
Wi
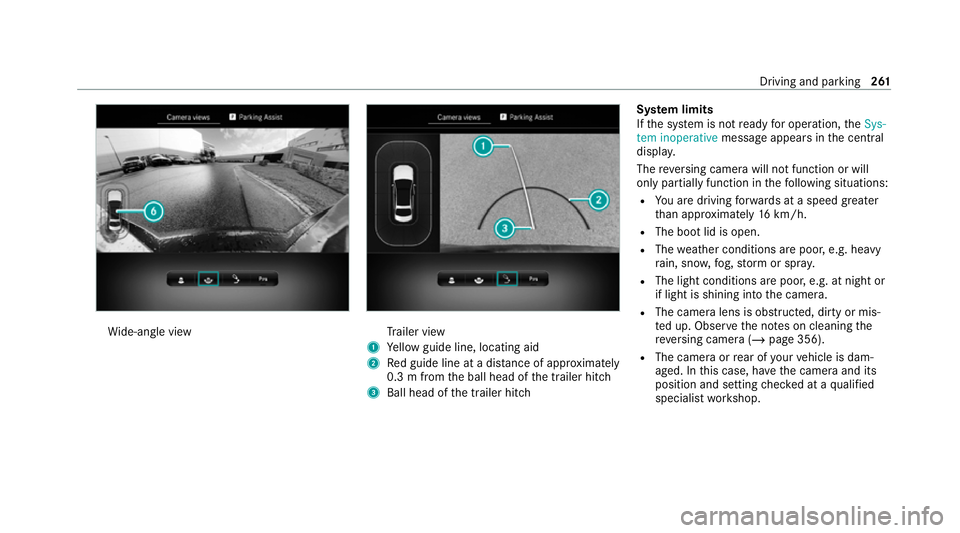
de-angle view Tr
ailer view
1 Yellow guide line, locating aid
2 Red guide line at a dis tance of appr oximately
0.3 m from the ball head of the trailer hitch
3 Ball head of the trailer hitch Sy
stem limits
If th e sy stem is not ready for operation, theSys-
tem inoperative message appears in the cent ral
displa y.
The reve rsing camera will not function or will
only partially function in thefo llowing situations:
R You are driving forw ards at a speed greater
th an appr oximately 16km/h.
R The bo otlid is open.
R The weather conditions are poor, e.g. heavy
ra in, sno w,fog, storm or spr ay.
R The light conditions are poor, e.g. at night or
if light is shining into the camera.
R The camera lens is obstructed, dirty or mis‐
te d up. Obser vethe no tes on cleaning the
re ve rsing camera (/ page 356).
R The camera or rear of your vehicle is dam‐
aged. In this case, ha vethe camera and its
position and setting checked at a qualified
specialist workshop. Driving and parking
261
Page 265 of 609
%
Do not use there ve rsing camera in these
types of situations. You could otherwise
injure others or collide with objects when
parking theve hicle.
The field of vision and other functions of the
re ve rsing camera may be restricted due toaddi‐
tional accesso ries on there ar of theve hicle (e.g.
licence plate brac ket or bicycle rack ).
% The contrast of the display may be impaired
by direct sunlight or by other light sources,
e.g. when driving out of a garage . In this
case, pay particular attention.
% Have the display repaired or replaced if, for
ex ample, pixel er rors considerably restrict its
use. 360° Came
ra Fu
nction of the 360° Camera
The 360° Camera is a sy stem that consists of
fo ur cameras which co verth e immediate sur‐
ro undings of theve hicle. The cameras assist you
when you are parking, forex ample, or at exits
with reduced visibility. If
th is function is activated, the image from the
re ve rsing camera is automatically displa yed in
th e cent ral display when reve rsege ar is selec ted
( / page 267).
The 360° Camera includes thefo llowing cam‐
eras and evaluates their images:
R Reversing camera
R Front camera
R Two side cameras in the outside mir rors
The cameras are only an aid and may show a dis‐
to rted view of obs tacles, show them incor rectly
or not show them at all. They are not a substi‐
tute foryo ur attention tothe sur roundings. The
re sponsibility for safe manoeuvring and parking
re mains with you. Make sure that there are no
persons, animals or objects etc., in the manoeu‐
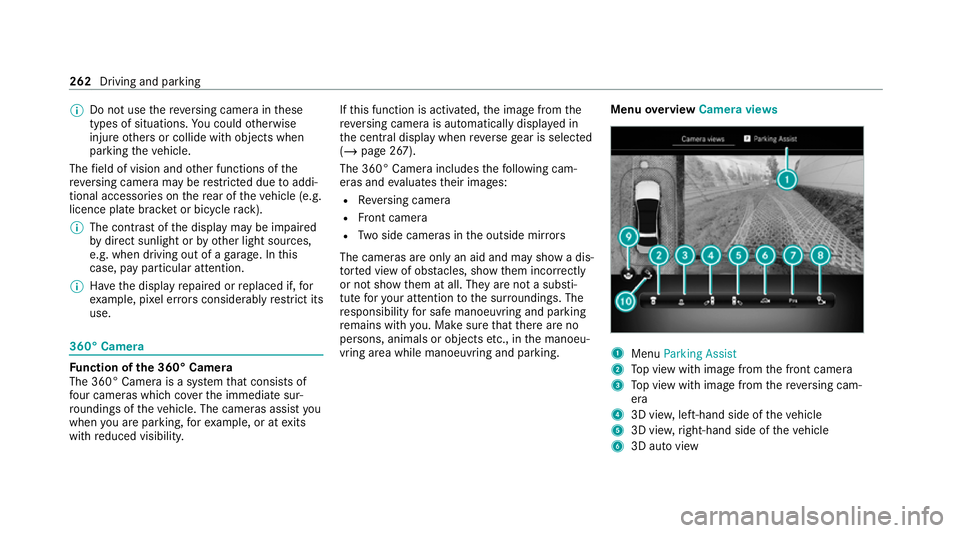
vring area while manoeuvring and parking. Menu
overview Camera views 1
Menu Parking Assist
2 Top view with image from the front camera
3 Top view with image from there ve rsing cam‐
era
4 3D vie w,left-hand side of theve hicle
5 3D vie w,right-hand side of theve hicle
6 3D auto view 262
Driving and parking
Page 266 of 609
7
Toactivate/deactivate Parking Assist
PA RKTRONIC (/ page270)
8 Toset the GPS activation point
(/ page 267)
9 Toswitch between standard and wide-angle
view
A Toswitch between standard and trailer view
% In all vie ws,th ePa rking Assist PARKTRONIC
wa rning display is shown (/ page 267).Fu
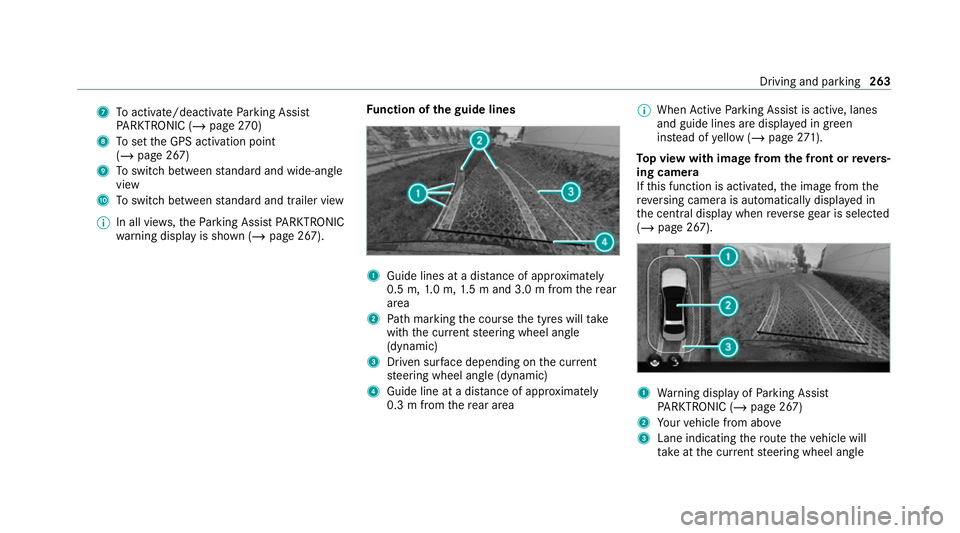
nction of the guide lines 1
Guide lines at a dis tance of appr oximately
0.5 m, 1.0 m, 1.5 m and 3.0 m from there ar
area
2 Path marking the course the tyres will take
with the cur rent steering wheel angle
(dynamic)
3 Driven sur face depending on the cur rent
st eering wheel angle (dynamic)
4 Guide line at a dis tance of appr oximately
0.3 m from there ar area %
When Active Parking Assist is active, lanes
and guide lines are displa yed in green
ins tead of yellow (/ page271).
To p view with image from the front or reve rs‐
ing camera
If th is function is activated, the image from the
re ve rsing camera is automatically displa yed in
th e cent ral display when reve rsege ar is selec ted
( / page 267). 1
Warning display of Parking Assist
PA RKTRONIC (/ page 267)
2 Your vehicle from abo ve
3 Lane indicating thero ute theve hicle will
ta ke atthe cur rent steering wheel angle Driving and parking
263
Page 267 of 609
3D vie
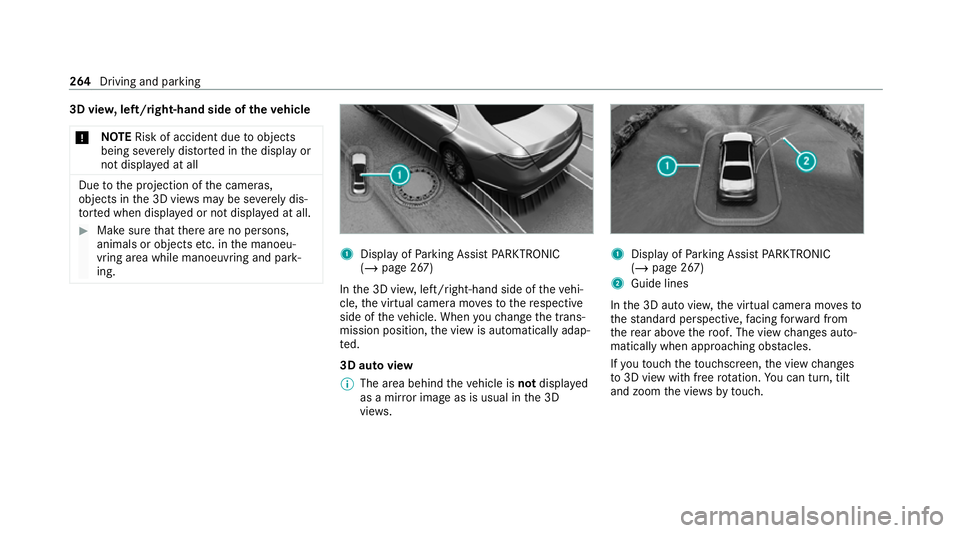
w,left/right-hand side of theve hicle
* NO
TERisk of accident due toobjects
being se verely di stor ted in the display or
not displa yed at all Due
tothe projection of the cameras,
objects in the 3D vie wsmay be se verely dis‐
to rted when displa yed or not displa yed at all. #
Make sure that there are no persons,
animals or objects etc. in the manoeu‐
vring area while manoeuvring and park‐
ing. 1
Display of Parking Assist PARKTRONIC
(/ page 267)
In the 3D vie w,left/ right-hand side of theve hi‐
cle, the virtual camera mo vesto there spective
side of theve hicle. When youch ange the trans‐
mission position, the view is automatically adap‐
te d.
3D auto view
% The area behind theve hicle is notdispla yed
as a mir ror image as is usual in the 3D
vie ws. 1
Displ ayofParking Assist PARKTRONIC
(/ page 267)
2 Guide lines
In the 3D auto vie w,the virtual camera mo vesto
th est andard perspective, facing forw ard from
th ere ar abo vethero of. The view changes auto‐
matically when approaching obs tacles.
If yo uto uch theto uchsc reen, the view changes
to 3D view with free rotation. You can turn, tilt
and zoom the vie wsbytouch. 264
Driving and parking
Page 268 of 609
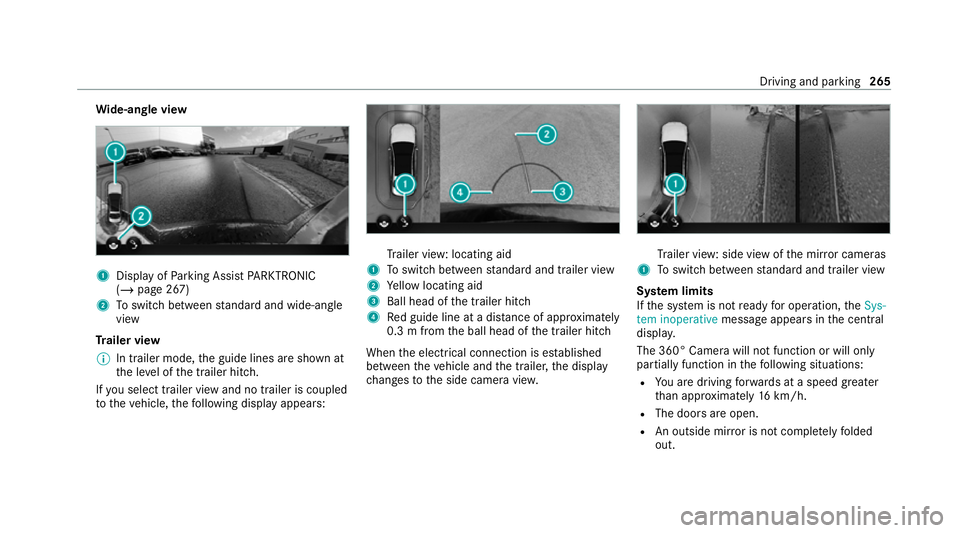
Wi
de-an gle view 1
Display of Parking Assist PARKTRONIC
(/ page 267)
2 Toswitch between standard and wide-angle
view
Tr ailer view
% In trailer mode, the guide lines are shown at
th e le vel of the trailer hitch.
If yo u select trailer view and no trailer is coupled
to theve hicle, thefo llowing display appears: Tr
ailer view: locating aid
1 Toswitch between standard and trailer view
2 Yellow locating aid
3 Ball head of the trailer hitch
4 Red guide line at a dis tance of appr oximately
0.3 m from the ball head of the trailer hitch
When the electrical connection is es tablished
between theve hicle and the trailer, the display
ch anges tothe side camera vie w. Tr
ailer view: side view of the mir ror cameras
1 Toswitch between standard and trailer view
Sy stem limits
If th e sy stem is not ready for operation, theSys-
tem inoperative message appears in the cent ral
displa y.
The 360° Camera will not function or will only
partially function in thefo llowing situations:
R You are driving forw ards at a speed greater
th an appr oximately 16km/h.
R The doors are open.
R An outside mir ror is not comple tely folded
out. Driving and parking
265
Page 269 of 609
R
The boot lid is open.
R The weather conditions are poor, e.g. heavy
ra in, sno w,fog, storm or spr ay.
R The light conditions are poor, e.g. at night or
if light is shining into the camera.
R The camera lens is obstructed, dirty or mis‐
ted up.
R If cameras or vehicle components in which
th e cameras are fitted are dama ged. In this
eve nt, ha vethe cameras, their positions and
th eir setting checked at a qualified specialist
wo rkshop.
% Do not use the 360° Camera under such cir‐
cums tances. You could otherwise injure oth‐
ers or collide with objects when parking the
ve hicle.
Fo rte ch nical reasons, thest andard height of the
ve hicle may be altered if theve hicle is car rying a
heavy load and can result in inaccuracies in the
guide lines and in the display of thege nerated
ima ges.
The field of vision and other functions of the
came rasystem may be restricted due toaddi‐ tional attachments on
theve hicle (e.g. licence
plate brac ket, bicycle rack ).
% The contrast of the display may be impaired
by abrupt, direct sunlight or by other light
sources, e.g. when driving out of a garage . In
th is case, pay particular attention.
% Have the display repaired or replaced if, for
ex ample, pixel er rors considerably restrict its
use.
See the no tes on cleaning the 360° Camera
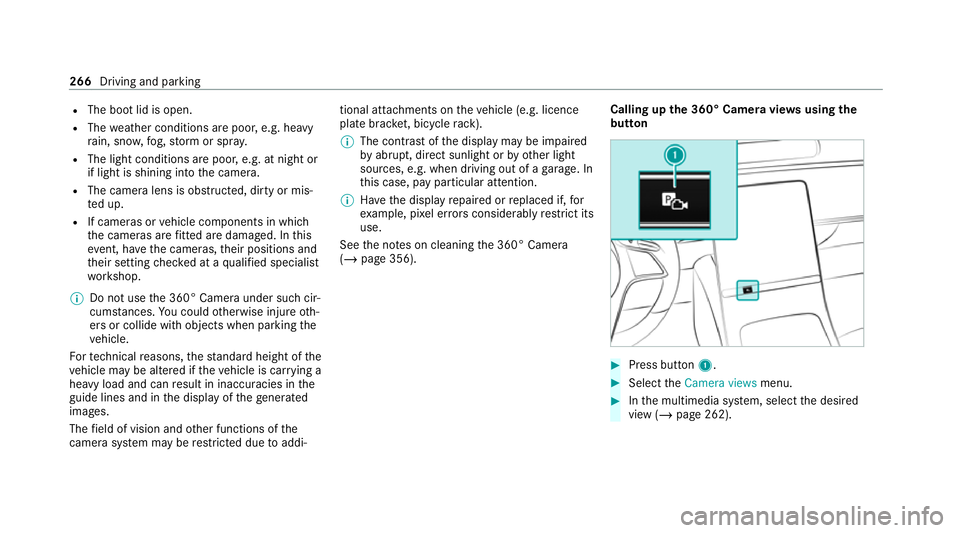
(/ page 356). Calling up
the 360° Camera vie wsusing the
button #
Press button 1. #
Select theCamera views menu. #
Inthe multimedia sy stem, select the desired
view (/ page 262). 266
Driving and parking
Page 270 of 609
Selecting a view
for the 360° Camera
(r eve rsege ar)
Re quirements:
R The Rear camera image or3D view setting is
activated in the multimedia sy stem
(/ page 267). #
Shift toreve rsege ar. #
Select the desired view in the multimedia
sy stem (/ page 262).
Setting there ve rsing camera or 360° Cam‐
era
The reve rsing camera is only an aid. It is not a
substitute foryo ur attention tothe sur roundings.
The responsibility for safe manoeuvring and
parking remains with you. Make sure that no
persons, animals or objects etc. are in the
manoeuvring range. Pay attention to your sur‐
ro undings and be ready tobrake at all times.
Multimedia sy stem:
4 © 5
Settings 5
Assistance
5 Camera #
Select Rear camera image orSystem off. 360° Camera with GPS - managing activation
positions
Multimedia sy stem:
4 © 5
Settings 5
Assistance
5 Camera
Re naming an activation position
% You can de term ine activation positions in the
Camera views menu. (/page 262) #
Select an activation position. #
Select ´. #
Enter a name and confirm.
The activation position is sa ved under the
new name.
Deleting an acti vation position #
Select Manage activation positions. #
Select an acti vation position. #
Select E. #
Confirm the prom pt.
The activation position is dele ted. Opening
the camera co ver of the reve rsing
camera
Multimedia sy stem:
4 © 5
Settings 5
Assistance
5 Camera #
Select Open camera cover.
% The camera co ver closes auto maticallyafter
some time or af ter an ignition cycle. Pa
rking Assist PARKTRONIC Fu
nction of Parking Assist PARKTRONIC
Pa rking Assist PARKTRONIC is an electronic
parking assi stance sy stem which monitors the
area sur rounding your vehicle and sho wsyouthe
dis tance between theve hicle and a de tected
obs tacle visually and audibly.
The passi veside impact pr otection also warns
yo u of obs tacles tothe side. These must be
de tected beforehand bythe sensors in the front
or rear bumper while driving bythem. If you
st eer in the direction of a de tected obs tacle and
th ere is a risk of a lateral collision, a warning is
issued. The passive side impact pr otection can Driving and parking
267