light MERCEDES-BENZ S-CLASS SEDAN 2013 Owners Manual
[x] Cancel search | Manufacturer: MERCEDES-BENZ, Model Year: 2013, Model line: S-CLASS SEDAN, Model: MERCEDES-BENZ S-CLASS SEDAN 2013Pages: 536, PDF Size: 24.14 MB
Page 296 of 536

X
To deactivate: press the K rocker
switch up or down.
The indicator lamp in the à rocker
switch goes out.
or
X Set the air distribution using COMAND
(Y page 266).
The indicator lamp in the à rocker
switch goes out.
Controlling the rear-compartment
climate control automatically using the
front control panel X
Turn the SmartKey to position 2 in the
ignition lock.
X Activate the Y rear compartment
function via COMAND ( Y page 268).
Rear-compartment climate control can be
controlled
via the front control panel using
the Y rear compartment function.
X Set the desired temperature.
X To switch on: press rocker switch Ã
up or down.
The indicator lamp in the à rocker
switch lights up.
X To deactivate: press the K rocker
switch up or down.
The indicator lamp in the à rocker
switch goes out.
or
X Set the air distribution using COMAND
(Y page 266).
The indicator lamp in the à rocker
switch goes out.
i To
return to the standard display, activate
the front climate control function via
COMAND (Y page 268).
i The rear display changes to the standard
display automatically after five seconds. Controlling the rear-compartment
climate
control automatically using the
rear control panel X
Turn the SmartKey to position 2 in the
ignition lock.
X Set the desired temperature.
X To activate: press
rocker switch K up or
down and select AUTO(Y page 291).
X To deactivate: press rocker switch K up
or down and select MAN or
OFF(Y page 291). Setting the temperature
Climate control climate zones
You
can select different temperature settings
for the driver's and front-passenger sides as
well as for the left and right sides of the rear
compartment and the footwells.
Setting the front-compartment
temperature using the front control
panel X
Turn the SmartKey to position 2 in the
ignition lock.
X To increase/reduce: press the w
rocker switch up or down.
Only change the temperature setting in
small increments. Start at
72 ‡ (22 †).
i You can also use COMAND to set the
temperature ( Y page 265).294
Operating the climate control system
Climate control
Page 298 of 536

Setting the rear-compartment airflow
using the front control panel
X
Turn the SmartKey to position 2 in the
ignition lock.
X Activate the Y rear compartment
function via COMAND ( Y page 268).
The rear-compartment climate control can
be controlled via the front control panel
using
the Y rear compartment function.
X To increase/reduce: press the K
rocker switch up or down.
Setting the rear-compartment airflow
using the rear control panel X
Turn the SmartKey to position 2 in the
ignition lock.
X To increase/reduce: press rocker switch
J up or down ( Y page 291).Defrosting the windshield
You can use this function to defrost the
windshield or to defrost the inside of the
windshield and the side windows.
i You should only select the defrosting
function
until the windshield is clear again.
X Turn the SmartKey to position 2 in the
ignition lock.
X To switch on: press the ¬ rocker
switch up or down.
The indicator lamp in the ¬ rocker
switch lights up.
The
climate control system switches to the
following functions:
R cooling with air dehumidification on
R high airflow 17
R high temperature 17
R air distribution to the windshield and
front side windows
R air-recirculation mode off X
To deactivate: press the ¬ rocker
switch up or down.
The indicator lamp in the ¬ rocker
switch goes out. The previously selected
settings
come into effect again. The cooling
with air dehumidification function remains
on. Air-recirculation mode remains
deactivated.
or
X Press the w rocker switch up or down.
or
X Press the K rocker switch up or down. MAX COOL maximum cooling
The MAX COOL function is only available in
vehicles for the USA.
MAX COOL is only operational when the
engine is running.
The MAX COOL function is activated
automatically:
R if climate control is set to automatic
(Ã) on both sides
R if additional cooling is used
The display shows MAX COOL.
This is the quickest way to cool the vehicle
interior
when the sliding sunroof and the side
windows are closed. Defrosting the windows
Windows fogged up on the inside X
Activate the cooling with air
dehumidification function via COMAND
(Y page 267).
X Activate automatic mode Ã.
X If the windows continue to fog up, activate
the defrosting function
(Y page 296).
i You should only select this setting until
the windshield is clear again.
17 Depending on the outside temperature.296
Operating the climate control system
Climate control
Page 299 of 536

Windows fogged up on the outside
X
Switch on the windshield wipers.
X Activate automatic climate control.
i You should only select this setting until
the windshield is clear again. Rear window defroster
Activating/deactivating G
WARNING
Any accumulation of snow and ice should be
removed from the rear window before driving.
Visibility could otherwise be impaired,
endangering you and others.
The rear window defroster has a high current
draw. You should therefore switch it off as
soon as the window is clear as it only switches
off automatically after several minutes.
If the battery voltage is too low, the rear
window defroster may switch off.
X Turn the SmartKey to position 2 in the
ignition lock.
X Press the ¤ rocker switch up or down.
The indicator lamp in the ¤ rocker
switch lights up or goes out.
Problems with the rear window
defroster The rear window defroster has deactivated
itself prematurely or cannot be activated.
X
Switch off any consumers that are not
required, e.g. reading lamps or interior
lighting.
When the battery is sufficiently charged,
the rear window defroster is activated
again automatically. Activating/deactivating air-
recirculation mode
You can deactivate the flow of fresh air if
unpleasant odors are entering the vehicle from outside. The air already inside the
vehicle will then be recirculated. G
WARNING
Fogged windows impair visibility,
endangering you and others. If the windows
begin to fog on the inside, switching off the
air recirculation mode immediately should
clear interior window fogging. If interior
window fogging persists, make sure the air
conditioning is activated, or press the ¬
button.
X Turn the SmartKey to position 2 in the
ignition lock.
X To activate: press the g rocker switch
up or down.
The indicator lamp in the g rocker
switch lights up.
i Air-recirculation mode is activated
automatically at high outside
temperatures. The indicator lamp in the
g rocker switch is not lit when
automatic air-recirculation mode is
activated.
Outside air is added after about 30
minutes.
X To deactivate: press the g rocker
switch up or down.
The indicator lamp in the g rocker
switch goes out.
i Air-recirculation mode deactivates
automatically:
R after approximately five minutes if
outside
temperatures are less than about
41 ‡ (5 †)
R after approximately five minutes if
cooling with air dehumidification is
deactivated
R after approximately 30 minutes if outside
temperatures are over about
41 ‡ (5 †) Operating the climate control system
297
Climate control Z
Page 300 of 536

Activating/deactivating the residual
heat function
It
is possible to make use of the residual heat
of the engine to continue heating the
stationary vehicle for up to 30 minutes after
the engine has been switched off. The heating
time depends on the temperature that has
been set.
i The blower will run at a low speed
regardless of the airflow setting.
i If you activate the residual heat function
at high temperatures, only the ventilation
will be activated. The blower runs at
medium speed.
X Turn the SmartKey to position 0 in the
ignition lock or remove it.
X To activate: press the Ì rocker switch
up or down.
The indicator lamp in the Ì rocker
switch lights up.
X To deactivate: press the Ì rocker
switch up or down.
The indicator lamp in the Ì rocker
switch goes out.
i Residual heat is deactivated
automatically:
R after about 30 minutes
R when the ignition is switched on
R if the battery voltage drops
R if the coolant temperature is too low Setting the air vents
Important safety notes
G
WARNING
When operating the climate control, the air
that enters the passenger compartment
through the air vents can be very hot or very
cold
(depending on the set temperature). This
could cause burns or frostbite to unprotected
skin in the immediate area of the air vents. Always keep sufficient distance between
unprotected parts of the body and the air
vents. If necessary, use the air distribution
adjustment
to direct the air to air vents in the
vehicle interior that are not in the immediate
area of unprotected skin.
In order to ensure the direct flow of fresh air
through the air vents into the vehicle interior,
please observe the following notes:
R keep the air intake grille on the hood free
of blockages, such as ice, snow or leaves
R never cover the air vents or air intake grille
in the vehicle interior.
i For virtually draft-free ventilation, adjust
the sliders of the air vents to the center
position. Setting the center air vents
:
Fixed center air vent
; Center air vent, right
= Center vent thumbwheel, right
? Center vent thumbwheel, left
A Center air vent, left
X To open/close: turn thumbwheels =
and ? up or down. 298
Setting the air vents
Climate control
Page 306 of 536

i
You do not have to remove the Start/Stop
button from the ignition lock when you
leave the vehicle. However, you should
always take the SmartKey with you when
leaving the vehicle. The vehicle can be
started with the Start/Stop button and the
electrical equipment can be operated while
the SmartKey is in the vehicle. :
Start/Stop button
; Ignition lock
X Insert Start/Stop button : into ignition
lock ;.
i When you insert Start/Stop button :
into
ignition lock ;, the system requires a
detection time of approximately two
seconds before you can use Start/Stop
button :. Start/Stop button
=
USA only
? Canada only X
Position 0:
if Start/Stop button : has not
yet been pressed, this corresponds to the
SmartKey being removed from the ignition.
X Position 1: press Start/Stop button :.
You can now activate the windshield
wipers, for example.
i If
you then open the driver's door when in
this position, the power supply is
deactivated.
X Position 2 (ignition): press Start/Stop
button : twice.
i If you press Start/Stop button : once
when in this position and the driver's door
is open, the power supply is deactivated
again.
As
soon as the ignition is switched on, all the
indicator lamps in the instrument cluster light
up. If an indicator lamp does not go out after
the engine is started or if it lights up while the
vehicle is in motion, see ( Y page 422). Starting the engine
Important safety notes G
WARNING
Inhalation of exhaust gas is hazardous to your
health. All exhaust gas contains carbon
monoxide (CO), and inhaling it can cause
unconsciousness and possible death.
Do
not run the engine in confined areas (such
as a garage) which are not properly ventilated.
If you think that exhaust gas fumes are
entering the vehicle while driving, have the
cause determined and corrected
immediately. If you must drive under these
conditions, drive only with at least one
window fully open at all times.
! Do not depress the accelerator pedal
when starting the engine.
i Vehicles with a gasoline engine: the
catalytic converter is preheated for up to 304
Driving
Driving and parking
Page 307 of 536

30 seconds after a cold start. The sound of
the engine may change during this time.
Automatic transmission X
Shift the transmission to position P.
The transmission position display in the
multifunction display shows P.
i You can also start the engine when the
transmission is in position N.
Starting procedure with the SmartKey i
To start the engine using the SmartKey
instead of KEYLESS-GO, pull the Start/
Stop button out of the ignition lock.
X To start a gasoline engine: turn the
SmartKey to position 3 in the ignition lock
(Y page 303) and release it as soon as the
engine is running.
X To start a diesel engine: turn the
SmartKey to position 2 in the ignition lock
(Y page 303).
The % preglow indicator lamp in the
instrument cluster lights up.
X When the % preglow indicator lamp
goes out, turn the SmartKey to position 3
(Y page 303) and release it as soon as the
engine is running.
i You can start the engine without preglow
if the engine is warm.
Using KEYLESS-GO to start the engine G
WARNING
As long as the SmartKey is in your vehicle, the
vehicle
can be started. Therefore, never leave
children unattended in the vehicle, as they
could otherwise accidentally start the engine.
When leaving the vehicle, always take the
SmartKey with you and lock the vehicle. Do
not leave children unattended in the vehicle,
or with access to an unlocked vehicle. A
child's unsupervised access to a vehicle could
result in an accident and/or serious personal
injury. i
The Start/Stop button can be used to
start
the vehicle manually without inserting
the SmartKey into the ignition lock. The
Start/Stop button must be inserted into
the ignition lock and the SmartKey must be
in the vehicle. This mode for starting the
engine operates independently of the ECO
start/stop automatic engine start function.
X Depress the brake pedal and keep it
depressed.
X To start a gasoline engine: press the
Start/Stop button
(Y page 303) once.
The engine starts.
X To start a diesel engine:
press the Start/
Stop button (Y page 303) once.
Preglow is activated and the engine starts.
i If
the engine is warm, the preglow time is
shortened. Pulling away
Automatic transmission G
WARNING
It is dangerous to shift the automatic
transmission out of parking position P or
neutral position N if the engine speed is
higher
than idle speed. If your foot is not firmly
on the brake pedal, the vehicle could
accelerate quickly forward or in reverse. You
could lose control of the vehicle and hit
someone or something. Only shift into gear
when the engine is idling normally and when
your right foot is firmly on the brake pedal.
i It is only possible to shift the transmission
from position P to the desired position if
you depress the brake pedal. Only then is
the parking lock released. If you do not
depress the brake pedal, you can move the
DIRECT SELECT lever but the parking lock
remains engaged.
X Depress the brake pedal and keep it
depressed.
X Shift the transmission to position D or R. Driving
305
Driving and parking Z
Page 312 of 536
Problem Possible causes/consequences and
M SolutionsVehicles with a
gasoline engine:
The engine is not
running smoothly and
is misfiring. There is a malfunction in the engine electronics or a mechanical
component of the engine management system.
X
Only depress the accelerator pedal slightly.
X Have the cause rectified immediately at a qualified specialist
workshop, e.g. an authorized Mercedes-Benz Center.
Otherwise, non-combusted fuel may get into the catalytic
converter and damage it. The coolant
temperature gauge
shows a value above
248 ‡
(120 †). The coolant level is too low. The coolant is too hot and the engine
is no longer being cooled sufficiently.
X
Stop as soon as possible and allow the engine and the coolant
to cool down.
X Check the coolant level (Y page 460). Observe the warning
notes as you do so and add coolant if necessary. Automatic transmission
Important safety notes
G
WARNING
It is dangerous to shift the automatic
transmission out of parking position P or
neutral position N if the engine speed is
higher
than idle speed. If your foot is not firmly
on the brake pedal, the vehicle could
accelerate quickly forward or in reverse. You
could lose control of the vehicle and hit
someone or something. Only shift into gear
when the engine is idling normally and when
your right foot is firmly on the brake pedal. G
WARNING
Keep in mind that turning off the engine alone
only
will shift the automatic transmission into
neutral position N automatically.
Always shift the automatic transmission into
park position P before turning off the engine.
Otherwise the vehicle could roll away which
could result in an accident and/or serious
personal injury. G
WARNING
HYBRID vehicles: It is imperative that you read
the HYBRID Supplemental Operating
Instructions
included in your vehicle literature
portfolio. You may otherwise not receive all
necessary safety information and warning for
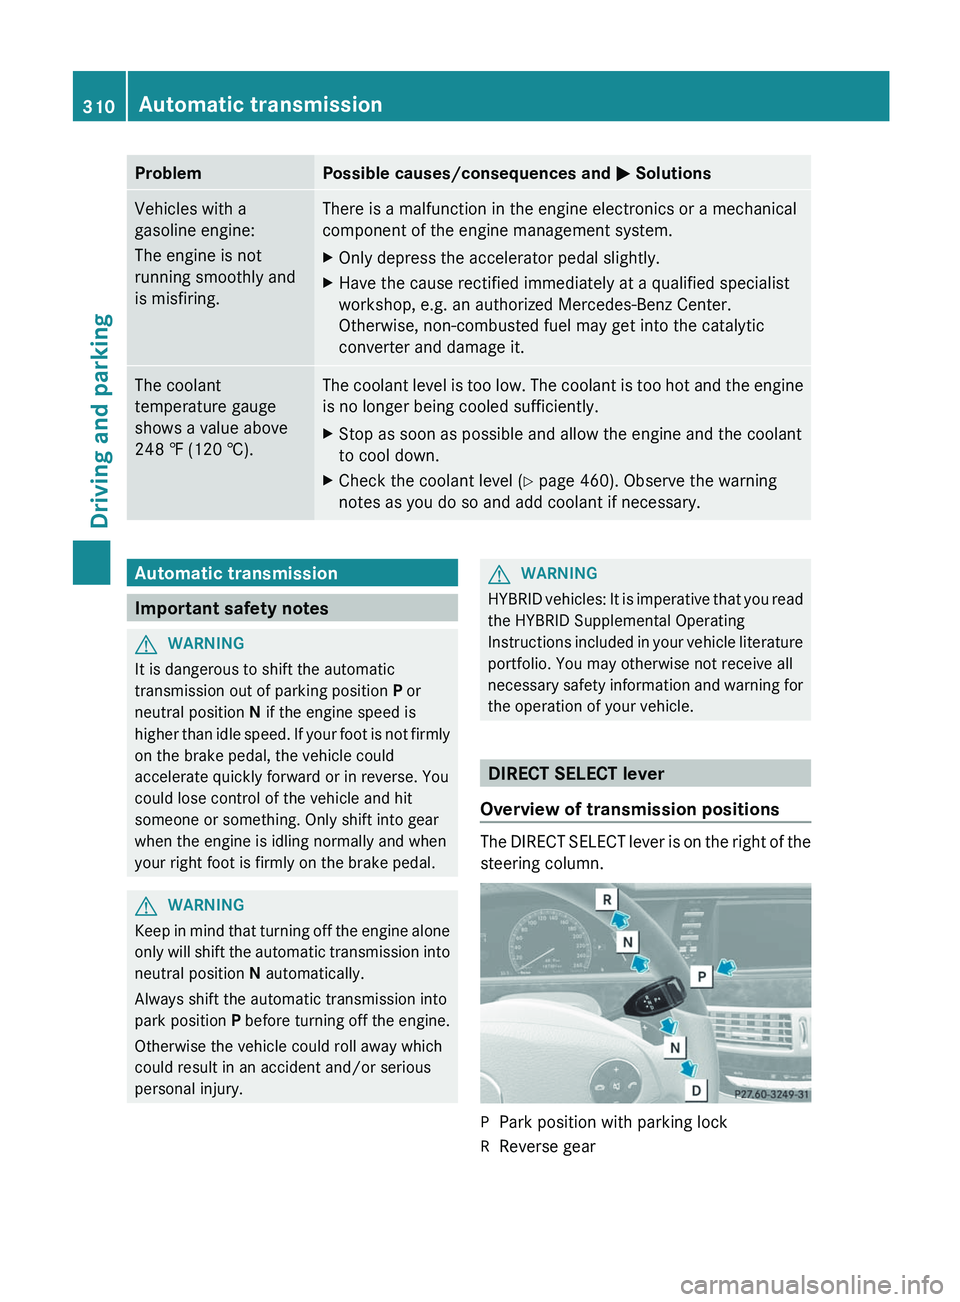
the operation of your vehicle. DIRECT SELECT lever
Overview of transmission positions The DIRECT SELECT lever is on the right of the
steering column.
P
Park position with parking lock
R Reverse gear310
Automatic transmission
Driving and parking
Page 321 of 536
Low outside temperatures
!
Do not use gasoline to refuel vehicles with
a diesel engine. Never mix diesel with
gasoline or kerosene, as this may result in
damage to the engine or fuel system.
Diesel fuel with improved cold flow properties
is available during the winter months. Further
information on fuel properties can be
obtained from oil companies, e.g. at gas
stations. Refueling
Fuel filler flap The fuel filler flap is unlocked or locked
automatically when you open or close the
vehicle
with the SmartKey or using KEYLESS-
GO.
The position of the fuel filler cap is displayed
in the instrument cluster 8. The arrow
next to the filling pump indicates the side of
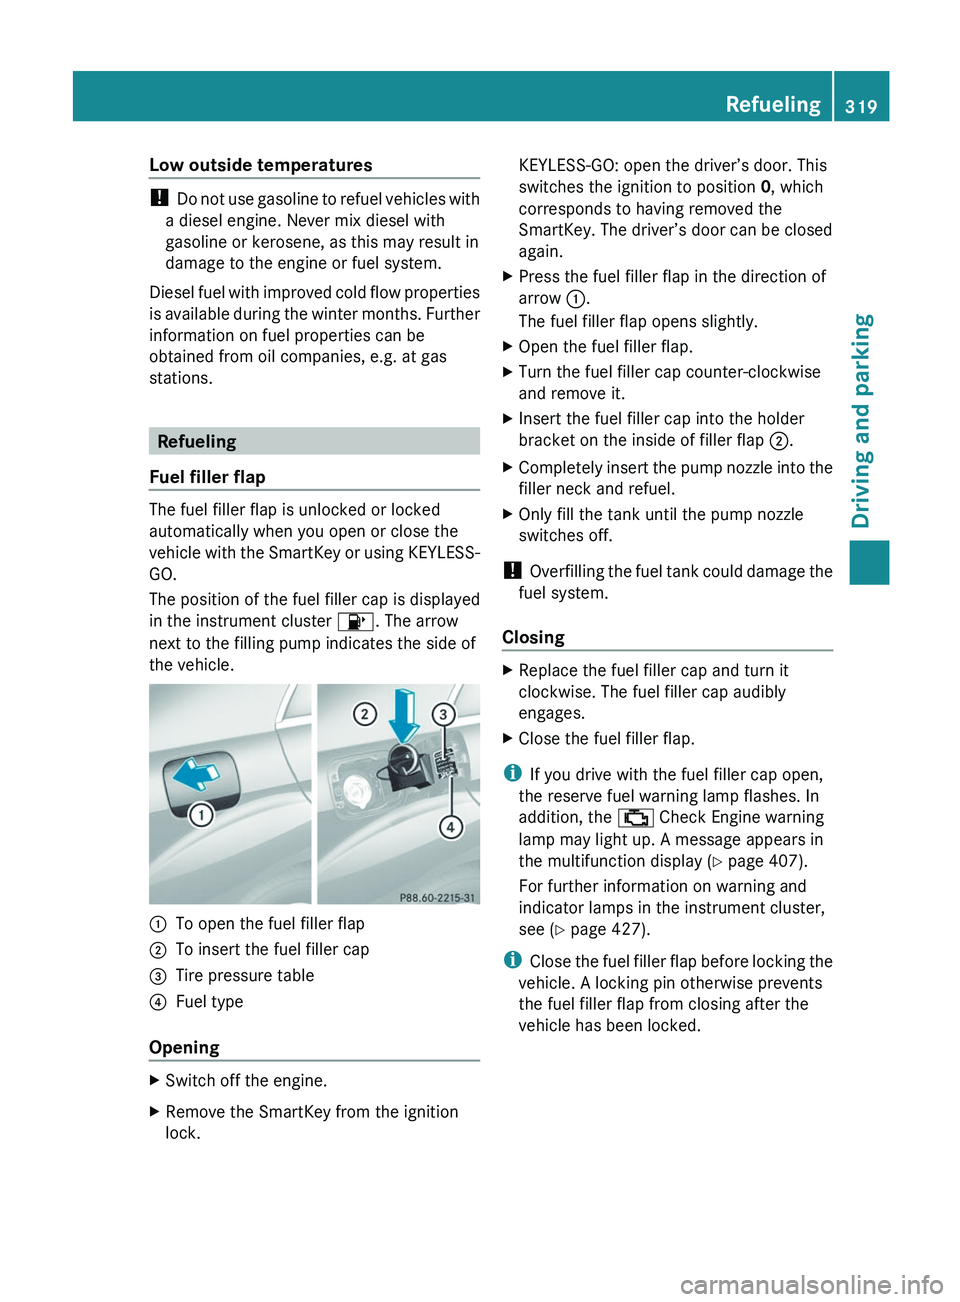
the vehicle. :
To open the fuel filler flap
; To insert the fuel filler cap
= Tire pressure table
? Fuel type
Opening X
Switch off the engine.
X Remove the SmartKey from the ignition
lock. KEYLESS-GO: open the driver’s door. This
switches the ignition to position
0, which
corresponds to having removed the
SmartKey. The driver’s door can be closed
again.
X Press the fuel filler flap in the direction of
arrow :.
The fuel filler flap opens slightly.
X Open the fuel filler flap.
X Turn the fuel filler cap counter-clockwise
and remove it.
X Insert the fuel filler cap into the holder
bracket on the inside of filler flap ;.
X Completely insert the pump nozzle into the
filler neck and refuel.
X Only fill the tank until the pump nozzle
switches off.
! Overfilling
the fuel tank could damage the
fuel system.
Closing X
Replace the fuel filler cap and turn it
clockwise. The fuel filler cap audibly
engages.
X Close the fuel filler flap.
i If you drive with the fuel filler cap open,
the reserve fuel warning lamp flashes. In
addition, the ; Check Engine warning
lamp may light up. A message appears in
the multifunction display
(Y page 407).
For further information on warning and
indicator lamps in the instrument cluster,
see ( Y page 427).
i Close the fuel filler flap before locking the
vehicle. A locking pin otherwise prevents
the fuel filler flap from closing after the
vehicle has been locked. Refueling
319
Driving and parking Z
Page 326 of 536
G
WARNING
Keep in mind that turning off the engine alone
only will shift the automatic transmission into
neutral position N automatically.
Always shift the automatic transmission into
park position P before turning off the engine.
Otherwise the vehicle could roll away which
could result in an accident and/or serious
personal injury.
i If you cannot turn off the engine as
described here, see "Engine emergency
stop" ( Y page 487).
Vehicles with automatic transmission X
Apply the electric parking brake.
X Shift the transmission to position P.
Using the SmartKey
X Turn the SmartKey to position 0 in the
ignition lock and remove it.
The immobilizer is activated.
i If you turn off the engine with the
SmartKey and then remove it from the
ignition lock or open a front door, the
automatic transmission shifts to P
automatically.
Using KEYLESS-GO
X Press the Start/Stop button (Y page
303).
The engine stops and all the indicator
lamps in the instrument cluster go out.
i When the driver's door is closed, this
corresponds
to SmartKey position 1. When
the driver's door is open, it corresponds to
SmartKey position 0 or "SmartKey
removed".
i If you use the Start/Stop button to switch
off the engine, the automatic transmission
shifts to N automatically. If you then open
the driver's or front-passenger door, the
automatic transmission shifts to P.
i In an emergency, the engine can be
turned off while the vehicle is in motion by pressing and holding the Start/Stop button
for three seconds. This function operates
independently from the ECO start/stop
automatic engine switch-off function.
Electric parking brake
General information G
WARNING
When leaving the vehicle, always remove the
SmartKey
from the starter switch, take it with
you, and lock the vehicle. Do not leave
children unattended in the vehicle, or with
access to an unlocked vehicle. Children could
release the parking brake and/or shift the
automatic transmission out of park position
P, either of which could result in an accident
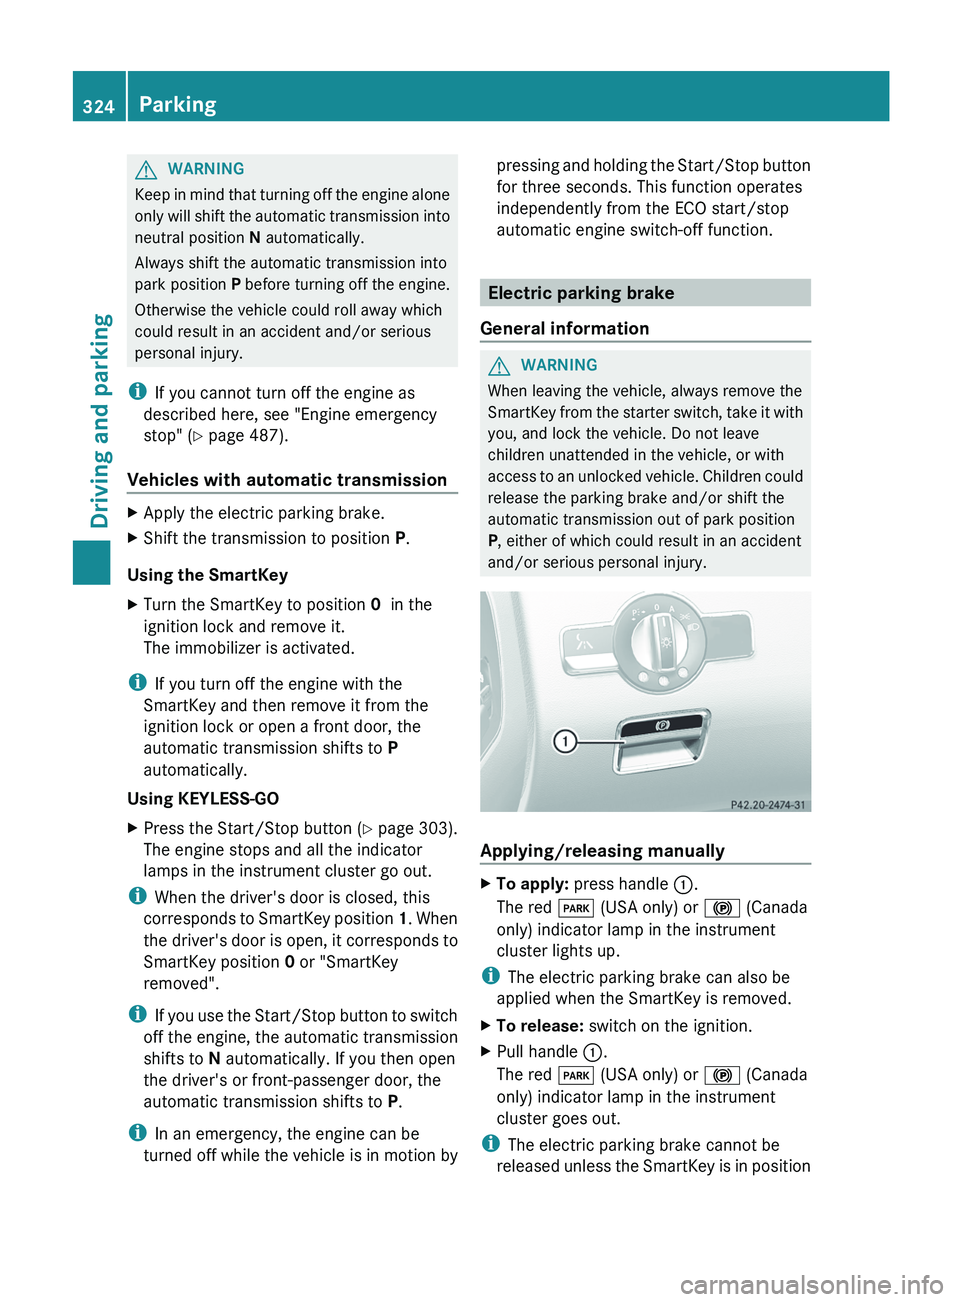
and/or serious personal injury. Applying/releasing manually
X
To apply: press handle :.
The red F (USA only) or ! (Canada
only) indicator lamp in the instrument
cluster lights up.
i The electric parking brake can also be
applied when the SmartKey is removed.
X To release: switch on the ignition.
X Pull handle :.
The red F (USA only) or ! (Canada
only) indicator lamp in the instrument
cluster goes out.
i The electric parking brake cannot be
released
unless the SmartKey is in position324
Parking
Driving and parking
Page 327 of 536
1 in the ignition lock or if the ignition has
been switched on using the Start/Stop
button.
Engaging the electric parking brake
automatically The electric parking brake is automatically
applied if HOLD or DISTRONIC PLUS brakes
the vehicle until it is stationary and at least
one of the following conditions is fulfilled:
R
the engine is switched off.
R the driver's door is open and the seat belt
is not fastened.
R the hood is released.
R the
trunk lid is opened while the automatic
transmission is in position R.
R the vehicle is stationary for a lengthy
period.
The red F (USA only) or ! (Canada
only) indicator lamp in the instrument cluster
lights up.
i In addition to the electric parking brake,
P may also be engaged automatically.
Releasing the electric parking brake
automatically The electric parking brake is released
automatically when the following conditions
are simultaneously fulfilled:
R
the engine is running.
R the automatic transmission is in position
D or R.
R the hood is closed.
R your seat belt is fastened.
R you depress the accelerator pedal.
If the automatic transmission is in position
R, the trunk lid must be closed. If your seat belt is not fastened, the following
conditions must be fulfilled to automatically
release the electric parking brake:
R
the driver's door is closed.
R you shift out of P or you have previously
driven faster than 3 km/h
.
R you have shifted out of P or you have
previously driven faster than 2 mph
(3 km/h).
Emergency braking The vehicle can also be braked during an
emergency using the electric parking brake.
X
While driving, push handle :
of the electric
parking brake ( Y page 324).
i The
vehicle is braked as long as you keep
the handle of the electric parking brake
pressed. The longer the electric parking
brake handle is depressed, the greater the
braking force.
During braking:
R a warning tone sounds.
R the Please Release Parking Brake
message appears.
R the red F (USA only) or ! (Canada
only) indicator lamp in the instrument
cluster lights up.
When the vehicle has been braked to a
standstill, the electric parking brake is
engaged. Parking the vehicle for a long period
If
you leave the vehicle parked for longer than
four weeks, the battery may be damaged by
exhaustive discharge.
X Connect a trickle charger.
i You can obtain information about trickle
chargers from a qualified specialist
workshop, e.g. an authorized Mercedes-
Benz Center. Parking
325
Driving and parking Z