MERCEDES-BENZ SL-CLASS ROADSTER 2013 Owners Manual
Manufacturer: MERCEDES-BENZ, Model Year: 2013, Model line: SL-CLASS ROADSTER, Model: MERCEDES-BENZ SL-CLASS ROADSTER 2013Pages: 572, PDF Size: 9.23 MB
Page 181 of 572
Active Body Control (except AMG
vehicles)
Vehicle level Important safety notes
G
WARNING
You can raise and lower the level of the
stationary vehicle using the corresponding
button.
Someone could
become trapped if the vehicle
is raised or lowered.
Therefore, make sure that nobody is in the
vicinity of the wheel housing or under the
vehicle. Otherwise limbs, e.g. hands and feet,
could become trapped.
In order to reduce fuel consumption and
improve the driving dynamics, the vehicle is
lowered as its speed increases. With the
SPORT suspension tuning, it is lowered by up
to 0.5 in (13mm), with COMFORT by up to
0.2 in (5mm). As the speed is reduced, the
vehicle is raised up to the set vehicle height.
Select the "Normal" setting for normal road
surfaces and "Raised" for driving with snow
chains or on particularly poor road surfaces.
Your selection remains stored even if you
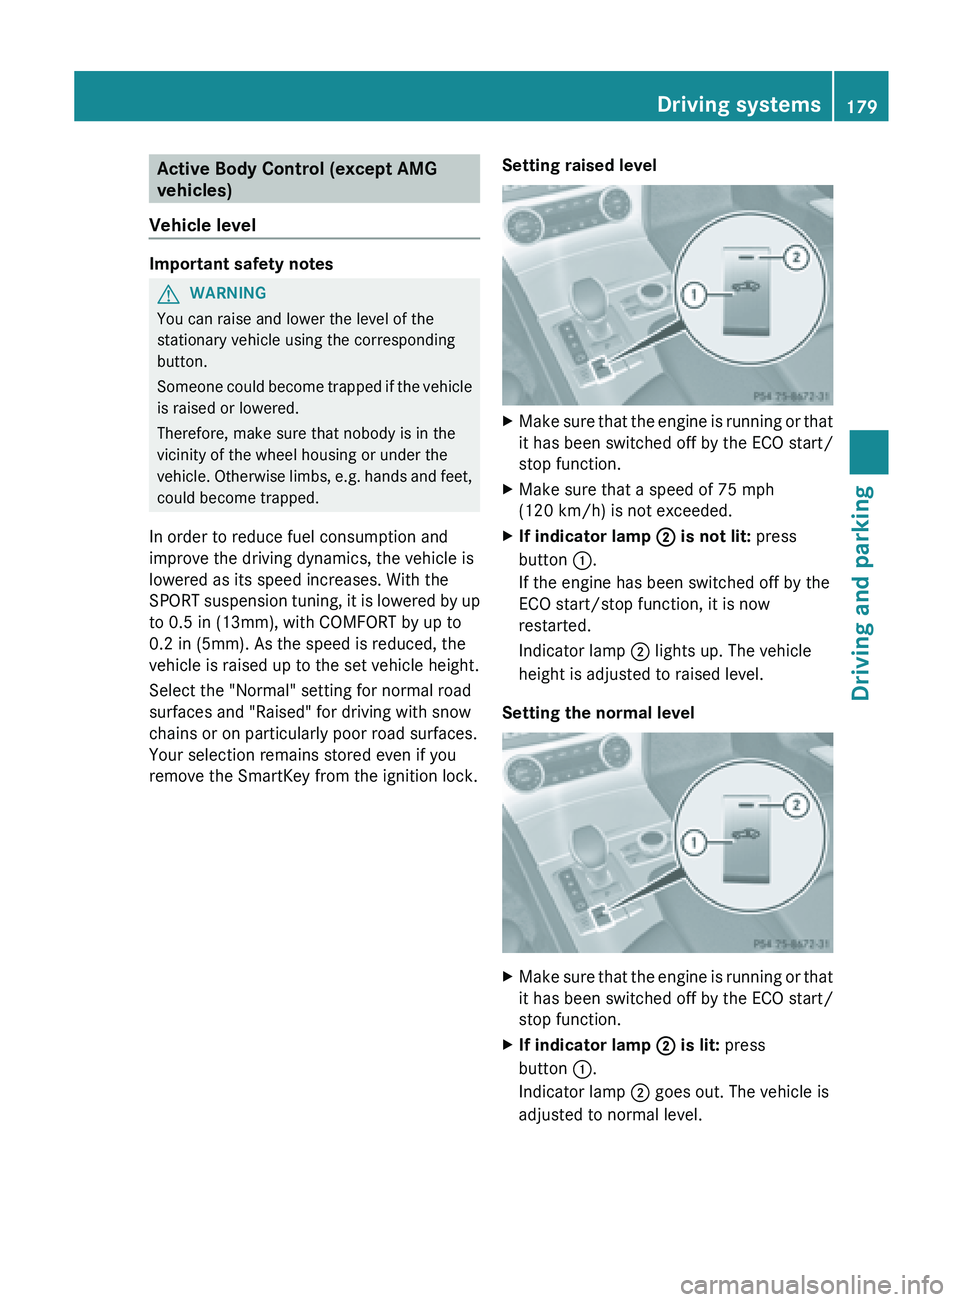
remove the SmartKey from the ignition lock. Setting raised level X
Make
sure that the engine is running or that
it has been switched off by the ECO start/
stop function.
X Make sure that a speed of 75 mph
(120 km/h ) is not exceeded.
X If indicator lamp
; is not lit: press
button :.
If the engine has been switched off by the
ECO start/stop function, it is now
restarted.
Indicator lamp ; lights up. The vehicle
height is adjusted to raised level.
Setting the normal level X
Make
sure that the engine is running or that
it has been switched off by the ECO start/
stop function.
X If indicator lamp ; is lit: press
button :.
Indicator lamp ; goes out. The vehicle is
adjusted to normal level. Driving systems
179
Driving and parking Z
Page 182 of 572
The "Raised level" setting is canceled if you:
R
are driving faster than approximately
75 mph (120 km/h)
R drive for approximately three minutes at a
speed over 50 mph (80km/h)
Suspension tuning General notes
The
electronically
controlled ABC suspension
system features improved driving dynamics
and ride comfort.
The ABC suspension system is tuned
individually to each wheel and depends on:
R the road surface condition, e.g. bumps
R the vehicle load
R your individual selection of the sporty or
comfort button
Your selection remains stored even if you
remove the SmartKey from the ignition lock.
Selecting sports tuning X
Make sure that the engine is running or that
it has been switched off by the ECO start/
stop function.
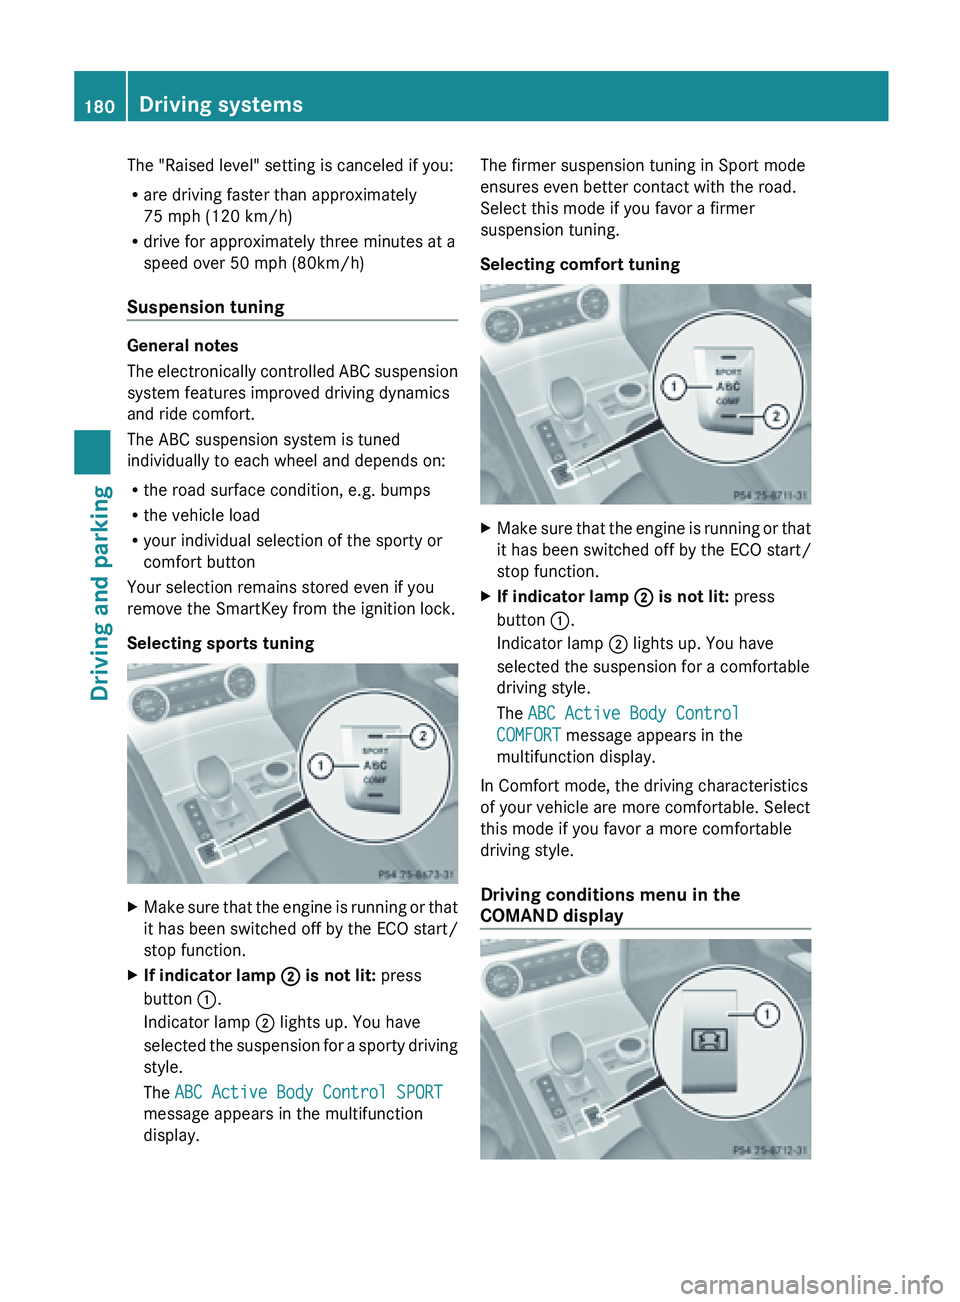
X If indicator lamp ; is not lit: press
button :.
Indicator lamp ; lights up. You have
selected the
suspension for a sporty driving
style.
The ABC Active Body Control SPORT
message appears in the multifunction
display. The firmer suspension tuning in Sport mode
ensures even better contact with the road.
Select this mode if you favor a firmer
suspension tuning.
Selecting comfort tuning
X
Make sure that the engine is running or that
it has been switched off by the ECO start/
stop function.
X If indicator lamp ; is not lit: press
button :.
Indicator lamp ; lights up. You have
selected the suspension for a comfortable
driving style.
The ABC Active Body Control
COMFORT message appears in the
multifunction display.
In Comfort mode, the driving characteristics
of your vehicle are more comfortable. Select
this mode if you favor a more comfortable
driving style.
Driving conditions menu in the
COMAND display 180
Driving systems
Driving and parking
Page 183 of 572
You can display some driving systems and
additional information in the COMAND
display.
X
Make sure that the SmartKey is in position
2 in the ignition lock.
X Make sure COMAND is switched on
(Y page 275).
X Press button :.
The corresponding displays appear in the
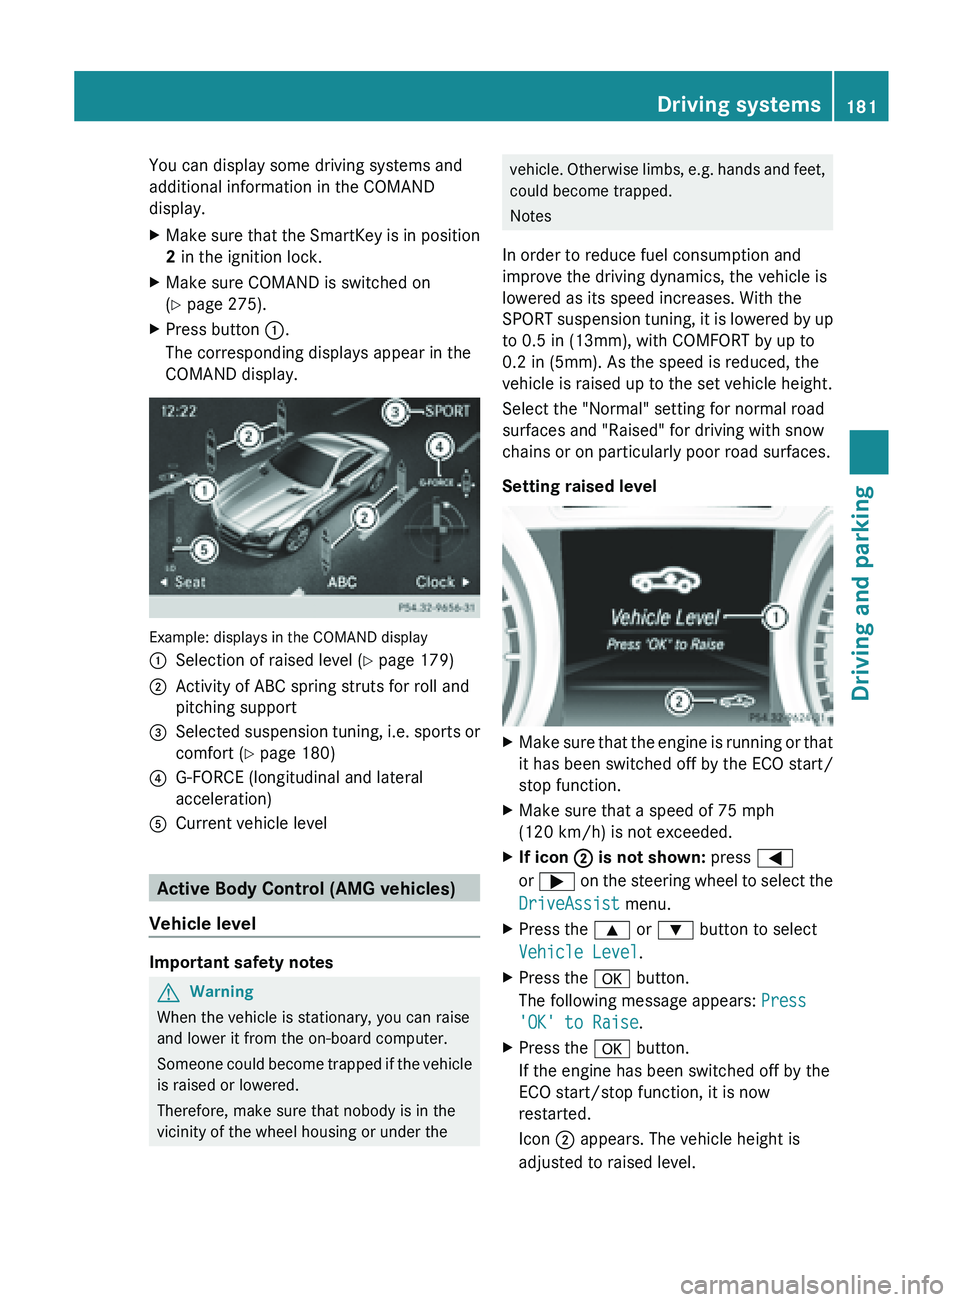
COMAND display. Example: displays in the COMAND display
:
Selection of raised level (Y page 179)
; Activity of ABC spring struts for roll and
pitching support
= Selected suspension tuning, i.e. sports or
comfort (
Y page 180)
? G-FORCE (longitudinal and lateral
acceleration)
A Current vehicle level Active Body Control (AMG vehicles)
Vehicle level Important safety notes
G
Warning
When the vehicle is stationary, you can raise
and lower it from the on-board computer.
Someone could
become trapped if the vehicle
is raised or lowered.
Therefore, make sure that nobody is in the
vicinity of the wheel housing or under the vehicle. Otherwise limbs, e.g. hands and feet,
could become trapped.
Notes
In order to reduce fuel consumption and
improve the driving dynamics, the vehicle is
lowered as its speed increases. With the
SPORT suspension
tuning, it is lowered by up
to 0.5 in (13mm), with COMFORT by up to
0.2 in (5mm). As the speed is reduced, the
vehicle is raised up to the set vehicle height.
Select the "Normal" setting for normal road
surfaces and "Raised" for driving with snow
chains or on particularly poor road surfaces.
Setting raised level X
Make sure that the engine is running or that
it has been switched off by the ECO start/
stop function.
X Make sure that a speed of 75 mph
(120 km/h ) is not exceeded.
X If icon ;
is not shown: press =
or ; on
the steering wheel to select the
DriveAssist menu.
X Press the 9 or : button to select
Vehicle Level.
X Press the a button.
The following message appears: Press
'OK' to Raise.
X Press the a button.
If the engine has been switched off by the
ECO start/stop function, it is now
restarted.
Icon ; appears. The vehicle height is
adjusted to raised level. Driving systems
181
Driving and parking Z
Page 184 of 572
Setting the normal level
X
Make sure that the engine is running or that
it has been switched off by the ECO start/
stop function.
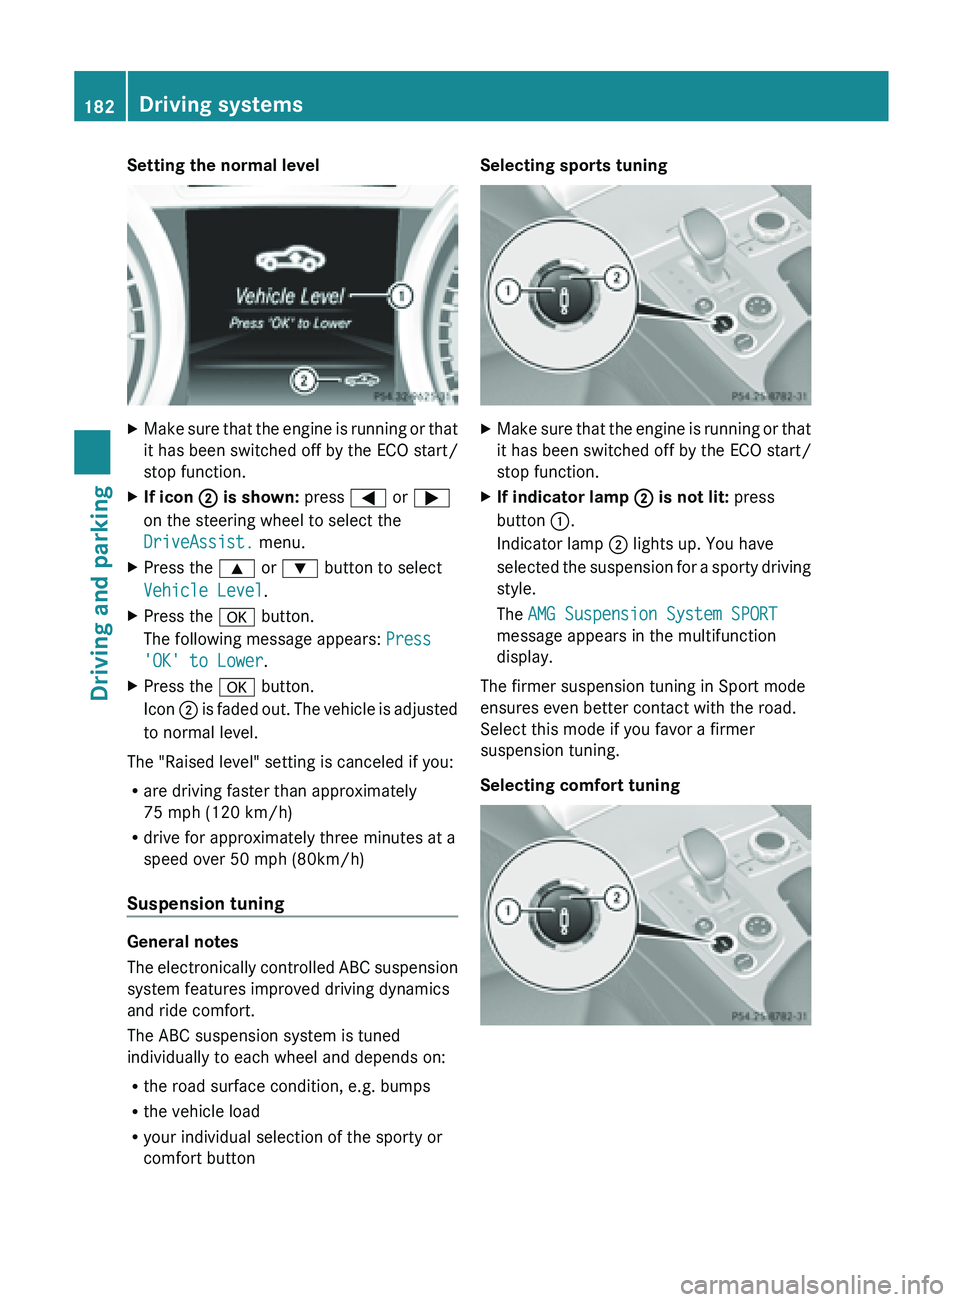
X If icon ; is shown: press = or ;
on the steering wheel to select the
DriveAssist. menu.
X Press the 9 or : button to select
Vehicle Level.
X Press the a button.
The following message appears: Press
'OK' to Lower.
X Press the a button.
Icon ; is
faded out. The vehicle is adjusted
to normal level.
The "Raised level" setting is canceled if you:
R are driving faster than approximately
75 mph (120 km/h)
R drive for approximately three minutes at a
speed over 50 mph (80km/h)
Suspension tuning General notes
The
electronically
controlled ABC suspension
system features improved driving dynamics
and ride comfort.
The ABC suspension system is tuned
individually to each wheel and depends on:
R the road surface condition, e.g. bumps
R the vehicle load
R your individual selection of the sporty or
comfort button Selecting sports tuning
X
Make sure that the engine is running or that
it has been switched off by the ECO start/
stop function.
X If indicator lamp ; is not lit: press
button :.
Indicator lamp ; lights up. You have
selected the
suspension for a sporty driving
style.
The AMG Suspension System SPORT
message appears in the multifunction
display.
The firmer suspension tuning in Sport mode
ensures even better contact with the road.
Select this mode if you favor a firmer
suspension tuning.
Selecting comfort tuning 182
Driving systems
Driving and parking
Page 185 of 572
X
Make sure that the engine is running or that
it has been switched off by the ECO start/
stop function.
X If indicator lamp ; is lit: press
button :.
Indicator lamp ; goes out. You have
selected the suspension for a comfortable
driving style.
The AMG Suspension System COMFORT
message appears in the multifunction
display.
In Comfort mode, the driving characteristics
of your vehicle are more comfortable. Select
this mode if you favor a more comfortable
driving style.
Driving conditions menu in the
COMAND display You can display some driving systems and
additional information in the COMAND
display.
X
Call up the driving conditions menu in the
COMAND display (Y
page 291).
The corresponding displays appear in the
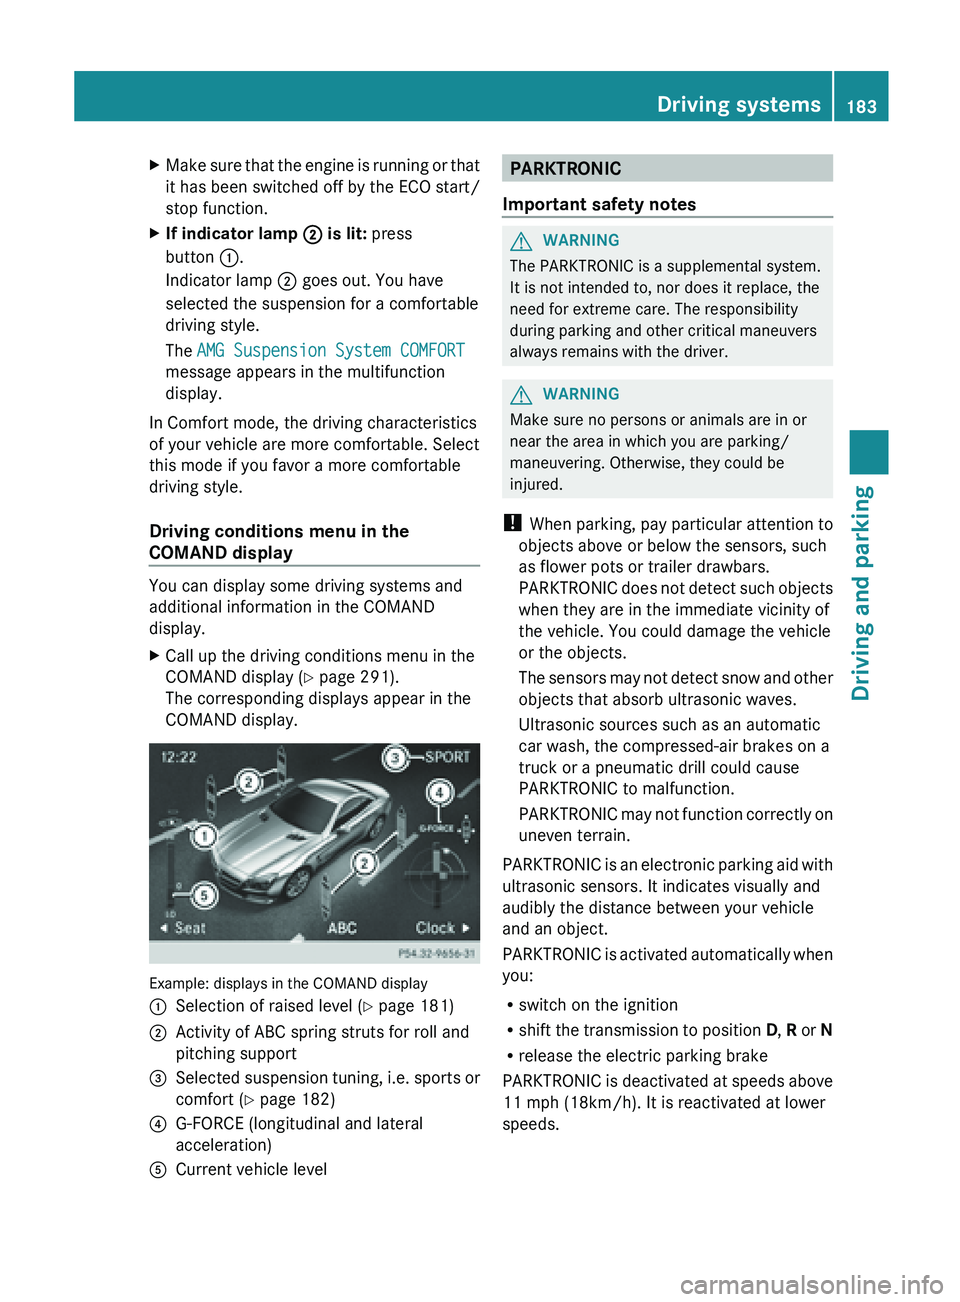
COMAND display. Example: displays in the COMAND display
:
Selection of raised level (Y page 181)
; Activity of ABC spring struts for roll and
pitching support
= Selected suspension tuning, i.e. sports or
comfort (
Y page 182)
? G-FORCE (longitudinal and lateral
acceleration)
A Current vehicle level PARKTRONIC
Important safety notes G
WARNING
The PARKTRONIC is a supplemental system.
It is not intended to, nor does it replace, the
need for extreme care. The responsibility
during parking and other critical maneuvers
always remains with the driver. G
WARNING
Make sure no persons or animals are in or
near the area in which you are parking/
maneuvering. Otherwise, they could be
injured.
! When parking,
pay particular attention to
objects above or below the sensors, such
as flower pots or trailer drawbars.
PARKTRONIC does not detect such objects
when they are in the immediate vicinity of
the vehicle. You could damage the vehicle
or the objects.
The sensors may not detect snow and other
objects that absorb ultrasonic waves.
Ultrasonic sources such as an automatic
car wash, the compressed-air brakes on a
truck or a pneumatic drill could cause
PARKTRONIC to malfunction.
PARKTRONIC may not function correctly on
uneven terrain.
PARKTRONIC is an electronic parking aid with
ultrasonic sensors. It indicates visually and
audibly the distance between your vehicle
and an object.
PARKTRONIC is activated automatically when
you:
R switch on the ignition
R shift the transmission to position D, R or N
R release the electric parking brake
PARKTRONIC is deactivated at speeds above
11 mph (18km/h). It is reactivated at lower
speeds. Driving systems
183
Driving and parking Z
Page 186 of 572
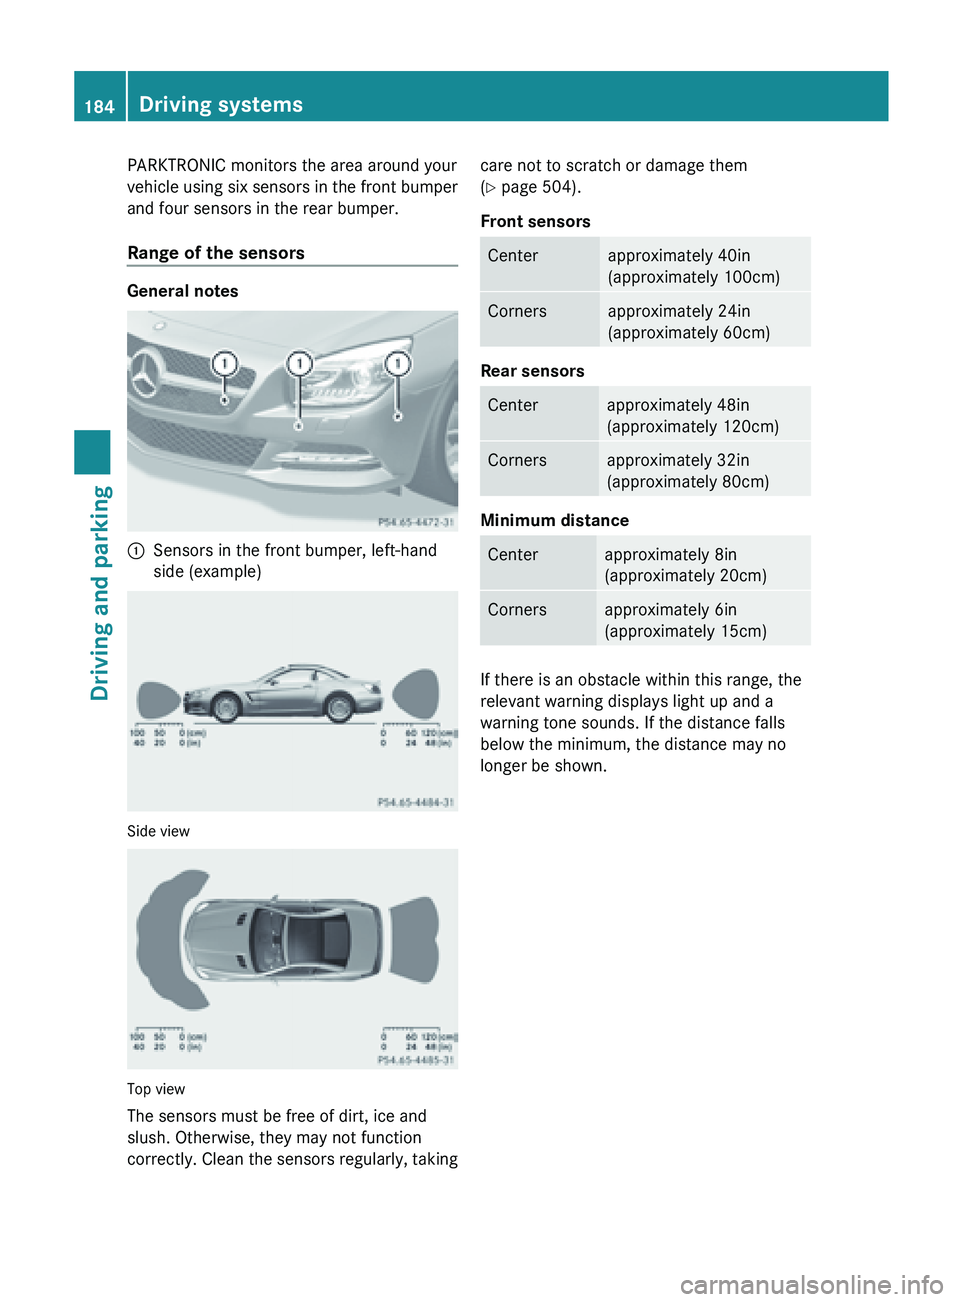
PARKTRONIC monitors the area around your
vehicle
using
six sensors in the front bumper
and four sensors in the rear bumper.
Range of the sensors General notes
:
Sensors in the front bumper, left-hand
side (example) Side view
Top view
The sensors must be free of dirt, ice and
slush. Otherwise, they may not function
correctly.
Clean
the sensors regularly, taking care not to scratch or damage them
(Y page 504).
Front sensors
Center approximately 40in
(approximately
100cm) Corners approximately 24in
(approximately
60cm) Rear sensors
Center approximately 48in
(approximately
120cm) Corners approximately 32in
(approximately
80cm) Minimum distance
Center approximately 8in
(approximately
20cm) Corners approximately 6in
(approximately
15cm) If there is an obstacle within this range, the
relevant warning displays light up and a
warning tone sounds. If the distance falls
below the minimum, the distance may no
longer be shown.184
Driving systems
Driving and parking
Page 187 of 572
Warning displays
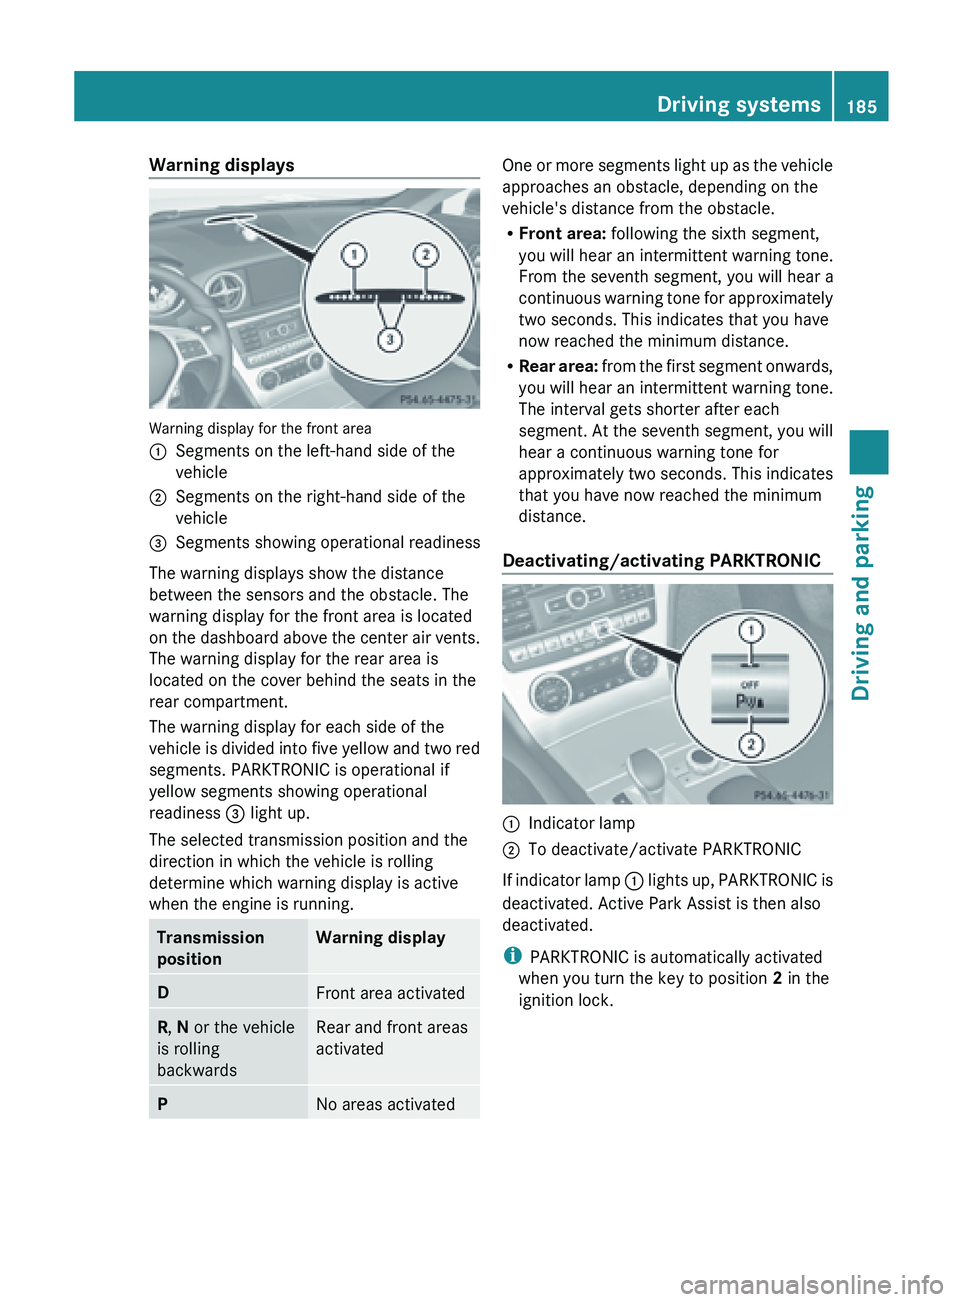
Warning display for the front area
:
Segments on the left-hand side of the
vehicle
; Segments on the right-hand side of the
vehicle
= Segments showing operational readiness
The warning displays show the distance
between the sensors and the obstacle. The
warning display for the front area is located
on the
dashboard above the center air vents.
The warning display for the rear area is
located on the cover behind the seats in the
rear compartment.
The warning display for each side of the
vehicle is divided into five yellow and two red
segments. PARKTRONIC is operational if
yellow segments showing operational
readiness = light up.
The selected transmission position and the
direction in which the vehicle is rolling
determine which warning display is active
when the engine is running. Transmission
position Warning display
D
Front area activated
R, N or the vehicle
is rolling
backwards Rear and front areas
activated
P
No areas activated One or more segments light up as the vehicle
approaches an obstacle, depending on the
vehicle's distance from the obstacle.
R
Front area: following the sixth segment,
you will hear an intermittent warning tone.
From the seventh segment, you will hear a
continuous warning
tone for approximately
two seconds. This indicates that you have
now reached the minimum distance.
R Rear area: from the first segment onwards,
you will hear an intermittent warning tone.
The interval gets shorter after each
segment. At the seventh segment, you will
hear a continuous warning tone for
approximately two seconds. This indicates
that you have now reached the minimum
distance.
Deactivating/activating PARKTRONIC :
Indicator lamp
; To deactivate/activate PARKTRONIC
If indicator lamp : lights
up, PARKTRONIC is
deactivated. Active Park Assist is then also
deactivated.
i PARKTRONIC is automatically activated
when you turn the key to position 2 in the
ignition lock. Driving systems
185
Driving and parking Z
Page 188 of 572
Problems with PARKTRONIC
Problem Possible causes/consequences and
M SolutionsOnly the red segments
in the PARKTRONIC
warning
displays
are lit.
You also hear a warning
tone for approximately
two seconds.
PARKTRONIC is
deactivated after
approximately five
seconds, and the
indicator lamp in the
PARKTRONIC button
lights up. PARKTRONIC has malfunctioned and has switched off.
X
If problems persist, have PARKTRONIC checked at a qualified
specialist workshop. Only the red segments
in the PARKTRONIC
warning
displays
are lit.
PARKTRONIC is
deactivated after
approximately five
seconds. The PARKTRONIC sensors are dirty or there is interference.
X
Clean the PARKTRONIC sensors ( Y page 504).
X Switch the ignition back on. The problem may be caused by an external source of radio or
ultrasound waves.
X
See if PARKTRONIC functions in a different location. Active Parking Assist
Important safety notes G
WARNING
PARKTRONIC and Active Parking Assist are
merely parking aids and may not detect all
obstacles. They do not relieve you of the
responsibility of paying attention.
You are always responsible for safety and
must continue to pay attention to your
immediate surroundings when parking,
exiting parking
spaces and maneuvering. You
could otherwise endanger yourself and
others. G
WARNING
When parking or exiting a parking space, you
need to make sure that no obstacles are
located in
the vicinity of the vehicle during the entire operation. Active Parking Assist does
not relieve you of the responsibility of paying
attention. It merely aids you by intervening
actively in the steering.
To stop the vehicle or to avoid an accident,
you need to apply the brakes yourself.
G
WARNING
Make sure no persons or animals are in or
near the area in which you are parking/
maneuvering. Otherwise, they could be
injured.
! If unavoidable, you should drive over
obstacles such as curbs slowly and not at
a sharp
angle. Otherwise, you may damage
the wheels or tires.
Active Parking Assist is an electronic parking
aid with ultrasound. Active steering
intervention can assist you when parking or 186
Driving systems
Driving and parking
Page 189 of 572
exiting a parking space. You may also use
PARKTRONIC (
Y page 183). When
PARKTRONIC is switched off, Active Parking
Assist is also unavailable.
Parking tips:
R pay attention to the PARKTRONIC
(Y page
185) warning messages during the
parking procedure.
R you can intervene in the steering procedure
to correct it at any time. Active Parking
Assist will then be canceled.
R when transporting a load which protrudes
from your vehicle, you should not use
Active Parking Assist.
R never use Active Parking Assist when snow
chains or an emergency spare wheel are
mounted.
R make sure that the tire pressures are
always correct. This has a direct influence
on the parking characteristics of the
vehicle.
Parking Detecting a parking space
G
WARNING
Objects located above the height range of
Active Parking Assist will not be detected
when the parking space is measured. These
are not taken into account when the parking
procedure is calculated, e.g. overhanging
loads, tail
sections or loading ramps of goods
vehicles. In some circumstances, Active
Parking Assist may therefore guide you into
the parking space too early. This may lead to
a collision. For this reason, you should avoid
using Active Parking Assist in such situations. G
WARNING
Active Parking Assist is merely an aid and may
sometimes recommend parking spaces that
are not suitable for parking. For example,
these might be spaces where parking is
prohibited, driveways, unsuitable surfaces,
etc. Active Parking Assist measures the parking
space as you drive past it. Any later changes
to the parking space are not taken into
account. For instance, this may be the case
when
the
vehicle parked in front of or behind
the space changes its position or when an
obstacle is moved into the parking space.
Active Parking Assist does not relieve you of
the responsibility of paying attention. If you
rely solely on Active Parking Assist, you could
cause an accident and injure yourself and
others.
You are always responsible for safety and
must continue to pay attention to your
immediate surroundings when parking and
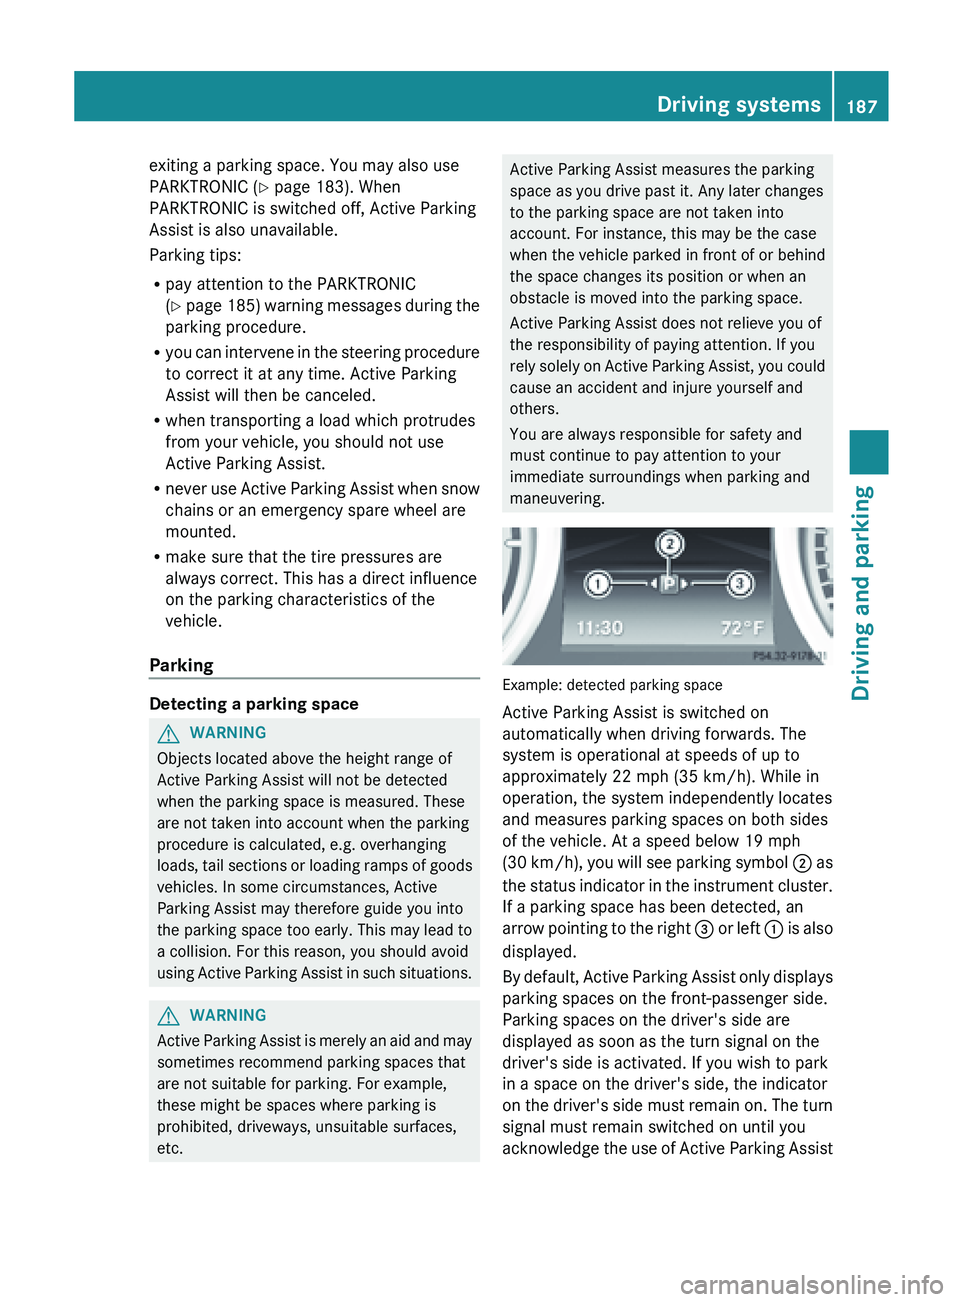
maneuvering. Example: detected parking space
Active Parking Assist is switched on
automatically when driving forwards. The
system is operational at speeds of up to
approximately
22 mph (35 km/h
). While in
operation, the system independently locates
and measures parking spaces on both sides
of the vehicle. At a speed below 19 mph
(30 km/h), you will see parking symbol ; as
the status indicator in the instrument cluster.
If a parking space has been detected, an
arrow pointing to the right = or left : is also
displayed.
By default, Active Parking Assist only displays
parking spaces on the front-passenger side.
Parking spaces on the driver's side are
displayed as soon as the turn signal on the
driver's side is activated. If you wish to park
in a space on the driver's side, the indicator
on the driver's side must remain on. The turn
signal must remain switched on until you
acknowledge the use of Active Parking Assist Driving systems
187Driving and parking Z
Page 190 of 572
by pressing the
a button on the
multifunction steering wheel.
Active Parking
Assist will only detect parking
spaces:
R that are parallel to the direction of travel
R that are at least 59 in (1.5 m) wide
R that are at least 40 in (1.0 m) longer than
your vehicle
A parking space is displayed while you are
driving past it, and until you are
approximately 50 ft (15 m) away from it.
Use Active Parking Assist for parking spaces:
R that are parallel to the direction of travel
R that are on straight roads, not bends
R that are on the same level as the road, e.g.
not on the pavement
Backing up into the parking space G
WARNING
The front of the vehicle will veer out in the
direction of the oncoming traffic during the
parking operation. In some cases the vehicle
will also take you onto sections of the
oncoming lane
during the parking procedure.
You are responsible for safety at all times and
must pay attention to any road users
approaching or passing. Stop the vehicle if
necessary or cancel the Active Parking Assist
parking procedure.
X Stop the vehicle when the parking space
symbol shows
the desired parking space in
the instrument cluster.
X Shift the transmission to position R.
The Start Park Assist? Yes: OK No:
% message
appears in the multifunction
display. X
To cancel the procedure: press the
% button on the multifunction steering
wheel or pull away.
or
X To park using Active Parking Assist:
press the
a
button on the multifunction
steering wheel.
The Park Assist Active Accelerate
and Brake Observe Surroundings
message appears in the multifunction
display.
X Let go of the multifunction steering wheel.
X Back up the vehicle, being ready to brake
at all times. Do not exceed a maximum
speed of approximately 6 mph (10 km/h
)
when backing up. Otherwise, Active
Parking Assist will be deactivated.
i When parking in tight spaces, you will
achieve the best results by backing up as
far as possible. When doing so, also
observe the PARKTRONIC messages.
X Stop as soon as PARKTRONIC sounds the
continuous warning tone, if not before.
Additional maneuvering
may be required in
tight parking spaces.
The Park Assist Active Select D
Observe Surroundings
message appears in
the multifunction display.
X Shift the transmission to position D while
the vehicle is stationary.
Active Parking
Assist immediately steers in
the other direction.
The Park Assist Active Accelerate
and Brake Observe Surroundings
message appears in the multifunction
display.
i You will achieve the best results by
waiting for the steering procedure to
complete before pulling away.
X Drive forwards and be ready to brake at all
times.
X Stop as soon as PARKTRONIC sounds the
continuous warning tone, if not before.188
Driving systems
Driving and parking