MERCEDES-BENZ SL ROADSTER 2008 Manual PDF
Manufacturer: MERCEDES-BENZ, Model Year: 2008, Model line: SL ROADSTER, Model: MERCEDES-BENZ SL ROADSTER 2008Pages: 317, PDF Size: 5.35 MB
Page 71 of 317
Opening and closing
68possible to close the door. Do not attempt
to forc
ethe door to close. You could oth-
erwise damage the door or the window. Locking/unlocking the vehicle from
the inside
You can centrally lock or unlock the vehicle
from the inside. This feature may be useful if,
for example, you wish to unlock the
passenger door from the inside or lock the
vehicle before you pull away. G
Risk of accident
Do not leave children unsupervised in the
vehicle. They could open adoor from the
inside –even if it is locked –and thereby
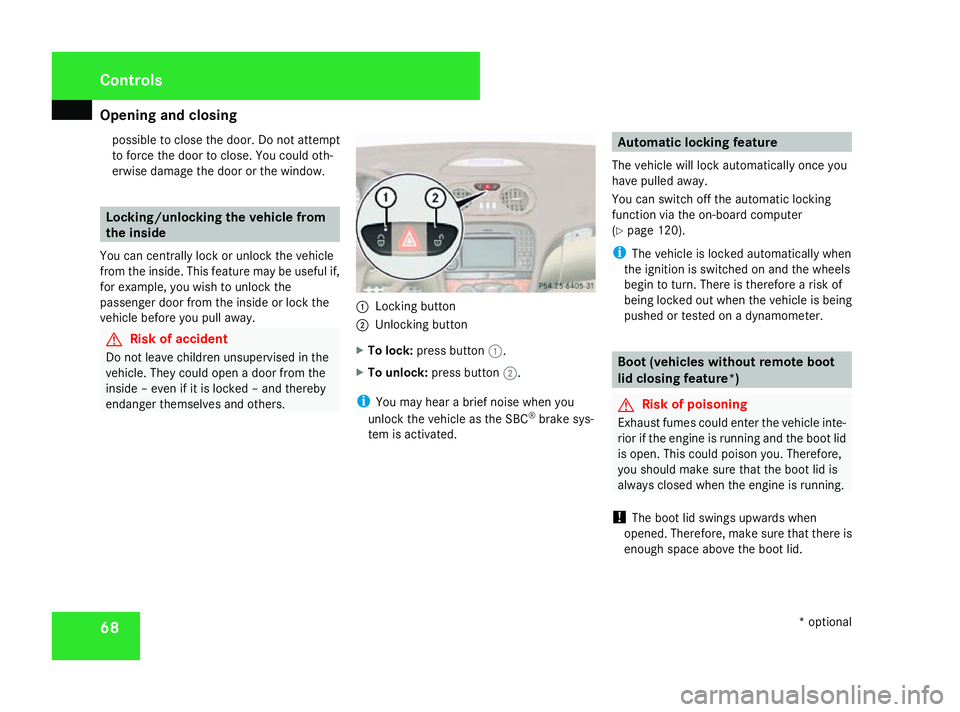
endanger themselves and others. 1
Lockingb utton
2 Unlocking button
X To lock: press button 1.
X To unlock: press button 2.
i You may hear abrief noise when you
unlock the vehicle as the SBC ®
brake sys-
tem is activated. Automatic lockingf
eature
The vehicle will lock automatically once you
have pulleda way.
You can switch off the automatic locking
function via the on-board computer
(Y page 120).
i The vehicle is locked automatically when
the ignition is switched on and the wheels
begin to turn. There is therefore arisk of
being locked out when the vehicle is being
pushed or tested on adynamometer. Boot (vehicles without remote boot
lid closing feature*)
G
Risk of poisoning
Exhaust fumes could enter the vehicle inte-
rior if the engine is running and the boot lid
is open. This could poison you. Therefore,
you should make sure that the boot lid is
always closed when the engine is running.
! The boot lid swings upwards when
opened. Therefore, make sure that there is
enough space above the boot lid. Controls
*optional
230_AKB; 5; 4, en-GB
bjanott
,V ersion: 2.9.6
2008-04-08T15:09:54+02:00
-Seite 68 Dateiname: 6515_3089_02_buchblock.pdf; preflight
Page 72 of 317
Opening and closing
69
Opening from the outside You can only open the boot lid after unlocking
it first.
i
You can only unlock the boot lid when the
vehicle is stationary and the roof is fully
opened or closed.
X To unlock centrally: press thekbut-
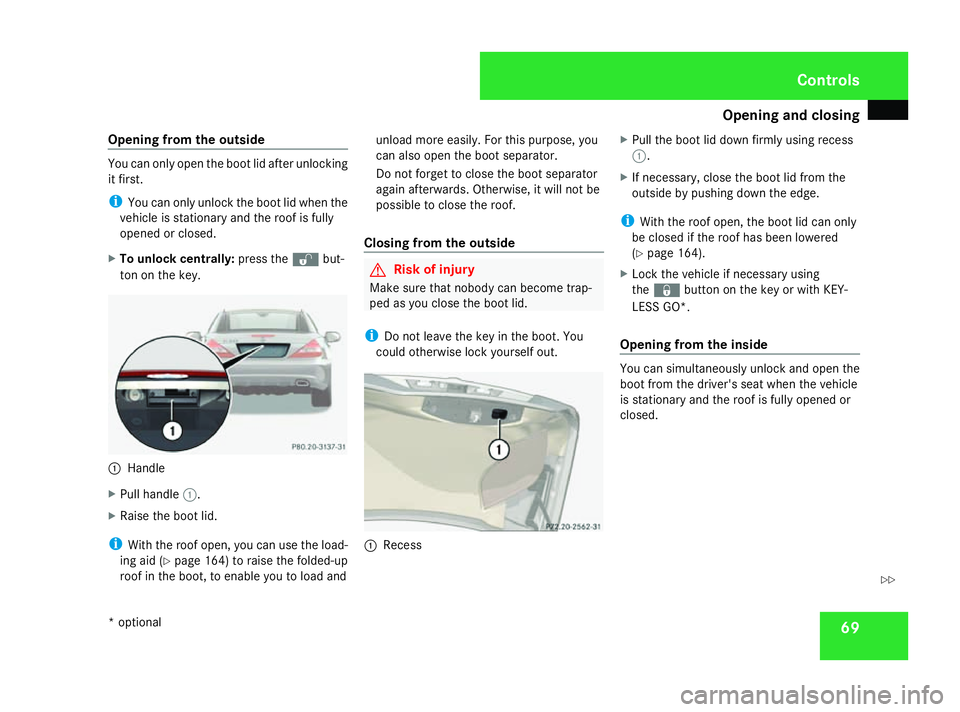
ton on the key. 1
Handle
X Pull handle 1.
X Raise the boot lid.
i With the roof open, you can use the load-
ing aid (Y page 164)toraise the folded-up
roof in the boot, to enable you to load and unload more easily. For this purpose, you
can also open the boot separator.
Do not forget to close the boot separator
again afterwards. Otherwise, it will not be
possible to close the roof.
Closing from the outside G
Risk of injury
Make sure that nobody can become trap-
ped as you close the boot lid.
i Do not leave the key in the boot. You
could otherwise lock yourself out. 1
Recess X
Pull the boot lid down firmly using recess
1.
X If necessary, close the boot lid from the
outside by pushing down the edge.
i With the roof open, the boot lid can only
be closed if the roof has been lowered
(Y page 164).
X Lock the vehicle if necessary using
the j buttonont he key or with KEY-
LES SGO*.
Opening from the inside You can simultaneously unlock and open the
boot from the driver's seat when the vehicle
is stationary and the roof is fully opened or
closed. Controls
*o ptional
230_AKB
;5;4,en-GB
bjanott, Version:2.9.6
2008-04-08T15:09:54+02:0
0-Seite 69 ZDateiname: 6515_3089_02_buchblock.pdf; preflight
Page 73 of 317
Opening and closing
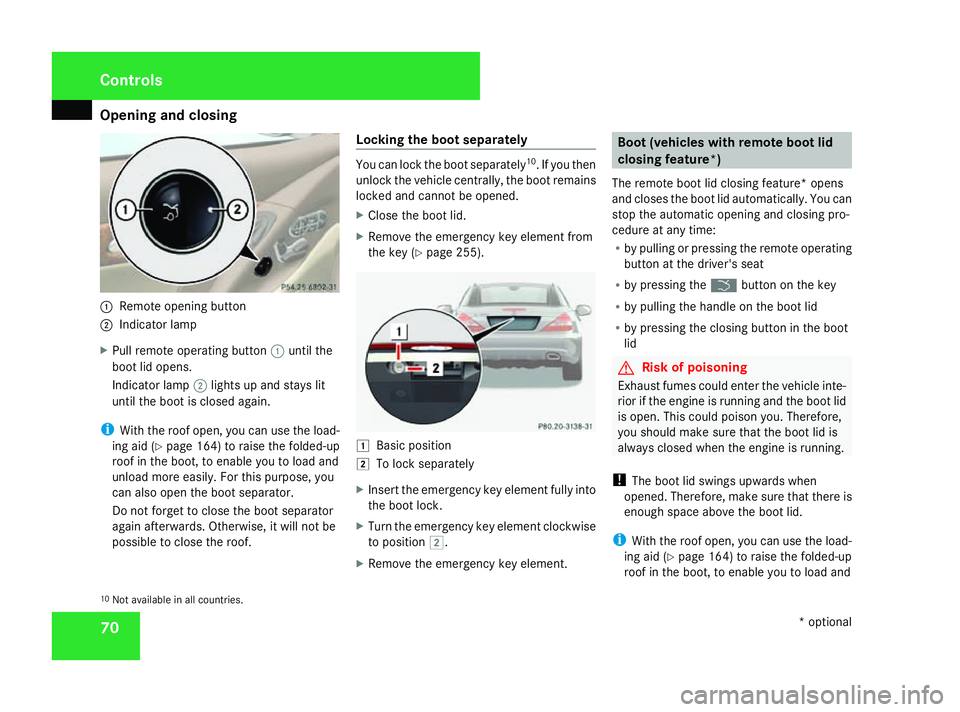
701
Remote opening button
2 Indicator lamp
X Pull remote operating button 1until the
boot lid opens.
Indicator lamp 2lights up and stays lit
until the boot is closed again.
i With the roof open, you can use the load-
ing aid (Y page 164) to raise the folded-up
roof in the boot, to enable you to load and
unload more easily.F or this purpose, you
can also open the boot separator.
Do not forget to close the boot separator
again afterwards. Otherwise, it will not be
possible to close the roof. Locking the boot separately You can lock the boot separately
10
.Ify ou then
unlock the vehicle centrally, the boot remains
locked and cannot be opened.
X Close the boot lid.
X Remove the emergency key element from
the key (Y page 255). $
Basic position
% To lock separately
X Insert the emergency key element fully into
the boot lock.
X Turn the emergency key element clockwise
to position %.
X Remove the emergency key element. Boot (vehicles with remote boot lid
closing feature*)
The remote boot lid closing feature* opens
and closes the boot lid automatically. You can
stop the automatic opening and closing pro-
cedure at any time:
R by pulling or pressing the remote operating
button at the driver's seat
R by pressing the ibutton on the key
R by pulling the handle on the boot lid
R by pressing the closing button in the boot
lid G
Risk of poisoning
Exhaust fumes could enter the vehicle inte-
rior if the engine is running and the boot lid
is open. This could poison you. Therefore,
you should make sure that the boot lid is
always closed when the engine is running.
! The boot lid swings upwards when
opened. Therefore, make sure that there is
enough space above the boot lid.
i With the roof open, you can use the load-
ing aid (Y page 164) to raise the folded-up
roof in the boot, to enable you to load and
10 Not availabl einall countries. Controls
*optional
230_AKB; 5; 4, en-GB
bjanott
,V ersion: 2.9.6
2008-04-08T15:09:54+02:00
-Seite 70 Dateiname: 6515_3089_02_buchblock.pdf; preflight
Page 74 of 317
Opening and closing
71
unload more easily. For this purpose, you
can also open the boot separator.
Do not forget to close the boot separator
again afterwards. Otherwise, it will not be
possible to close the roof.
Opening from the outside You can only open the boot lid after unlocking
it first.
i
You can only unlock the boot lid when the
vehicle is stationary and the roof is fully
opened or closed.
X To unlock centrally: press thekbut-
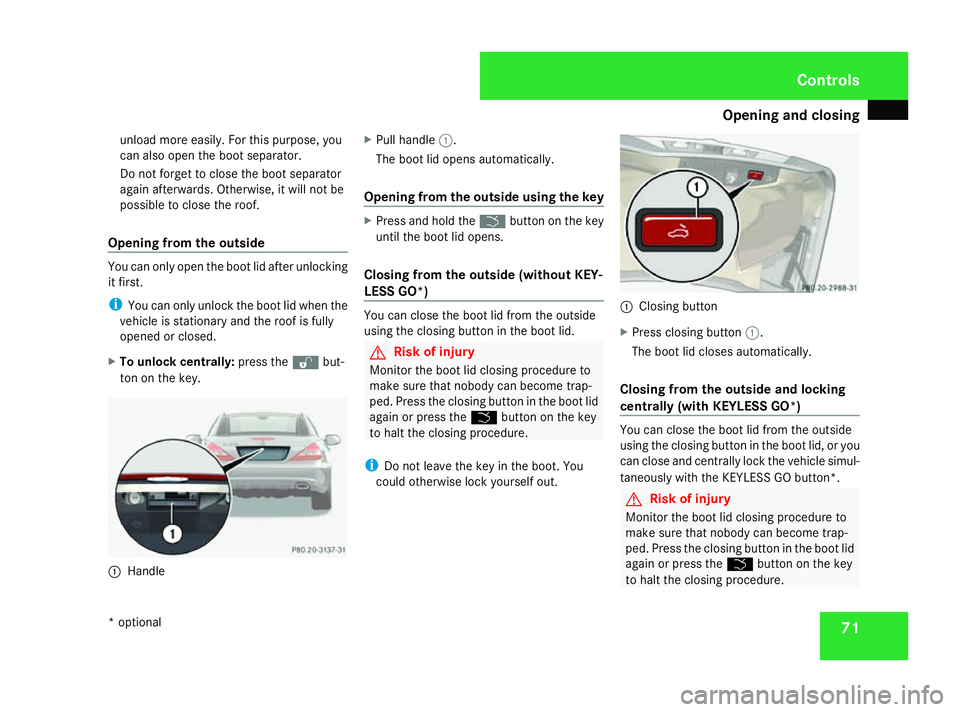
ton on the key. 1
Handle X
Pull handle 1.
The boot lid opens automatically.
Opening from the outsid eusing the key X
Press and hold the ibuttonont he key
until the boot lid opens.
Closing from the outsid e(without KEY-
LESS GO*) You can close the boot lid from the outside
using the closin
gbutto nint he boot lid. G
Risk of injury
Monitor the boot lid closin gprocedure to
make sure that nobody can become trap-
ped. Press the closin gbutto nint he boot lid
again or press the ibuttonont he key
to halt the closin gprocedure.
i Do not leave the key in the boot. You
could otherwise lock yourself out. 1
Closing button
X Press closin gbutton 1.
The boot lid closes automatically.
Closing from the outsid eand locking
centrally (with KEYLESS GO*) You can close the boot lid from the outside
using the closin
gbutto nint he boot lid, or you
can close and centrally lock the vehicle simul-
taneously with the KEYLESSGOb utton*. G
Risk of injury
Monitor the boot lid closin gprocedure to
make sure that nobody can become trap-
ped. Press the closin gbutto nint he boot lid
again or press the ibuttonont he key
to halt the closin gprocedure. Controls
*o ptional
230_AKB
;5;4,en-GB
bjanott, Version:2.9.6
2008-04-08T15:09:54+02:0
0-Seite 71 ZDateiname: 6515_3089_02_buchblock.pdf; preflight
Page 75 of 317
Opening and closing
72
i
Do not leave the key in the boot. You
could otherwise lock yourself out. 1
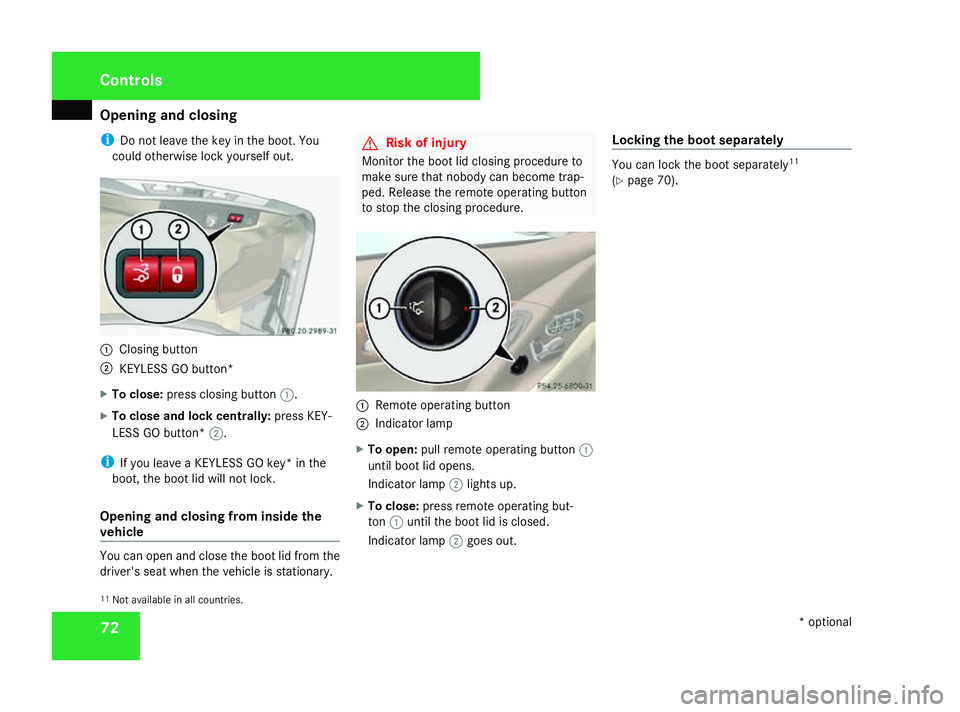
Closing button
2 KEYLESSGOb utton*
X To close: press closing button 1.
X To close and lock centrally: press KEY-
LESS GO button* 2.
i If you leave aKEYLESSGOk ey* in the
boot, the boot lid will not lock.
Opening and closing from inside the
vehicle You can open and close the boot lid from the
driver's seat when the vehicle is stationary. G
Risk of injury
Monitor the boot lid closing procedure to
make sure that nobody can become trap-
ped. Release the remote operating button
to stop the closing procedure. 1
Remote operating button
2 Indicator lamp
X To open: pull remote operating button 1
until boot lid opens.
Indicator lamp 2lights up.
X To close: press remote operating but-
ton 1until the boot lid is closed.
Indicator lamp 2goes out. Locking the boot separately You can lock the boot separately
11
(Y page 70).
11 Not availabl einall countries. Controls
*optional
230_AKB; 5; 4, en-GB
bjanott
,V ersion: 2.9.6
2008-04-08T15:09:54+02:00
-Seite 72 Dateiname: 6515_3089_02_buchblock.pdf; preflight
Page 76 of 317
Key positions
73Key positions
Key
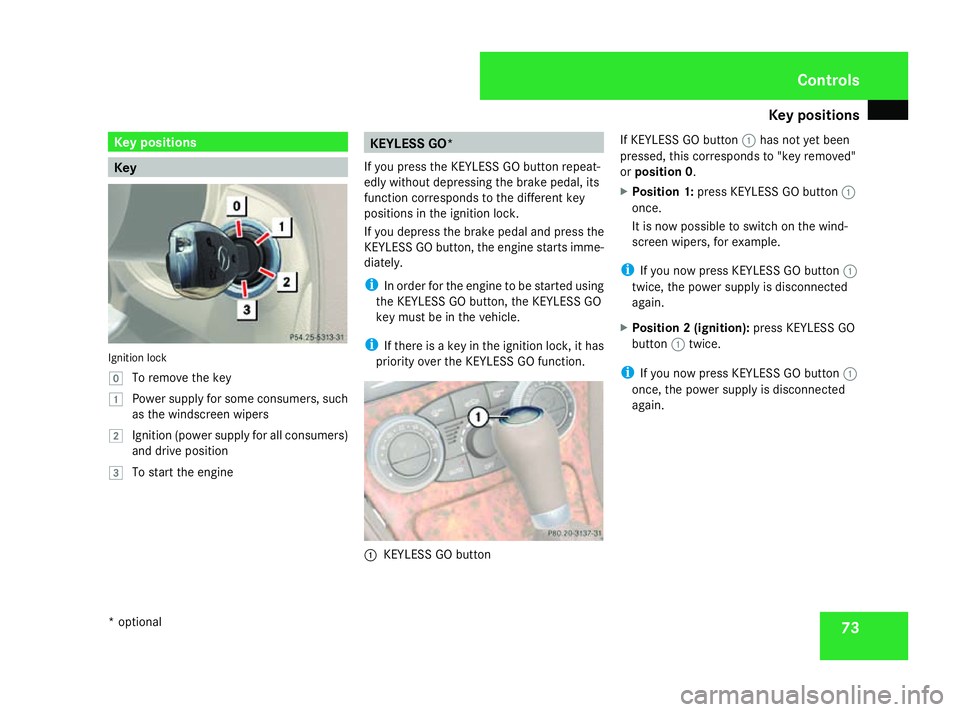
Ignition lock
}
To remove th ekey
$ Power supply for som econsumers, such
as th ewindscreen wipers
% Ignition (power supply for all consumers)
and driv eposition
& To start th eengine KEYLESS GO*
If you pres sthe KEYLESS GO button repeat-
edly without depressing th ebrak epedal, its
function corresponds to th edifferen tkey
position sintheignition lock.
If you depress th ebrak epedal and pres sthe
KEYLESS GO button ,the engine start simme-
diately.
i In orde rfor th eengine to be started using
th eK EYLESS GO button ,the KEYLESS GO
key must be in th evehicle.
i If there is akey in th eignition lock, it has
priorit yover th eKEYLESS GO function. 1
KEYLESS GO button If KEYLESS GO button
1has no tyet been
pressed, this corresponds to "key removed"
or position 0 .
X Position 1: pressKEYLESS GO button 1
once.
It is no wpossible to switch on th ewind-
screen wipers, for example.
i If you no wpressKEYLESS GO button 1
twice, th epower supply is disconnected
again.
X Position 2(ignition): pressKEYLESS GO
button 1twice.
i If you no wpressKEYLESS GO button 1
once, th epower supply is disconnected
again. Controls
*o ptional
230_AKB
;5;4,en-GB
bjanott ,V ersion: 2.9.6
2008-04-08T15:09:54+02:00
-Seite 73 ZDateiname: 6515_3089_02_buchblock.pdf; preflight
Page 77 of 317
Seats
74 Seats
Points to remember
G
Risk of injury
The seats can still be adjusted when there
is no key in the ignition lock. For this rea-
son, children should never be left unsuper-
vised in the vehicle. They could become
trapped when adjusting aseat. G
Risk of accident
Only adjust the driver's seat when the vehi-
cle is stationary. You will otherwise be dis-
tracted from the road and traffic conditions
and you could lose control of the vehicle as
ar esult of the seat moving. This could
cause an accident. G
Risk of injury
Make sure that nobody can become trap-
ped when you adjust the seat.
Observe the notes concerning the airbag
system.
Secure children as recommended; see
"Children in the vehicle" section.
! When you move the seats, make sure that
there are no objectsint he footwell orbehind the seats. Otherwise, you could
damage the seats and the objects.
i The head restraint scannot be removed. Adjusting the seat electrically
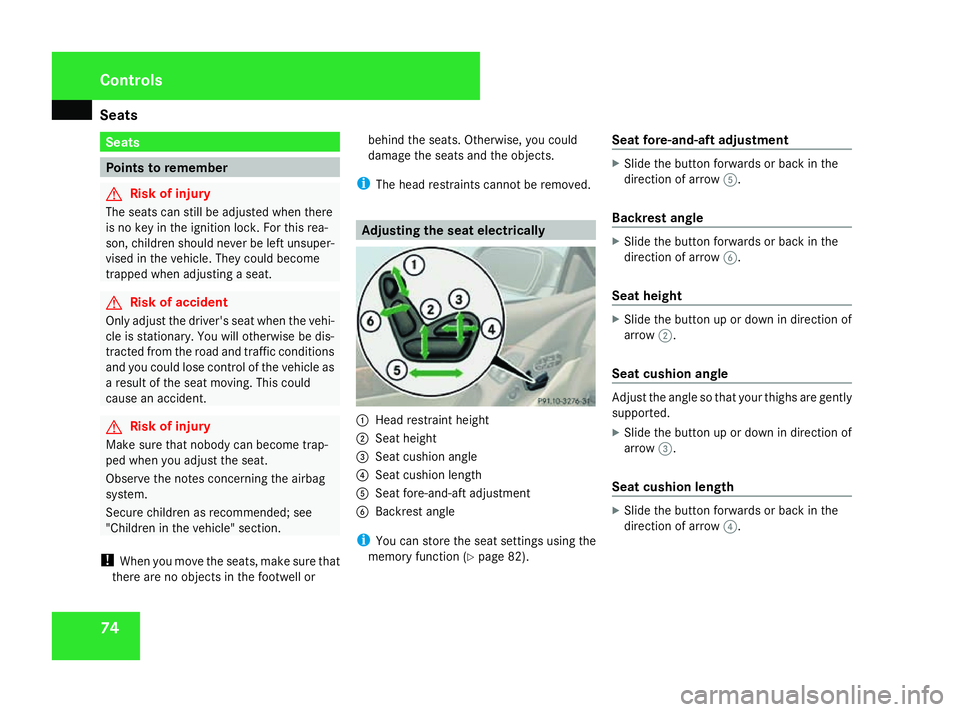
1
Head restraint height
2 Seat height
3 Seat cushion angle
4 Seat cushion length
5 Seat fore-and-aft adjustment
6 Backrest angle
i You can store the seat settings using the
memory function (Y page 82). Seat fore-and-aft adjustment X
Slide the button forwards or back in the
direction of arrow 5.
Backrest angle X
Slide the button forwards or back in the
direction of arrow 6.
Seat height X
Slide the button up or down in direction of
arrow 2.
Seat cushiona ngle Adjust the angle so that yourt
highs are gently
supported.
X Slide the button up or down in direction of
arrow 3.
Seat cushionl ength X
Slide the button forwards or back in the
direction of arrow 4. Controls
230_AKB; 5; 4, en-GB
bjanott,
Version: 2.9.6
2008-04-08T15:09:54+02:00
-Seite 74 Dateiname: 6515_3089_02_buchblock.pdf; preflight
Page 78 of 317
Seats
75
Head restraint height G
Risk of injury
Make sure that the central area of the head
restraint supports the back of your head at
about eye level. You could seriously injure
your neck if your head is not correctly sup-
ported by the head restraint in the event of
an accident. Never travel without acor-
rectly adjusted and engaged head restraint.
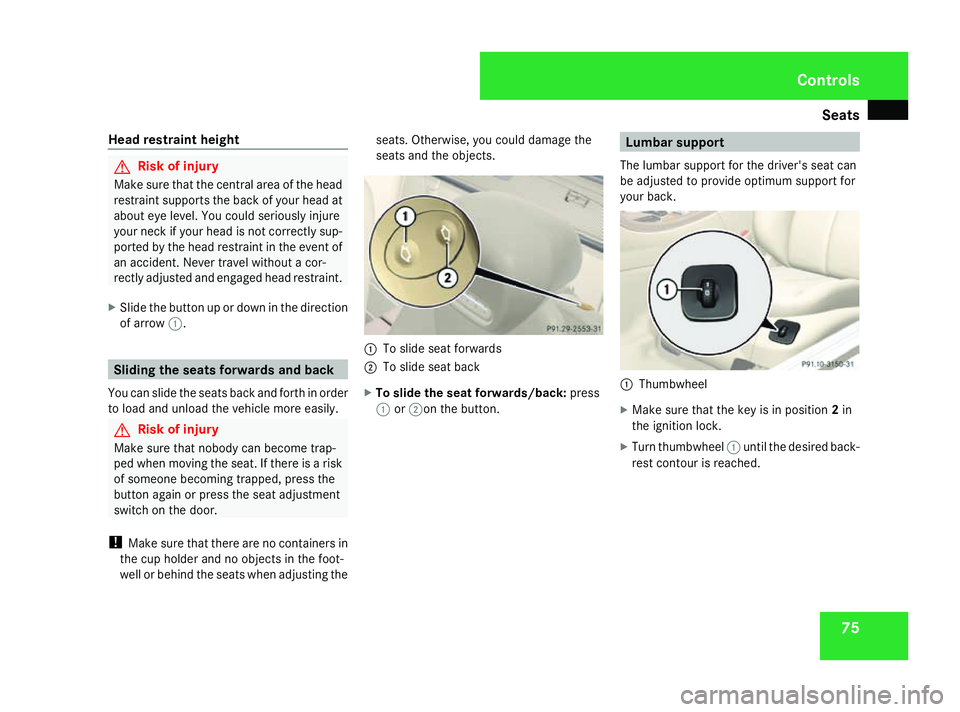
X Slide the button up or down in the direction
of arrow 1. Sliding the seats forwardsa
nd back
You can slide the seats back and forth in order
to load and unload the vehicle more easily. G
Risk of injury
Make sure that nobody can become trap-
ped when moving the seat. If there is arisk
of someone becoming trapped, press the
button again or press the seat adjustment
switch on the door.
! Make sure that there are no containers in
the cup holder and no objectsint he foot-
well or behind the seats when adjusting the seats. Otherwise, you could damage the
seats and the objects.
1
To slide seat forwards
2 To slide seat back
X To slide the seat forwards/back: press
1 or2on the button. Lumbar support
The lumbar support for the driver's seat can
be adjusted to provide optimum support for
your back. 1
Thumbwheel
X Make sure that the key is in position 2in
the ignition lock.
X Turn thumbwheel 1until the desired back-
rest contour is reached. Controls
230_AKB; 5; 4, en-GB
bjanott
,V ersion: 2.9.6
2008-04-08T15:09:54+02:00
-Seite 75 ZDateiname: 6515_3089_02_buchblock.pdf; preflight
Page 79 of 317
Seats
76 Multi-contour seat*
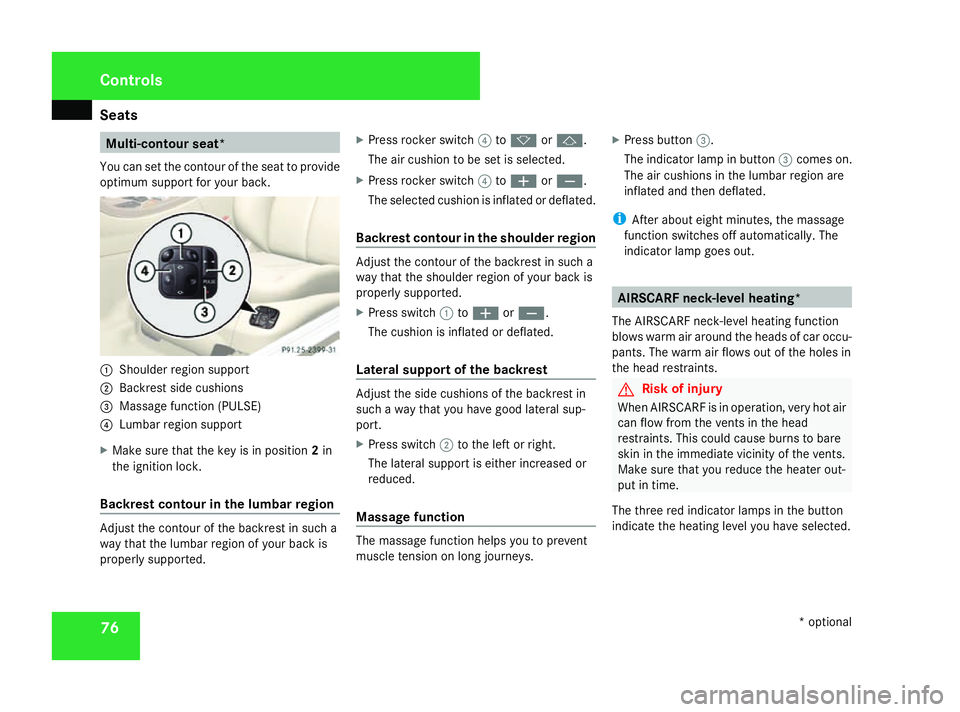
You can set the contour of the seat to provide
optimum support for your back. 1
Shoulder region support
2 Backrest side cushions
3 Massage function (PULSE)
4 Lumbarr egion support
X Make sure that the key is in position 2in
the ignition lock.
Backrest contour in the lumbar region Adjust the contour of the backrest in such a
way that the lumbar region of yourb
ack is
properly supported. X
Press rocker switch 4tok orj.
The air cushion to be set is selected.
X Press rocker switch 4toæ orç.
The selected cushion is inflated or deflated.
Backrest contour in the shoulder region Adjust the contour of the backrest in such a
way that the shoulder region of yourb
ack is
properly supported.
X Press switch 1toæ orç.
The cushion is inflated or deflated.
Lateral support of the backrest Adjust the side cushions of the backrest in
such
away that you have good lateral sup-
port.
X Press switch 2to the left or right.
The lateral support is either increased or
reduced.
Massage function The massage function helps you to prevent
muscle tension on long journeys.X
Press button 3.
The indicator lamp in button 3comes on.
The air cushions in the lumbar region are
inflated and then deflated.
i After aboute ight minutes, the massage
function switches off automatically.T he
indicator lamp goes out. AIRSCARF neck-level heating*
The AIRSCARF neck-level heating function
blowsw arm air around the headsofc ar occu-
pants. The warm air flows out of the holes in
the head restraints. G
Risk of injury
When AIRSCARF is in operation, very hot air
can flow from the vents in the head
restraints. This could cause burns to bare
skin in the immediate vicinity of the vents.
Make sure that you reduce the heater out-
put in time.
The three red indicator lamps in the button
indicate the heating level you have selected. Controls
*optional
230_AKB; 5; 4, en-GB
bjanott,
Version: 2.9.6 2008-04-08T15:09:54+02:00-Seite 76 Dateiname: 6515_3089_02_buchblock.pdf; preflight
Page 80 of 317
Seats
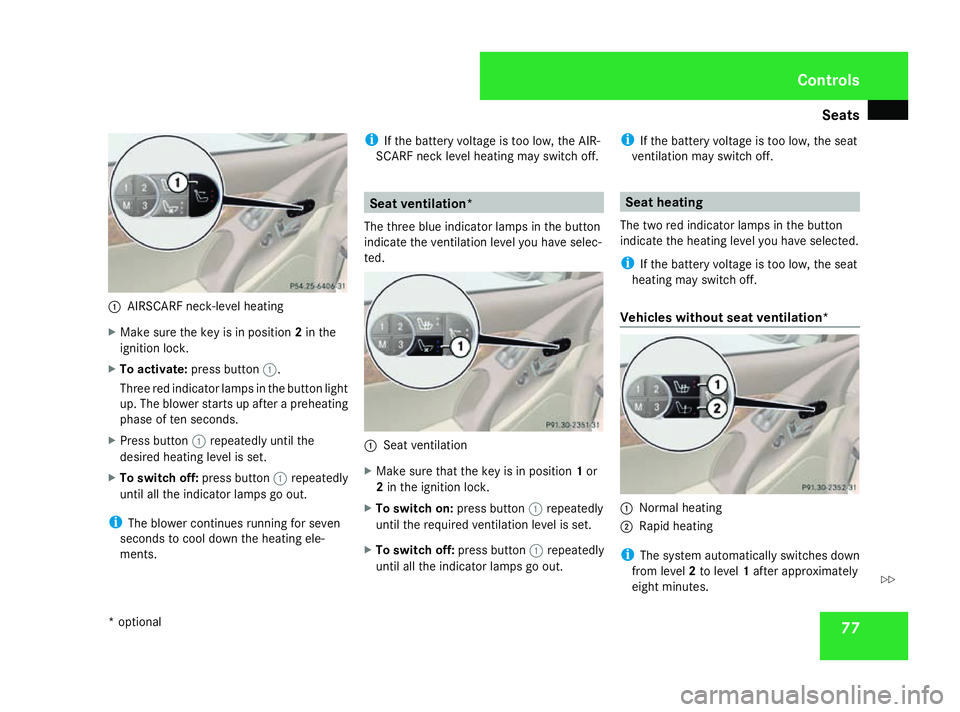
771
AIRSCARF neck-level heating
X Make sure the key is in position 2in the
ignition lock.
X To activate: press button 1.
Three red indicator lamps in the button light
up. The blower starts up after apreheating
phase of ten seconds.
X Press button 1repeatedly until the
desired heating level is set.
X To switch off: press button1repeatedly
until all the indicator lamps go out.
i The blower continues running for seven
seconds to cool down the heating ele-
ments. i
If the battery voltage is too low, the AIR-
SCARF neck level heating may switch off. Seat ventilation*
The three bluei ndicator lamps in the button
indicate the ventilation level you have selec-
ted. 1
Seat ventilation
X Make sure that the key is in position 1or
2 in the ignition lock.
X To switch on: press button1repeatedly
until the required ventilation level is set.
X To switch off: press button1repeatedly
until all the indicator lamps go out. i
If the battery voltage is too low, the seat
ventilation may switch off. Seat heating
The two red indicator lamps in the button
indicate the heating level you have selected.
i If the battery voltage is too low, the seat
heating may switch off.
Vehicles without seat ventilation* 1
Normal heating
2 Rapid heating
i The system automatically switches down
from level 2to level 1after approximately
eight minutes. Controls
*o ptional
230_AKB; 5; 4, en-GB
bjanott,
Version: 2.9.6 2008-04-08T15:09:54+02:00-Seite 77 ZDateiname: 6515_3089_02_buchblock.pdf; preflight