MERCEDES-BENZ SLC ROADSTER 2018 Owner's Manual
Manufacturer: MERCEDES-BENZ, Model Year: 2018, Model line: SLC ROADSTER, Model: MERCEDES-BENZ SLC ROADSTER 2018Pages: 298, PDF Size: 5.26 MB
Page 251 of 298
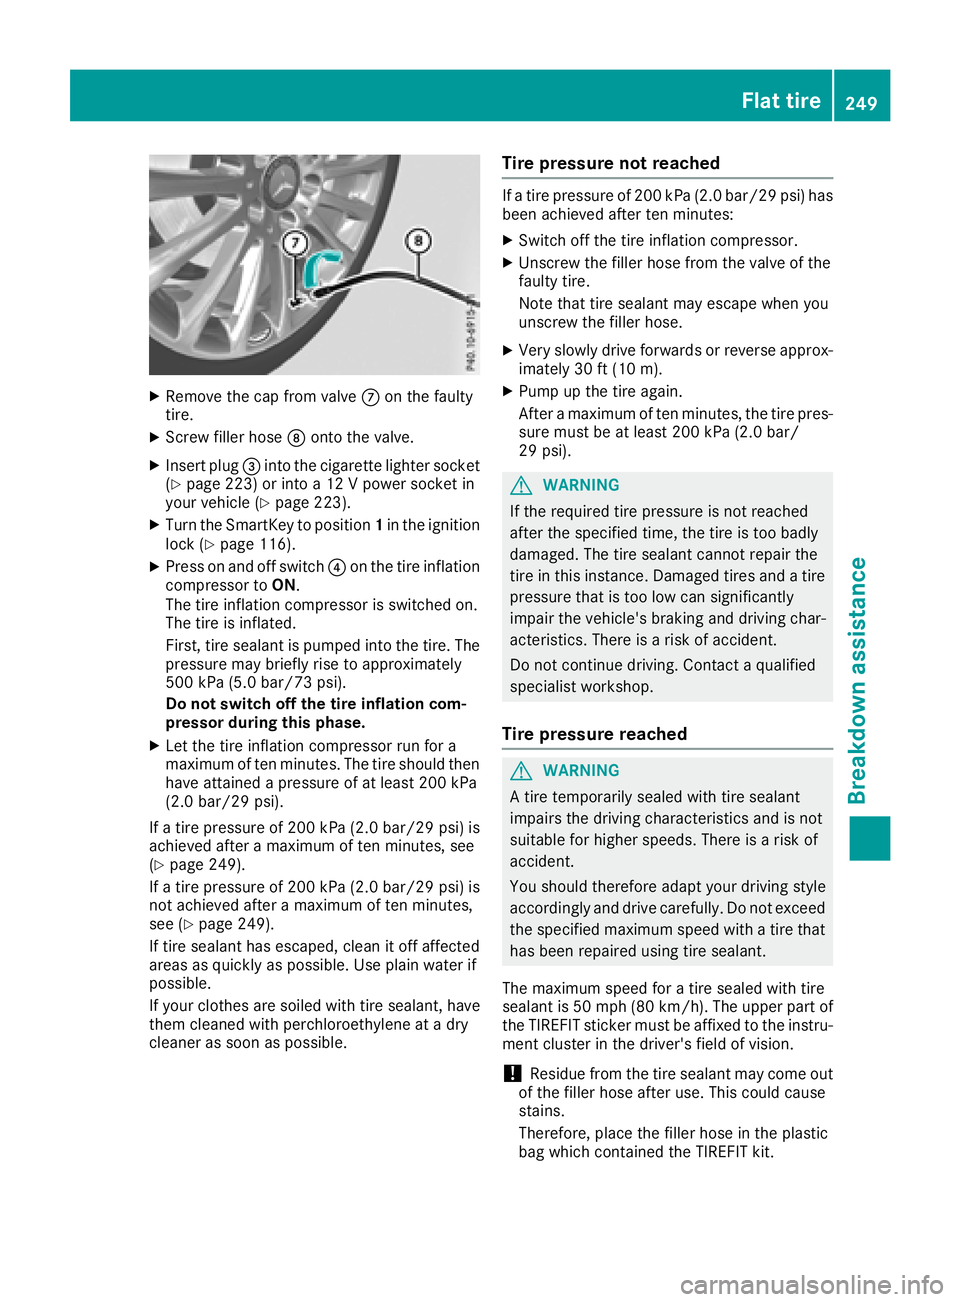
XRemove thecap from valv eC on th efault y
tire.
XScrew filler hos eD onto th evalve.
XInser tplug =intothe cigarette lighte rsocke t
(Ypage 223) or int oa12Vpower socke tin
your vehicl e(Ypage 223).
XTurn theSma rtKey to position 1in th eignition
loc k(Ypage 116).
XPress on and off switch ?on th etirei nflation
compressor to ON.
The tire inflation compressor is switched on .
The tire is inflated.
First ,tires ealan tispumped int othe tire. The
pressur emay briefly ris etoapproximately
50 0k Pa(5.0b ar/7 3psi).
Do not switch off th etirei nflation com -
pressor during this phase .
XLet thetirei nflation compressor run for a
maximum of te nminutes. The tire should then
hav eattained apressur eofatl east 200kPa
(2. 0b ar/29 psi) .
If at irep ressur eof200 kPa( 2.0b ar/29 psi) is
achieved after amaximum of te nminutes, see
(
Ypage 249).
If at irep ressur eof200 kPa( 2.0b ar/29 psi) is
no ta chieved after amaximum of te nminutes,
see (
Ypage 249).
If tire sealan thas escaped, clean it off affecte d
areas as quickly as possible. Use plain water if
possible.
If your clothes are soiled wit htires ealant, hav e
them cleane dwithp erchloroethylen eatadry
cleane rassoo
nasp o
ssible.
Tire pressure not reached
Ifat irep ressur eof200 kPa(2.0 bar/29 psi) has
beena chieved after ten minutes:
XSwitch off the tire inflation compressor.
XUnscrew the filler hose from the valve of the
faulty tire.
Note that tire sealant may escap ewheny ou
unscrew the filler hose.
XVery slowly drive forwards or reverse approx- imately 30 ft (10 m).
XPump up the tire again.
After amaximu moften minutes ,the tire pres-
sure must be at least 200 kPa (2.0 bar/
29 psi).
GWARNING
If the required tire pressure is not reached
after the specified time, the tire is too badly
damaged. The tire sealant cannot repair the
tire in this instance. Damaged tires and atire
pressure that is too low can significantly
impair the vehicle's braking and driving char-
acteristics. There is arisk of accident.
Do not continue driving. Contact aqualified
specialist workshop.
Tire pressure reached
GWARNING
At ire temporarily sealed with tire sealant
impairs the driving characteristics and is not
suitabl efor higher speeds. There is arisk of
accident.
You should thereforea dapt yourdriving style
accordingly and drive carefully .Donot exceed
the specified maximu mspeedw ithatire that
has beenr epaired using tire sealant.
The maximu mspeedf oratire sealed with tire
sealant is 50 mph (80 km/h). The upper part of
the TIREFIT sticker must be affixed to the instru-
ment cluster in the driver's fieldofv ision.
!Residuefrom the tire sealant may come out
of the filler hose after use .This coul dcause
stains.
Therefore, place the filler hose in the plastic
bag which contained the TIREFIT kit.
Flat tire249
Breakdowna ssistance
Z
Page 252 of 298
HEnvironmentalnote
Hav ethe used tir esealantb ottle disposed of
professionally, e.g .ataqualifieds pecialist
workshop.
If tir epressure of 20 0kPa(2.0 ba r/29 psi )has
beena chieved after amaximu mperiod of ten
minutes:
XSwitch off the tire inflation compressor.
XUnscrew the filler hose from the valve of the
faulty tire.
XStow the tire sealant bottle and the tire infla- tion compressor.
XPull away immediately.
XStop after driving for approximately ten
minutes and check the tire pressure with the
tire inflation compressor.
The tire pressure must now be at least
130 kPa (1.3 bar/19 psi).
GWARNING
If the required tire pressure is not reached
after driving for ashort period, the tire is too
badly damaged. The tire sealant cannot repair
the tire in this instance. Damaged tires and a
tire pressure that is too low can significantly
impair the vehicle's braking and driving char-
acteristics. There is arisk of accident.
Do not continue driving. Contact aqualified
specialist workshop.
iIn cases such as the one mentioned above,
contact an authorized Mercedes-Benz Cen-
ter. Or call 1-800-FOR-MERCedes( in the
USA) or 1-800-387-0100 (in Canada).
XCorrect the tire pressure if it is still at least
130 kPa (1.3 bar/19 psi).S ee the Tire and
Loading Information placard on the driver's
side B-pillar or the tire pressure tabl einthe
fuel filler flapf or values.
XTo increase the tire pressure: switch on the
tire inflation compressor.
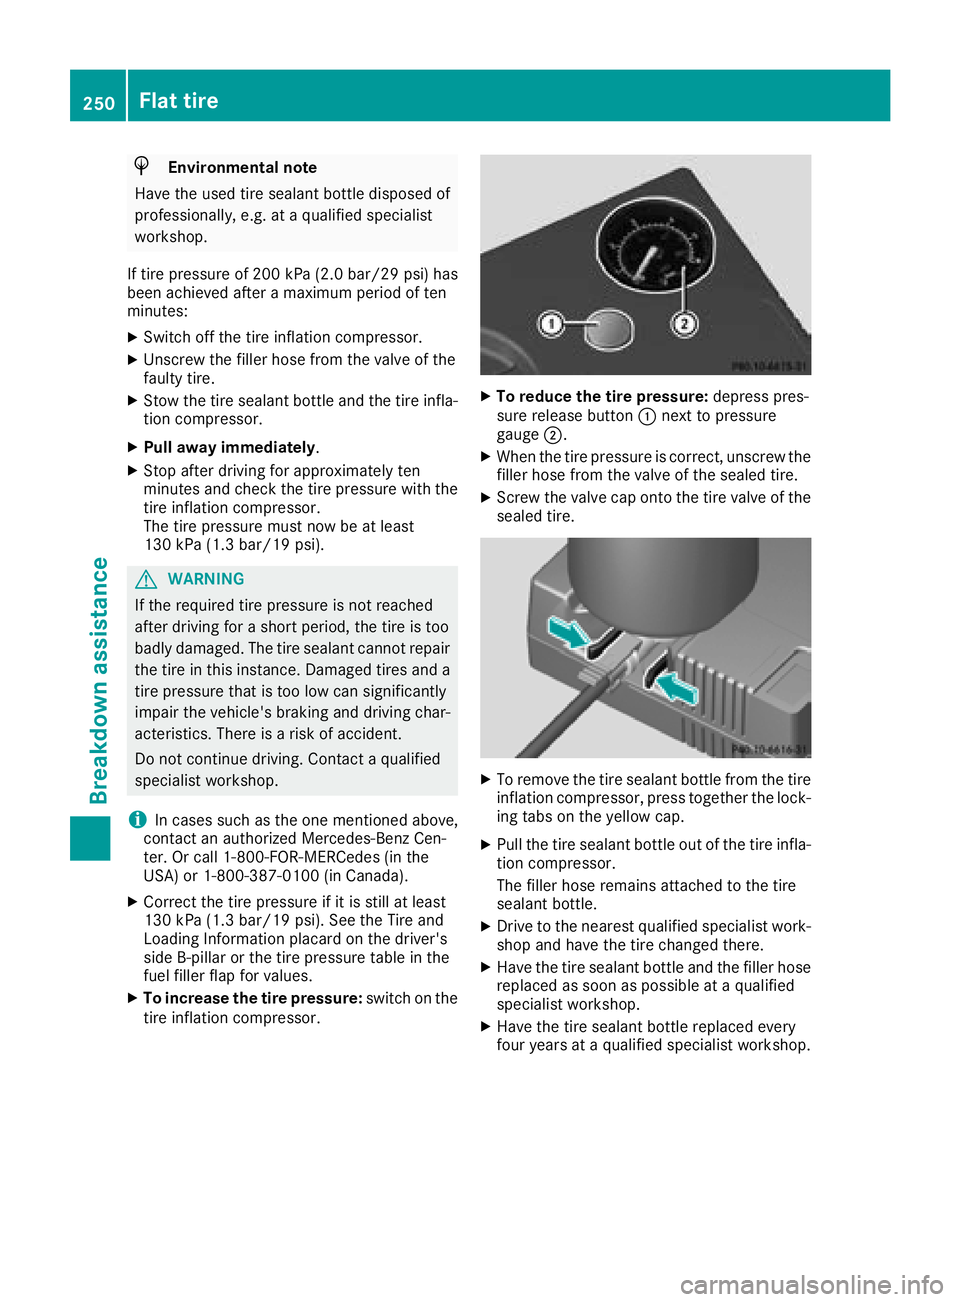
XTo reduce the tire pressure: depress pres-
sure release button :next to pressure
gauge ;.
XWhen the tire pressure is correct, unscrew the
filler hose from the valve of the sealed tire.
XScrew the valve cap onto the tire valve of the
sealed tire.
XTo remove the tire sealant bottle from the tire
inflation compressor, press together the lock-
ing tabs on the yellow cap.
XPullthe tire sealant bottle out of the tire infla-
tion compressor.
The filler hose remains attache dtothe tire
sealant bottle.
XDrive to the nearest qualified specialist work-
shop and have the tire change dthere.
XHave the tire sealant bottle and the filler hose
replaced as soon as possibleataq ualified
specialist workshop.
XHave the tire sealant bottle replaced every
four years at aqualified specialist workshop.
250Flat tire
Breakdowna ssistance
Page 253 of 298
Battery (vehicle)
Important safety notes
Specialtool sand expert knowledg eare required
when working on the battery ,e.g.r emovala nd
installation. Yo ushoul dtherefore have al lwork
involving the battery carrie doutataq uali fied
specialist workshop.
GWARNING
Wor kcarrie doutincorrectly on the battery
can lead ,for example, to ashort circui tand
thusd amagethe vehicl eelectronics .Thisc an
lead to functio nrestrictions applying to
safety-relevant systems, e.g .the lighting sys-
tem, the ABS (anti-lock braking system )orthe
ESP
®(Electronic Stability Program). The oper-
ating safety of your vehicl emaybe restricted.
Yo uc ould lose controloft he vehicle, for
example:
Rwhen braking
Rin the event of abrupt steering maneuvers
and/or when the vehicle's speed is not
adapted to the roadc onditions
There is ariskofana ccident.
In the event of ashort circui torasimilar inci-
dent, contact aquali fied specialist workshop
immediately. Do not drive any further .You
shoul dhavea llwork involving the battery car-
rie do utataq uali fied specialist workshop.
For further informatio nabout ABS and ESP
®,
see (Ypage 57 )and (Ypage 60).
GWARNING
Electrostati cbuild -upc an lead to the creation
of sparks, which could ignite the highl yexplo-
sive gases of abattery.T here is ariskofa n
explosion.
Before handling the battery ,touch the vehicle
body to remove any existing electrostatic
build-up.
The highl yflammabl egasmixture form swhen
charging the battery as well as when jump-start-
ing. Alway
smakes uret hatn either yo unor the bat-
tery is electrostaticall ycharged. Abuild -upo f
electrostatic charge can be caused ,for exam-
ple:
Rby wearing clothing made from synthetic
fibers
Rdu etof rictionbetween clothing and seats
Rif yo upushorp ullt he battery across the car-
pe toro thersyntheti cmaterials
Rif yo uwipet he battery with acloth
GWARNING
During the charging process ,abattery produ-
ces hydrogen gas. If ashort circui toccurs or
sparks are created,t he hydrogen gascan
ignite .There is ariskofane xplosion.
RMake sure thatt he positive terminal of a
connected battery does not come into con- tact with vehicl eparts.
RNever place meta lobjects or tool sonabat-
tery.
RIt is important thaty ouobserve the descri-
be do rder of the battery terminal swhen
connecting and disconnecting abattery.
RWhe njump-starting ,makes uret hatt he
battery pole swithi de ntical polarity are
connected.
RIt is particularly important to observe the
describe dorder when connecting and dis-
connecting the jumper cables.
RNever connect or disconnect the battery
terminal swhile the engine is running.
GWARNING
Battery aci discaustic .There is ariskofi njury.
Avoidc ontact with skin, eyes or clothing. Do
not inhal eany battery gases .Donot lean over
the battery .Keepc hildren away from batter-
ies. Wash away battery aci dimmediatelyw ith
plenty of clean water and see kmedica latten-
tion.
HEnvironmental note
Batterie scontain pollu-
tants .Itisi llegalto dispose
of them with the household
Battery (vehicle)251
Breakdo wn assis tance
Z
Page 254 of 298
rubbish. They must be col-
lected separately and dis-
posed of in an environmen-
tallyresponsible recycling
system.
Dispose of batterie sinan
environmentally responsi-
ble manner. Take dis-
charge dbatterie stoaq uali-
fied specialist workshop or
to ac ollection point for
used batteries.
!Have the battery checked regularl yata
qualified specialist workshop.
Observe the service interval sinthe Mainte-
nance Booklet or contact aqualified specialist
workshop for more information.
!Always have work on batterie scarrie dout at
aq ualified specialist workshop.
Shoul dit, in exceptionalc ircumstances, be
absolutel ynecessary to disconnect the 12-
volt battery yourself, please observe the fol-
lowing:
RSecure the vehicletop revent it from rolling
away.
RSwitch off the ignition.
RDisconnect the negative terminal first and
then the positive terminal.
The transmission is locked in position j
after disconnecting the battery.
After the work has been done, install the bat- tery and replace the cover of the positive ter-
minal clamp firmly.
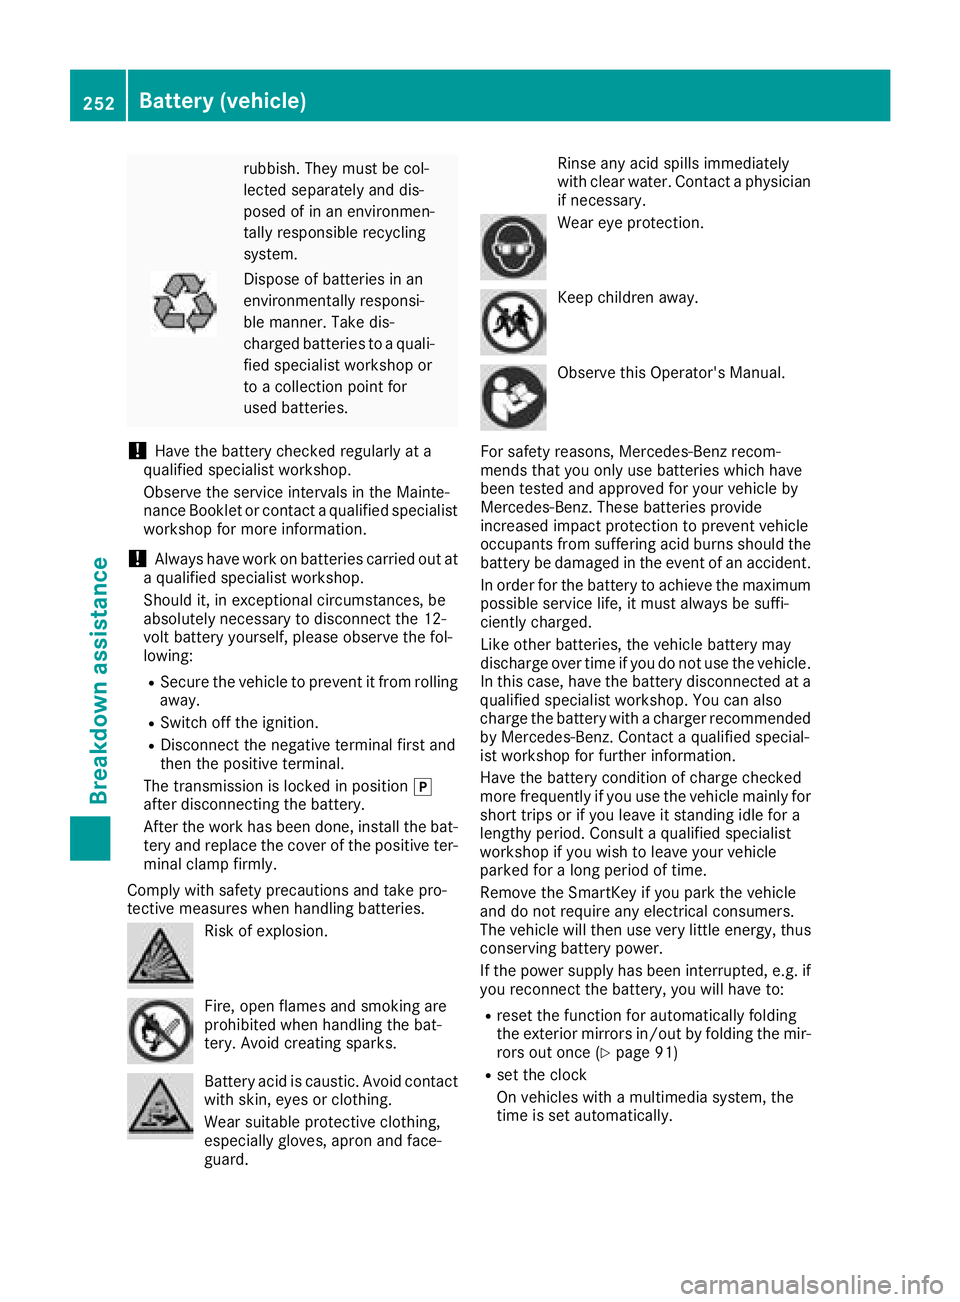
Comply with safety precautions and take pro-
tective measures when handling batteries.
Ris kofe xplosion.
Fire, open flame sand smoking are
prohibited when handling the bat-
tery. Avoid creating sparks.
Battery acid is caustic. Avoid contact
with skin, eye sorclothing.
Wears uitable protective clothing,
especially gloves, apro nand face-
guard. Rinse any acid spills immediately
with clearw
ater. Contact aphysician
if necessary.
Weare ye protection.
Keep children away.
Observe this Operator's Manual.
For safety reasons, Mercedes-Benz recom-
mends that you only use batterie swhich have
been tested and approved for you rvehicleb y
Mercedes-Benz. These batterie sprovide
increase dimpact protection to prevent vehicle
occupants from suffering acid burns should the
battery be damaged in the event of an accident.
In order for the battery to achieve the maximum
possible service life,itm ust alwaysbesuffi-
ciently charged.
Like other batteries, the vehicleb attery may
discharge over time if you do not use the vehicle.
In this case, have the battery disconnected at a
qualified specialist workshop.Y ou can also
charge the battery with acharge rrecommended
by Mercedes-Benz. Contact aqualified special-
ist workshop for further information.
Have the battery condition of charge checked
more frequently if you use the vehiclem ainlyfor
short trips or if you leave it standing idlef or a
lengthy period. Consult aqualified specialist
workshop if you wis htoleave you rvehicle
parked for along periodoft ime.
Remove the SmartKey if you park the vehicle
and do not require any electricalc onsumers.
The vehiclew illt hen use very little energy,t hus
conserving battery power.
If the powers upply has been interrupted ,e.g. if
you reconnect the battery ,you wil lhave to:
Rreset the function for automatically folding
the exterior mirrors in/out by folding the mir-
rors out once (
Ypag e91)
Rset the clock
On vehicles with amultimedia system, the
time is set automatically.
252Battery (vehicle)
Breakdown assistance
Page 255 of 298
Charging thebattery
GWARNING
During chargin gand jump-starting, explosive
gases can escape from th ebattery. Thereisa
ris kofane xplosion.
Particularly avoid fire, open flames, creating
sparks and smoking. Ensure there is sufficient
ventilatio nwhile chargin gand jump-starting.
Do no tlean ove rabattery.
GWARNING
Battery acid is caustic .Thereisar iskofi njury.
Avoid contac twiths kin, eyes or clothing .Do
no tinhale any battery gases.Don otlean over
th eb attery. Keep childre naway from batter-
ies. Wash away battery acid immediately with
plenty of clean wate rand seek medical atten-
tion.
GWARNING
Ad ischarged battery can freezeatt empera-
tures below freezing point. When jump-start-
ing th evehicle or chargin gthe battery, gases
can escape from th ebattery. Thereisar isko f
an explosion.
Allow th efroze nbattery to thaw out before
chargin gitorjump-starting.
!Only use battery chargers witham aximum
chargin gvoltage of 14.8 V.
!Only charge th ebattery usingt hejump-
starting connection point.
The jump-startin gconnection pointisint he
enginec ompartment.
If th eindicator/warning lamps do no tlight up at
low temperatures, it is ver ylikely that th edis-
charge dbattery has frozen.Int hisc ase, you
may neither charge th ebattery no rjump-start
th ev ehicle .The servic elife of athawed-out bat-
tery may be shorter. The starting characteristics
can be impaired, particularly at low tempera-
tures. Hav ethe thawed-out battery checked at a
qualified specialist workshop.
Read th ebattery charger's operatin ginstruc-
tions before chargin gthe battery.
XOpen th ehood.
XConnect th ebattery charge rtothepositive
terminal and ground pointint hesame order
as when connecting th edonor battery in the
jump-startin gprocedure (
Ypage 253).
Jump-starting
For th ejump-startin gprocedure, use only th ejump-startin gconnection pointint heenginec om-
partment, consisting of apositiv etermi nal and aground point.
GWARNING
Battery acid is caustic .Thereisar iskofi njury.
Avoid contac twiths kin, eyes or clothing .Donotinhale any battery gases.Don otlean ove rthe
battery. Keep childre naway from batteries .Wash away battery acid immediately withp lenty of
clean wate rand seek medical attention.
GWARNING
During chargin gand jump-starting, explosive gases can escape from th ebattery. Thereisar isk
of an explosion.
Particularly avoid fire, open flames, creating sparks and smoking. Ensure there is sufficient ven-
tilatio nwhile chargin gand jump-starting. Do no tlean ove rabattery.
Jump-starting253
Breakdown assistance
Z
Page 256 of 298
GWARNING
During the charging process,ab attery produces hydrogen gas. If ashort circui toccurs or sparks
are created ,the hydrogen gas can ignite. There is arisk of an explosion.
RMake sure that the positive terminal of aconnected battery does not come into contact with
vehiclep arts.
RNever place metal objects or tools on abattery.
RIt is important that you observe the described order of the battery terminal swhen connecting
and disconnecting abattery.
RWhen jump-starting, make sure that the battery polesw ith identical polarity are connected.
RIt is particularlyimportant to observe the described order when connecting and disconnecting
the jumper cables.
RNever connect or disconnect the battery terminal swhile the engine is running.
GWARNING
Ad ischarged battery can freeze at temperatures below freezing point. When jump-starting the
vehicleorc harging the battery,g asescan escap efrom the battery.T here isarisk of an explosion.
Allow the frozen battery to thaw out before charging it or jump-starting.
!Avoid repeated and lengthy starting attempts. Otherwise, the catalytic converter coul dbe
damaged by the non-combusted fuel.
If the indicator/warning lamp sdonot light up at low temperatures, it is very likelyt hat the dis-
charge dbattery has frozen. In this case, you may neither charge the battery nor jump-start the
vehicle. The service life of athawed-out battery may be shorter. The starting characteristics can be
impaired,p articularlyatlow temperatures. Have the thawed-out battery checked at aqualified
specialist workshop.
Do not start the vehicleu singarapi dc harging device. If you rvehicle's battery is discharged, the
engine can be jump-started from another vehicleorf romasecond battery using jumper cables.
Observe the following points:
RThe battery is not accessible in all vehicles. If the other vehicle's battery is not accessible,j ump-
start the vehicleu singasecond battery or ajump-starting device.
RYou may only jump-start the vehiclew hen the engine and exhaust system are cold.
RDo not start the engine if the battery is frozen. Let the battery thaw first.
ROnly jump-start from batterieswitha12Vv oltagerating.
ROnly use jumper cables which have asufficient cross-section and insulated terminal clamps.
RIf the battery is full ydischarged, leave the battery that is being used to jump-start connected for
af ew minutes before attempting to start. This charge sthe battery slightly.
RMake sure that the two vehicles do not touch.
Make sure that:
RThe jumper cables are not damaged.
RBare parts of the terminal clamp do not come into contact with other metal parts while the jumper
cables are connected to the battery.
RThe jumper cables cannot come into contact with parts which can move when the engine is
running, such as the V-belt pulley or the fan.
XSecure the vehiclebyapplying the electric parking brake.
XShift the transmission to position j.
254Jump-starting
Breakdown assistance
Page 257 of 298
XMake sure that the ignition is switched off. All indicator lamps in the instrumentcluster must be
off. When using the SmartKey, turn the SmartKey to position uin the ignition lock and remove it
(
Ypage 116).
XSwitch off all electrical consumers, e.g. rear window defroster, lighting, etc.
XOpen the hood.
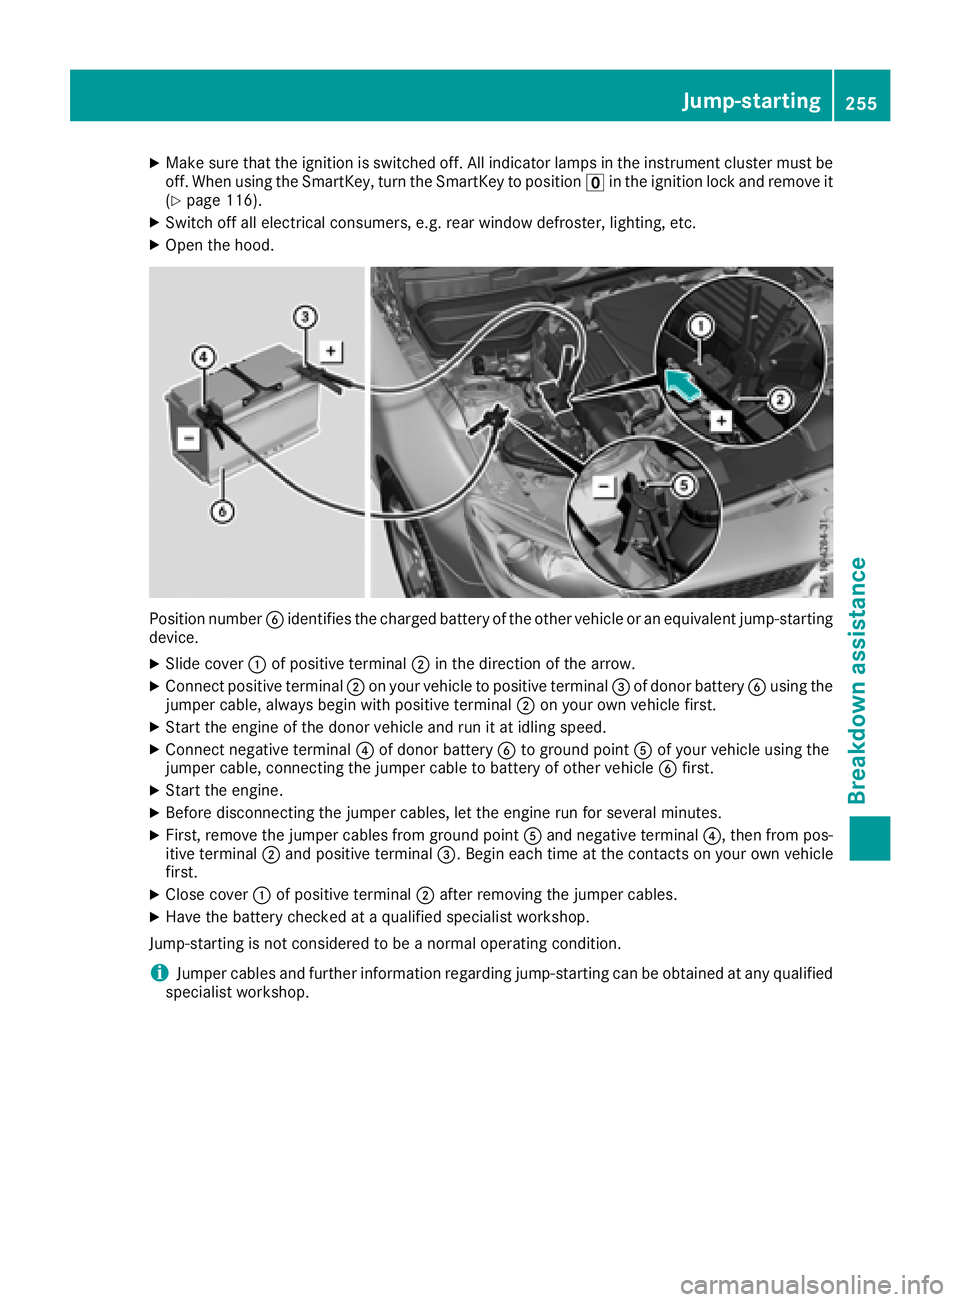
Position number Bidentifies the charged battery of the other vehicle or an equivalent jump-starting
device.
XSlide cover :of positive terminal ;in the direction of the arrow.
XConnect positive terminal ;on your vehicle to positive terminal =of donor battery Busing the
jumper cable, always begin with positive terminal ;on your own vehicle first.
XStart the engine of the donor vehicle and run it at idling speed.
XConnect negative terminal ?of donor battery Bto ground point Aof your vehicle using the
jumper cable, connecting the jumper cable to battery of other vehicle Bfirst.
XStart the engine.
XBefore disconnecting the jumper cables, let the engine run for several minutes.
XFirst, remove the jumper cables from ground point Aand negative terminal ?,then from pos-
itive terminal ;and positive terminal =.Begin each time at the contacts on your own vehicle
first.
XClose cover :of positive terminal ;after removing the jumper cables.
XHave the battery checked at aqualified specialist workshop.
Jump-starting is not considered to be anormal operating condition.
iJumper cables and further information regarding jump-starting can be obtained at any qualified
specialist workshop.
Jump-starting255
Breakdown assistance
Z
Page 258 of 298
Towingand tow-starting
Important safety notes
GWARNING
When towing or tow-startin ganotherv ehicle
and its weight is greate rthant he permissible
gross weight of your vehicle, the:
Rthe towing ey ecould detach itself
Rthe vehicle/trailer combinatio ncould roll-
over.
There is ariskofana ccident.
When towing or tow-startin ganotherv ehicle,
its weight shoul dnot be greate rthant he per-
missibl egross weight of your vehicle.
Detail sonthe permissibl egross vehicl eweigh t
of your vehicl ecan be found on the vehicl eide n-
tification plate (
Ypage 289).
!When Activ eBrake Assist, Distance Pilot
DISTRONICort he HOLD functio nisa ctivated,
the vehicl ebrakes automaticall yincertain
situations.
To avoi ddamag etothe vehicle, deactivate
these system sinthe following or similar sit-
uations:
Rwhen towing the vehicle
Rin the car wash
!Onlys ecurethe tow rop eortow ba ratthe
towing eyes. Otherwise, the vehicl ecould be
damaged.
!Do not us ethe towing ey efor recovery, this
could damage the vehicle. If in doubt, recover
the vehicl ewithac rane.
!When towing ,pulla wa yslowly and
smoothly. If the tractiv epower is too high, the
vehicles could be damaged.
!Do not tow with sling-typ eequipment .This
could damage the vehicle.
!When towing away vehicles with KEYLESS-
GO ,use the key instea dofthe Start/Stop
button. The automatic transmission mayo th-
erwis eshift to position jwhen yo uopent he
driver's or front-passenge rdoor, which could
damage the transmission.
!Make sure thatt he electricparkin gb rake is
released .Ifthe electri cparkin gbrake is faulty,
visit aquali fied specialis tworkshop.
!The vehicl ecan be towed amaximum of
30 miles (50km). The towing spee dof30mph
(50 km/h )mustn ot be exceeded.
If the vehicl ehasto be towed mor ethan
30 miles (50km), the entire vehicl emustb e
raised and transported.
!If yo utow or tow-start anotherv ehicle, its
weight must not exceed the maximum per-
missibl egross vehicl eweigh tofy ourvehicle.
It is better to have the vehicl etransporte dthan
to have it towed away.
The automatic transmission must be in position
i when the vehicl eisbeing towed away.
The battery must be connected and charged.
Otherwise, you:
Rcanno tturnt he SmartKeytop osition 2in
the ignition lock.
Rcanno tshift the automatic transmission to
position i.
Deactivate the automatic locking featur ebef
o
re
the vehicl eistowed (Ypage 173).Y oucould
otherwis ebelocked ou twhenp ushing or towing
the vehicle.
Installing/removin gthe towin geye
Installing the towin geye
GWARNING
The exhaust tai lpipem aybe ver yhot. There is
ar iskofb urns when removing the rea rcover.
Do not touch the exhaust pipe .Tak ep articular
car ew henr emoving the rea rcover.
256Towin gand tow-starting
Breakdow nassistance
Page 259 of 298
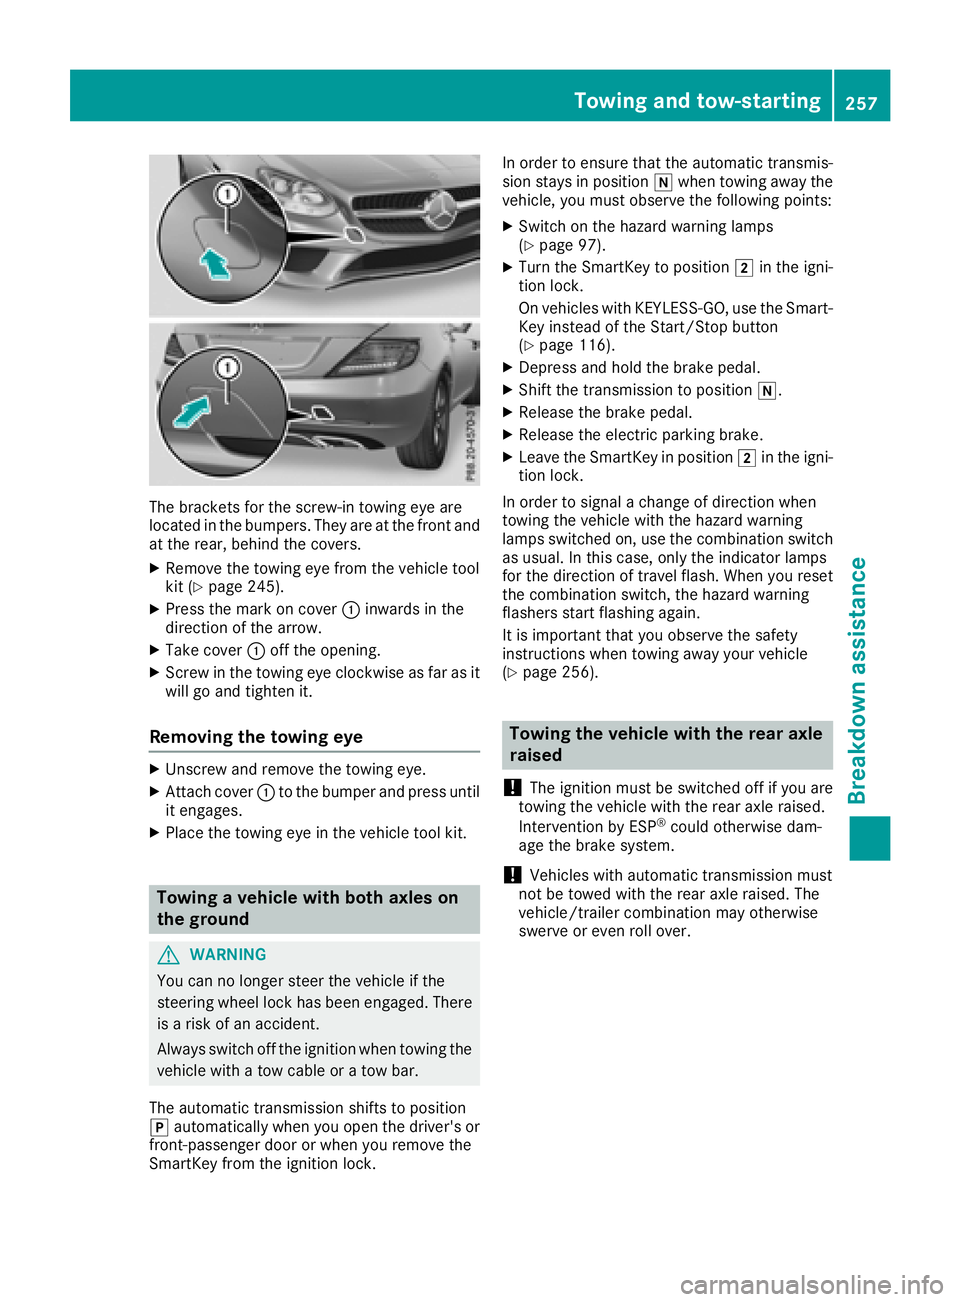
The bracketsfor the screw-in towing eye are
located in the bumpers. They are at the front and
at the rear, behind the covers.
XRemove the towing eye from the vehicle tool
kit (Ypage 245).
XPress the mark on cover :inwards in the
direction of the arrow.
XTake cover :off the opening.
XScrew in the towing eye clockwise as far as it
will go and tighten it.
Removing the towing eye
XUnscrew and remove the towing eye.
XAttach cover :to the bumper and press until
it engages.
XPlace the towing eye in the vehicle tool kit.
Towing avehicle with both axles on
the ground
GWARNING
You can no longer steer the vehicle if the
steerin gwheel lock has been engaged. There
is ar isk of an accident.
Always switch off the ignition when towing the
vehicle with atow cable or atow bar.
The automatic transmission shifts to position
j automatically when you open the driver's or
front-passenger door or when you remove the
SmartKey from the ignition lock. In order to ensure that the automatic transmis-
sion stays in position
iwhen towing away the
vehicle, you must observe the following points:
XSwitch on the hazard warning lamps
(Ypage 97).
XTurn the SmartKey to position 2in the igni-
tion lock.
On vehicles with KEYLESS-GO, use the Smart-
Key instead of the Start/Stop button
(
Ypage 116).
XDepress and hold the brake pedal.
XShift the transmission to position i.
XRelease the brake pedal.
XRelease the electric parking brake.
XLeave the SmartKey in position2in the igni-
tion lock.
In order to signal achange of direction when
towing the vehicle with the hazard warning
lamps switched on, use the combination switch
as usual. In this case, only the indicator lamps
for the direction of travel flash. When you reset
the combination switch, the hazard warning
flashers start flashing again.
It is important that you observe the safety
instructions when towing away your vehicle
(
Ypage 256).
Towing the vehicle with the rear axle
raised
!
The ignition must be switched off if you are
towing the vehicle with the rear axle raised.
Intervention by ESP
®could otherwise dam-
age the brake system.
!Vehicles with automatic transmission must
not be towed with the rear axle raised. The
vehicle/trailer combination may otherwise
swerve or even roll over.
Towing and tow-starting257
Breakdown assistance
Z
Page 260 of 298
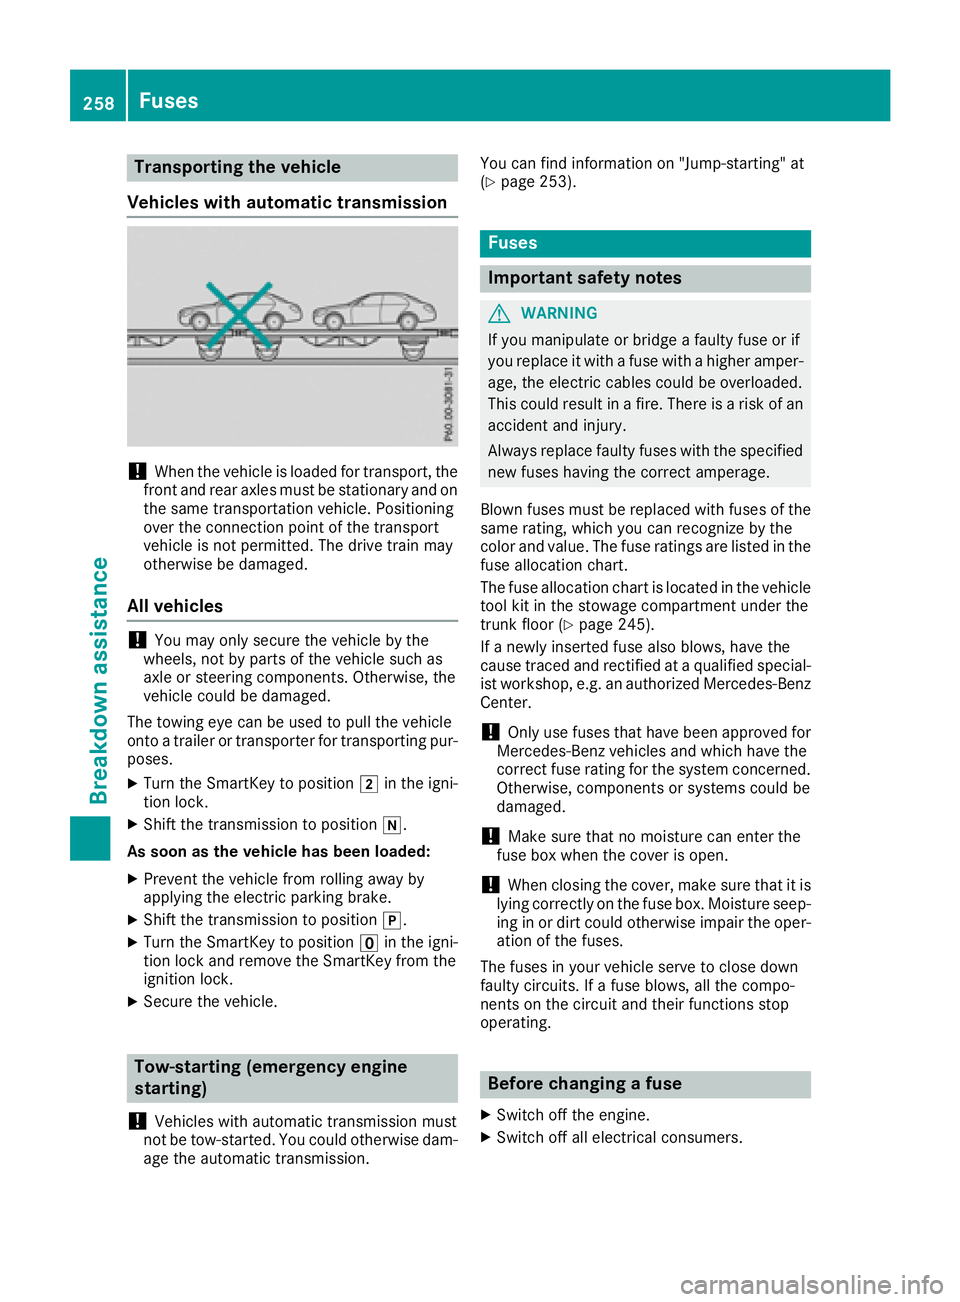
Transporting the vehicle
Vehicle switha utomatic transmission
!When the vehicl eisloaded for transport, the
front and rea raxles must be stationar yand on
the same transportatio nvehicle. Positioning
ove rthe connectio npoint of the transport
vehicl eisnot permitted .The drive train may
otherwis ebedamaged .
Allv eh icles
!Youm ayonl ysecur ethe vehicl ebythe
wheels ,not by parts of the vehicl esucha s
axl eors teerin gcomponents. Otherwise, the
vehicl ecould be damaged.
The towing ey ecan be used to pull the vehicle
onto atrailer or transporte rfor transporting pur-
poses.
XTurn the SmartKeytop osition 2in the igni-
tio nlock.
XShift the transmission to position i.
As soon as the vehicle has been loaded:
XPrevent the vehicl efromr olling away by
applying the electri cparkin gb rake.
XShift the transmission to position j.
XTurn the SmartKeytoposition uin the igni-
tio nlocka nd remove the SmartKeyf romthe
ignition lock.
XSecure the vehicle.
Tow-starting (emergency engine
starting)
!
Vehicles with automatic transmission must
not be tow-started .You could otherwis edam -
ag et he automatic transmission. Yo
uc an find informatio non"Jump-starting "at
(
Ypage 253).
Fuses
Important safety notes
GWARNING
If yo umanipulate or bridg eafaulty fuse or if
yo ur eplace it with afusew ithah ighe ramper -
age, the electri ccable scould be overloaded.
Thi scould resul tinafire. There is ariskofa n
accident and injury.
Alway sreplace faulty fuses with the specified
new fuses havin gthe correct amperage.
Blown fuses must be replaced with fuses of the
same rating ,which yo ucan recognize by the
color and value. The fuse rating sarelisted in the
fuse allocation chart.
The fuse allocation chart is locate dinthe vehicle
tool kit in the stowag ecompartment under the
trunk floor (
Ypage 245).
If an ewly inserte dfusea lsob lows ,havet he
cause traced and rectifie dataqualified special-
is tw orkshop ,e.g.ana uthorize dMercedes-Benz
Center.
!Onlyu sefuses thath aveb eena pproved for
Mercedes-Benz vehicles and which have the
correct fuse rating for the system concerned.
Otherwise, components or system scould be
damaged.
!Make sure thatnom oisture can enterthe
fuse bo xwhent he cove risopen.
!When closing the cover, make sure thatiti s
lying correctl yonthe fuse box. Moisture seep-
ing in or dirt could otherwis eimpai rthe oper-
atio
n of the fuses.
The fuses in your vehicl eserve to close down
faulty circuits. If afuseb lows ,allthe compo-
nents on the circui tand their functions stop
operating.
Before changin gafuse
XSwitch off the engine.
XSwitch off al lelectrical consumers.
258Fuses
Breakdow nassistance