MERCEDES-BENZ SLK-CLASS ROADSTER 2014 Owners Manual
Manufacturer: MERCEDES-BENZ, Model Year: 2014, Model line: SLK-CLASS ROADSTER, Model: MERCEDES-BENZ SLK-CLASS ROADSTER 2014Pages: 356, PDF Size: 48.94 MB
Page 181 of 356
HOLD function
General notes The HOLD function can assist the driver in the
following situations:
R when pulling away, especially on steep
slopes
R when maneuvering on steep slopes
R when waiting in traffic
The vehicle is kept stationary without the
driver having to depress the brake pedal.
The braking effect is canceled and the HOLD
function deactivated when you depress the
accelerator pedal to pull away.
Important safety notes G
WARNING
When leaving the vehicle, it can still roll away
despite being braked by the HOLD function if:
R there is a malfunction in the system or in
the voltage supply.
R the HOLD function has been deactivated by
pressing the accelerator pedal or the brake
pedal, e.g. by a vehicle occupant.
R the electrical system in the engine
compartment, the battery or the fuses have
been tampered with.
R the battery is disconnected
There is a risk of an accident.
If you wish to exit the vehicle, always turn off
the HOLD function and secure the vehicle
against rolling away.
! If DISTRONIC PLUS or the HOLD function
is activated, the vehicle brakes
automatically in certain situations. To
prevent damage to the vehicle, deactivate
DISTRONIC PLUS and the HOLD function in
the following or other similar situations:
R when towing the vehicle
R in the car wash
Deactivating the HOLD function
(Y page 179). Activation conditions You can activate the HOLD function if:
R
the vehicle is stationary
R the engine is running or if it has been
automatically switched off by the ECO
start/stop function
R the driver's door is closed or your seat belt
is fastened
R the hood is closed.
R the electric parking brake is released
R the selector lever is in position D,Ror Non
vehicles with automatic transmission
R DISTRONIC PLUS is deactivated
Activating the HOLD function X
Make sure that the activation conditions
are met.
X Depress the brake pedal.
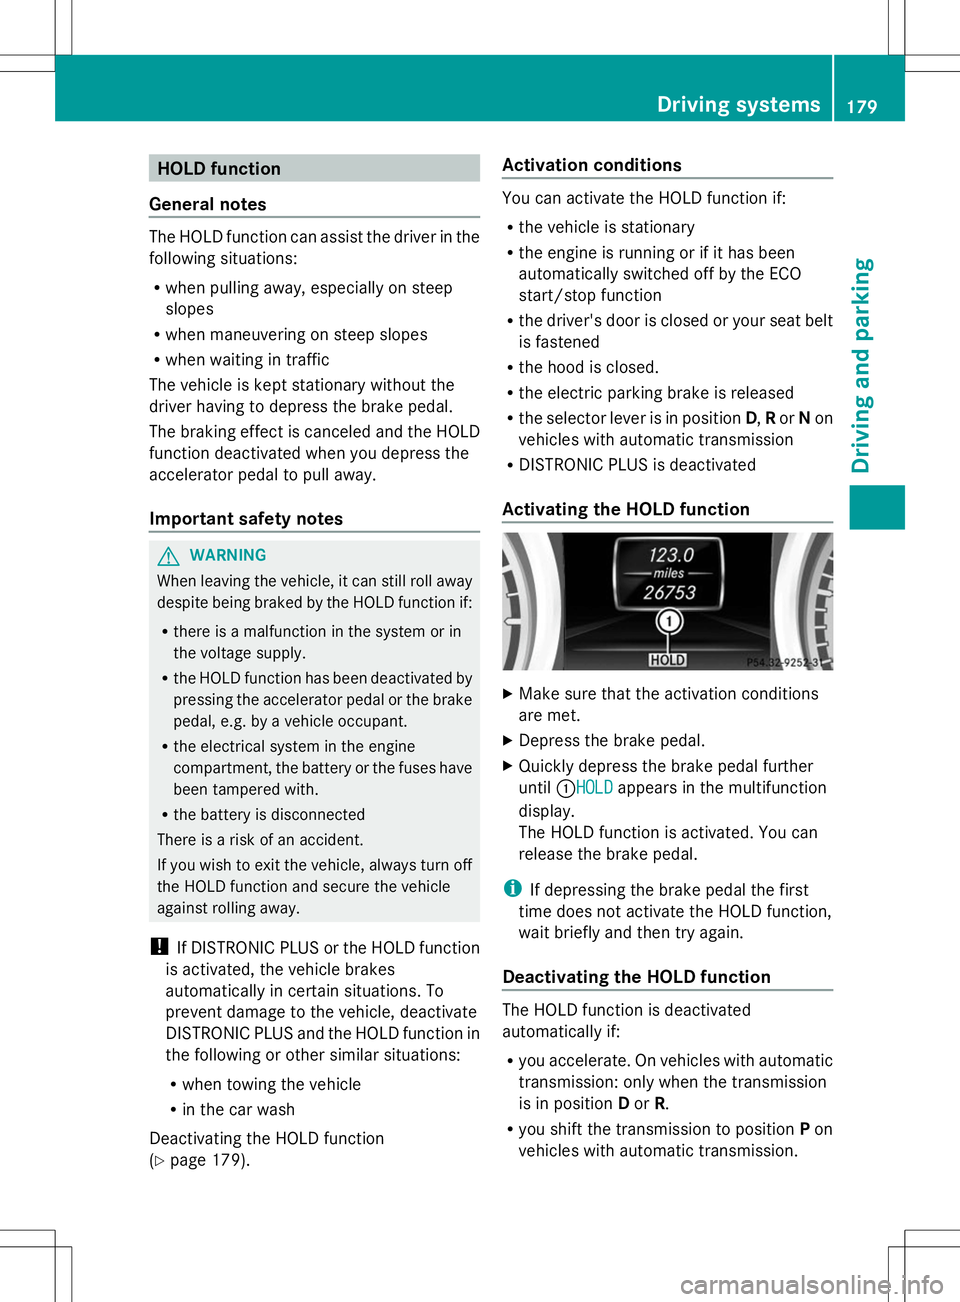
X Quickly depress the brake pedal further
until :HOLDHOLD appears in the multifunction
display.
The HOLD function is activated. You can
release the brake pedal.
i If depressing the brake pedal the first
time does not activate the HOLD function,
wait briefly and then try again.
Deactivating the HOLD function The HOLD function is deactivated
automatically if:
R
you accelerate. On vehicles with automatic
transmission: only when the transmission
is in position Dor R.
R you shift the transmission to position Pon
vehicles with automatic transmission. Driving systems
179Driving and parking Z
Page 182 of 356
R
you apply the brakes again with a certain
amount of pressure until HOLD
HOLD disappears
from the multifunction display.
R you secure the vehicle using the electric
parking brake.
R you activate DISTRONIC PLUS.
i After a time, the electric parking brake
secures the vehicle and relieves the service
brake.
The electric parking brake automatically
secures the vehicle if the HOLD function is
activated and:
R the driver's door is open and the driver's
seat belt is unfastened.
R the engine is switched off, unless it is
automatically switched off by the ECO
start/stop function.
R the hood is opened.
R a system malfunction occurs.
R the power supply is not sufficient.
If there is a malfunction in the vehicle
electronics, a warning message may also
appear in the multifunction display.
Brake Immediately Brake Immediately
X Immediately depress the brake firmly until
the warning message in the multifunction
display goes out.
The HOLD function is deactivated.
In vehicles with automatic transmission:
Shift to 'P'
Shift to 'P' .
X Shift the transmission to position Pto
prevent the vehicle from rolling away.
The HOLD function is deactivated. The
warning message in the multifunction
display disappears.
The horn will also sound at regular intervals if
the HOLD function is activated and you:
R switch the engine off, open the driver's
door and remove your seat belt.
R open the hood.
The sounding of the horn alerts you to the fact
that the vehicle has been parked while the
HOLD function is still activated. If you attempt to lock the vehicle, the tone becomes louder.
The vehicle is not locked until the HOLD
function is deactivated.
i
If the engine has been switched off, it
cannot be started again until the HOLD
function has been deactivated. PARKTRONIC
Important safety notes PARKTRONIC is an electronic parking aid with
ultrasonic sensors. It indicates visually and
audibly the distance between your vehicle
and an object.
PARKTRONIC is only an aid. It is not a
replacement for your attention to your
immediate surroundings. You are always
responsible for safe maneuvering, parking
and exiting a parking space. When
maneuvering, parking or pulling out of a
parking space, make sure that there are no
persons, animals or objects in the area in
which you are maneuvering.
! When parking, pay particular attention to
objects above or below the sensors, such
as flower pots or trailer drawbars.
PARKTRONIC does not detect such objects
when they are in the immediate vicinity of
the vehicle. You could damage the vehicle
or the objects.
The sensors may not detect snow and other
objects that absorb ultrasonic waves.
Ultrasonic sources such as an automatic
car wash, the compressed-air brakes on a
truck or a pneumatic drill could cause
PARKTRONIC to malfunction.
PARKTRONIC may not function correctly on
uneven terrain.
PARKTRONIC is activated automatically when
you:
R switch on the ignition.
R move the selector lever to position D,Ror
N on vehicles with automatic transmission.
R release the electric parking brake. 180
Driving syste
msDriving and parking
Page 183 of 356
PARKTRONIC is deactivated at speeds above
11 mph (18km/h). It is reactivated at lower
speeds.
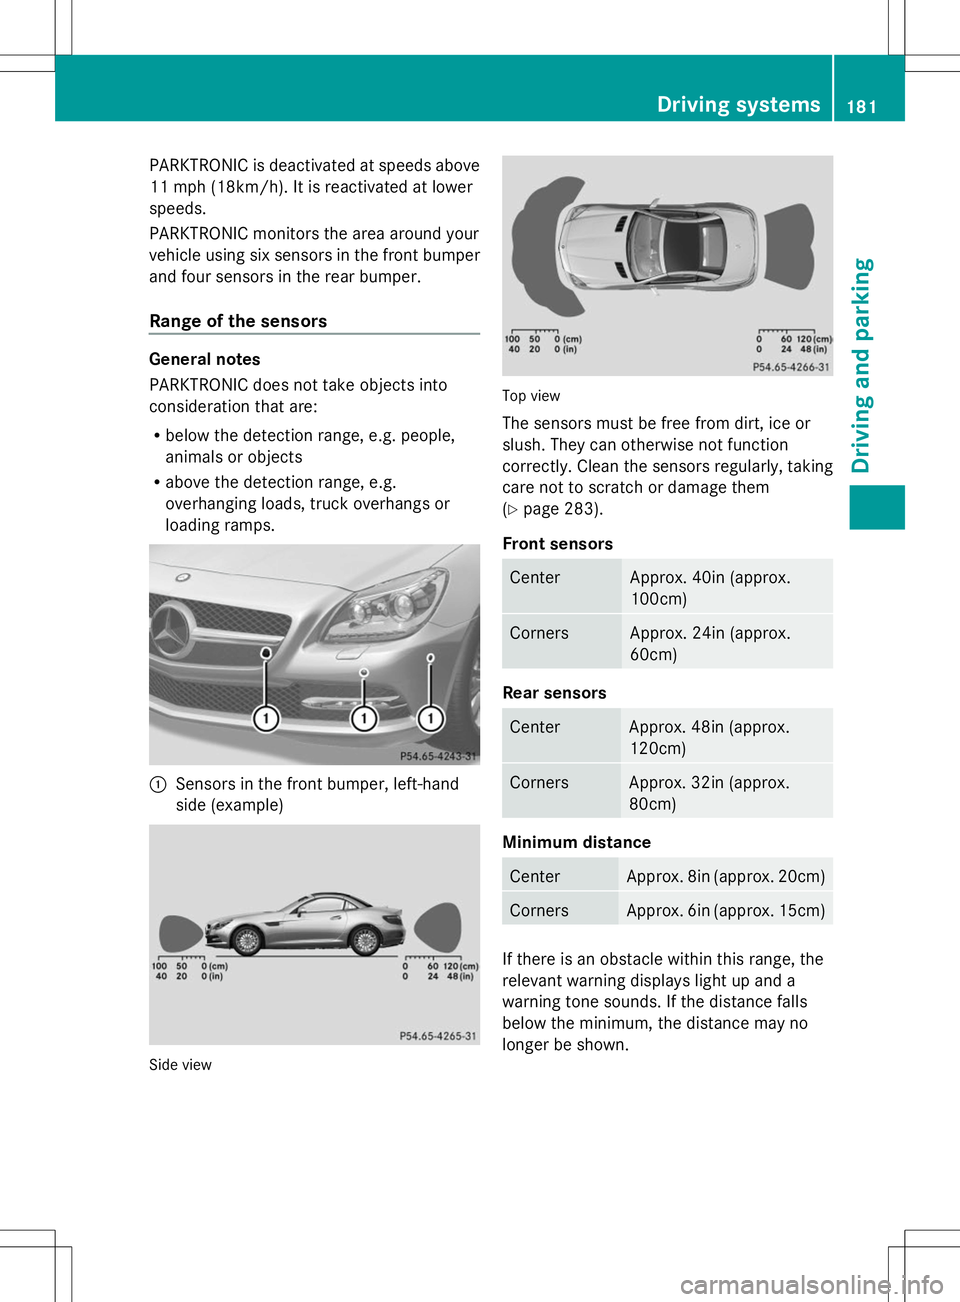
PARKTRONIC monitors the area around your
vehicle using six sensors in the front bumper
and four sensors in the rear bumper.
Range of the sensors General notes
PARKTRONIC does not take objects into
consideration that are:
R below the detection range, e.g. people,
animals or objects
R above the detection range, e.g.
overhanging loads, truck overhangs or
loading ramps. :
Sensors in the front bumper, left-hand
side (example) Side view Top view
The sensors must be free from dirt, ice or
slush. They can otherwise not function
correctly. Clean the sensors regularly, taking
care not to scratch or damage them
(Y
page 283).
Front sensors Center Approx. 40in (approx.
100cm)
Corners Approx. 24in (approx.
60cm)
Rear sensors
Center Approx. 48in (approx.
120cm)
Corners Approx. 32in (approx.
80cm)
Minimum distance
Center Approx. 8in (approx. 20cm)
Corners Approx. 6in (approx. 15cm)
If there is an obstacle within this range, the
relevant warning displays light up and a
warning tone sounds. If the distance falls
below the minimum, the distance may no
longer be shown. Driving systems
181Driving and parking Z
Page 184 of 356
Warning displays
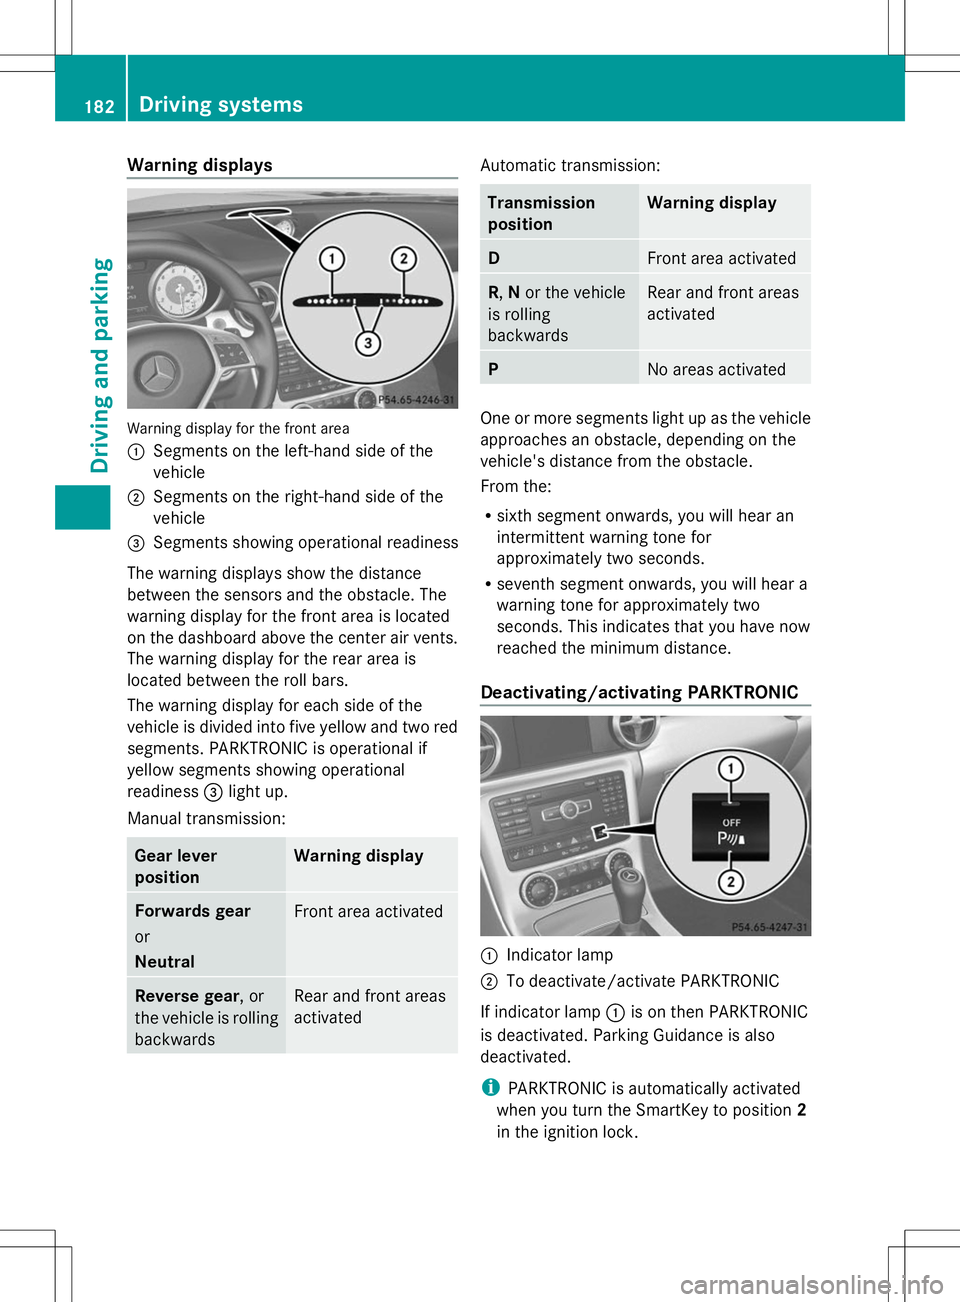
Warning display for the front area
:
Segments on the left-hand side of the
vehicle
; Segments on the right-hand side of the
vehicle
= Segments showing operational readiness
The warning displays show the distance
between the sensors and the obstacle. The
warning display for the front area is located
on the dashboard above the center air vents.
The warning display for the rear area is
located between the roll bars.
The warning display for each side of the
vehicle is divided into five yellow and two red
segments. PARKTRONIC is operational if
yellow segments showing operational
readiness =light up.
Manual transmission: Gear lever
position Warning display
Forwards gear
or
Neutral
Front area activated
Reverse gear, or
the vehicle is rolling
backwards Rear and front areas
activated Automatic transmission:
Transmission
position Warning display
D
Front area activated
R,
Nor the vehicle
is rolling
backwards Rear and front areas
activated
P
No areas activated
One or more segments light up as the vehicle
approaches an obstacle, depending on the
vehicle's distance from the obstacle.
From the:
R
sixth segment onwards, you will hear an
intermittent warning tone for
approximately two seconds.
R seventh segment onwards, you will hear a
warning tone for approximately two
seconds. This indicates that you have now
reached the minimum distance.
Deactivating/activating PARKTRONIC :
Indicator lamp
; To deactivate/activate PARKTRONIC
If indicator lamp :is on then PARKTRONIC
is deactivated. Parking Guidance is also
deactivated.
i PARKTRONIC is automatically activated
when you turn the SmartKey to position 2
in the ignition lock. 182
Driving systemsDriving and parking
Page 185 of 356
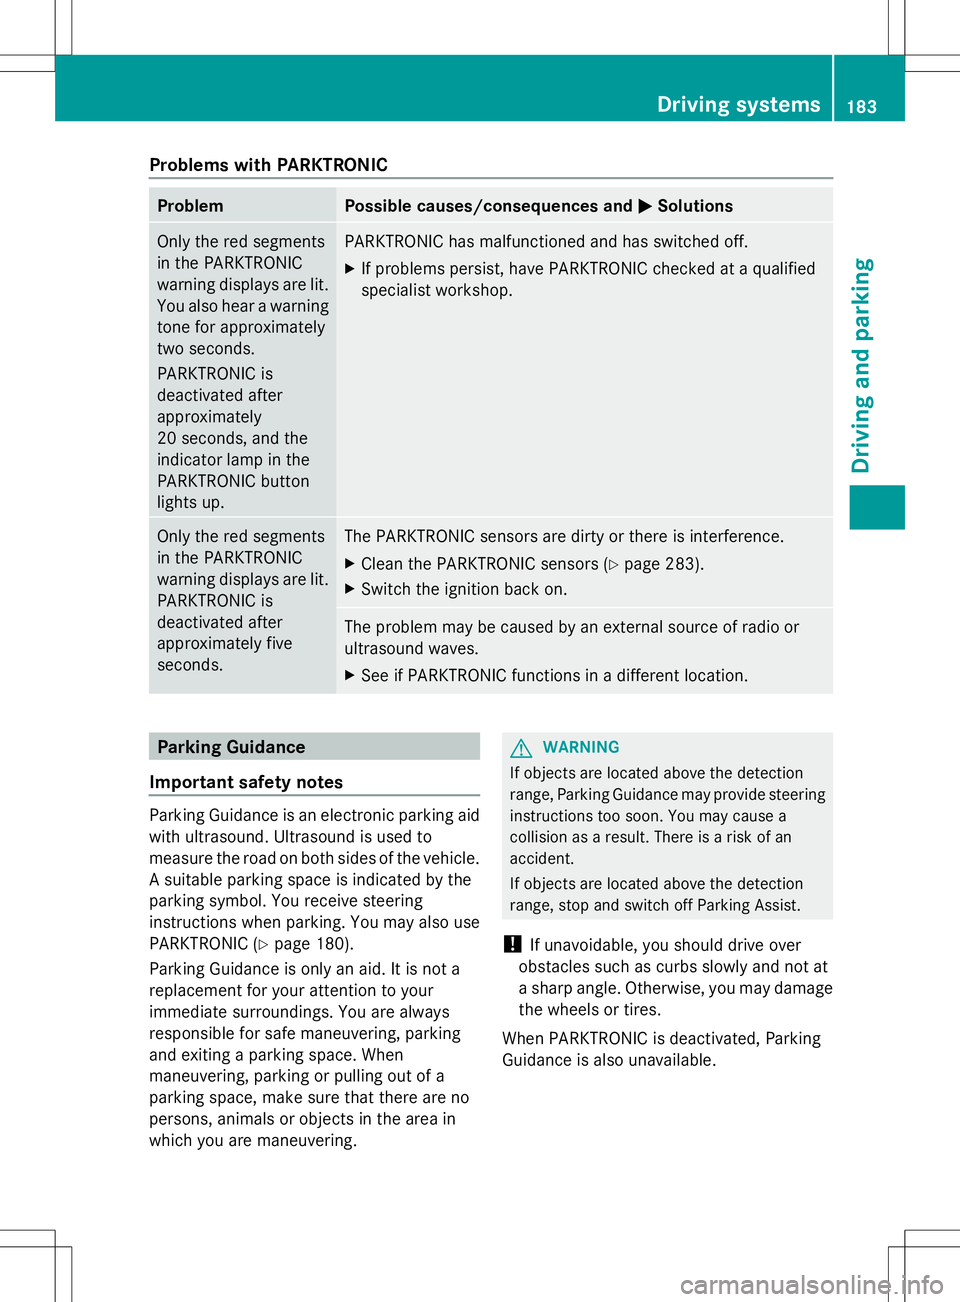
Problems with PARKTRONIC
Problem Possible causes/consequences and
M
MSolutions Only the red segments
in the PARKTRONIC
warning displays are lit.
You also hear a warning
tone for approximately
two seconds.
PARKTRONIC is
deactivated after
approximately
20 seconds, and the
indicator lamp in the
PARKTRONIC button
lights up. PARKTRONIC has malfunctioned and has switched off.
X
If problems persist, have PARKTRONIC checked at a qualified
specialist workshop. Only the red segments
in the PARKTRONIC
warning displays are lit.
PARKTRONIC is
deactivated after
approximately five
seconds. The PARKTRONIC sensors are dirty or there is interference.
X
Clean the PARKTRONIC sensors (Y page 283).
X Switch the ignition back on. The problem may be caused by an external source of radio or
ultrasound waves.
X
See if PARKTRONIC functions in a different location. Parking Guidance
Important safety notes Parking Guidance is an electronic parking aid
with ultrasound. Ultrasound is used to
measure the road on both sides of the vehicle.
A suitable parking space is indicated by the
parking symbol. You receive steering
instructions when parking. You may also use
PARKTRONIC (Y page 180).
Parking Guidance is only an aid. It is not a
replacement for your attention to your
immediate surroundings. You are always
responsible for safe maneuvering, parking
and exiting a parking space. When
maneuvering, parking or pulling out of a
parking space, make sure that there are no
persons, animals or objects in the area in
which you are maneuvering. G
WARNING
If objects are located above the detection
range, Parking Guidance may provide steering
instructions too soon. You may cause a
collision as a result. There is a risk of an
accident.
If objects are located above the detection
range, stop and switch off Parking Assist.
! If unavoidable, you should drive over
obstacles such as curbs slowly and not at
a sharp angle. Otherwise, you may damage
the wheels or tires.
When PARKTRONIC is deactivated, Parking
Guidance is also unavailable. Driving systems
183Driving and parking Z
Page 186 of 356
Parking Guidance may also display spaces
not suitable for parking, e.g.:
R where parking or stopping is prohibited
R in front of driveways or entrances and exits
R on unsuitable surfaces
Use Parking Guidance for parking spaces:
R that are parallel to the direction of travel
R that are on straight roads, not bends
R that are on the same level as the road, i.e.
not on the pavement, for example. Parking
Guidance may not detect flat curbs
Parking tips:
R On narrow roads, drive as close to the
parking space as possible.
R Parking spaces that are littered or
overgrown might be identified or measured
incorrectly.
R Parking spaces that are partially occupied
by trailer drawbars might not be identified
as such or be measured incorrectly.
R Snowfall or heavy rain may lead to a parking
space being measured inaccurately.
R Pay attention to the PARKTRONIC
(Y page 182) warning messages during the
parking procedure.
R When transporting a load which protrudes
from your vehicle, you must not use Parking
Guidance.
R Never use Parking Guidance with snow
chains or an emergency spare wheel
mounted.
R Make sure that the tire pressures are
always correct. This has a direct effect on
the steering instructions.
R The way your vehicle is positioned in the
parking space after parking is dependent
on various factors. These include the
position and shape of the vehicles parked
in front and behind it and the conditions of
the location. In some cases, Parking
Guidance may guide you too far or not far
enough into a parking space. In some
cases, it may also lead you across or onto the curb. If necessary, cancel the parking
procedure with Parking Guidance.
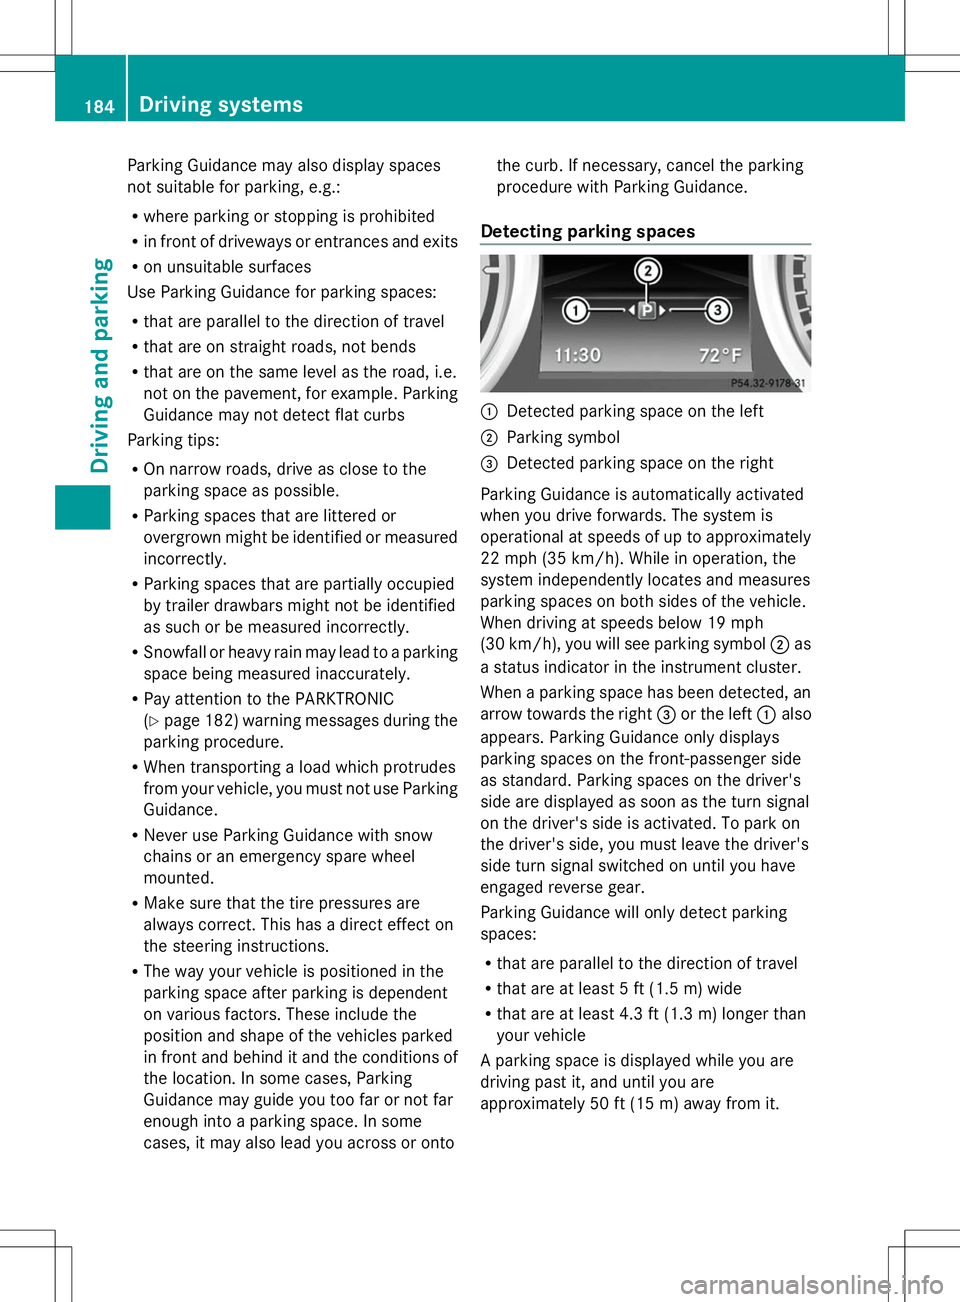
Detecting parking spaces :
Detected parking space on the left
; Parking symbol
= Detected parking space on the right
Parking Guidance is automatically activated
when you drive forwards. The system is
operational at speeds of up to approximately
22 mph (35 km/h). While in operation, the
system independently locates and measures
parking spaces on both sides of the vehicle.
When driving at speeds below 19 mph
(30 km/h), you will see parking symbol ;as
a status indicator in the instrument cluster.
When a parking space has been detected, an
arrow towards the right =or the left :also
appears. Parking Guidance only displays
parking spaces on the front-passenger side
as standard. Parking spaces on the driver's
side are displayed as soon as the turn signal
on the driver's side is activated. To park on
the driver's side, you must leave the driver's
side turn signal switched on until you have
engaged reverse gear.
Parking Guidance will only detect parking
spaces:
R that are parallel to the direction of travel
R that are at least 5 ft (1.5 m) wide
R that are at least 4.3 ft (1.3 m) longer than
your vehicle
A parking space is displayed while you are
driving past it, and until you are
approximately 50 ft (15 m) away from it. 184
Driving systemsDriving and parking
Page 187 of 356
Parking
Moving the vehicle into the stop position
X Stop the vehicle when the parking space
symbol shows the desired parking space in
the instrument cluster.
X Vehicles with manual transmission: shift to
reverse gear.
Vehicles with automatic transmission: shift
into position R.
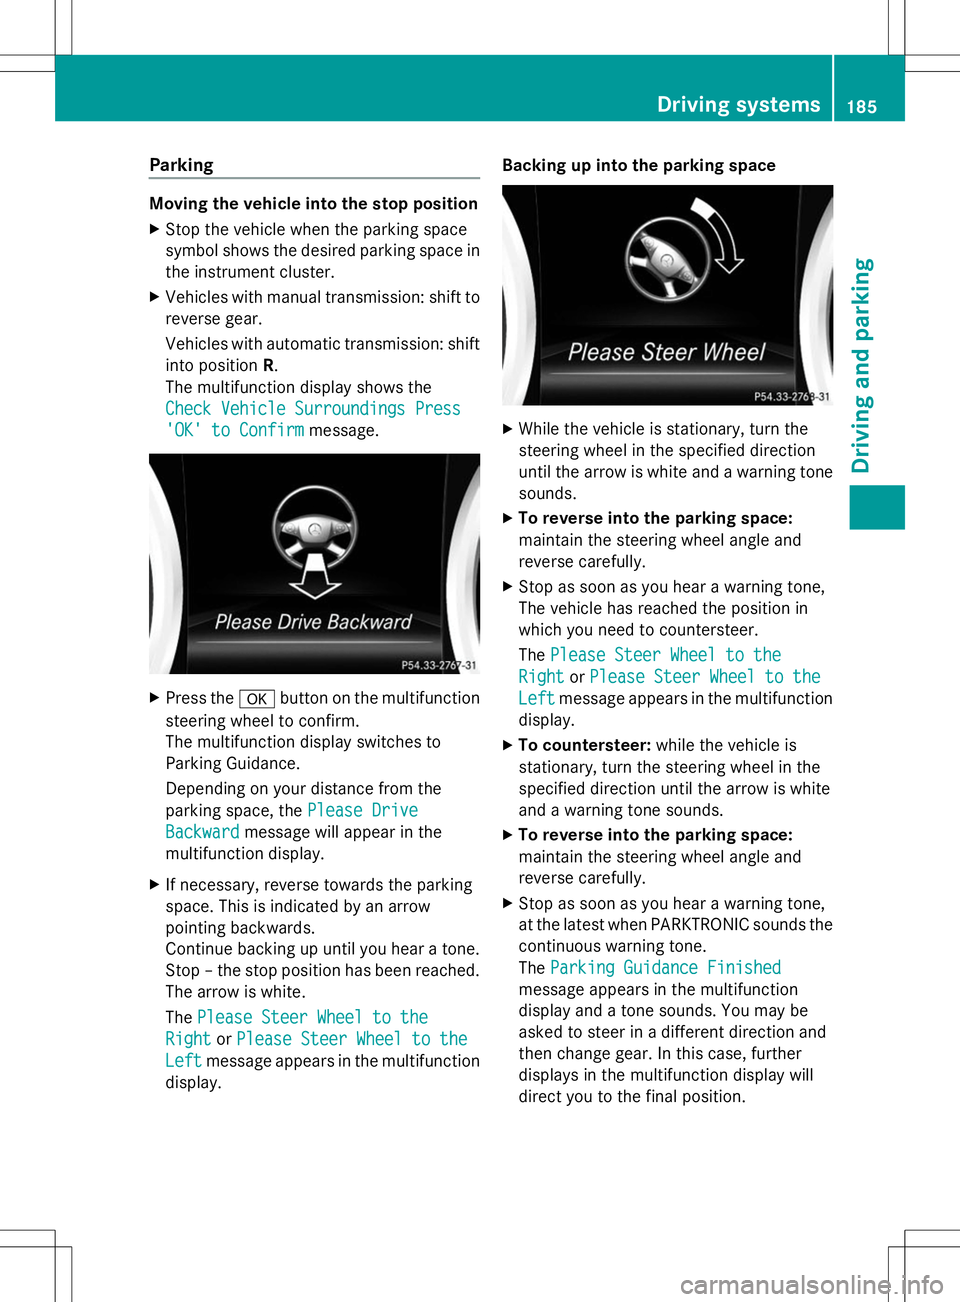
The multifunction display shows the
Check Vehicle Surroundings Press
Check Vehicle Surroundings Press
'OK' to Confirm 'OK' to Confirm message. X
Press the abutton on the multifunction
steering wheel to confirm.
The multifunction display switches to
Parking Guidance.
Depending on your distance from the
parking space, the Please Drive
Please Drive
Backward Backward message will appear in the
multifunction display.
X If necessary, reverse towards the parking
space. This is indicated by an arrow
pointing backwards.
Continue backing up until you hear a tone.
Stop – the stop position has been reached.
The arrow is white.
The Please Steer Wheel to the
Please Steer Wheel to the
Right Right orPlease Steer Wheel to the
Please Steer Wheel to the
Left
Left message appears in the multifunction
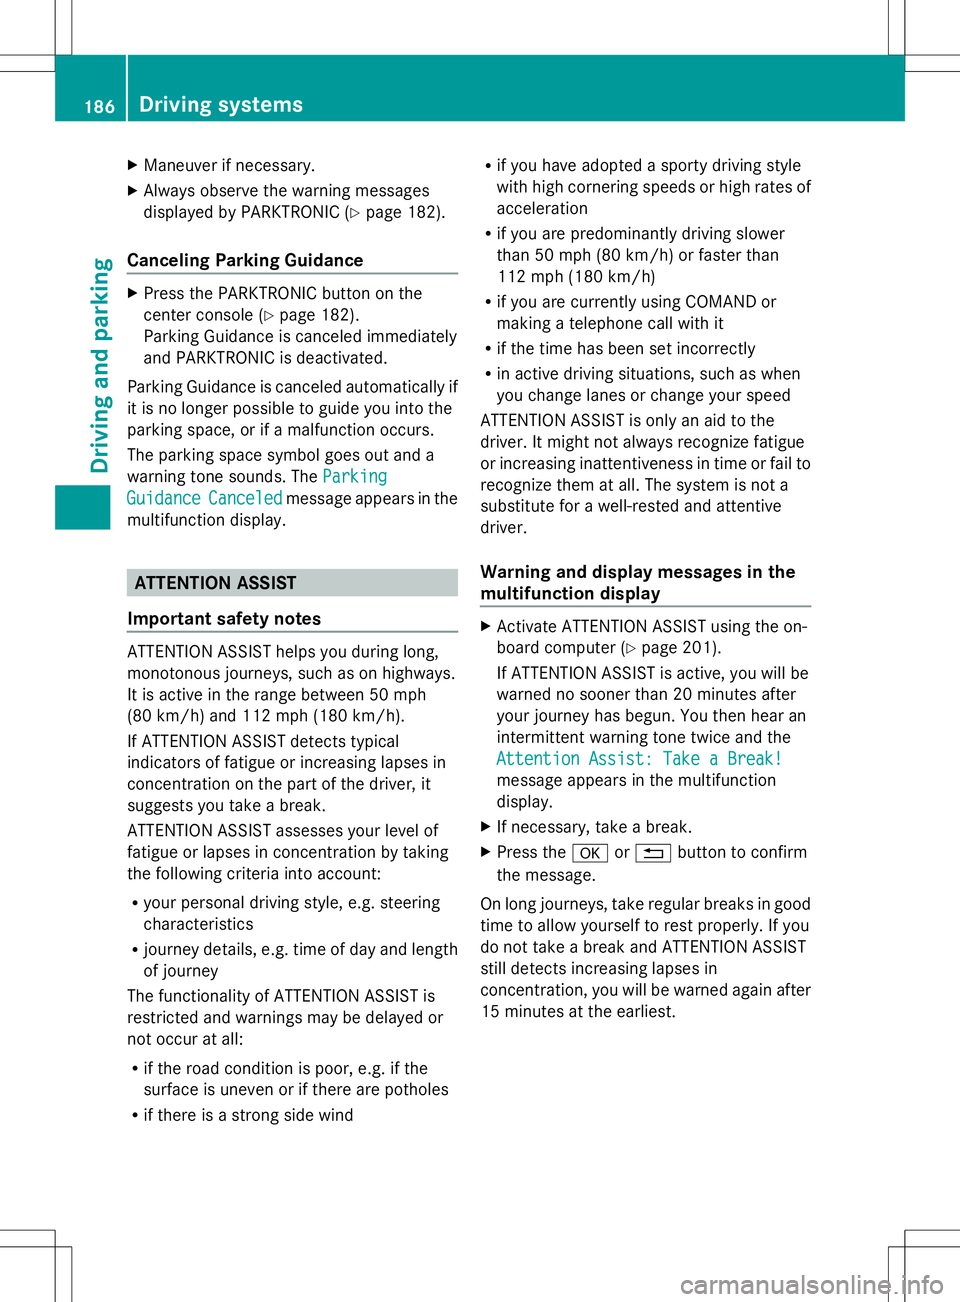
display. Backing up into the parking space
X
While the vehicle is stationary, turn the
steering wheel in the specified direction
until the arrow is white and a warning tone
sounds.
X To reverse into the parking space:
maintain the steering wheel angle and
reverse carefully.
X Stop as soon as you hear a warning tone,
The vehicle has reached the position in
which you need to countersteer.
The Please Steer Wheel to the Please Steer Wheel to the
Right
Right orPlease Steer Wheel to the
Please Steer Wheel to the
Left
Left message appears in the multifunction
display.
X To countersteer: while the vehicle is
stationary, turn the steering wheel in the
specified direction until the arrow is white
and a warning tone sounds.
X To reverse into the parking space:
maintain the steering wheel angle and
reverse carefully.
X Stop as soon as you hear a warning tone,
at the latest when PARKTRONIC sounds the
continuous warning tone.
The Parking Guidance Finished Parking Guidance Finished
message appears in the multifunction
display and a tone sounds. You may be
asked to steer in a different direction and
then change gear. In this case, further
displays in the multifunction display will
direct you to the final position. Driving systems
185Driving and parking Z
Page 188 of 356
X
Maneuver if necessary.
X Always observe the warning messages
displayed by PARKTRONIC (Y page 182).
Canceling Parking Guidance X
Press the PARKTRONIC button on the
center console (Y page 182).
Parking Guidance is canceled immediately
and PARKTRONIC is deactivated.
Parking Guidance is canceled automatically if
it is no longer possible to guide you into the
parking space, or if a malfunction occurs.
The parking space symbol goes out and a
warning tone sounds. The Parking
Parking
Guidance Guidance Canceled
Canceledmessage appears in the
multifunction display. ATTENTION ASSIST
Important safety notes ATTENTION ASSIST helps you during long,
monotonous journeys, such as on highways.
It is active in the range between 50 mph
(80 km/h) and 112 mph (180 km/h).
If ATTENTION ASSIST detects typical
indicators of fatigue or increasing lapses in
concentration on the part of the driver, it
suggests you take a break.
ATTENTION ASSIST assesses your level of
fatigue or lapses in concentration by taking
the following criteria into account:
R your personal driving style, e.g. steering
characteristics
R journey details, e.g. time of day and length
of journey
The functionality of ATTENTION ASSIST is
restricted and warnings may be delayed or
not occur at all:
R if the road condition is poor, e.g. if the
surface is uneven or if there are potholes
R if there is a strong side wind R
if you have adopted a sporty driving style
with high cornering speeds or high rates of
acceleration
R if you are predominantly driving slower
than 50 mph (80 km/h) or faster than
112 mph (180 km/h)
R if you are currently using COMAND or
making a telephone call with it
R if the time has been set incorrectly
R in active driving situations, such as when
you change lanes or change your speed
ATTENTION ASSIST is only an aid to the
driver. It might not always recognize fatigue
or increasing inattentiveness in time or fail to
recognize them at all. The system is not a
substitute for a well-rested and attentive
driver.
Warning and display messages in the
multifunction display X
Activate ATTENTION ASSIST using the on-
board computer (Y page 201).
If ATTENTION ASSIST is active, you will be
warned no sooner than 20 minutes after
your journey has begun. You then hear an
intermittent warning tone twice and the
Attention Assist: Take a Break! Attention Assist: Take a Break!
message appears in the multifunction
display.
X If necessary, take a break.
X Press the aor% button to confirm
the message.
On long journeys, take regular breaks in good
time to allow yourself to rest properly. If you
do not take a break and ATTENTION ASSIST
still detects increasing lapses in
concentration, you will be warned again after
15 minutes at the earliest. 186
Driving systemsDriving and parking
Page 189 of 356
ATTENTION ASSIST is reset when you
continue your journey and starts assessing
your tiredness again if:
R you switch off the engine.
R you take off your seat belt and open the
driver's door, e.g. for a change of drivers or
to take a break.
When ATTENTION ASSIST is deactivated, the
é symbol appears in the multifunction
display in the assistance graphics display. Driving Assistance package
General notes The Driving Assistance package consists of
DISTRONIC PLUS (Y page 169), Blind Spot
Assist (Y page 187) and Lane Keeping Assist
(Y page 188).
Blind Spot Assist General notes
Blind Spot Assist uses a radar sensor system
to monitor the areas on both sides of your
vehicle. It supports you from a speed of
approximately 20 mph (30 km/h). A warning
display in the exterior mirrors draws your
attention to vehicles detected in the
monitored area. If you then switch on the
corresponding turn signal to change lanes,
you will also receive a visual and audible
collision warning. Blind Spot Assist uses
sensors in the rear bumper for monitoring
purposes.
For Blind Spot Assist to assist you, the radar
sensor system must be operational.
Important safety notes G
WARNING
Blind Spot Assist does not react to:
R vehicles overtaken too closely on the side,
placing them in the blind spot area
R vehicles which approach with a large speed
differential and overtake your vehicle As a result, Blind Spot Assist may not give
warnings in such situations. There is a risk of
an accident.
Always observe the traffic conditions
carefully, and maintain a safe lateral distance.
i USA only:
This device has been approved by the FCC
as a "Vehicular Radar System". The radar
sensor is intended for use in an automotive
radar system only. Removing, tampering
with, or altering the device will void any
warranties, and is not permitted by the
FCC. Do not tamper with, alter, or use in
any non-approved way.
Any unauthorized modification to this
device could void the user’s authority to
operate the equipment.
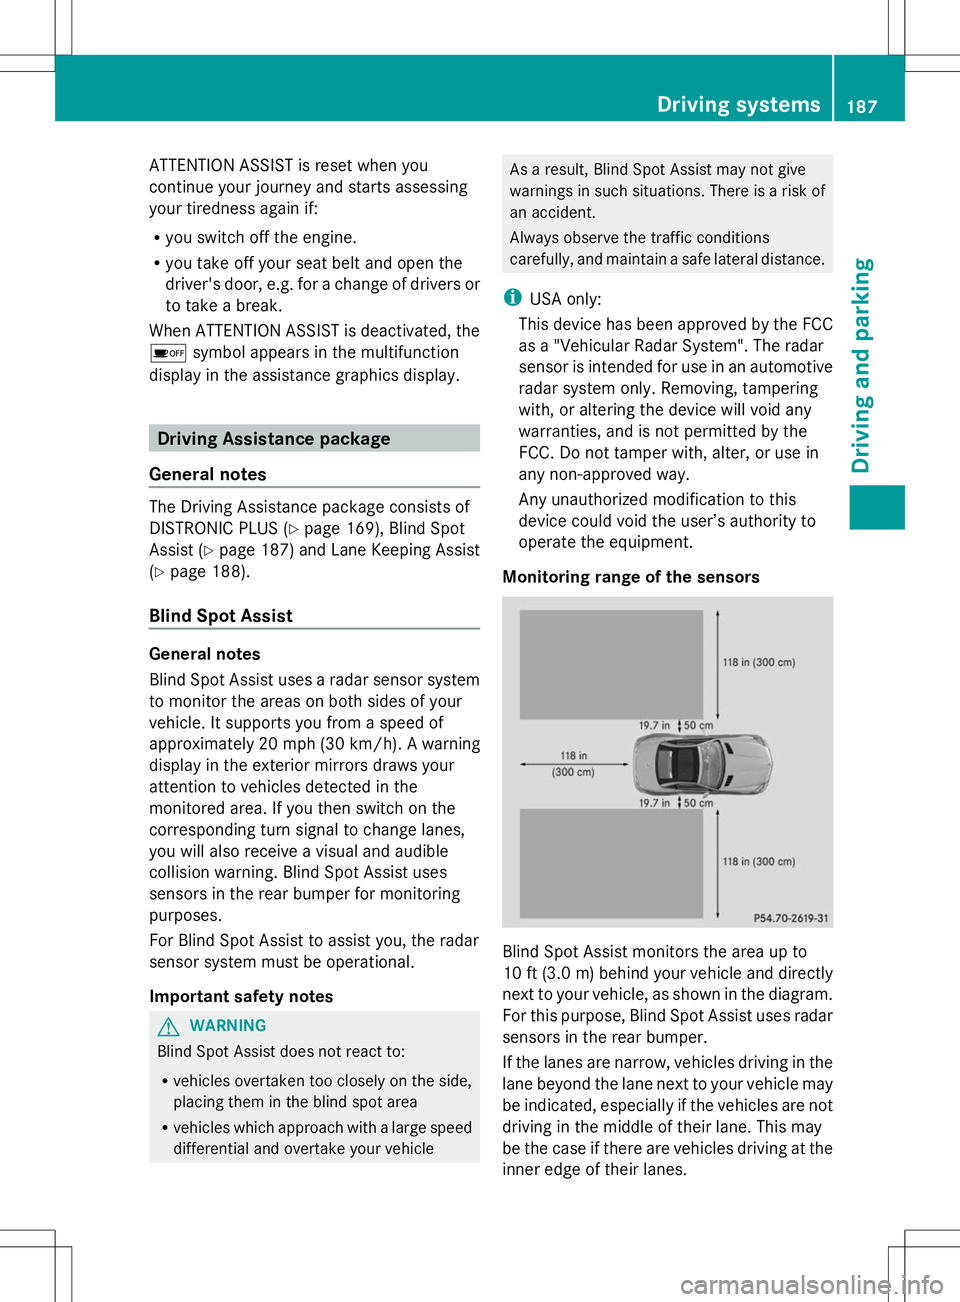
Monitoring range of the sensors Blind Spot Assist monitors the area up to
10 ft
(3.0 m) behind your vehicle and directly
next to your vehicle, as shown in the diagram.
For this purpose, Blind Spot Assist uses radar
sensors in the rear bumper.
If the lanes are narrow, vehicles driving in the
lane beyond the lane next to your vehicle may
be indicated, especially if the vehicles are not
driving in the middle of their lane. This may
be the case if there are vehicles driving at the
inner edge of their lanes. Driving systems
187Driving and parking Z
Page 190 of 356
Due to the nature of the system:
R
warnings may be issued in error when
driving close to crash barriers or similar
solid lane borders.
R the warning is canceled when driving for an
extended period next to long vehicles, such
as trucks.
The two radar sensors for Blind Spot Assist
are integrated into the sides of the rear
bumper. Make sure that the bumper is free of
dirt, ice or slush in the vicinity of the sensors.
The sensors must not be covered, for
example by cycle racks or overhanging loads.
Following a severe impact or in the event of
damage to the bumpers, have the function of
the sensors checked at a qualified specialist
workshop. Blind Spot Assist may otherwise
not work properly.
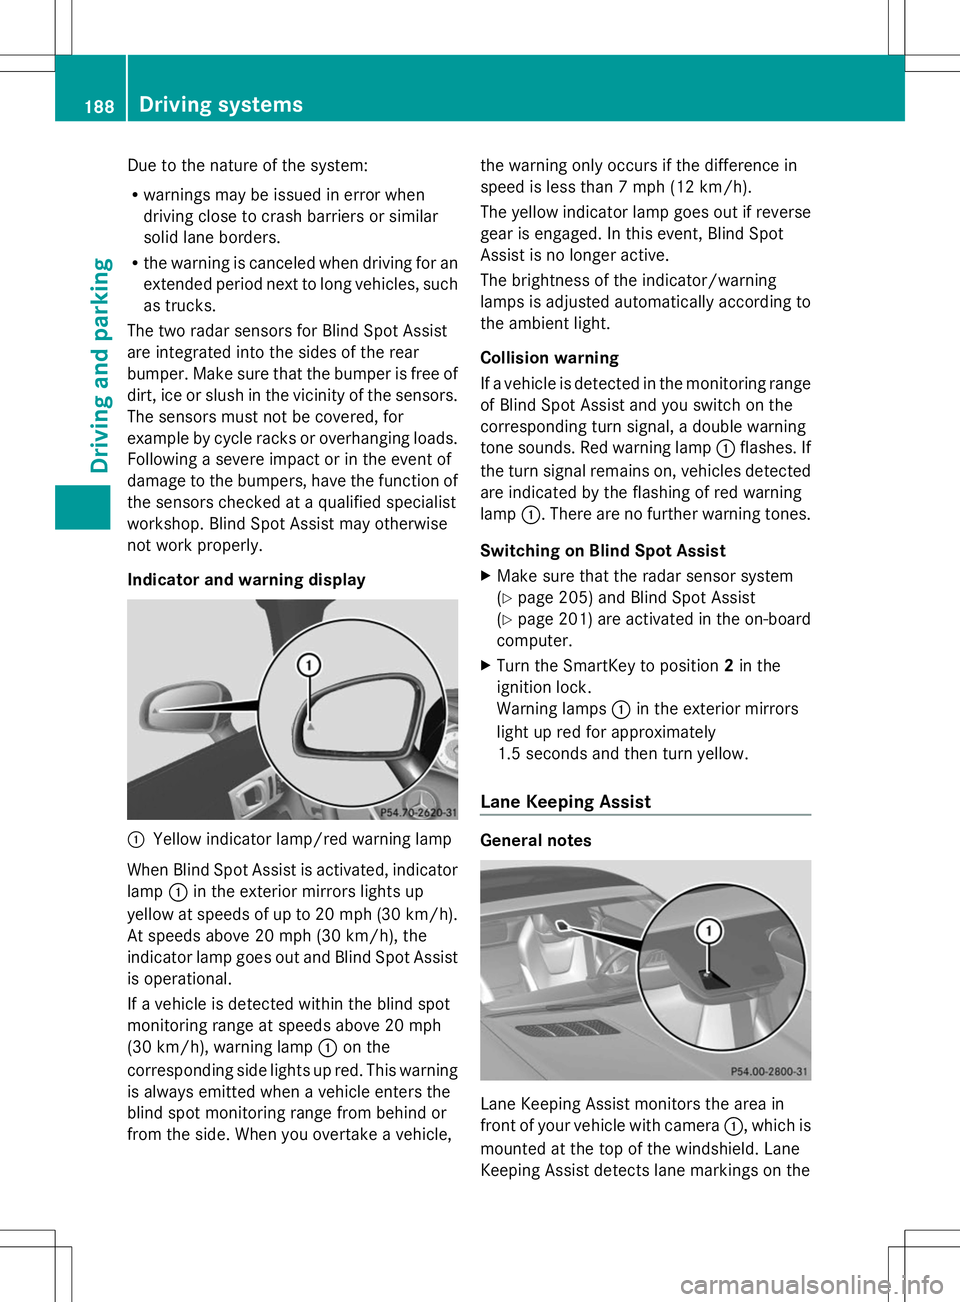
Indicator and warning display :
Yellow indicator lamp/red warning lamp
When Blind Spot Assist is activated, indicator
lamp :in the exterior mirrors lights up
yellow at speeds of up to 20 mph (30 km/h).
At speeds above 20 mph (30 km/h), the
indicator lamp goes out and Blind Spot Assist
is operational.
If a vehicle is detected within the blind spot
monitoring range at speeds above 20 mph
(30 km/h), warning lamp :on the
corresponding side lights up red. This warning
is always emitted when a vehicle enters the
blind spot monitoring range from behind or
from the side. When you overtake a vehicle, the warning only occurs if the difference in
speed is less than 7 mph (12 km/h).
The yellow indicator lamp goes out if reverse
gear is engaged. In this event, Blind Spot
Assist is no longer active.
The brightness of the indicator/warning
lamps is adjusted automatically according to
the ambient light.
Collision warning
If a vehicle is detected in the monitoring range
of Blind Spot Assist and you switch on the
corresponding turn signal, a double warning
tone sounds. Red warning lamp
:flashes. If
the turn signal remains on, vehicles detected
are indicated by the flashing of red warning
lamp :. There are no further warning tones.
Switching on Blind Spot Assist
X Make sure that the radar sensor system
(Y page 205) and Blind Spot Assist
(Y page 201) are activated in the on-board
computer.
X Turn the SmartKey to position 2in the
ignition lock.
Warning lamps :in the exterior mirrors
light up red for approximately
1.5 seconds and then turn yellow.
Lane Keeping Assist General notes
Lane Keeping Assist monitors the area in
front of your vehicle with camera
:, which is
mounted at the top of the windshield. Lane
Keeping Assist detects lane markings on the 188
Driving systemsDriving and parking