rear view mirror MERCEDES-BENZ SLK ROADSTER 2008 Owners Manual
[x] Cancel search | Manufacturer: MERCEDES-BENZ, Model Year: 2008, Model line: SLK ROADSTER, Model: MERCEDES-BENZ SLK ROADSTER 2008Pages: 273, PDF Size: 4.42 MB
Page 11 of 273
8 L
Lam p
Display message . . . . . . . . . . . . . .182
Lamps
see Indicator and warning lamp
Licence plate lighting
Display message . . . . . . . . . . . . . .184
Lighting
see Lights
Lights
Constant headlamp mode . . . . . . . .73
Cornering light function . . . . . . . . . .76
Dipped-beam headlamps . . . . . . . . .73
Display message . . . . . . . . . . . . . .182
Front foglamp s.. . . . . . . . . . . . . . . .74
Hazard warning lamps . . . . . . . . . . .76
Headlamp flasher . . . . . . . . . . . . . . .75
Headlamp range . . . . . . . . . . . . . . . .76
Light switch . . . . . . . . . . . . . . . . . . .73
Main-beam headlamps . . . . . . . . . . .75
Rear foglamp . . . . . . . . . . . . . . . . . .74
Switching off (display message) . . . . . . . . . . . . . . . . . . . . . . . . . . . .184
Turn signals . . . . . . . . . . . . . . . . . . .75
LIM indicator lam p
Cruise control . . . . . . . . . . . . . . . .110
Variable Speedtronic . . . . . . . . . . .113
Load compartment load, maximum
. . . . . . . . . . . . . . . . . . . . . . . . . .253, 254 Locking
Automatic . . . . . . . . . . . . . . . . . . . . .57
Emergency locking . . . . . . . . . . . . .211
From the inside (central locking
button) . . . . . . . . . . . . . . . . . . . . . . .57
Luggage cover
see Boot separator
Luggage net . . . . . . . . . . . . . . . . . . . .137
Lumbar support . . . . . . . . . . . . . . . . . .61 M
Main-beam headlamps Display message . . . . . . . . . . . . . .184
Main fuse box . . . . . . . . . . . . . . . . . . .238
Maintenanc e
Battery . . . . . . . . . . . . . . . . . . . . . .230
Malfunction memory
see Message memory menu
Manual gearshift program . . . . . . . ..88
Manual transmissio n. . . . . . . . . . . . . .85
Maximum spee d
Technical data . . . . . . . . . . . . . . . .245
Memory card . . . . . . . . . . . . . . . . . . . .99
Operation (on-board computer) . . . .99
Memory functio n. . . . . . . . . . . . . . . . .68
Menu (on-board computer) . . . . . . . ..94
AMG . . . . . . . . . . . . . . . . . . . . . . . . .96
Audio . . . . . . . . . . . . . . . . . . . . . . . .98
DVD . . . . . . . . . . . . . . . . . . . . . . . . .99 Message memory . . . . . . . . . . . . .
.100
Navigation . . . . . . . . . . . . . . . . . . .100
Resetting to factory settings . . . . .101
Settings . . . . . . . . . . . . . . . . . . . . .101
Standard displa y.. . . . . . . . . . . . . .95
Submenu overview . . . . . . . . . . . . .101
Telephone . . . . . . . . . . . . . . . . . . .108
Trip computer . . . . . . . . . . . . . . . .107
Message
see Message memory menu
Mirror
Sun viso r.. . . . . . . . . . . . . . . . . . .140
Mobile phone . . . . . . . . . . . . . . . . . . .141
Bracket . . . . . . . . . . . . . . . . . . . . .142
Display message . . . . . . . . . . . . . .187
Installatio n.. . . . . . . . . . . . . . . . . .241
Own number sending . . . . . . . . . . .143
Run-on time . . . . . . . . . . . . . . . . . .143
Telephone menu (on-board com-
puter) . . . . . . . . . . . . . . . . . . . . . . .108
Modifying the programming
Key . . . . . . . . . . . . . . . . . . . . . . . . . .56
MP3 . . . . . . . . . . . . . . . . . . . . . . . . . . . .99
Operation (on-board computer) . . . .99
Multi-function display . . . . . . . . ..90, 92
Multi-function steering wheel . . . . ..91
Overview . . . . . . . . . . . . . . . . . . . . .28 Index
171_AKB; 3; 4, en-G
B
vpfaff7, 2007-11-13T10:50:25+01:00 - Seite
8
Page 12 of 273
9N
Navigation . . . . . . . . . . . . . . . . . . . . .100
Navigation menu (on-board com-
puter) . . . . . . . . . . . . . . . . . . . . . . .100 O
Oil topping up . . . . . . . . . . . . . . . . . . .153
On-board computer . . . . . . . . . . . . . ..91
AMG menu . . . . . . . . . . . . . . . . . . . .96
Audio menu . . . . . . . . . . . . . . . . . . .98
Display message . . . . . . . . . . . . . .174
DVD menu . . . . . . . . . . . . . . . . . . . .99
Factory setting s.. . . . . . . . . . . . . .101
Instrument cluster submenu . . . . .102
Lighting submenu . . . . . . . . . . . . .102
Message memory menu . . . . . . . . .100
Navigation menu . . . . . . . . . . . . . .100
Settings menu . . . . . . . . . . . . . . . .101
Standard display menu . . . . . . . . . .95
Telephone menu . . . . . . . . . . . . . .108
Trip computer menu . . . . . . . . . . . .107
Vehicle submenu . . . . . . . . . . . . . .102
On-board computer language . . . ..102
One-touch gearshiftin g. . . . . . . . . . . .86
Operating system see On-board computer
Outside temperature
Display (on-board computer) . . .91, 96 Overhead control panel
Overview . . . . . . . . . . . . . . . . . . . . .32
Own number sending (mobile
phone) . . . . . . . . . . . . . . . . . . . . . . . . .143 P
Paint code number . . . . . . . . . . . . ..242
Parking . . . . . . . . . . . . . . . . . . . . . . . . .83
Parking aid . . . . . . . . . . . . . . . . . . . . . .67
Parktronic . . . . . . . . . . . . . . . . . . .115
Parking brake
Display message . . . . . . . . . . . . . .181
Parking lamps
Display message . . . . . . . . . . . . . .185
Parking loc k
Releasing manually (automati c
transmission) . . . . . . . . . . . . . . . . .212
Parking position
Exterior mirror . . . . . . . . . . . . . . . . .67
Parktronic . . . . . . . . . . . . . . . . . . . . . .115
Activating/deactivating . . . . . . . . .117
Malfunction . . . . . . . . . . . . . . . . . .204
Range of the sensors . . . . . . . . . . .115
Warning display . . . . . . . . . . . . . . .116
PASSENGER AIRBAG OFF warning
lamp . . . . . . . . . . . . . . . . . . . . . . .46, 191
Performance . . . . . . . . . . . . . . . . . . .245
Permanent Speedtronic . . . . . . . . ..114 Petrol
Minimum grad e.. . . . . . . . . . . . . .149
Plastic trim
Cleaning . . . . . . . . . . . . . . . . . . . . .168
Power window s
see Side window
Program selector button
Automatic transmission . . . . . . . . . .87
Pulling away . . . . . . . . . . . . . . . . . . . . .82 R
RACETIMER (on-board computer) . ..9 7
Radio Changing a station (on-board
computer) . . . . . . . . . . . . . . . . . . . .99
see separate operating instructions
Rain sensor
Windscreen wipers . . . . . . . . . . . . . .79
Range (on-board computer) . . . . . ..107
R button see Reset button
Rear foglamp
Display message . . . . . . . . . . . . . .185
Rear-view mirror
Adjusting . . . . . . . . . . . . . . . . . . . . .65
Anti-dazzle (manual) . . . . . . . . . . . . .65
Anti-dazzle mode (automatic) . . . . .67
Rear windo w
Cleaning . . . . . . . . . . . . . . . . . . . . .168 Index
171_AKB; 3; 4, en-GB
vpfaff7,
2007-11-13T10:50:25+01:00 - Seite
9
Page 22 of 273
Exterior view
19Function Pag
e 1 Boot
Opening and closing 58
2 Rear window heatin
g 130
3 Fuel filler fla
p 148
Fuel requirements 149
4 Doors
Opening and closing 56
Opening/closing in an
emergency
210
5 Exterior mirrors
66
6 Roof
Opening and closin
g 132
Draught stop 135
Boot separator 134
7 Cleaning the windows
16
7 8 Windscreen wipers
78 Function Page
9 Opening the bonnet
150
Engine oil 151
Coolant 154
Vehicle battery 230
a Front lights
215
b Towing
234
c Headlamp cleaning system
76
d Wheels and tyres
155
Tyre pressure loss warning
system
158
Flat tyre 218
Vehicle tool kit 172
Spare wheel* 172,
225 e Rear lights
21
6 f Towing
234 At a glance
* optional
171_AKB; 3; 4, en-GB
vpfaff7,
2007-11-13T10:50:25+01:00 - Seite 19
Page 35 of 273
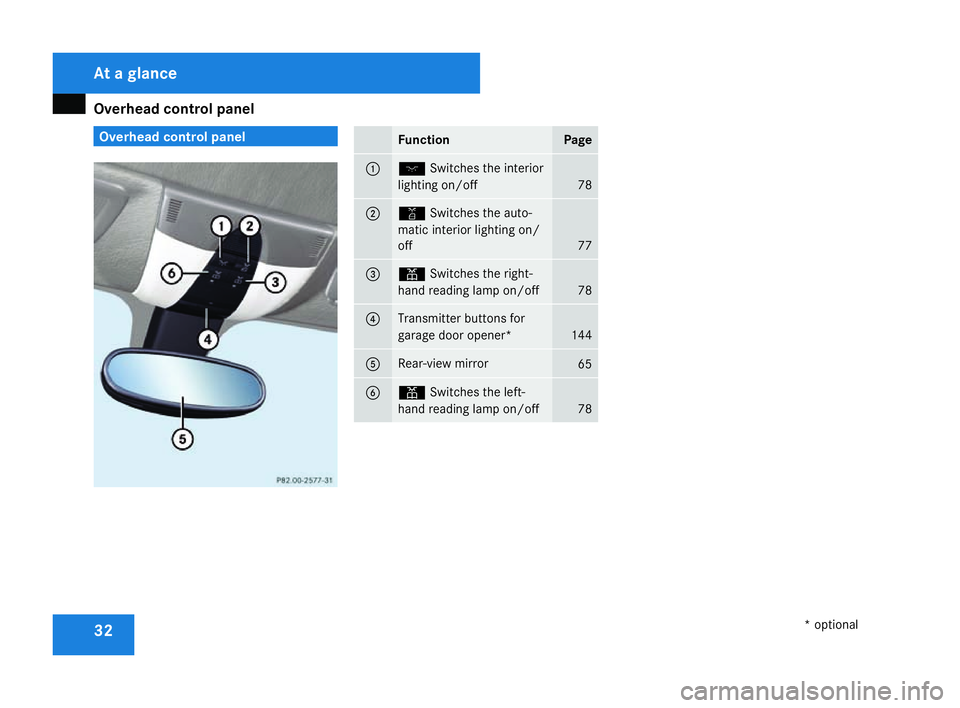
Overhead control panel
32 Overhead control panel
Function Page
1 ð
Switches the interior
lighting on/off 78
2 ¡
Switches the auto-
matic interior lighting on/
off 77
3 X
Switches the right-
hand reading lamp on/off 78
4 Transmitter buttons for
garage door opener*
144
5 Rear-view mirror
65
6 X
Switches the left-
hand reading lamp on/off 78At a glance
* optional
171_AKB; 3; 4, en-GB
vpfaff7,
2007-11-13T10:50:25+01:00 - Seite 32
Page 57 of 273
Anti-theft syste
ms54 Interior motion sensor*
If the interior motion sensor is primed, a vis-
ual and audible alarm is triggered if move-
ment is detected in the vehicle interior whil e
the vehicle is locked. This occurs, for exam-
ple, if someone breaks the side windows of
your vehicle or reaches into the vehicle's inte -
rior.
Priming the interior motion sensor X
Make sure that:
R
the side windows are close d
R the stowage compartment under the
armrest is closed.
R there are no objects, e.g. mascots, hang-
ing on the rear-view mirror or on the
grasp handles on the roof trim.
This will prevent false alarms.
X Make sure that the roof is closed.
The interior motion sensor can only be
primed when the roof is closed (with the
exception of vehicles for the Netherlands).
Vehicles for the Netherlands: the interior
motion sensor is primed even when the
roof is open. However, the roof should be
closed so as to prevent a false alarm. X
Make sure that the boot lid is closed.
Only then can the interior motion sensor be
primed.
X Lock the vehicle using the key.
The interior motion sensor is primed after
approximately 30 seconds.
To deactivate the interior motion sen-
sor To prevent a false alarm, deactivate the inte-
rior motion sensor if you lock your vehicle and
R
people remain in the vehicle
R animals remain in the vehicle
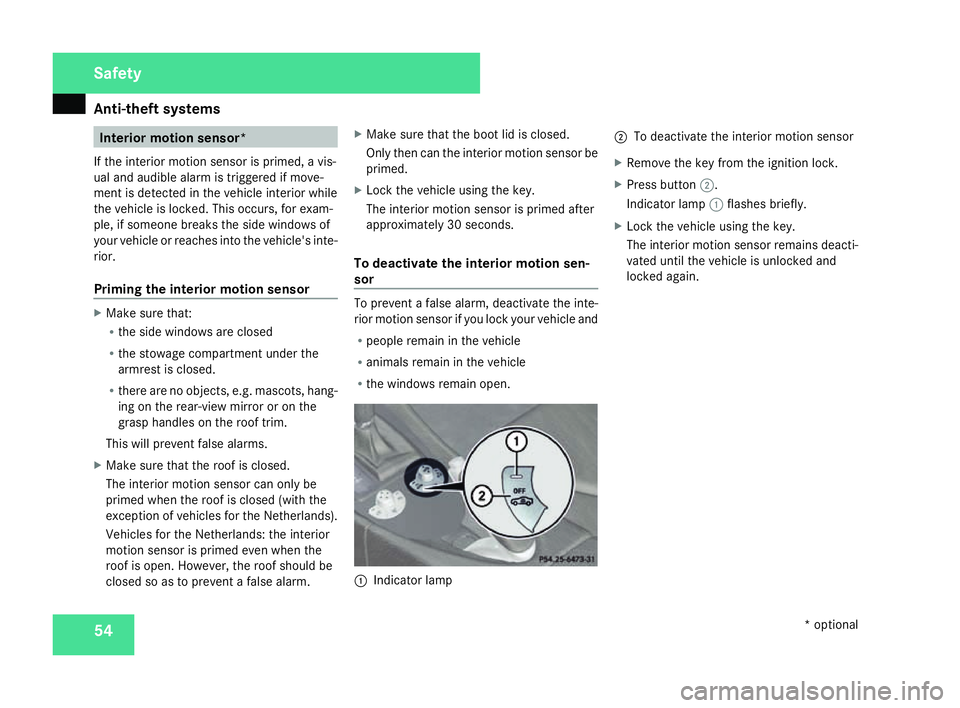
R the windows remain open. 1
Indicator lamp 2
To deactivate the interior motion sensor
X Remove the key from the ignition lock.
X Press button 2.
Indicator lamp 1flashes briefly .
X Lock the vehicle using the key.
The interior motion sensor remains deacti-
vated until the vehicle is unlocked and
locked again. Safety
* optional
171_AKB; 3; 4, en-GB
vpfaff7,
2007-11-13T10:50:25+01:00 - Seite 54
Page 68 of 273
Mirrors
65Easy-entry/exit feature*
The easy-entry/exit feature makes getting in
and out of your vehicle easier.
The steering wheel swings upwards whe n
you:
R remove the key from the ignition lock
R open the driver's door when the key is in
the ignition lock or in position 1.
The steering wheel is moved automatically to
the position previously set when the key is
inserted into the ignition lock with the driver's
door closed. G
Risk of injury
Make sure that nobody can become trap -
ped when you activate the easy-entry/exit
feature.
If there is a risk of becoming trapped, stop
the adjustment procedure. To halt the pro-
cedure:
R press the steering-column adjustment
switc h
R press one of the memory function posi-
tion buttons
The steering column stops moving immedi-
ately. Never leave children unsupervised in the
vehicle. They could open the driver's door
and thereby unintentionally activate the
easy-entry feature and become trapped.
The most recent position of the steering
wheel is stored when you switch off the igni-
tion or when you store a memory position
( Y page 68).
You can activate and deactivate the easy-
entry/exit feature via the on-board computer
( Y page 106). Mirrors
Rear-view mirror
X Adjust the rear-view mirror by hand so yo u
have a good overview of the traffic condi-
tions.
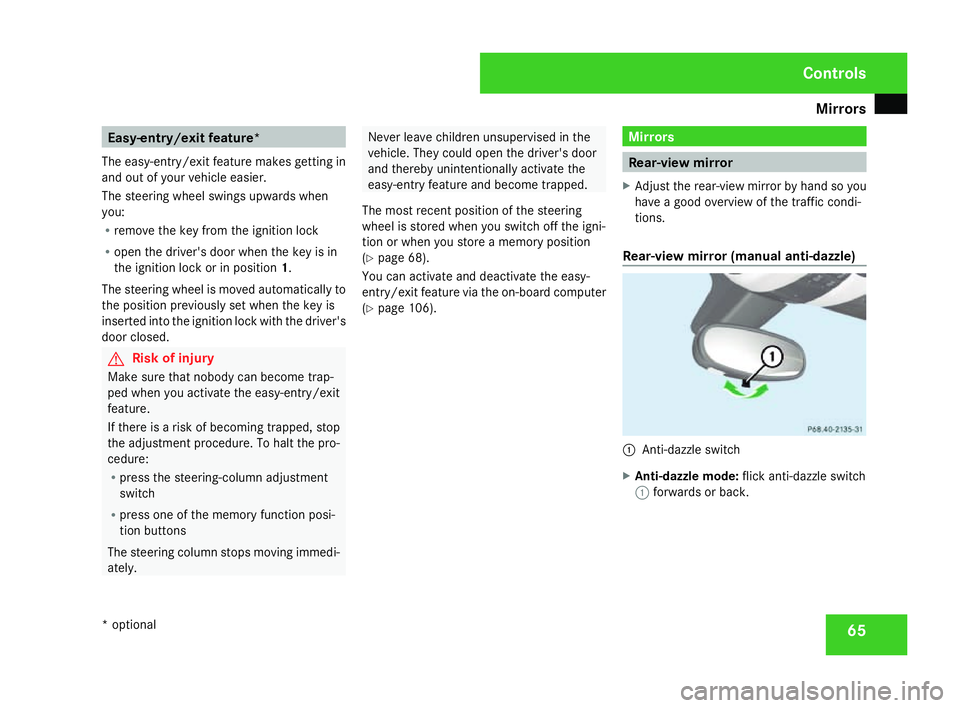
Rear-view mirror (manual anti-dazzle) 1
Anti-dazzle switch
X Anti-dazzle mode: flick anti-dazzle switch
1 forwards or back. Controls
* optional
171_AKB; 3; 4, en-GB
vpfaff7,
2007-11-13T10:50:25+01:00 - Seite 65
Page 70 of 273
Mirrors
67
R
The exterior mirrors fold in automatically as
soon as you lock the vehicle from the out-
side.
R The exterior mirrors fold out again auto-
matically as soon as you unlock the vehicle
and then open the driver's or front-
passenger door.
i If you have activated this function and fold
in the exterior mirrors using button 1, they
will not be folded out automatically. You
can then only fold out the exterior mirrors
using button 1. Automatic anti-dazzle mirrors
*
The rear-view mirror and the exterior mirror
on the driver's side automatically go into anti-
dazzle mode if the ignition is switched on and
incident light from headlamps strikes the sen-
sor in the rear-view mirror.
The mirrors do not go into anti-dazzle mode if
reverse gear is engaged and the interior light-
ing is switched on. G
Risk of accident
If incident light from the headlamps of othe r
vehicles is prevented from striking the sen-
sor in the rear-view mirror, for instance if the draught stop is fitted, the mirrors' auto-
matic anti-dazzle function will not operate.
Incident light could then dazzle you. This
may prevent you from observing the traffic
conditions, thereby causing an accident. In
this case, adjust the rear-view mirror man-
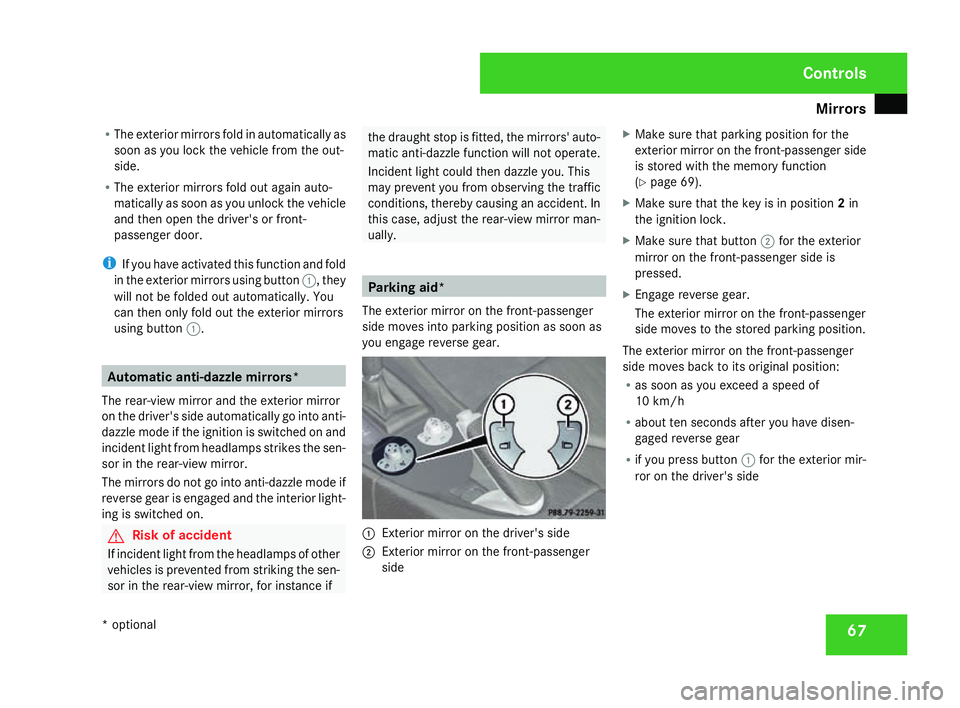
ually. Parking aid*
The exterior mirror on the front-passenger
side moves into parking position as soon as
you engage reverse gear. 1
Exterior mirror on the driver's side
2 Exterior mirror on the front-passenge r
side X
Make sure that parking position for the
exterior mirror on the front-passenger side
is stored with the memory function
(Y page 69).
X Make sure that the key is in position 2in
the ignition lock .
X Make sure that button 2for the exterior
mirror on the front-passenger side is
pressed.
X Engage reverse gear .
The exterior mirror on the front-passenger
side moves to the stored parking position.
The exterior mirror on the front-passenger
side moves back to its original position:
R as soon as you exceed a speed of
10 km/h
R about ten seconds after you have disen -
gaged reverse gear
R if you press button 1for the exterior mir-
ror on the driver's sid e Controls
* optional
171_AKB; 3; 4, en-GB
vpfaff7,
2007-11-13T10:50:25+01:00 - Seite 67
Page 81 of 273

Windscreen wipers
78
Manual control
Interior lighting
X
To switch on/off: press theðbutton.
Reading lamps
X To switch on/off: press theXbutton.
Depending on the equipment, the reading
lamps are in the overhead control panel or,
for vehicles equipped with the light pack-
age*, at the bottom of the rear-view mirror . Windscreen wipers
Combination switch
1
To switch on the windscreen wipers
2 Single wipe/to wipe the windscreen using
washer fluid
Settings: 0 Windscreen wipers off
I Intermittent wipe
II Continuous wipe, slow
III Continuous wipe, fast
!
Vehicles with a rain sensor*: If the windscreen becomes dirty in dry
weather conditions, the windscreen wiper
s
may be activated inadvertently. This could
then damage the windscreen wiper blades
or scratch the windscreen.
For this reason, you should always switch
off the windscreen wipers in dry weather.
X Make sure that the key is in position 1or
2 in the ignition lock .
The various wiper settings can be selected
as follows: Single wipe
X Briefly press the combination switch to the
pressure point in the direction of arrow
2 . Cont
rols
* optional
171_AKB; 3; 4, en-GB
vpfaff7,
2007-11-13T10:50:25+01:00 - Seite 78
Page 148 of 273
Features
145
X
Erase the memory of the integrated remote
control (Y page 146)before programming
it for the first time.
X Turn the key to position 2in the ignition
lock .
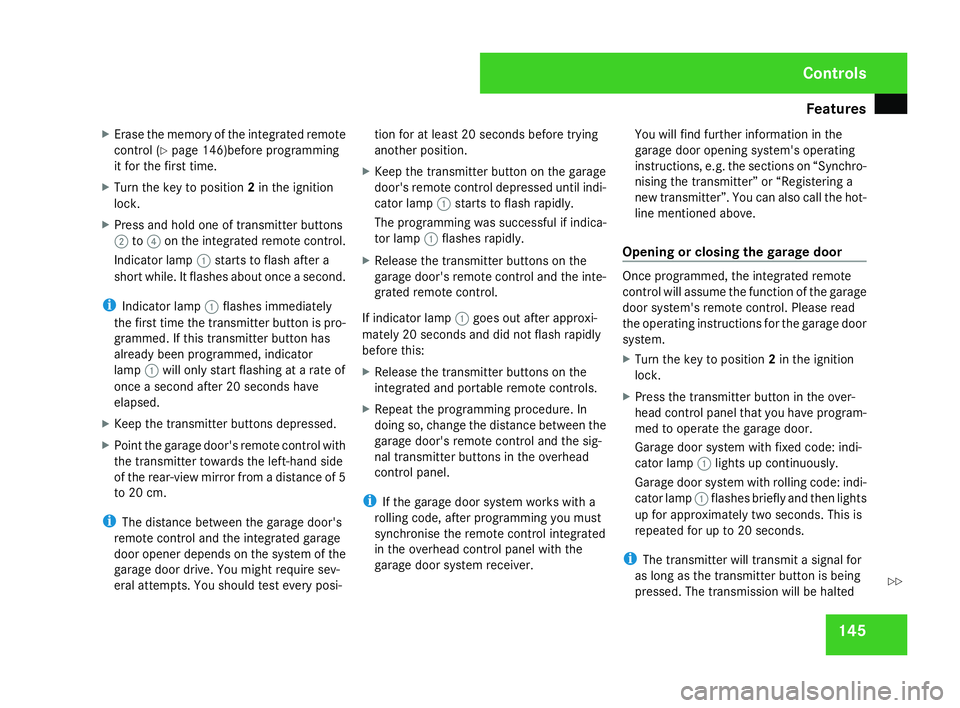
X Press and hold one of transmitter button s
2 to4 on the integrated remote control.
Indicator lamp 1starts to flash after a
short while. It flashes about once a second.
i Indicator lamp 1flashes immediately
the first time the transmitter button is pro-
grammed. If this transmitter button has
already been programmed, indicator
lamp 1will only start flashing at a rate of
once a second after 20 seconds have
elapsed .
X Keep the transmitter buttons depressed.
X Point the garage door's remote control with
the transmitter towards the left-hand side
of the rear-view mirror from a distance of 5
to 20 cm.
i The distance between the garage door's
remote control and the integrated garage
door opener depends on the system of the
garage door drive. You might require sev-
eral attempts. You should test every posi- tion for at least 20 seconds before trying
another position.
X Keep the transmitter button on the garage
door's remote control depressed until indi-
cator lamp 1starts to flash rapidly.
The programming was successful if indica-
tor lamp 1flashes rapidly .
X Release the transmitter buttons on th e
garage door's remote control and the inte-
grated remote control.
If indicator lamp 1goes out after approxi-
mately 20 seconds and did not flash rapidly
before this:
X Release the transmitter buttons on th e
integrated and portable remote controls.
X Repeat the programming procedure. In
doing so, change the distance between th e
garage door's remote control and the sig-
nal transmitter buttons in the overhead
control panel.
i If the garage door system works with a
rolling code, after programming you must
synchronise the remote control integrated
in the overhead control panel with the
garage door system receiver. You will find further information in the
garage door opening system's operating
instructions, e.g. the sections on “Synchro-
nising the transmitter” or “Registering
a
new transmitter”. You can also call the hot-
line mentioned above .
Opening or closing the garage door Once programmed, the integrated remot
e
control will assume the function of the garag e
door system's remote control. Please read
the operating instructions for the garage door
system.
X Turn the key to position 2in the ignition
lock .
X Press the transmitter button in the over-
head control panel that you have program-
med to operate the garage door.
Garage door system with fixed code: indi-
cator lamp 1lights up continuously.
Garage door system with rolling code: indi-
cator lamp 1flashes briefly and then lights
up for approximately two seconds. This is
repeated for up to 20 seconds.
i The transmitter will transmit a signal for
as long as the transmitter button is being
pressed. The transmission will be halted Controls
171_AKB; 3; 4, en-GB
vpfaff7,
2007-11-13T10:50:25+01:00 - Seite 145 Z