seats MERCEDES-BENZ SLK ROADSTER 2008 Owners Manual
[x] Cancel search | Manufacturer: MERCEDES-BENZ, Model Year: 2008, Model line: SLK ROADSTER, Model: MERCEDES-BENZ SLK ROADSTER 2008Pages: 273, PDF Size: 4.42 MB
Page 38 of 273
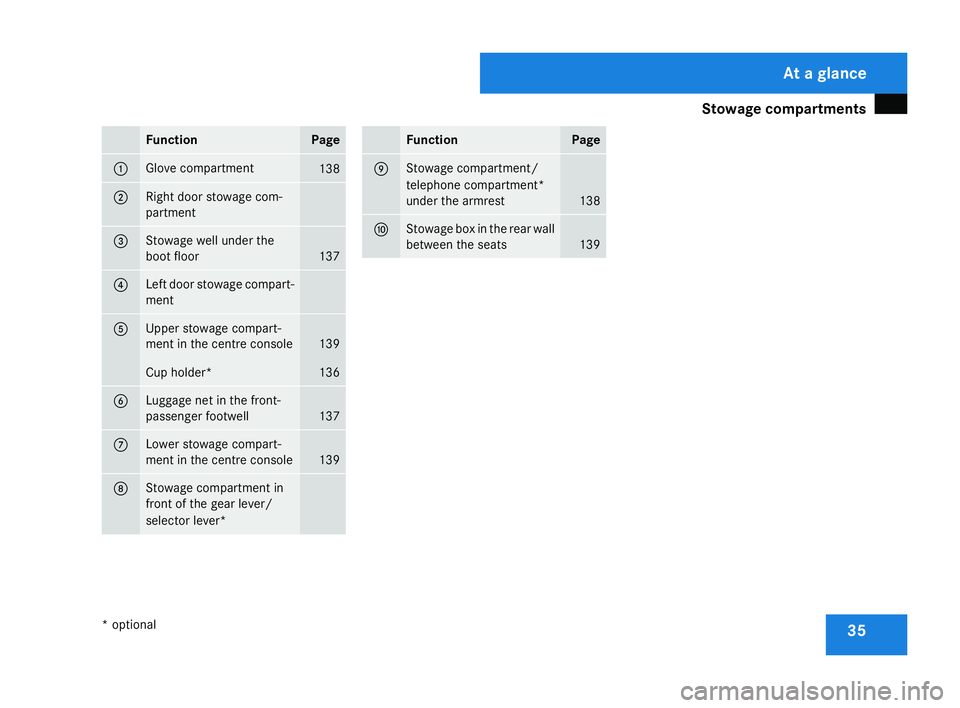
Stowage compartments
35Function Page
1 Glove compartmen
t 138
2 Right door stowage com-
partmen
t 3 Stowage well under the
boot floor
137
4 Left door stowage compart-
ment
5 Upper stowage compart-
ment in the centre console
139
Cup holder* 136
6 Luggage net in the front-
passenger footwell
137
7 Lower stowage compart-
ment in the centre console
139
8 Stowage compartment in
front of the gear lever/
selector lever* Function Pag
e 9 Stowage compartment/
telephone compartment*
under the armres
t 138
a Stowage box in the rear wall
between the seats 139 At a glanc
e
* optional
171_AKB; 3; 4, en-GB
vpfaff7,
2007-11-13T10:50:25+01:00 - Seite 35
Page 45 of 273
Occupant safet
y42 R
Make sure there are no heavy or sharp-
edged objects in pockets of clothing.
R Do not lean forwards, e.g. over the cove r
of the driver's front airbag, particularly
when the vehicle is in motion .
R Do not put your feet on the dashboard.
R Only hold the steering wheel by the rim.
This allows the airbag to inflate fully. You
could be injured if the airbag is deployed
and you are holding the inside of the
steering wheel.
R Do not lean on the doors from inside the
vehicle.
R Make sure that there are no people, ani-
mals or objects between the vehicle
occupants and the area of deployment of
the airbag.
R Do not place any objects between the
seat backrest and the door.
R Do not hang any hard objects, for exam-
ple coat hangers, on the grab handles or
coat hooks .
R Do not attach accessories, e.g. cup hold -
ers, to the doors.
It is not possible to rule out the risk of inju-
ries caused by an airbag due to the high speed at which the airbag is required to
deploy.
G
Risk of injury
The airbag's functionality can only be guar-
anteed if the following parts are not cov-
ered and no badges or stickers are
attached to them:
R Padded steering wheel boss
R Front-passenger front airbag cover
R Outer side of seats G
Risk of injury
When an airbag deploys, a small amount of
powder is released. The powder may cause
short-term breathing difficulties to persons
suffering from asthma or other pulmonary
conditions .
In order to prevent possible breathing dif-
ficulties you should leave the vehicle as
soon as it is safe to do so. You can also open
the window to allow fresh air to enter the
interior. The powder does not constitute a
health hazard and does not indicate that
there is a fire in the vehicle. G
Risk of injury
The airbag parts are hot after the airbag ha s
been deployed. Do not touch them, other -
wise you may burn yourself.
Occupants are not protected by the airbags
in the event of another accident. Have th e
airbags checked at a qualified specialist
workshop.
Front airbag s
The front airbags are designed to increase
protection for the driver's and front-
passenger head and chest .
The driver's front airbag and front-passenger
front airbag are deployed:
R at the start of an accident with a high rat e
of vehicle acceleration or deceleration in a
longitudinal direction
R if the system determines that airbag
deployment can offer additional protection
to that provided by the seat belt
R if the seat belt is fastened
R independently of other airbags in the vehi-
cle
R if the vehicle overturns, but only if the sys-
tem detects high vehicle deceleration in a
longitudinal direction Safety
171_AKB; 3; 4, en-GB
vpfaff7,
2007-11-13T10:50:25+01:00 - Seite 42
Page 58 of 273
55
Opening and closing
...........................56
Key positions ...................................... .59
Seats .................................................... 59
Steering wheel .................................... 63
Mirrors ................................................. 65
Memory functions* .............................68
Seat belts ............................................ .69
Lights ................................................... 73
Windscreen wipers .............................78
Side windows ...................................... 79Driving and parking
............................81
Transmission ....................................... 84
Instrument cluster ..............................90
On-board computer .............................91
Driving systems ................................ 109
Air conditioning ................................. 118
Opening/closing the roof .................132
Loading and stowing ........................136
Features ............................................. 140 Controls
171_AKB; 3; 4, en-GB
vpfaff7,
2007-11-13T10:50:25+01:00 - Seite 55
Page 62 of 273
Seats
59
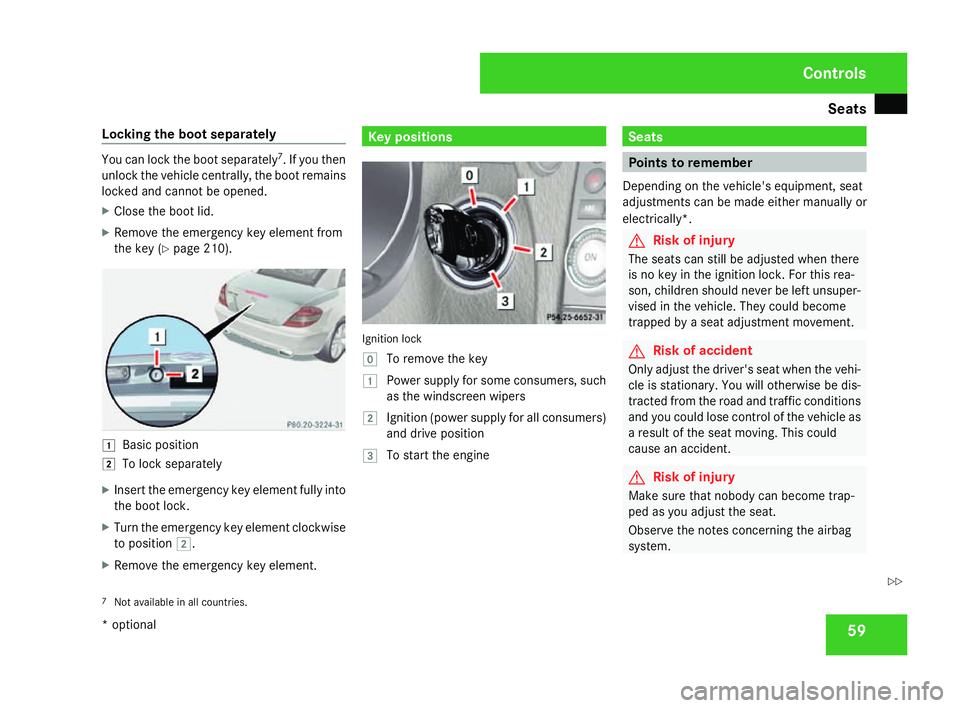
Locking the boot separately You can lock the boot separately
7
. If you then
unlock the vehicle centrally, the boot remains
locked and cannot be opened.
X Close the boot lid.
X Remove the emergency key element from
the key (Y page 210). $
Basic position
% To lock separately
X Insert the emergency key element fully into
the boot lock.
X Turn the emergency key element clockwise
to position %.
X Remove the emergency key element. Key positions
Ignition loc
k
} To remove the key
$ Power supply for some consumers, such
as the windscreen wipers
% Ignition (power supply for all consumers)
and drive positio n
& To start the engine Seats
Points to remember
Depending on the vehicle's equipment, seat
adjustments can be made either manually or
electrically*. G
Risk of injury
The seats can still be adjusted when there
is no key in the ignition lock. For this rea -
son, children should never be left unsuper-
vised in the vehicle. They could become
trapped by a seat adjustment movement. G
Risk of accident
Only adjust the driver's seat when the vehi-
cle is stationary. You will otherwise be dis-
tracted from the road and traffic conditions
and you could lose control of the vehicle as
a result of the seat moving. This could
cause an accident. G
Risk of injury
Make sure that nobody can become trap -
ped as you adjust the seat.
Observe the notes concerning the airbag
system.
7 Not available in all countries. Controls
* optional
171_AKB; 3; 4, en-GB
vpfaff7,
2007-11-13T10:50:25+01:00 - Seite 59 Z
Page 63 of 273
Seats
60 Secure children as recommended; see the
"Children in the vehicle" section.
! When you move the seats, make sure that
there are no objects in the footwell or
behind the seats. Otherwise, you could
damage the seats and the objects.
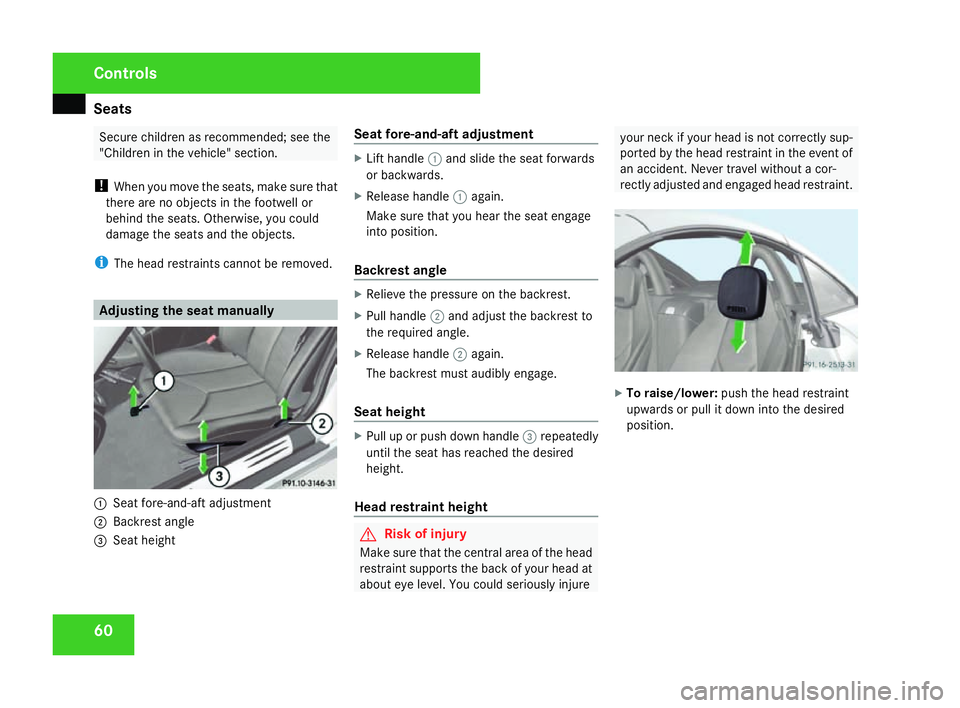
i The head restraints cannot be removed. Adjusting the seat manually
1
Seat fore-and-aft adjustment
2 Backrest angle
3 Seat height Seat fore-and-aft adjustmen
t X
Lift handle 1and slide the seat forwards
or backwards.
X Release handle 1again.
Make sure that you hear the seat engag e
into position .
Backrest angle X
Relieve the pressure on the backrest.
X Pull handle 2and adjust the backrest to
the required angle.
X Release handle 2again.
The backrest must audibly engage.
Seat height X
Pull up or push down handle 3repeatedly
until the seat has reached the desired
height.
Head restraint height G
Risk of injury
Make sure that the central area of the head
restraint supports the back of your head at
about eye level. You could seriously injure your neck if your head is not correctly sup-
ported by the head restraint in the event of
an accident. Never travel without a cor-
rectly adjusted and engaged head restraint. X
To raise/lower: push the head restraint
upwards or pull it down into the desire d
position. Controls
171_AKB; 3; 4, en-GB
vpfaff7,
2007-11-13T10:50:25+01:00 - Seite 60
Page 64 of 273
Seats
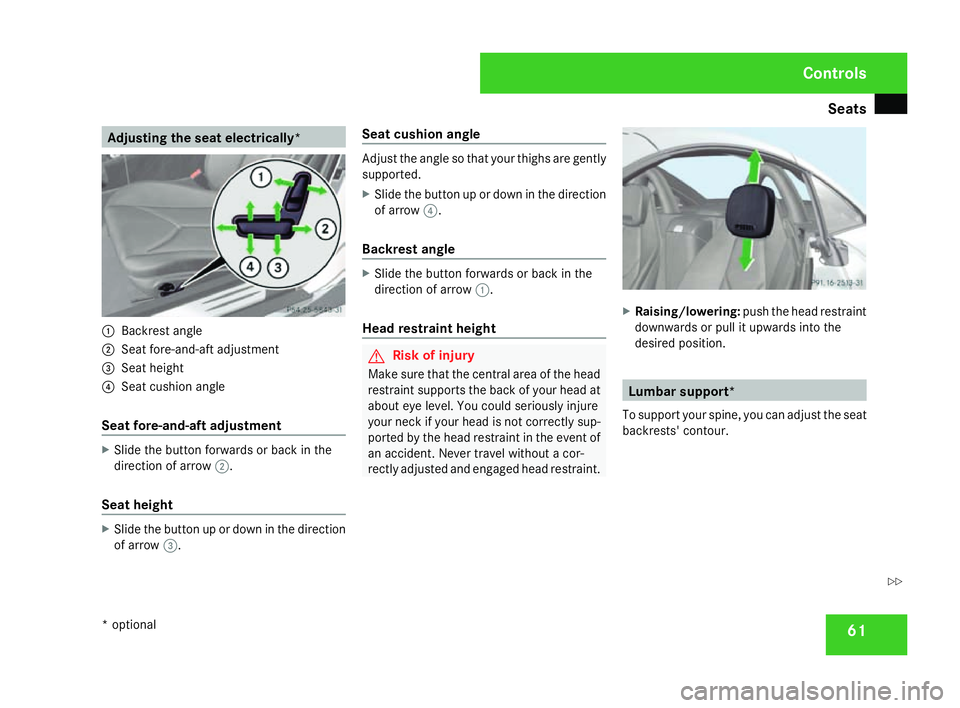
61Adjusting the seat electrically*
1
Backrest angle
2 Seat fore-and-aft adjustment
3 Seat height
4 Seat cushion angle
Seat fore-and-aft adjustmen tX
Slide the button forwards or back in the
direction of arrow 2.
Seat height X
Slide the button up or down in the directio n
of arrow 3. Seat cushion angle Adjust the angle so that your thighs are gently
supported.
X
Slide the button up or down in the directio n
of arrow 4.
Backrest angle X
Slide the button forwards or back in the
direction of arrow 1.
Head restraint height G
Risk of injury
Make sure that the central area of the head
restraint supports the back of your head at
about eye level. You could seriously injure
your neck if your head is not correctly sup-
ported by the head restraint in the event of
an accident. Never travel without a cor-
rectly adjusted and engaged head restraint. X
Raising/lowering :push the head restraint
downwards or pull it upwards into the
desired position. Lumbar support*
To support your spine, you can adjust the seat
backrests' contour. Controls
* optional
171_AKB; 3; 4, en-GB
vpfaff7,
2007-11-13T10:50:25+01:00 - Seite 61 Z
Page 65 of 273

Seats
621
Upper backrest contour
2 Lower backrest contour
X Make sure that the key is in position 2in
the ignition lock .
X Turn thumbwheels 1and 2until th e
desired backrest contour has been set. AIRSCARF neck-level heating*
The AIRSCARF neck-level heating function
blows warm air around the heads of car occu-
pants. The warm air flows out of the holes in
the head restraints. G
Risk of injury
When AIRSCARF is in operation, very hot ai r
can flow from the vents in the head
restraints. This could cause burns to bare
skin in the immediate vicinity of the vents .
Make sure that you reduce the heater out-
put in time.
The three red indicator lamps in the button
indicate the heating level you have selected. 1
AIRSCARF neck-level heating X
Make sure the key is in position 2in the
ignition lock .
X To activate :press button 1.
Three red indicator lamps in the button light
up. The blower starts up after a preheating
phase of seven seconds.
X Press button 1repeatedly until the
desired heating level is set.
X To switch off: press button1repeatedly
until all the indicator lamps go out.
i The blower continues running for seven
seconds to cool down the heating ele-
ments.
i If the battery voltage is too low, the AIR-
SCARF neck level heating may switch off. Controls
* optional
171_AKB; 3; 4, en-GB
vpfaff7,
2007-11-13T10:50:25+01:00 - Seite 62
Page 73 of 273
Seat belts
70 as low down as possible, i.e. over your
hip joints – not across your abdomen. If
necessary, push down the belt strap
slightly and then retighten it in the roll-up
direction.
R Seat belts must not be twisted and mus t
always be inside the belt loop of the seat .
R Do not route the belt strap across sharp
or fragile objects, especially if these ar e
located on or in your clothing, e.g. spec -
tacles, pencils, keys, etc. The seat belt
strap could be damaged and tear in an
accident and you or other vehicle occu -
pants could be injured.
R Only one person should use each seat
belt at any one time. Children must never
travel sitting on the lap of other occu-
pants. It would not be possible to restrain
the child in the event of a sudden change
in direction, braking or an accident. This
could result in severe or even fatal inju-
ries to the child and other occupants.
R Persons less than 1.50 m tall cannot
wear the seat belts correctly. For this
reason, secure persons less than 1.50 m
tall in specially designed, suitabl e
restraint systems . R
Children less than 1.50 m tall or under
12 years of age cannot wear the seat
belts properly. Therefore, always secure
these children in suitable child restraint
systems on suitable vehicle seats. You
can find more information under "Chil-
dren in the vehicle" in the "Safety" sec -
tion of the Owner's Manual. Follow the
manufacturer's installation instructions
when fitting the child restraint system.
R Do not secure any objects with a seat belt
if the seat belt is also being used by one
of the vehicle's occupants. G
Risk of injury
The seat belt does not offer the intended
level of protection unless the backrest is
almost vertical. Under certain circumstan-
ces this could cause severe or even fata l
injuries.
Before starting a journey, make sure that
the seat is properly adjusted and that the
backrest is almost vertical. G
Risk of injury
A dirty or damaged seat belt or a seat bel t
that has been subjected to a load in an
accident or modified no longer offers the intended level of protection. Under certai
n
circumstances this could cause severe or
even fatal injuries.
For this reason, check regularly that the
seat belts are not damaged or dirty.
Always have damaged seat belts or sea t
belts that have been subjected to a load in
an accident replaced at a qualified special-
ist workshop. Choose a qualified specialist
workshop which has the necessary special-
ist knowledge and tools for the work
required. Mercedes-Benz recommends
that you use a Mercedes-Benz Service
Centre for this purpose.
For safety reasons, Mercedes-Benz recom -
mends that you only use seat belts which
have been approved by Mercedes-Benz for
your vehicle. Controls
171_AKB; 3; 4, en-GB
vpfaff7,
2007-11-13T10:50:25+01:00 - Seite 70
Page 79 of 273
Light
s 76 Hazard warning lamps
1
Hazard warning lamp button
X To activate :press hazard warning lamp
button 1.
All turn signals flash. If you now activate a
turn signal, only those turn signal lamps on
the corresponding side of the vehicle will
flash.
X To deactivate :press hazard warning lamp
button 1. Adjusting the headlamp range (vehi-
cles with halogen headlamps)
The headlamp range control allows you to
adjust the cone of light from the headlamps
according to how your vehicle is laden.
You can only adjust the headlamp range while
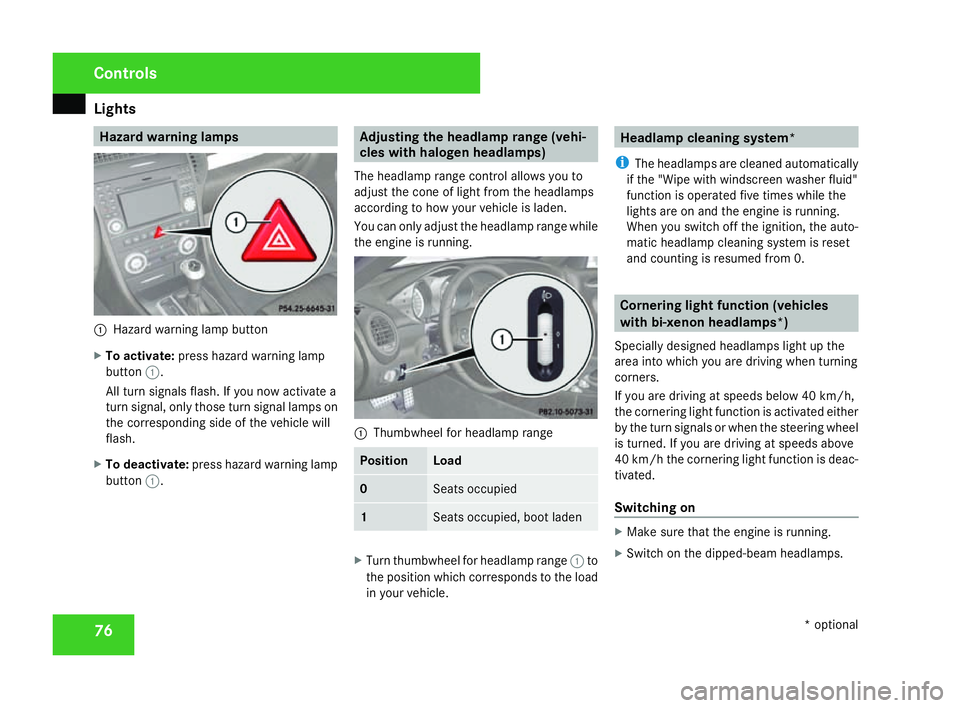
the engine is running. 1
Thumbwheel for headlamp range Position Load
0 Seats occupied
1 Seats occupied, boot lade
n X
Turn thumbwheel for headlamp range 1to
the position which corresponds to the load
in your vehicle. Headlamp cleaning system*
i The headlamps are cleaned automatically
if the "Wipe with windscreen washer fluid"
function is operated five times while the
lights are on and the engine is running.
When you switch off the ignition, the auto-
matic headlamp cleaning system is reset
and counting is resumed from 0. Cornering light function (vehicles
with bi-xenon headlamps*)
Specially designed headlamps light up the
area into which you are driving when turning
corners.
If you are driving at speeds below 40 km/h,
the cornering light function is activated either
by the turn signals or when the steering wheel
is turned. If you are driving at speeds above
40 km/h the cornering light function is deac-
tivated.
Switching on X
Make sure that the engine is running.
X Switch on the dipped-beam headlamps. Control
s
* optional
171_AKB; 3; 4, en-GB
vpfaff7,
2007-11-13T10:50:25+01:00 - Seite 76
Page 142 of 273
Loading and stowing
139
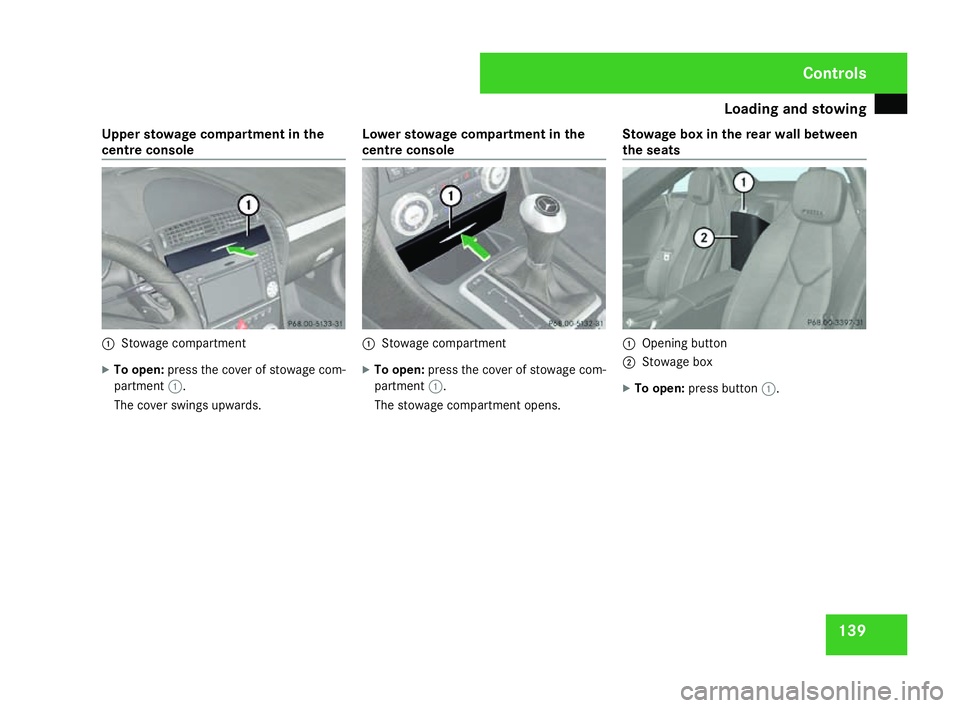
Upper stowage compartment in th
e
centre console 1
Stowage compartment
X To open: press the cover of stowage com-
partment 1.
The cover swings upwards. Lower stowage compartment in the
centre consol
e 1
Stowage compartment
X To open: press the cover of stowage com-
partment 1.
The stowage compartment opens. Stowage box in the rear wall between
the seats 1
Opening button
2 Stowage box
X To open: press button 1. Cont
rols
171_AKB; 3; 4, en-GB
vpfaff7,
2007-11-13T10:50:25+01:00 - Seite 139