towing MERCEDES-BENZ SLK ROADSTER 2014 User Guide
[x] Cancel search | Manufacturer: MERCEDES-BENZ, Model Year: 2014, Model line: SLK ROADSTER, Model: MERCEDES-BENZ SLK ROADSTER 2014Pages: 357, PDF Size: 10.22 MB
Page 186 of 357
Sports tuning
The firmer suspension settings in sports
mode ensures even better contact with the
road. Select this mode if you wish to experi-
ence direct feedback from the road surface,
when employing a sporty driving style, e.g. on
winding country roads.
X If indicator lamp : :is not lit: press but-
ton ;.
Indicator lamp :lights up. You have selec-
ted the suspension for a sporty driving
style.
Comfort tuning Select comfort mode if you prefer a more
comfortable style of driving.
X If indicator lamp : :is lit: press but-
ton ;.
Indicator lamp :goes out. You have selec-
ted the suspension for a comfortable driv-
ing style. HOLD function
General notes The HOLD function can assist the driver in the
following situations:
R when pulling away, especially on steep
slopes
R when manoeuvring on steep slopes
R when waiting in traffic
The vehicle is kept stationary without the
driver having to depress the brake pedal.
The braking effect is cancelled and the HOLD function is deactivated when you depress the
accelerator pedal to pull away. Important safety notes G
WARNING
When leaving the vehicle, it can still roll away despite being braked by the HOLD function if:
R there is a malfunction in the system or in
the voltage supply
R the HOLD function is deactivated by the
accelerator pedal being depressed, e.g. by
a vehicle occupant
R the electrical system in the engine com-
partment, the battery or the fuses are tam-
pered with
R the battery is disconnected
There is a risk of an accident.
Before leaving the vehicle, always deactivate
the HOLD function and secure the vehicle
from rolling away.
! If DISTRONIC PLUS or the HOLD function
is activated, the vehicle brakes automati-
cally in certain situations. To prevent dam-
age to the vehicle, deactivate DISTRONIC
PLUS and the HOLD function in the follow-
ing or other similar situations:
R when towing the vehicle
R in the car wash
Deactivate the HOLD function (Y page 184).
Activation conditions You can activate the HOLD function if:
R
the vehicle is stationary
R the engine is running or if it has been auto-
matically switched off by the ECO start/
stop function
R the driver's door is closed or if your seat
belt is fastened
R the bonnet is closed
R the electric parking brake is released
R the selector lever is in position D,Ror Non
vehicles with automatic transmission
R DISTRONIC PLUS is deactivated Driving systems
183Driving and parking Z
Page 266 of 357
Useful information
............................264
Stowage areas .................................. 264
Features ............................................. 267 263Stowing and features
Page 267 of 357
Useful information
i This Owner's Manual describes all mod-
els, series and optional equipment for your
vehicle that were available at the time of
going to press. National variations are pos- sible. Note that your vehicle may not be
equipped with all of the functions descri-
bed. This is also the case for systems and
functions relevant to safety.
i Read the information on qualified special-
ist workshops: (Y page 24). Stowage areas
Stowage spaces
Important safety notes G
WARNING
If you do not correctly store objects in the
vehicle interior, they can slip or be flung
around, thus striking vehicle occupants.
There is a risk of injury, especially when brak- ing or abruptly changing directions.
R Always store objects so that they cannot be
flung around in these or in similar situa-
tions.
R Always make sure that objects do not pro-
trude from stowage compartments, lug-
gage nets or stowage nets.
R Close lockable stowage compartments
while driving.
R Stow and secure objects that are heavy,
hard, pointy, sharp-edged, fragile or too
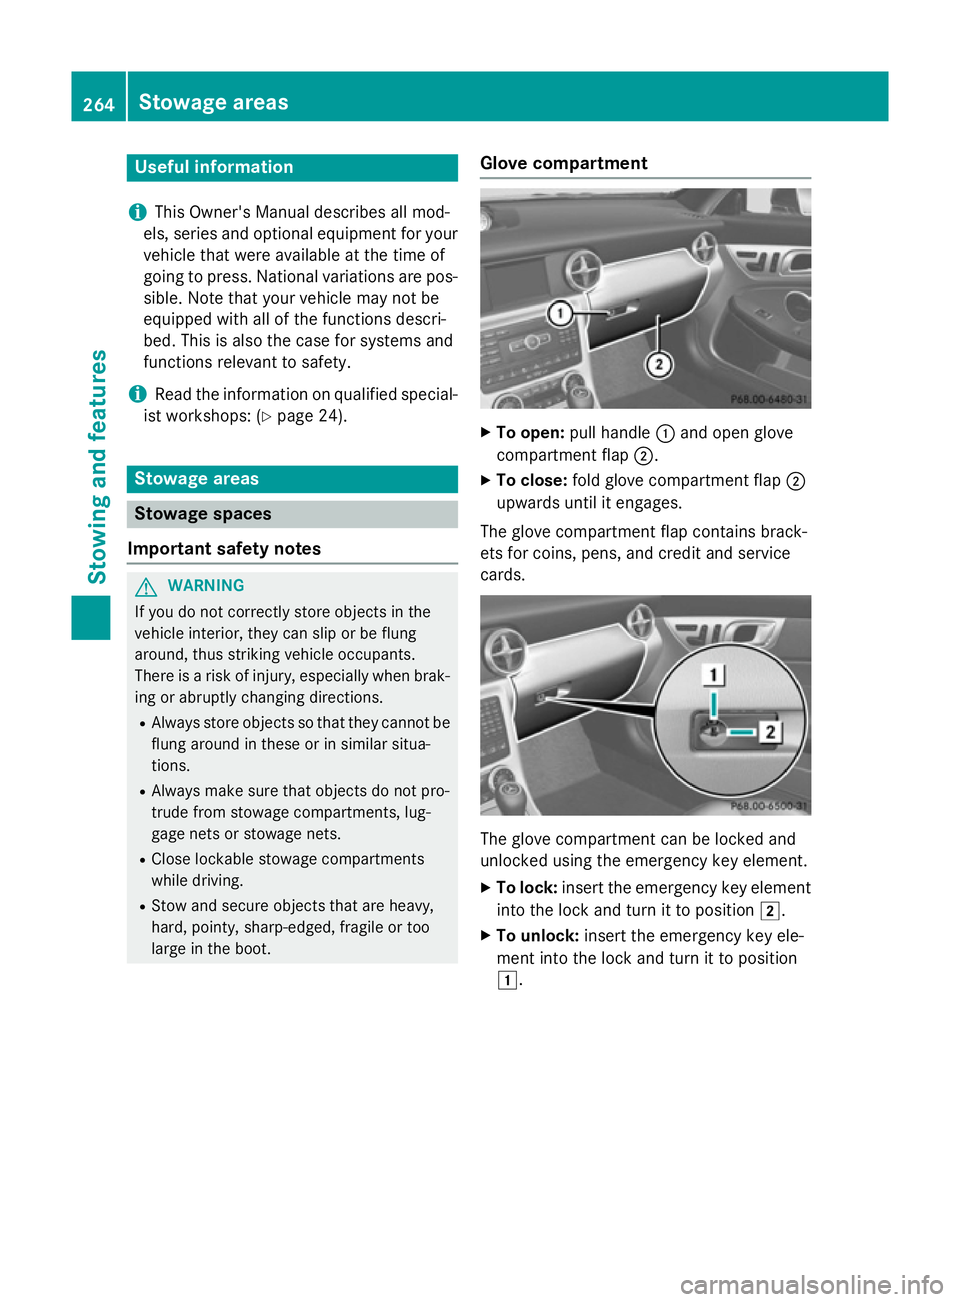
large in the boot. Glove compartment X
To open: pull handle :and open glove
compartment flap ;.
X To close: fold glove compartment flap ;
upwards until it engages.
The glove compartment flap contains brack-
ets for coins, pens, and credit and service
cards. The glove compartment can be locked and
unlocked using the emergency key element.
X To lock: insert the emergency key element
into the lock and turn it to position 2.
X To unlock: insert the emergency key ele-
ment into the lock and turn it to position
1. 264
Stowage areasStowing and features
Page 268 of 357
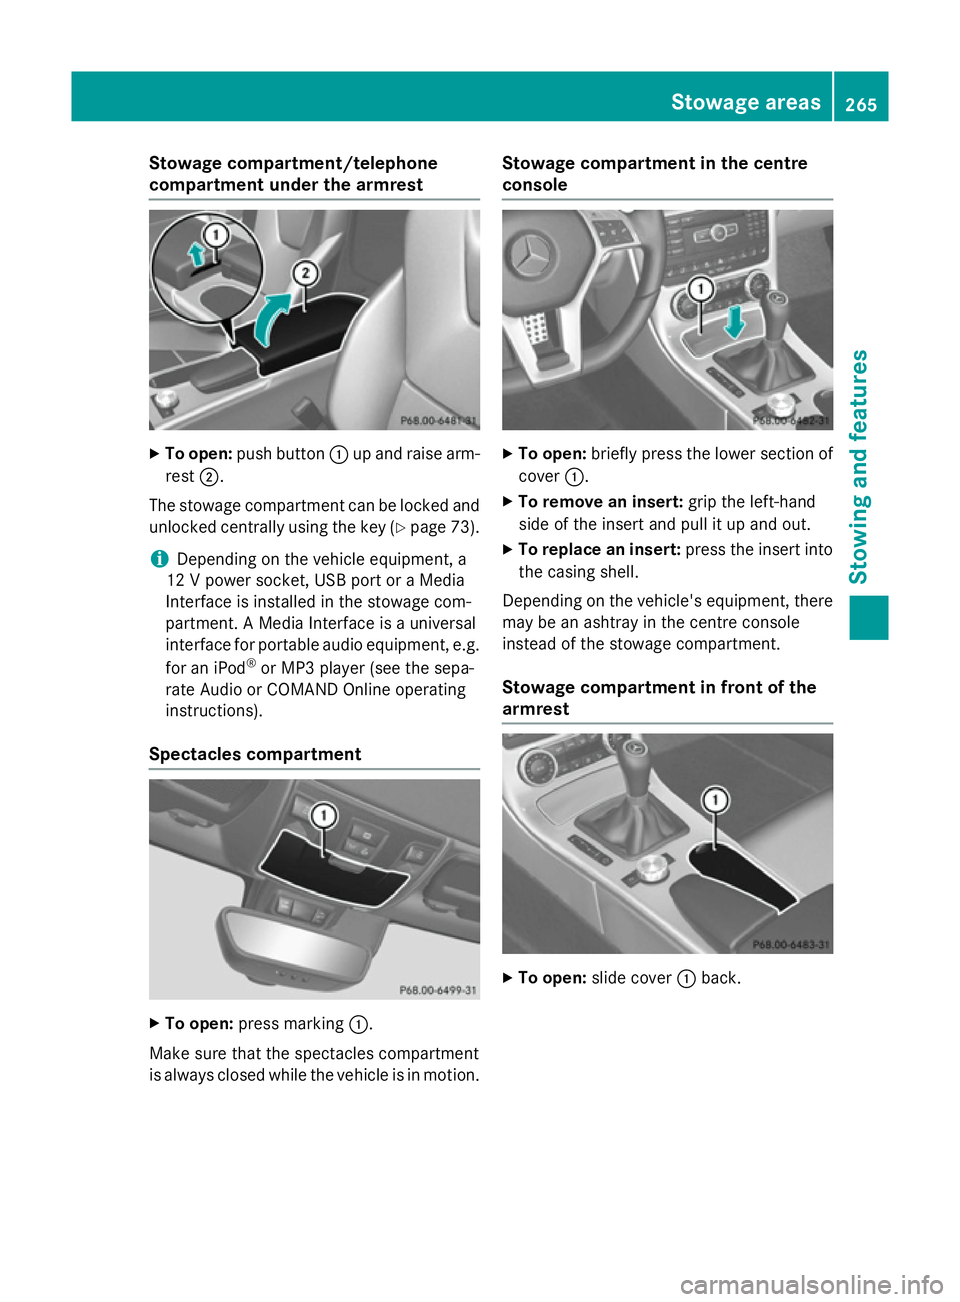
Stowage compartment/telephone
compartment under the armrest
X
To open: push button :up and raise arm-
rest ;.
The stowage compartment can be locked and
unlocked centrally using the key (Y page 73).
i Depending on the vehicle equipment, a
12 V power socket, USB port or a Media
Interface is installed in the stowage com-
partment. A Media Interface is a universal
interface for portable audio equipment, e.g.
for an iPod ®
or MP3 player (see the sepa-
rate Audio or COMAND Online operating
instructions).
Spectacles compartment X
To open: press marking :.
Make sure that the spectacles compartment
is always closed while the vehicle is in motion. Stowage compartment in the centre
console
X
To open: briefly press the lower section of
cover :.
X To remove an insert: grip the left-hand
side of the insert and pull it up and out.
X To replace an insert: press the insert into
the casing shell.
Depending on the vehicle's equipment, there may be an ashtray in the centre console
instead of the stowage compartment.
Stowage compartment in front of the
armrest X
To open: slide cover :back. Stowage areas
265Stowing and features Z
Page 269 of 357
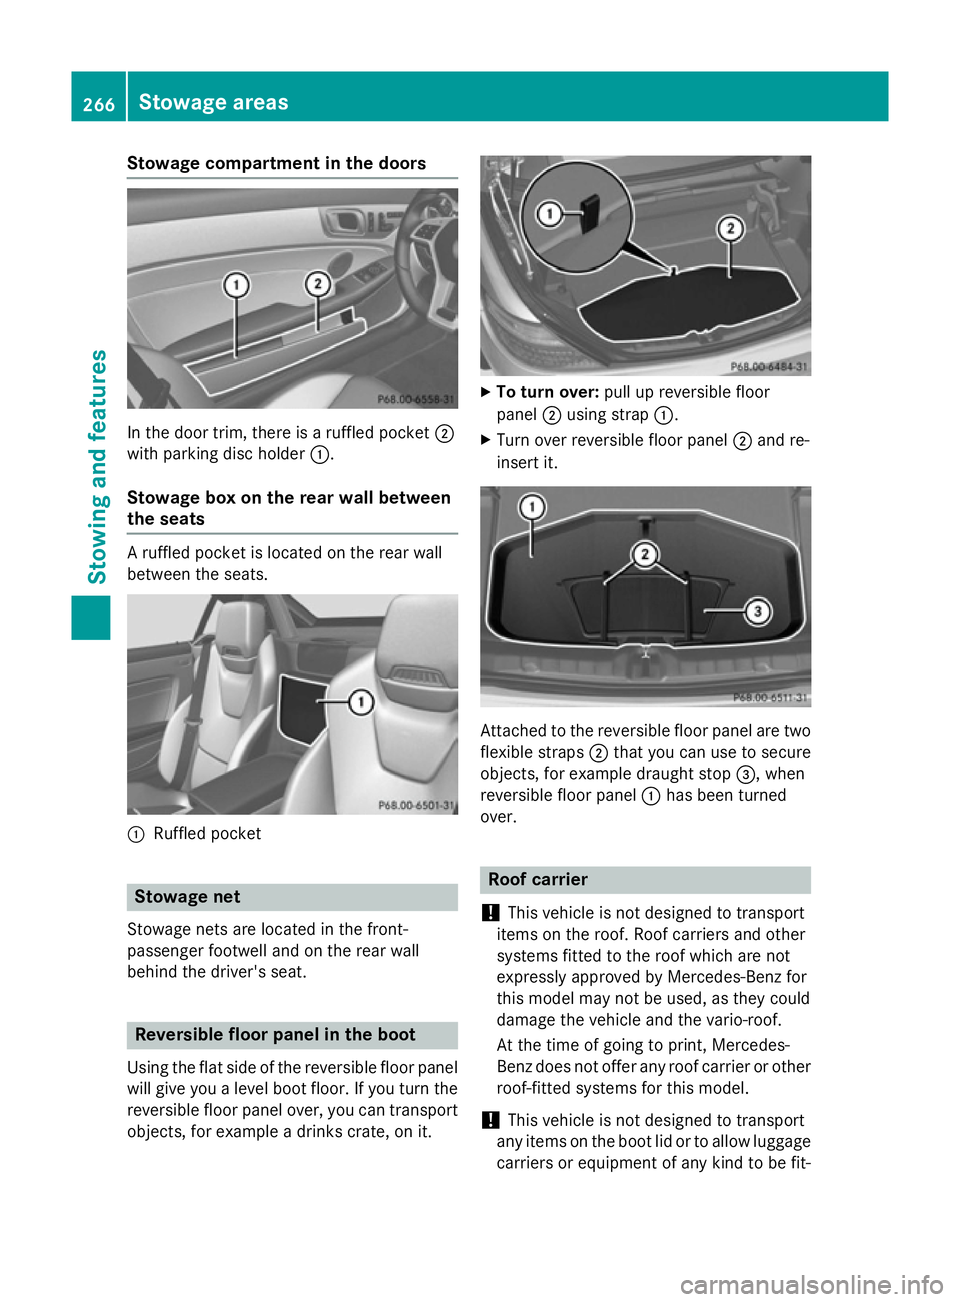
Stowage compartment in the doors
In the door trim, there is a ruffled pocket
;
with parking disc holder :.
Stowage box on the rear wall between
the seats A ruffled pocket is located on the rear wall
between the seats. :
Ruffled pocket Stowage net
Stowage nets are located in the front-
passenger footwell and on the rear wall
behind the driver's seat. Reversible floor panel in the boot
Using the flat side of the reversible floor panel
will give you a level boot floor. If you turn the reversible floor panel over, you can transport
objects, for example a drinks crate, on it. X
To turn over: pull up reversible floor
panel ;using strap :.
X Turn over reversible floor panel ;and re-
insert it. Attached to the reversible floor panel are two
flexible straps ;that you can use to secure
objects, for example draught stop =, when
reversible floor panel :has been turned
over. Roof carrier
! This vehicle is not designed to transport
items on the roof. Roof carriers and other
systems fitted to the roof which are not
expressly approved by Mercedes-Benz for
this model may not be used, as they could
damage the vehicle and the vario-roof.
At the time of going to print, Mercedes-
Benz does not offer any roof carrier or other
roof-fitted systems for this model.
! This vehicle is not designed to transport
any items on the boot lid or to allow luggage
carriers or equipment of any kind to be fit- 266
Stowage areasStowing and features
Page 270 of 357
ted to the boot lid. Otherwise the vehicle
and the vario-roof could be damaged. Features
Cup holders
Important safety notes G
WARNING
If you do not correctly store objects in the
vehicle interior, they can slip or be flung
around, thus striking vehicle occupants.
There is a risk of injury, especially when brak- ing or abruptly changing directions.
R Always store objects so that they cannot be
flung around in these or in similar situa-
tions.
R Always make sure that objects do not pro-
trude from stowage compartments, lug-
gage nets or stowage nets.
R Close lockable stowage compartments
while driving.
R Stow and secure objects that are heavy,
hard, pointy, sharp-edged, fragile or too
large in the boot.
! Only use the cup holders for containers of
the right size and which have lids. The
drinks could otherwise spill.
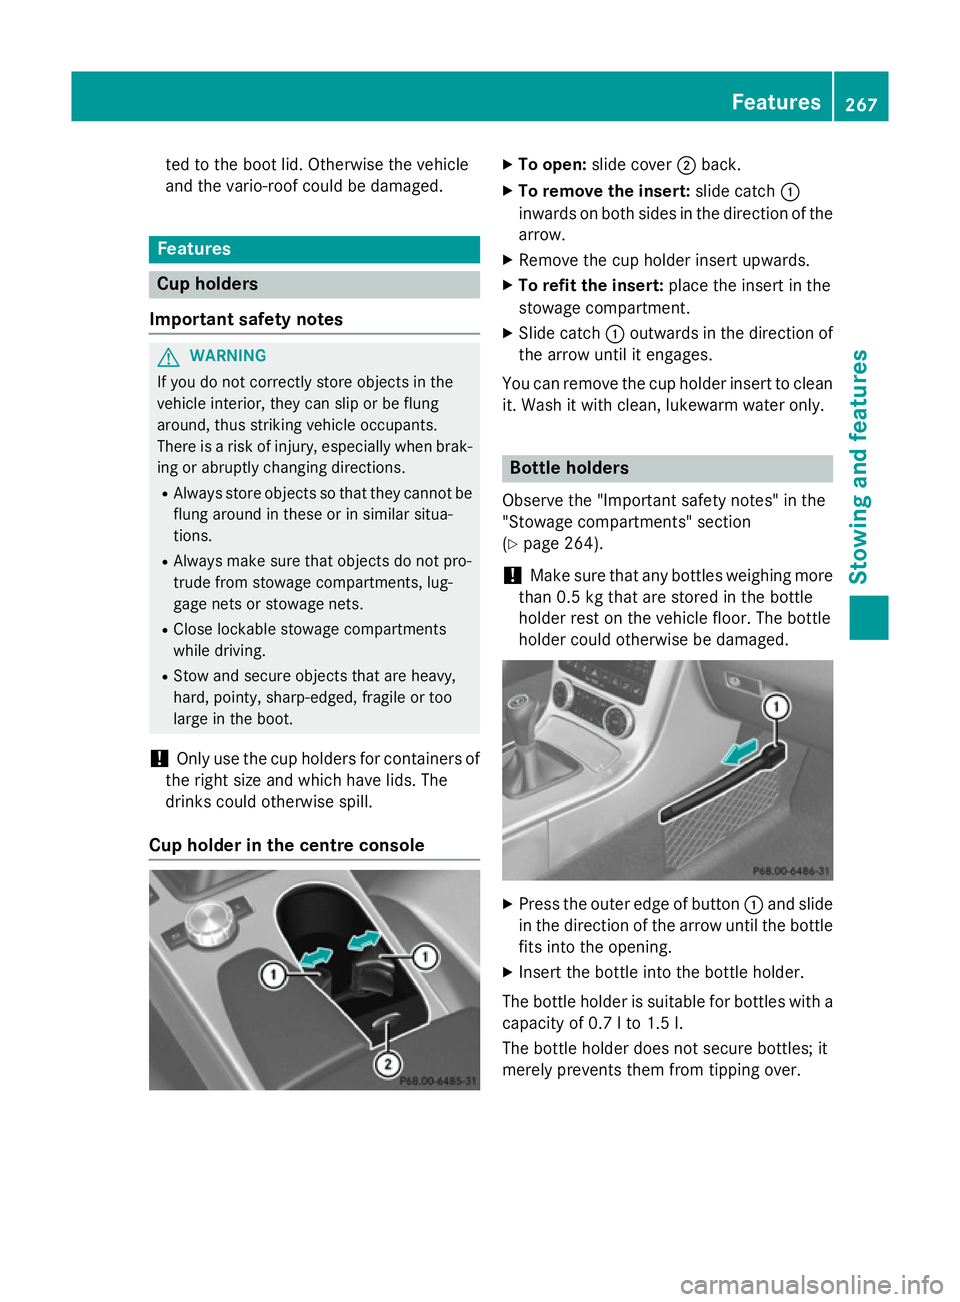
Cup holder in the centre console X
To open: slide cover ;back.
X To remove the insert: slide catch:
inwards on both sides in the direction of the
arrow.
X Remove the cup holder insert upwards.
X To refit the insert: place the insert in the
stowage compartment.
X Slide catch :outwards in the direction of
the arrow until it engages.
You can remove the cup holder insert to clean it. Wash it with clean, lukewarm water only. Bottle holders
Observe the "Important safety notes" in the
"Stowage compartments" section
(Y page 264).
! Make sure that any bottles weighing more
than 0.5 kg that are stored in the bottle
holder rest on the vehicle floor. The bottle
holder could otherwise be damaged. X
Press the outer edge of button :and slide
in the direction of the arrow until the bottle
fits into the opening.
X Insert the bottle into the bottle holder.
The bottle holder is suitable for bottles with a
capacity of 0.7 lto 1.5 l.
The bottle holder does not secure bottles; it
merely prevents them from tipping over. Features
267Stowing and features Z
Page 271 of 357
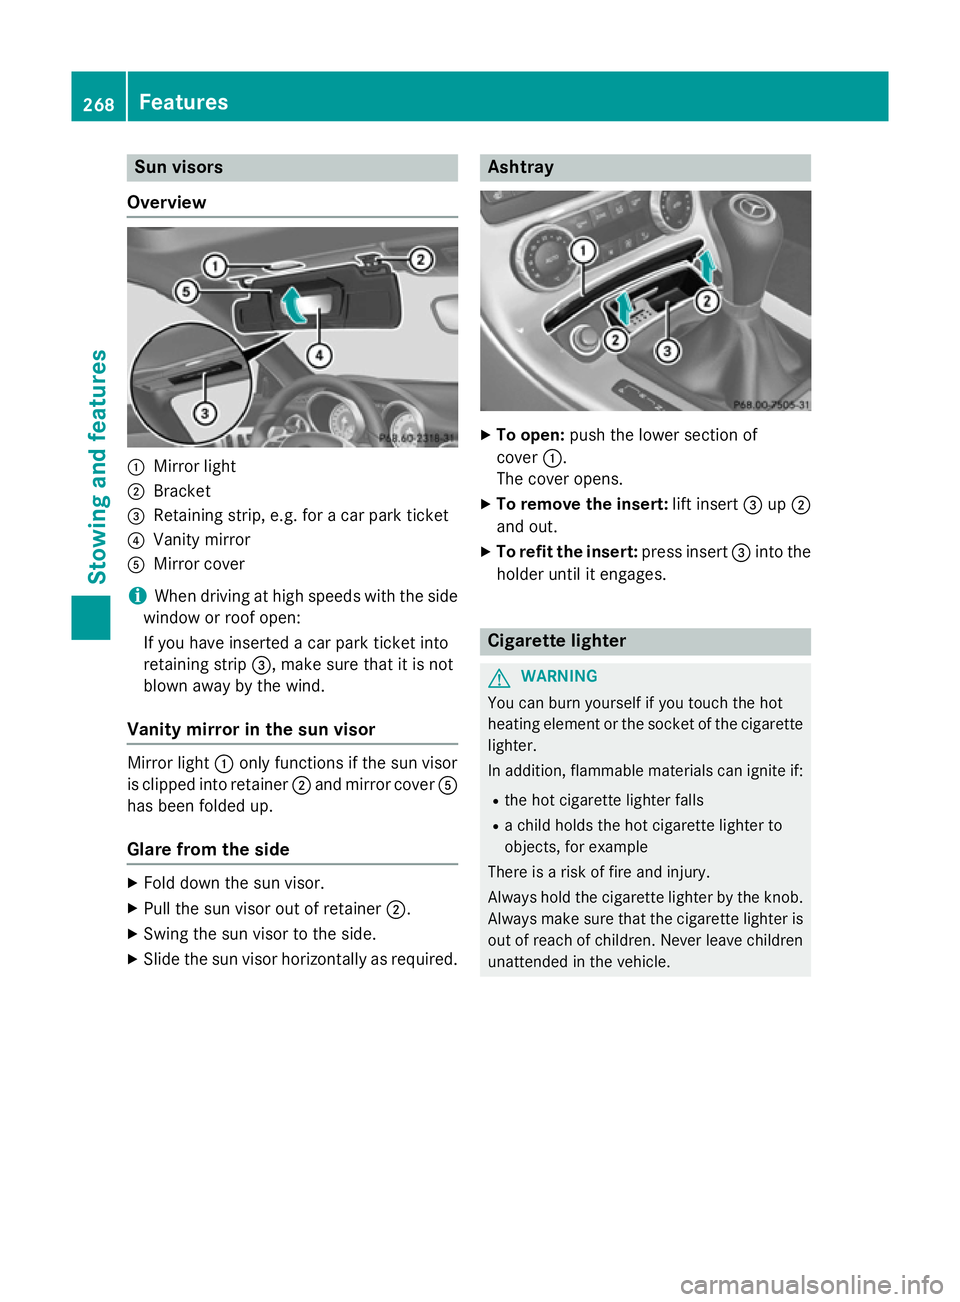
Sun visors
Overview :
Mirror light
; Bracket
= Retaining strip, e.g. for a car park ticket
? Vanity mirror
A Mirror cover
i When driving at high speeds with the side
window or roof open:
If you have inserted a car park ticket into
retaining strip =, make sure that it is not
blown away by the wind.
Vanity mirror in the sun visor Mirror light
:only functions if the sun visor
is clipped into retainer ;and mirror cover A
has been folded up.
Glare from the side X
Fold down the sun visor.
X Pull the sun visor out of retainer ;.
X Swing the sun visor to the side.
X Slide the sun visor horizontally as required. Ashtray
X
To open: push the lower section of
cover :.
The cover opens.
X To remove the insert: lift insert=up;
and out.
X To refit the insert: press insert=into the
holder until it engages. Cigarette lighter
G
WARNING
You can burn yourself if you touch the hot
heating element or the socket of the cigarette lighter.
In addition, flammable materials can ignite if:
R the hot cigarette lighter falls
R a child holds the hot cigarette lighter to
objects, for example
There is a risk of fire and injury.
Always hold the cigarette lighter by the knob.
Always make sure that the cigarette lighter is
out of reach of children. Never leave children unattended in the vehicle. 268
FeaturesStowing and features
Page 272 of 357
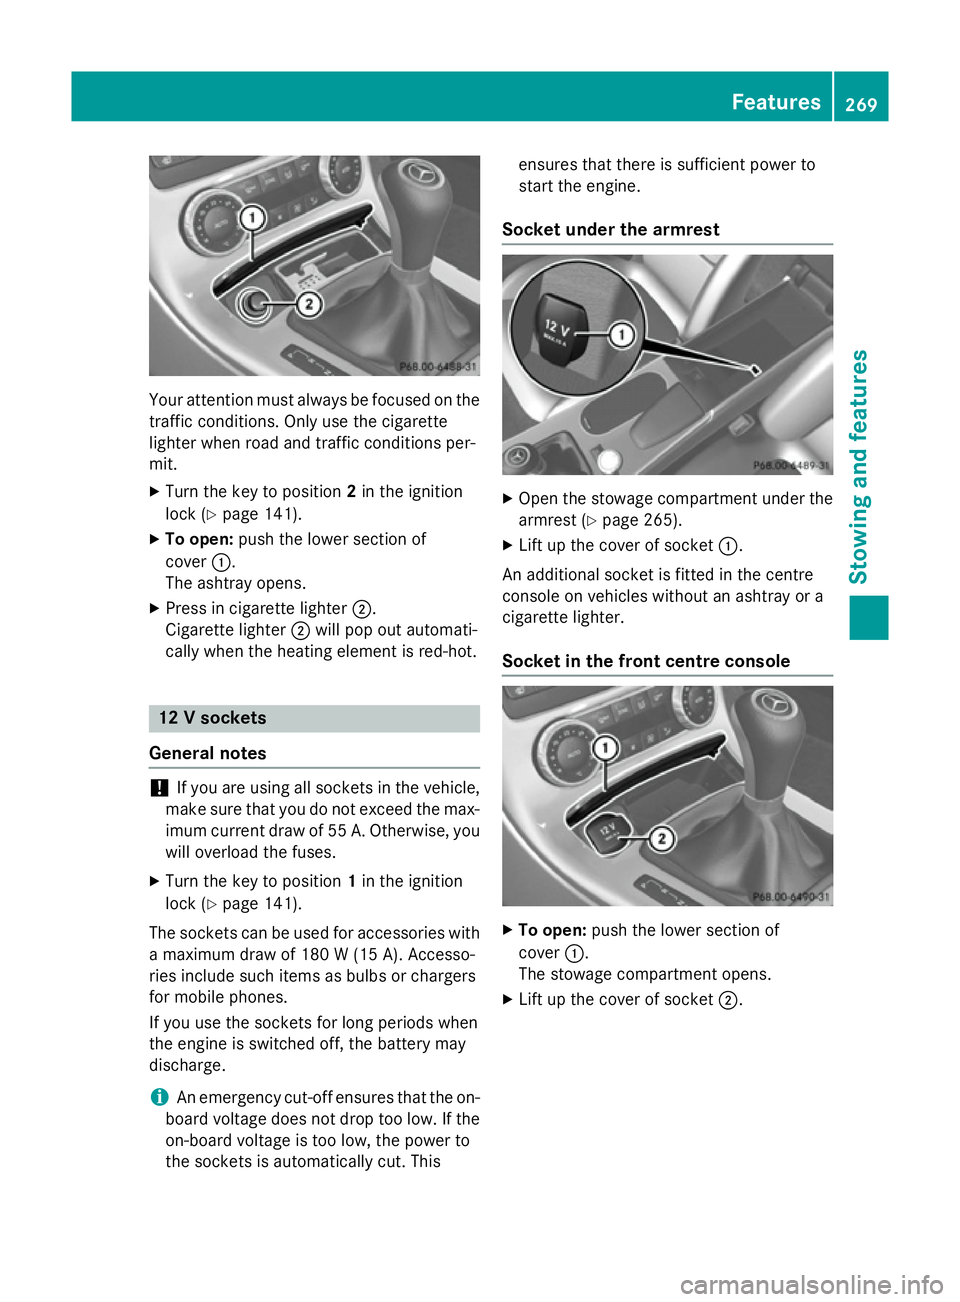
Your attention must always be focused on the
traffic conditions. Only use the cigarette
lighter when road and traffic conditions per-
mit.
X Turn the key to position 2in the ignition
lock (Y page 141).
X To open: push the lower section of
cover :.
The ashtray opens.
X Press in cigarette lighter ;.
Cigarette lighter ;will pop out automati-
cally when the heating element is red-hot. 12 V sockets
General notes !
If you are using all sockets in the vehicle,
make sure that you do not exceed the max- imum current draw of 55 A. Otherwise, you
will overload the fuses.
X Turn the key to position 1in the ignition
lock (Y page 141).
The sockets can be used for accessories with a maximum draw of 180 W (15 A). Accesso-
ries include such items as bulbs or chargers
for mobile phones.
If you use the sockets for long periods when
the engine is switched off, the battery may
discharge.
i An emergency cut-off ensures that the on-
board voltage does not drop too low. If the
on-board voltage is too low, the power to
the sockets is automatically cut. This ensures that there is sufficient power to
start the engine.
Socket under the armrest X
Open the stowage compartment under the
armrest (Y page 265).
X Lift up the cover of socket :.
An additional socket is fitted in the centre
console on vehicles without an ashtray or a
cigarette lighter.
Socket in the front centre console X
To open: push the lower section of
cover :.
The stowage compartment opens.
X Lift up the cover of socket ;. Features
269Stowing and features Z
Page 273 of 357
Mobile phone
Important safety notes G
WARNING
Operating mobile communications equip-
ment while driving distracts you from paying
attention to traffic conditions. This could also cause you to lose control of the vehicle. There
is a risk of an accident.
Use this device only when the vehicle is sta-
tionary.
i You must observe the legal requirements
for the country in which you are currently
driving when operating mobile communi-
cations equipment in the vehicle.
If it is permitted by law to operate commu-
nications equipment while the vehicle is in
motion, you may only do so if the traffic sit-
uation permits. You may otherwise be dis-
tracted from the traffic conditions, cause
an accident and injure yourself and others.
Excessive levels of electromagnetic radiation
may cause damage to your health and to the
health of others. The use of an exterior aerial takes into consideration the scientific discus-
sion surrounding the possible health risk
posed by electromagnetic fields.
Mercedes-Benz recommends the use of an
approved exterior aerial. This ensures:
R optimal mobile phone reception quality in
the vehicle
R that mutual interference between the vehi-
cle electronics and mobile phones is mini-
mised
An exterior aerial has the following advan-
tages:
R it conducts the electromagnetic fields gen-
erated by a wireless device to the exterior
R the field strength in the vehicle interior is
lower than in a vehicle that does not have
an exterior aerial
Information on retrofitting two-way radios
and mobile phones (RF transmitters)
(Y page 340). General notes There are various mobile phone brackets that
may be fitted in your vehicle; in some cases,
these are country-specific.
You can connect a Bluetooth ®
-capable
mobile phone with Audio 20 or COMAND
Online via the Bluetooth ®
interface. This also
applies if your vehicle is equipped with con-
venience telephony.
More information on suitable mobile phones,
mobile phone brackets and on connecting
Bluetooth ®
-capable mobile phones with
Audio 20 or COMAND Online can be obtained:
R at your Mercedes-Benz Service Centre
R on the Internet at http://www.mercedes-
benz.com/connect
i The functions and services available when
you use the phone depend on your mobile
phone model and service provider.
Using a mobile phone If the mobile phone is inserted in the mobile
phone bracket, the mobile phone will be
charged and connected with the exterior aer-
ial.
X Open the telephone compartment
(Y page 265).
X Place the mobile phone bracket into the
pre-installed fitting; see the separate instal-
lation instructions for the mobile phone fit-
ting.
X Insert the mobile phone into the mobile
phone bracket; see the separate installa-
tion instructions for the mobile phone fit-
ting.
Operating the mobile phone You can operate the telephone using the
6
and~ buttons on the multifunction
steering wheel. You can operate other mobile
phone functions via the on-board computer
(Y page 208). 270
FeaturesStowing and features
Page 274 of 357
When you remove the key from the ignition
lock, the mobile phone is disconnected from
the hands-free system. Active calls will first
be transferred to the mobile phone directly. Garage door opener
General notes The HomeLink
®
garage door opener integra-
ted in the rear-view mirror allows you to oper-
ate up to three different door and gate sys-
tems.
Once programmed, the integrated garage
door opener in the rear-view mirror will
assume the function of the garage door sys-
tem's remote control. Please also read the
operating instructions for the garage door
system.
When programming a garage door opener,
park the vehicle outside the garage. Do not
run the engine while programming.
The garage door opener is only available for
certain countries. Observe the legal require-
ments for each individual country.
The HomeLink ®
garage door opener is com-
patible with most European garage and gate
opener drives. More information on Home-
Link ®
and/or compatible products is availa-
ble:
R at a qualified specialised workshop
R via the HomeLink ®
Hotline
(0) 08000 466 354 65 or alternatively
+49 (0) 6838 907-277
R on the Internet at
http://www.homelink.com
Important safety notes G
WARNING
When you operate or program the garage door with the integrated garage door opener, per-
sons in the range of movement of the garage
door can become trapped or struck by the
garage door. There is a risk of injury. When using the integrated garage door
opener, always make sure that nobody is
within the range of movement of the garage
door.
G
WARNING
Combustion engines emit poisonous exhaust
gases such as carbon monoxide. Inhaling
these exhaust gases leads to poisoning. There is a risk of fatal injury. Therefore never leave
the engine running in enclosed spaces with-
out sufficient ventilation.
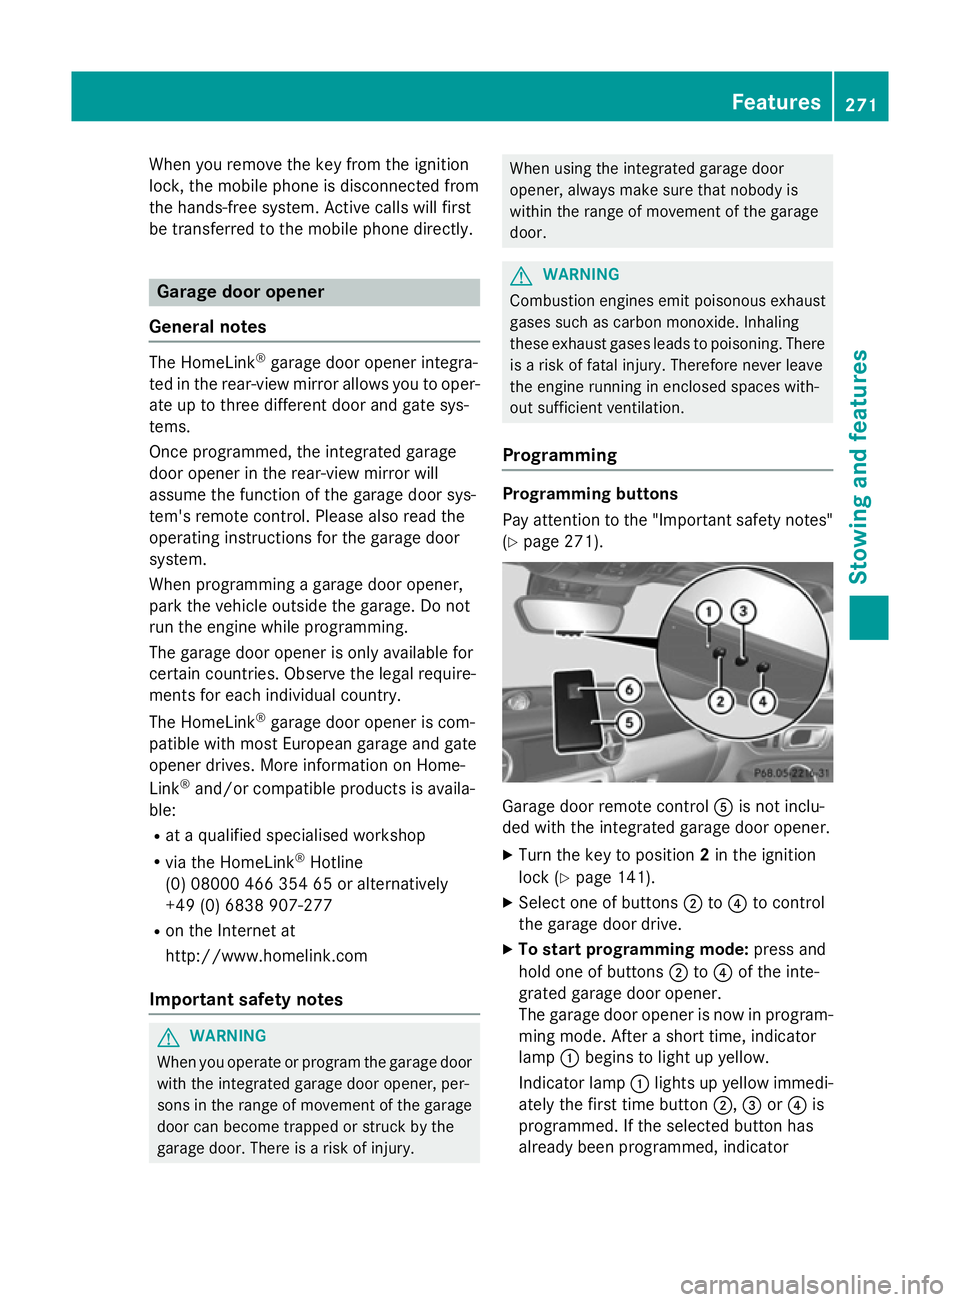
Programming Programming buttons
Pay attention to the "Important safety notes"
(Y page 271). Garage door remote control
Ais not inclu-
ded with the integrated garage door opener.
X Turn the key to position 2in the ignition
lock (Y page 141).
X Select one of buttons ;to? to control
the garage door drive.
X To start programming mode: press and
hold one of buttons ;to? of the inte-
grated garage door opener.
The garage door opener is now in program- ming mode. After a short time, indicator
lamp :begins to light up yellow.
Indicator lamp :lights up yellow immedi-
ately the first time button ;,=or? is
programmed. If the selected button has
already been programmed, indicator Features
271Stowing and features Z