washer fluid MERCEDES-BENZ SLK ROADSTER 2014 Owners Manual
[x] Cancel search | Manufacturer: MERCEDES-BENZ, Model Year: 2014, Model line: SLK ROADSTER, Model: MERCEDES-BENZ SLK ROADSTER 2014Pages: 357, PDF Size: 10.22 MB
Page 19 of 357
Roof lining and carpets (cleaning
instructions)
...................................... 292
Roof switch .......................................... 88 S
Safety Child restraint systems .................... 52
Children in the vehicle ..................... 51
Safety system
see Driving safety systems
Seat belt
Correct usage .................................. 43
Switching belt adjustment on/off
(on-board computer) ...................... 217
Seat belts
Adjusting the driver's and front-
passenger seat belt ......................... 45
Cleaning ......................................... 292
Fastening ......................................... 44
Important safety guidelines ............. 42
Introduction ..................................... 42
Releasing ......................................... 44
Warning lamp ................................. 251
Warning lamp (function) ................... 45
Seats
Adjusting (electrically) ..................... 98
Adjusting (manually) ........................ 98
Adjusting the 4-way lumbar sup-
port .................................................. 99
Adjusting the head restraint ............ 98
Cleaning the cover ......................... 291
Correct driver's seat position ........... 96
Important safety notes .................... 97
Overview .......................................... 97
Seat heating problem ...................... 99
Storing settings (memory func-
tion) ............................................... 106
Switching AIRSCARF on/off .......... 100
Switching seat heating on/off ......... 99
Selector lever
Cleaning ......................................... 291
Sensors (cleaning instructions) ....... 290
Service
see ASSYST PLUS
Service Centre
see Qualified specialist workshop Service menu (on-board com-
puter)
.................................................. 212
Service products
Brake fluid ..................................... 348
Coolant (engine) ............................ 348
Engine oil ....................................... 346
Fuel ................................................ 343
Important safety notes .................. 342
Washer fluid ................................... 349
Setting the air distribution ............... 132
Setting the airflow ............................ 132
Settings
Factory (on-board computer) ......... 218
On-board compute r....................... 213
SETUP (on-board computer) ............. 219
Side lamps
Switching on/of f........................... 112
Side windows
Convenience closing ........................ 85
Important safety notes .................... 83
Opening/closing (front) ................... 84
Opening/closing all ......................... 84
Overview .......................................... 83
Problem (malfunction) ..................... 87
Resetting ......................................... 86
Sidebag ................................................ 47
Snow chains ...................................... 317
Socket
Under the armrest ......................... 269
Sockets
Centre console .............................. 269
General notes ................................ 269
Spare wheel
Storing ........................................... 335
Specialist workshop ............................ 24
Spectacles compartment ................. 265
Speed Limit Assist
Activating/deactivating the warn-ing function .................................... 211
Display message ............................ 237
Display message in the multifunc-tion display .................................... 193
Displaying ...................................... 211
Function/note s............................. 192
Important safety notes .................. 192
Speed, controlling
see Cruise control 16
Index
Page 22 of 357
Leaving parked up .........................1
64
Locking (in an emergency) .............. .80
Locking (key) ................................... 73
Lowering ........................................ 328
Pulling away ................................... 144
Raising ........................................... 325
Registration ..................................... 24
Securing from rolling away ............ 325
Tow-starting ................................... 306
Towing away .................................. 306
Transporting .................................. 308
Unlocking (in an emergency) ........... 80
Unlocking (key) ................................ 73
Vehicle data ................................... 349
Vehicle battery
see Battery (vehicle)
Vehicle data ....................................... 349
Vehicle dimensions ........................... 349
Vehicle emergency locking ................ 80
Vehicle identification number
see VIN
Vehicle identification plate .............. 342
Vehicle tool kit .................................. 295
Video
Operating the DVD ......................... 207
VIN ...................................................... 342 W
Warning and indicator lamps ABS ................................................ 252
Brakes ........................................... 252
Distance warning signal ................. 260
ESP® ............................................. 254
ESP® OFF ...................................... 255
LIM (cruise control) ........................ 169
LIM (DISTRONIC PLUS) .................. 173
LIM (variable SPEEDTRONIC) ......... 181
Overview .......................................... 32
PASSENGER AIR BAG OFF ............... 41
Reserve fuel ................................... 258
Seat belt ........................................ 251
Tyre pressure monitor ................... 261
Warning triangle ................................ 294
Washer fluid
Display message ............................ 249
Wheel and tyre combinations
see Tyres Wheel bolt tightening torque
........... 328
Wheel chock ...................................... 325
Wheeled draught stop
see AIRGUIDE
Wheels
Changing a whee l.......................... 323
Changing/replacing ....................... 323
Checking ........................................ 315
Cleaning ......................................... 288
Cleaning (warning) ......................... 324
Emergency spare wheel ................. 334
Fitting a new wheel ........................ 327
Fitting a wheel ............................... 324
Important safety notes .................. 314
Overview ........................................ 314
Removing a whee l.......................... 327
Storing ........................................... 324
Tightening torque ........................... 328
Wheel size/tyre size ...................... 328
Windows
Cleaning ......................................... 289
see Side windows
Windscreen
Demisting ...................................... 133
Windscreen washer fluid
see Windscreen washer system
Windscreen washer system
Note s............................................. 349
Topping up ..................................... 284
Windscreen wipers
Display message ............................ 249
Problem (malfunction) ................... 123
Replacing the wiper blades ............ 121
Switching on/of f........................... 120
Winter operation
Important safety notes .................. 316
Overview ........................................ 316
Radiator cover ............................... 281
Slippery road surfaces ................... 168
Snow chains .................................. 317
Winter tyres
Limiting the speed (on-board com-
puter) ............................................. 216
M+S tyre s...................................... 316
Wiper blades
Cleaning ......................................... 289
Important safety notes .................. 121
Replacing ....................................... 121 Index
19
Page 116 of 357
Combination switch
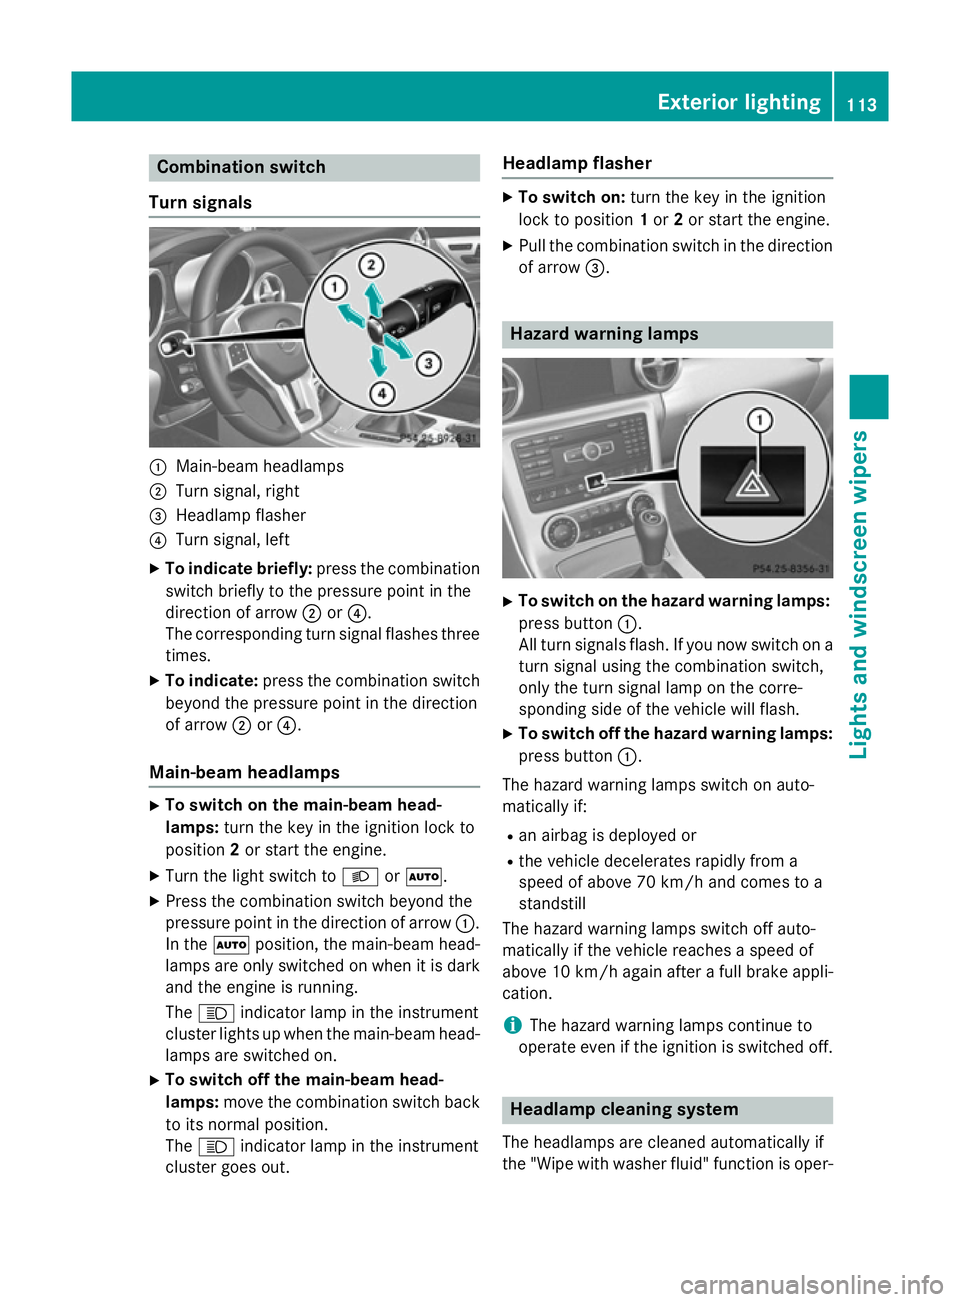
Turn signals :
Main-beam headlamps
; Turn signal, right
= Headlamp flasher
? Turn signal, left
X To indicate briefly: press the combination
switch briefly to the pressure point in the
direction of arrow ;or?.
The corresponding turn signal flashes three
times.
X To indicate: press the combination switch
beyond the pressure point in the direction
of arrow ;or?.
Main-beam headlamps X
To switch on the main-beam head-
lamps: turn the key in the ignition lock to
position 2or start the engine.
X Turn the light switch to LorÃ.
X Press the combination switch beyond the
pressure point in the direction of arrow :.
In the Ãposition, the main-beam head-
lamps are only switched on when it is dark
and the engine is running.
The K indicator lamp in the instrument
cluster lights up when the main-beam head-
lamps are switched on.
X To switch off the main-beam head-
lamps: move the combination switch back
to its normal position.
The K indicator lamp in the instrument
cluster goes out. Headlamp flasher X
To switch on: turn the key in the ignition
lock to position 1or 2or start the engine.
X Pull the combination switch in the direction
of arrow =. Hazard warning lamps
X
To switch on the hazard warning lamps:
press button :.
All turn signals flash. If you now switch on a turn signal using the combination switch,
only the turn signal lamp on the corre-
sponding side of the vehicle will flash.
X To switch off the hazard warning lamps:
press button :.
The hazard warning lamps switch on auto-
matically if:
R an airbag is deployed or
R the vehicle decelerates rapidly from a
speed of above 70 km/h and comes to a
standstill
The hazard warning lamps switch off auto-
matically if the vehicle reaches a speed of
above 10 km/h again after a full brake appli- cation.
i The hazard warning lamps continue to
operate even if the ignition is switched off. Headlamp cleaning system
The headlamps are cleaned automatically if
the "Wipe with washer fluid" function is oper- Exterior lighting
113Lights and windscreen wipers Z
Page 123 of 357
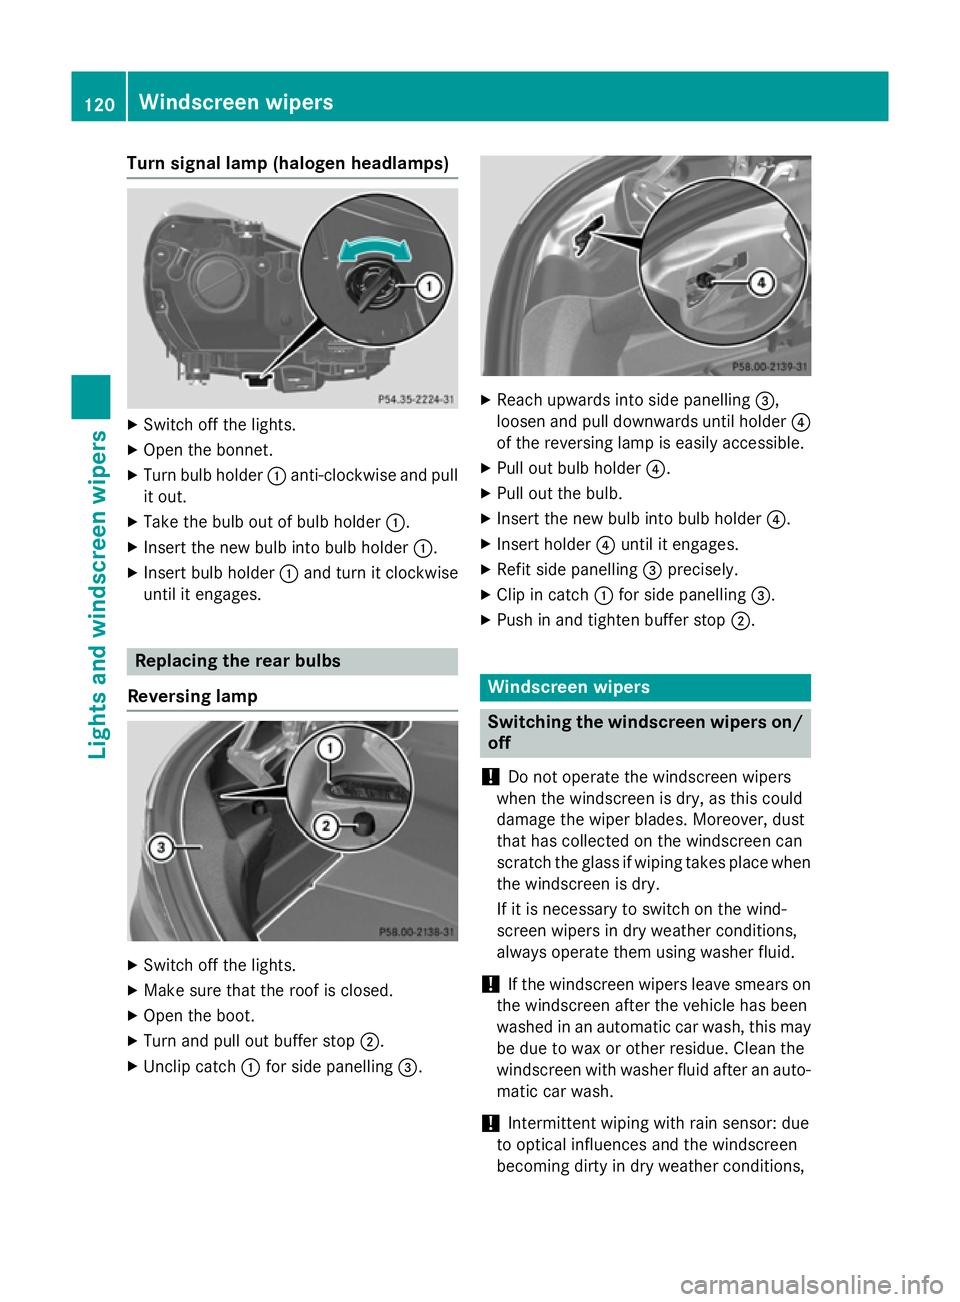
Turn signal lamp (halogen headlamps)
X
Switch off the lights.
X Open the bonnet.
X Turn bulb holder :anti-clockwise and pull
it out.
X Take the bulb out of bulb holder :.
X Insert the new bulb into bulb holder :.
X Insert bulb holder :and turn it clockwise
until it engages. Replacing the rear bulbs
Reversing lamp X
Switch off the lights.
X Make sure that the roof is closed.
X Open the boot.
X Turn and pull out buffer stop ;.
X Unclip catch :for side panelling =. X
Reach upwards into side panelling =,
loosen and pull downwards until holder ?
of the reversing lamp is easily accessible.
X Pull out bulb holder ?.
X Pull out the bulb.
X Insert the new bulb into bulb holder ?.
X Insert holder ?until it engages.
X Refit side panelling =precisely.
X Clip in catch :for side panelling =.
X Push in and tighten buffer stop ;. Windscreen wipers
Switching the windscreen wipers on/
off
! Do not operate the windscreen wipers
when the windscreen is dry, as this could
damage the wiper blades. Moreover, dust
that has collected on the windscreen can
scratch the glass if wiping takes place when the windscreen is dry.
If it is necessary to switch on the wind-
screen wipers in dry weather conditions,
always operate them using washer fluid.
! If the windscreen wipers leave smears on
the windscreen after the vehicle has been
washed in an automatic car wash, this may
be due to wax or other residue. Clean the
windscreen with washer fluid after an auto- matic car wash.
! Intermittent wiping with rain sensor: due
to optical influences and the windscreen
becoming dirty in dry weather conditions, 120
Windscreen
wipersLights and windscreen wipers
Page 124 of 357
the windscreen wipers may be activated
inadvertently. This could damage the wind- screen wiper blades or scratch the wind-
screen.
For this reason, you should always switch
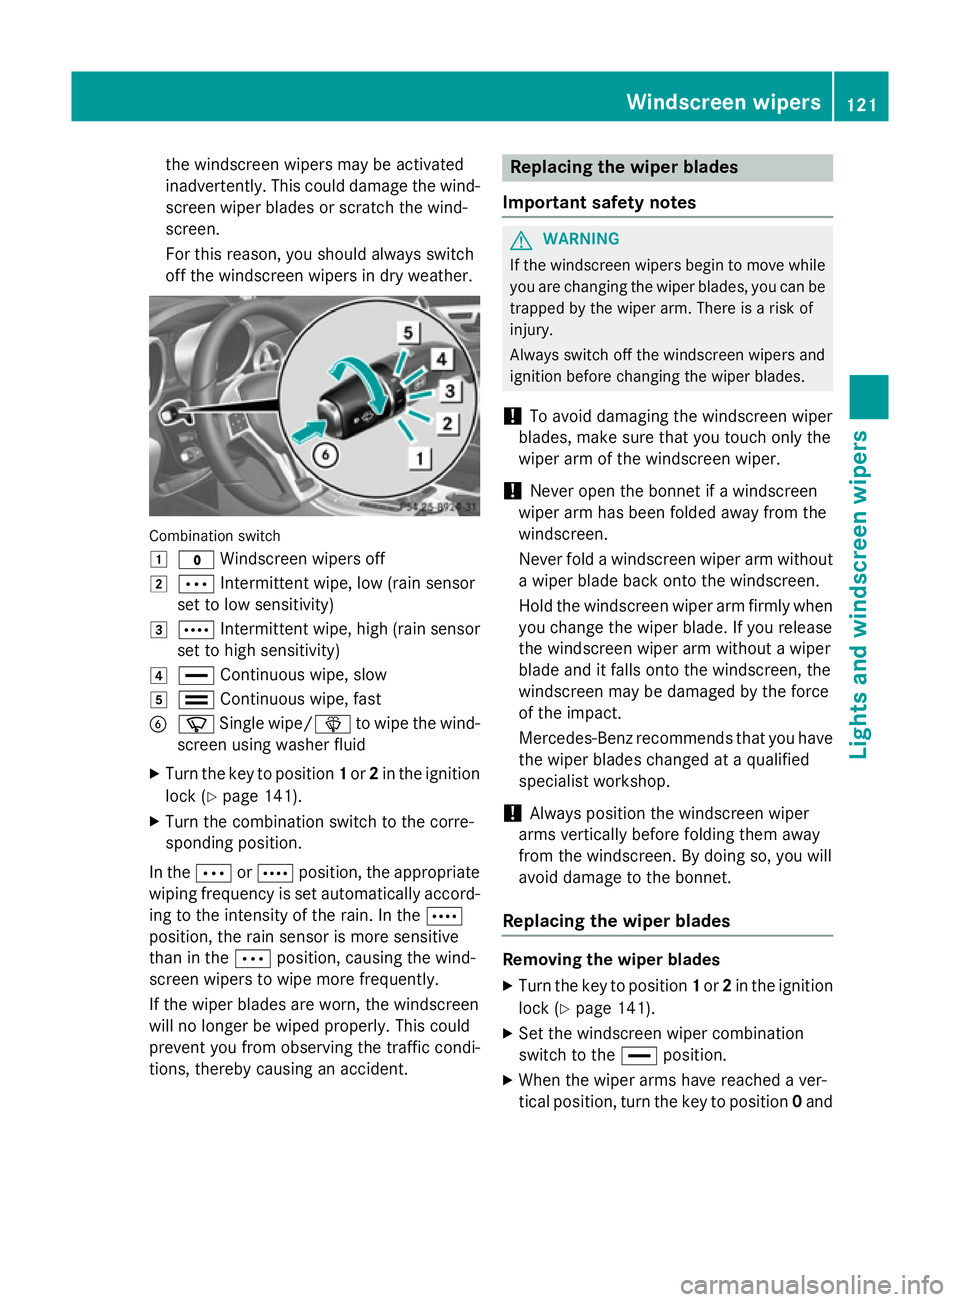
off the windscreen wipers in dry weather. Combination switch
1
$ Windscreen wipers off
2 Ä Intermittent wipe, low (rain sensor
set to low sensitivity)
3 Å Intermittent wipe, high (rain sensor
set to high sensitivity)
4 ° Continuous wipe, slow
5 ¯ Continuous wipe, fast
B í Single wipe/ îto wipe the wind-
screen using washer fluid
X Turn the key to position 1or 2in the ignition
lock (Y page 141).
X Turn the combination switch to the corre-
sponding position.
In the ÄorÅ position, the appropriate
wiping frequency is set automatically accord- ing to the intensity of the rain. In the Å
position, the rain sensor is more sensitive
than in the Äposition, causing the wind-
screen wipers to wipe more frequently.
If the wiper blades are worn, the windscreen
will no longer be wiped properly. This could
prevent you from observing the traffic condi-
tions, thereby causing an accident. Replacing the wiper blades
Important safety notes G
WARNING
If the windscreen wipers begin to move while
you are changing the wiper blades, you can be trapped by the wiper arm. There is a risk of
injury.
Always switch off the windscreen wipers and
ignition before changing the wiper blades.
! To avoid damaging the windscreen wiper
blades, make sure that you touch only the
wiper arm of the windscreen wiper.
! Never open the bonnet if a windscreen
wiper arm has been folded away from the
windscreen.
Never fold a windscreen wiper arm without
a wiper blade back onto the windscreen.
Hold the windscreen wiper arm firmly when you change the wiper blade. If you release
the windscreen wiper arm without a wiper
blade and it falls onto the windscreen, the
windscreen may be damaged by the force
of the impact.
Mercedes-Benz recommends that you havethe wiper blades changed at a qualified
specialist workshop.
! Always position the windscreen wiper
arms vertically before folding them away
from the windscreen. By doing so, you will
avoid damage to the bonnet.
Replacing the wiper blades Removing the wiper blades
X Turn the key to position 1or 2in the ignition
lock (Y page 141).
X Set the windscreen wiper combination
switch to the °position.
X When the wiper arms have reached a ver-
tical position, turn the key to position 0and Windscreen
wipers
121Lights and windscreen wipers Z
Page 126 of 357
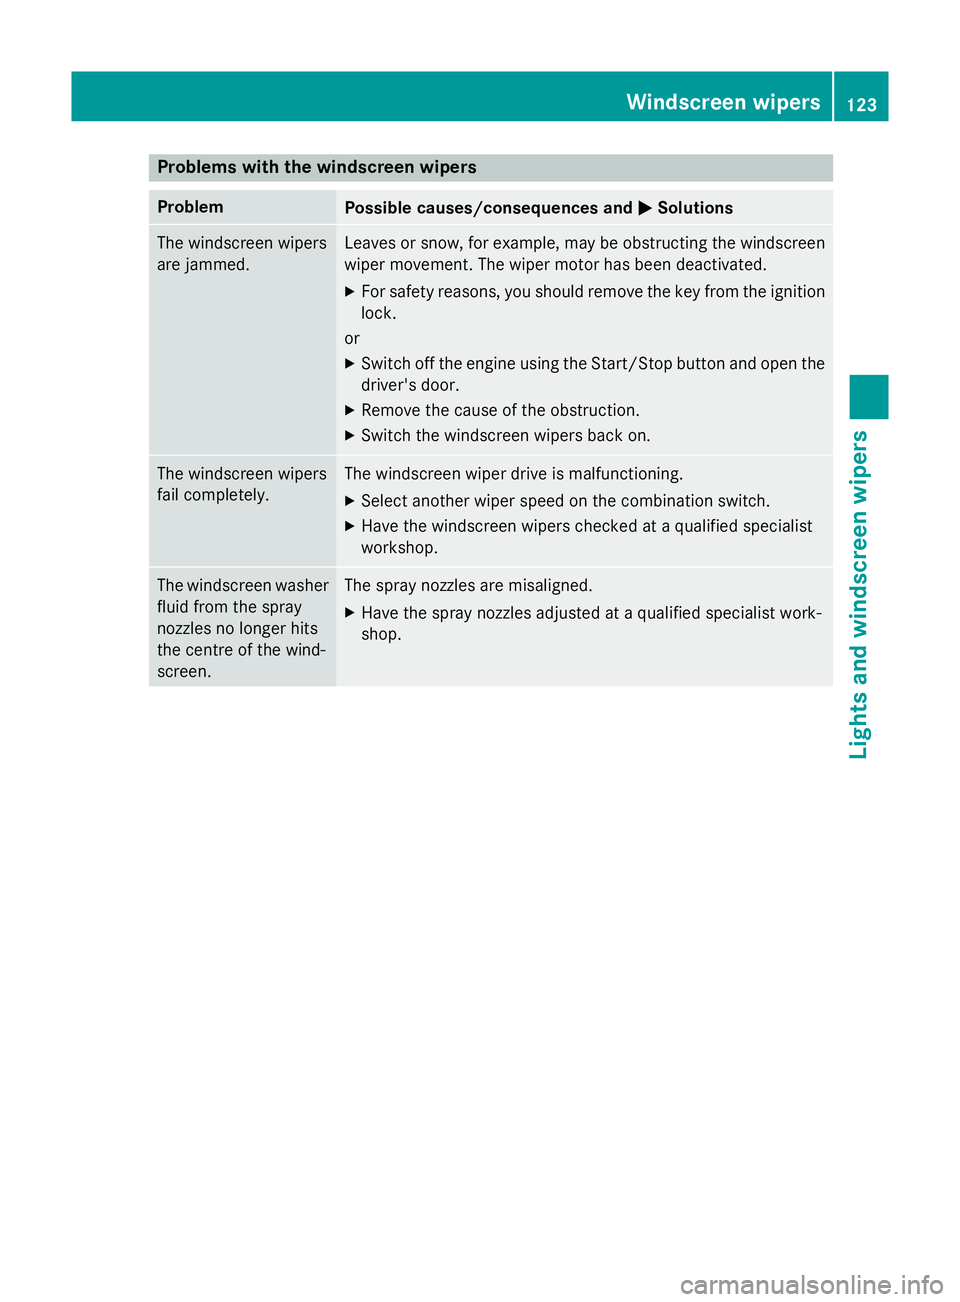
Problems with the windscreen wipers
Problem
Possible causes/consequences and
M
MSolutions The windscreen wipers
are jammed. Leaves or snow, for example, may be obstructing the windscreen
wiper movement. The wiper motor has been deactivated.
X For safety reasons, you should remove the key from the ignition
lock.
or
X Switch off the engine using the Start/Stop button and open the
driver's door.
X Remove the cause of the obstruction.
X Switch the windscreen wipers back on. The windscreen wipers
fail completely. The windscreen wiper drive is malfunctioning.
X Select another wiper speed on the combination switch.
X Have the windscreen wipers checked at a qualified specialist
workshop. The windscreen washer
fluid from the spray
nozzles no longer hits
the centre of the wind-
screen. The spray nozzles are misaligned.
X Have the spray nozzles adjusted at a qualified specialist work-
shop. Windscreen wipers
123Lights and windscreen wipers Z
Page 252 of 357
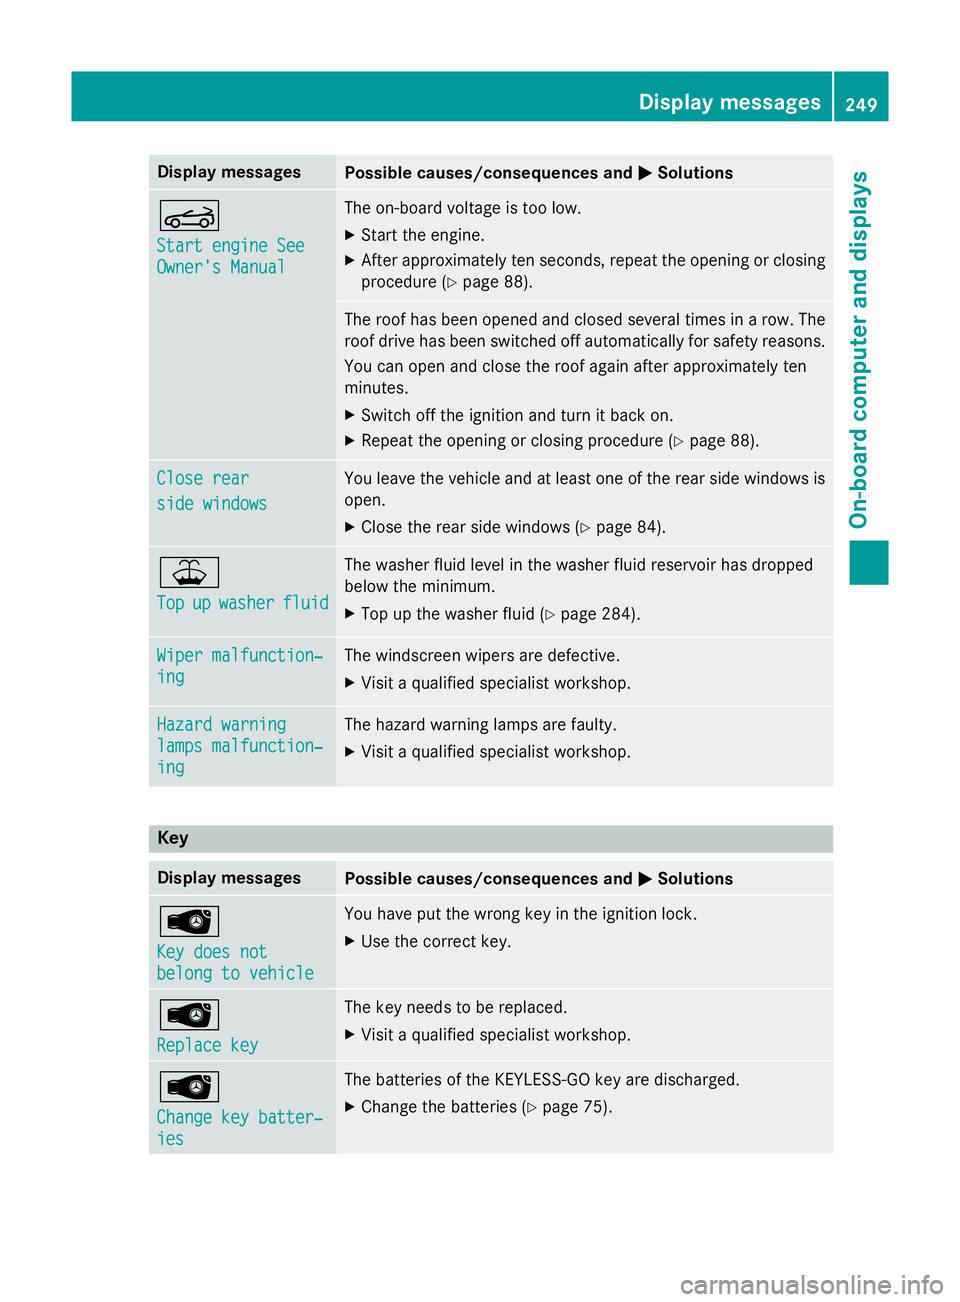
Display messages
Possible causes/consequences and
M
MSolutions K
Start engine See Start engine See
Owner's Manual Owner's Manual The on-board voltage is too low.
X Start the engine.
X After approximately ten seconds, repeat the opening or closing
procedure (Y page 88). The roof has been opened and closed several times in a row. The
roof drive has been switched off automatically for safety reasons.
You can open and close the roof again after approximately ten
minutes.
X Switch off the ignition and turn it back on.
X Repeat the opening or closing procedure (Y page 88).Close rear
Close rear
side windows side windows You leave the vehicle and at least one of the rear side windows is
open.
X Close the rear side windows (Y page 84).¥
Top Top
up
upwasher
washer fluid
fluid The washer fluid level in the washer fluid reservoir has dropped
below the minimum.
X Top up the washer fluid (Y page 284).Wiper malfunction‐ Wiper malfunction‐
ing ing The windscreen wipers are defective.
X Visit a qualified specialist workshop. Hazard warning
Hazard warning
lamps malfunction‐ lamps malfunction‐
ing ing The hazard warning lamps are faulty.
X Visit a qualified specialist workshop. Key
Display messages
Possible causes/consequences and
M
MSolutions Â
Key does not Key does not
belong to vehicle belong to vehicle You have put the wrong key in the ignition lock.
X Use the correct key. Â
Replace key Replace key The key needs to be replaced.
X Visit a qualified specialist workshop. Â
Change key batter‐ Change key batter‐
ies ies The batteries of the KEYLESS-GO key are discharged.
X Change the batteries (Y page 75). Display
messages
249On-board computer and displays Z
Page 287 of 357
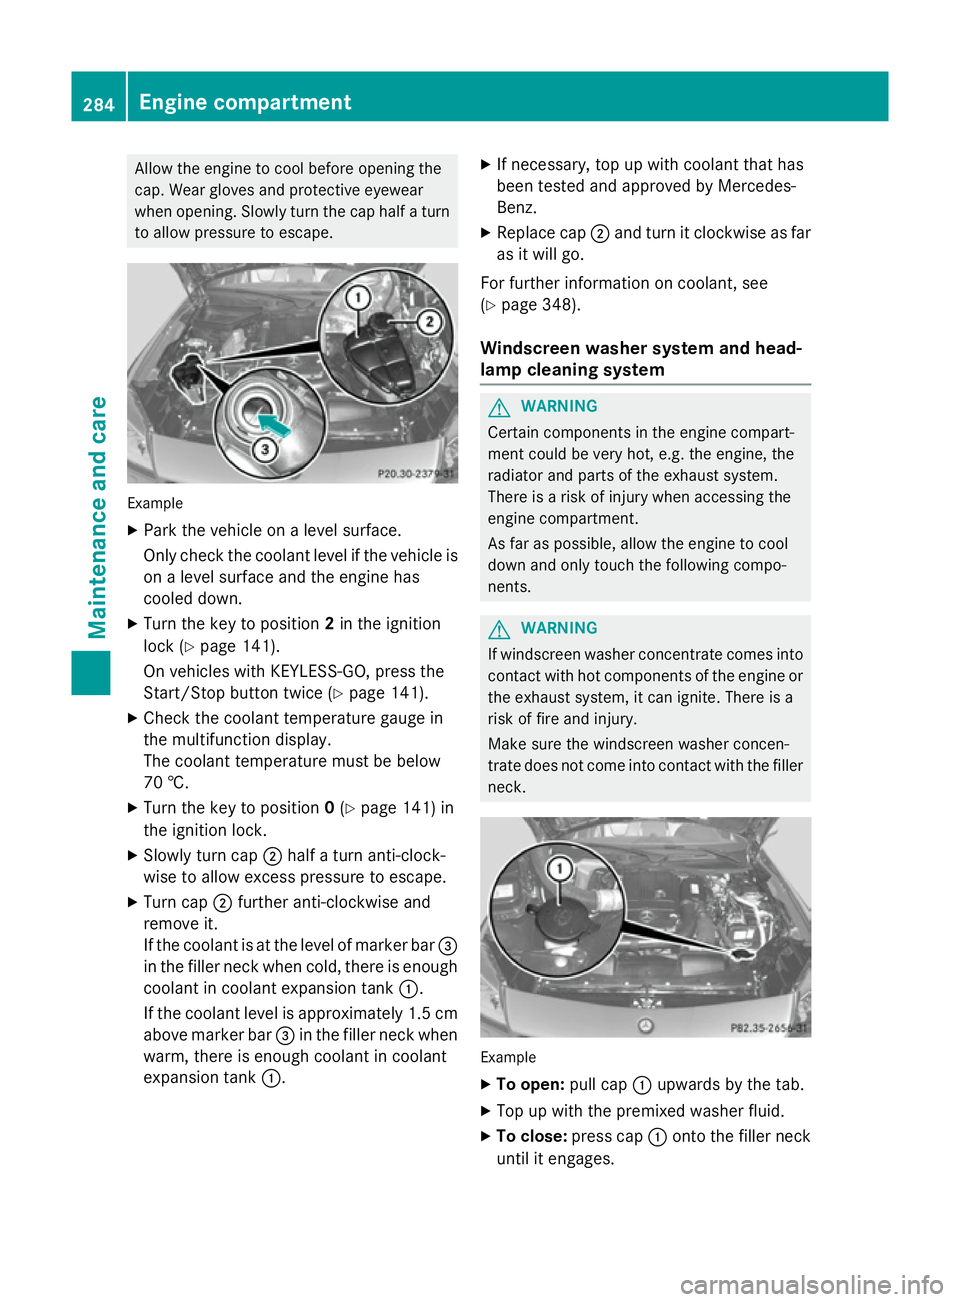
Allow the engine to cool before opening the
cap. Wear gloves and protective eyewear
when opening. Slowly turn the cap half a turn to allow pressure to escape. Example
X Park the vehicle on a level surface.
Only check the coolant level if the vehicle is
on a level surface and the engine has
cooled down.
X Turn the key to position 2in the ignition
lock (Y page 141).
On vehicles with KEYLESS-GO, press the
Start/Stop button twice (Y page 141).
X Check the coolant temperature gauge in
the multifunction display.
The coolant temperature must be below
70 †.
X Turn the key to position 0(Y page 141) in
the ignition lock.
X Slowly turn cap ;half a turn anti-clock-
wise to allow excess pressure to escape.
X Turn cap ;further anti-clockwise and
remove it.
If the coolant is at the level of marker bar =
in the filler neck when cold, there is enough coolant in coolant expansion tank :.
If the coolant level is approximately 1.5 cm above marker bar =in the filler neck when
warm, there is enough coolant in coolant
expansion tank :. X
If necessary, top up with coolant that has
been tested and approved by Mercedes-
Benz.
X Replace cap ;and turn it clockwise as far
as it will go.
For further information on coolant, see
(Y page 348).
Windscreen washer system and head-
lamp cleaning system G
WARNING
Certain components in the engine compart-
ment could be very hot, e.g. the engine, the
radiator and parts of the exhaust system.
There is a risk of injury when accessing the
engine compartment.
As far as possible, allow the engine to cool
down and only touch the following compo-
nents. G
WARNING
If windscreen washer concentrate comes into contact with hot components of the engine or
the exhaust system, it can ignite. There is a
risk of fire and injury.
Make sure the windscreen washer concen-
trate does not come into contact with the filler neck. Example
X To open: pull cap:upwards by the tab.
X Top up with the premixed washer fluid.
X To close: press cap :onto the filler neck
until it engages. 284
Engine compartmentMaintenance and care
Page 288 of 357
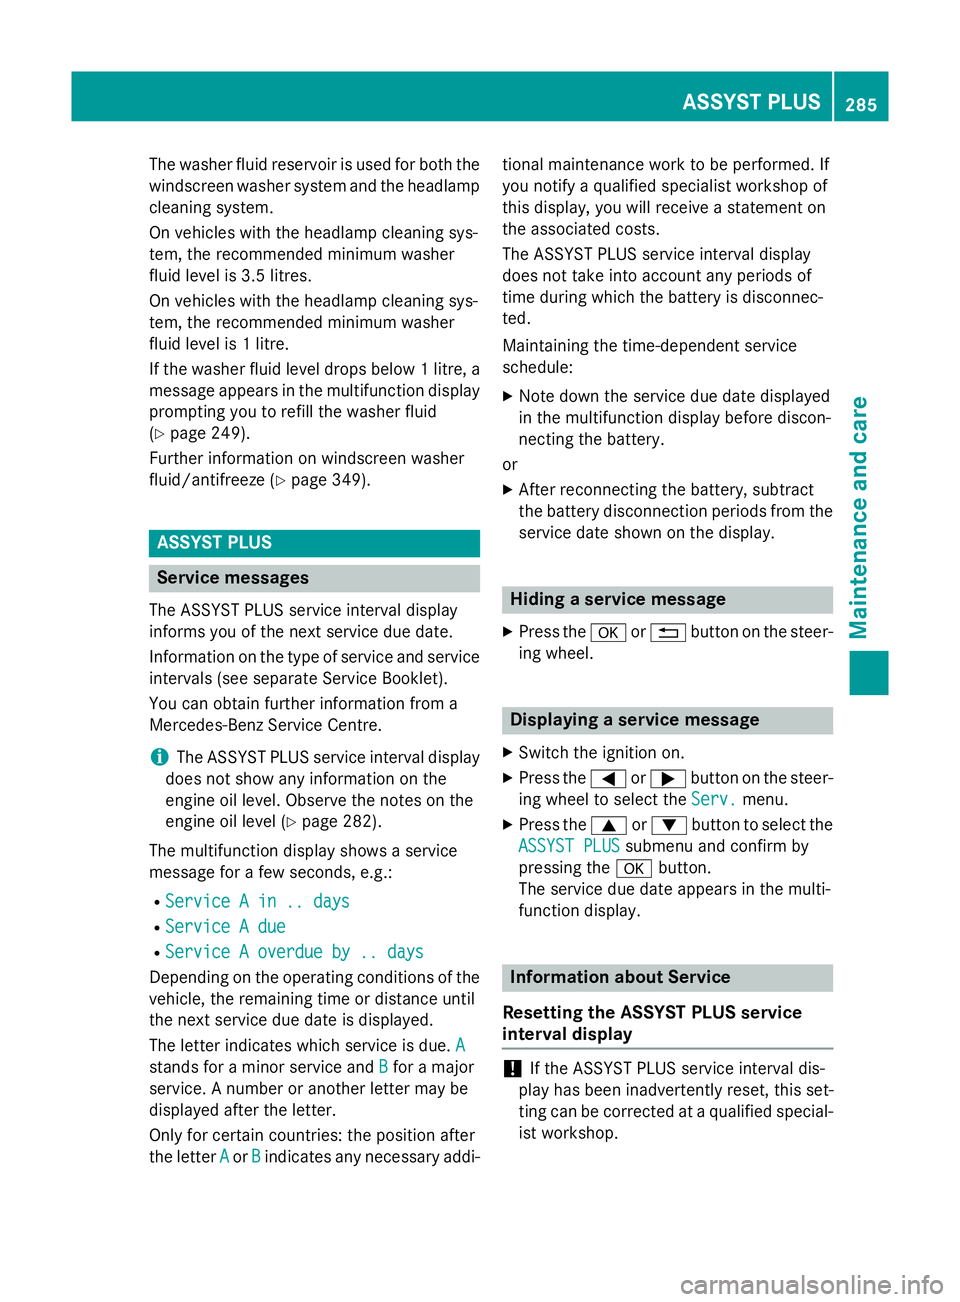
The washer fluid reservoir is used for both the
windscreen washer system and the headlamp cleaning system.
On vehicles with the headlamp cleaning sys-
tem, the recommended minimum washer
fluid level is 3.5 litres.
On vehicles with the headlamp cleaning sys-
tem, the recommended minimum washer
fluid level is 1 litre.
If the washer fluid level drops below 1 litre, amessage appears in the multifunction display
prompting you to refill the washer fluid
(Y page 249).
Further information on windscreen washer
fluid/antifreeze (Y page 349). ASSYST PLUS
Service messages
The ASSYST PLUS service interval display
informs you of the next service due date.
Information on the type of service and service
intervals (see separate Service Booklet).
You can obtain further information from a
Mercedes-Benz Service Centre.
i The ASSYST PLUS service interval display
does not show any information on the
engine oil level. Observe the notes on the
engine oil level (Y page 282).
The multifunction display shows a service
message for a few seconds, e.g.:
R Service A in .. days
Service A in .. days
R Service A due Service A due
R Service A overdue by .. days
Service A overdue by .. days
Depending on the operating conditions of the vehicle, the remaining time or distance until
the next service due date is displayed.
The letter indicates which service is due. A A
stands for a minor service and B
Bfor a major
service. A number or another letter may be
displayed after the letter.
Only for certain countries: the position after
the letter A
A or B Bindicates any necessary addi- tional maintenance work to be performed. If
you notify a qualified specialist workshop of
this display, you will receive a statement on
the associated costs.
The ASSYST PLUS service interval display
does not take into account any periods of
time during which the battery is disconnec-
ted.
Maintaining the time-dependent service
schedule:
X Note down the service due date displayed
in the multifunction display before discon-
necting the battery.
or X After reconnecting the battery, subtract
the battery disconnection periods from the
service date shown on the display. Hiding a service message
X Press the aor% button on the steer-
ing wheel. Displaying a service message
X Switch the ignition on.
X Press the =or; button on the steer-
ing wheel to select the Serv. Serv.menu.
X Press the 9or: button to select the
ASSYST PLUS
ASSYST PLUS submenu and confirm by
pressing the abutton.
The service due date appears in the multi-
function display. Information about Service
Resetting the ASSYST PLUS service
interval display !
If the ASSYST PLUS service interval dis-
play has been inadvertently reset, this set-
ting can be corrected at a qualified special-
ist workshop. ASSYST PLUS
285Maintenance and care Z
Page 346 of 357
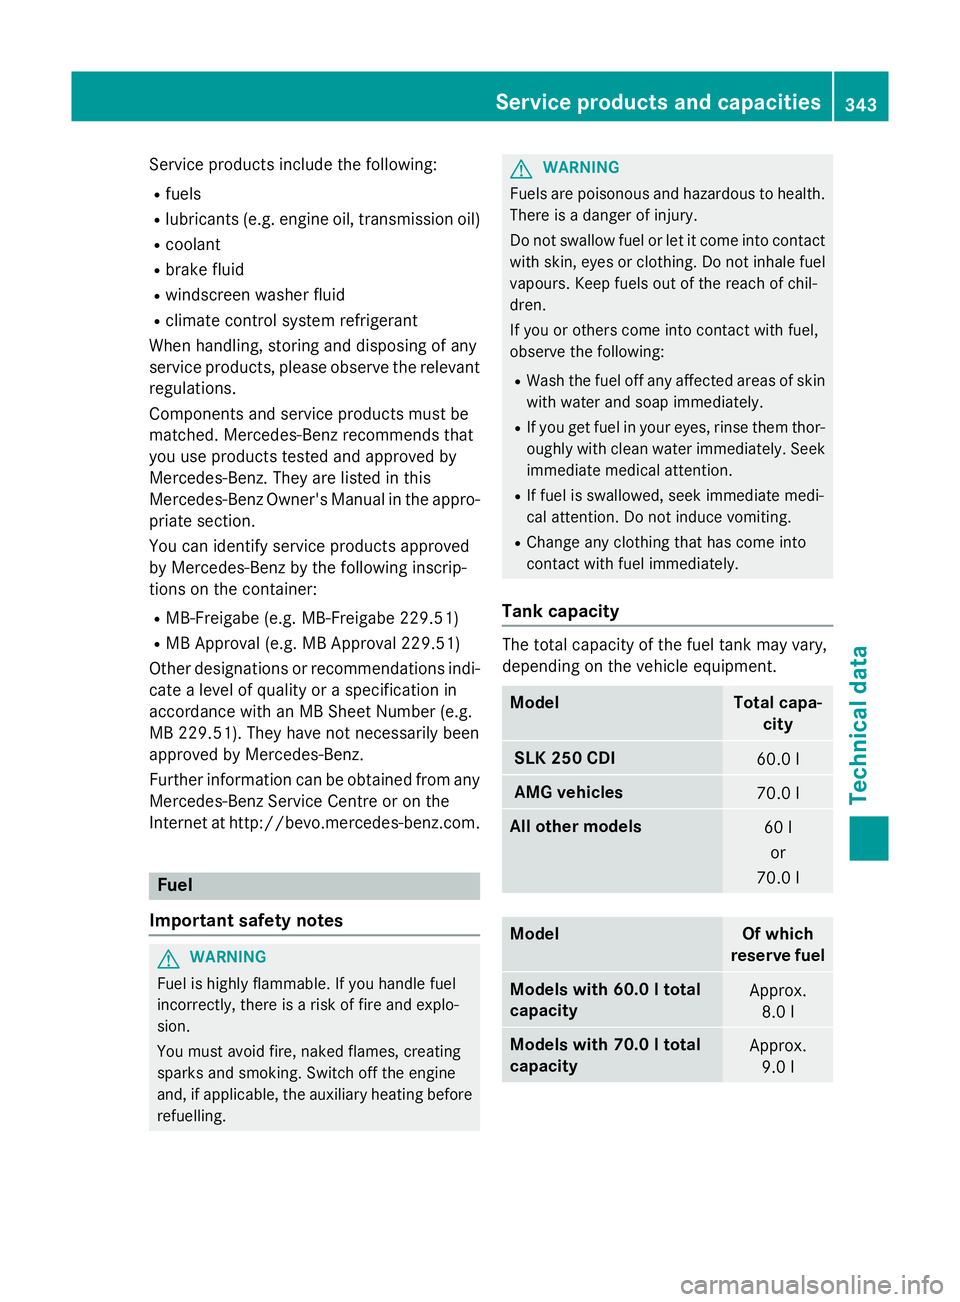
Service products include the following:
R fuels
R lubricants (e.g. engine oil, transmission oil)
R coolant
R brake fluid
R windscreen washer fluid
R climate control system refrigerant
When handling, storing and disposing of any
service products, please observe the relevant regulations.
Components and service products must be
matched. Mercedes-Benz recommends that
you use products tested and approved by
Mercedes-Benz. They are listed in this
Mercedes-Benz Owner's Manual in the appro-
priate section.
You can identify service products approved
by Mercedes-Benz by the following inscrip-
tions on the container:
R MB-Freigabe (e.g. MB-Freigabe 229.51)
R MB Approval (e.g. MB Approval 229.51)
Other designations or recommendations indi- cate a level of quality or a specification in
accordance with an MB Sheet Number (e.g.
MB 229.51). They have not necessarily been
approved by Mercedes-Benz.
Further information can be obtained from any
Mercedes-Benz Service Centre or on the
Internet at http://bevo.mercedes-benz.com. Fuel
Important safety notes G
WARNING
Fuel is highly flammable. If you handle fuel
incorrectly, there is a risk of fire and explo-
sion.
You must avoid fire, naked flames, creating
sparks and smoking. Switch off the engine
and, if applicable, the auxiliary heating before refuelling. G
WARNING
Fuels are poisonous and hazardous to health. There is a danger of injury.
Do not swallow fuel or let it come into contact
with skin, eyes or clothing. Do not inhale fuel
vapours. Keep fuels out of the reach of chil-
dren.
If you or others come into contact with fuel,
observe the following:
R Wash the fuel off any affected areas of skin
with water and soap immediately.
R If you get fuel in your eyes, rinse them thor-
oughly with clean water immediately. Seek immediate medical attention.
R If fuel is swallowed, seek immediate medi-
cal attention. Do not induce vomiting.
R Change any clothing that has come into
contact with fuel immediately.
Tank capacity The total capacity of the fuel tank may vary,
depending on the vehicle equipment.
Model Total capa-
city SLK 250 CDI
60.0 l
AMG vehicles
70.0 l
All other models
60 l
or
70.0 l Model Of which
reserve fuel Models with 60.0 l total
capacity
Approx.
8.0 l Models with 70.0 l total
capacity
Approx.
9.0 l Service products and capacities
343Technical data Z