MERCEDES-BENZ SPRINTER 2005 Service Manual PDF
Manufacturer: MERCEDES-BENZ, Model Year: 2005, Model line: SPRINTER, Model: MERCEDES-BENZ SPRINTER 2005Pages: 1232, PDF Size: 39.23 MB
Page 61 of 1232
(7) Drive ABS sensor ring ring in as far as the
stop with a plastic hammer.
(8) Install hub on axle tube.
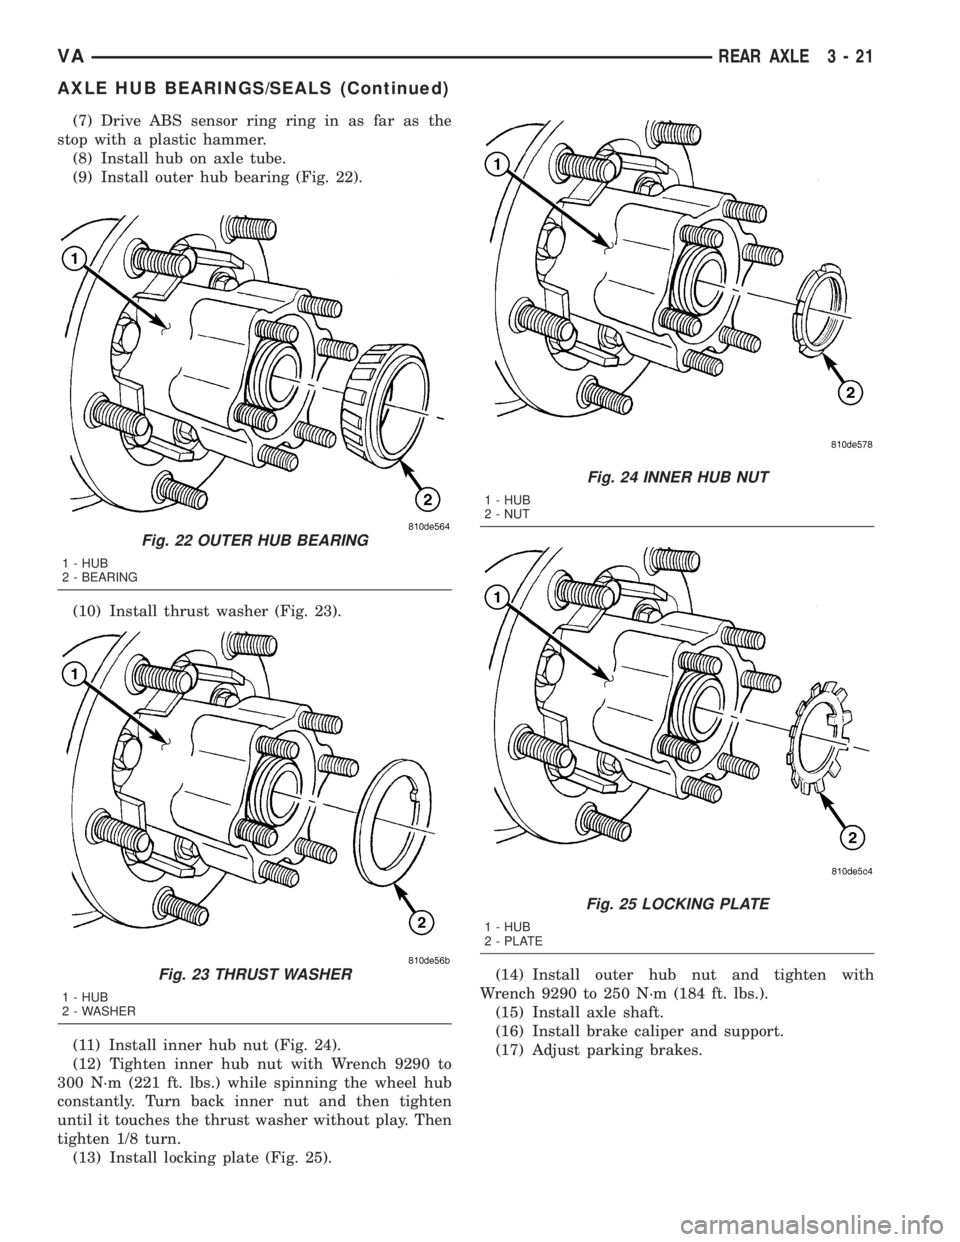
(9) Install outer hub bearing (Fig. 22).
(10) Install thrust washer (Fig. 23).
(11) Install inner hub nut (Fig. 24).
(12) Tighten inner hub nut with Wrench 9290 to
300 N´m (221 ft. lbs.) while spinning the wheel hub
constantly. Turn back inner nut and then tighten
until it touches the thrust washer without play. Then
tighten 1/8 turn.
(13) Install locking plate (Fig. 25).(14) Install outer hub nut and tighten with
Wrench 9290 to 250 N´m (184 ft. lbs.).
(15) Install axle shaft.
(16) Install brake caliper and support.
(17) Adjust parking brakes.
Fig. 22 OUTER HUB BEARING
1 - HUB
2 - BEARING
Fig. 23 THRUST WASHER
1 - HUB
2 - WASHER
Fig. 24 INNER HUB NUT
1 - HUB
2 - NUT
Fig. 25 LOCKING PLATE
1 - HUB
2 - PLATE
VAREAR AXLE 3 - 21
AXLE HUB BEARINGS/SEALS (Continued)
Page 62 of 1232
PINION SEAL
REMOVAL
(1) Remove wheels.
(2) Push back brake pads and release hand brake.
NOTE: If it is not possible to spin rear axle shafts
manually, detach rear brake cables.
(3) Drain rear axle oil.
(4) Remove propeller shaft.
(5) Spin pinion flange by hand and check axial
play of bearing.
CAUTION: There must not be any thrust bearing
play. If play excess or there are particles (shavings)
in the drained oil, replace gear assembly.
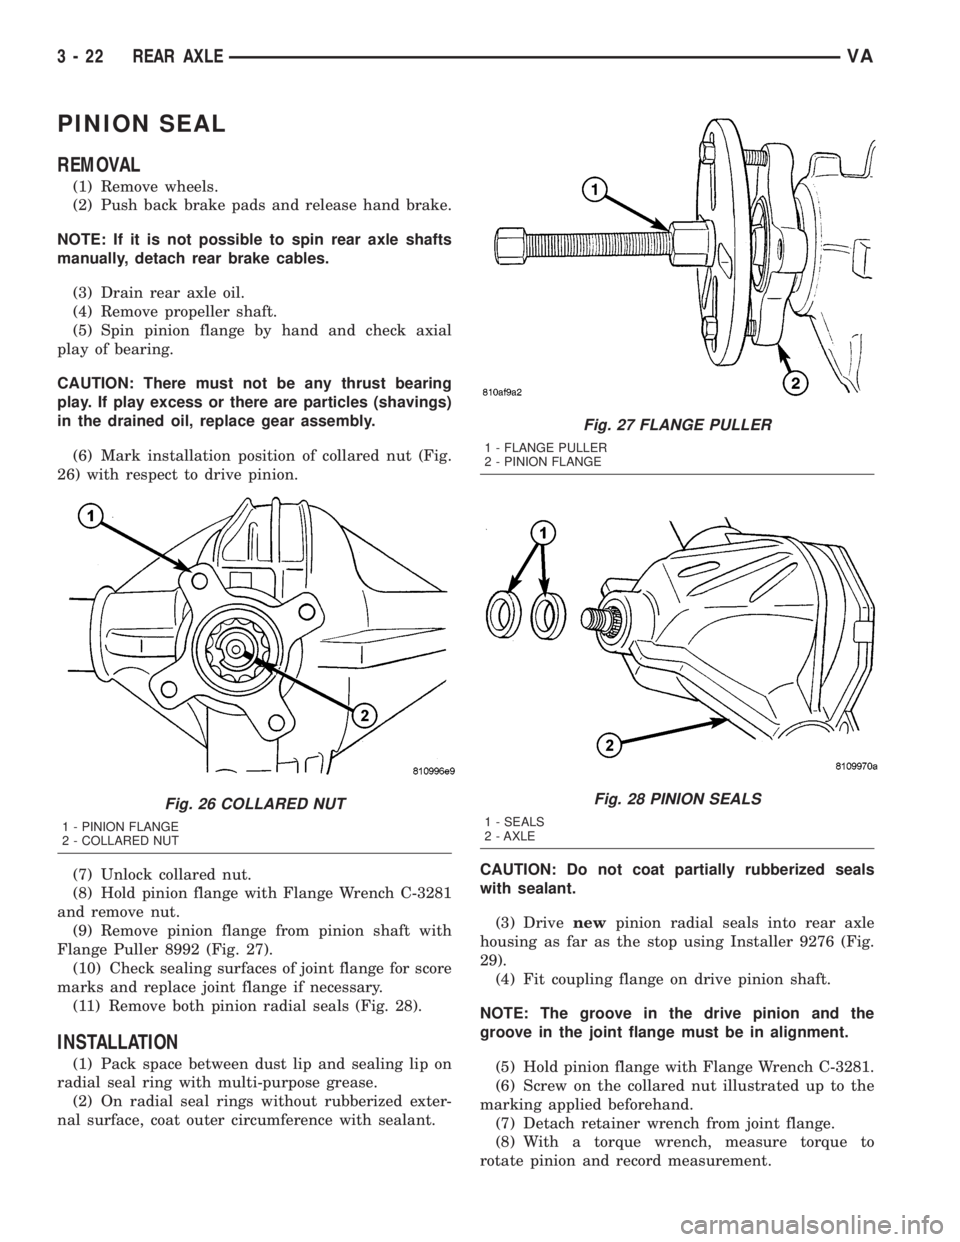
(6) Mark installation position of collared nut (Fig.
26) with respect to drive pinion.
(7) Unlock collared nut.
(8) Hold pinion flange with Flange Wrench C-3281
and remove nut.
(9) Remove pinion flange from pinion shaft with
Flange Puller 8992 (Fig. 27).
(10) Check sealing surfaces of joint flange for score
marks and replace joint flange if necessary.
(11) Remove both pinion radial seals (Fig. 28).
INSTALLATION
(1) Pack space between dust lip and sealing lip on
radial seal ring with multi-purpose grease.
(2) On radial seal rings without rubberized exter-
nal surface, coat outer circumference with sealant.CAUTION: Do not coat partially rubberized seals
with sealant.
(3) Drivenewpinion radial seals into rear axle
housing as far as the stop using Installer 9276 (Fig.
29).
(4) Fit coupling flange on drive pinion shaft.
NOTE: The groove in the drive pinion and the
groove in the joint flange must be in alignment.
(5) Hold pinion flange with Flange Wrench C-3281.
(6) Screw on the collared nut illustrated up to the
marking applied beforehand.
(7) Detach retainer wrench from joint flange.
(8) With a torque wrench, measure torque to
rotate pinion and record measurement.
Fig. 26 COLLARED NUT
1 - PINION FLANGE
2 - COLLARED NUT
Fig. 27 FLANGE PULLER
1 - FLANGE PULLER
2 - PINION FLANGE
Fig. 28 PINION SEALS
1 - SEALS
2 - AXLE
3 - 22 REAR AXLEVA
Page 63 of 1232
(9) Unscrew the marked nut.
(10) Reattach retainer wrench to joint flange.
(11) Screw onnewcollared nut and tighten care-
fully in stages until the previously value of torque to
rotate is exceeded by 0.5 N´m. (4.4 in. lbs.).
CAUTION: The total friction moment must not be
obtained by slackening the collared nut. Avoid over-
tightening the collared nut otherwise the compres-
sion ring inside will be compressed and will have to
be replaced. This requires total disassembly of the
gear set.
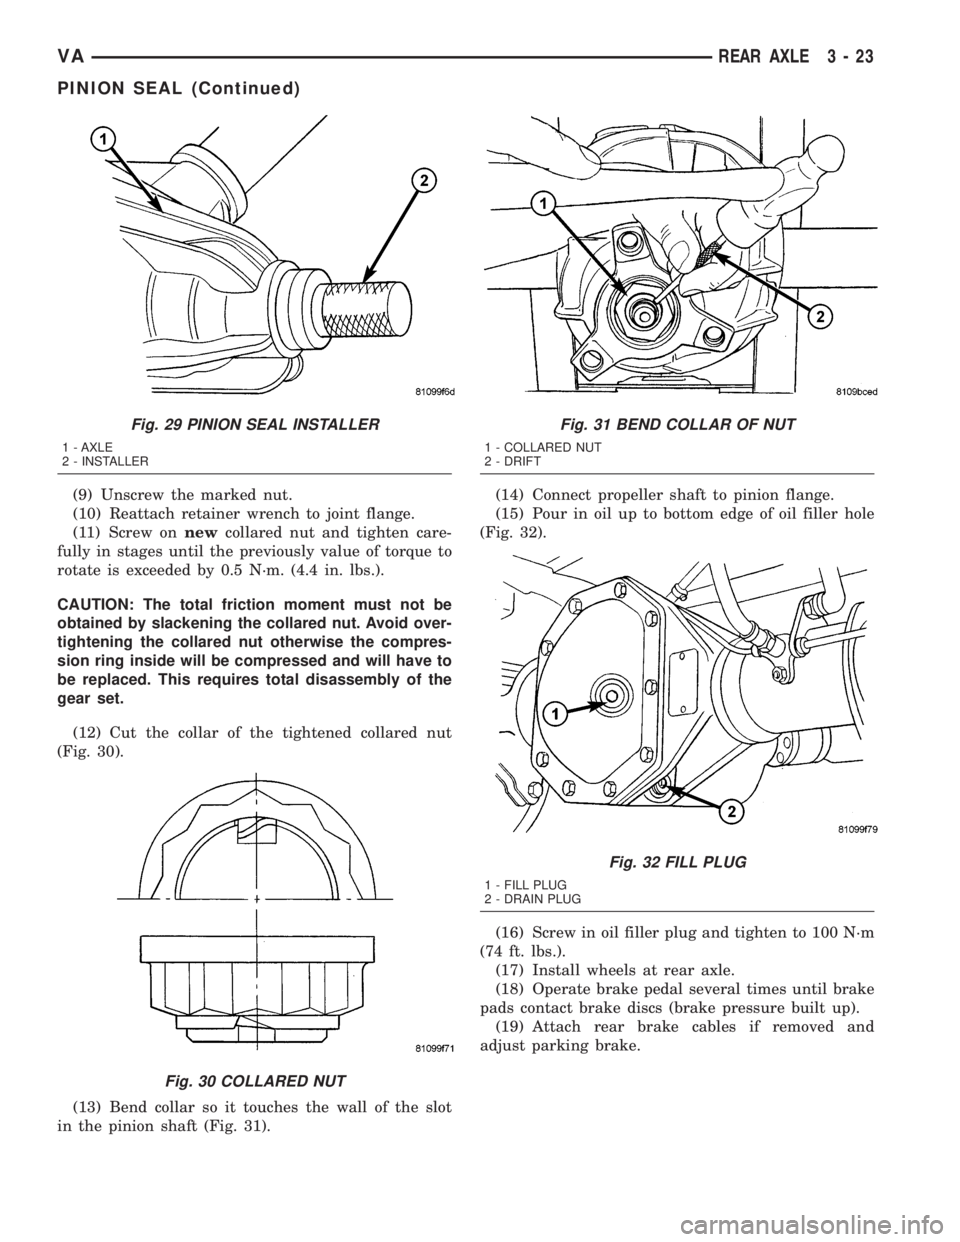
(12) Cut the collar of the tightened collared nut
(Fig. 30).
(13) Bend collar so it touches the wall of the slot
in the pinion shaft (Fig. 31).(14) Connect propeller shaft to pinion flange.
(15) Pour in oil up to bottom edge of oil filler hole
(Fig. 32).
(16) Screw in oil filler plug and tighten to 100 N´m
(74 ft. lbs.).
(17) Install wheels at rear axle.
(18) Operate brake pedal several times until brake
pads contact brake discs (brake pressure built up).
(19) Attach rear brake cables if removed and
adjust parking brake.
Fig. 29 PINION SEAL INSTALLER
1 - AXLE
2 - INSTALLER
Fig. 30 COLLARED NUT
Fig. 31 BEND COLLAR OF NUT
1 - COLLARED NUT
2 - DRIFT
Fig. 32 FILL PLUG
1 - FILL PLUG
2 - DRAIN PLUG
VAREAR AXLE 3 - 23
PINION SEAL (Continued)
Page 64 of 1232

Page 65 of 1232
BRAKES
TABLE OF CONTENTS
page page
BRAKES - BASE........................... 1BRAKES - ABS........................... 29
BRAKES - BASE
TABLE OF CONTENTS
page page
BRAKES - BASE
DIAGNOSIS AND TESTING - BASE BRAKE
SYSTEM.............................2
STANDARD PROCEDURE
STANDARD PROCEDURE - MANUAL
BLEEDING............................4
STANDARD PROCEDURE - PRESSURE
BLEEDING............................5
HYDRAULIC/MECHANICAL
SPECIFICATIONS
SPECIFICATIONS - TORQUE CHART.......5
BASE BRAKE.........................6
SPECIAL TOOLS
BRAKES.............................7
BRAKE LINES
STANDARD PROCEDURE
STANDARD PROCEDURE - ISO FLARING . . . 8
STANDARD PROCEDURE - DOUBLE
INVERTED FLARING....................8
BRAKE PADS/SHOES
REMOVAL
REMOVAL - FRONT (SRW)...............9
REMOVAL - FRONT (DRW)...............9
REMOVAL - REAR (16º WHEELS) (SRW)....9
REMOVAL - REAR (15º WHEELS) (SRW)....9
REMOVAL - REAR (DRW)...............10
INSTALLATION
INSTALLATION - FRONT (SRW)..........10
INSTALLATION - FRONT (DRW)..........11
INSTALLATION - REAR (16º WHEELS)
(SRW) ..............................11
INSTALLATION - REAR (16º WHEELS)
(SRW) ..............................11
INSTALLATION - REAR (DRW)...........11
DISC BRAKE CALIPERS
REMOVAL
REMOVAL - FRONT (SRW)..............11REMOVAL - FRONT (DRW)..............12
REMOVAL - REAR (SRW)...............12
REMOVAL - REAR (DRW)...............12
INSTALLATION
INSTALLATION - FRONT (SRW)..........12
INSTALLATION - FRONT (DRW)..........13
INSTALLATION - REAR (SRW)...........13
INSTALLATION - REAR (DRW)...........13
DISC BRAKE CALIPER ADAPTER
REMOVAL
REMOVAL - FRONT....................13
REMOVAL - REAR.....................13
INSTALLATION
INSTALLATION - FRONT................14
INSTALLATION - REAR.................14
FLUID
DIAGNOSIS AND TESTING - BRAKE FLUID
CONTAMINATION.....................14
STANDARD PROCEDURE - BRAKE FLUID
LEVEL..............................14
SPECIFICATIONS
BRAKE FLUID........................14
FLUID RESERVOIR
REMOVAL.............................15
INSTALLATION.........................15
ALB LEVER
REMOVAL.............................15
INSTALLATION.........................15
ALB CONTROLLER
REMOVAL.............................15
INSTALLATION.........................15
ADJUSTMENTS
ADJUSTMENT........................16
MASTER CYLINDER
DIAGNOSIS AND TESTING - MASTER
CYLINDER/POWER BOOSTER...........16
VABRAKES 5 - 1
Page 66 of 1232
STANDARD PROCEDURE - MASTER
CYLINDER BLEEDING..................17
REMOVAL.............................17
INSTALLATION.........................18
PEDAL
REMOVAL.............................18
INSTALLATION.........................19
POWER BRAKE BOOSTER
DESCRIPTION.........................19
OPERATION...........................19
REMOVAL.............................19
INSTALLATION.........................19
ROTORS
REMOVAL
REMOVAL - FRONT (SRW)..............19
REMOVAL - REAR (SRW)...............20
REMOVAL - FRONT (DRW)..............20
REMOVAL - REAR (DRW)...............20
INSTALLATION
INSTALLATION - FRONT (SRW)..........21
INSTALLATION - REAR (SRW)...........21
INSTALLATION - FRONT (DRW)..........21
INSTALLATION - REAR (DRW)...........21
SUPPORT PLATE
REMOVAL - REAR......................22
INSTALLATION - REAR...................22
PARKING BRAKE
SPECIFICATIONS
TORQUE CHART......................22SPECIAL TOOLS
PARK BRAKE........................23
CABLE TENSIONER
REMOVAL.............................23
INSTALLATION.........................23
CABLES
REMOVAL
REMOVAL - FRONT....................24
REMOVAL - REAR.....................24
INSTALLATION
INSTALLATION - FRONT................24
INSTALLATION - REAR.................25
ADJUSTMENTS
ADJUSTMENT - PARKING BRAKE CABLES . 25
LEVER
REMOVAL.............................26
INSTALLATION.........................26
SHOES
REMOVAL
REMOVAL - (SRW)....................26
REMOVAL - (DRW)....................26
CLEANING - REAR DRUM IN HAT BRAKE....27
INSTALLATION
INSTALLATION - (SRW).................27
INSTALLATION - (DRW).................27
ADJUSTMENTS
ADJUSTMENT........................27
BRAKES - BASE
DIAGNOSIS AND TESTING - BASE BRAKE
SYSTEM
Base brake components consist of the brake pads,
calipers, brake drum in hat rotor in the rear, rotors,
brake lines, master cylinder, booster, and parking
brake components.
Brake diagnosis involves determining if the prob-
lem is related to a mechanical, hydraulic, or vacuum
operated component.
The first diagnosis step is the preliminary check.
PRELIMINARY BRAKE CHECK
(1) Check condition of tires and wheels. Damaged
wheels and worn, damaged, or underinflated tires
can cause pull, shudder, vibration, and a condition
similar to grab.
(2) If complaint was based on noise when braking,
check suspension components. Jounce front and rear
of vehicle and listen for noise that might be caused
by loose, worn or damaged suspension or steering
components.(3) Inspect brake fluid level and condition. Note
that the brake reservoir fluid level will decrease in
proportion to normal lining wear.Also note that
brake fluid tends to darken over time. This is
normal and should not be mistaken for contam-
ination.
(a) If fluid level is abnormally low, look for evi-
dence of leaks at calipers, wheel cylinders, brake
lines, and master cylinder.
(b) If fluid appears contaminated, drain out a
sample to examine. System will have to be flushed
if fluid is separated into layers, or contains a sub-
stance other than brake fluid. The system seals
and cups will also have to be replaced after flush-
ing. Use clean brake fluid to flush the system.
(4) Check parking brake operation. Verify free
movement and full release of cables and pedal. Also
note if vehicle was being operated with parking
brake partially applied.
(5) Check brake pedal operation. Verify that pedal
does not bind and has adequate free play. If pedal
lacks free play, check pedal and power booster for
being loose or for bind condition. Do not road test
until condition is corrected.
(6) Check booster vacuum check valve and hose.
(7) If components checked appear OK, road test
the vehicle.
5 - 2 BRAKES - BASEVA
Page 67 of 1232
ROAD TESTING
(1) If complaint involved low brake pedal, pump
pedal and note if it comes back up to normal height.
(2) Check brake pedal response with transmission
in Neutral and engine running. Pedal should remain
firm under constant foot pressure.
(3) During road test, make normal and firm brake
stops in 25-40 mph range. Note faulty brake opera-
tion such as low pedal, hard pedal, fade, pedal pulsa-
tion, pull, grab, drag, noise, etc.
(4) Attempt to stop the vehicle with the parking
brake only and note grab, drag, noise, etc.
PEDAL FALLS AWAY
A brake pedal that falls away under steady foot
pressure is generally the result of a system leak. The
leak point could be at a brake line, fitting, hose, or
caliper/wheel cylinder. If leakage is severe, fluid will
be evident at or around the leaking component.
Internal leakage (seal by-pass) in the master cylin-
der caused by worn or damaged piston cups, may
also be the problem cause.
An internal leak in the ABS or RWAL system may
also be the problem with no physical evidence.
LOW PEDAL
If a low pedal is experienced, pump the pedal sev-
eral times. If the pedal comes back up worn linings,
rotors, drums, or rear brakes out of adjustment are
the most likely causes. The proper course of action is
to inspect and replace all worn component and make
the proper adjustments.
SPONGY PEDAL
A spongy pedal is most often caused by air in the
system. However, thin brake drums or substandard
brake lines and hoses can also cause a spongy pedal.
The proper course of action is to bleed the system,
and replace thin drums and substandard quality
brake hoses if suspected.
HARD PEDAL OR HIGH PEDAL EFFORT
A hard pedal or high pedal effort may be due to
lining that is water soaked, contaminated, glazed, or
badly worn. The power booster or check valve could
also be faulty.
PEDAL PULSATION
Pedal pulsation is caused by components that are
loose, or beyond tolerance limits.
The primary cause of pulsation are disc brake
rotors with excessive lateral runout or thickness vari-
ation, or out of round brake drums. Other causes are
loose wheel bearings or calipers and worn, damaged
tires.NOTE: Some pedal pulsation may be felt during
ABS activation.
BRAKE DRAG
Brake drag occurs when the lining is in constant
contact with the rotor or drum. Drag can occur at one
wheel, all wheels, fronts only, or rears only.
Drag is a product of incomplete brake shoe release.
Drag can be minor or severe enough to overheat the
linings, rotors and drums.
Minor drag will usually cause slight surface char-
ring of the lining. It can also generate hard spots in
rotors and drums from the overheat-cool down pro-
cess. In most cases, the rotors, drums, wheels and
tires are quite warm to the touch after the vehicle is
stopped.
Severe drag can char the brake lining all the way
through. It can also distort and score rotors and
drums to the point of replacement. The wheels, tires
and brake components will be extremely hot. In
severe cases, the lining may generate smoke as it
chars from overheating.
Common causes of brake drag are:
²Seized or improperly adjusted parking brake
cables.
²Loose/worn wheel bearing.
²Seized caliper or wheel cylinder piston.
²Caliper binding on corroded bushings or rusted
slide surfaces.
²Loose caliper mounting.
²Drum brake shoes binding on worn/damaged
support plates.
²Mis-assembled components.
²Long booster output rod.
If brake drag occurs at all wheels, the problem
may be related to a blocked master cylinder return
port, or faulty power booster (binds-does not release).
BRAKE FADE
Brake fade is usually a product of overheating
caused by brake drag. However, brake overheating
and resulting fade can also be caused by riding the
brake pedal, making repeated high deceleration stops
in a short time span, or constant braking on steep
mountain roads. Refer to the Brake Drag information
in this section for causes.
BRAKE PULL
Front brake pull condition could result from:
²Contaminated lining in one caliper
²Seized caliper piston
²Binding caliper
²Loose caliper
²Rusty caliper slide surfaces
²Improper brake pads
²Damaged rotor
VABRAKES - BASE 5 - 3
BRAKES - BASE (Continued)
Page 68 of 1232
A worn, damaged wheel bearing or suspension
component are further causes of pull. A damaged
front tire (bruised, ply separation) can also cause
pull.
A common and frequently misdiagnosed pull condi-
tion is where direction of pull changes after a few
stops. The cause is a combination of brake drag fol-
lowed by fade at one of the brake units.
As the dragging brake overheats, efficiency is so
reduced that fade occurs. Since the opposite brake
unit is still functioning normally, its braking effect is
magnified. This causes pull to switch direction in
favor of the normally functioning brake unit.
An additional point when diagnosing a change in
pull condition concerns brake cool down. Remember
that pull will return to the original direction, if the
dragging brake unit is allowed to cool down (and is
not seriously damaged).
REAR BRAKE GRAB OR PULL
Rear grab or pull is usually caused by improperly
adjusted or seized parking brake cables, contami-
nated lining, bent or binding shoes and support
plates, or improperly assembled components. This is
particularly true when only one rear wheel is
involved. However, when both rear wheels are
affected, the master cylinder or proportioning valve
could be at fault.
BRAKES DO NOT HOLD AFTER DRIVING THROUGH DEEP
WATER PUDDLES
This condition is generally caused by water soaked
lining. If the lining is only wet, it can be dried by
driving with the brakes very lightly applied for a
mile or two. However, if the lining is both soaked and
dirt contaminated, cleaning and/or replacement will
be necessary.
BRAKE LINING CONTAMINATION
Brake lining contamination is mostly a product of
leaking calipers or worn seals, driving through deep
water puddles, or lining that has become covered
with grease and grit during repair. Contaminated lin-
ing should be replaced to avoid further brake prob-
lems.
WHEEL AND TIRE PROBLEMS
Some conditions attributed to brake components
may actually be caused by a wheel or tire problem.
A damaged wheel can cause shudder, vibration and
pull. A worn or damaged tire can also cause pull.
Severely worn tires with very little tread left can
produce a grab-like condition as the tire loses and
recovers traction. Flat-spotted tires can cause vibra-
tion and generate shudder during brake operation. A
tire with internal damage such as a severe bruise,
cut, or ply separation can cause pull and vibration.BRAKE NOISES
Some brake noise is common with rear drum
brakes and on some disc brakes during the first few
stops after a vehicle has been parked overnight or
stored. This is primarily due to the formation of trace
corrosion (light rust) on metal surfaces. This light
corrosion is typically cleared from the metal surfaces
after a few brake applications causing the noise to
subside.
BRAKE SQUEAK/SQUEAL
Brake squeak or squeal may be due to linings that
are wet or contaminated with brake fluid, grease, or
oil. Glazed linings and rotors with hard spots can
also contribute to squeak. Dirt and foreign material
embedded in the brake lining will also cause squeak/
squeal.
A very loud squeak or squeal is frequently a sign of
severely worn brake lining. If the lining has worn
through to the brake pads in spots, metal-to-metal
contact occurs. If the condition is allowed to continue,
rotors can become so scored that replacement is nec-
essary.
BRAKE CHATTER
Brake chatter is usually caused by loose or worn
components, or glazed/burnt lining. Rotors with hard
spots can also contribute to chatter. Additional causes
of chatter are out-of-tolerance rotors, brake lining not
securely attached to the shoes, loose wheel bearings
and contaminated brake lining.
THUMP/CLUNK NOISE
Thumping or clunk noises during braking are fre-
quentlynotcaused by brake components. In many
cases, such noises are caused by loose or damaged
steering, suspension, or engine components. However,
calipers that bind on the slide surfaces can generate
a thump or clunk noise.
STANDARD PROCEDURE
STANDARD PROCEDURE - MANUAL BLEEDING
Use Mopar brake fluid, or an equivalent quality
fluid meeting SAE and DOT 4 standards only. Use
fresh, clean fluid from a sealed container at all times.
(1) Remove reservoir filler caps and fill reservoir.
(2) If calipers, or wheel cylinders were overhauled,
open all caliper and wheel cylinder bleed screws.
Then close each bleed screw as fluid starts to drip
from it. Top off master cylinder reservoir once more
before proceeding.
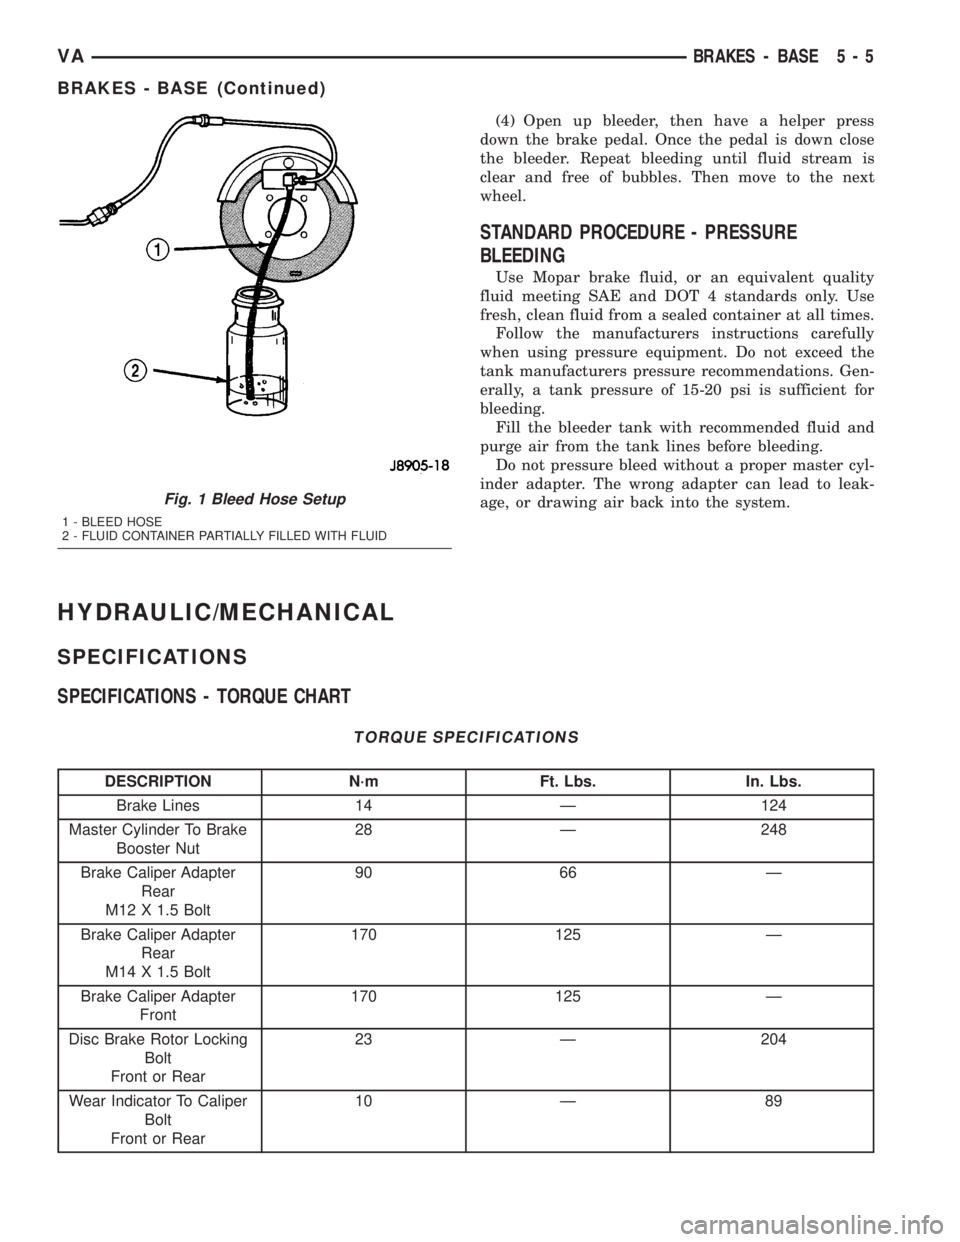
(3) Attach one end of bleed hose to bleed screw
and insert opposite end in glass container partially
filled with brake fluid (Fig. 1). Be sure end of bleed
hose is immersed in fluid.
5 - 4 BRAKES - BASEVA
BRAKES - BASE (Continued)
Page 69 of 1232
(4) Open up bleeder, then have a helper press
down the brake pedal. Once the pedal is down close
the bleeder. Repeat bleeding until fluid stream is
clear and free of bubbles. Then move to the next
wheel.
STANDARD PROCEDURE - PRESSURE
BLEEDING
Use Mopar brake fluid, or an equivalent quality
fluid meeting SAE and DOT 4 standards only. Use
fresh, clean fluid from a sealed container at all times.
Follow the manufacturers instructions carefully
when using pressure equipment. Do not exceed the
tank manufacturers pressure recommendations. Gen-
erally, a tank pressure of 15-20 psi is sufficient for
bleeding.
Fill the bleeder tank with recommended fluid and
purge air from the tank lines before bleeding.
Do not pressure bleed without a proper master cyl-
inder adapter. The wrong adapter can lead to leak-
age, or drawing air back into the system.
HYDRAULIC/MECHANICAL
SPECIFICATIONS
SPECIFICATIONS - TORQUE CHART
TORQUE SPECIFICATIONS
DESCRIPTION N´m Ft. Lbs. In. Lbs.
Brake Lines 14 Ð 124
Master Cylinder To Brake
Booster Nut28 Ð 248
Brake Caliper Adapter
Rear
M12 X 1.5 Bolt90 66 Ð
Brake Caliper Adapter
Rear
M14 X 1.5 Bolt170 125 Ð
Brake Caliper Adapter
Front170 125 Ð
Disc Brake Rotor Locking
Bolt
Front or Rear23 Ð 204
Wear Indicator To Caliper
Bolt
Front or Rear10 Ð 89
Fig. 1 Bleed Hose Setup
1 - BLEED HOSE
2 - FLUID CONTAINER PARTIALLY FILLED WITH FLUID
VABRAKES - BASE 5 - 5
BRAKES - BASE (Continued)
Page 70 of 1232
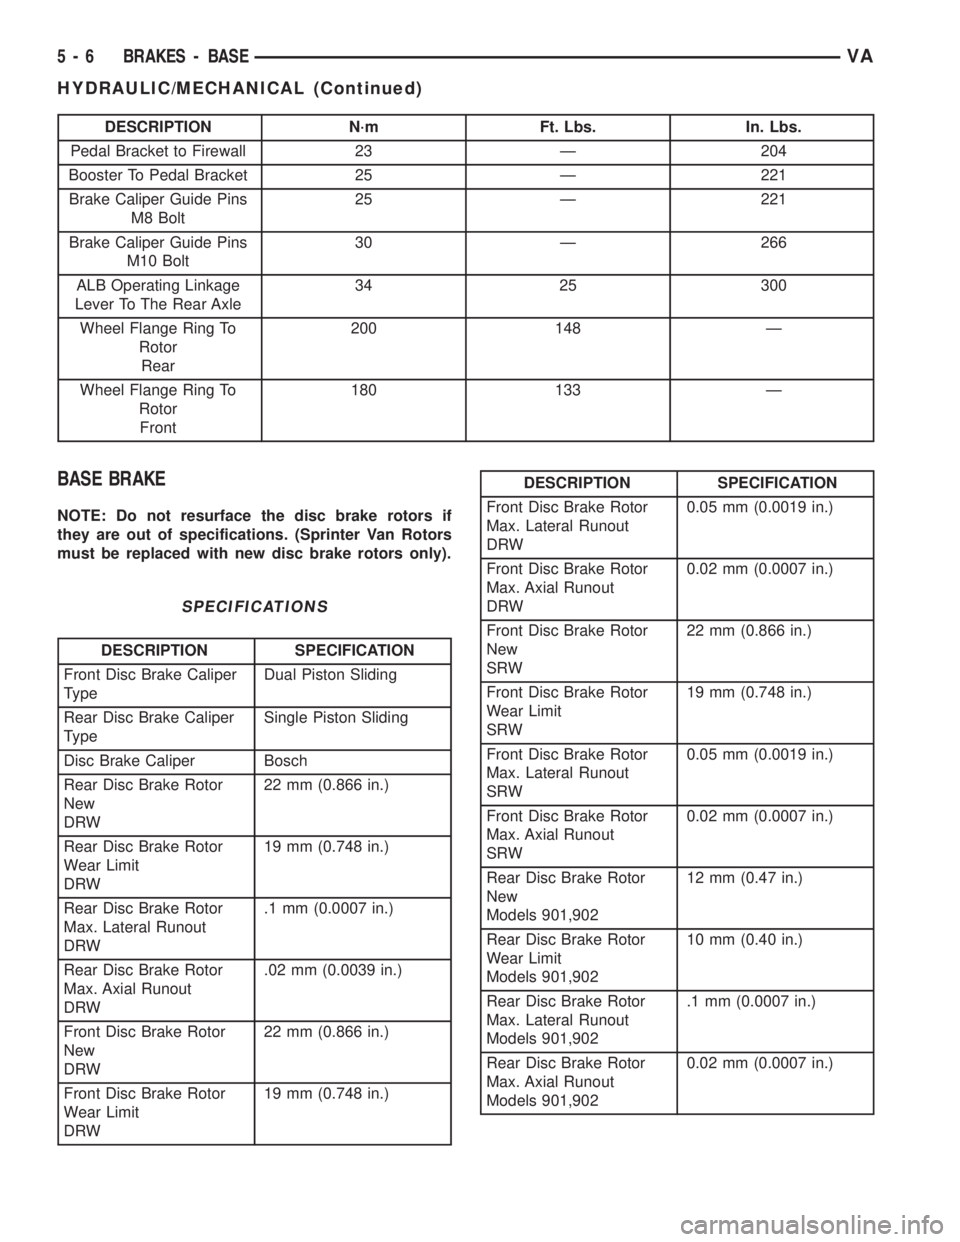
DESCRIPTION N´m Ft. Lbs. In. Lbs.
Pedal Bracket to Firewall 23 Ð 204
Booster To Pedal Bracket 25 Ð 221
Brake Caliper Guide Pins
M8 Bolt25 Ð 221
Brake Caliper Guide Pins
M10 Bolt30 Ð 266
ALB Operating Linkage
Lever To The Rear Axle34 25 300
Wheel Flange Ring To
Rotor
Rear200 148 Ð
Wheel Flange Ring To
Rotor
Front180 133 Ð
BASE BRAKE
NOTE: Do not resurface the disc brake rotors if
they are out of specifications. (Sprinter Van Rotors
must be replaced with new disc brake rotors only).
SPECIFICATIONS
DESCRIPTION SPECIFICATION
Front Disc Brake Caliper
TypeDual Piston Sliding
Rear Disc Brake Caliper
TypeSingle Piston Sliding
Disc Brake Caliper Bosch
Rear Disc Brake Rotor
New
DRW22 mm (0.866 in.)
Rear Disc Brake Rotor
Wear Limit
DRW19 mm (0.748 in.)
Rear Disc Brake Rotor
Max. Lateral Runout
DRW.1 mm (0.0007 in.)
Rear Disc Brake Rotor
Max. Axial Runout
DRW.02 mm (0.0039 in.)
Front Disc Brake Rotor
New
DRW22 mm (0.866 in.)
Front Disc Brake Rotor
Wear Limit
DRW19 mm (0.748 in.)
DESCRIPTION SPECIFICATION
Front Disc Brake Rotor
Max. Lateral Runout
DRW0.05 mm (0.0019 in.)
Front Disc Brake Rotor
Max. Axial Runout
DRW0.02 mm (0.0007 in.)
Front Disc Brake Rotor
New
SRW22 mm (0.866 in.)
Front Disc Brake Rotor
Wear Limit
SRW19 mm (0.748 in.)
Front Disc Brake Rotor
Max. Lateral Runout
SRW0.05 mm (0.0019 in.)
Front Disc Brake Rotor
Max. Axial Runout
SRW0.02 mm (0.0007 in.)
Rear Disc Brake Rotor
New
Models 901,90212 mm (0.47 in.)
Rear Disc Brake Rotor
Wear Limit
Models 901,90210 mm (0.40 in.)
Rear Disc Brake Rotor
Max. Lateral Runout
Models 901,902.1 mm (0.0007 in.)
Rear Disc Brake Rotor
Max. Axial Runout
Models 901,9020.02 mm (0.0007 in.)
5 - 6 BRAKES - BASEVA
HYDRAULIC/MECHANICAL (Continued)