headlamp MERCEDES-BENZ SPRINTER 2012 MY12 Operator’s Manual
[x] Cancel search | Manufacturer: MERCEDES-BENZ, Model Year: 2012, Model line: SPRINTER, Model: MERCEDES-BENZ SPRINTER 2012Pages: 292, PDF Size: 6.75 MB
Page 166 of 292
The windshield wipers may otherwise move
and injure you.
X Turn the key to position 0 in the ignition
lock or remove it.
! Do not fold the windshield wipers away
from the windshield unless the hood is
closed. Otherwise, you could damage the
hood.
X Fold the wiper arms away from the
windshield until you feel them engage.
X Clean the windshield and the wiper blades.
X Fold the windshield wipers back again
before switching on the ignition.
Headlamps Wipe the headlamp lenses with a wet sponge.
! Only use washer
fluid which is suitable for
plastic lamp lenses. Unsuitable washer
fluid could damage the plastic lamp lenses
of the headlamps.
Therefore, do not use:
R dry cloths
R abrasive products
R solvents
R cleaning products containing solvents
You could otherwise scratch or damage the
surface of the lenses.
Sliding door Clean the contact plates and the tips of the
contact pins around the sliding door with
water, shampoo and a soft cloth.
Do not oil or grease the contact plates and
contact pins.
Remove foreign objects. Power washers
! Maintain the following minimum
distances between the high-pressure
nozzle and the object being cleaned:
R approximately 2.2 ft (70 cm)
when using
round-jet nozzles
R approximately 1 ft (30 cm) when using
25° flat-spray jets and concentrated-
power jets
Keep the water jet moving while cleaning.
To avoid causing damage, do not point the
water jet directly at:
R door joints
R brake hoses
R electrical components
R plug connections
R seals
R the drive train, especially not at the
intermediate bearing of the propeller
shaft
R the rear-view camera or the microphone
opening on the bottom of the rear-view
camera. Keep a minimum distance of
1.6 ft (50 cm). G
Warning
Do not
use round-jet nozzles to clean the tires.
The pulsating water jet can cause damage to
the substructure of
the tires that is not visible
from the outside. This type of damage only
becomes noticeable at a much later stage and
can cause the tires to burst. This could cause
you to lose control of the vehicle, resulting in
an accident and injuring yourself or others.
Replace damaged tires immediately. Automatic car wash
If the vehicle is very dirty, prewash it before
you put it through an automatic car wash. G
Warning
If a wax preservative is applied after the
vehicle is washed,
you should remove the wax164
Cleaning and care
Operation
Page 173 of 292
Have the system checked immediately at a
qualified specialist workshop, e.g. at an
authorized Sprinter Dealer.
i There is usually a notice in the engine
compartment to remind
you when the next
brake fluid change is due. Windshield washer system/
headlamp cleaning system
Add windshield washer concentrate to the
washer fluid all year round. G
Warning
Windshield washer concentrate is highly
flammable.
Fire, naked flames
and smoking are therefore
prohibited when you are handling windshield
washer concentrate.
! Only use washer fluid concentrate which
is suitable for plastic lenses. Unsuitable
washer fluid concentrate could damage the
plastic lenses of the headlamps.
Adapt the mixing ratio to the ambient
temperature. If the temperature is above
freezing, use Summerwash to prevent
smearing. If there is a risk of frost, use
Winterwash to prevent the water from
freezing on the windshield.
The washer fluid reservoir has a capacity of
approximately 6.3 US qt (6.0 l). X
Mix the washer fluid to the appropriate
mixing ratio in a container beforehand.
X Remove washer fluid reservoir cap 0046.X
Add washer fluid.
X Replace cap 0046. Engine oil level
You will find information about engine oil
consumption in the "Driving tips" section
(Y page 141).
Check the engine oil level on a regular basis,
e.g. weekly or each time you refuel.
Checking the engine oil level in the
display Depending on the vehicle's equipment, in
vehicles with a diesel engine, the engine oil
level is shown in the display.
Only check the engine oil level when the
engine is at operating temperature.
X
Park the vehicle on a level surface.
X Switch off the engine.
X Wait for five minutes.
X Turn the key to position 2 in the ignition
lock.
The display is activated.
i If at extremely low temperatures no
engine oil level is displayed after five
minutes, repeat the engine oil level check
after a further five minutes.
If an oil level reading is still not displayed,
check the engine
oil level with the dipstick.
Have the oil level display checked at a
qualified specialist workshop, e.g. at an
authorized Sprinter Dealer.
Vehicles without steering wheel buttons
X Press the 007B menu button on the
instrument cluster repeatedly until the
display shows the 00B1 symbol.
The --:-- display flashes
while the oil level
is being measured. Maintenance
171
Operation Z
Page 198 of 292
Problem Possible causes/consequences and
0050 Solutions0077
US vehicles
only:
The yellow tire
pressure
monitor warning
lamp flashes for
60 seconds and
then remains lit. The tire pressure monitor has malfunctioned.
X
Have the tire pressure monitor and the wheels checked at a
qualified specialist workshop. 00BA
The yellow water
separator
indicator lamp
lights up when
the ignition is
started. The water that has collected in the water separator has reached
the maximum level.
X
Drain the water separator ( Y page 221).00BD
The yellow
washer fluid
level indicator
lamp for the
windshield
washer/
headlamp
cleaning system
lights up after
the engine is
started or while
the vehicle is in
motion. The water level is too low.
X
Top up washer fluid ( Y page 171).0082
The red seat belt
warning lamp
lights up for
approximately
six seconds
when the key is
turned to
position 2 in the
ignition lock.
A warning tone
also sounds. The warning lamp is to remind you to fasten your seat belt.
X
Fasten seat belt (Y page 34).196
TroubleshootingPractical advice
Page 211 of 292
Display messages Possible causes/consequences and
0050 Solutions0055
Low beam left The left-hand low beam is faulty
7
.
X Halogen headlamps: replace the bulbs as soon as possible
(Y page 233).
X Bi-Xenon headlamps: consult a qualified specialist workshop
as soon as possible. 0055
Low beam right The right-hand low beam is faulty
7
.
X Halogen headlamps: replace the bulbs as soon as possible.
(Y page 233)
X Bi-Xenon headlamps: consult a qualified specialist workshop
as soon as possible. 0055
Cornering lt. left The left-hand cornering light is faulty
7
.
X Visit a qualified specialist workshop as soon as possible. 0055
Cornering lt.
right The right-hand cornering light is faulty
7
.
X Visit a qualified specialist workshop as soon as possible. 0055
Lights on
automatic. Remove
key The automatic headlamp feature is active: the light switch is in the
005A position and you have forgotten to remove the key.
X
Remove the key from the ignition lock. 0055
Turn signal left The left-hand turn signal is faulty.
X
Replace the bulb as soon as possible (Y page 233). 0055
Turn signal right The right-hand turn signal is faulty.
X
Replace the bulb as soon as possible (Y page 233). 0055
Brake lamp left The left-hand brake lamp is faulty
7
.
X Replace the bulb as soon as possible (Y page 233). 0055
Brake lamp right The right brake lamp is faulty
7
.
X Replace the bulb as soon as possible (Y page 233). 0055
Third brake lamp The high-mounted brake lamp is faulty
7
. This display message will
only appear if all LEDs have failed.
X Visit a qualified specialist workshop as soon as possible. 7
Depending on the equipment, the bulb-failure indicator may not be featured for any lamps other than the
turn signals. Troubleshooting
209
Practical advice Z
Page 221 of 292
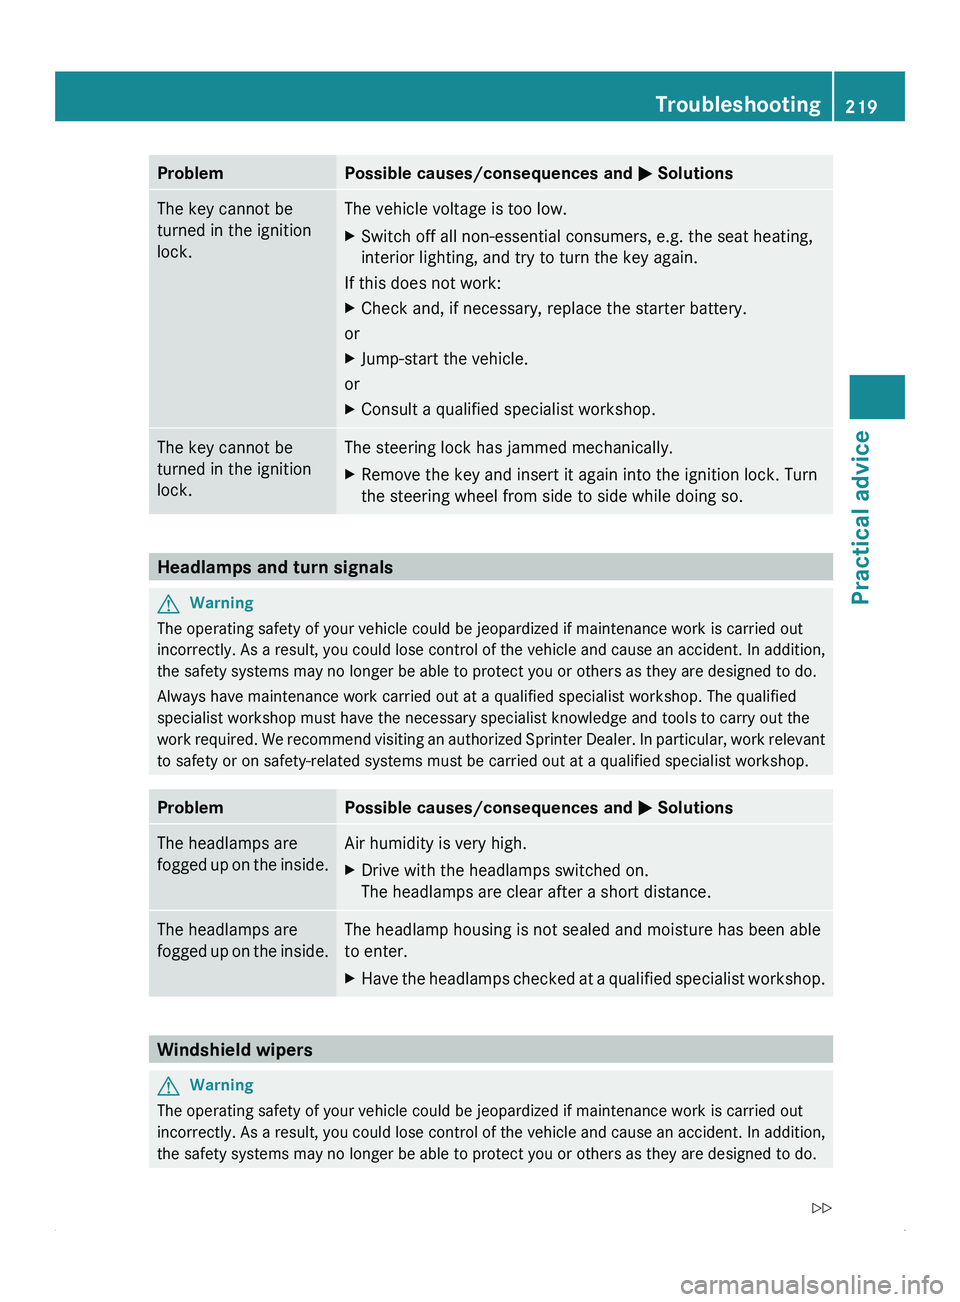
Problem Possible causes/consequences and
0050 SolutionsThe key cannot be
turned in the ignition
lock. The vehicle voltage is too low.
X
Switch off all non-essential consumers, e.g. the seat heating,
interior lighting, and try to turn the key again.
If this does not work:
X Check and, if necessary, replace the starter battery.
or
X Jump-start the vehicle.
or
X Consult a qualified specialist workshop. The key cannot be
turned in the ignition
lock. The steering lock has jammed mechanically.
X
Remove the key and insert it again into the ignition lock. Turn
the steering wheel from side to side while doing so. Headlamps and turn signals
G
Warning
The operating safety of your vehicle could be jeopardized if maintenance work is carried out
incorrectly. As a
result, you could lose control of the vehicle and cause an accident. In addition,
the safety systems may no longer be able to protect you or others as they are designed to do.
Always have maintenance work carried out at a qualified specialist workshop. The qualified
specialist workshop must have the necessary specialist knowledge and tools to carry out the
work required. We recommend visiting an authorized Sprinter Dealer. In particular, work relevant
to safety or on safety-related systems must be carried out at a qualified specialist workshop. Problem Possible causes/consequences and
0050 SolutionsThe headlamps are
fogged up
on
the inside. Air humidity is very high.
X
Drive with the headlamps switched on.
The headlamps are clear after a short distance. The headlamps are
fogged up
on
the inside. The headlamp housing is not sealed and moisture has been able
to enter.
X
Have the headlamps checked at a qualified specialist workshop. Windshield wipers
G
Warning
The operating safety of your vehicle could be jeopardized if maintenance work is carried out
incorrectly. As a
result, you could lose control of the vehicle and cause an accident. In addition,
the safety systems may no longer be able to protect you or others as they are designed to do. Troubleshooting
219
Practical advice
Z
Page 236 of 292
Do not change Xenon bulbs yourself, but have
them replaced at a qualified specialist
workshop which has
the necessary specialist
knowledge and tools to carry out the work
required.
We recommend an authorized Sprinter Dealer
for this purpose. In particular, work relevant
to safety or on safety-related systems must
be carried out at a qualified specialist
workshop.
R To prevent short circuits, switch off the
lighting system before changing a bulb.
R Only touch new bulbs with a clean, lint-free
cloth or similar. Do not work with wet or
greasy fingers.
R Only install 12 V bulbs of the same type and
of the correct wattage.
R Have the headlamp setting checked
regularly.
R If the new bulb still does not light up consult
a qualified specialist workshop, e.g. an
authorized Sprinter Dealer.
R Have the following LEDs and bulbs replaced
at a qualified specialist workshop, e.g. an
authorized Sprinter Dealer:
-the additional turn signals in the exterior
mirrors
- the high-mounted brake lamp
- the Bi-Xenon bulbs
- the fog lamps
! Make sure the bulbs are always securely
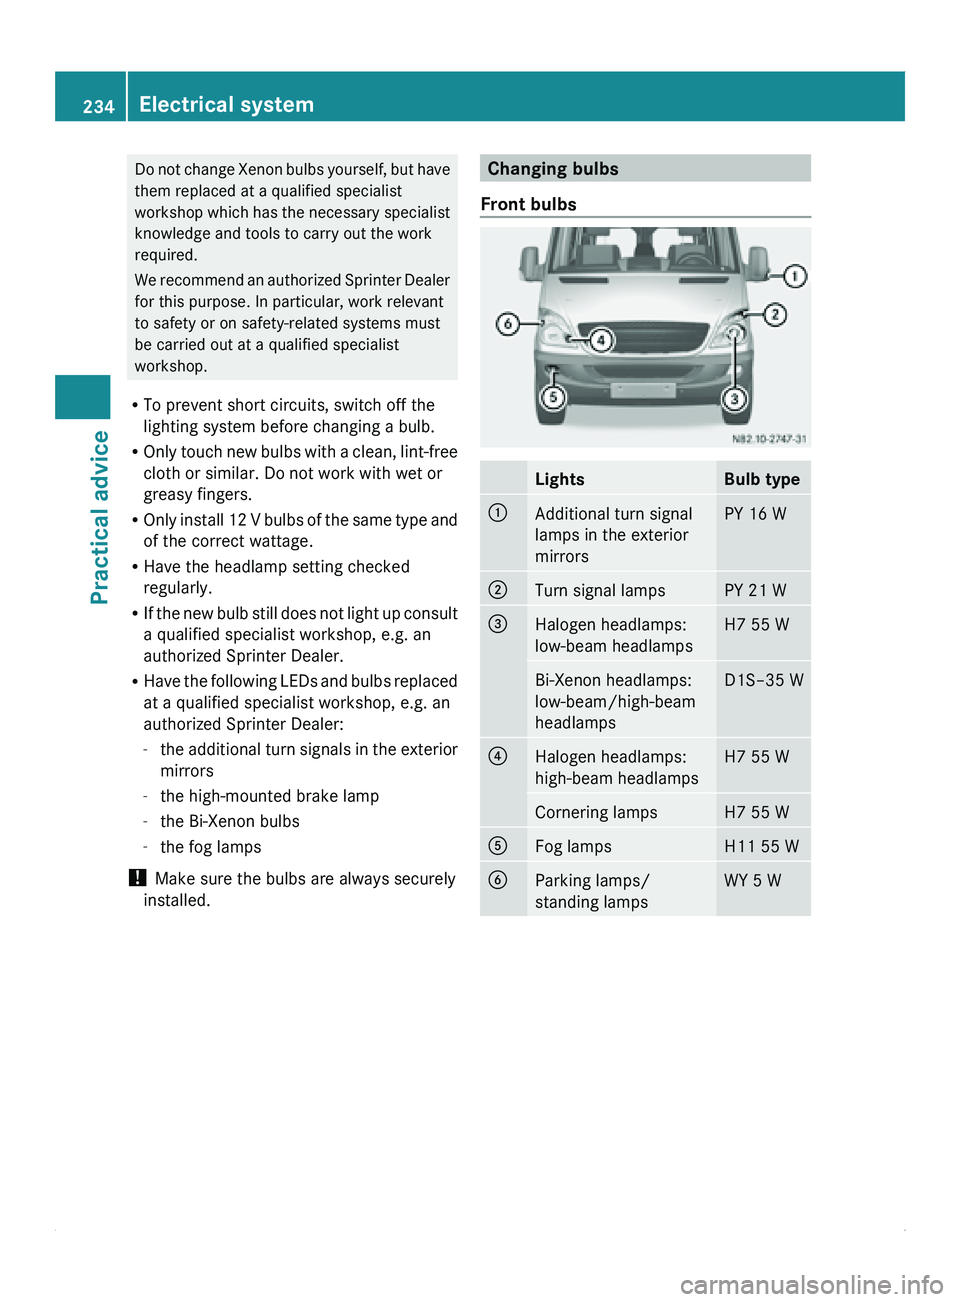
installed. Changing bulbs
Front bulbs Lights Bulb type
0046
Additional turn signal
lamps in the exterior
mirrors PY 16 W
0047
Turn signal lamps PY 21 W
008A
Halogen headlamps:
low-beam headlamps H7 55 W
Bi-Xenon headlamps:
low-beam/high-beam
headlamps D1S–35 W
0088
Halogen headlamps:
high-beam headlamps H7 55 W
Cornering lamps H7 55 W
0086
Fog lamps H11 55 W
0087
Parking lamps/
standing lamps WY 5 W234
Electrical system
Practical advice
Page 237 of 292
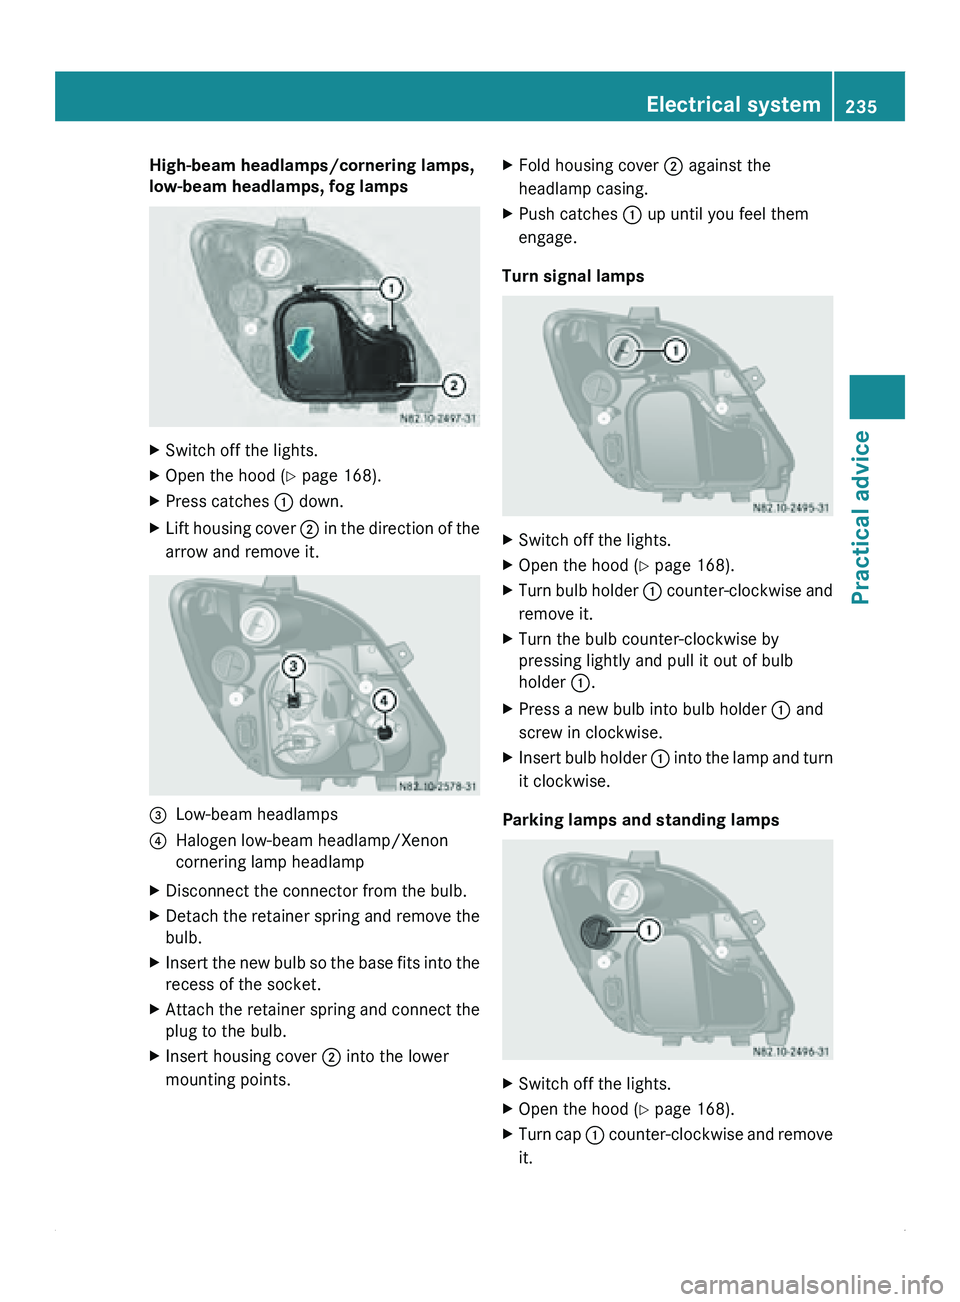
High-beam headlamps/cornering lamps,
low-beam headlamps, fog lamps
X
Switch off the lights.
X Open the hood (Y page 168).
X Press catches 0046 down.
X Lift housing cover 0047 in the direction of the
arrow and remove it. 008A
Low-beam headlamps
0088 Halogen low-beam headlamp/Xenon
cornering lamp headlamp
X Disconnect the connector from the bulb.
X Detach the retainer spring and remove the
bulb.
X Insert the new bulb so the base fits into the
recess of the socket.
X Attach the retainer spring and connect the
plug to the bulb.
X Insert housing cover 0047 into the lower
mounting points. X
Fold housing cover 0047 against the
headlamp casing.
X Push catches 0046 up until you feel them
engage.
Turn signal lamps X
Switch off the lights.
X Open the hood (Y page 168).
X Turn bulb holder 0046 counter-clockwise and
remove it.
X Turn the bulb counter-clockwise by
pressing lightly and pull it out of bulb
holder 0046
.
X Press a new bulb into bulb holder 0046 and
screw in clockwise.
X Insert bulb holder 0046 into the
lamp and turn
it clockwise.
Parking lamps and standing lamps X
Switch off the lights.
X Open the hood (Y page 168).
X Turn cap 0046 counter-clockwise and remove
it. Electrical system
235
Practical advice Z
Page 244 of 292
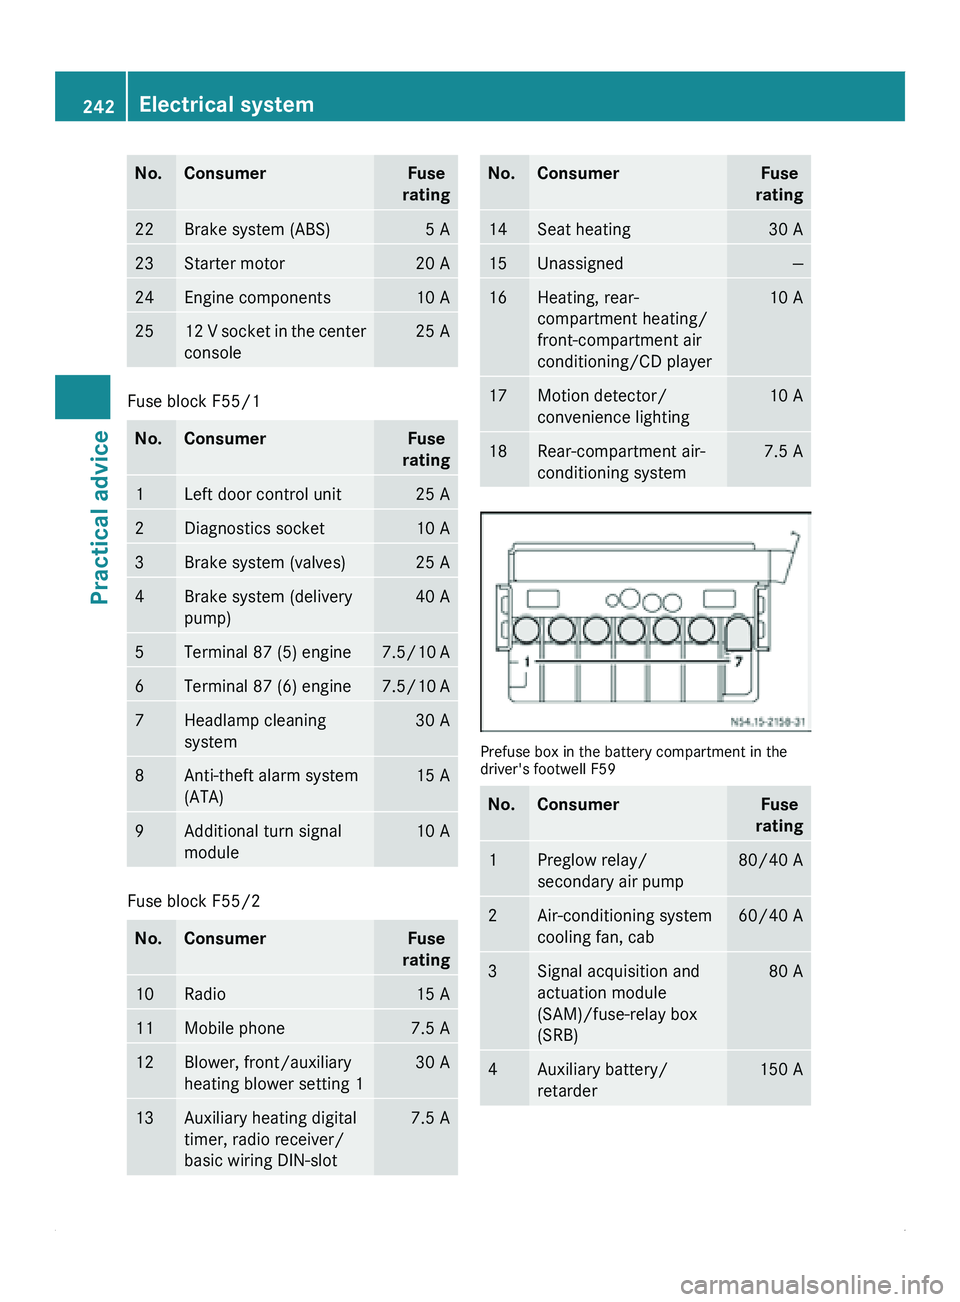
No. Consumer Fuse
rating 22 Brake system (ABS) 5 A
23 Starter motor 20 A
24 Engine components 10 A
25 12 V socket in the center
console 25 A
Fuse block F55/1
No. Consumer Fuse
rating 1 Left door control unit 25 A
2 Diagnostics socket 10 A
3 Brake system (valves) 25 A
4 Brake system (delivery
pump) 40 A
5 Terminal 87 (5) engine 7.5/10 A
6 Terminal 87 (6) engine 7.5/10 A
7 Headlamp cleaning
system 30 A
8 Anti-theft alarm system
(ATA) 15 A
9 Additional turn signal
module 10 A
Fuse block F55/2
No. Consumer Fuse
rating 10 Radio 15 A
11 Mobile phone 7.5 A
12 Blower, front/auxiliary
heating blower setting 1 30 A
13 Auxiliary heating digital
timer, radio receiver/
basic wiring DIN-
slot 7.5 A No. Consumer Fuse
rating 14 Seat heating 30 A
15 Unassigned —
16 Heating, rear-
compartment heating/
front-compartment air
conditioning/CD player 10 A
17 Motion detector/
convenience lighting 10 A
18 Rear-compartment air-
conditioning system 7.5 A
Prefuse box in the battery compartment in the
driver's footwell F59
No. Consumer Fuse
rating 1 Preglow relay/
secondary air pump 80/40 A
2 Air-conditioning system
cooling fan, cab 60/40 A
3 Signal acquisition and
actuation module
(SAM)/fuse-relay box
(SRB) 80 A
4 Auxiliary battery/
retarder 150 A242
Electrical systemPractical advice
Page 289 of 292
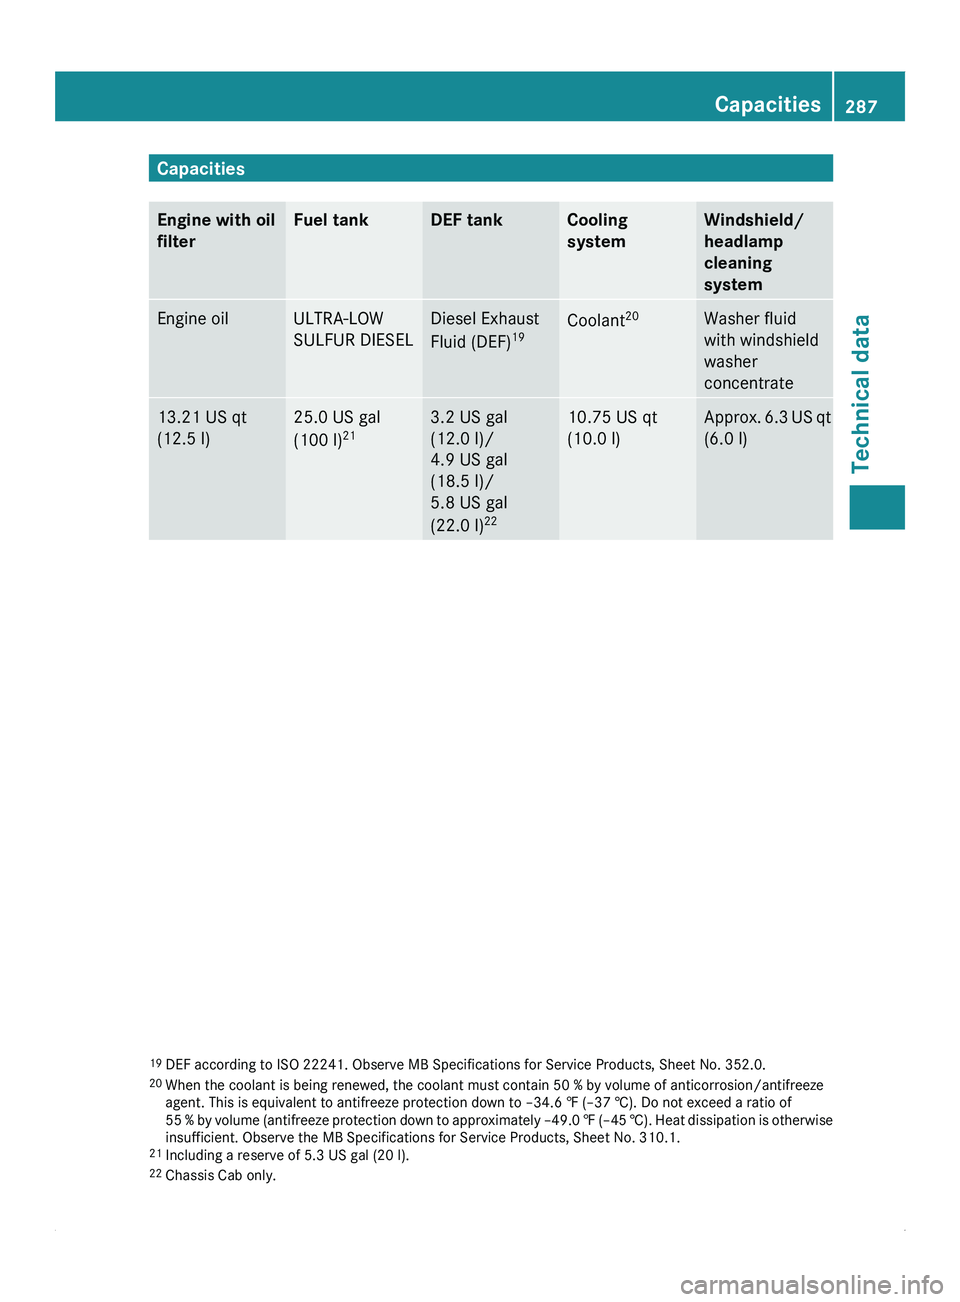
Capacities
Engine with oil
filter Fuel tank DEF tank Cooling
system Windshield/
headlamp
cleaning
system
Engine oil ULTRA-LOW
SULFUR DIESEL Diesel Exhaust
Fluid (DEF)
19 Coolant
20 Washer fluid
with windshield
washer
concentrate
13.21 US qt
(12.5 l) 25.0 US gal
(100 l)
21 3.2 US gal
(12.0 l)/
4.9 US gal
(18.5 l)/
5.8 US gal
(22.0 l)
22 10.75 US qt
(10.0 l) Approx. 6.3 US qt
(6.0 l) 19
DEF according to ISO 22241 . Observe MB Specifications for Service Products,
Sheet No. 352.0.
20 When the coolant is being renewed, the coolant must contain 50 % by volume of anticorrosion/antifreeze
agent. This is equivalent to antifreeze protection down to –34.6 ‡ (–37 †). Do not exceed a ratio of
55 % by volume (antifreeze protection down to approximately –49.0 ‡ (–45 †). Heat dissipation is otherwise
insufficient. Observe the MB Specifications for Service Products, Sheet No. 310.1.
21 Including a reserve of 5.3 US gal (20 l).
22 Chassis Cab only. Capacities
287
Technical data Z