warning light MERCEDES-BENZ SPRINTER 2012 MY12 Operator’s Manual
[x] Cancel search | Manufacturer: MERCEDES-BENZ, Model Year: 2012, Model line: SPRINTER, Model: MERCEDES-BENZ SPRINTER 2012Pages: 292, PDF Size: 6.75 MB
Page 68 of 292
X
To fold the seat cushions forwards: lift
the seat cushion out of front
anchorage 0046.
X Pull the seat cushion forwards slightly and
out of rear anchorage 0047.
X Fold the rear edge of the seat cushion up.
i You can stow
various articles in the space
under the twin co-driver's seat.
X To fold the seat cushion back: fold down
the seat cushion by the rear edge.
X Slide the seat cushion under the seat
backrest into rear anchorage 0047
.
X Push down on the seat cushion at the front
until it engages in front anchorage 0046. Rear bench seat
G
Warning!
The unlocking levers at the foot of the rear
bench seat must lie parallel to the vehicle
floor. You may only install a rear bench seat
with two seats on the driver's side.
Information about this can be found at any
authorized Sprinter dealer.
The integral seat
belts can only protect you as
intended if you correctly install the prescribed
rear bench seats. For this reason, have a rear
bench seat with four seats installed only at a
qualified specialist workshop, e.g. an
authorized Sprinter dealer.
Keep the mounting shells of the bench seats
on the floor free from dirt and other objects.
The secure engaging of the locks is
guaranteed only in this way.
For safety reasons, have bench seat mounting
shells retrofitted only at an authorized
Sprinter dealer.
i Do not exceed the maximum permissible
number of seats for models registered as
passenger vehicles.
! For safety reasons, the rear bench seat
with four seats must be installed or
removed only at a qualified specialist workshop, e.g. an authorized Sprinter
dealer.
Removing two-seat or three-seat rear
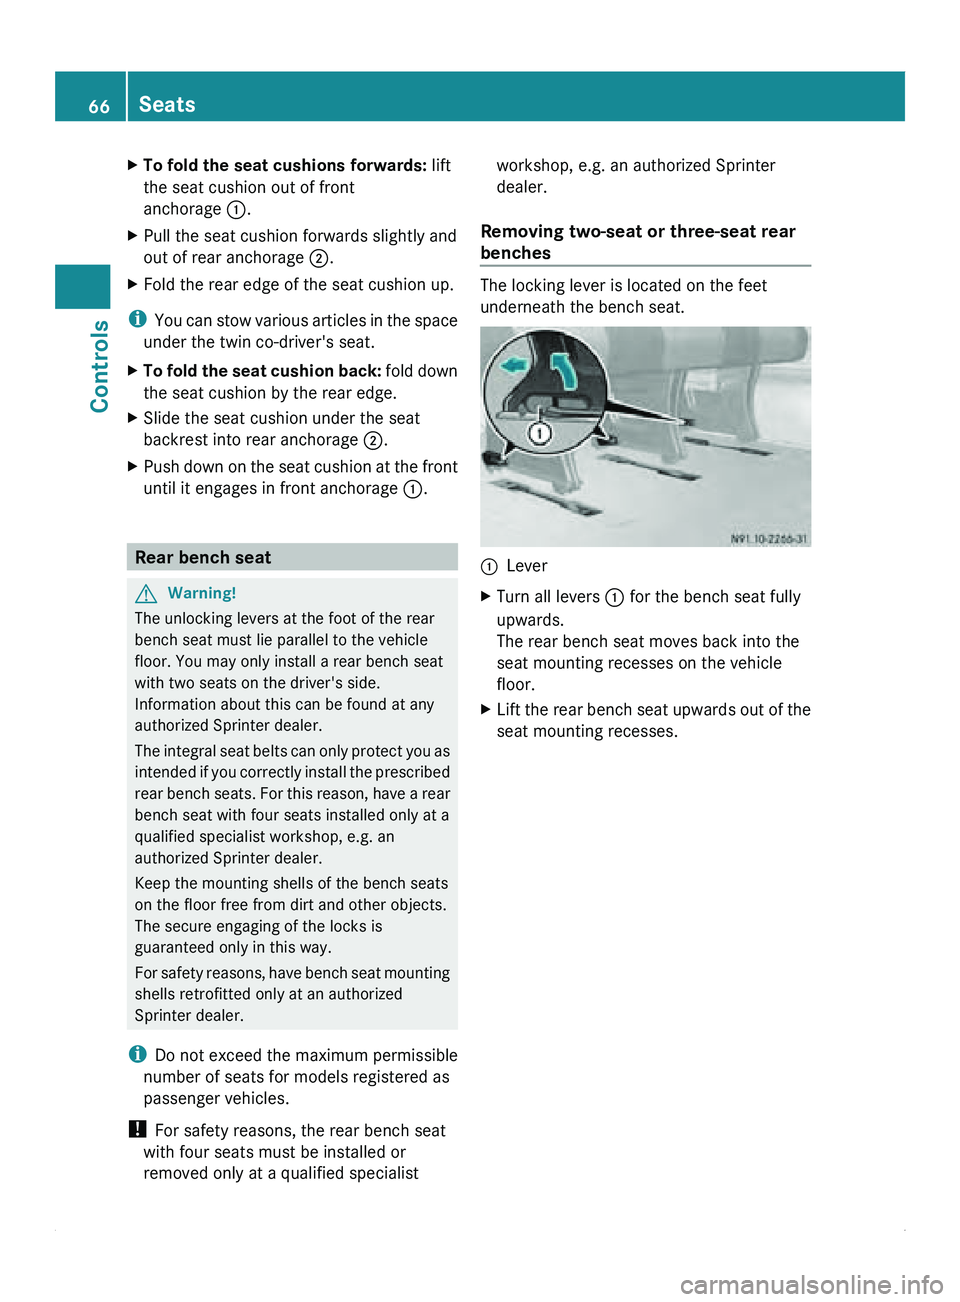
benches The locking lever is located on the feet
underneath the bench seat.
0046
Lever
X Turn all levers 0046 for the bench seat fully
upwards.
The rear bench seat moves back into the
seat mounting recesses on the vehicle
floor.
X Lift the rear bench seat upwards out of the
seat mounting recesses.66
Seats
Controls
Page 73 of 292
The display in the instrument cluster is
activated when you:
R
open the driver's door
R turn the key
to position 2 in the ignition lock
R press the 0048 reset button
R switch on the lights
The display switches off automatically after
approximately 30 seconds if:
R the vehicle lighting is not switched on.
R the key is in position 0 in the ignition lock.G
Warning
No messages can be displayed if the
instrument cluster and/or the display fails.
You will then not be able to see information
about the vehicle status, such as speed and
outside temperature, warning/indicator
lamps and display messages or the failure of
systems. Handling characteristics may be
affected. Adapt your speed and driving style
accordingly.
Immediately consult a qualified specialist
workshop. The qualified specialist workshop
must have the necessary specialist
knowledge and tools to carry out the work
required. We recommend an authorized
Sprinter Dealer for
this purpose. In particular,
all work relevant to safety or on safety-related
systems must be carried out at a qualified
specialist workshop. G
Warning
Only use the adjustment buttons on the
instrument cluster when
the traffic conditions
permit. You would otherwise be too distracted
and could cause an accident.
Do not reach through the steering wheel to
operate the adjustment buttons. The
movement of the steering wheel would be
significantly impeded. Your attention would
also be diverted from road and traffic
conditions. This could cause you to lose
control of the vehicle, and lead to an accident. Do not rest your head or chest on the steering
wheel or dashboard when operating the
adjustment buttons.
You will find page references for further
information in the index under "Air bag".
Speedometer
i In some countries, a warning sounds
when the vehicle reaches the maximum
speed limit, e.g. at 75 mph (120 km/h).
The speed can also be shown in the display.
You can find information on the digital
speedometer for vehicles without steering
wheel buttons under ( Y page 73) and for
vehicles with steering wheel buttons under
(Y page 77). Tachometer
The red band
in the tachometer indicates the
engine's overrevving range.
To protect the engine, the fuel supply is
interrupted when the red band is reached.
! Do not drive in the overrevving range, as
this could damage the engine.
0040Environmental information
Avoid driving at high engine revs. This driving
style causes an unnecessary increase in
vehicle fuel consumption and, therefore,
damage to the
environment due to increased
emission of pollution. Instrument cluster
71
Controls Z
Page 74 of 292
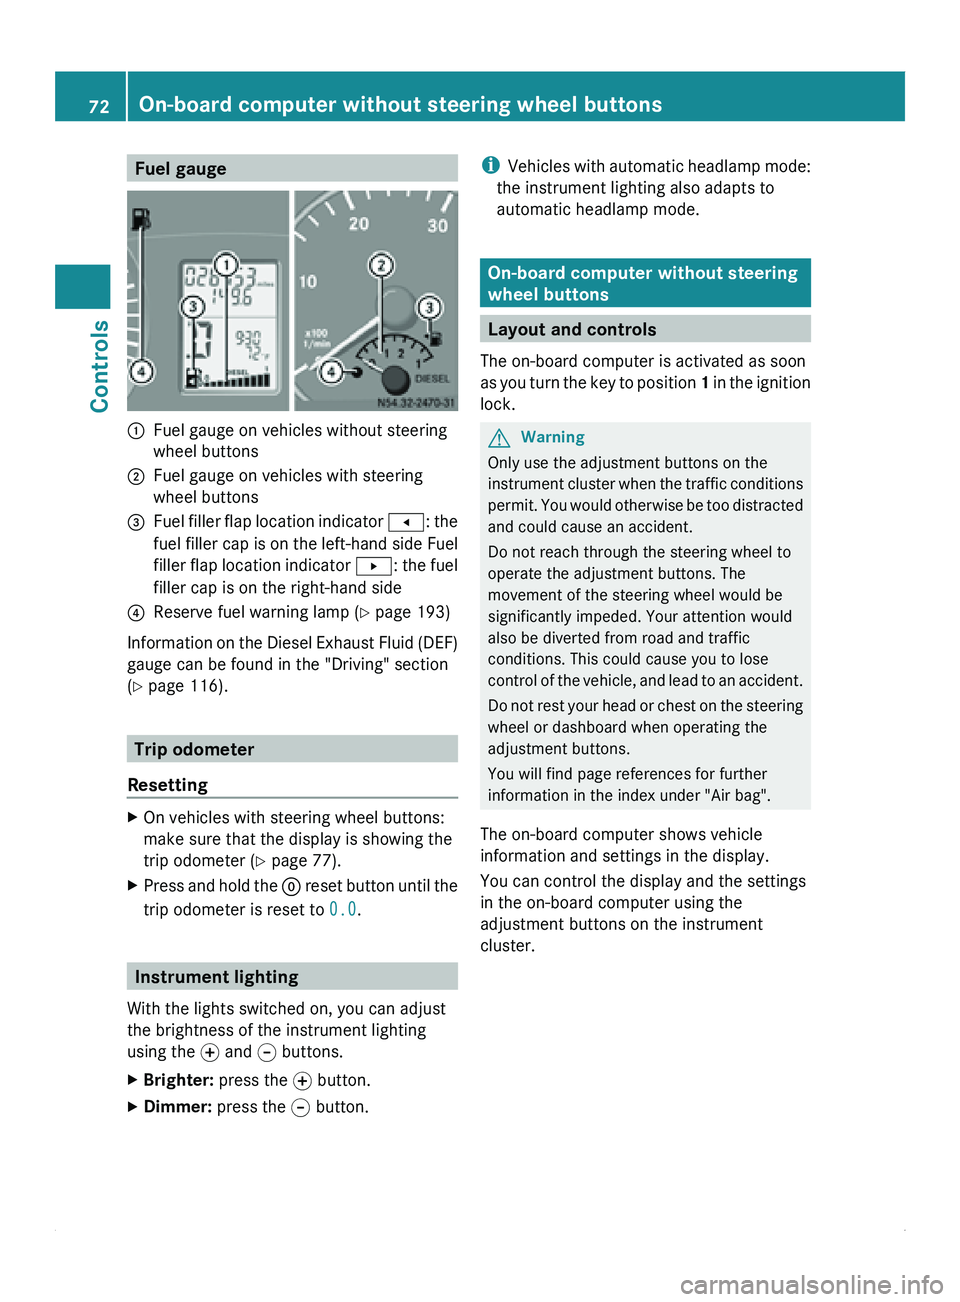
Fuel gauge
0046
Fuel gauge on vehicles without steering
wheel buttons
0047 Fuel gauge on vehicles with steering
wheel buttons
008A Fuel filler flap location indicator
0081: the
fuel filler
cap is on the left-hand side Fuel
filler flap location indicator 0082: the fuel
filler cap is on the right-hand side
0088 Reserve fuel warning lamp ( Y page 193)
Information on the Diesel Exhaust Fluid (DEF)
gauge can be found in the "Driving" section
(Y page 116). Trip odometer
Resetting X
On vehicles with steering wheel buttons:
make sure that the display is showing the
trip odometer (Y
page 77).
X Press and hold the 0048 reset button
until the
trip odometer is reset to 0.0.Instrument lighting
With the lights switched on, you can adjust
the brightness of the instrument lighting
using the 0069
and 006A buttons.
X Brighter: press the 0069 button.
X Dimmer: press the 006A button. i
Vehicles with automatic
headlamp mode:
the instrument lighting also adapts to
automatic headlamp mode. On-board computer without steering
wheel buttons
Layout and controls
The on-board computer is activated as soon
as you turn
the key to position 1 in the ignition
lock. G
Warning
Only use the adjustment buttons on the
instrument cluster when
the traffic conditions
permit. You would otherwise be too distracted
and could cause an accident.
Do not reach through the steering wheel to
operate the adjustment buttons. The
movement of the steering wheel would be
significantly impeded. Your attention would
also be diverted from road and traffic
conditions. This could cause you to lose
control of the vehicle, and lead to an accident.
Do not rest your head or chest on the steering
wheel or dashboard when operating the
adjustment buttons.
You will find page references for further
information in the index under "Air bag".
The on-board computer shows vehicle
information and settings in the display.
You can control the display and the settings
in the on-board computer using the
adjustment buttons on the instrument
cluster. 72
On-board computer without steering wheel buttons
Controls
Page 75 of 292
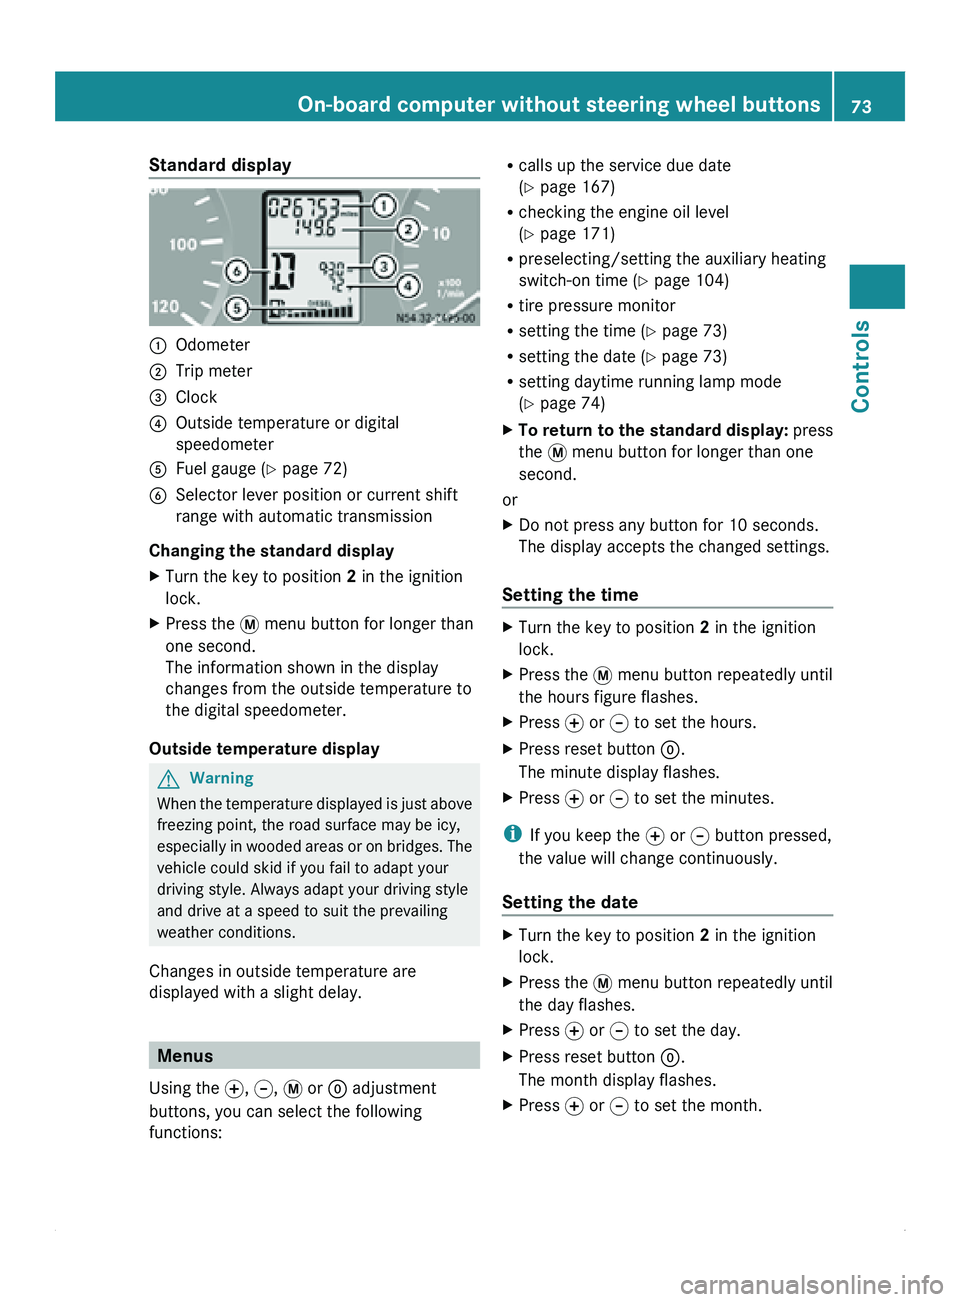
Standard display
0046
Odometer
0047 Trip meter
008A Clock
0088 Outside temperature or digital
speedometer
0086 Fuel gauge ( Y page 72)
0087 Selector lever position or current shift
range with automatic transmission
Changing the standard display
X Turn the key to position 2 in the ignition
lock.
X Press the 007B menu button for longer than
one second.
The information shown in the display
changes from the outside temperature to
the digital speedometer.
Outside temperature display G
Warning
When the temperature displayed is just above
freezing point, the road surface may be icy,
especially in wooded
areas or on bridges. The
vehicle could skid if you fail to adapt your
driving style. Always adapt your driving style
and drive at a speed to suit the prevailing
weather conditions.
Changes in outside temperature are
displayed with a slight delay. Menus
Using the 0069, 006A, 007B or 0048 adjustment
buttons, you can select the following
functions: R
calls up the service due date
(Y page 167)
R checking the engine oil level
(Y page 171)
R preselecting/setting the auxiliary heating
switch-on time ( Y page 104)
R tire pressure monitor
R setting the time (Y
page 73)
R setting the date ( Y page 73)
R setting daytime running lamp mode
(Y page 74)
X To return to the standard display: press
the 007B menu button for longer than one
second.
or
X Do not press any button for 10 seconds.
The display accepts the changed settings.
Setting the time X
Turn the key to position 2 in the ignition
lock.
X Press the 007B menu button repeatedly until
the hours figure flashes.
X Press 0069 or 006A to set the hours.
X Press reset button 0048.
The minute display flashes.
X Press 0069 or 006A to set the minutes.
i If you keep the 0069 or 006A button pressed,
the value will change continuously.
Setting the date X
Turn the key to position 2 in the ignition
lock.
X Press the 007B menu button repeatedly until
the day flashes.
X Press 0069 or 006A to set the day.
X Press reset button 0048.
The month display flashes.
X Press 0069 or 006A to set the month. On-board computer without steering wheel buttons
73
Controls Z
Page 76 of 292
X
Press reset button 0048.
The year display flashes.
X Press 0069 or 006A to set the year.
i If you keep the 0069 or 006A button pressed,
the value will change continuously.
Setting daytime running lamp mode If you have switched daytime running lamp
mode on and the light switch is in the 0027
position, the following light up automatically
when the engine is running: the parking
lamps, the low-beam headlamps, the tail
lamps and the license plate lamps.
For safety reasons, it is only possible to
change this setting when the vehicle is
stationary. The factory setting is ON in
countries in which daytime running lamp
mode is mandatory.
X
Turn the key to position 2 in the ignition
lock.
X Press the 007B menu button repeatedly until
the 0064 indicator lamp in the instrument
cluster flashes and the message ON or
OFF appears in the display.
X Press 0069 or 006A to activate or deactivate
daytime running lamp mode.
i USA only:
If you turn the light switch to 006C or
0064, the corresponding light is switched
on. Daytime running lamp mode remains
activated if the light switch is turned to
005A.
Canada only:
If you turn
the light switch to 0064, the low-
beam headlamps are switched on. Daytime
running lamp mode remains activated if the
light switch is turned to 006C or 005A. On-board computer with steering
wheel buttons
Layout and controls
The on-board computer is activated as soon
as you turn
the key to position 1 in the ignition
lock. G
Warning
Only use the on-board computer when road
and traffic conditions permit. You would
otherwise be distracted and unable to
concentrate properly on driving, and could
cause an accident.
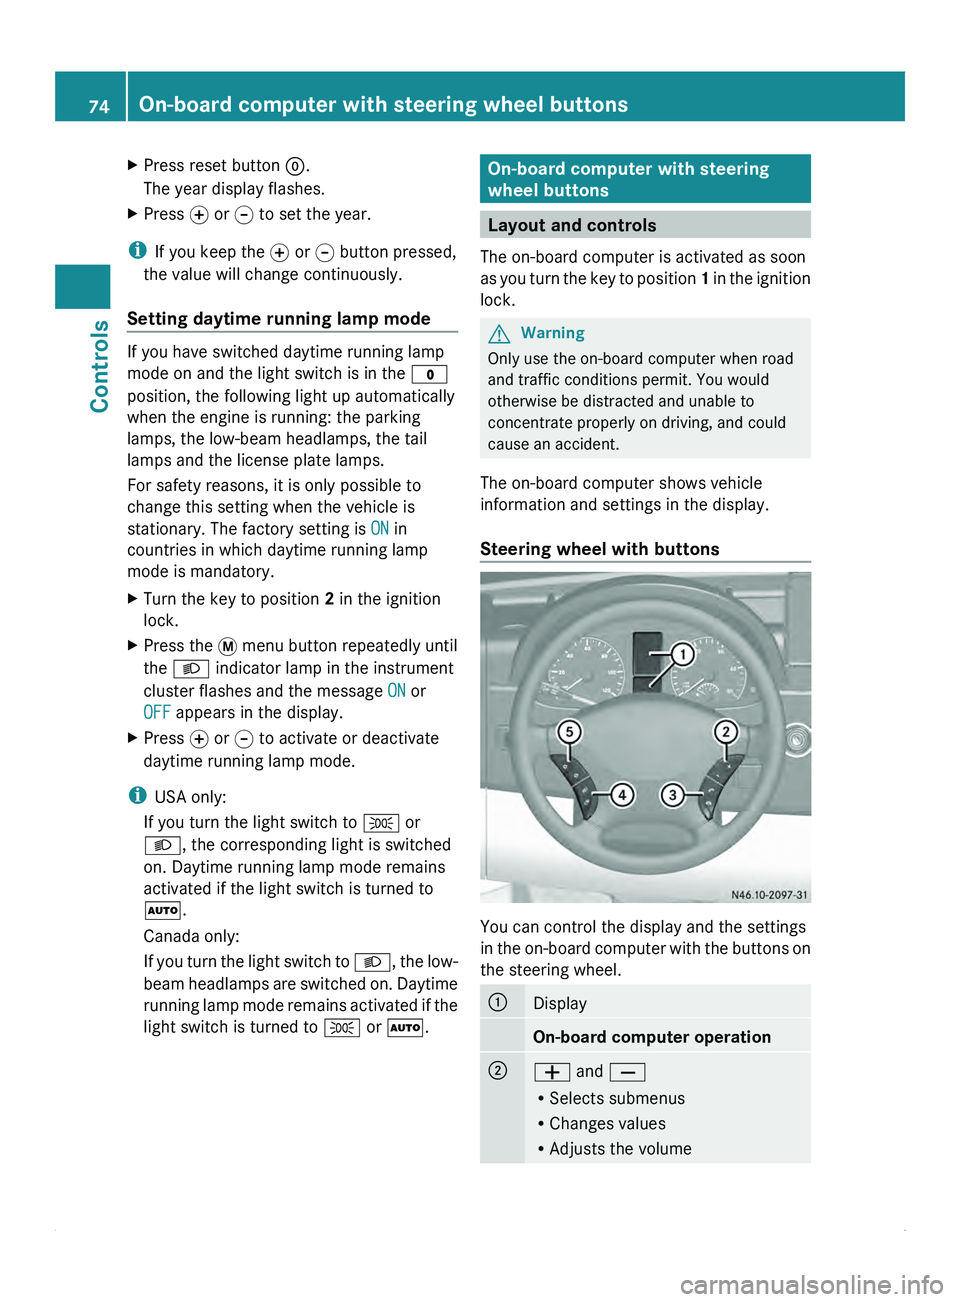
The on-board computer shows vehicle
information and settings in the display.
Steering wheel with buttons You can control the display and the settings
in the
on-board
computer with the buttons on
the steering wheel. 0046
Display
On-board computer operation
0047
005A and 005B
R
Selects submenus
R Changes values
R Adjusts the volume74
On-board computer with steering wheel buttons
Controls
Page 91 of 292
Lamp failure indicator
The bulb failure indicator monitors all lamps
of the exterior lighting with the exception of
the front position lamps and the trailer
lighting. If a bulb fails, either the
0055( Y page
197)
indicator lamp lights up or
a corresponding message is shown in the
display ( Y page 209).
i Depending on the equipment, the bulb
failure indicator can be omitted for all
lamps with the exception of the turn signal
lamps. G
Warning
The bulb failure indicator is only an aid. You
are responsible for the proper functioning of
the vehicle lighting. Insufficient or non-
functioning vehicle lighting
puts the operating
safety of the vehicle at risk. You could cause
an accident and injure yourself or others.
Therefore, check the lighting equipment of
the vehicle before each journey and, if
necessary, check the operation and condition
of the trailer lighting equipment. Light switch
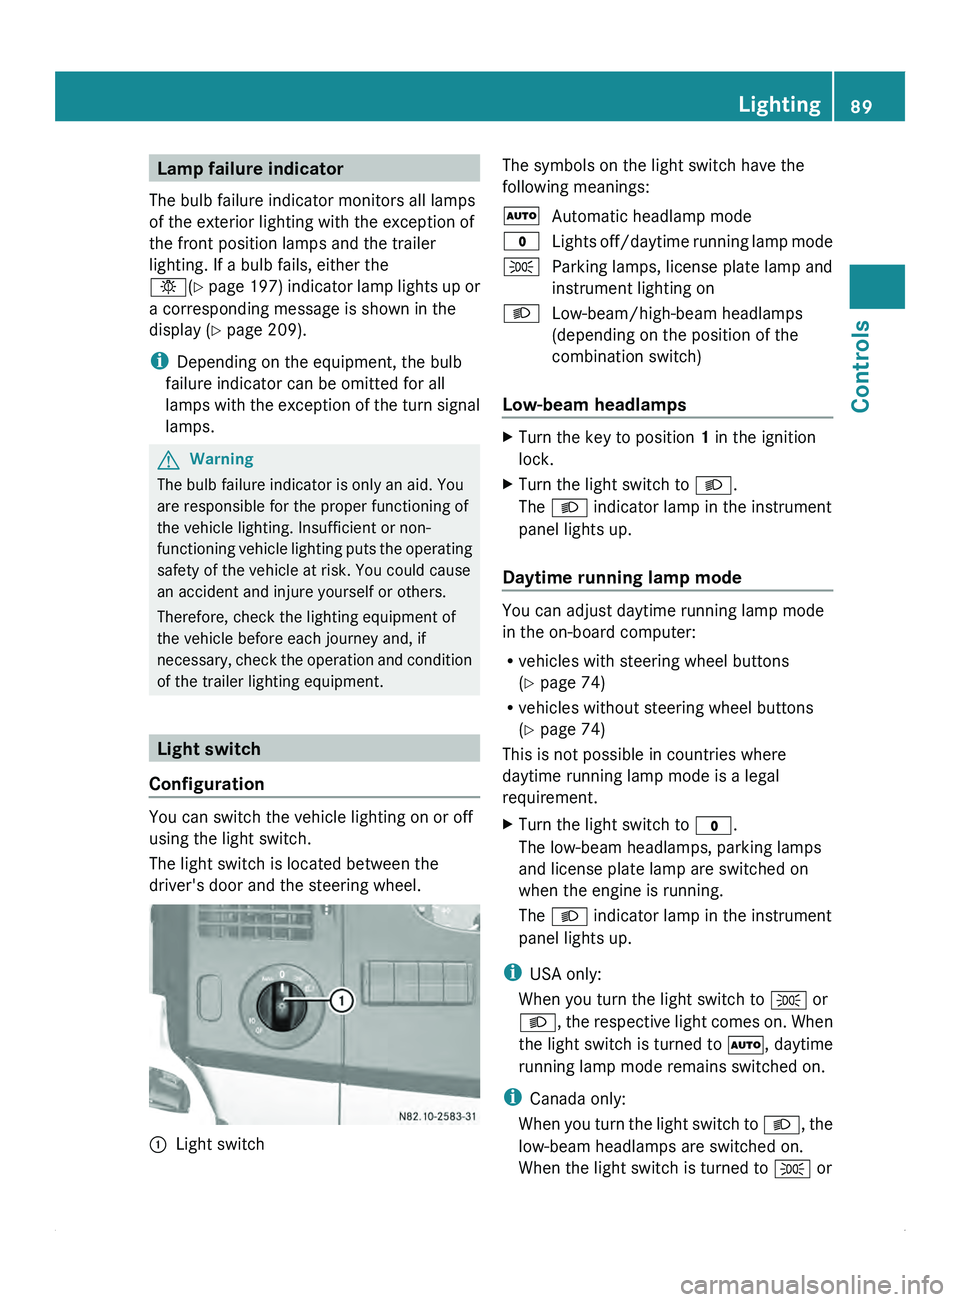
Configuration You can switch the vehicle lighting on or off
using the light switch.
The light switch is located between the
driver's door and the steering wheel.
0046
Light switch The symbols on the light switch have the
following meanings:
005A
Automatic headlamp mode
0027 Lights off/daytime
running lamp mode
006C Parking lamps, license plate lamp and
instrument lighting on
0064 Low-beam/high-beam headlamps
(depending on the position of the
combination switch)
Low-beam headlamps X
Turn the key to position 1 in the ignition
lock.
X Turn the light switch to 0064.
The 0064 indicator lamp in the instrument
panel lights up.
Daytime running lamp mode You can adjust daytime running lamp mode
in the on-board computer:
R
vehicles with steering wheel buttons
(Y page 74)
R vehicles without steering wheel buttons
(Y page 74)
This is not possible in countries where
daytime running lamp mode is a legal
requirement.
X Turn the light switch to 0027.
The low-beam headlamps, parking lamps
and license plate lamp are switched on
when the engine is running.
The 0064 indicator lamp in the instrument
panel lights up.
i USA only:
When you turn the light switch to 006C or
0064, the respective
light comes on. When
the light switch is turned to 005A, daytime
running lamp mode remains switched on.
i Canada only:
When you turn the light switch to 0064, the
low-beam headlamps are switched on.
When the light switch is turned to 006C or Lighting
89
Controls Z
Page 92 of 292
005A, daytime running lamp mode remains
switched on.
Automatic headlamp mode Parking lamps, low-beam headlamps and the
license plate lamp are switched on
automatically depending on the ambient
light.
G
Warning!
If the light switch is set to 005A,
the low-beam
headlamps will not come on automatically if
it is foggy. This could endanger you and
others. Therefore, turn the light switch to
0064
in fog.
The automatic headlamp feature is only an
aid. The driver is responsible for the vehicle's
lighting at all times.
X Turn the light switch to 005A.
The parking lamps are switched on/off
automatically when the key is in position
1 in the ignition lock.
Parking lamps, low-beam headlamps and
the license plate
lamp are switched on/off
automatically, depending on ambient light
conditions, when the engine is running.
Front fog lamps/rear fog lamp X
Turn light switch 0046 to 0064 or 006C.
i If your vehicle is only equipped with rear
fog lamps, you
must turn the light switch to
0064.
X Front fog lamps: pull light switch 0046 out
to the first stop.
The green 0067 indicator lamp next to the
light switch lights up.
X Rear fog lamp: pull light switch 0046 out to
the second stop.
The yellow 006A
indicator lamp next to the
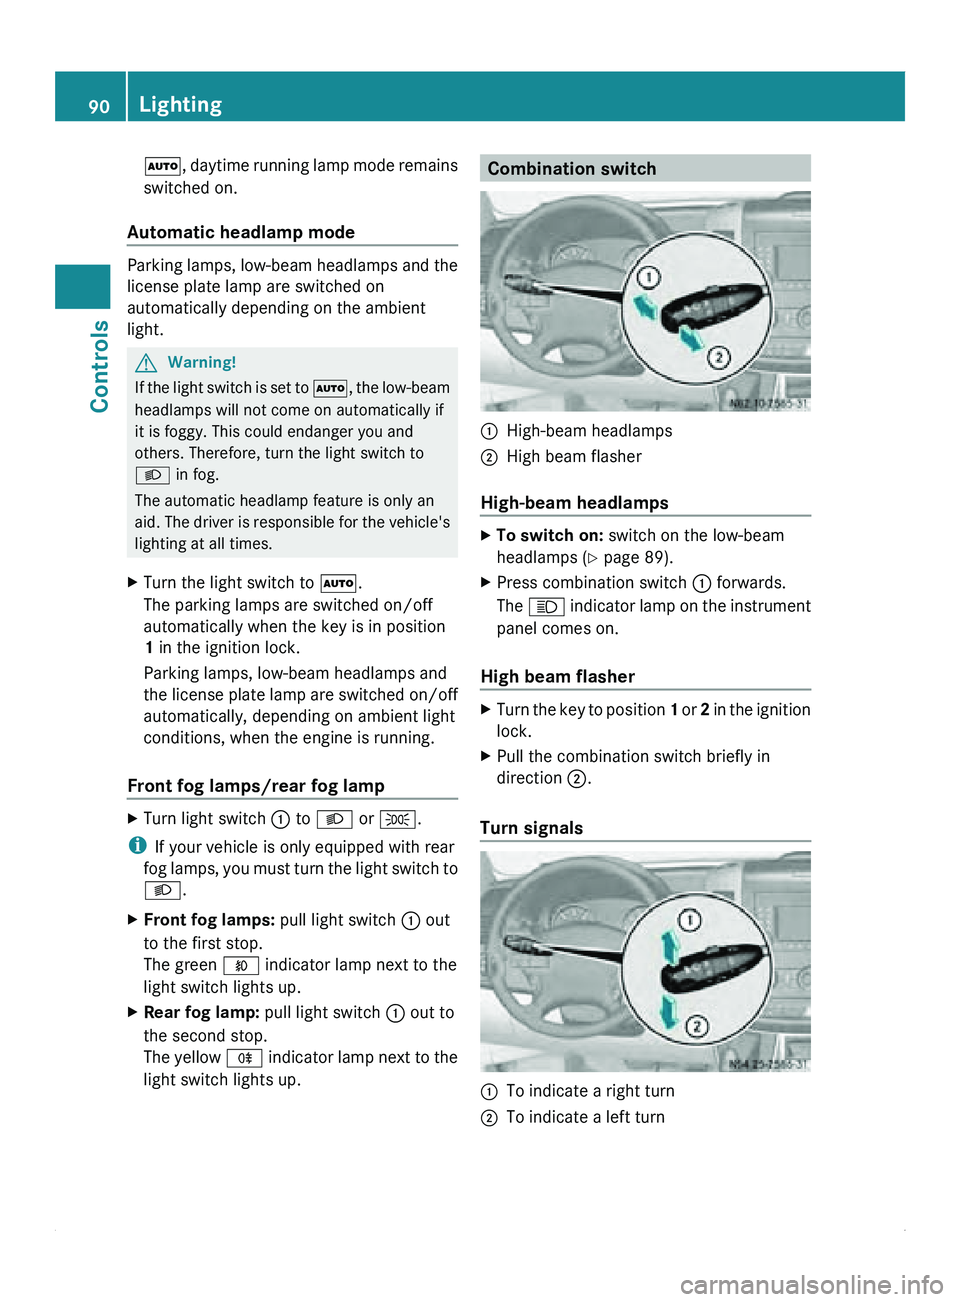
light switch lights up. Combination switch
0046
High-beam headlamps
0047 High beam flasher
High-beam headlamps X
To switch on: switch on the low-beam
headlamps ( Y page 89).
X Press combination switch
0046 forwards.
The 0063 indicator lamp
on the instrument
panel comes on.
High beam flasher X
Turn the key to position 1 or 2
in the ignition
lock.
X Pull the combination switch briefly in
direction 0047.
Turn signals 0046
To indicate a right turn
0047 To indicate a left turn90
Lighting
Controls
Page 93 of 292
X
To indicate: press the combination switch
in desired direction 0046 or 0047, until it
engages.
The combination switch automatically
returns to its original position after large
steering movements.
X To indicate briefly: press the
combination
switch briefly in desired direction 0046
or 0047.
The corresponding turn signal flashes three
times. Cornering light function (vehicles
with Bi-Xenon headlamps)
When the low-beam
headlamps are switched
on, the cornering light function improves the
illumination of the road in the direction you
are turning.
The cornering light function switches on
automatically, if:
R you are traveling at a speed of less than
25 mph (40 km/h) and you switch on the
indicator lamp or turn the steering wheel.
R you are traveling at a speed of between
25 mph (40 km/h) and 43 mph
(70 km/h) and you turn the steering wheel.
The cornering light may continue to be lit for
a short time, but is deactivated automatically
after a maximum of three minutes. Hazard warning lamps
The hazard warning lamps work even when
the ignition is
switched off. They are activated
automatically when an air bag is deployed or
after heavy brake application from a speed of
more than 43 mph (70 km/h) that brings the
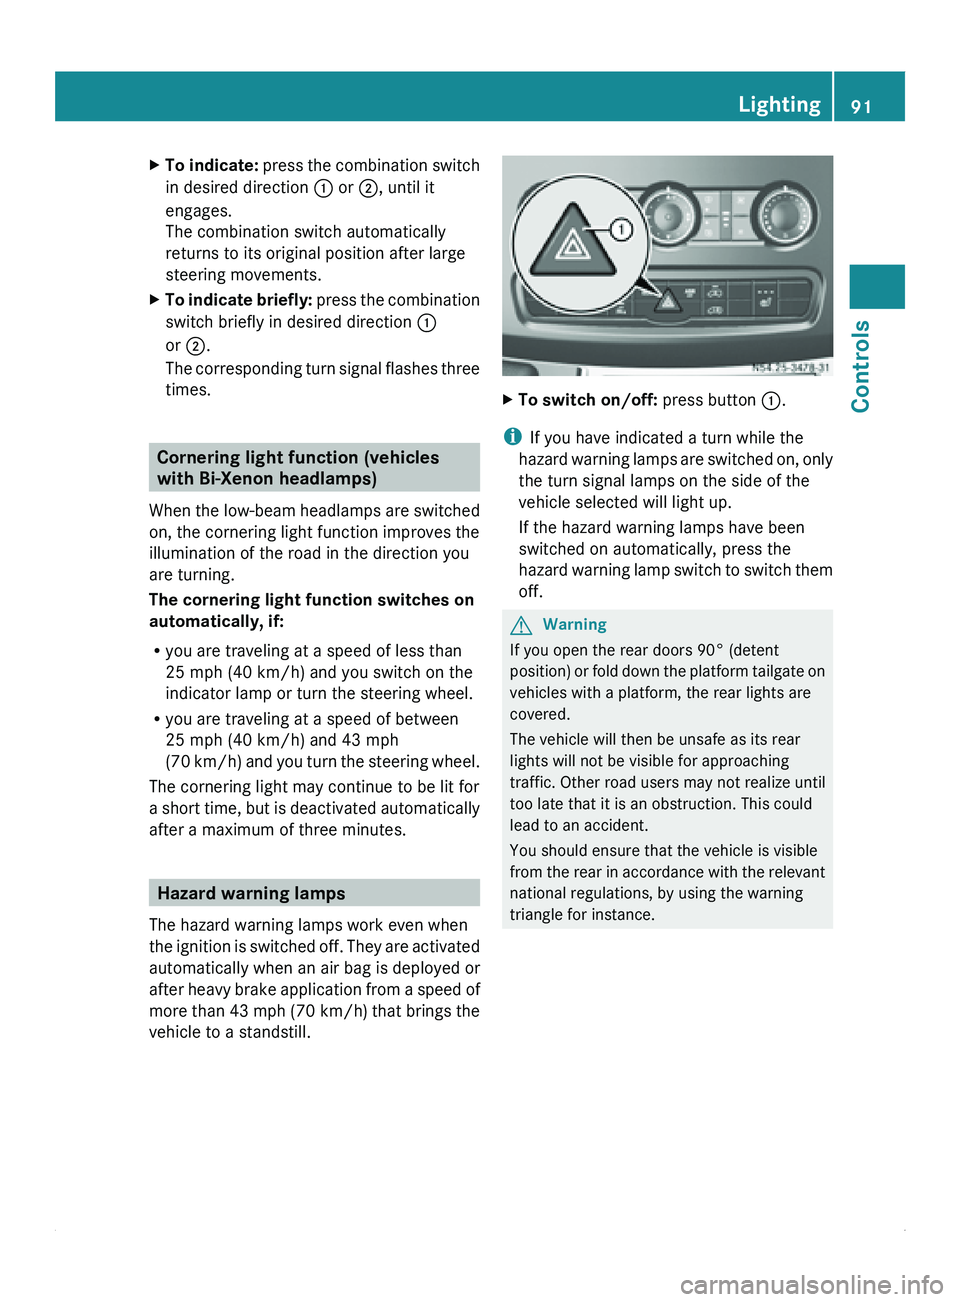
vehicle to a standstill. X
To switch on/off: press button 0046.
i If you have indicated a turn while the
hazard warning lamps
are switched on, only
the turn signal lamps on the side of the
vehicle selected will light up.
If the hazard warning lamps have been
switched on automatically, press the
hazard warning lamp switch to switch them
off. G
Warning
If you open the rear doors 90° (detent
position) or fold
down the platform tailgate on
vehicles with a platform, the rear lights are
covered.
The vehicle will then be unsafe as its rear
lights will not be visible for approaching
traffic. Other road users may not realize until
too late that it is an obstruction. This could
lead to an accident.
You should ensure that the vehicle is visible
from the rear in accordance with the relevant
national regulations, by using the warning
triangle for instance. Lighting
91
Controls Z
Page 95 of 292
lights on/off separately, depending on the
position of the central control switch.
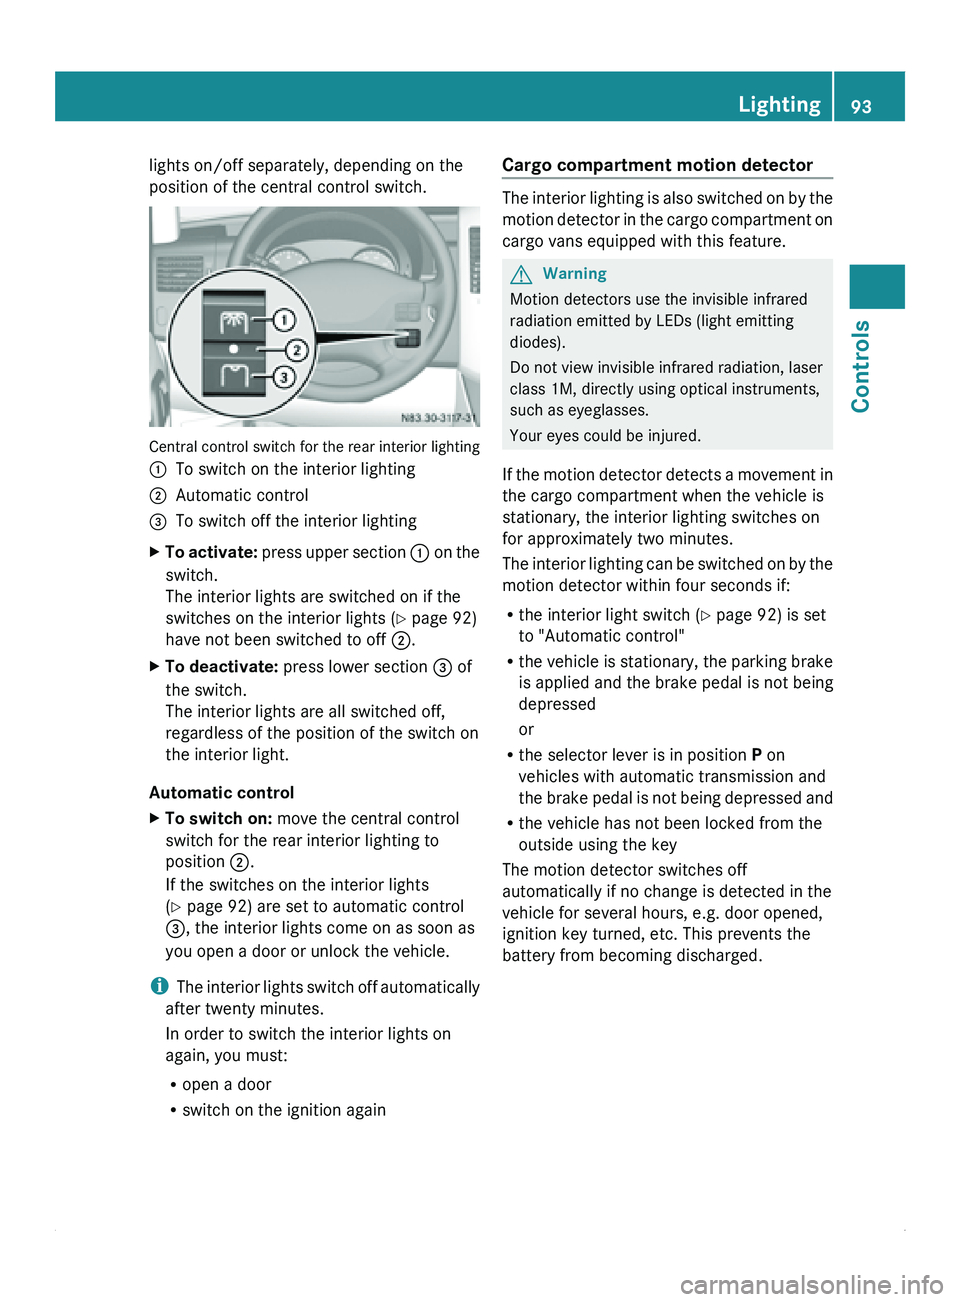
Central control switch for the rear interior lighting
0046
To switch on the interior lighting
0047 Automatic control
008A To switch off the interior lighting
X To activate: press
upper section 0046 on the
switch.
The interior lights are switched on if the
switches on the interior lights (Y page 92)
have not been switched to off 0047.
X To deactivate: press lower section 008A of
the switch.
The interior lights are all switched off,
regardless of the position of the switch on
the interior light.
Automatic control
X To switch on: move the central control
switch for the rear interior lighting to
position 0047.
If the switches on the interior lights
(Y page 92) are set to automatic control
008A, the interior lights come on as soon as
you open a door or unlock the vehicle.
i The interior
lights
switch off automatically
after twenty minutes.
In order to switch the interior lights on
again, you must:
R open a door
R switch on the ignition again Cargo compartment motion detector The interior lighting is also switched on by the
motion detector
in
the cargo compartment on
cargo vans equipped with this feature. G
Warning
Motion detectors use the invisible infrared
radiation emitted by LEDs (light emitting
diodes).
Do not view invisible infrared radiation, laser
class 1M, directly using optical instruments,
such as eyeglasses.
Your eyes could be injured.
If
the motion detector detects a movement in
the cargo compartment when the vehicle is
stationary, the interior lighting switches on
for approximately two minutes.
The interior lighting can be switched on by the
motion detector within four seconds if:
R the interior light switch (Y page 92) is set
to "Automatic control"
R the vehicle is stationary, the parking brake
is applied and the brake pedal is not being
depressed
or
R the selector lever is in position P on
vehicles with automatic transmission and
the brake pedal is not being depressed and
R the vehicle has not been locked from the
outside using the key
The motion detector switches off
automatically if no change is detected in the
vehicle for several hours, e.g. door opened,
ignition key turned, etc. This prevents the
battery from becoming discharged. Lighting
93
Controls Z
Page 102 of 292
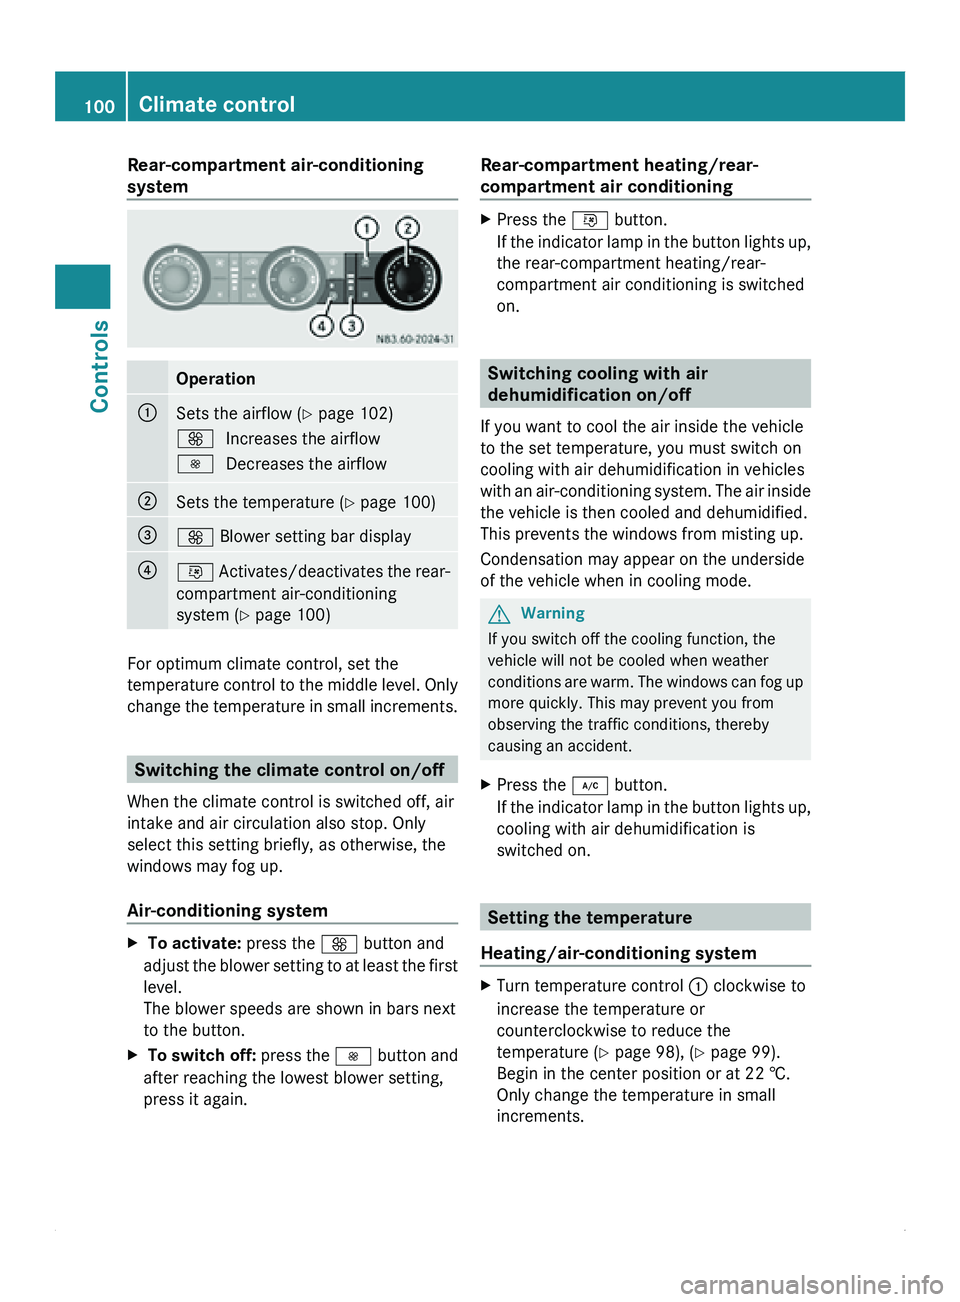
Rear-compartment air-conditioning
system
Operation
0046
Sets the airflow (
Y page 102)
0099 Increases the airflow
0097 Decreases the airflow 0047
Sets the temperature (
Y page 100)008A
0099 Blower setting bar display
0088
0076 Activates/deactivates the rear-
compartment air-conditioning
system ( Y
page 100)For optimum climate control, set the
temperature control to
the middle level. Only
change the temperature in small increments. Switching the climate control on/off
When the climate control is switched off, air
intake and air circulation also stop. Only
select this setting briefly, as otherwise, the
windows may fog up.
Air-conditioning system X
To activate: press the 0099 button and
adjust the blower
setting to at least the first
level.
The blower speeds are shown in bars next
to the button.
X To switch off: press the 0097
button and
after reaching the lowest blower setting,
press it again. Rear-compartment heating/rear-
compartment air conditioning X
Press the 0076 button.
If the indicator
lamp in the button lights up,
the rear-compartment heating/rear-
compartment air conditioning is switched
on. Switching cooling with air
dehumidification on/off
If you want to cool the air inside the vehicle
to the set temperature, you must switch on
cooling with air dehumidification in vehicles
with an air-conditioning
system. The air inside
the vehicle is then cooled and dehumidified.
This prevents the windows from misting up.
Condensation may appear on the underside
of the vehicle when in cooling mode. G
Warning
If you switch off the cooling function, the
vehicle will not be cooled when weather
conditions are warm.
The windows can fog up
more quickly. This may prevent you from
observing the traffic conditions, thereby
causing an accident.
X Press the 005C button.
If the indicator
lamp in the button lights up,
cooling with air dehumidification is
switched on. Setting the temperature
Heating/air-conditioning system X
Turn temperature control 0046 clockwise to
increase the temperature or
counterclockwise to reduce the
temperature ( Y page 98), (Y page 99).
Begin in the center position or at 22 †.
Only change the temperature in small
increments. 100
Climate control
Controls