key battery MERCEDES-BENZ SPRINTER 2013 MY13 Operator’s Manual
[x] Cancel search | Manufacturer: MERCEDES-BENZ, Model Year: 2013, Model line: SPRINTER, Model: MERCEDES-BENZ SPRINTER 2013Pages: 334, PDF Size: 3.88 MB
Page 7 of 334
Automatic transmission
emergency mode
...............................141
Auxiliary heating Activating/deactivating heater
booster mode ................................ 125
Conditions for switching on ...........119
Important safety notes ..................118
Operating with the button (control
panel) ............................................ 119
Operation with the remote control .121
Operation with the timer ................122
Problem (malfunction) ...................128
Selecting a switch-on time ............. 119
Setting the switch-on time .............120
see Auxiliary heating
Axle load, permissible (trailer
towing) ............................................... 329B
Backup lamps Changing bulbs ........................ 99, 101
Backup lamps (Chassis Cab)
Changing bulbs .............................. 100
BAS (Brake Assist System)
Display message ............................ 198
Function/notes ................................ 56
Indicator lamp ................................ 210
Basic settings
see Settings
Battery
Isolating switch .............................. 132
Replacing (SmartKey) ................66, 67
Battery (SmartKey)
Checking .......................................... 66
Important safety notes ....................66
Replacing ................................... 66, 67
Battery (vehicle)
Care ............................................... 255
Charge indicator lamp ...................214
Charging ........................................ 254
Disconnecting and connecting
(driver's footwell) ........................... 251
Disconnecting and connecting
(engine compartment) ...................253
Display message ............................ 208
Important safety notes ..................250Installing/removing (driver's
footwell) ......................................... 252
Installing/removing (engine
compartment)
................................ 254
Jump starting ................................. 267
Location ......................................... 250
Removing/installing the floor
covering (driver's footwell) ............251
Belt
see Seat belts
Bio-diesel ........................................... 317
Bleeding the fuel system ..................137
Bodies Body/equipment mounting
directives for trucks .........................28
Bottle holder ...................................... 227
see Cuph older
Brake
EBD .................................................. 57
Brake Assist System
see BAS (Brake Assist System)
Brake fluid
Checking the level .........................245
Display message ............................ 199
Notes .................................... .245, 324
Warning lamp ................................. 211
Brake force distribution,
electronic
see EBD (electronic brake force
distribution)
Brake lamps
Changing bulbs ........................ 99, 101
Brake lamps (Chassis Cab)
Changing bulbs .............................. 100
Brake linings
Display message ............................ 199
Indicator lamp ................................ 214
Brakes
ABS .................................................. 56
Applying the parking brake ............146
BAS .................................................. 56
Brake fluid (notes) .................245, 324
Checking brake fluid leve l.............. 245
Display messages ..........................199
Driving tips .................................... 150
Important safety notes ..................150
Maintenance .................................. 210
Parking brake (notes) ..................... 151 Index
5
Page 11 of 334
Doors
Central locking/unlocking
(SmartKey) ...................................... .64
Control panel ................................... 38
Display message ............................ 209
Indicator lamp ................................ 219
Drinking and driving .........................148
Drinks holder see Bottle holder
see Cuph older
Driver's/co-driver's door
Unlocking ......................................... 70
Driver's seat
see Seats
Driving abroad ................................... 149
Driving off-road see Off-road driving
Driving on flooded roads ..................151
Driving safety systems ABS (Anti-lock Braking System) .......56
ASR (Acceleration Skid Control )...... 58
BAS (Brake Assist System) ..............56
EBD (electronic brake force
distribution) ..................................... 57
ESP ®
(Electronic Stability
Program) .......................................... 57
Important safety information ...........56
Overview .......................................... 56
Driving systems
Cruise control ................................ 155
Display message ............................ 207
PARKTRONI C................................. 157
Rea rview camera .......................... 161
Driving tips
Automatic transmission .................140
Brakes ........................................... 150
Break-in period .............................. 132
Downhill gradient ........................... 150
Drinking and driving .......................148
Driving abroad ............................... 149
Driving in winter ............................ .152
Driving on flooded road s................ 151
Driving on wet road s...................... 151
Exhaus tcheck ............................... 148
Fuel ................................................ 148
General .......................................... 147
Hydroplaning ................................. 151Icy road surfaces
........................... 152
Important safety notes ..................132
Limited braking efficiency on
salted road s................................... 151
Off-road driving .............................. 153
Overru ncut-off .............................. 148
Snow chains .................................. 277
Speed limitation ............................ .149
Towing atrailer .............................. 168
Transport by rail ............................ .150
Wet road surface ........................... 150 E
EBD (electronic brake force
distribution) Display message ............................ 200
Function/notes ................................ 57
Indicator lamps .............................. 210
Electrical closing assist ......................72
Electrical fuses see Fuses
Electrical step
Cleaning ......................................... 260
Display message ............................ 208
Emergency release ..........................72
Function .......................................... .72
Important safety notes ....................72
Indicator lamp ................................ 219
Manual retractio n............................ 72
Obstacle detection ........................... 72
Electrical system
Battery mai nswitc h....................... 132
Electronic Stability Program
see ESP ®
(Electroni cStability Program)
Emergenc yexit .................................... 59
Emergency exi twindow ..................... 59
Emergency Tensioning Devices Function .......................................... .50
Safety guideline s............................. 43
Emissions control
Service and warranty information ....23
Engine
ADR (working speed governor) ......167
Changing the power output .............25
Check Engine warning lamp ........... 216
Cleaning instructions .....................257
Engine number ............................... 316 Index
9
Page 18 of 334
S
Safety Children in the vehicle .....................50
Child restraint systems ....................50
Safety systems
see Driving safety systems
Seat belts
Adjusting the height ......................... 48
Belt force limiters ............................ 50
Belt warning/warning lamp .............49
Cleaning ......................................... 261
Correct usage .................................. 47
Display message ............................ 201
Emergency Tensioning Devices ....... .50
Fastening ......................................... 48
Important safety guidelines .............47
Safety guidelines ............................. 43
Warning lamp ................................. 219
Seat heating ........................................ .85
Seats Adjusting lumbar support ................80
Adjusting the co-driver's seat ..........80
Adjusting the head restraint ............84
Armrest ............................................ 84
Cleaning the cover .........................261
Folding sea t..................................... 82
Important safety notes ....................80
Rea rbenchs eat............................... 83
Seat heating .................................... 85
Setting the driver's seat ................... 80
Swivel seat ....................................... 81
Twi nco-driver's seat ........................ 82
Securing loads
Important safety notes ..................234
Selector lever
Cleaning ......................................... 260
Sensors (cleaning instructions) .......259
Service Center see Qualified specialist workshop
Service interval display
Calling up the service due date ...... 249
Exceeding a service due date ........249
Notes ............................................. 249
Service due date (automatic
display) .......................................... 249Service products
Bio-diesel (FAME fuel ).................... 317
Brake fluid ............................. 245, 324
Coolant (engine) ............................ 324
Diese l............................................ 317
Diesel Exhaust Fluid (DEF) .............320
Engine oil ....................................... 321
Fuel ................................................ 317
Important safety notes ..................316
Power steering fluid .......................323
Refrigerant ..................................... 326
Transmission oil ............................. 323
Washer fluid .................................. .326
Settings
Resetting all (vehicles with
steering wheel buttons) .................183
Resetting submenus (vehicles
with steering wheel buttons) .........184
Setting the air distribution ...............113
Setting the airflow ............................114
Setting the clock Vehicles without steering wheel
buttons .......................................... 179
Vehicles with steering wheel
buttons .......................................... 186
Short journeys (diesel particle
filter) ................................................... 149
Side windows Cleaning ......................................... 257
Hinged sid ewindows ....................... 76
Important safety information ...........76
Opening/closing .............................. 76
Overview .......................................... 76
Problem (malfunction) .....................77
Resetting ......................................... 77
Sliding door
Child-proof locks .............................. 55
Cleaning ......................................... 259
Closing assist ................................... 72
Important safety notes ....................70
Opening/closing .............................. 70
SmartKey
Changing the battery .................66, 67
Changing the locking system
settings .......................................... 189
Checking the battery .......................66
Display message ............................ 209
Door central locking/unlocking .......64 16
Index
Page 22 of 334
Trailer loads and drawbar
noseweights
...................................... 173
Trailer towing PARKTRONI C................................. 160
Permissible trailer loads and
drawba rnoseweights ............169, 173
Transmission
see Automatic transmission
Transmission oil ................................ 323
Transport Loading guidelines .........................232
Vehicle .......................................... .271
Transportation
Rail ................................................ 150
Transport by rail ................................ 150
Transporting Load distribution ............................ 234
Securing aload .............................. 234
Trim pieces (cleaning instructions) .260
Trip computer (on-board
computer) .......................................... 189
Trip meter see Trip odometer
Trip odometer
Display (vehicles without steering
wheel buttons) ............................... 178
Display (vehicles with steering
wheel buttons) ............................... 182
Resetting ....................................... 177
see Trip computer (on-board computer)
Turn signals
Changing bulbs (front) .....................98
Changing bulbs (rear) ..............99, 101
Switching on/off .............................. 92
Turn signals (Chassis Cab)
Changing bulbs (rear) ....................100
Twin co-driver's seat
Folding tabl e.................................. 225
Stowag ecompartmen t.................. 224
Two-way radios
Type approval/frequency ..............314
TWR (Tongue Weight Rating)
(definition) ......................................... 295 U
Unlocking From inside the vehicle (central
unlocking button) ............................. 69 V
Vehicle Correct use ...................................... 26
Data acquisition ............................... 29
Display message ............................ 208
Electronics ..................................... 314
Equipment ....................................... 23
Individual settings (vehicles with
steering wheel buttons) .................183
Limited Warranty ............................. 29
Loading .......................................... 286
Locking (SmartKey) .......................... 64
Lowering ........................................ 307
Maintenance .................................... 23
Operating safety .............................. 24
Parking for a long period ................ 147
Pulling away ................................... 135
Raising ........................................... 304
Registration ..................................... 23
Reporting problems .........................28
Securing from rolling away ............145
Towing away .................................. 268
Transporting .................................. 271
Unlocking (SmartKey) ......................64
Vehicle battery
see Battery (vehicle)
Vehicle bodies
General notes .................................. 27
Vehicle data ....................................... 326
Vehicle identification number .......... 315
Vehicle identification plate ..............315
Vehicle tool kit .................................. 264
Voltage supply Fuse s............................................. 271 W
Warning and indicator lamps Brakes ........................................... 211
Check Engine ................................. 216
Coolant .......................................... 215
Diesel Exhaus tFluid (DEF) .............213 20
Index
Page 62 of 334
sure to explicitly point out the risks
described here.
R Only vehicle occupants who know how to
use the emergency exit window are
permitted to sit next to it.
R Access to the emergency exit window must
remain unobstructed. Do not place any
large or heavy objects on or in front of the
seats next to the emergency exit window.
R The window handles must not be used as
hooks, e.g. to hang up light objects, bags
or items of clothing.
R When exiting the vehicle through the
emergency exit window, pay attention to
the vehicle height and the local conditions.
Particularly children and smaller adults
may require assistance when exiting the
vehicle. Theft deterrent locking system
Immobilizer
X To activate: remove the key from the
ignition lock.
X To deactivate: turn the key to position 2
in the ignition lock.
The immobilizer prevents your vehicle from
being started without the correct key.
Always take the key with you and lock the
vehicle when leaving the vehicle. If you leave
the key in the vehicle, anyone can start the
engine.
i The immobilizer is always deactivated
when you start the engine.
In the event that the engine cannot be
started when the starter battery is fully
charged, the immobilizer may be faulty.
Contact an authorized Sprinter dealeror
call 1-877-762-8267 (in USA) or
1-800-387-0100 (in Canada). ATA (Anti-Theft Alarm system)
X To arm: close all doors.
X Lock the vehicle with the key.
The indicator lamp in the central locking
button (Y page 69) flashes.
X To deactivate: unlock the vehicle with the
key.
The indicator lamp in the central locking
button (Y page 69) goes out.
i Cargo Van and Crew Van only:
Unless you ope nadoor or the tailgate
within 40 seconds after unlocking the
vehicle:
R the vehicle will be locked again
R the anti-thef talarm system will be armed
again
If the alarm system is armed, a visual and
audible alarm is triggered by the following:
R Unlocking the vehicle fro minside
R Opening a door
R Opening the hood
i The alar mis not switched off, even if you
immediately close the open door that has
triggered it, for example.
X To stop the alarm: press the0009button
on the remote control.
Or
X Insert the key into the ignition lock.
The alarm stops. Tow-away alarm
Operation Av
isual and audible alarm is triggered if the
inclination of the vehicle changes when the
tow-away alarm is armed. This can be the
case if the vehicle is raised on one side, for
example. 60
Theft deterrent locking systemSafety
Page 67 of 334
If there is a key is in the ignition lock, the
remote control is inoperative. When locking
or unlocking the vehicle with the remote
control, always pay attention to the indicator
lamp signaling. Also check the locking knobs
of the doors.
Unlocking/locking the vehicle with the
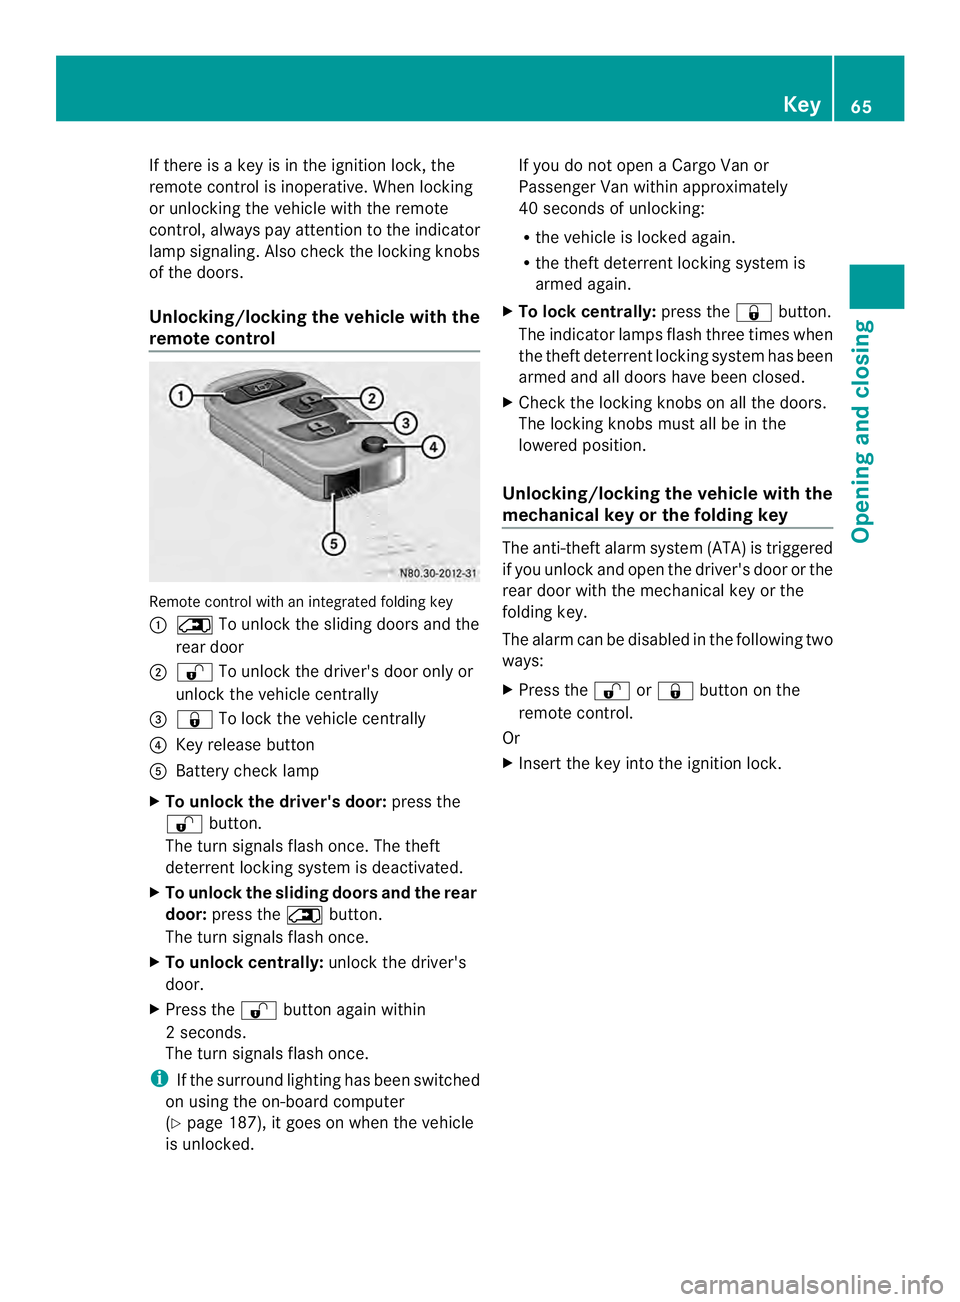
remote control Remote control with an integrated folding key
0005 0002 To unlock the sliding doors and the
rear door
0006 0009 To unlock the driver's door only or
unlock the vehicle centrally
0026 0008 To lock the vehicle centrally
0025 Key release button
0023 Battery check lamp
X To unlock the driver's door: press the
0009 button.
The turn signals flash once. The theft
deterrent locking system is deactivated.
X To unlockt he sliding doors and the rear
door: press the 0002button.
The turn signals flash once.
X To unlock centrally: unlock the driver's
door.
X Press the 0009button again within
2s econds.
The turn signals flash once.
i If the surround lighting has been switched
on using the on-board computer
(Y page 187), it goes on when the vehicle
is unlocked. If you do not open a Cargo Van or
Passenger Van within approximately
40 seconds of unlocking:
R
the vehicle is locked again.
R the theft deterrent locking system is
armed again.
X To lock centrally: press the0008button.
The indicator lamps flash three times when
the thef tdeterrent locking system has been
armed and all doors have been closed.
X Check the locking knobs on all the doors.
The locking knobs must all be in the
lowered position.
Unlocking/locking the vehicle with the
mechanical key or the folding key The anti-thef
talarm system (ATA) is triggered
if you unloc kand open the driver's door or the
rea rdoor with the mechanical key or the
folding key.
The alarm can be disabled in the following two
ways:
X Press the 0009or0008 button on the
remote control.
Or
X Insert the key into the ignition lock. Key
65Opening and closing Z
Page 68 of 334
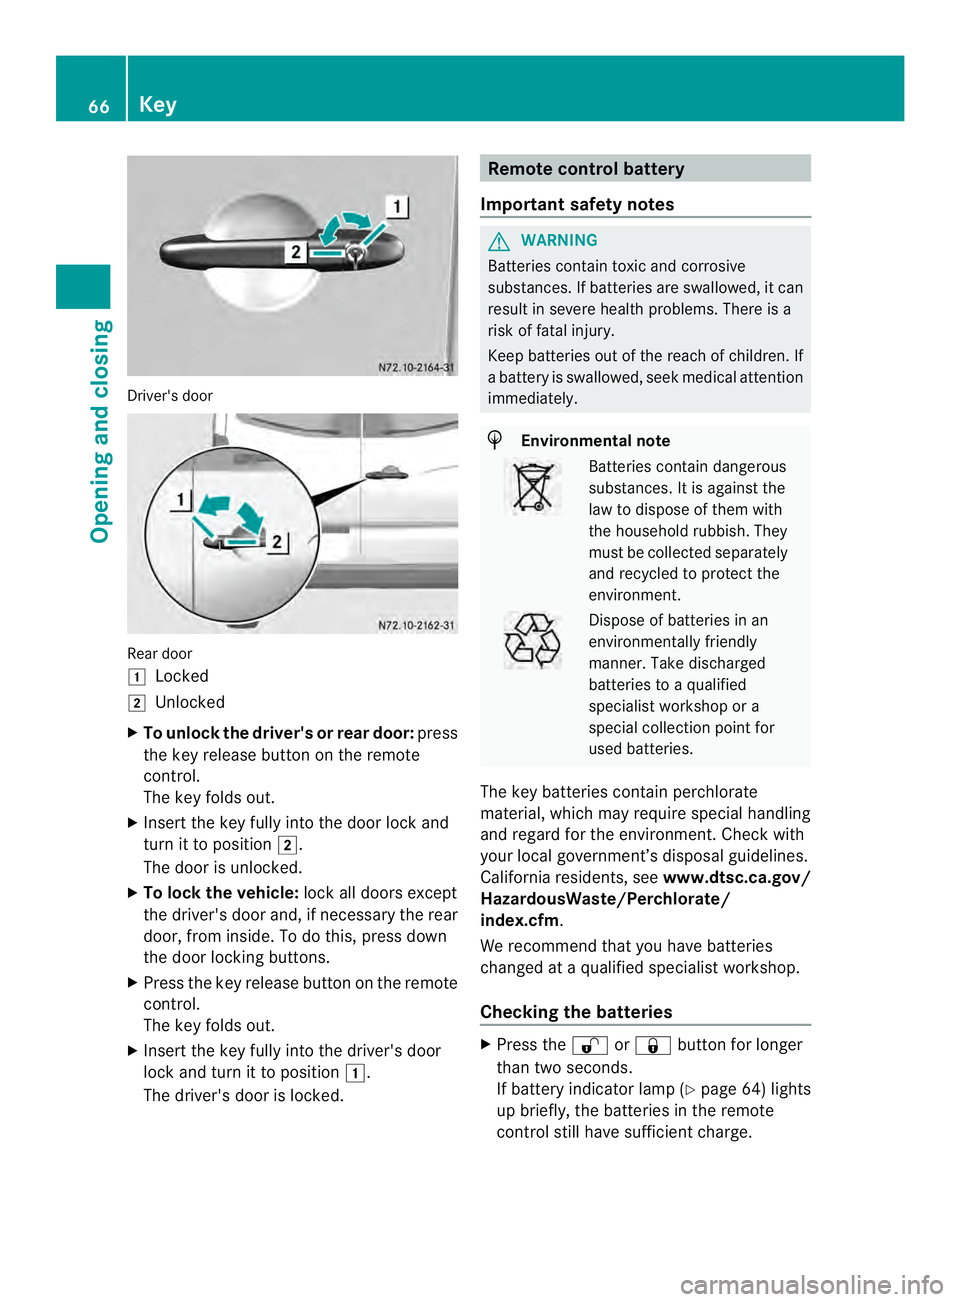
Driver's door
Rear door
0008
Locked
0009 Unlocked
X To unlock the driver' sor rear door: press
the key release button on the remote
control.
The key folds out.
X Insert the key fully into the door lock and
turn it to position 0009.
The door is unlocked.
X To lock the vehicle: lock all doors except
the driver's door and, if necessary the rear
door, fro minside .To do this, press down
the door locking buttons.
X Press the key release button on the remote
control.
The key folds out.
X Insert the key fully into the driver's door
lock and turn it to position 0008.
The driver's door is locked. Remote control battery
Important safety notes G
WARNING
Batteries contain toxic and corrosive
substances. If batteries are swallowed, it can
result in severe health problems. There is a
risk of fatal injury.
Keep batteries out of the reach of children. If
a battery is swallowed, seek medical attention
immediately. H
Environmental note Batteries contain dangerous
substances. It is against the
law to dispose of them with
the household rubbish. They
must be collected separately
and recycled to protect the
environment.
Dispose of batteries in an
environmentally friendly
manner
.Take discharged
batteries to a qualified
specialist workshop or a
special collectio npoint for
used batteries.
The key batteries contain perchlorate
material, which may require special handling
and regard for the environment. Check with
your local government’s disposal guidelines.
California residents, see www.dtsc.ca.gov/
HazardousWaste/Perchlorate/
index.cfm.
We recommend that you have batteries
changed at a qualified specialist workshop.
Checking the batteries X
Press the 0009or0008 button for longer
than two seconds.
If battery indicator lamp (Y page 64) lights
up briefly, the batteries in the remote
control still have sufficient charge. 66
KeyOpening and closing
Page 69 of 334
Otherwise, change the batteries
immediately.
i If the remote control is checked within the
signal reception range of the vehicle,
pressing the 0008or0009 button:
R lock or
R unlock the vehicle
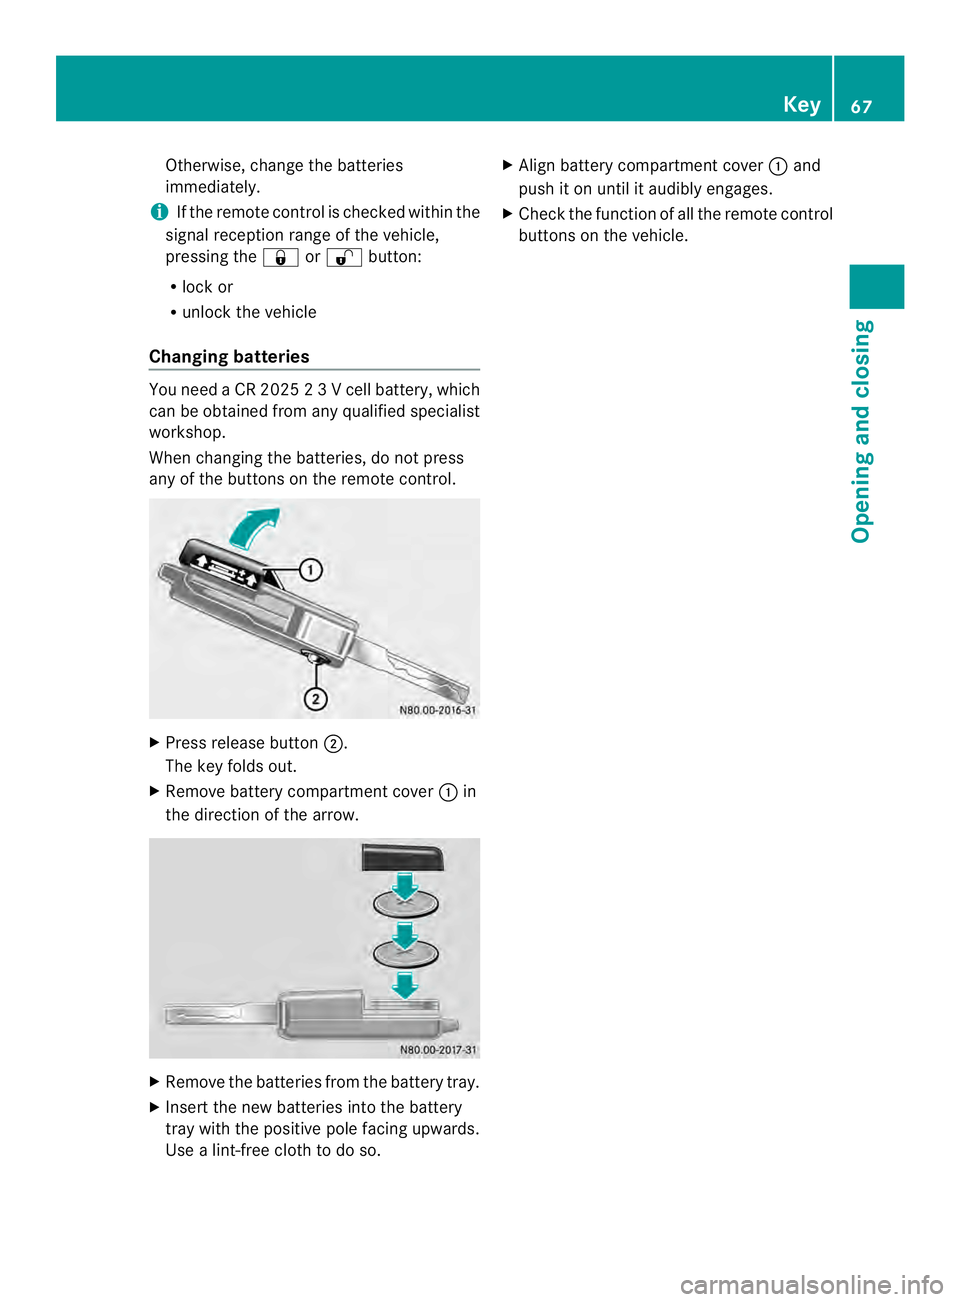
Changing batteries You need a CR 2025
23Vcell battery, which
can be obtained from any qualified specialist
workshop.
When changing the batteries, do not press
any of the buttons on the remote control. X
Press release button 0006.
The key folds out.
X Remove battery compartment cover 0005in
the direction of the arrow. X
Remove the batteries from the battery tray.
X Insert the new batteries into the battery
tray with the positive pole facing upwards.
Use a lint-free cloth to do so. X
Align battery compartment cover 0005and
push it on until it audibly engages.
X Check the function of all the remote control
buttons on the vehicle. Key
67Opening and closing Z
Page 70 of 334
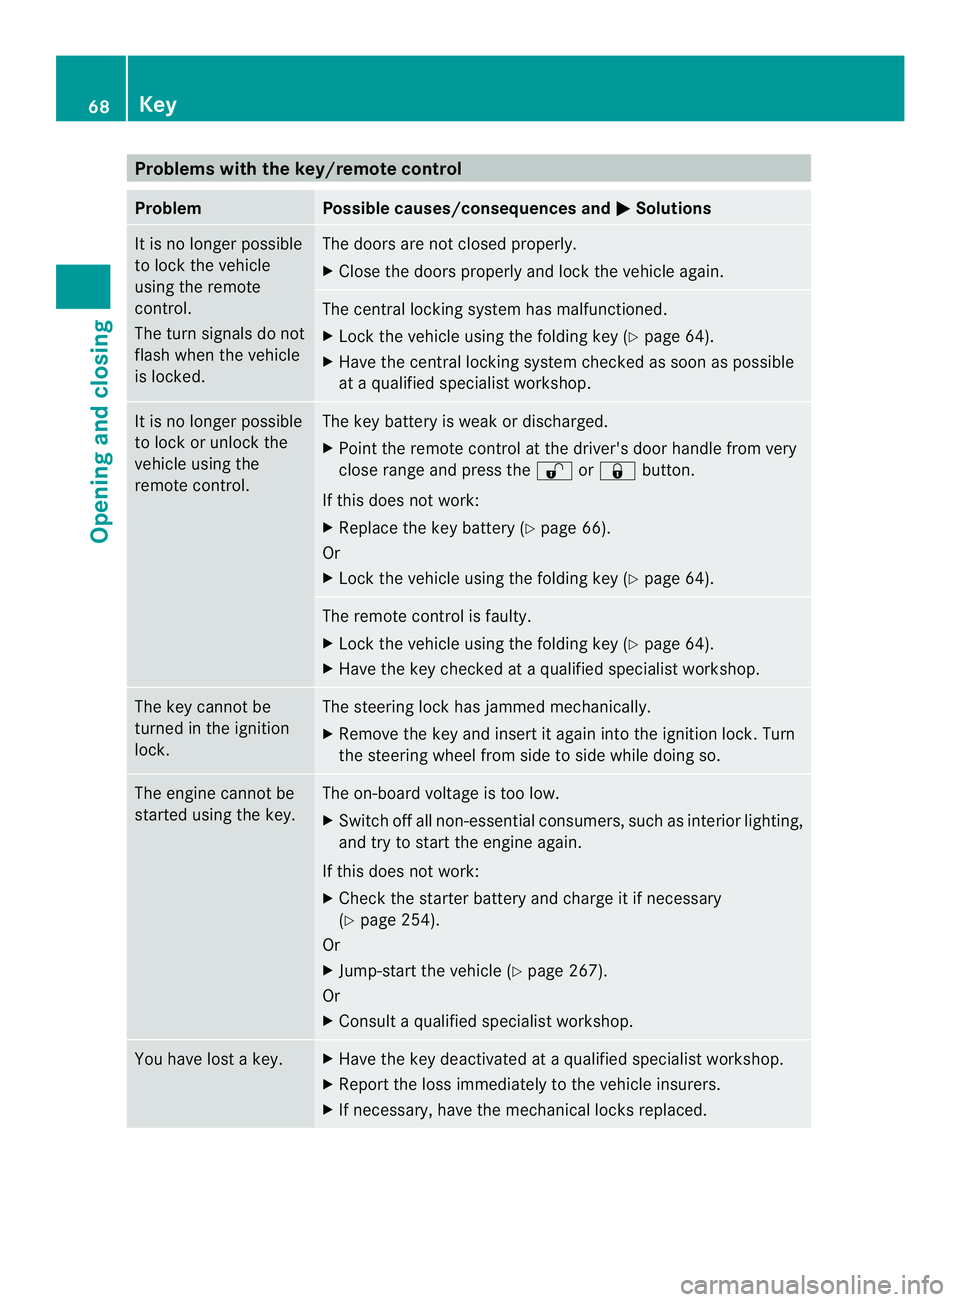
Problems with the key/remote control
Problem Possible causes/consequences and
0004 Solutions
It is no longer possible
to lock the vehicle
using the remote
control.
The turn signals do not
flash when the vehicle
is locked. The doors are not closed properly.
X
Close the doors properly and lock the vehicle again. The central locking system has malfunctioned.
X
Lock the vehicle using the folding key (Y page 64).
X Have the central locking system checked as soon as possible
at a qualified specialist workshop. It is no longer possible
to lock or unlock the
vehicle using the
remote control. The key battery is weak or discharged.
X
Point the remote control at the driver's door handle from very
close range and press the 0009or0008 button.
If this does not work:
X Replace the key battery (Y page 66).
Or
X Lock the vehicle using the folding key (Y page 64). The remote control is faulty.
X
Lock the vehicle using the folding key (Y page 64).
X Have the key checked at a qualified specialist workshop. The key cannot be
turned in the ignition
lock. The steering lock has jammed mechanically.
X
Remove the key and insert it again into the ignition lock. Turn
the steering wheel from side to side while doing so. The engine cannot be
started using the key. The on-board voltage is too low.
X
Switch off all non-essential consumers, such as interior lighting,
and try to start the engine again.
If this does not work:
X Check the starter battery and charge it if necessary
(Y page 254).
Or
X Jump-start the vehicle (Y page 267).
Or
X Consult a qualified specialist workshop. You have lost a key. X
Have the key deactivated at a qualified specialist workshop.
X Report the loss immediately to the vehicle insurers.
X If necessary, have the mechanical locks replaced. 68
KeyOpening and closing
Page 87 of 334
Seat heating
G
WARNING
Repeatedly switching on the seat heating can
cause the seat cushion and backrest pads to
become very hot. The health of persons with
limited temperature sensitivity or a limited
ability to react to excessively high
temperatures may be affected or they may
even suffer burn-like injuries. There is a risk
of injury.
Therefore, do not switch the seat heating on
repeatedly.
! When you leave your seat, do not place
anything on the seat and switch off the seat
heating. Do not switch the seat heating on
when the seat is not occupied, e.g. when
driving without a co-driver. The seat
heating may otherwise overheat, causing
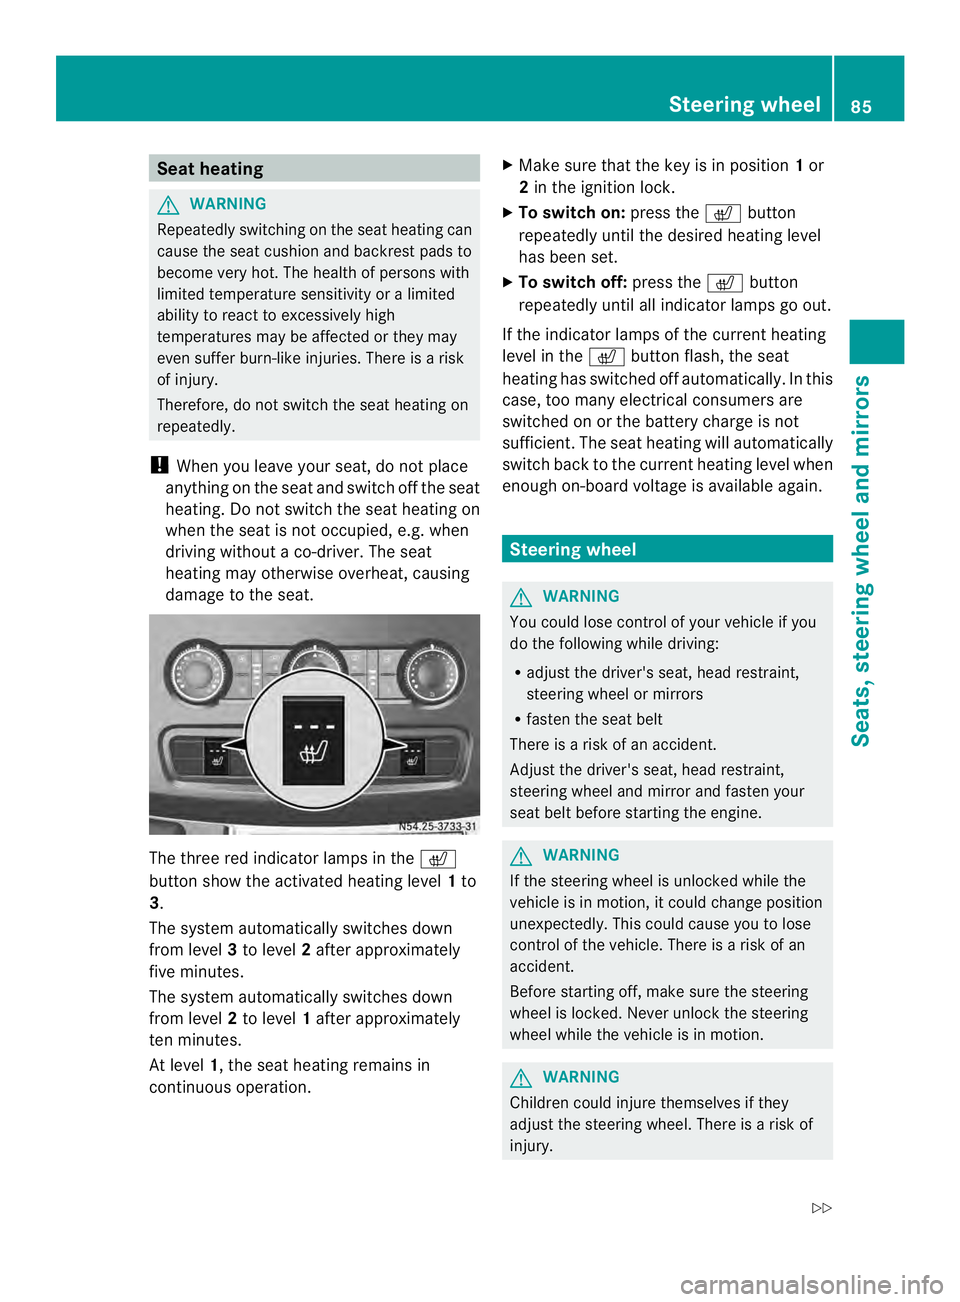
damage to the seat. The three red indicator lamps in the
0007
button show the activated heating level 1to
3.
The system automatically switches down
from level 3to level 2after approximately
five minutes.
The system automatically switches down
from level 2to level 1after approximately
ten minutes.
At level 1, the seat heating remains in
continuous operation. X
Make sure that the key is in position 1or
2 in the ignition lock.
X To switch on: press the0007button
repeatedly until the desired heating level
has been set.
X To switch off: press the0007button
repeatedly until all indicator lamps go out.
If the indicator lamps of the current heating
level in the 0007button flash, the seat
heating has switched off automatically. In this
case, too many electrical consumers are
switched on or the battery charge is not
sufficient. The seat heating will automatically
switch back to the current heating level when
enough on-board voltage is available again. Steering wheel
G
WARNING
You could lose control of your vehicle if you
do the following while driving:
R adjust the driver's seat, head restraint,
steering wheel or mirrors
R fasten the seat belt
There is a risk of an accident.
Adjust the driver's seat, head restraint,
steering wheel and mirror and fasten your
seat belt before starting the engine. G
WARNING
If the steering wheel is unlocked while the
vehicle is in motion, it could change position
unexpectedly. This could cause you to lose
control of the vehicle. There is a risk of an
accident.
Before starting off, make sure the steering
wheel is locked. Never unlock the steering
wheel while the vehicle is in motion. G
WARNING
Children could injure themselves if they
adjust the steering wheel. There is a risk of
injury. Steering wheel
85Seats, steering wheel and mirrors
Z