MERCEDES-BENZ SPRINTER 2015 MY15 Operator’s Manual
Manufacturer: MERCEDES-BENZ, Model Year: 2015, Model line: SPRINTER, Model: MERCEDES-BENZ SPRINTER 2015Pages: 334, PDF Size: 5.94 MB
Page 121 of 334
i
If the windows still fog up, set the control
as described for defrosting (Y page 118).
Vehicle with air conditioning
X Activate cooling with air dehumidification
(Y page 117).
X Press the 0066button (Y page 114).
The reheat function is switched on. The
indicator lamp in the switch lights up.
To switch off the reheat function, press the
0066 button again. The indicator lamp in
the button goes out.
Windows fogged up on the outside You should only select this setting until the
windshield is clear again.
X Switch on the windshield wipers
(Y page 107).
X Switch on climate control (Y page 116).
X Adjust air distribution to the footwell
(Y page 117).
X Close the air vents (Y page 120).Window heating
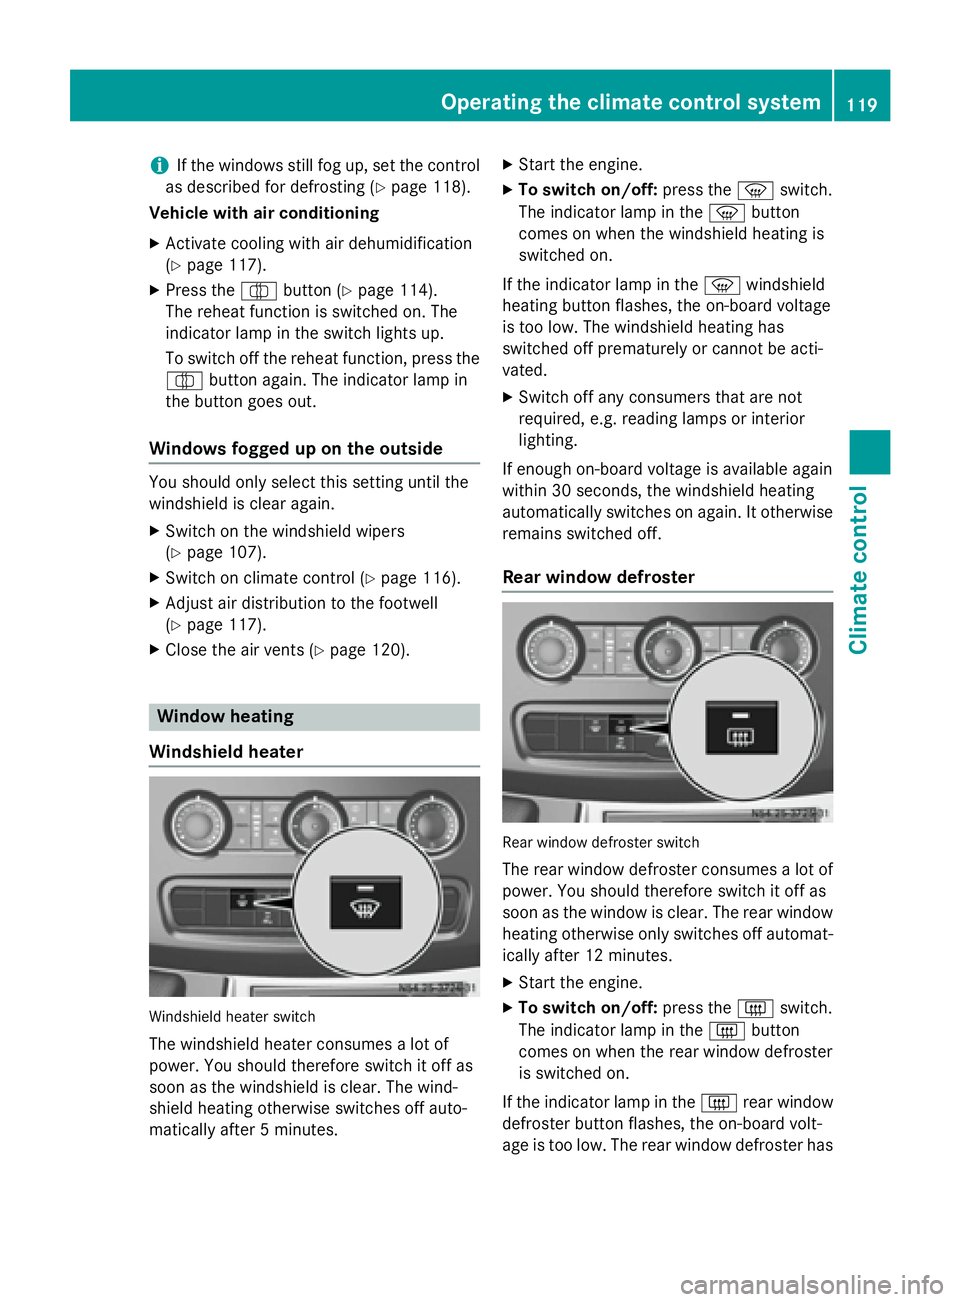
Windshield heater Windshield heater switch
The windshield heater consumes a lot of
power. You should therefore switch it off as
soon as the windshield is clear. The wind-
shield heating otherwise switches off auto-
matically after 5 minutes. X
Start the engine.
X To switch on/off: press the0085switch.
The indicator lamp in the 0085button
comes on when the windshield heating is
switched on.
If the indicator lamp in the 0085windshield
heating button flashes, the on-board voltage
is too low. The windshield heating has
switched off prematurely or cannot be acti-
vated.
X Switch off any consumers that are not
required, e.g. reading lamps or interior
lighting.
If enough on-board voltage is available again
within 30 seconds, the windshield heating
automatically switches on again. It otherwise
remains switched off.
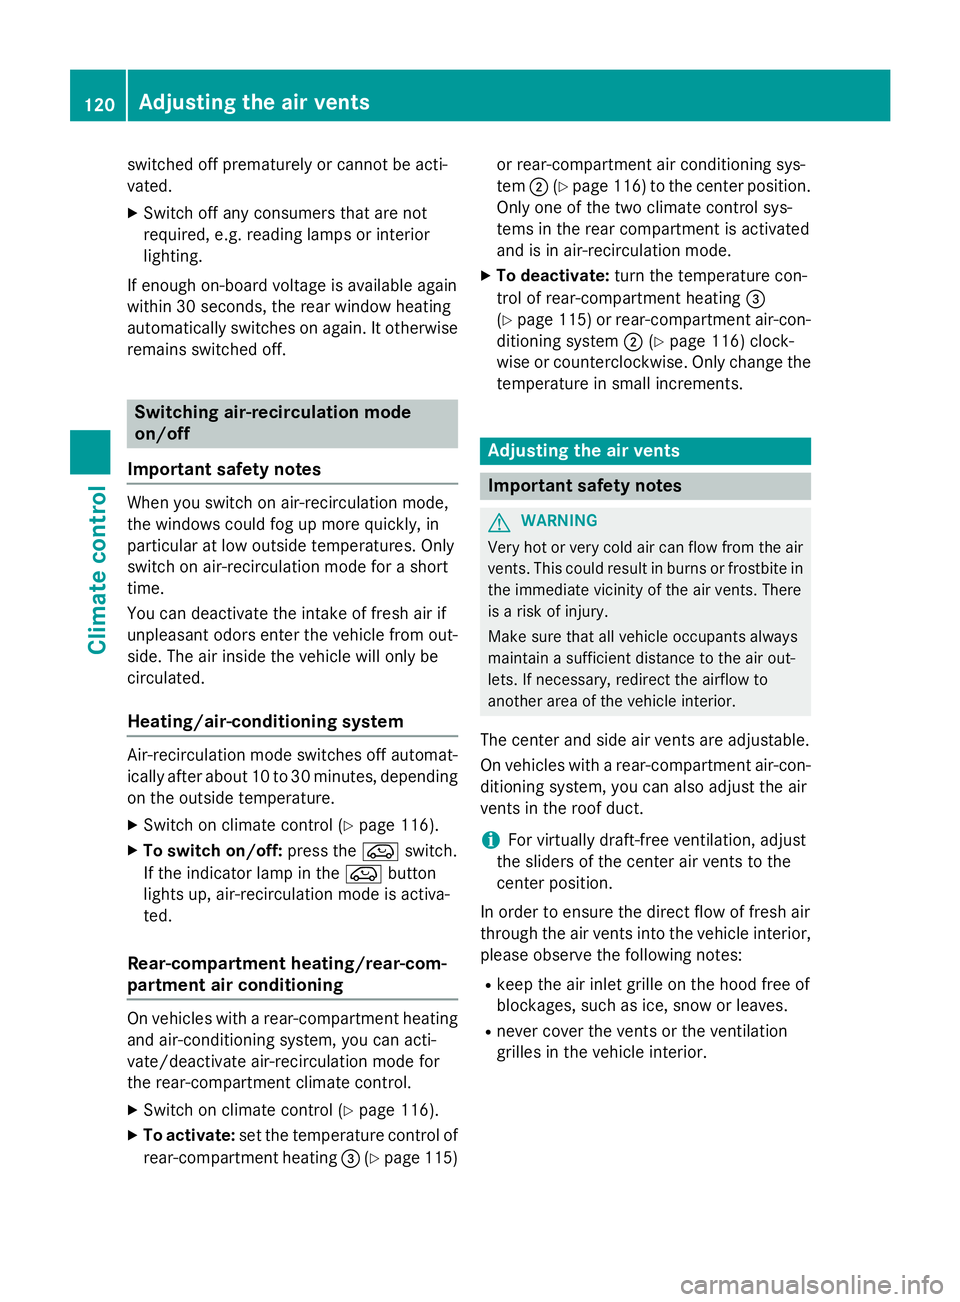
Rear window defroster Rear window defroster switch
The rear window defroster consumes a lot of
power. You should therefore switch it off as
soon as the window is clear. The rear window
heating otherwise only switches off automat- ically after 12 minutes.
X Start the engine.
X To switch on/off: press the0071switch.
The indicator lamp in the 0071button
comes on when the rear window defroster
is switched on.
If the indicator lamp in the 0071rear window
defroster button flashes, the on-board volt-
age is too low. The rear window defroster has Operating the climate control system
119Climate control
Page 122 of 334
switched off prematurely or cannot be acti-
vated.
X Switch off any consumers that are not
required, e.g. reading lamps or interior
lighting.
If enough on-board voltage is available again
within 30 seconds, the rear window heating
automatically switches on again. It otherwise
remains switched off. Switching air-recirculation mode
on/off
Important safety notes When you switch on air-recirculation mode,
the windows could fog up more quickly, in
particular at low outside temperatures. Only
switch on air-recirculation mode for a short
time.
You can deactivate the intake of fresh air if
unpleasant odors enter the vehicle from out-
side. The air inside the vehicle will only be
circulated.
Heating/air-conditioning system Air-recirculation mode switches off automat-
ically after about 10 to 30 minutes, depending
on the outside temperature.
X Switch on climate control (Y page 116).
X To switch on/off: press the008Aswitch.
If the indicator lamp in the 008Abutton
lights up, air-recirculation mode is activa-
ted.
Rear-compartment heating/rear-com-
partment air conditioning On vehicles with a rear-compartment heating
and air-conditioning system, you can acti-
vate/deactivate air-recirculation mode for
the rear-compartment climate control.
X Switch on climate control (Y page 116).
X To activate: set the temperature control of
rear-compartment heating 0087(Ypage 115) or rear-compartment air conditioning sys-
tem
0044(Ypage 116) to the center position.
Only one of the two climate control sys-
tems in the rear compartment is activated
and is in air-recirculation mode.
X To deactivate: turn the temperature con-
trol of rear-compartment heating 0087
(Y page 115) or rear-compartment air-con-
ditioning system 0044(Ypage 116) clock-
wise or counterclockwise. Only change the
temperature in small increments. Adjusting the air vents
Important safety notes
G
WARNING
Very hot or very cold air can flow from the air vents. This could result in burns or frostbite in the immediate vicinity of the air vents. There
is a risk of injury.
Make sure that all vehicle occupants always
maintain a sufficient distance to the air out-
lets. If necessary, redirect the airflow to
another area of the vehicle interior.
The center and side air vents are adjustable.
On vehicles with a rear-compartment air-con-
ditioning system, you can also adjust the air
vents in the roof duct.
i For virtually draft-free ventilation, adjust
the sliders of the center air vents to the
center position.
In order to ensure the direct flow of fresh air
through the air vents into the vehicle interior, please observe the following notes:
R keep the air inlet grille on the hood free of
blockages, such as ice, snow or leaves.
R never cover the vents or the ventilation
grilles in the vehicle interior. 120
Adjusting the air ventsClimate control
Page 123 of 334
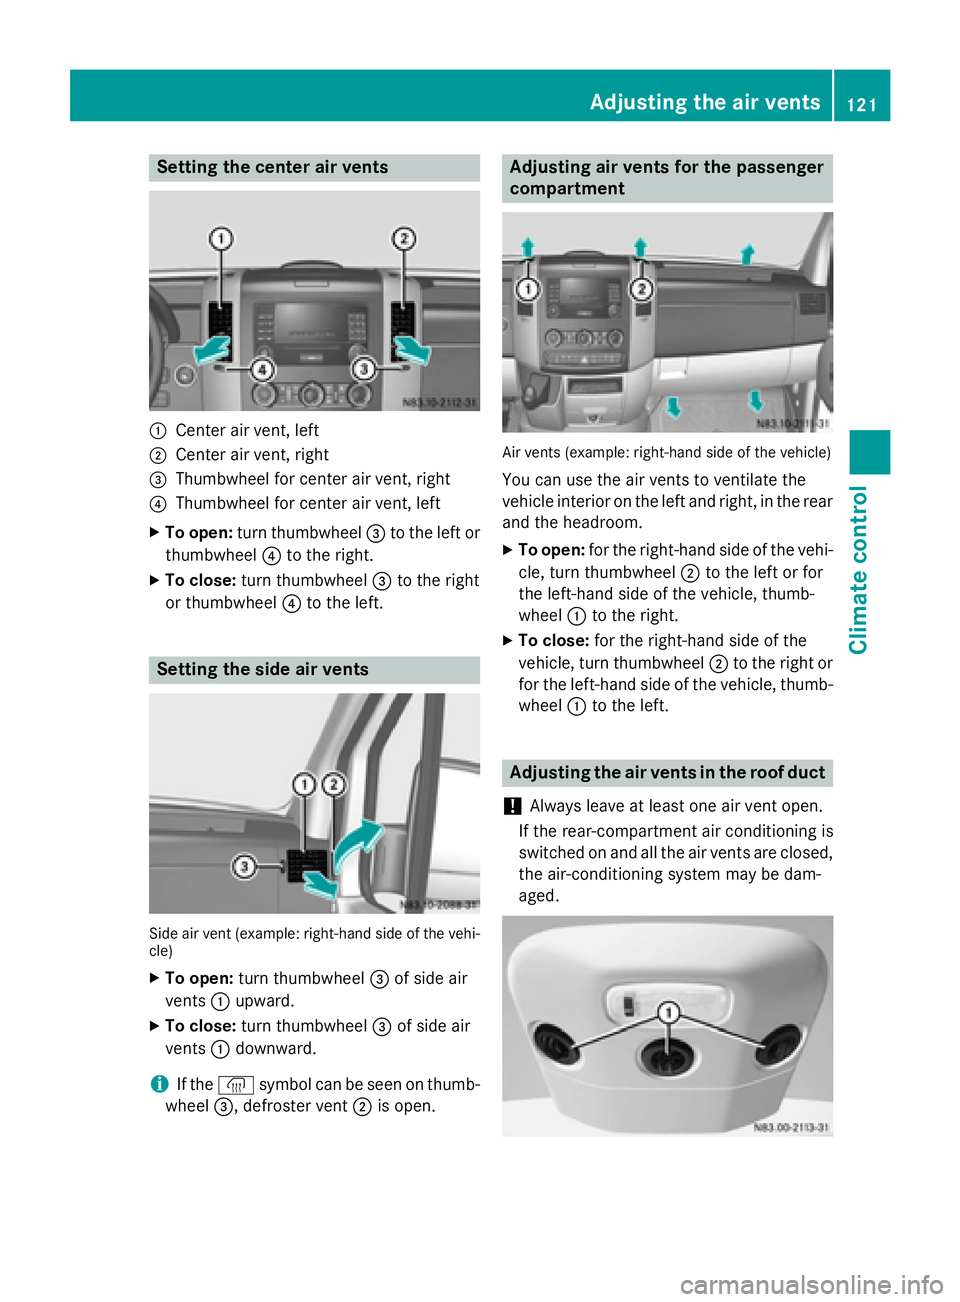
Setting the center air vents
0043
Center air vent, left
0044 Center air vent, right
0087 Thumbwheel for center air vent, right
0085 Thumbwheel for center air vent, left
X To open: turn thumbwheel 0087to the left or
thumbwheel 0085to the right.
X To close: turn thumbwheel 0087to the right
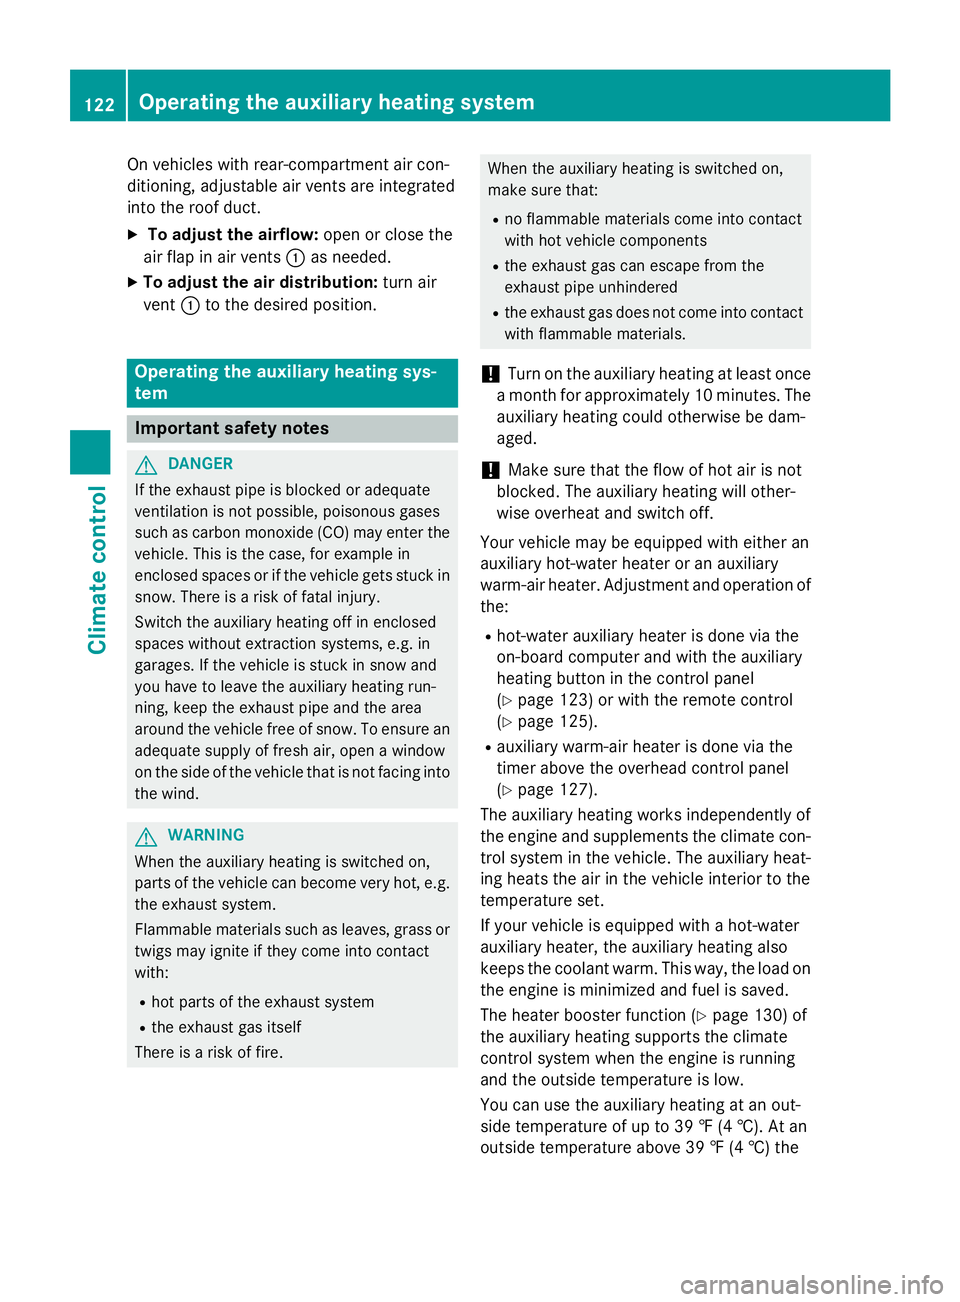
or thumbwheel 0085to the left. Setting the side air vents
Side air vent (example: right-hand side of the vehi-
cle)
X To open: turn thumbwheel 0087of side air
vents 0043upward.
X To close: turn thumbwheel 0087of side air
vents 0043downward.
i If the
0060 symbol can be seen on thumb-
wheel 0087, defroster vent 0044is open. Adjusting air vents for the passenger
compartment
Air vents (example: right-hand side of the vehicle)
You can use the air vents to ventilate the
vehicle interior on the left and right, in the rear and the headroom.
X To open: for the right-hand side of the vehi-
cle, turn thumbwheel 0044to the left or for
the left-hand side of the vehicle, thumb-
wheel 0043to the right.
X To close: for the right-hand side of the
vehicle, turn thumbwheel 0044to the right or
for the left-hand side of the vehicle, thumb-
wheel 0043to the left. Adjusting the air vents in the roof duct
! Always leave at least one air vent open.
If the rear-compartment air conditioning is
switched on and all the air vents are closed, the air-conditioning system may be dam-
aged. Adjusting the air vents
121Climate control Z
Page 124 of 334
On vehicles with rear-compartment air con-
ditioning, adjustable air vents are integrated
into the roof duct.
X To adjust the airflow: open or close the
air flap in air vents 0043as needed.
X To adjust the air distribution: turn air
vent 0043to the desired position. Operating the auxiliary heating sys-
tem Important safety notes
G
DANGER
If the exhaust pipe is blocked or adequate
ventilation is not possible, poisonous gases
such as carbon monoxide (CO) may enter the vehicle. This is the case, for example in
enclosed spaces or if the vehicle gets stuck in
snow. There is a risk of fatal injury.
Switch the auxiliary heating off in enclosed
spaces without extraction systems, e.g. in
garages. If the vehicle is stuck in snow and
you have to leave the auxiliary heating run-
ning, keep the exhaust pipe and the area
around the vehicle free of snow. To ensure an adequate supply of fresh air, open a window
on the side of the vehicle that is not facing into
the wind. G
WARNING
When the auxiliary heating is switched on,
parts of the vehicle can become very hot, e.g. the exhaust system.
Flammable materials such as leaves, grass or
twigs may ignite if they come into contact
with:
R hot parts of the exhaust system
R the exhaust gas itself
There is a risk of fire. When the auxiliary heating is switched on,
make sure that:
R no flammable materials come into contact
with hot vehicle components
R the exhaust gas can escape from the
exhaust pipe unhindered
R the exhaust gas does not come into contact
with flammable materials.
! Turn on the auxiliary heating at least once
a month for approximately 10 minutes. The
auxiliary heating could otherwise be dam-
aged.
! Make sure that the flow of hot air is not
blocked. The auxiliary heating will other-
wise overheat and switch off.
Your vehicle may be equipped with either an
auxiliary hot-water heater or an auxiliary
warm-air heater. Adjustment and operation of the:
R hot-water auxiliary heater is done via the
on-board computer and with the auxiliary
heating button in the control panel
(Y page 123) or with the remote control
(Y page 125).
R auxiliary warm-air heater is done via the
timer above the overhead control panel
(Y page 127).
The auxiliary heating works independently of
the engine and supplements the climate con- trol system in the vehicle. The auxiliary heat-
ing heats the air in the vehicle interior to the
temperature set.
If your vehicle is equipped with a hot-water
auxiliary heater, the auxiliary heating also
keeps the coolant warm. This way, the load on
the engine is minimized and fuel is saved.
The heater booster function (Y page 130) of
the auxiliary heating supports the climate
control system when the engine is running
and the outside temperature is low.
You can use the auxiliary heating at an out-
side temperature of up to 39 ‡ (4 †). At an
outside temperature above 39 ‡ (4 †) the 122
Operating the auxiliary heating systemClimate control
Page 125 of 334
auxiliary heating system and the heater boos-
ter function switch off automatically. Heating time
The heating time when operating the auxiliary heating with the vehicle is stationary without
the engine running depends on the outside
temperature and the electrical consumers
switched on. Outside
tempera-
ture Heating
time Possible
startup proce-
dures
Above
23 ‡
(00F85 †) Approx.
20 minutes 6
23 ‡
(00F85 †) to
5 ‡
(00F815 †) Approx.
40 minutes 3
Below 5 ‡
(00F815 †) Approx.
50 minutes 2
You can then switch on the auxiliary heating
again.
If you do not start the engine for a while, the
total duration of heating is limited to a maxi-
mum of 120 minutes to protect the starter
battery. Switching on the auxiliary heating is
then automatically disabled. You can, for
example, switch on the auxiliary heating with- out the engine running if the outside temper-
ature is 00F85 ‡ (00F820 †) a maximum of two
times. If you try it again, the indicator lamps in
the 0084 button (Y page 123) flash alter-
nately for approximately 2 minutes to signal
switch-on interlock. The auxiliary heating can-
not be switched on without starting the
engine.
When the condition of charge of the starter
battery is sufficient again, the switch-on inter-
lock will be deactivated. To charge the starter
battery, let the engine run. The engine run
time required to reach the necessary condi- tion of charge depends on the outside tem-
perature and on the electrical consumers
switched on. Outside tempera-
ture Engine runtime
Above 32 ‡ (0 †) at least 10 minutes
32 ‡ (0 †) to 14 ‡
(00F810 †) at least 15 minutes
Below 14 ‡ (00F810 †) at least 20 minutes
Before switching on
X Check the fuel level and top up if necessary.
The auxiliary heating is operated directly
using the vehicle's fuel. The tank must be at
least a quarter full to ensure that the aux-
iliary heating functions.
X Switch on climate control (Y page 116).
X Set the temperature control to the desired
temperature (Y page 117).
X Set the air distribution as required
(Y page 117).
X Open the center (Y page 121) and side air
vents (Y page 121) and set them to the
middle position.
i The auxiliary heating automatically
switches to heater booster mode after the
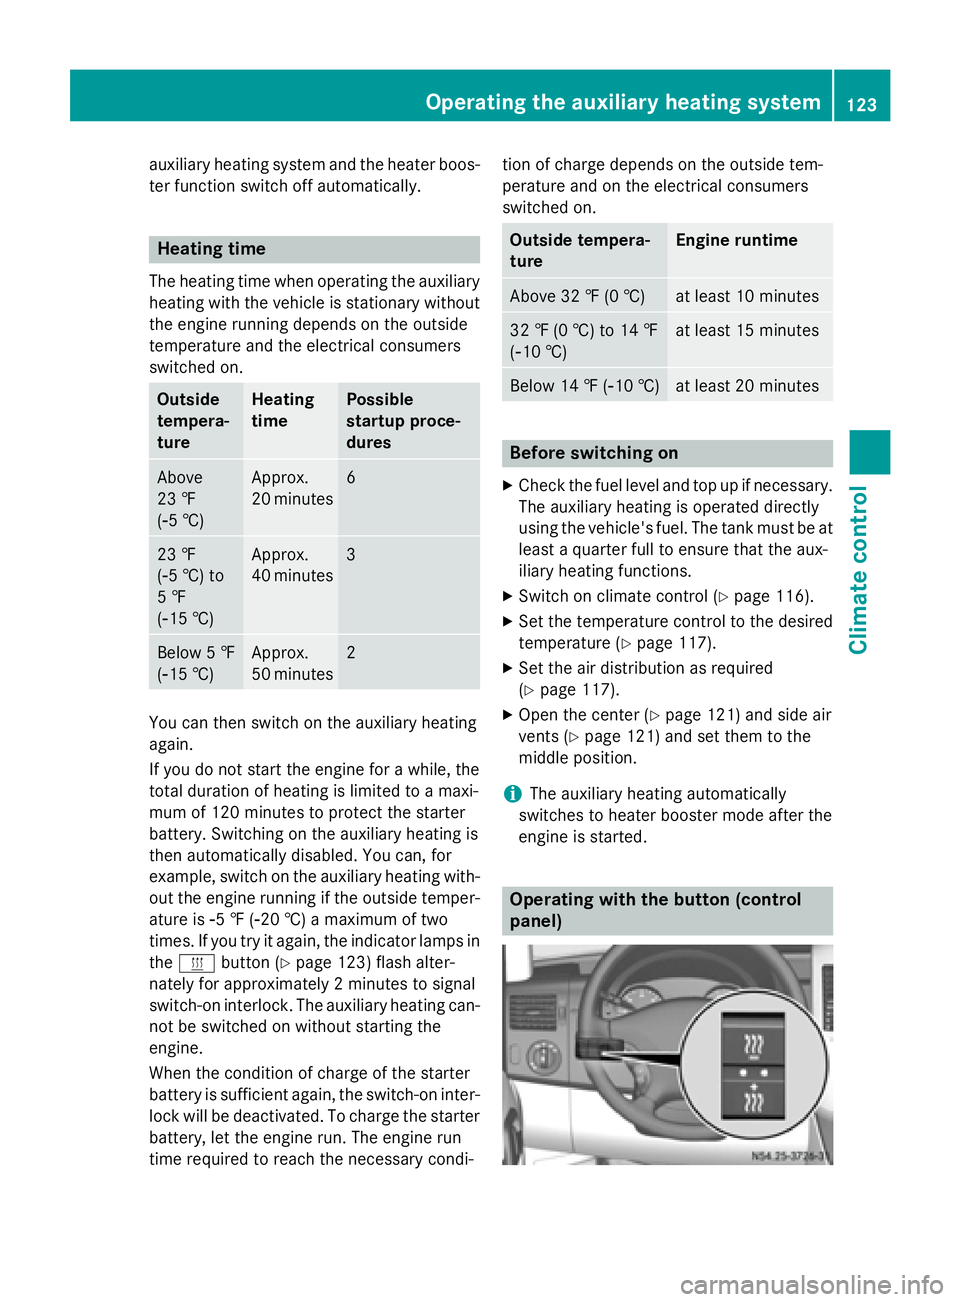
engine is started. Operating with the button (control
panel)Operating the auxiliary heating system
123Climate control Z
Page 126 of 334
i
Switch the heater booster function on or
off with the 006Abutton (Y page 130).
X To activate the auxiliary heating sys-
tem: press and hold the upper section of
the 0084 switch for longer than 2 seconds.
The red indicator lamp in the button lights
up. The auxiliary heating heats or ventilates the interior to the temperature that you
have set. The blower switches to the first
level.
X To switch off auxiliary heating: press the
upper section of the 0084button.
or
X Turn the key in the ignition lock to posi-
tion 0.
The red indicator lamp in the button goes
out. The auxiliary heating operates for
another 2 minutes and then switches off
automatically. Selecting a switch-on time
Important information You can use the on-board computer to define
up to three switch-on times, one of which canbe selected.
The yellow indicator lamp in the 0084button
goes out after 30 minutes, if you:
R have selected the switch-on time and
R turn the key to position 0in the ignition lock
On-board computer without steering
wheel buttons X
Turn the key to position 2in the ignition
lock.
X Press the 0084button.
The 0084 symbol flashes in the display.
or
X Press the 0079menu button on the instru-
ment cluster repeatedly until the 0084
symbol flashes in the display.
X Use the 0074or0075 buttons on the instrument
cluster to select the switch-on time 1 1to 3
3. The switch-on time selected is displayed.
X Wait 10 seconds for the standard display to
appear.
The switch-on time is selected. The yellow
indicator lamp in the 0084button lights up.
If you do not preselect a switch-on time,
and --:-- --:-- is shown in the display, this
means that the automatic switch-on mode
is switched off. The yellow indicator lamp in the 0084 button goes out.
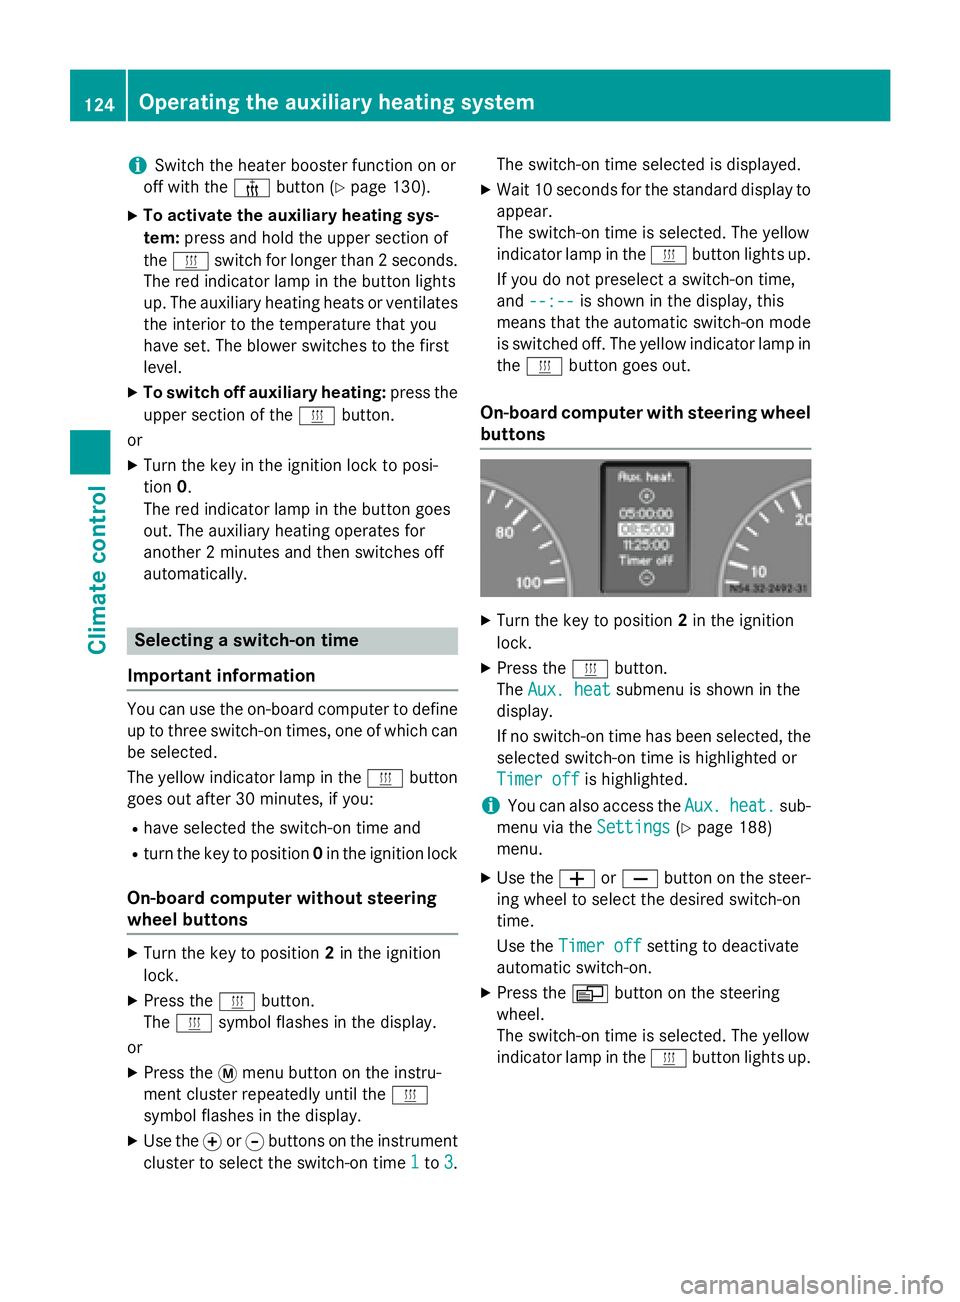
On-board computer with steering wheel
buttons X
Turn the key to position 2in the ignition
lock.
X Press the 0084button.
The Aux. heat Aux. heat submenu is shown in the
display.
If no switch-on time has been selected, the
selected switch-on time is highlighted or
Timer off Timer off is highlighted.
i You can also access the
Aux.
Aux.heat.
heat. sub-
menu via the Settings
Settings(Ypage 188)
menu.
X Use the 0081or0082 button on the steer-
ing wheel to select the desired switch-on
time.
Use the Timer off Timer off setting to deactivate
automatic switch-on.
X Press the 0080button on the steering
wheel.
The switch-on time is selected. The yellow
indicator lamp in the 0084button lights up. 124
Operating the auxiliary heating systemClimate control
Page 127 of 334
Setting the switch-on time
X Use the same method to select a switch-on
time as described in the "Preselecting a
switch-on time" section.
On-board computer without steering
wheel buttons
X Press the 0045reset button on the instru-
ment cluster.
The hour display flashes.
X Use the 0074and 0075buttons on the instru-
ment cluster to set the hours.
X Press the 0045reset button
The minute display flashes.
X Use the 0074and 0075buttons to set the
minutes.
The switch-on time is set and selected.
On-board computer with steering wheel
buttons
X Press the 0063button on the steering
wheel.
The display shows the Hours
Hours menu.
X Use the 0081and0082 buttons on the
steering wheel to set the hours.
X Press the 0063button.
The display shows the Minutes
Minutes menu.
X Use the 0081and0082 buttons to set the
minutes.
X Press the 0080button.
The switch-on time is set and selected. Operation with the remote control
Important information You can switch the auxiliary heating on/off
and set the operating duration using the
remote control. You can use up to 4 remote
control units on the vehicle. These must be
synchronized for the receiver in your vehicle
(Y page 126). The remote control has a maximum range of
approximately 600 meters. This range is
reduced by:
R sources of interference
R solid objects between the remote control
and the vehicle
R the remote control being in an unfavorable
position in relation to the vehicle
R transmitting from an enclosed space
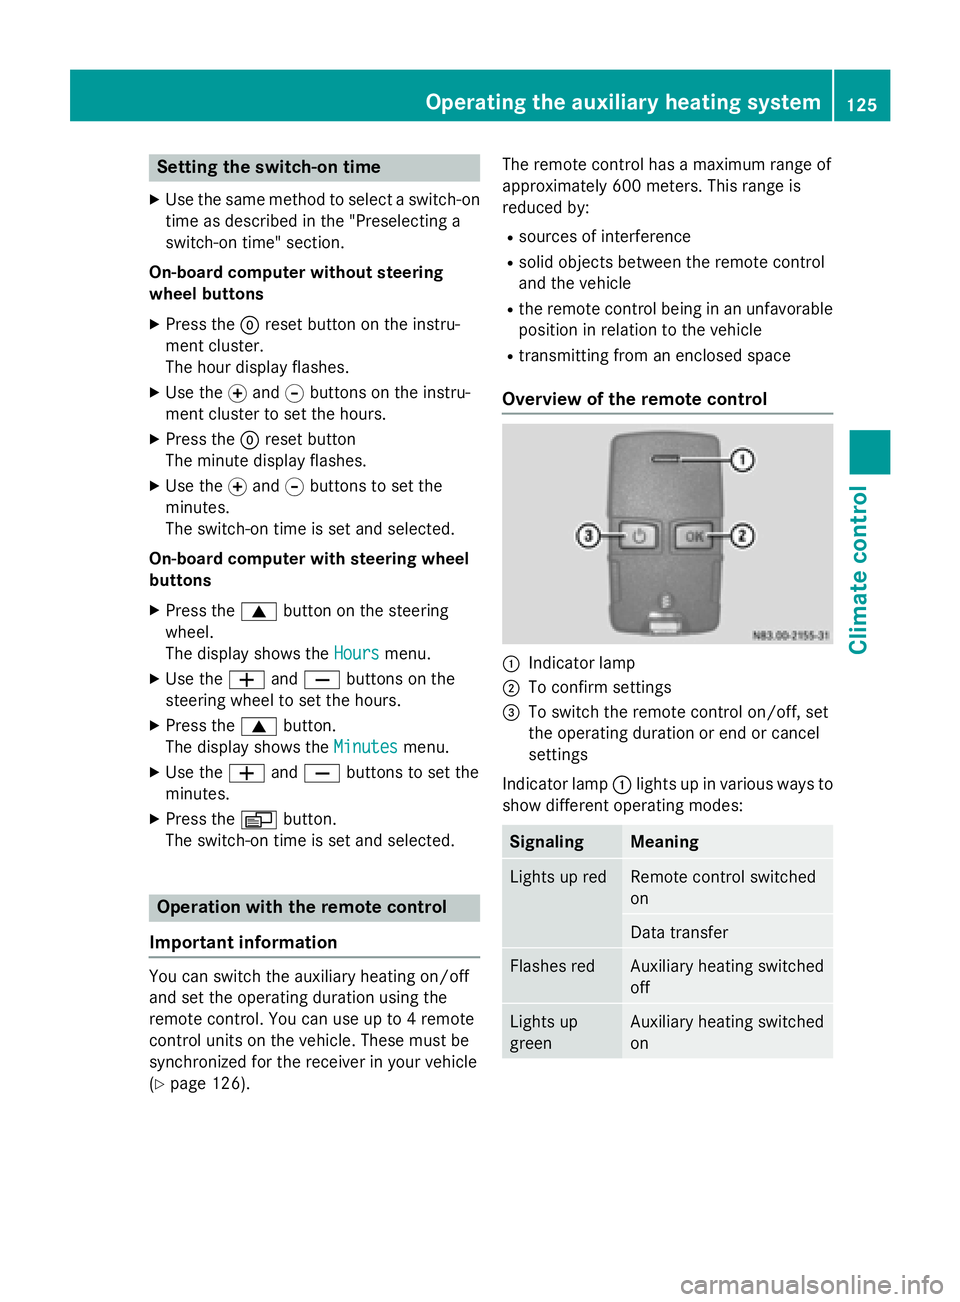
Overview of the remote control 0043
Indicator lamp
0044 To confirm settings
0087 To switch the remote control on/off, set
the operating duration or end or cancel
settings
Indicator lamp 0043lights up in various ways to
show different operating modes: Signaling Meaning
Lights up red Remote control switched
on
Data transfer
Flashes red Auxiliary heating switched
off
Lights up
green Auxiliary heating switched
onOperating the auxiliary heating system
125Climate control Z
Page 128 of 334
Signaling Meaning
Flashes green Change operating duration
active Flashes alter-
nately red and
green Remote control in syn-
chronizing mode
i
When the remote control battery is weak,
indicator lamp 0043flashes red rapidly.
Replace the remote control battery
(Y page 130).
You can find further information on the lamp
status in the "Problems with the auxiliary
heating" section (Y page 132).
Switching the remote control on/off The remote control switches to standby mode
after 10 seconds. Indicator lamp 0043goes out.
X To switch on: press and hold the 00D0
button until indicator lamp 0043lights up red.
If a connection between the remote control and the receiver in the vehicle has been
established and indicator lamp 0043:
R flashes red, the auxiliary heating is
switched off.
R lights up green, the auxiliary heating is
switched on.
X To switch off: press and hold the 00D0
button until indicator lamp 0043goes out.
Switching the auxiliary heating on/off X
Switch on the remote control.
X To switch on: when indicator lamp 0043
flashes red, press the 0070button.
During data transmission, indicator
lamp 0043lights up red.
When indicator lamp 0043lights up green, the
auxiliary heating is switched on.
X To switch off: when indicator lamp 0043
lights up green, press the 0070button.
During data transmission, indicator
lamp 0043lights up red. When indicator lamp
0043flashes red, the
auxiliary heating is switched off.
Changing the operating duration X
Switch on the remote control.
X When indicator lamp 0043flashes red, press
00D0 and0070 simultaneously.
Indicator lamp 0043flashes green.
X Press the 00D0button repeatedly until the
desired operating duration is shown.
R 20 minutes
Indicator lamp 0043flashes green twice.
R 30 minutes
Indicator lamp 0043flashes green three
times.
R 40 minutes
Indicator lamp 0043flashes green four
times.
X Press the 0070button.
During data transmission, indicator
lamp 0043lights up red.
If indicator lamp 0043emits two long, green
flashes, the selected operating duration is
stored.
i If no adjustment is made, indicator
lamp 0043flashes six times and the remote
control goes into standby mode.
Synchronizing the remote control X
Press the 0084auxiliary heating button in
the control panel (Y page 123) for longer
than 10 seconds.
When you press and hold the 0084button,
the red indicator lamp lights up in the but-
ton.
When the red indicator lamp in the 0084
button flashes, the receiver in the vehicle is ready for synchronizing.
X Press and hold the 00D0remote control
button until indicator lamp 0043lights up red.
If there is an active connection between the remote control and the receiver, indicator
lamp 0043flashes alternately red and green. 126
Operating the auxiliary heating systemClimate control
Page 129 of 334
The remote control is in synchronizing
mode.
i If you press the
00D0button again on the
remote control after starting synchroniza-
tion, you will only synchronize this remote
control unit with the receiver. Any other
remote control units that were synchron-
ized will be cleared. Indicator lamp 0043
flashes alternately red and green (very
slowly).
X Press the 0070button on the remote con-
trol.
During data transmission, indicator
lamp 0043lights up red.
When remote control indicator lamp 0043
emits two long green flashes, the selected
operating time is synchronized. The indica-
tor lamp in the 0084auxiliary heating but-
ton goes out. Operation with the timer
Important safety notes This is only for vehicles with a hot-water aux-
iliary heater. G
DANGER
If a switch-on time has been selected, the
auxiliary heating switches on automatically.
R If the ventilation is insufficient, poisonous
exhaust gases can collect, in particular car-
bon monoxide. This is the case in enclosed
spaces, for example. There is a risk of fatal
injuries.
R If highly flammable substances or flamma-
ble materials are nearby, there is a risk of a
risk of fire and explosion.
Always deactivate the preselected switch-on
times if you stop the vehicle in such or similar situations.
Use the timer to: R activate/deactivate immediate heating
mode
R set up to three switch-on times R
set the operating duration from 10to
120 minutes or to continuous operation
R set the heating level (preselected temper-
ature) to a range between 10 and 30
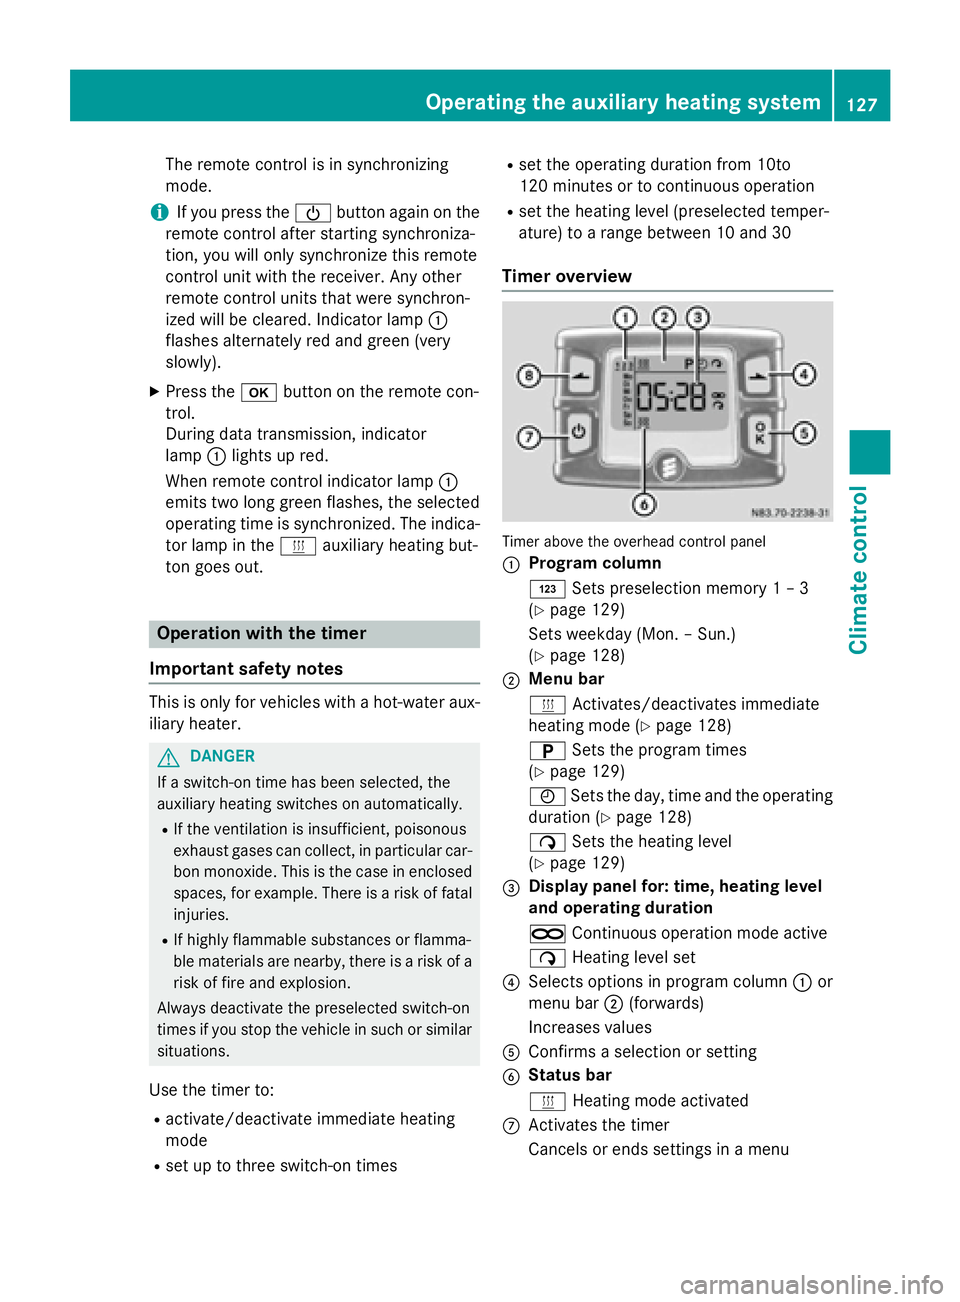
Timer overview Timer above the overhead control panel
0043
Program column
0059
Sets preselection memory 1 – 3
(Y page 129)
Sets weekday (Mon. – Sun.)
(Y page 128)
0044 Menu bar
0084
Activates/deactivates immediate
heating mode (Y page 128)
0045 Sets the program times
(Y page 129)
0045 Sets the day, time and the operating
duration (Y page 128)
00D1 Sets the heating level
(Y page 129)
0087 Display panel for: time, heating level
and operating duration
00D5 Continuous operation mode active
00D1 Heating level set
0085 Selects options in program column 0043or
menu bar 0044(forwards)
Increases values
0083 Confirms a selection or setting
0084 Status bar
0084
Heating mode activated
006B Activates the timer
Cancels or ends settings in a menu Operating the auxiliary heating system
127Climate control Z
Page 130 of 334
006C
Selects options in program column 0043or
menu bar 0044(backwards)
Reduces values
Activating the timer The timer switches to standby mode after
10 seconds. The display goes off.
X Press and hold the 00D0button until the
menu bar appears in the display and the
time is shown.
Setting the day, time and operating
duration You must reset the day, time, and default
value for the operating duration:
R during initial operation
R after a voltage supply interruption (e.g. if
the battery has been disconnected)
R after a malfunction.
You can find further information on malfunc-
tions in the "Problems with the auxiliary heat-
ing" section (Y page 132).
X Press the 00CFor00DB button until the
0045 symbol in menu bar 0044flashes.
X Press the 0070button.
In program column 0043, the day selected
flashes.
X Press the 00CFor00DB button to set the
desired day.
X Press the 0070button.
The day selected is stored. The hour setting
of the clock flashes.
X In the same way, set the hour and subse-
quently the minutes, then confirm by press- ing the 0070button.
The time is stored. Program column 0043dis-
appears and the operating duration
flashes.
i The operating duration set is the default
setting for immediate heating mode. You
can set the operating duration from 10 to
120 minutes or activate continuous opera-
tion. X
Using the 00CFor00DB button, set the
minute value or select the 00D5symbol for
continuous operation.
X Press the 0070button.
The operating duration is stored. The time
is shown.
Activating/deactivating immediate
heating mode X
To switch on: press the00CFor00DB but-
ton until the 0084symbol in the menu bar
flashes.
X Press the 0070button.
The operation duration flashes in the dis-
play.
i You can preset the default value that is
shown (Y page 128).
X Using the 00CFor00DB button, set the
minute value (10 – 120) or select the 00D5
symbol for continuous operation.
X Press the 0070button.
Immediate heating mode is activated. The
time and the 0084symbol appear.
X To switch off: press the00CFor00DB
button until the 0084symbol flashes in the
menu bar, and then press the 0070button.
Immediate heating mode is deactivated.
The 0084 symbol disappears.
The auxiliary heating operates for another
two minutes and then switches off auto-
matically.
i If you switch off the ignition while imme-
diate heating mode (operating duration
10– 120 minutes) is active, immediate
heating mode is also switched off. The aux- iliary heating operates for another
two minutes and then switches off auto-
matically.
If you have set continuous operation as the
operating duration and you switch off the
ignition, the auxiliary heating switches off
automatically after about 15 minute s.If, in
the remaining time, the ignition is switched
on again, continuous operation of the aux-
iliary heating continues. 128
Operating the auxiliary heating systemClimate control