door lock MERCEDES-BENZ SPRINTER 2019 MY19 with 7” screen
[x] Cancel search | Manufacturer: MERCEDES-BENZ, Model Year: 2019, Model line: SPRINTER, Model: MERCEDES-BENZ SPRINTER 2019Pages: 354, PDF Size: 6.15 MB
Page 73 of 354

#
Tounlo ck:pull lo cking pin 2upwards man‐
ually or use the cent ral locking button to
unlo ckthe sliding door (/ page44). #
Press button 1or pull outside handle 3.
The sliding door opens or closes. #
Press button 1again or pull outside handle
3.
The sliding door stops moving. Un
locking the electric sliding door manually If
th ere has been a malfunction or if the battery
has been disconnected, you can use release
cat ch2 todisconnect the sliding door from the
electric mo tor.Then, you can open or close the
door manually. #
Vehicles with comple tesliding door trim:
re mo vethe co ver from release cat ch2.
Service ope ration is accessible. #
Todisconnect the sliding door from the
electric mo tor:turn release cat ch2 180°
clockwise.
The "MAN" position is set. #
Tounlo ck:pull lo cking pin 3upwards man‐
ually or use the cent ral locking button to
unlo ckthe sliding door (/ page44). #
Press button 1. #
Open or close the sliding door with the out‐
side/inside door handle. #
Toconnect the sliding door tothe electric
mo tor:turn release cat ch2 180° counter-
clockwise.
The "AUTO" position is set. #
Adjust the sliding door (/ page 49).
If it is not possible to rectify the malfunction: #
Visit a qualified specialist workshop. Re
setting the electric sliding door Sliding door buttons on
the center console Sliding door button on
the door sill (B-pillar)
Yo u must reset the sliding door if there has been
a malfunction or a voltage supply inter ruption. Opening and closing
49
Page 75 of 354
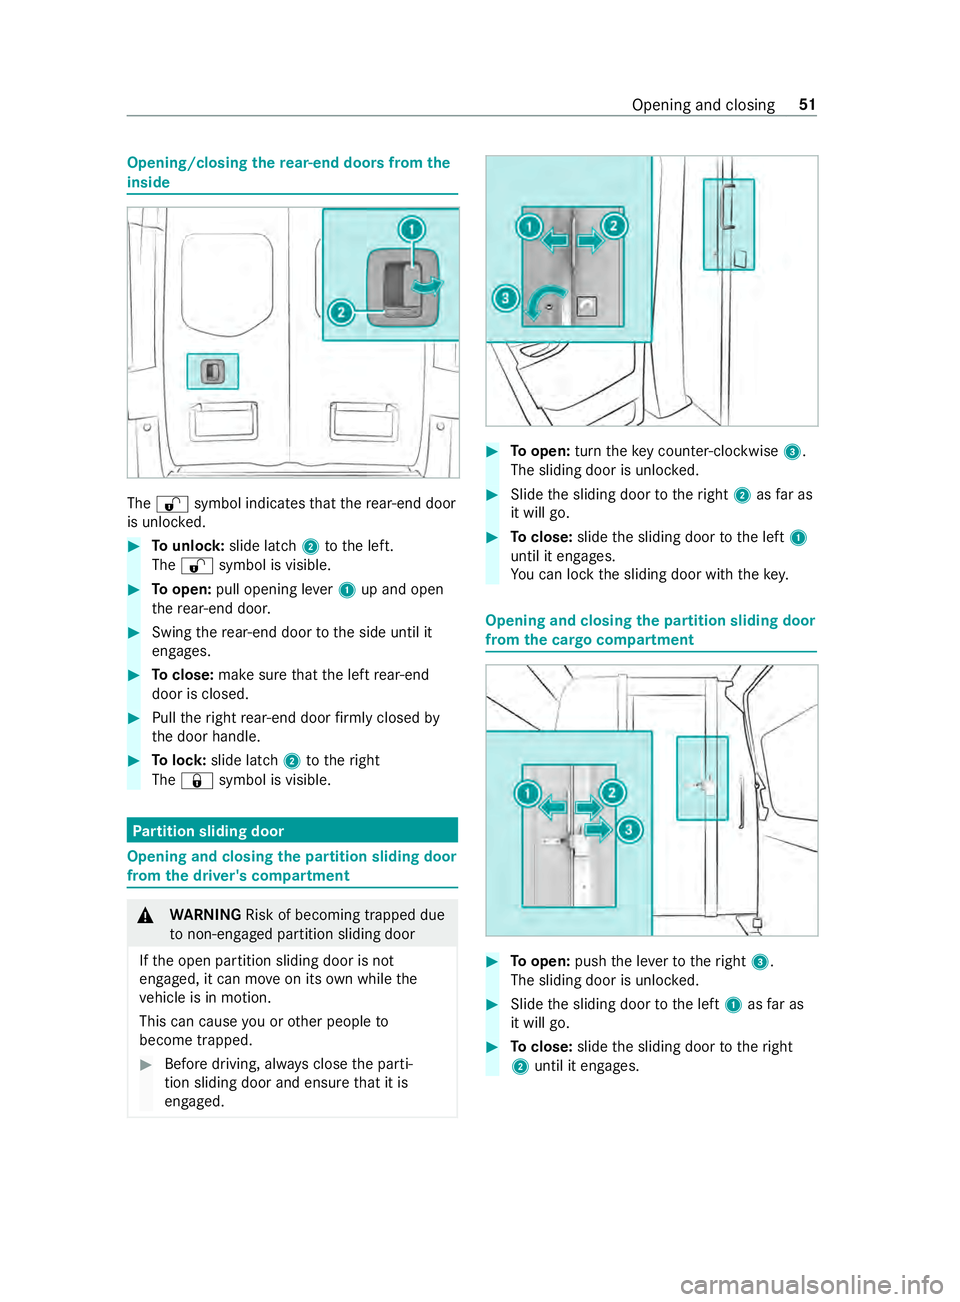
Opening/closing
there ar-end doors from the
inside The
0036 symbol indicates that there ar-end door
is unlo cked. #
Tounlo ck:slide latch 2tothe left.
The 0036 symbol is visible. #
Toopen: pull opening le ver1 up and open
th ere ar-end door. #
Swing there ar-end door tothe side until it
engages. #
Toclose: make sure that the left rear-end
door is closed. #
Pull theright rear-end door firm ly closed by
th e door handle. #
Tolock: slide latch 2totheright
The 0037 symbol is visible. Pa
rtition sliding door Opening and closing
the pa rtition sliding door
from the driver's compa rtment &
WARNING Risk of becoming trapped due
to non-engaged pa rtition sliding door
If th e open partition sliding door is not
engaged, it can mo veon its own while the
ve hicle is in motion.
This can cause you or other people to
become trapped. #
Before driving, alw ays close the parti‐
tion sliding door and ensure that it is
engaged. #
Toopen: turntheke y counter-clockwise 3.
The sliding door is unloc ked. #
Slide the sliding door totheright 2asfar as
it will go. #
Toclose: slidethe sliding door tothe left 1
until it engages.
Yo u can lock the sliding door with thekey. Opening and closing
the pa rtition sliding door
from the cargo compa rtment #
Toopen: pushthe le verto theright 3.
The sliding door is unloc ked. #
Slide the sliding door tothe left 1asfar as
it will go. #
Toclose: slidethe sliding door totheright
2 until it engages. Opening and closing
51
Page 76 of 354
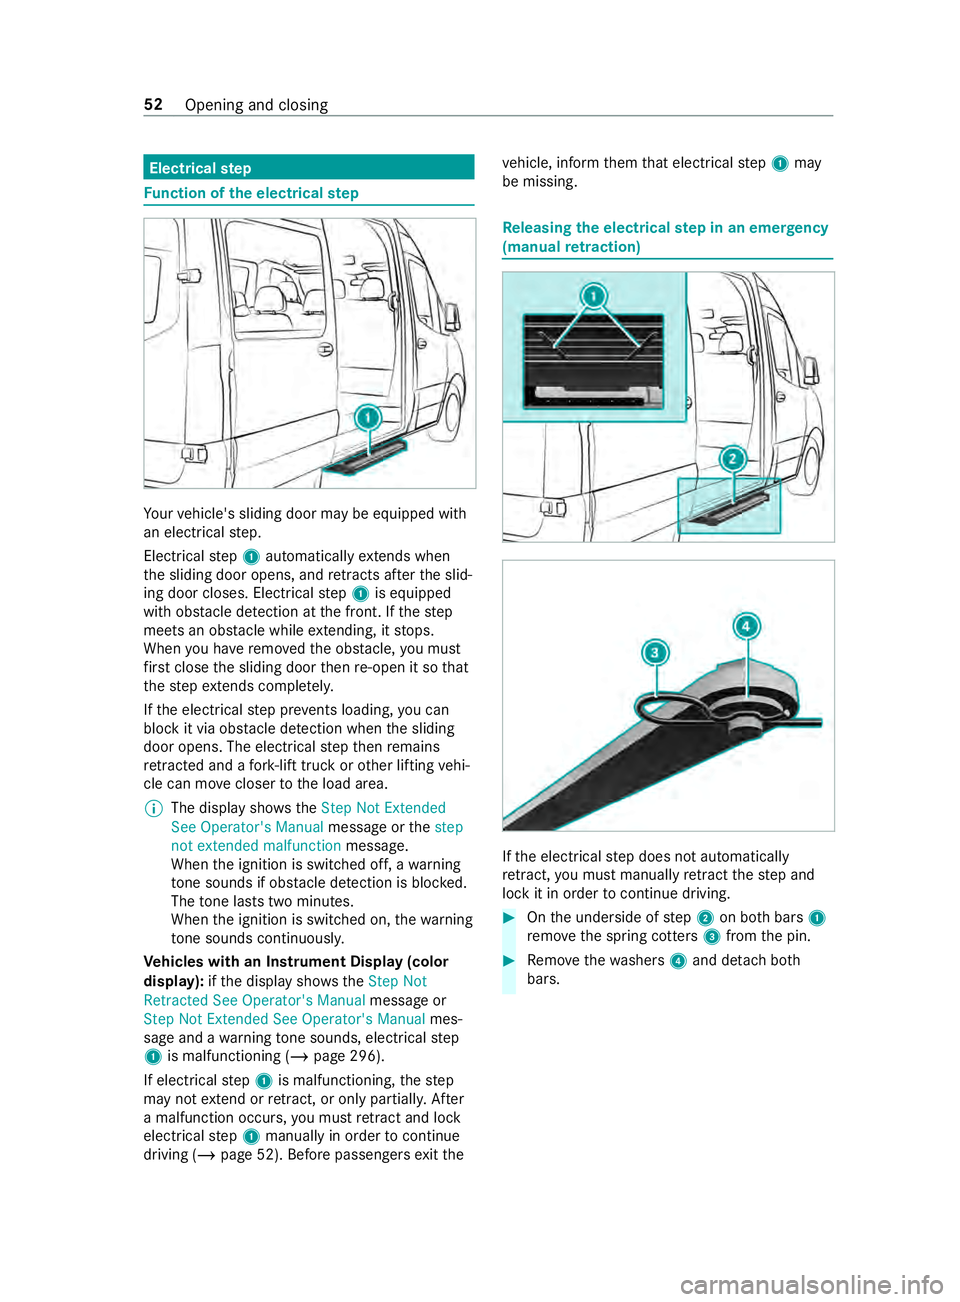
Electrical
step Fu
nction of the electrical step Yo
ur vehicle's sliding door may be equipped with
an electrical step.
Elect rical step 1 automatically extends when
th e sliding door opens, and retracts af terth e slid‐
ing door closes. Elect rical step 1 is equipped
with obs tacle de tection at the front. If thestep
meets an obs tacle while extending, it stops.
When you ha veremo vedth e obs tacle, you must
fi rs t close the sliding door then re-open it so that
th estep extends compl etely.
If th e electrical step pr events loading, you can
block it via obs tacle de tection when the sliding
door opens. The electrical step then remains
re tracted and a fork -lift truck or other lifting vehi‐
cle can mo vecloser tothe load area.
% The display sho ws theStep Not Extended
See Operator's Manual message orthestep
not extended malfunction message.
When the ignition is switched off, a warning
to ne sounds if obs tacle de tection is blo cked.
The tone la sts two minutes.
When the ignition is switched on, thewa rning
to ne sounds continuous ly.
Ve hicles with an Instrument Display (color
display): ifth e display sho ws theStep Not
Retracted See Operator's Manual message or
Step Not Extended See Operator's Manual mes‐
sage and a warning tone sounds, electrical step
1 is malfunctioning (/ page 296).
If electrical step 1 is malfunctioning, thestep
may not extend or retract, or only pa rtiall y.After
a malfunction occurs, you must retract and lo ck
electrical step 1 manually in order tocontinue
driving (/ page 52). Before passengers exitthe ve
hicle, inform them that electrical step 1 may
be missing. Re
leasing the electrical step in an emer gency
(manual retraction) If
th e electrical step does not automatically
re tract, you must manually retract thestep and
lock it in order tocontinue driving. #
Onthe underside of step 2 on bo thbars 1
re mo vethe spring cotters 3from the pin. #
Remo vethewa shers 4and de tach both
bars. 52
Opening and closing
Page 78 of 354
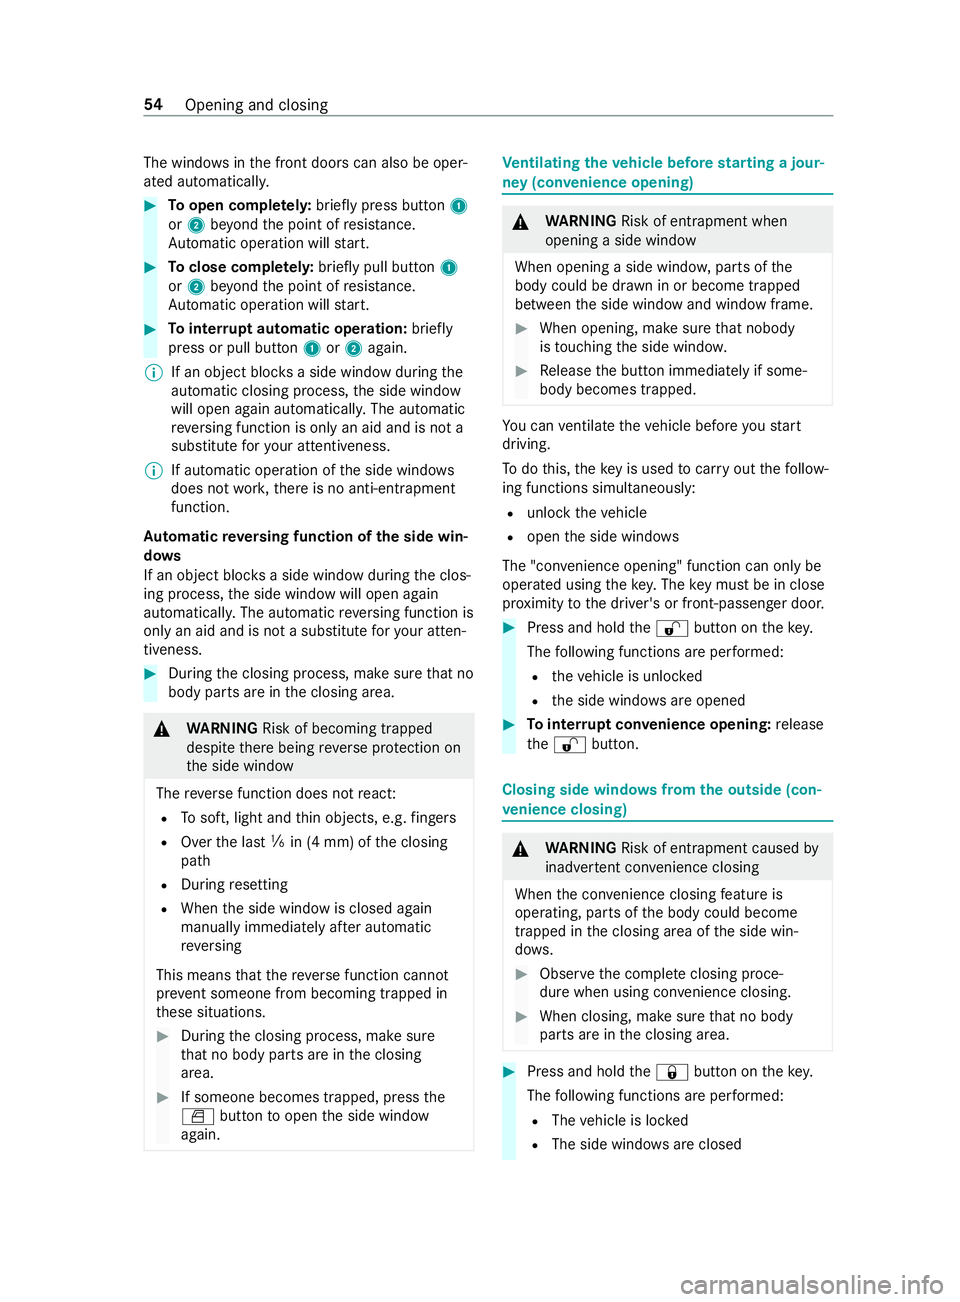
The windo
wsinthe front doors can also be oper‐
ated automaticall y. #
Toopen comple tely: briefly press button 1
or 2 beyond the point of resis tance.
Au tomatic operation will start. #
Toclose comple tely: briefly pull button 1
or 2 beyond the point of resis tance.
Au tomatic operation will start. #
Tointer rupt automatic operation: briefly
press or pull button 1or2 again.
% If an object bloc
ksa side wind owduring the
automatic closing process, the side window
will open again automaticall y.The automatic
re ve rsing function is only an aid and is not a
substitute foryo ur attentiveness.
% If automatic operation of
the side windo ws
does not work,th ere is no anti-entra pment
function.
Au tomatic reve rsing function of the side win‐
do ws
If an object bloc ksa side wind owduring the clos‐
ing process, the side window will open again
automaticall y.The automatic reve rsing function is
only an aid and is not a substitute foryo ur atten‐
tiveness. #
During the closing process, make sure that no
body parts are in the closing area. &
WARNING Risk of becoming trapped
despite there being reve rse pr otection on
th e side window
The reve rse function does not react:
R Tosoft, light and thin objects, e.g. fingers
R Over the last 00CFin (4 mm) of the closing
path
R During resetting
R When the side window is closed again
manually immediately af ter automatic
re ve rsing
This means that there ve rse function cann ot
pr eve nt someone from becoming trapped in
th ese situations. #
During the closing process, make sure
th at no body parts are in the closing
area. #
If someone becomes trapped, press the
0062 button toopen the side window
again. Ve
ntilating theve hicle before starting a jour‐
ney (co nvenience opening) &
WARNING Risk of entrapment when
opening a side window
When opening a side windo w,parts of the
body could be dr awn in or become trapped
between the side window and window frame. #
When opening, make sure that nobody
is touching the side windo w. #
Release the button immediately if some‐
body becomes trapped. Yo
u can ventilate theve hicle before youstart
driving.
To do this, theke y is used tocar ryout thefo llow‐
ing functions simultaneously:
R unlock theve hicle
R open the side windo ws
The "con venience opening" function can only be
ope rated using thekey. Thekey must be in close
pr ox imity tothe driver's or front-passen ger door. #
Press and hold the0036 button on thekey.
The following functions are per form ed:
R theve hicle is unloc ked
R the side windo wsare opened #
Tointer rupt convenience opening: release
th e0036 button. Closing side windo
wsfrom the outside (con‐
ve nience closing) &
WARNING Risk of entrapment caused by
inadver tent con venience closing
When the con venience closing feature is
operating, parts of the body could become
trapped in the closing area of the side win‐
do ws. #
Obser vethe comple teclosing proce‐
du re when using con venience closing. #
When closing, make su rethat no body
parts are in the closing area. #
Press and hold the0037 button on thekey.
The following functions are per form ed:
R The vehicle is loc ked
R The side windo wsare closed 54
Opening and closing
Page 80 of 354
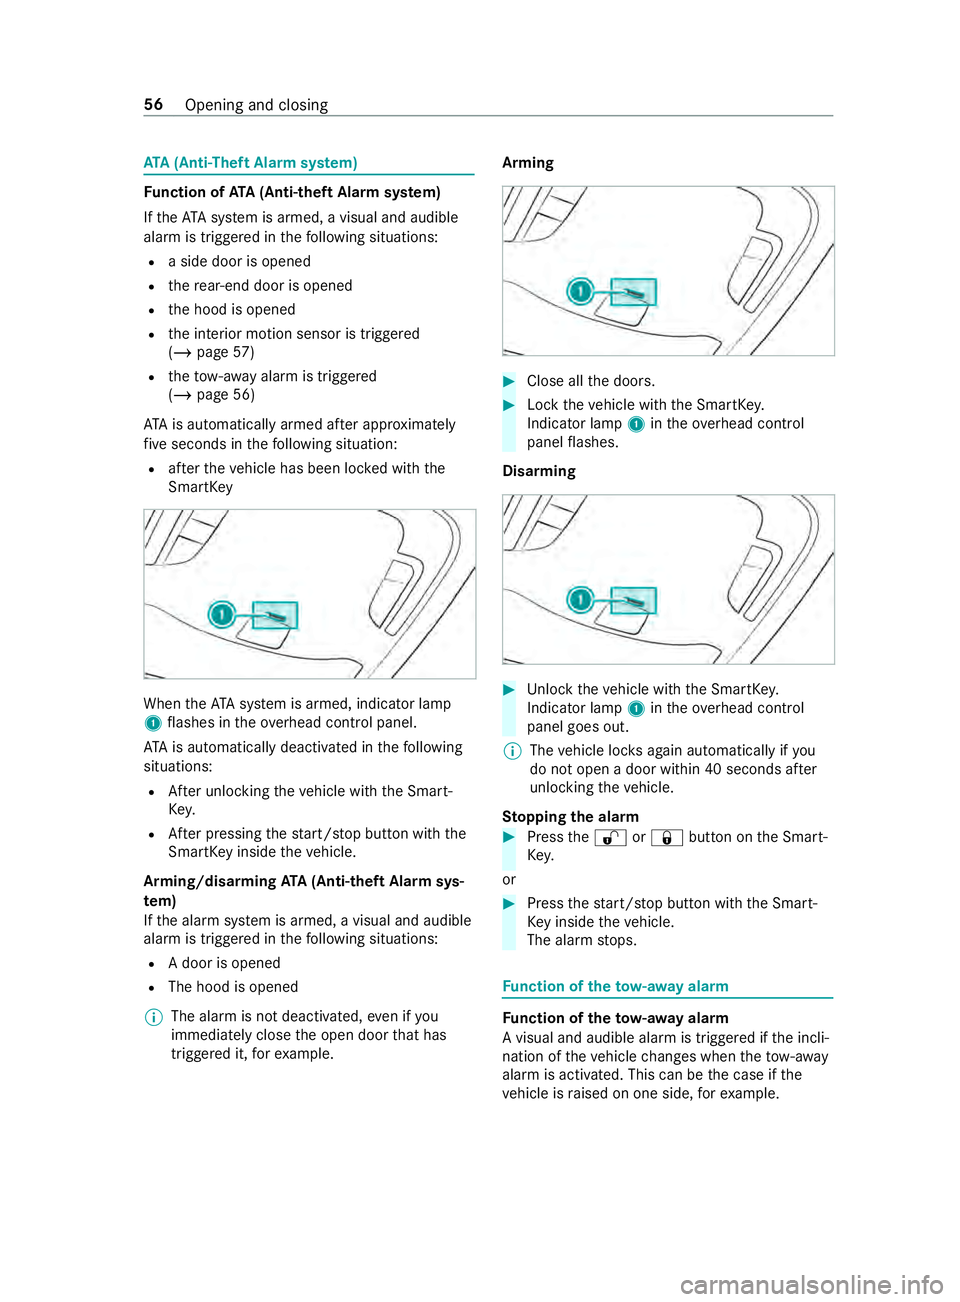
ATA
(Anti-Theft Alarm sy stem) Fu
nction of ATA(Anti- theft Alarm sy stem)
If th eATA system is armed, a visual and audible
alarm is triggered in thefo llowing situations:
R a side door is opened
R there ar-end door is opened
R the hood is opened
R the interior motion sensor is triggered
(/ page 57)
R theto w- aw ay alarm is triggered
(/ page 56)
ATA is automatically armed af ter appro ximately
fi ve seconds in thefo llowing situation:
R afte rth eve hicle has been loc ked with the
SmartK ey When
theATA system is armed, indicator lamp
1 flashes in theove rhead cont rol panel.
AT A is au tomatical lydeactivated in thefo llowing
situations:
R After unlocking theve hicle with the Smart‐
Ke y.
R After pressing thest art/ stop button with the
SmartK eyinside theve hicle.
Arming/disarming ATA(Anti- theft Alarm sys‐
te m)
If th e alarm sy stem is armed, a visual and audible
alarm is triggered in thefo llowing situations:
R A door is opened
R The hood is opened
% The alarm is not deactivated,
even if you
immediately close the open door that has
triggered it, forex ample. Arming #
Close all the doors. #
Lock theve hicle with the SmartK ey.
Indicator lamp 1intheove rhead cont rol
panel flashes.
Disarming #
Unlock theve hicle with the SmartK ey.
Indicator lamp 1intheove rhead cont rol
panel goes out.
% The
vehicle loc ksagain automatically if you
do not open a door within 40 seconds af ter
unlo cking theve hicle.
St opping the ala rm #
Press the0036 or0037 button on the Smart‐
Ke y.
or #
Press thest art/ stop button with the Smart‐
Ke y inside theve hicle.
The alarm stops. Fu
nction of theto w- aw ay alarm Fu
nction of theto w- aw ay alarm
A visual and audible ala rmis triggered if the incli‐
nation of theve hicle changes when theto w- aw ay
alarm is activated. This can be the case if the
ve hicle is raised on one side, forex ample. 56
Opening and closing
Page 81 of 354
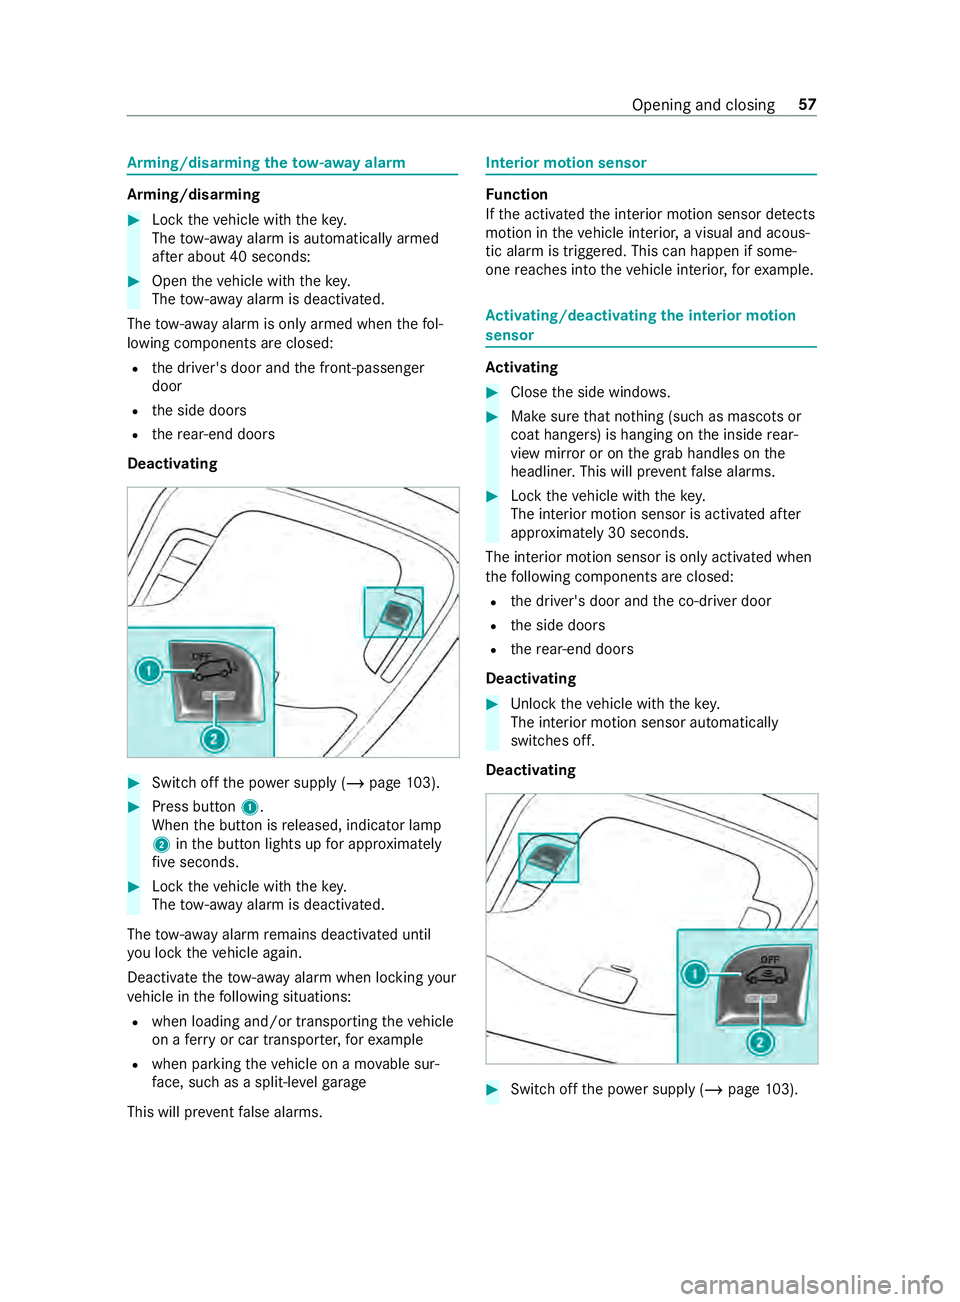
Arming/disarming
theto w- aw ay alarm Arming/disarming
#
Lock theve hicle with thekey.
The tow- aw ay alarm is automatically armed
af te r about 40 seconds: #
Open theve hicle with thekey.
The tow- aw ay alarm is deactivated.
The tow- aw ay alarm is only armed when thefo l‐
lowing components are closed:
R the driver's door and the front-passenger
door
R the side doors
R there ar-end doors
Deactivating #
Swit choff the po wer supply (/ page103). #
Press but ton1.
When the button is released, indicator lamp
2 inthe button lights up for appro ximately
fi ve seconds. #
Lock theve hicle with thekey.
The tow- aw ay alarm is deactivated.
The tow- aw ay alarm remains deactivated until
yo u lock theve hicle again.
Deactivate theto w- aw ay alarm when locking your
ve hicle in thefo llowing situations:
R when loading and/or transporting theve hicle
on a ferry or car transpor ter,fo rex ample
R when parking theve hicle on a mo vable sur‐
fa ce, such as a split-le velga rage
This will pr eventfalse alarms. Interior motion sensor
Fu
nction
If th e activated the interior motion sensor de tects
motion in theve hicle interior, a visual and acous‐
tic alarm is triggered. This can happen if some‐
one reaches into theve hicle interior, forex ample. Ac
tivating/deactivating the in terior motion
sensor Ac
tivating #
Close the side windo ws. #
Make sure that no thing (such as masc ots or
coat hangers) is hanging on the inside rear‐
view mir ror or on the grab handles on the
headliner. This will pr event false alarms. #
Lock theve hicle with thekey.
The interior motion sensor is activated af ter
appr oximately 30 seconds.
The interior motion sensor is only activated when
th efo llowing components are closed:
R the driver's door and the co-driver door
R the side doors
R there ar-end doors
Deactivating #
Unlock theve hicle with thekey.
The interior motion sensor automatically
switches off.
Deactivating #
Switch off the po wer supply (/ page103). Opening and closing
57
Page 90 of 354
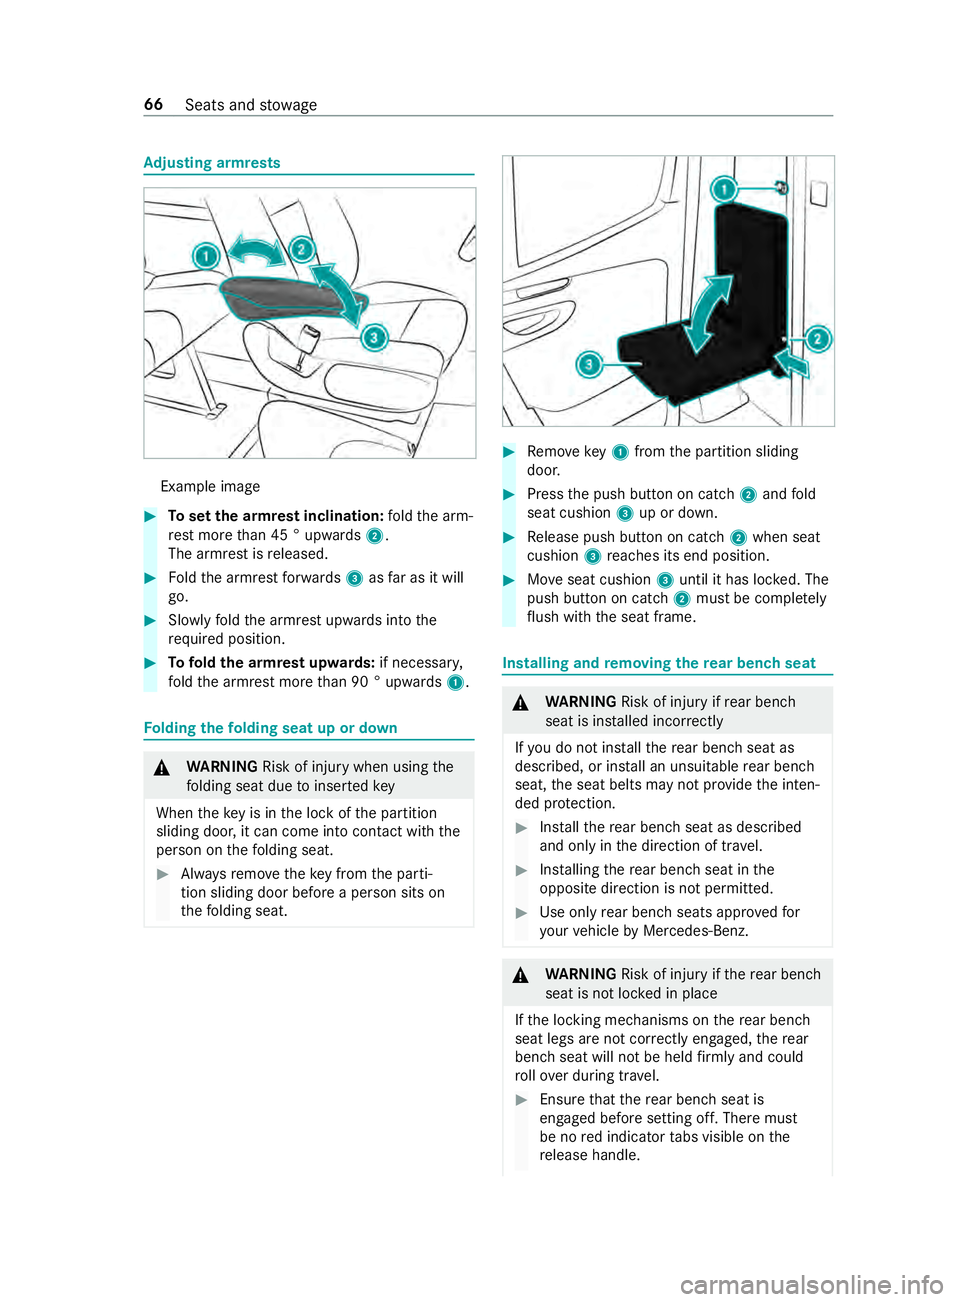
Ad
justing armrests Example ima
ge #
Toset the armrest inclination: fold the arm‐
re st more than 45 ° upwards 2.
The armrest is released. #
Foldthe armrest forw ards 3asfar as it will
go. #
Slowly fold the armrest upwards into the
re qu ired position. #
Tofold the armrest up wards: if necessar y,
fo ld the armrest more than 90 ° upwards 1. Fo
lding thefo lding seat up or down &
WARNING Risk of inju rywhen using the
fo lding seat due toinser tedkey
When theke y is in the lock of the partition
sliding door, it can come into contact with the
person on thefo lding seat. #
Alwaysre mo vetheke y from the parti‐
tion sliding door before a person sits on
th efo lding seat. #
Remo vekey1 from the partition sliding
door. #
Press the push button on catch 2and fold
seat cushion 3up or down. #
Release push button on cat ch2 when seat
cushion 3reaches its end position. #
Moveseat cushion 3until it has loc ked. The
push button on catch 2must be comple tely
fl ush with the seat frame. Installing and
removing the rear ben chseat &
WARNING Risk of inju ryifre ar ben ch
seat is ins talled incor rectly
If yo u do not ins tallth ere ar ben chseat as
described, or ins tall an unsuitable rear ben ch
seat, the seat belts may not pr ovide the inten‐
ded pr otection. #
Installth ere ar ben chseat as described
and only in the direction of tra vel. #
Installing there ar ben chseat in the
opposite direction is not permitted. #
Use only rear ben chseats appr ovedfor
yo ur vehicle byMercedes-Benz. &
WARNING Risk of inju ryifth ere ar ben ch
seat is not loc ked in place
If th e locking mechanisms on there ar ben ch
seat legs are not cor rectly engaged, there ar
ben chseat will not be held firm lyand could
ro llove r during tr avel. #
Ensure that there ar ben chseat is
engaged before setting off. There must
be no red indicator tabs visible on the
re lease handle. 66
Seats and stowage
Page 97 of 354
pants). The
values are specified on theve hi‐
cle identification plate on the B-pillar.
R the load must not pr otru de abo vethe upper
edge of the seat backrests.
R if possible, alw ays transport the load in the
cargo compa rtment.
R fastenthe load tothe tie-down eyes and
spread the load as evenly as possible.
R use tie-down eyes and fastening components
which are suitable forth ewe ight and size of
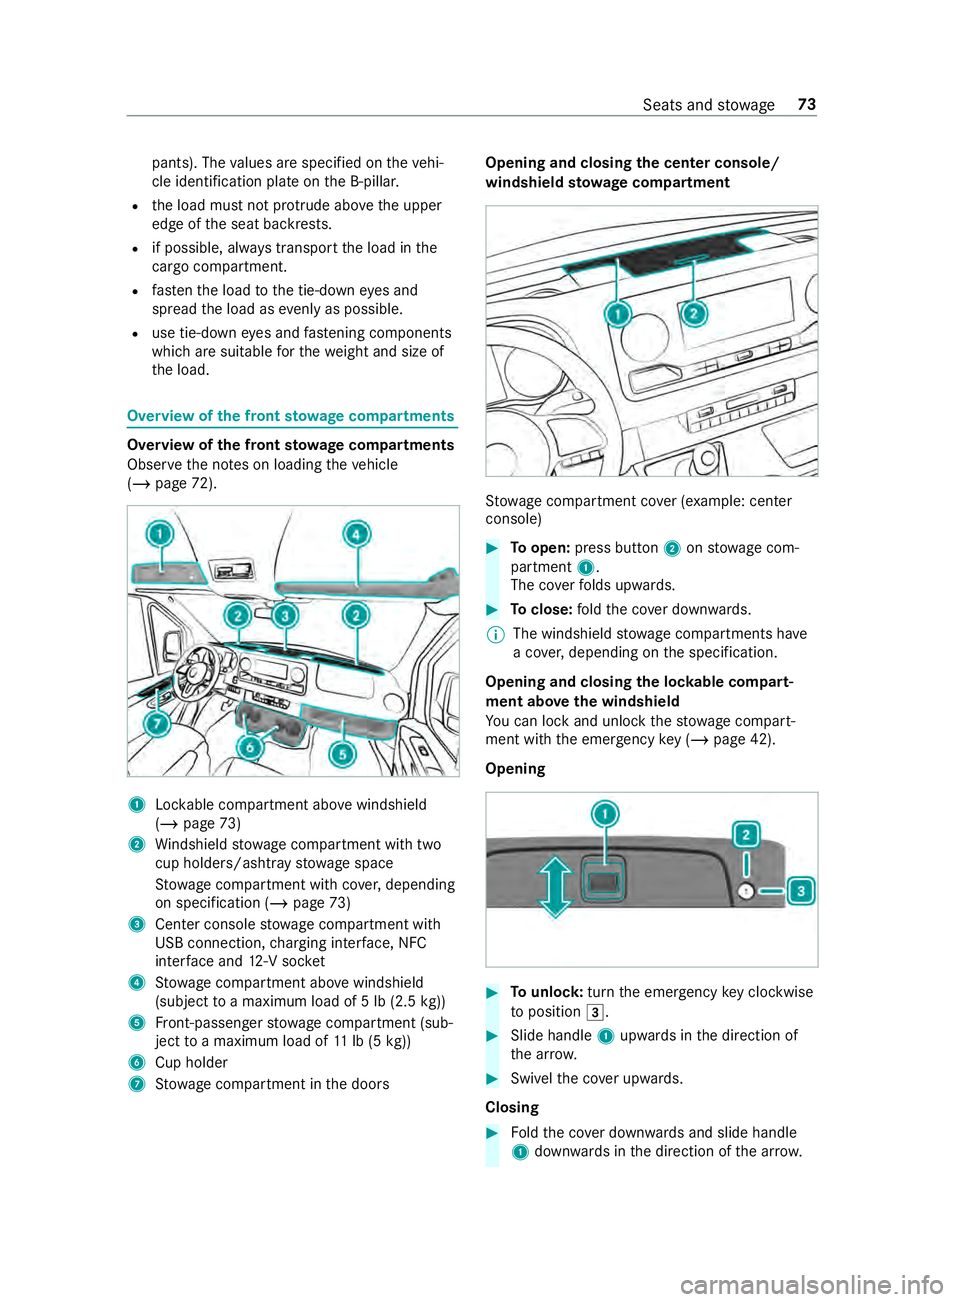
th e load. Overview of
the front stowage compa rtments Overvi
ewofthe front stowage compa rtments
Obser vethe no tes on loading theve hicle
(/ page 72). 1
Lockable compartment abo vewindshield
(/ page 73)
2 Windshield stowage compartment with two
cup holde rs/ashtr aystow age space
St ow age compartment with co ver,depending
on specification (/ page73)
3 Center console stowage compartment with
USB connection, charging inter face, NFC
inter face and 12-V soc ket
4 Stow age compartment abo vewindshield
(subject toa maximum load of 5 lb (2.5 kg))
5 Front-passenger stowage compartment (sub‐
ject toa maximum load of 11lb (5 kg))
6 Cup holder
7 Stow age compartment in the doors Opening and closing
the center console/
windshield stowage compa rtment St
ow age compartment co ver (e xamp le: cen ter
console) #
Toopen: press button 2onstow age com‐
partment 1.
The co verfo lds upwards. #
Toclose: fold the co ver down wards.
% The windshield
stowage compartments ha ve
a co ver,depending on the specification.
Opening and closing the loc kable compart‐
ment abo vethe windshield
Yo u can lock and unlo ck thestow age compart‐
ment with the emer gency key (/ page 42).
Opening #
Tounlo ck:turn the emer gency key clo ckwise
to position 0049. #
Slide handle 1upwards in the direction of
th e ar row. #
Swivelth e co ver upwards.
Closing #
Foldthe co ver down wards and slide handle
1 down wards inthe direction of the ar row. Seats and
stowage 73
Page 98 of 354
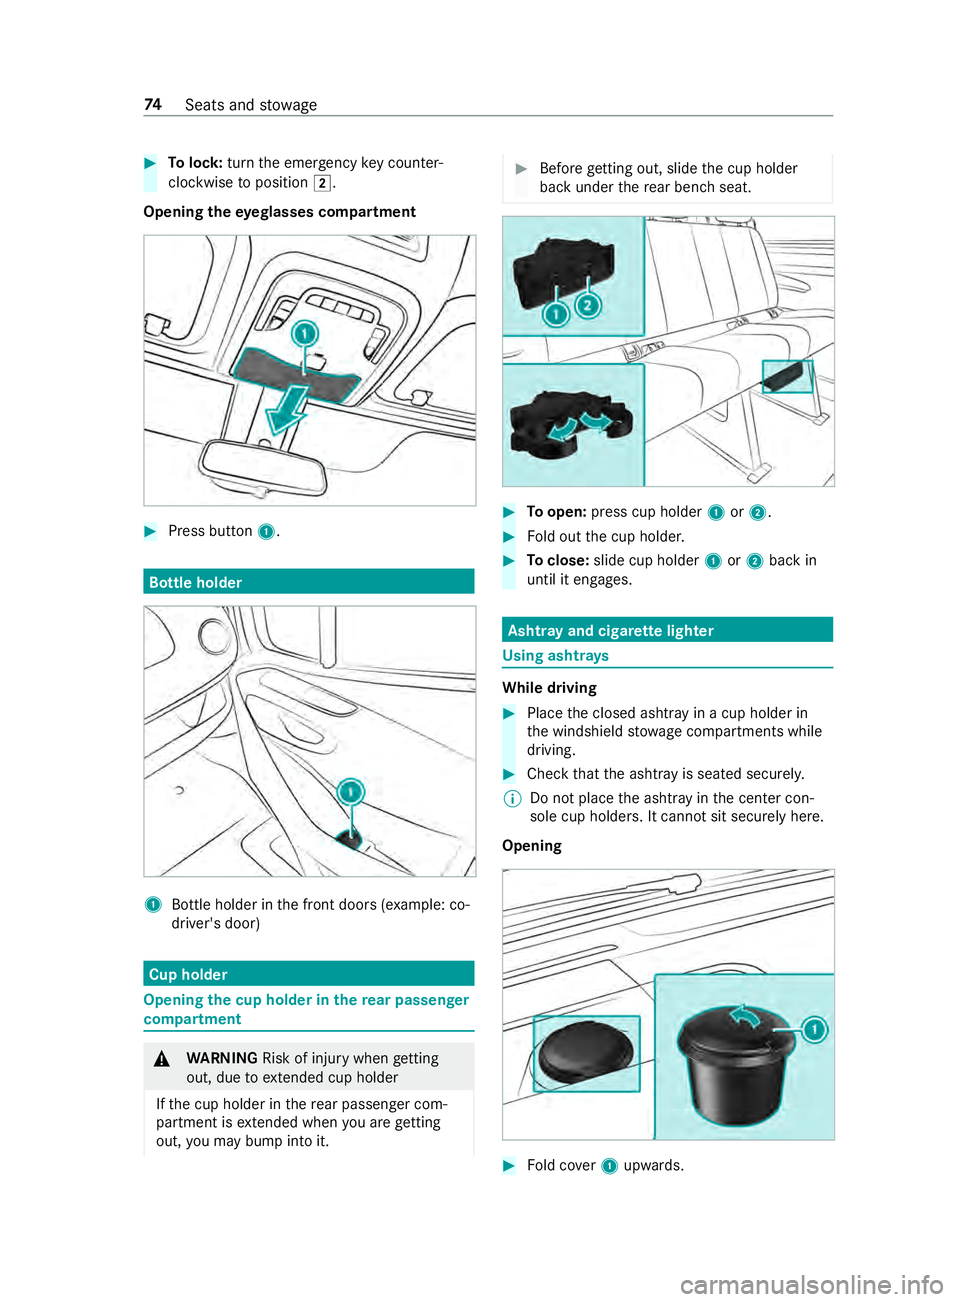
#
Tolock: turnthe emer gency key counter-
clo ckwise toposition 0048.
Opening theey eglasses compa rtment #
Press button 1. Bottle holder
1
Bottle holder in the front doors (e xample: co-
driver's door) Cup holder
Opening
the cup holder in there ar passen ger
compa rtment &
WARNING Risk of inju rywhen getting
out, due toextended cup holder
If th e cup holder in there ar passenger com‐
partment is extended when you are getting
out, you may bump into it. #
Before getting out, slide the cup holder
back under there ar ben chseat. #
Toopen: press cup holder 1or2. #
Fold out the cup holder. #
Toclose: slide cup holder 1or2 back in
until it engages. Asht
ray and cigar ette lighter Using asht
rays While driving
#
Place the closed ashtr ayin a cup holder in
th e windshield stowage compartments while
driving. #
Check that the ashtray is seated securely.
% Do not place
the ashtray in the center con‐
sole cup holders. It cann otsit securely here.
Opening #
Fold co ver1 upwards. 74
Seats and stowage
Page 110 of 354
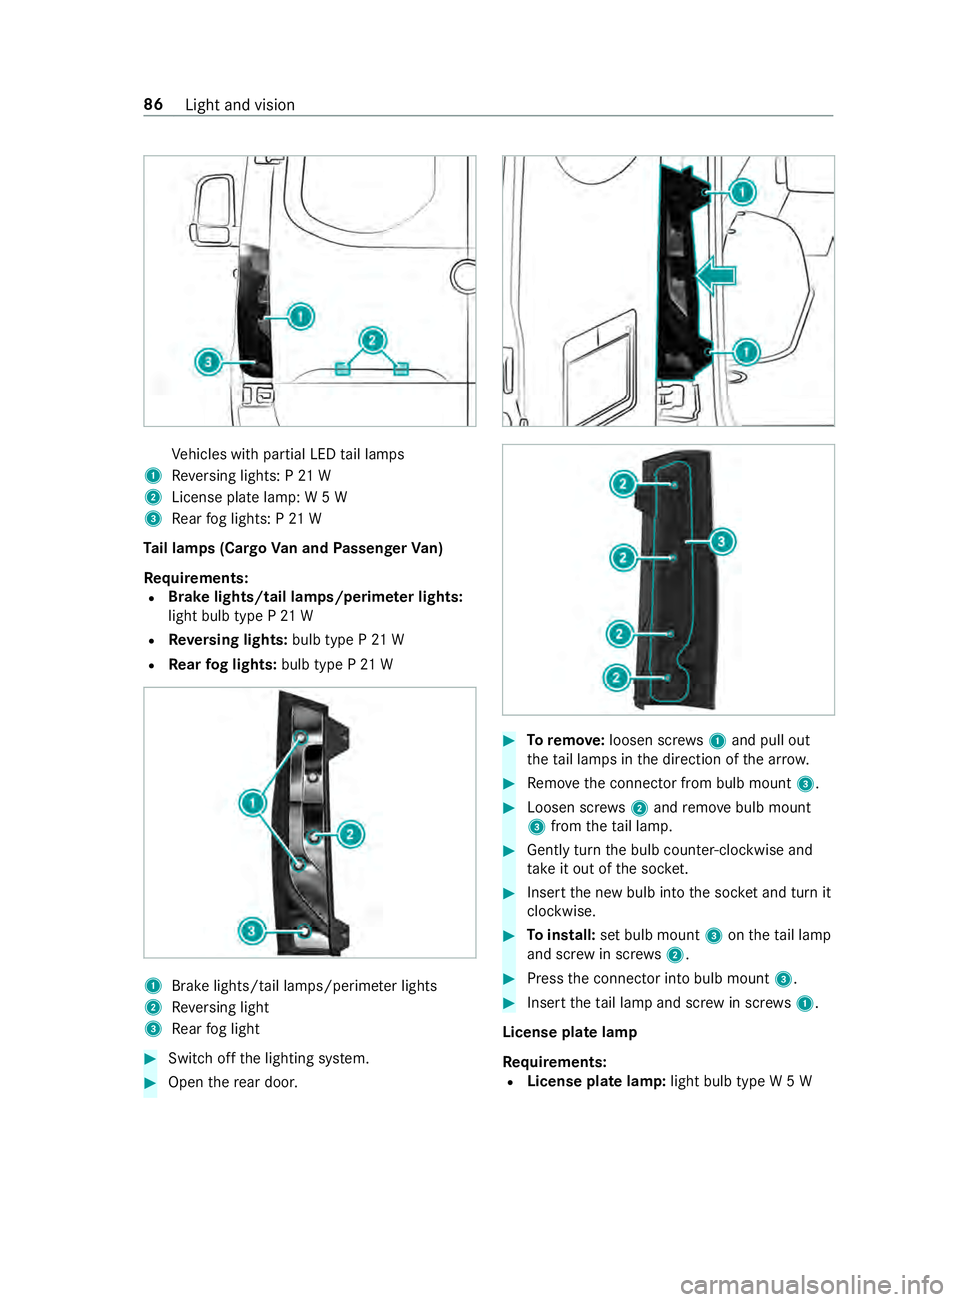
Ve
hicles with partial LED tail lamps
1 Reversing lights: P 21 W
2 License plate lamp: W 5 W
3 Rear fog lights: P 21 W
Ta il lamps (Cargo Van and Passenger Van)
Re quirements:
R Brake lights/tail lamps/perime
ter lights:
light bulb type P 21 W
R Reversing lights: bulb type P 21 W
R Rear fog lights: bulb type P 21 W 1
Brake lights/tail la mps/perime ter lights
2 Reversing light
3 Rear fog light #
Switch off the lighting sy stem. #
Open there ar door. #
Toremo ve:loosen scr ews1 and pull out
th eta il lamps in the direction of the ar row. #
Remo vethe connector from bulb mount 3. #
Loosen scr ews2 and remo vebulb mount
3 from theta il lamp. #
Gently turn the bulb counter-clockwise and
ta ke it out of the soc ket. #
Inse rtthe new bulb into the soc ket and turn it
clo ckwise. #
Toinstall: set bulb mount 3ontheta il lamp
and scr ewin scr ews2. #
Press the connector into bulb mount 3. #
Insert theta il lamp and scr ewin scr ews1.
License plate lamp
Re quirements:
R License plate lamp: light bulb type W 5 W86
Light and vision