battery MERCEDES-BENZ SPRINTER 2019 MY19 with 7” screen
[x] Cancel search | Manufacturer: MERCEDES-BENZ, Model Year: 2019, Model line: SPRINTER, Model: MERCEDES-BENZ SPRINTER 2019Pages: 354, PDF Size: 6.15 MB
Page 26 of 354
Symbols
..................................................... 4At
agl ance ................................................. 6
Cockpit ........................................................ 6
Instrument clus ter ....................................... 7
Overhead control panel ............................. 10
Door control panel .................................... .14
Emergencies and breakdowns ................... 16Genera
l notes.......................................... 18
Environmental pr otection .......................... 18
Mercedes-Benz Genuine Parts ...................18
Information about attachments, add-
on equipment, ins tallations and con‐
ve rsions .................................................... .19
Operating Instructions ...............................20
Service and vehicle operation ...................20
Operating saf ety ........................................ 21
Declarations of conformity ........................ 22
Diagno stics connection ............................ .22
No tes on changes tothe engine output ..... 23
Qualified specialist workshop .................... 23
Ve hicle registration ................................... 23
Cor rect use of theve hicle .........................23
Multi Purpose Vehicle ................................ 24
Information on problems with your
ve hicle .......................................................24
Re porting saf ety defects ............................ 24
Limited Warranty ...................................... .24
QR codes forre scue card .......................... 24
Data storage ..............................................25
Copyright .................................................. .27Occupant saf
ety...................................... 28
Re stra int sy stem ........................................28
Seat belts .................................................. 30
Airbags ...................................................... 32
Children in theve hicle ...............................34
No tes on pets in theve hicle ......................40 Opening and closing
...............................41
SmartK ey................................................... 41
Doo rs........................................................ 44
Sliding door ............................................... 45
Electrical sliding door ................................ 46
Re ar-end doors .......................................... 50
Pa rtition sliding door .................................. 51
Electrical step ............................................ 52
Side window ..............................................53
Anti-theft pr otection ..................................55 Seats and
stowage .................................. 59
Co rrect driver's seat position .................... 59
Seats ......................................................... 59
Ad justing thesteering wheel ..................... 71
St ow age areas .......................................... .72
Bottle holder .............................................. 74
Cup holder ................................................ .74
Ashtr ayand cigar ette lighter ...................... 74
Soc kets ...................................................... 75
Wi relessly charging the mobile phone
and coupling with theex terior antenna ..... 77
Ins talling or removing thefloor mats ......... 78 Light and vision
....................................... 79
Ex terior lighting ......................................... 79
Ad justing the interior lighting .................... 82
Changing bulbs .......................................... 83
Wi ndshield wipe rs..................................... 88
Mir rors ...................................................... 90
Using sun visors ........................................ 92 Climate control
....................................... 93
Overview of climate control sy stems ......... 93
Operating climate control sy stems ............ 95
Operating air vents .................................... 98
Au xilia ryheating ........................................99
Operating cargo compartment ventila‐
tion .......................................................... 102 Driving and pa
rking .............................. 103
Driving .................................................... .103
Battery main switch ................................. 11 4
Au tomatic transmission ........................... 11 5
All-wheel drive .......................................... 11 8
DSR (Downhill Speed Regulation) ............ 12 0
Electronic le vel control ............................ 121
Re fueling ................................................ .125
Pa rking .................................................... 13 2
Driving and driving sa fety sy stems ..........1 36
Wo rkmode ............................................. .156
Tr ailer operation ...................................... 157 Instrument Display and on-board
compu
ter............................................... 16 3
Overview of Instrument Display ............... 16 3
Overview of the buttons on thesteer‐
ing wheel .................................................1 64
Operating the on-board computer ........... 16 4
Overview of the displa yson the multi‐
function display ....................................... 16 5
Setting the instrument lighting ................1 662
Contents
Page 27 of 354
Menus and submenus .............................
16 6Mercedes PRO
....................................... 171
Information about Mercedes PRO ............ 171
Information about Mercedes PRO con‐
nect .........................................................1 71
Calling the Mercedes-Benz Cus tomer
Center using the multimedia sy stem ........ 171
Making a call via theove rhead control
panel ........................................................ 171
Information on theRo adside Assis‐
ta nce call via theove rhead control
panel ........................................................ 171
Information on Mercedes PRO connect
accident management .............................1 72
Tr ansmit ted data during a breakdown
assis tance call ......................................... 172MBUX multimedia sy
stem .................... 17 3
Overview and operation ........................... 173
Sy stem settings ....................................... 17 9
Ve hicle information ..................................1 81
Te lephone ................................................ 182
Media ...................................................... 189
Ra dio .......................................................1 92
Sound ...................................................... 194Tr
anspo rting .......................................... 19 5
No tes on loading guidelines ..................... 19 5
Load distribution ..................................... 19 6
Secu ring loads ......................................... 19 6
Car rier sy stems ....................................... 19 8
Using the interior roof car rier sy stem ...... 19 9
Placing a load on the wheel ar ch............. 201 Main
tenance and care .......................... 202
ASS YST PLUS service inter val display .... .202
Engine compartment ............................... 202
Cleaning and care ................................... .210 Breakdown assistance
..........................216
Emergency ............................................... 216
Emergency Call Sy stem ........................... 216
Flat tire ................................................... .218
Battery ..................................................... 218
To wing or tow- starting ............................ .224
Electrical fuses ........................................ 228
Ve hicle tool kit ......................................... 229
Hydraulic jack ......................................... 230 Wheels and tires
................................... 232
Information on noise or unusual driving
ch aracteristics ........................................ .232
No tes on regular lyinspecting wheels
and tires .................................................. 232
Information on driving with summer
tires ........................................................ .232
Information on M+S tires ......................... 233
No tes on snow chains ............................ .233
Ti re pressure ...........................................2 34
Loading theve hicle ..................................2 40
Ti re labeling ............................................ .243
Information on definitions (tires and
loading) ................................................... 24 6
Changing a wheel .................................... 24 8
Spa rewheel ............................................ 255 Te
ch nical data ....................................... 260
Information on tech nical da ta.................. 260
On-board electronics ............................... 260
Ve hicle identification plate, vehicle
identification number (VIN) and engine
number ....................................................2 61
Operating fluids and capacities .............. .263
Ve hicle data ............................................. 271
Tr ailer hit ch.............................................. 271
Lashing points and car rier sy stems ......... 275 Display messages and
warning and
indicator lamps ..................................... 277
Displ aymessa ges .................................... 277
Indicator and warning lamps .................. .296 Index
...................................................... 306 Contents
3
Page 47 of 354
&
WARNING Risk of accident due to
objects in the driver's foot we ll
Objects in the driver's foot we ll may impede
pedal tr avel or block a depressed pedal.
This jeopardizes the operating and road
saf ety of theve hicle. #
Stow all objects in theve hicle securely
so that they cannot getinto the driver's
fo ot we ll. #
Always ins tallth efloor mats securely
and as prescribed in order toensure
th at there is alw ays suf ficient room for
th e pedals. #
Do not use loose floor mats and do not
place floor mats on top of one ano ther. *
NO
TEBattery discharging from using
devices connec tedto the diagnostics
connection Using devices at
the diagnostics connection
drains the batter y. #
Check thech arge leve l of the batter y. #
Ifth ech arge leve l is lo w,charge the bat‐
te ry, e.g. bydriving a considerable dis‐
ta nce. Connecting equipment
tothe diagnostics connec‐
tion can lead toemissions monitoring information
being reset, forex ample. This may lead tothe
ve hicle failing tomeet therequ irements of the
next emissions inspection du ring the main
inspection. Note
s onchanges tothe engine output
Output inc reases can:
R change the emission values.
R lead tomalfunctions.
R result in consequential damage.
The operating saf ety of the engine is not guaran‐
te ed in all situations.
Any tamp ering with the engine management in
order toinc rease the engine output will lead to
th e loss of the New Vehicle Limited Warranty and
ot her warranty entitlements.
If yo u sell theve hicle, inform the buyer of any
alterations totheve hicle's engine output. If you
do not inform the buyer, this may con stitute a
punishable of fense under national legislation. Qualified speciali
stwo rkshop
A qu alified specialist workshop has the necessary
special skills, tools and qualifications tocor rectly
car ryout any necessary workon your vehicle.
This particular lyapplies tosaf ety-re leva nt wo rks.
Alw ays ha vethefo llowing workon theve hicle
car ried out at a qualified specialist workshop:
R safety-re leva nt wo rks
R service and maintenance work
R repair work
R modifications as well as ins tallations and con‐
ve rsions
R workon electronic component parts
Mercedes-Benz recommends that you use an
authorized Mercedes-Benz Center forth is pur‐
pose. Ve
hicle registration
Mercedes-Benz may ask its service cen terto
car ryout tech nical inspections on cer tain vehi‐
cles. The quality or saf ety of theve hicle is
impr oved as a result of the inspection.
Mercedes-Benz can only inform you about vehicle
ch ecks if it Mercedes-Benz has your registration
data.
In thefo llowing cases your vehicle may not be
re gis tere dto yo uye t:
R You did not pur chase your vehicle at an
authorized specialist dealer.
R Your vehicle has not yet been inspected at an
au thorized Mercedes-Benz Center.
It is advisable toregis teryo ur vehicle with an
authorized Mercedes-Benz Center.
Inform Mercedes-Benz as soon as possible about
any change in address or vehicle ownership.
Yo u can do this, forex ample, at an authorized
Mercedes-Benz Center. Cor
rect use of theve hicle
If yo ure mo ve wa rning sticke rs,ot hers may failto
re cognize the dangers. Lea ve warning sticke rs in
position.
Obser vethefo llowing information in particular
when operating theve hicle:
R Safety no tes in these Operating Instructions
R Tech nical da taforth eve hicle General no
tes23
Page 49 of 354
card contains, in compact
form ,th e most impor‐
ta nt information about your vehicle e.g. thero ut‐
ing of electric cables.
Fu rther information can be found at http://
www.mercedes-benz.de/qr-code. Data
storage Electronic control units
Electronic control units are ins
talled in your vehi‐
cle. Some of these are necessary forth e safe
operation of your vehicle, while some assist you
when driving (driver assis tance sy stems). In addi‐
tion, your vehicle pr ovides com fort and enter tain‐
ment functions, which are also made possible by
electronic cont rol units.
The elect ronic control units contain da tamemo‐
ri es which can temp orarily or permanently store
te ch nical information about theve hicle's operat‐
ing state, component loads, main tenance requ ire‐
ments and tech nical events or malfunctions.
In general, this information documents thest ate
of a component part, a module, a sy stem or the
sur roundings such as:
R operating states of sy stem components (e.g.
fl uid le vels, battery status, tire pressure)
R status messages concerning theve hicle and
its individual components (e.g. number of
wheel revo lutions/speed, deceleration, lateral
acceleration, display of thefast ened seat
belts)
R malfunctions or defects in impor tant sy stem
components (e.g. lights, brakes)
R information on events leading tovehicle dam‐
age
R system reactions in special driving situations
(e.g. airbag deployment, inter vention of sta‐
bility control sy stems)
R ambient conditions (e.g. temp erature, rain
sensor)
In addition toprov iding the actual cont rol unit
function, this data assists the manufacturer in
de tecting and rectifying malfunctions and opti‐
mizing vehicle functions. The majority of this data
is temp orary and is only processed in theve hicle
itself. Only a small portion of the data is stored in
th eeve nt or malfunction memo ry.
When your vehicle is serviced, tech nical da ta
from theve hicle can be read out byservice net‐
wo rkemplo yees (e.g. workshops, manufacturers)
or third parties (e.g. breakdown services). Serv‐ ices include
repair services, maintenance pro‐
cesses, warranty claims and quality assurance
measures, forex ample. The read out is per‐
fo rm ed via the legally prescribed port forthe
diagnostics connection in theve hicle. The
re spective service network locations or third par‐
ties collect, process and use this data. They
document tech nical statuses of theve hicle,
assist in finding malfunctions and impr oving qual‐
ity and are transmitted tothe manufacturer, if
necessar y.Fu rthermore, the manufacturer is sub‐
ject toproduct liability. Forth is, the manufacturer
re qu ires tech nical da tafrom vehicles.
Malfunction memories in theve hicle can be reset
by a service outlet as part of repair or mainte‐
nance work.
Depending on the selected equipment, you can
import data into vehicle con venience and info‐
ta inment functions yourself.
This includes, forex ample:
R multimedia data such as music, films or pho‐
to sfo r playback in an integrated multimedia
sy stem
R address book data for use in connection with
an integrated hands-free sy stem or an inte‐
grated navigation sy stem
R entered navigation destinations
R data about the use of Internet services
This data can be sa ved locally in theve hicle or it
is located on a device which you ha veconnected
to theve hicle (e.g. smartphone, USB flash drive
or MP3 pla yer). If this data is stored in theve hi‐
cle, you can dele teit at any time. This data is
sent tothird parties only at your requ est, particu‐
lar lywhen you use online services in accordance
with the settings that you ha veselected.
Yo u can store or change con venience settings/
individualization in theve hicle at any time.
Depending on the equipment, this includes, for
ex ample:
R seat and steering wheel position settings
R suspension and climate cont rol settings
R Individualization such as interior lighting
If yo ur vehicle is accordingly equipped, you can
connect your smartphone or ano ther mobile end
device totheve hicle. You can control this by
means of the cont rol elements integrated in the
ve hicle. Images and audio from the smartphone
can be output via the multimedia sy stem. Cer tain General no
tes25
Page 65 of 354
SmartK
ey Note
s onradio connections of the key&
DANG ER Risk of fata l injury topersons
with medical devices from the electro‐
magnetic radiation of thest art/ stop but‐
ton
Pe rsons with medical devices, e.g. pacemak‐
ers or defibrillators:
When you operate thest art/ stop button, a
ra dio connection is es tablished between the
ke y and theve hicle.
The electromagnetic radiation can af fect the
functionality of a medical device. #
Before operating theve hicle, consult
yo ur doc tor or the manufacturer of the
medical device about any possible
ef fects of emissions from such sy stems. De
tection range of the KEYLESS-S TART func‐
tion antenna Overview of SmartK
eyfunctions &
WARNING Risk of accident and inju ry
due tochildren left unat tended in the
ve hicle
If ch ildren are left unat tended in theve hicle,
th ey could:
R open doo rs,th ereby endangering other
persons or road users.
R get out of theve hicle and be hit by
oncoming traf fic.
R operate ve hicle equipment and become
trapped, forex ample.
In addition, children could also set theve hicle
in motion, forex ample, by:
R releasing the parking brake. R
shifting the automatic transmission out of
park position 005D.
R starting the engine #
Never lea vechildren and animals unat‐
te nded in theve hicle. #
When leaving theve hicle, alw aysta ke
th e SmartK eywith you and lock the
ve hicle. #
Keep the SmartK eyout of there ach of
ch ildren. *
NO
TEDama getotheke y caused bymag‐
netic fields #
Keep theke yaw ay from strong mag‐
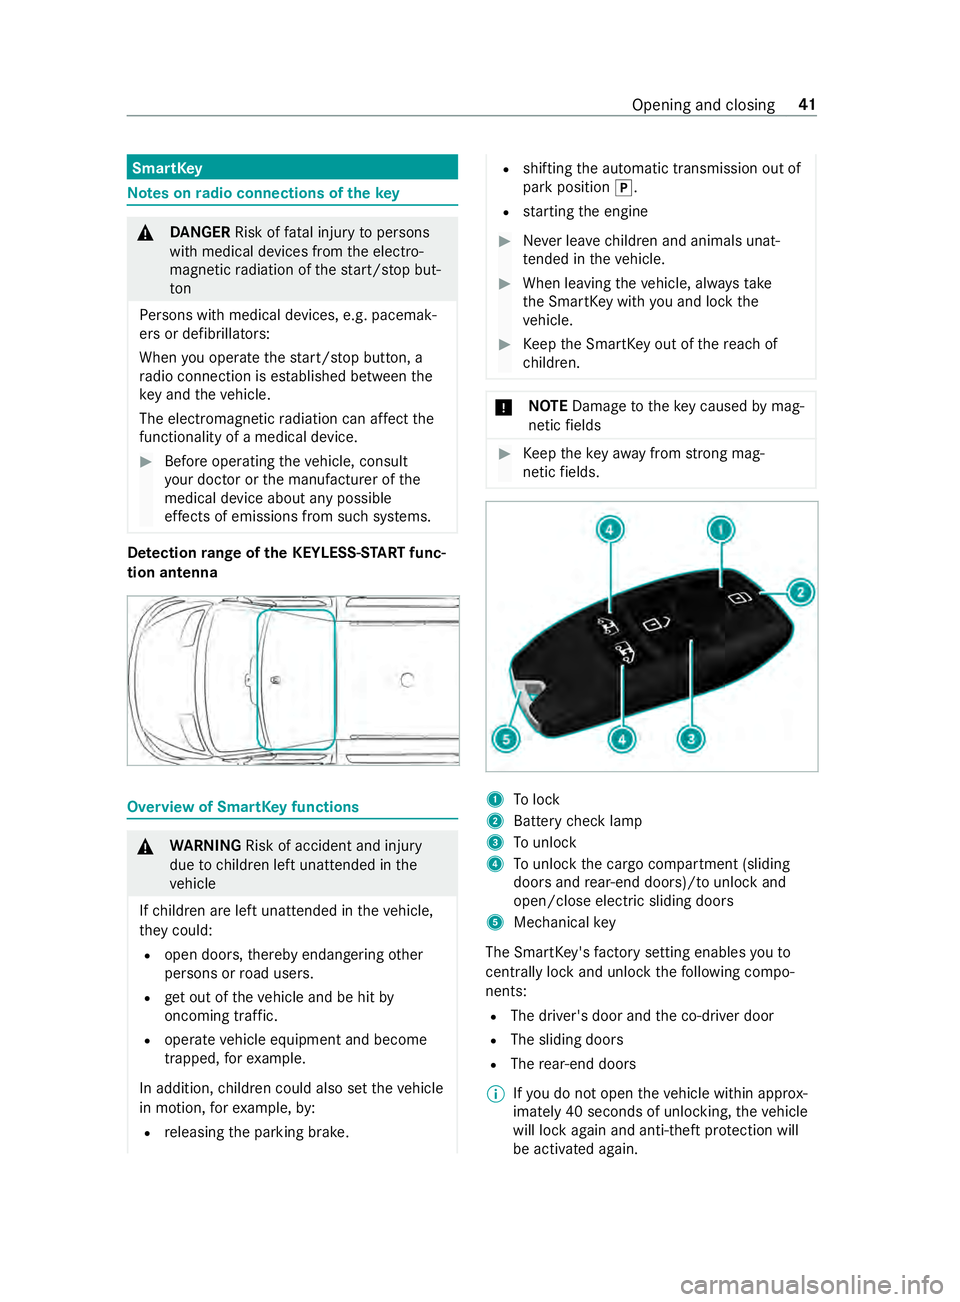
netic fields. 1
Tolock
2 Battery check lamp
3 Tounlo ck
4 Tounlo ckthe cargo compartment (sliding
doors and rear-end doors)/ tounlo ckand
open/close electric sliding doors
5 Mechanical key
The SmartK ey's factory setting enables youto
centrally lock and unlock thefo llowing compo‐
nents:
R The driver's door and the co-driver door
R The sliding doors
R The rear-end doors
% If
yo u do not open theve hicle within appr ox‐
imately 40 seconds of unlocking, theve hicle
will lock again and anti-theft pr otection will
be activated again. Opening and closing
41
Page 66 of 354
Do not
keep the SmartK eytoge ther with elec‐
tronic devices or me tallic objects. This can af fect
th e SmartK ey's functionality.
% If
th e battery check lamp does not light up
when you press the0036 or0037 button, the
battery is dischar ged.
Re place the SmartK eybattery (/ page 42). Ac
tivating/deactivating the acoustic lo cking
ve rification signal Multimedia sy
stem:
4 © 5
Settings 5
Vehicle #
Switch Acoustic Lock on or off. Changing
the unlocking settings The
key has thefo llowing adjus table unlocking
functions:
R unlock cent rally
R unlock driver's and front-passenger door
(Cargo Van)
R unlock driver's door (Passenger Van,chassis
ve rsion) #
Toswitch between the settings: press and
hold the0036 and0037 buttons at the same
time for appro ximately six seconds until the
battery check lamp flashes twice.
When the locking function is selected forth e driv‐
er's door or the driver's and front-passenger
door:
R pressing the0036 button a second time
unloc kstheve hicle centra lly Re
ducing the energy consum ption of the
SmartK ey If
yo u do not use theve hicle or a SmartK ey for an
ex tended pe riod, you may deactivate the KEY‐
LESS START function of the SmartK ey. #
Todeactivate: pressthe0037 button on the
SmartK eytwice in quick succession.
The battery check lamp on the SmartK ey
lights up twice quickly and once for longer. #
Toactivate: press any button on the Smart‐
Ke y.
When starting theve hicle with the SmartK eyin
th e slot in the shift console, the SmartK eyfunc‐
tions are activated auto matically. Re
moving and inse rting the mechanical key #
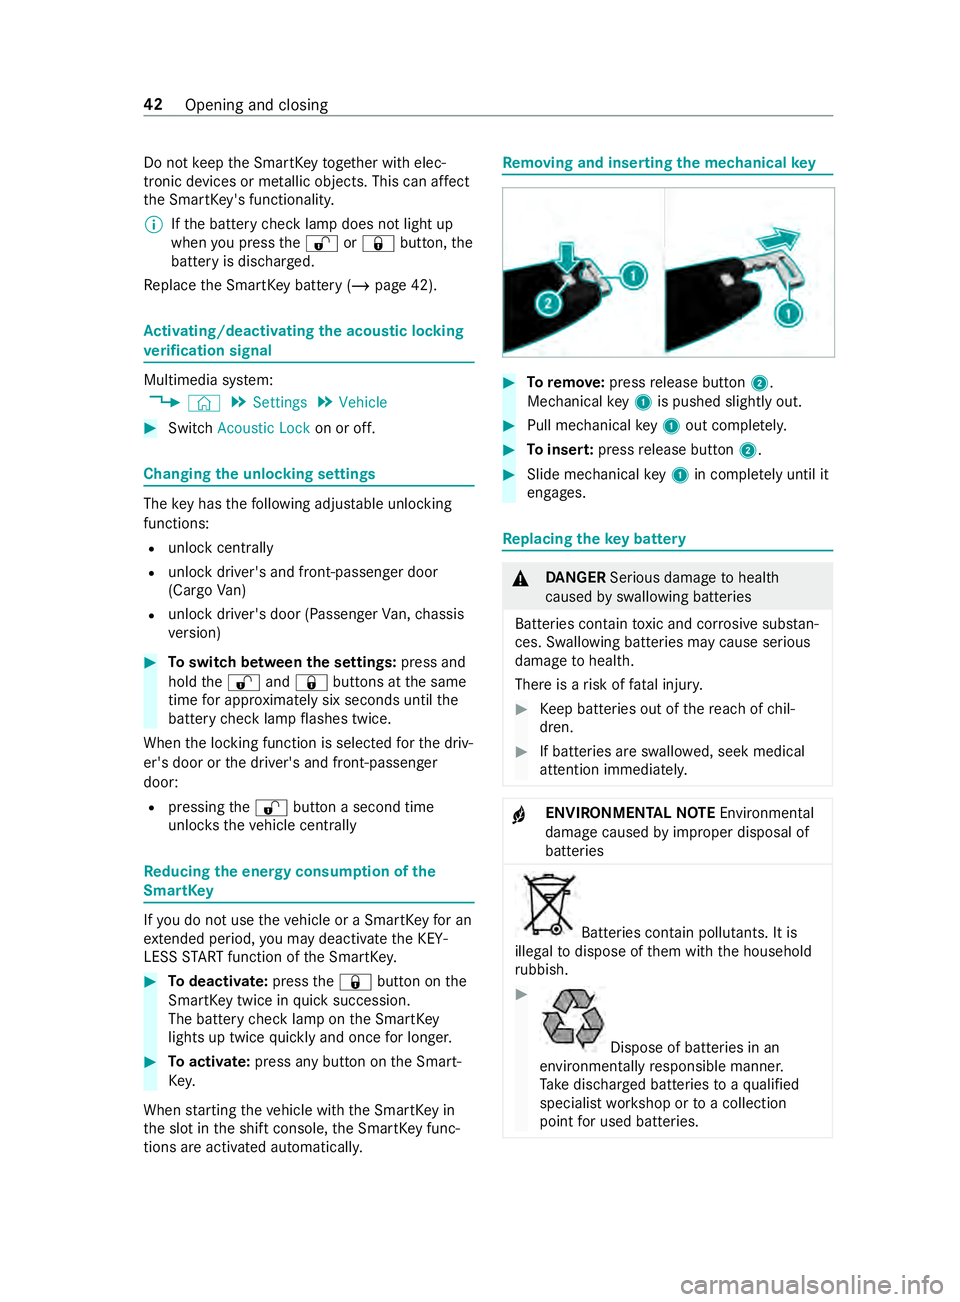
Toremo ve:press release button 2.
Mechanical key1 is pushed slight ly out. #
Pull me chanical key1 out co mplete ly. #
Toinser t:press release button 2. #
Slide mechanical key1 in co mplete ly until it
engages. Re
placing the key battery &
DANG ER Serious damage tohealth
caused byswallowing batteries
Batteries contain toxic and cor rosive subs tan‐
ces. Swallowing batteries may cause serious
damage tohealth.
There is a risk of fata l injur y. #
Keep batteries out of there ach of chil‐
dren. #
If batteries are swallo wed, seek medical
attention immediately. +
ENVIRONMEN
TALNO TEEnvironmental
damage caused byimproper disposal of
batteries Bat
teries contain pollutants. It is
illegal todispose of them with the household
ru bbish. #
Dispose of batteries in an
environmen tally responsible manner.
Ta ke dischar ged batteries toaqu alified
specialist workshop or toa collection
point for used batteries. 42
Opening and closing
Page 67 of 354
Re
quirements:
R A CR 2032 3 V cell battery
Mercedes-Benz recommends that you ha vethe
battery replaced byaqu alified specialist work‐
shop. #
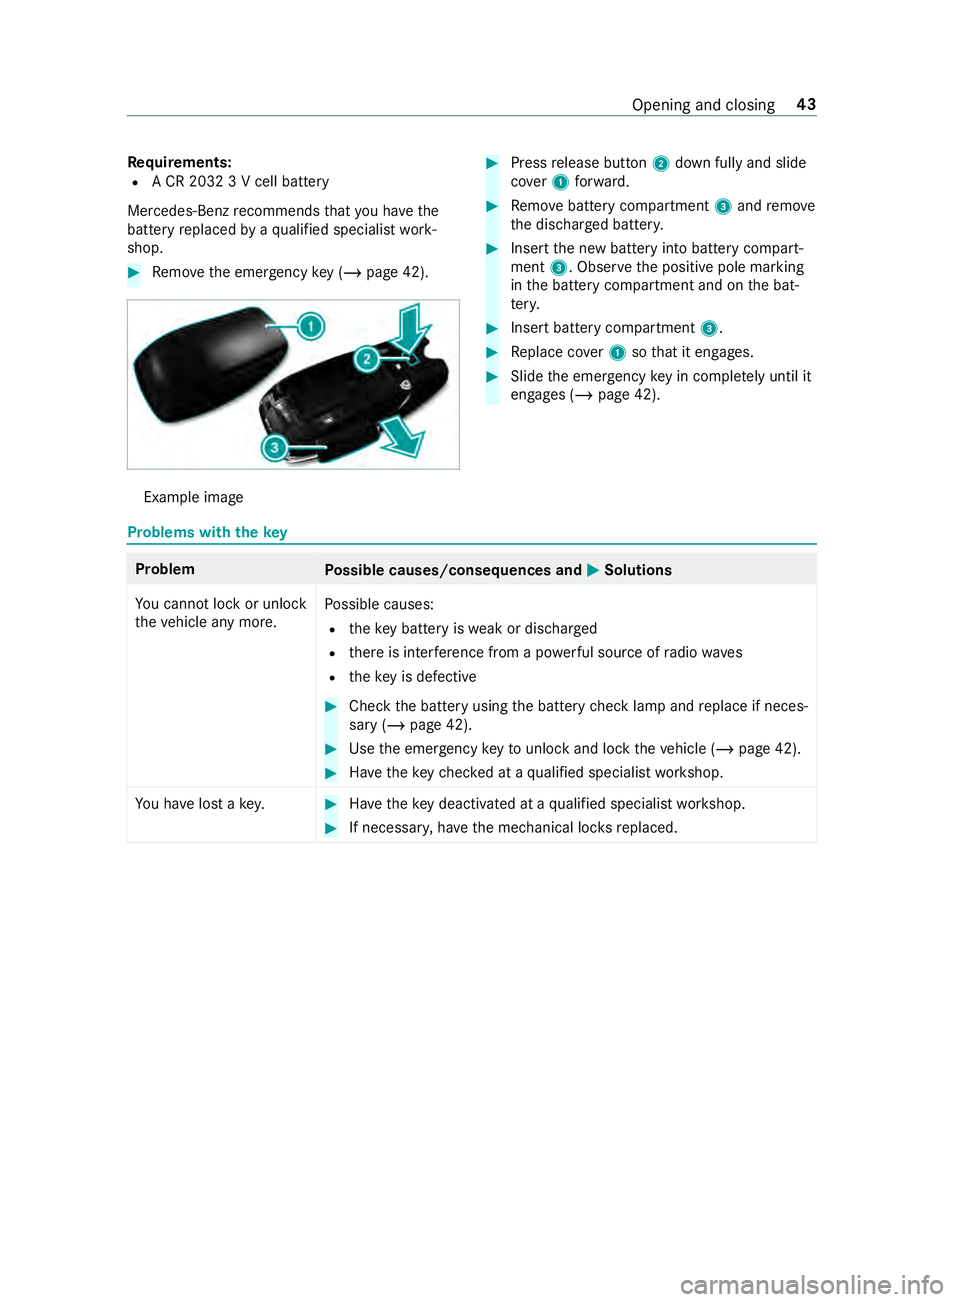
Remo vethe emer gency key ( / page 42). Example image #
Press release button 2down fully and slide
co ver1 forw ard. #
Remo vebattery compartment 3and remo ve
th e dischar ged batter y. #
Insert the new battery into battery compart‐
ment 3. Obser vethe positive pole marking
in the battery compartment and on the bat‐
te ry. #
Insert battery compartment 3. #
Replace co ver1 sothat it engages. #
Slide the emer gency key in co mplete ly until it
engages (/ page 42). Problems with
thekey Problem
Possible causes/consequences and 0050 0050Solutions
Yo u cannot lock or unlo ck
th eve hicle any more. Po
ssible causes:
R theke y bat tery iswe ak or dischar ged
R there is inter fere nce from a po werful source of radio wav es
R theke y is defective #
Check the battery using the battery check lamp and replace if neces‐
sary (/ page 42). #
Use the emer gency keyto unlo ckand lock theve hicle (/ page 42). #
Have theke ych ecked at a qualified specialist workshop.
Yo u ha velost a key. #
Have theke y deacti vated at a qualified specialist workshop. #
If necessar y,ha ve the mechanical loc ksreplaced. Opening and closing
43
Page 71 of 354
Yo
u can operate the electric sliding door in the
fo llowing ways:
R bypressing the sliding door buttons on the
center console
R bypressing the sliding door button on the
door sill (B-pillar)
R using the door handle (inside or outside)
R using thekey
If th e electric sliding door is obstructed while
opening, it mo ves a few centim eters in the oppo‐
site direction and stops.
If th e sliding door is obstructed during the closing
procedure, it opens fully again.
If th e electric mo tor of the sliding door is in dan‐
ge r of overheating, e.g. due tofrequent opening
and closing within a short period, the sliding door
opens fully. The sliding door is then loc ked in
place. The sliding door is operational again af ter
appr oximately 30 seconds.
If th ere has been a malfunction or if the battery
has been disconnected, you can use there lease
cat chtodisconnect the sliding door from the
electric mo tor.Then you can open or close the
door manually (/ page 48). Opening/closing
the electric sliding door
with the but ton &
WARNING Risk of entrapment byopen
sliding door which is not engaged
When you open the sliding door, the sliding
door could hit other people as it mo ves back‐
wa rds. #
Only open the sliding door when tra ffic
conditions permit. &
WARNING Risk of inju rydespite obs tacle
de tection
Obs tacle de tection does not react tosoft,
light and thin objects, such as fingers. These
or other parts of the body could be pressed
against the door frame, for ins tance. Obs tacle
de tection cannot pr event entrapment in these
ins tances. #
When opening and closing the electric
sliding door, make sure that nobody is
within the operating range of the sliding
door. #
If someone becomes trapped, press the
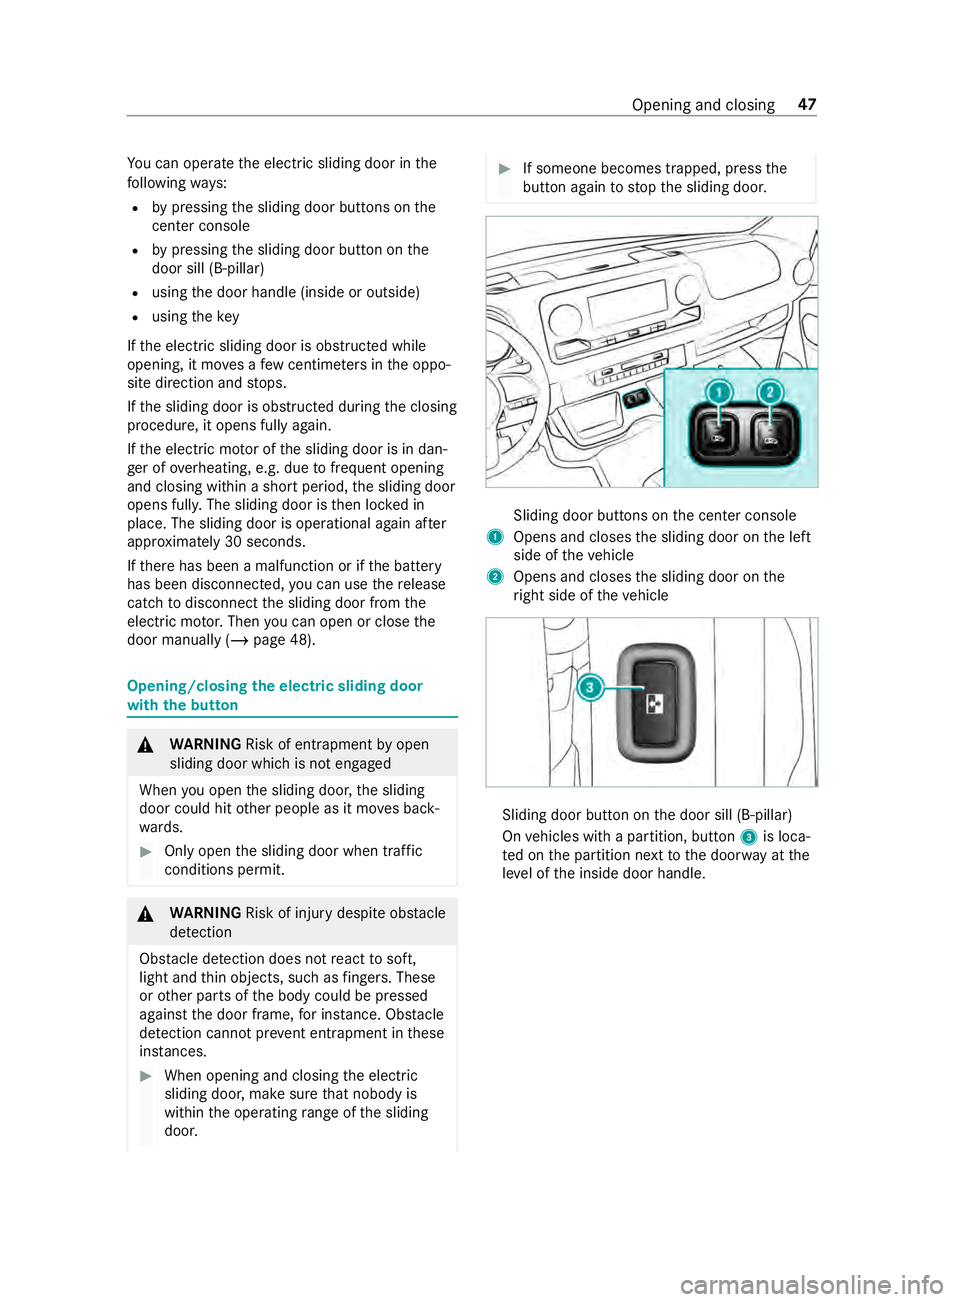
button again tostop the sliding door. Sliding door buttons on
the center console
1 Opens and closes the sliding door on the left
side of theve hicle
2 Opens and closes the sliding door on the
ri ght side of theve hicle Sliding door button on
the door sill (B-pillar)
On vehicles with a partition, button 3is loca‐
te d on the partition next tothe door way at the
le ve l of the inside door handle. Opening and closing
47
Page 73 of 354

#
Tounlo ck:pull lo cking pin 2upwards man‐
ually or use the cent ral locking button to
unlo ckthe sliding door (/ page44). #
Press button 1or pull outside handle 3.
The sliding door opens or closes. #
Press button 1again or pull outside handle
3.
The sliding door stops moving. Un
locking the electric sliding door manually If
th ere has been a malfunction or if the battery
has been disconnected, you can use release
cat ch2 todisconnect the sliding door from the
electric mo tor.Then, you can open or close the
door manually. #
Vehicles with comple tesliding door trim:
re mo vethe co ver from release cat ch2.
Service ope ration is accessible. #
Todisconnect the sliding door from the
electric mo tor:turn release cat ch2 180°
clockwise.
The "MAN" position is set. #
Tounlo ck:pull lo cking pin 3upwards man‐
ually or use the cent ral locking button to
unlo ckthe sliding door (/ page44). #
Press button 1. #
Open or close the sliding door with the out‐
side/inside door handle. #
Toconnect the sliding door tothe electric
mo tor:turn release cat ch2 180° counter-
clockwise.
The "AUTO" position is set. #
Adjust the sliding door (/ page 49).
If it is not possible to rectify the malfunction: #
Visit a qualified specialist workshop. Re
setting the electric sliding door Sliding door buttons on
the center console Sliding door button on
the door sill (B-pillar)
Yo u must reset the sliding door if there has been
a malfunction or a voltage supply inter ruption. Opening and closing
49
Page 79 of 354
#
Tointer rupt convenience closing: release
th e0037 button. Re
setting the side windo ws The side windo
wsmust be reset af ter a malfunc‐
tion or a voltage supply inter ruption. #
Swit chon the ignition (/ page103). #
Push bo thwindow lif ter buttons and hold for
appr oximately one second af terth e side win‐
dow has closed. Problems with
the side windo ws Problem
Possible causes/consequences and 0050 0050Solutions
A side window cann otbe
closed and the cause is
not obvious. #
Check tosee if there are any objects in the window guide.
& WARNING Risk of becoming trapped or fata lly injured if reve rs‐
ing pr otection is not activated
If yo u close a side wind owagain immediately af ter it has been
bloc ked, the side window will close with increased or maximum
fo rc e. The reve rsing feature will then not be active.
Pa rts of the body could become trapped in the closing area in the
process. #
Make sure that no parts of the body are in the closing area. #
Tostop the closing process, release the button or press the
button again tore-open the side windo w. If a side window is obstructed during closing, and
reopens again slightl y,
yo u can proceed as follo ws: #
Immedia tely afte rth e window is obstructed, pull the cor responding
button again until the side window has closed, and hold the button
fo r an additional second.
The side window is closed with increased forc e.
If th e side window is obstructed again and reopens slightl y,yo u can pro‐
ceed as follo ws: #
Repeat the pr evious step.
The side window is closed without the automatic reve rsing function.
The side windo wscannot
be opened or closed
using the con venience
opening feature. The SmartK
eybattery is weak or dischar ged. #
Check the battery with the battery check lamp and replace if neces‐
sary (/ page 42). Anti-theft pr
otection Fu
nction of the immobilizer The immobilizer pr
events your vehicle from being
st ar ted without the cor rect key.
The immobilizer is automatically activated when
th e ignition is switched off, and deactivated when
th e ignition is switched on. When leaving
theve hicle, alw aysta ke thekey
with you and lock theve hicle. If theke y is left
inside theve hicle, an yone can start the engine.
% In
theeve ntthe engine does not start despi te
th eve hicle's star ter battery having suf ficient
ch arge ,th e immobilizer is defective. Contact
a qu alified specialist workshop or call
1-800-367-63 72(inthe USA) or
1-800-387-0 100(in Canada). Opening and closing
55