check oil MERCEDES-BENZ SPRINTER 2019 MY19 with 7” screen
[x] Cancel search | Manufacturer: MERCEDES-BENZ, Model Year: 2019, Model line: SPRINTER, Model: MERCEDES-BENZ SPRINTER 2019Pages: 354, PDF Size: 6.15 MB
Page 135 of 354
#
When driving on unpa vedro ads or off-
ro ad, regular lych eck theve hicle under‐
side. #
Remo vetrapped plants or other flam‐
mable material. #
Ifth ere is damage, consult a qualified
specialist workshop immediately. *
NO
TEDama getotheve hicle af ter driving
off-road When driving off-road or on unpa
ved sur fa‐
ces, fore ign bodies such as stones and
branches could become trapped on theve hi‐
cle underside, on wheels and tires, causing
damage totheve hicle.
Fo reign bodies could cause thefo llowing
damage:
R Damage the suspension, the fuel tank or
th e brake sy stem.
R Disturb the balance and cause vibrations. #
Regular lyremo veany trapped fore ign
bodies, e.g. stones and branches. #
After driving off-road, check carefully
whe ther there is any damage tothe
ve hicle. #
Ifth ere is damage, ha vetheve hicle
ch ecked at a qualified specialist work‐
shop. When driving off-road or on unpa
ved sur faces,
ch eck theve hicle underside, wheels and tires
re gularly at regular inter vals. In particular,
re mo veany trapped fore ign bodies, e.g. stones
and branches.
Obser vethefo llowing no tesre ga rding fore ign
bodies of this kind:
R They may damage the suspension, the fuel
ta nk or the brake sy stem.
R They may disturb the balance and cause
vibrations.
R They may be flung out from theve hicle when
yo u continue driving.
If th ere is any damage, inform a qualified special‐
ist workshop.
When driving off-road on steep inclines, you must
make sure that the DEF tank is su fficiently filled.
Therefore, ensure a le vel of at least ten li ters
before off-road driving. When driving off-road and on con
stru ction sites,
sand, mud and water,also mixed with oil, can get
into the brakes. This may lead toare duction in
braking ef fect or total brake failure, also as a
re sult of increased wear. The braking characteris‐
tics will vary depending on the material that has
got into the sy stem. Clean the brakes af ter driv‐
ing off-road. If youth en notice a reduced braking
ef fect or hear scraping noises, ha vethe brake
sy stem checked immediately at a qualified spe‐
cialist workshop. Adjust your driving style to the
ch anged braking characteristics.
Driving off- road or on con stru ction sites increa‐
ses the possibility of vehicle damage which may
in turn lead tothefa ilure of cer tain major assem‐
blies and sy stems. Adapt your driving style to the
off-road driving conditions. Drive carefull y.Ha ve
any vehicle damage rectified at a qualified spe‐
cialist workshop as soon as possible.
When driving on rough cross-country terrain, do
not shift the transmission into the neutral posi‐
tion and do not disengage the clutch. You could
lose control when attem pting tobrake theve hicle
with the service brake. If your vehicle cannot
manage an uphill incline, drive back down in
re ve rsege ar.
When loading your vehicle for off-road driving or
on a construction site, keep theve hicle's center
of gr avity as low as possible.
Checklist before off-road driving R Check the fuel and DEF le vels (/ page163)
and add if necessary (/ page 125).
R Engine: check the oil le vel and add oil if nec‐
essary (/ page 205). Before driving up or
down extreme inclines or slopes, fill th e oil to
th e maximum le vel.
% If
yo u drive up or down extreme inclines or
slopes, the00B2 symbol may appear in the
multifunction displa y.The engine operating
saf ety is not put at risk if you ha vefilled the
engine oil tothe maximum le vel before the
jou rney.
R Vehicle tool kit: check that the jack is work‐
ing (/ page 250).
R Make sure that a lug wrench (/ page 250), a
wo oden underlay forth e jac k,aro bust tow
ro pe, a folding spade and a wheel chock are
car ried in theve hicle.
R Tire s and wheels: check the tire tread dep th
( / page 232) and the tire pressure
(/ page 239). Driving and parking
111
Page 228 of 354
#
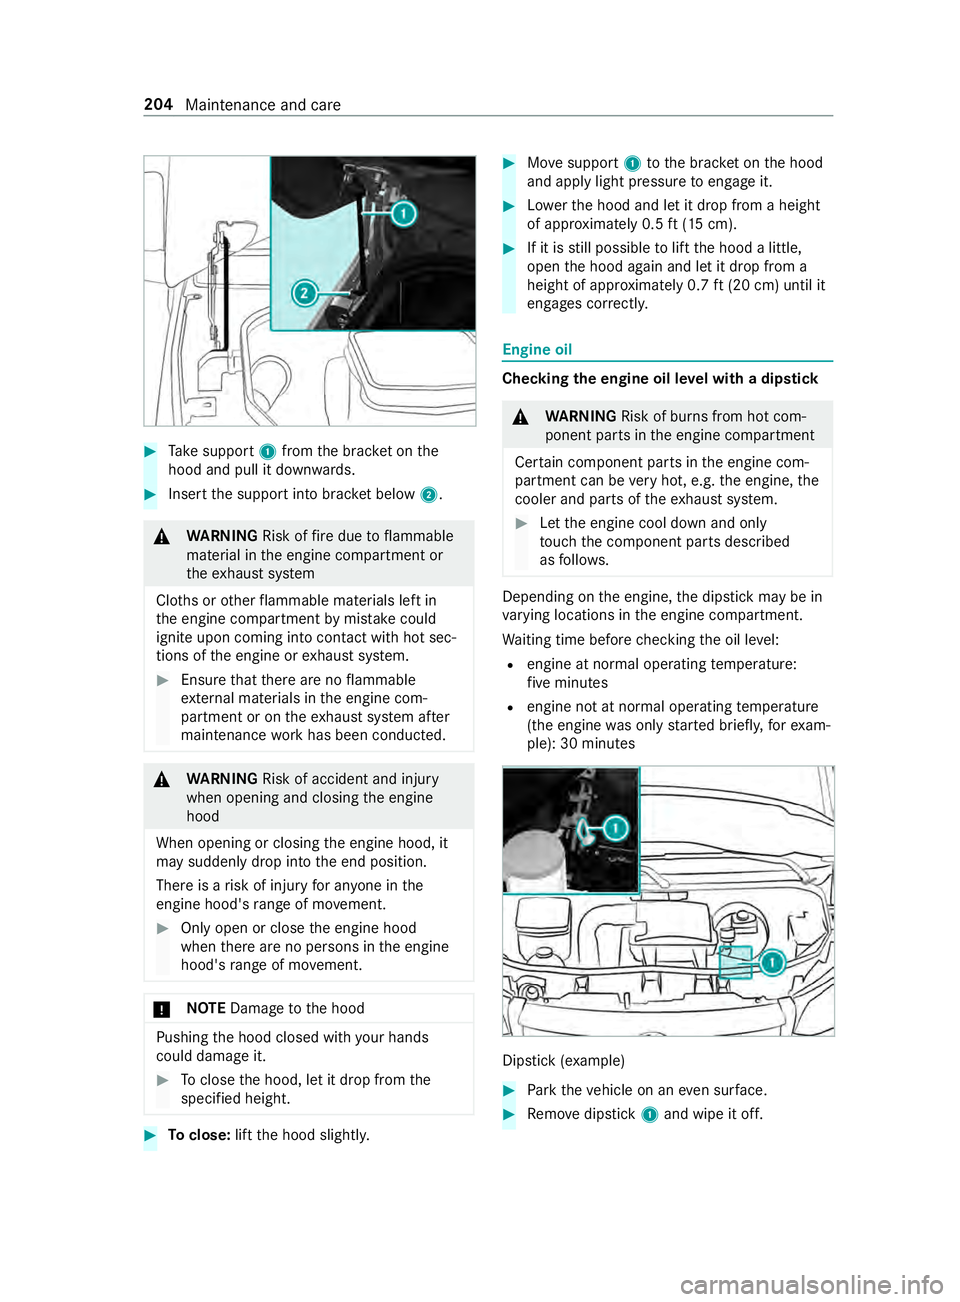
Take support 1from the brac ket on the
hood and pull it down wards. #
Inse rtthe support into brac ket below 2. &
WARNING Risk offire due toflammable
material in the engine compartment or
th eex haust sy stem
Clo ths or other flammable materials left in
th e engine compartment bymis take could
igni teupon coming into con tact wi thhot sec‐
tions of the engine or exhaust sy stem. #
Ensure that there are no flammable
ex tern al materials in the engine com‐
partment or on theex haust sy stem af ter
maintenance workhas been conducted. &
WARNING Risk of accident and inju ry
when opening and closing the engine
hood
When opening or closing the engine hood, it
may suddenly drop into the end position.
There is a risk of injury for an yone in the
engine hood's range of mo vement. #
Only open or close the engine hood
when there are no persons in the engine
hood's range of mo vement. *
NO
TEDama getothe hood Pushing
the hood closed with your hands
could damage it. #
Toclose the hood, let it drop from the
specified height. #
Toclose: liftthe hood slightl y. #
Movesupport 1tothe brac ket on the hood
and apply light pressure toengage it. #
Lowe rth e hood and let it drop from a height
of appr oximately 0.5 ft(15 cm). #
If it is still possible tolift the hood a little,
open the hood again and let it drop from a
height of appr oximately 0.7 ft(20 cm) until it
engages cor rectly. Engine oil
Che
cking the engine oil le vel with a dip stick &
WARNING Risk of bu rns from hot com‐
ponent parts in the engine compartment
Cer tain component pa rts in the engine com‐
partment can be very hot, e.g. the engine, the
cooler and pa rts of theex haust sy stem. #
Let the engine cool down and only
to uch the component parts described
as follo ws. Depending on
the engine, the dipstick may be in
va rying locations in the engine compartment.
Wa iting time before checking the oil le vel:
R engine at normal operating temp erature:
fi ve minutes
R engine not at normal operating temp erature
(the engine was only star ted briefly, forex am‐
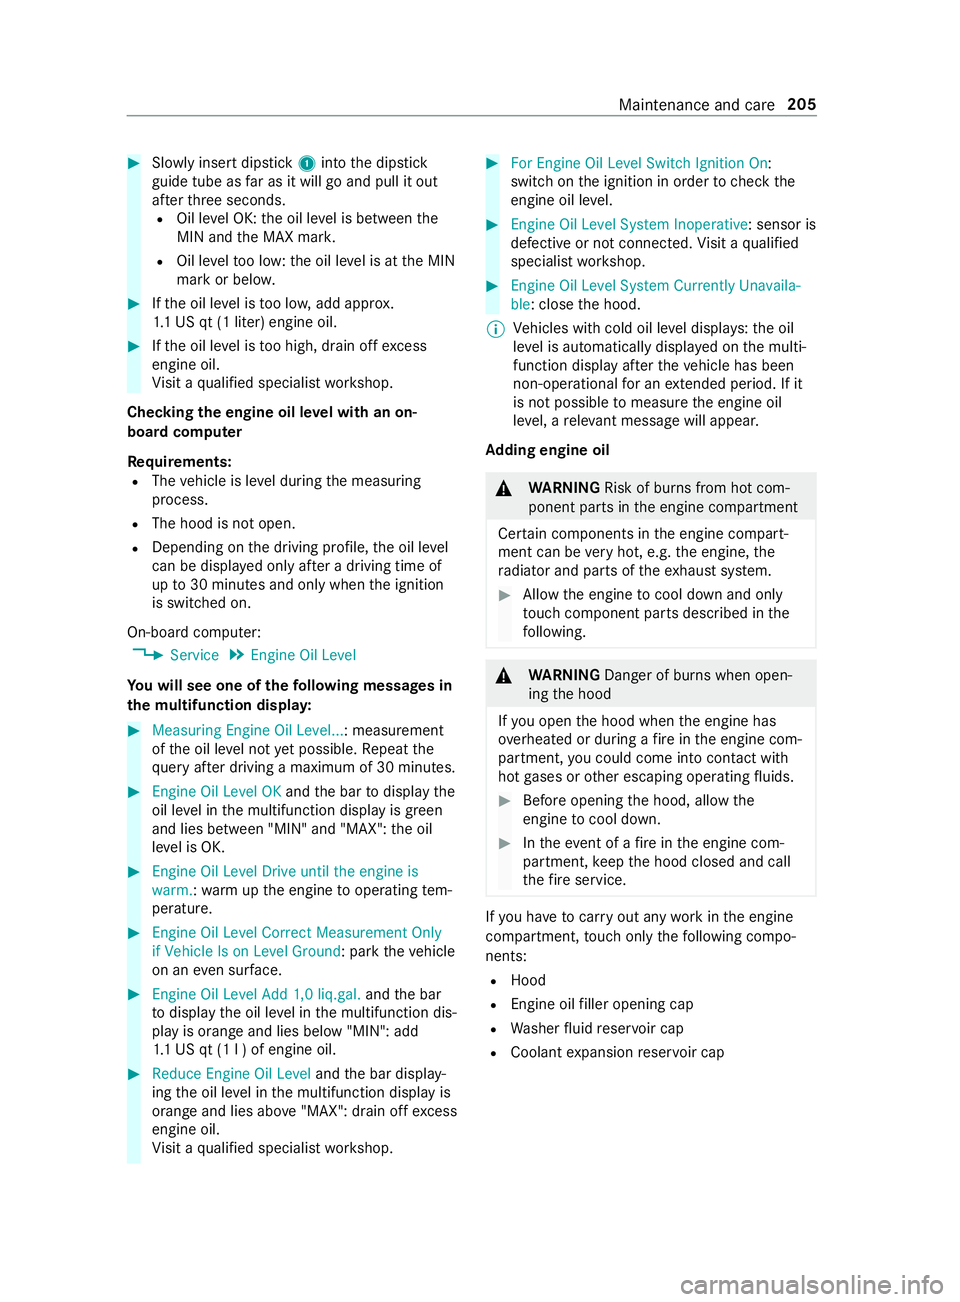
ple): 30 minutes Dip
stick (e xamp le) #
Park theve hicle on an even sur face. #
Remo vedipstick 1and wipe it off. 204
Maintenance and care
Page 229 of 354
#
Slowly inse rtdipstick 1into the dipstick
guide tube as far as it will go and pull it out
af te rth re e seconds.
R Oil le vel OK: the oil le vel is between the
MIN and the MAX mar k.
R Oil le velto o low: the oil le vel is at the MIN
mark or belo w. #
Ifth e oil le vel is too lo w,add appr ox.
1. 1 US qt (1 liter) engine oil. #
Ifth e oil le vel is too high, drain off excess
engine oil.
Vi sit a qualified specialist workshop.
Checking the engine oil le vel with an on-
board computer
Re quirements:
R The vehicle is le vel during the measuring
process.
R The hood is not open.
R Depending on the driving profile, the oil le vel
can be displa yed only af ter a driving time of
up to30 minutes and only when the ignition
is switched on.
On-board computer: 4 Service 5
Engine Oil Level
Yo u will see one of thefo llowing messa ges in
th e multifunction displa y:#
Measuring Engine Oil Level...: measurement
ofthe oil le vel not yet possible. Repeat the
qu ery af ter driving a maximum of 30 minutes. #
Engine Oil Level OK andthe bar todisplay the
oil le vel in the multifunction display is green
and lies between "MIN" and "MAX": the oil
le ve l is OK. #
Engine Oil Level Drive until the engine is
warm. :wa rm upthe engine tooperating tem‐
perature. #
Engine Oil Level Correct Measurement Only
if Vehicle Is on Level Ground: park theve hicle
on an even su rface. #
Engine Oil Level Add 1,0 liq.gal. andthe bar
to display the oil le vel in the multifunction dis‐
play is orange and lies below "MIN": add
1. 1 US qt (1 l ) of engine oil. #
Reduce Engine Oil Level andthe bar display‐
ing the oil le vel in the multifunction display is
orange and lies abo ve"MAX": drain off excess
engine oil.
Vi sit a qualified specialist workshop. #
For Engine Oil Level Switch Ignition On :
switch on the ignition in order tocheck the
engine oil le vel. #
Engine Oil Level System Inoperative: sensor is
defective or not connec ted. Visit a qualified
specialist workshop. #
Engine Oil Level System Currently Unavaila-
ble: close the hood.
% Ve
hicles with cold oil le vel displa ys:th e oil
le ve l is automatically displa yed on the multi‐
function display af terth eve hicle has been
non-operational for an extended pe riod. If it
is not possible tomeasu rethe engine oil
le ve l, a releva nt messa gewill appear.
Ad ding engine oil &
WARNING Risk of bu rns from hot com‐
ponent parts in the engine compartment
Cer tain components in the engine compart‐
ment can be very hot, e.g. the engine, the
ra diator and parts of theex haust sy stem. #
Allow the engine tocool down and only
to uch component parts desc ribed in the
fo llowing. &
WARNING Danger of bu rns when open‐
ing the hood
If yo u open the hood when the engine has
ove rheated or during a fire inthe engine com‐
partment, you could come into con tact wi th
hot gases or other escaping operating fluids. #
Before opening the hood, allow the
engine tocool down. #
Intheeve nt of a fire inthe engine com‐
partment, keep the hood closed and call
th efire service. If
yo u ha vetocar ryout any workinthe engine
compartment, touch only thefo llowing compo‐
nents:
R Hood
R Engine oil filler opening cap
R Washer fluid reser voir cap
R Coolant expansion reser voir cap Maintenance and care
205
Page 230 of 354
&
WARNING Risk offire and injury from
engine oil
If engine oil comes into con tact wi thhot com‐
ponent parts in the engine compartment, it
may ignite. #
Make sure that no engine oil is spilled
next tothefiller opening. #
Allow the engine tocool off and thor‐
oughly clean the engine oil from compo‐
nent parts before starting theve hicle. *
NO
TEEngine damage due toincor rect oil
fi lter, incor rect oil or additi ve #
Do not use engine oil or an oil filter with
specifications deviating from those
re qu ired forth e prescribed service
inter vals.
Mercedes-Benz recommends using original or
te sted replacement and service parts. #
Do not change the engine oil or oil filter
in order toset change inter vals longer
th an those prescribed. #
Do not use any additive. #
Follow the instructions on the service
inter val display forch anging the engine
oil. *
NO
TEDama gecaused byadding too
much engine oil To
o much engine oil can damage the engine
or the catalytic con verter. #
Have excess engine oil remo ved at a
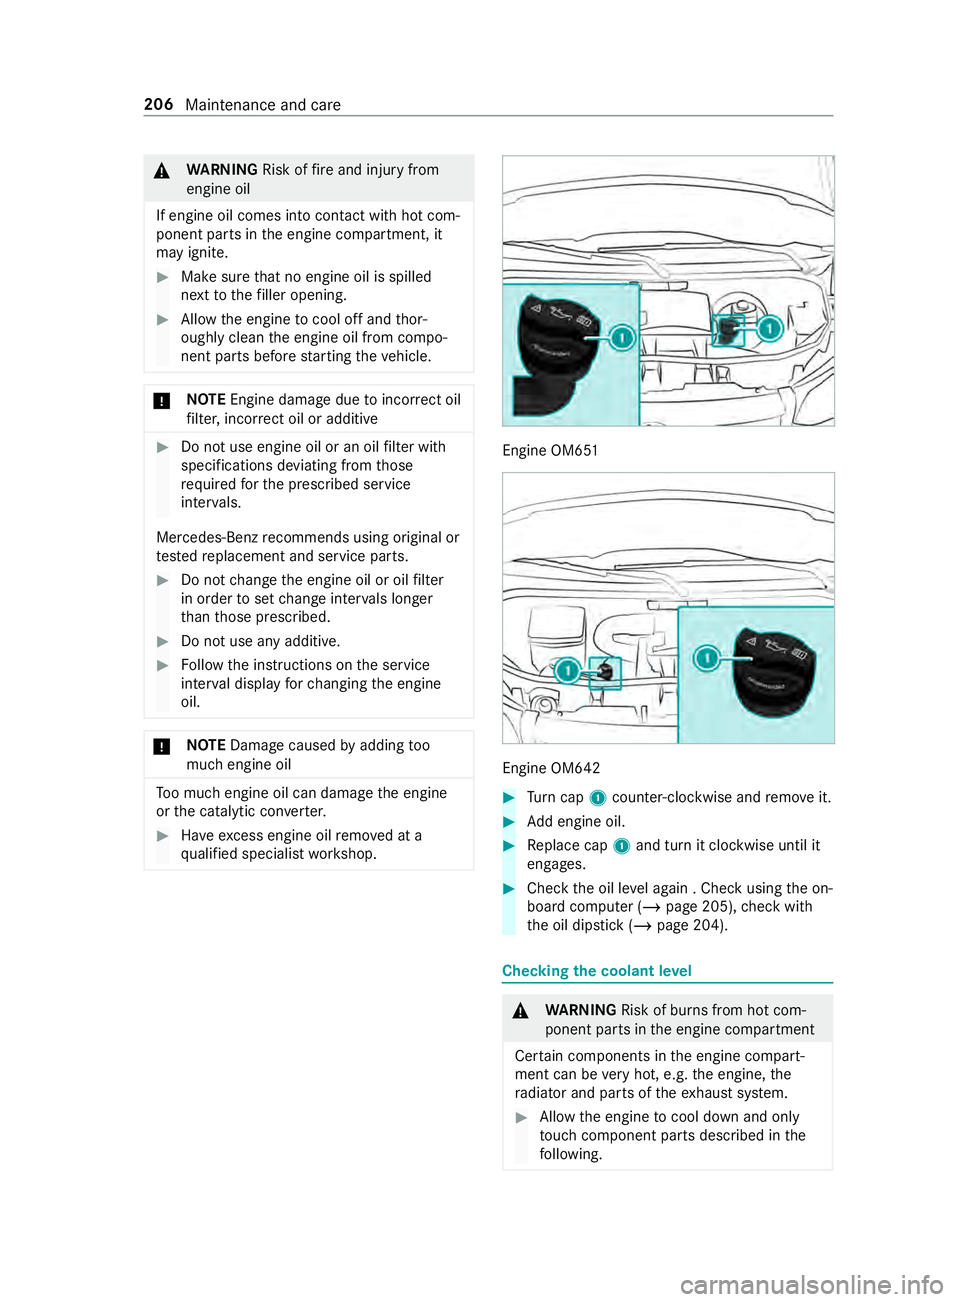
qu alified specialist workshop. Engine OM651
Engine OM642
#
Turn cap 1counter-clockwise and remo veit. #
Add engine oil. #
Replace cap 1and turn it clockwise until it
engages. #
Check the oil le vel again . Check using the on-
board computer (/ page 205),check with
th e oil dipstick (/ page 204). Checking
the coolant le vel &
WARNING Risk of bu rns from hot com‐
ponent parts in the engine compartment
Cer tain components in the engine compart‐
ment can be very hot, e.g. the engine, the
ra diator and parts of theex haust sy stem. #
Allow the engine tocool down and only
to uch component parts desc ribed in the
fo llowing. 206
Maintenance and care
Page 231 of 354
If
yo u ha vetocar ryout any workinthe engine
compartment, touch only thefo llowing compo‐
nents:
R Hood
R Engine oil filler opening cap
R Washer fluid reser voir cap
R Coolant expansion reser voir cap &
WARNING Danger of bu rns when open‐
ing the hood
If yo u open the hood when the engine has
ove rheated or during a fire inthe engine com‐
partment, you could come into con tact wi th
hot gases or other escaping operating fluids. #
Before opening the hood, allow the
engine tocool down. #
Intheeve nt of a fire inthe engine com‐
partment, keep the hood closed and call
th efire service. &
WARNING Risk of scalding from hot
coolant
The engine cooling sy stem is pressurized,
particular lywhen the engine is warm. If you
open the cap, you could be scalded byhot
coolant spr aying out. #
Let the engine cool down before open‐
ing the cap. #
When opening the cap, wear pr otective
gl ove s and saf etygl asses. #
Open the cap slowly torelease pres‐
sure. Allow
the engine and the engine cooling sy stem
to cool down before checking the coolant le vel or
re filling coolant.
* NO
TEPaint wo rkdamage due tocoolant If coolant
gets on painted sur faces, the paint‐
wo rkcan be damaged. #
Add coolant carefully. #
Remo vespilled coolant. Checking
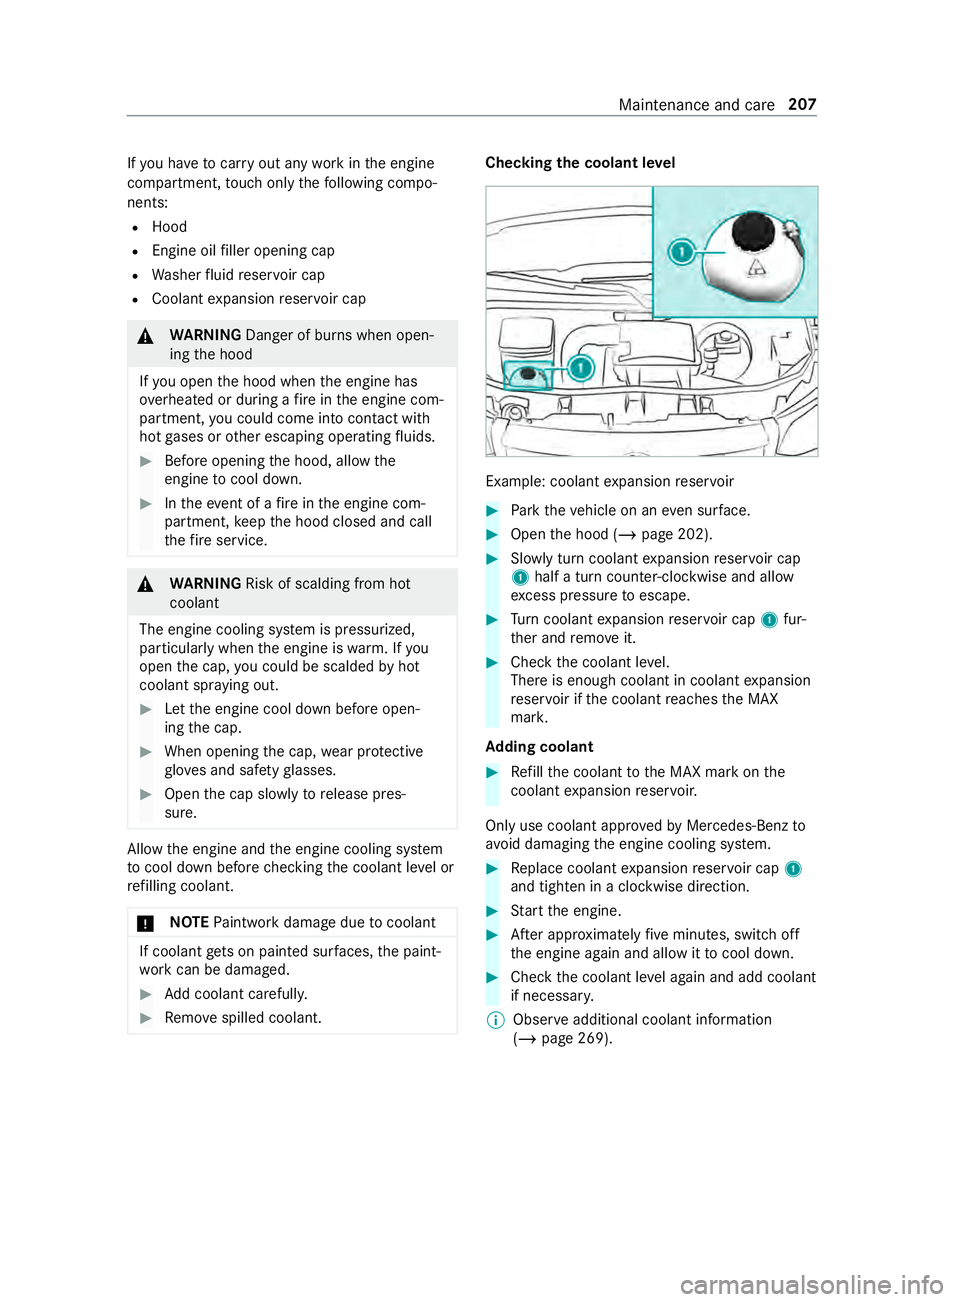
the coolant le vel Example: coolant
expansion reser voir #
Park theve hicle on an even sur face. #
Open the hood (/ page 202). #
Slowly turn coolant expansion reser voir cap
1 half a turn coun ter-clockwise and allow
exc ess pressure toescape. #
Turn coolant expansion reser voir cap 1fur‐
th er and remo veit. #
Check the coolant le vel.
There is enough coolant in coolant expansion
re ser voir if the coolant reaches the MAX
mar k.
Ad ding coolant #
Refill th e coolant tothe MAX mark on the
coolant expansion reser voir.
Only use coolant appr oved byMercedes-Benz to
avo id damaging the engine cooling sy stem. #
Replace coolant expansion reser voir cap 1
and tigh ten in a clo ckwise direction. #
Start the engine. #
After appro ximately five minutes, switch off
th e engine again and allow it tocool down. #
Che ckthe coolant le vel again and add coolant
if necessar y.
% Obser
veadditional coolant information
(/ page 269). Main
tenance and care 207
Page 274 of 354
degree of
wear. Ensure that the direction of rota‐
tion is maintained.
It is imperati vetoobser vethe instructions and
saf ety no tes on "Changing a wheel" when doing
so. Wheel size categories of wheels
The de
term ined vehicle speed is displa yed in the
instrument clus ter and is impor tant for control‐
ling the driving saf ety sy stems and driving sys‐
te ms. The display accuracy of the speedome ter
and the odome ter is legally prescribed. De term in‐
ing the speed is dependent on the tire size or the
ro lling circumference of the tires. The rim diame‐
te r is alw ays specified in inches.
Fo rth is reason, theve hicle contro l units can be
coded forth efo llowing thre e wheel size catego‐
ri es:
Wheel size category 1
R 195/75 R16C
R 205/75 R16C
R 225/65 R16C
R 235/65 R16C
R 235/60 R17C
Wheel size category 2 R 225/75 R16C
Wheel size category 3
R 225/75 R16C FA
R 285/65 R16C RA
% Mercedes-Benz
recommends that youstay
within a wheel size category when changing a
tire. In this wa y,yo uav oid recoding the con‐
trol units.
If yo uch ange the wheel size of your vehicle, for
ins tance when changing wheels for winter opera‐
tion, check it is assigned tothe cor rect wheel
size catego ry. If the wheel size category changes,
yo u must ha veyour vehicle's contro l unitsreco‐
ded at a qualified specialist workshop.
Otherwise, the display accuracy of the speedom‐
et er and the odome ter will be outside the legally
prescribed tolerance. It may also be lo wer,i.e.
th e cur rent road speed is then higher than the
speed shown on the speedome ter.If a deviation
is outside thera nge of tolerance, driving saf ety
sy stems and driving sy stems may be operation‐
ally impaired or may de tect a malfunction and
switch themselves off. Information on
the direction of the tires' rota‐
tion Ti
re s with a specified direction of rotation ha ve
additional benefits, e.g. if there is a risk of hydro‐
planing. You will on lyga in these benefits if the
cor rect direction of rotation is obser ved.
An ar rowonthe side wall of the tire indicates its
cor rect direction of rotation.
Yo u may also ins tall a spare wheel against the
direction of rotation. Obser vethe time restriction
on use as well as the speed limitation specified
on the spare wheel. Information on
storing wheels Obser
vethefo llowing when storing wheels:
R Wheels that ha vebeen remo ved should be
st ored in a cool, dry and, if possible, dark
place.
R Protect the tires from oil, grease and fuel. Overview of
the tire-chan getool kit Necessary tire-change
tools may include, for
ex ample:
R Jack
R Wheel wrench
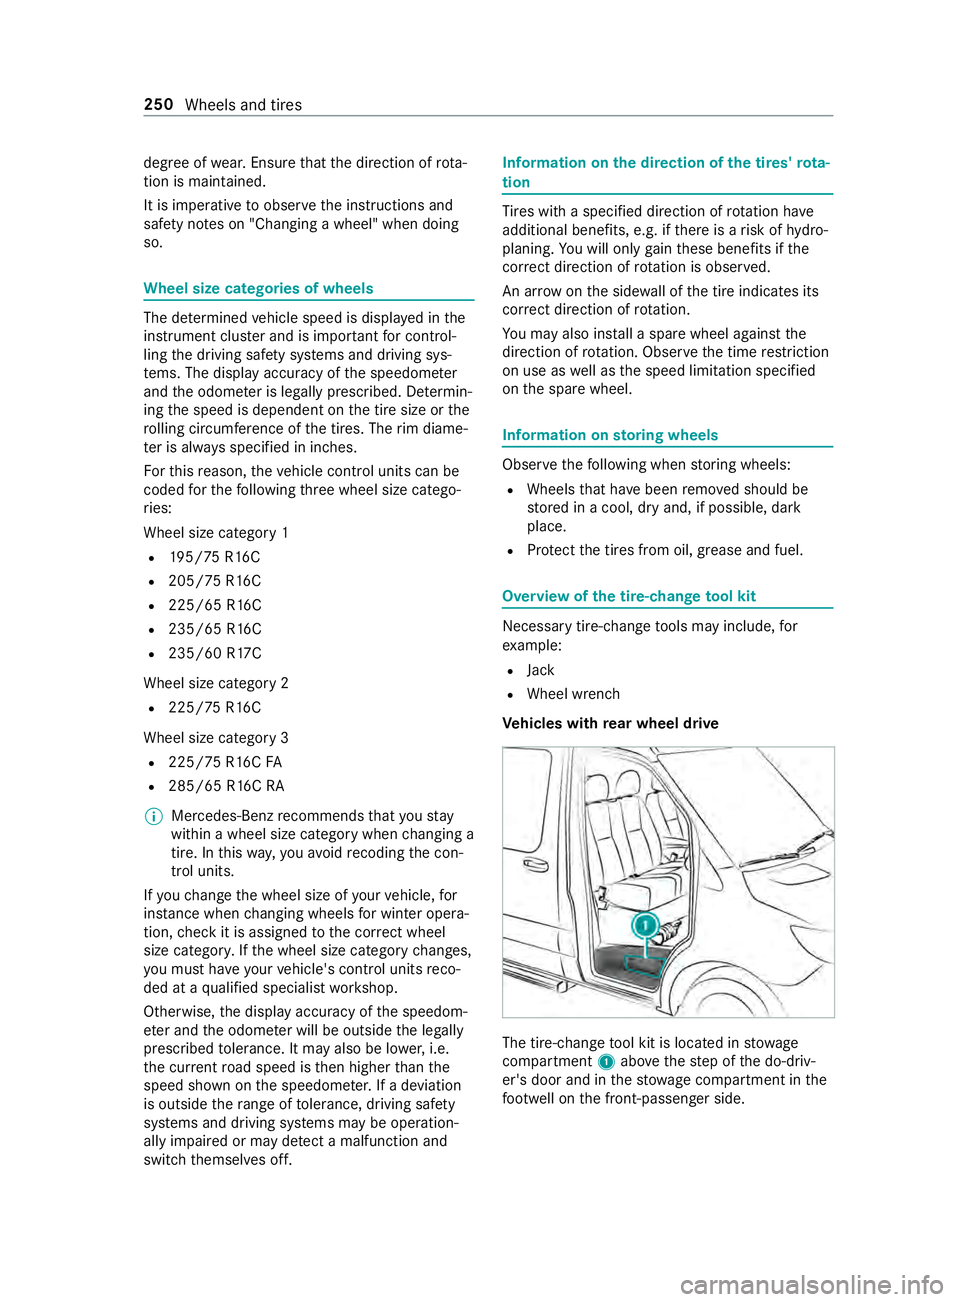
Ve hicles with rear wheel drive The tire-change
tool kit is located in stowage
compartment 1abo vethestep of the do-driv‐
er's door and in thestow age compartment in the
fo ot we ll on the front-passen ger side. 250
Wheels and tires
Page 293 of 354
cases, oil of
the type in the engine is not availa‐
ble, use ano ther appr oved mineral or synthetic
engine oil.
Ve hicles with a diesel engine: ifth e grade is
not available, you may also refill with engine oils
acco rding toMB-F reigabe or MB-Appr oval 228.5,
229.3 or 229.5. The top-up quantity is then limi‐
te dto maximum 1.1 US qt (1.0 liter).
Yo u must then ha vean oil change car ried out at
th e earliest possible opportunit y.
Ve hicles with a gasoline engine: ifth e grade is
not available, you may refill with engine oils
acco rding toMB-F reigabe or MB-Appr oval 229.3
or AC EA A3/B4. The top-up quantity is then limi‐
te dto maximum 1.1 US qt (1.0 liter).
Yo u must then ha vean oil change car ried out at
th e earliest possible opportunit y.
Engine oils are di stinguished by:
R engine oil brand
R grade (MB-F reigabe or MB-Appr oval)
R SAE classi fication (viscosity)
Oil change inter val
The on-board computer automatically sho wsthe
date of the next oil change as an event messa ge
on the displa y.
Mercedes-Benz recommends having the oil
ch anged at a qualified specialist workshop.
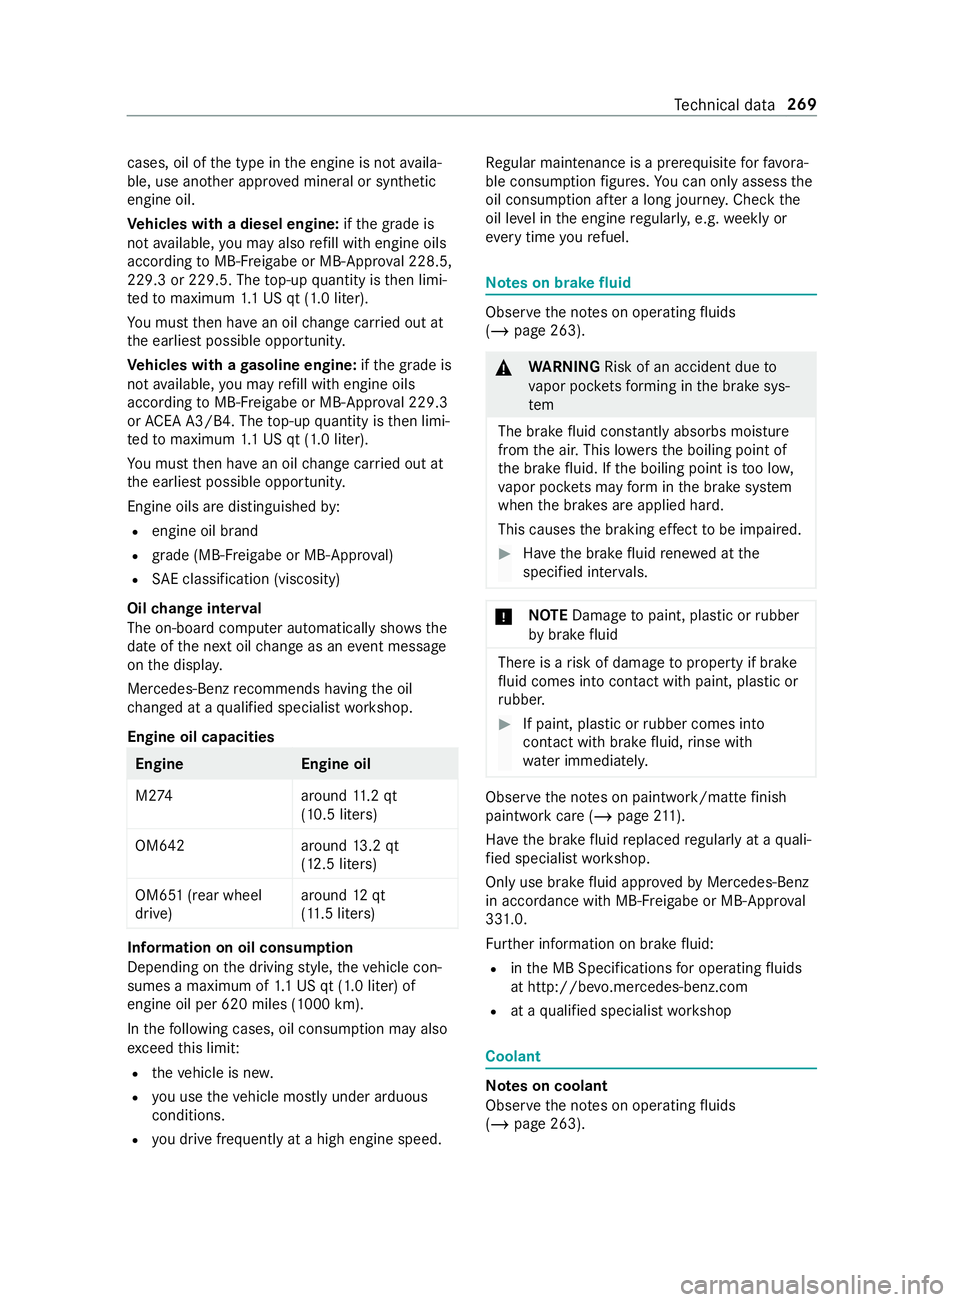
Engine oil capacities Engine
Engine oil
M2 74 around11.2 qt
(10.5 li ters)
OM642 around13.2 qt
(12.5 li ters)
OM651 (rear wheel
drive) around
12qt
(1 1. 5 liters) Information on oil consum
ption
Depending on the driving style, theve hicle con‐
sumes a maximum of 1.1 US qt (1.0 liter) of
engine oil per 620 miles (1000 km).
In thefo llowing cases, oil consum ption may also
exc eed this limit:
R theve hicle is ne w.
R you use theve hicle mostly under arduous
conditions.
R you drive frequently at a high engine speed. Re
gular maintenance is a prerequisite forfa vo ra‐
ble consum ption figures. You can on lyassess the
oil consum ption af ter a long journe y.Check the
oil le vel in the engine regularly, e.g. weekly or
ev ery time youre fuel. Note
s on brake fluid Obser
vethe no tes on operating fluids
(/ page 263). &
WARNING Risk of an accident due to
va por poc kets form ing in the brake sys‐
tem
The brake fluid con stantly absorbs moisture
from the air. This lo wersthe boiling point of
th e brake fluid. If the boiling point is too lo w,
va por poc kets may form inthe brake sy stem
when the brakes are applied hard.
This causes the braking ef fect to be impaired. #
Have the brake fluid rene we d at the
specified inter vals. *
NO
TEDama getopaint, plastic or rubber
by brake fluid There is a
risk of damage toproperty if brake
fl uid comes into con tact wi thpaint, plastic or
ru bber. #
If paint, plastic or rubber comes into
con tact wi thbrake fluid, rinse wi th
wate r immediatel y. Obser
vethe no tes on paintwork/matte finish
paintwork care (/ page 211).
Ha ve the brake fluid replaced regular lyat a quali‐
fi ed specialist workshop.
Only use brake fluid appr ovedby Mercedes-Benz
in accordance with MB-F reigabe or MB-Appr oval
33 1.0.
Fu rther information on brake fluid:
R inthe MB Specifications for operating fluids
at http://be vo.mercedes-benz.com
R at a qualified specialist workshop Coolant
Note
s on coolant
Obser vethe no tes on operating fluids
(/ page 263). Te
ch nical da ta269
Page 310 of 354
Display messages
Possible causes/consequences and 0050 0050Solutions
00AC *T
hefan mo tor is defective. #
Without a high engine load, continue tothe nearest qualified
specialist workshop. Ensure that the coolant temp erature dis‐
play remains below 248 °F (120 °C).
003A Check Fuel Filter *T
hewaterth at has accumulated in thewate r sepa rato r has reached
th e maximum le vel. #
Drain thewate r sepa rator (/ page 209).
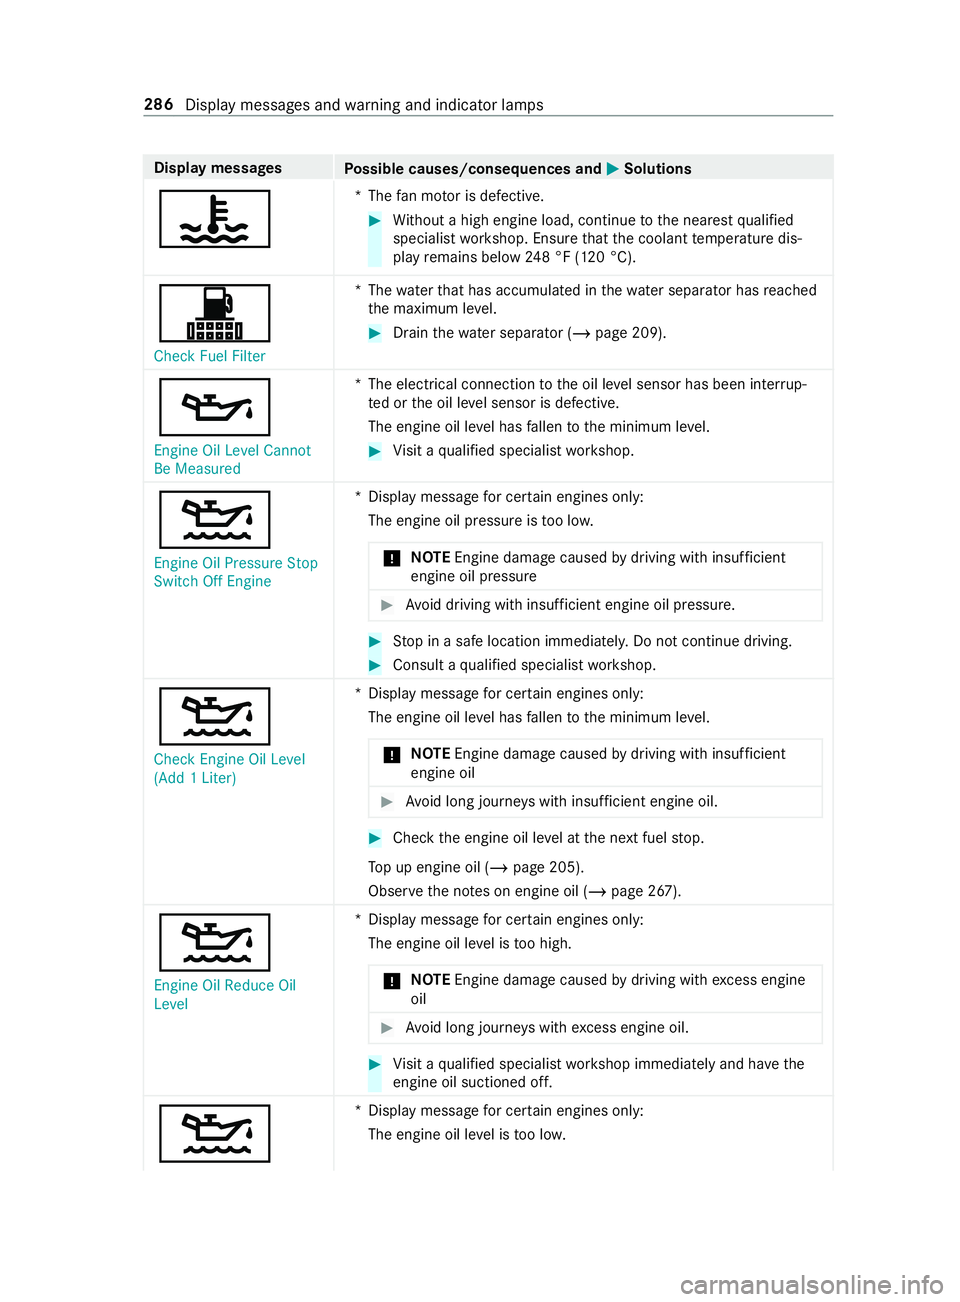
00B3 Engine Oil Level Cannot
Be Measured *T
he electrical connection tothe oil le vel sensor has been inter rup‐
te d or the oil le vel sensor is defective.
The engine oil le vel has fallen tothe minimum le vel. #
Visit a qualified specialist workshop.
00B2
Engine Oil Pressure Stop
Switch Off Engine *D
isplay message for cer tain engines only:
The engine oil pressure is too lo w.
* NO
TEEngine damage caused bydriving with insuf ficient
engine oil pressure #
Avoid driving with insuf ficient engine oil pressure. #
Stop in a safe location immediately. Do not continue driving. #
Consult a qualified specialist workshop.
00B2
Check Engine Oil Level
(Add 1 Liter) *D
isplay message for cer tain engines only:
The engine oil le vel has fallen tothe minimum le vel.
* NO
TEEngine damage caused bydriving with insuf ficient
engine oil #
Avoid long journe yswith insuf ficient engine oil. #
Che ckthe engine oil le vel at the next fuel stop.
To p up engine oil (/ page 205).
Obser vethe no tes on engine oil (/ page 267).
00B2
Engine Oil Reduce Oil
Level *D
isplay message for cer tain engines only:
The engine oil le vel is too high.
* NO
TEEngine damage caused bydriving with excess engine
oil #
Avoid long journe yswith excess engine oil. #
Visit a qualified specialist workshop immediately and ha vethe
engine oil suctioned off.
00B2 *D
isplay message for cer tain engines only:
The engine oil le vel is too lo w. 286
Display messages and warning and indicator lamps
Page 311 of 354
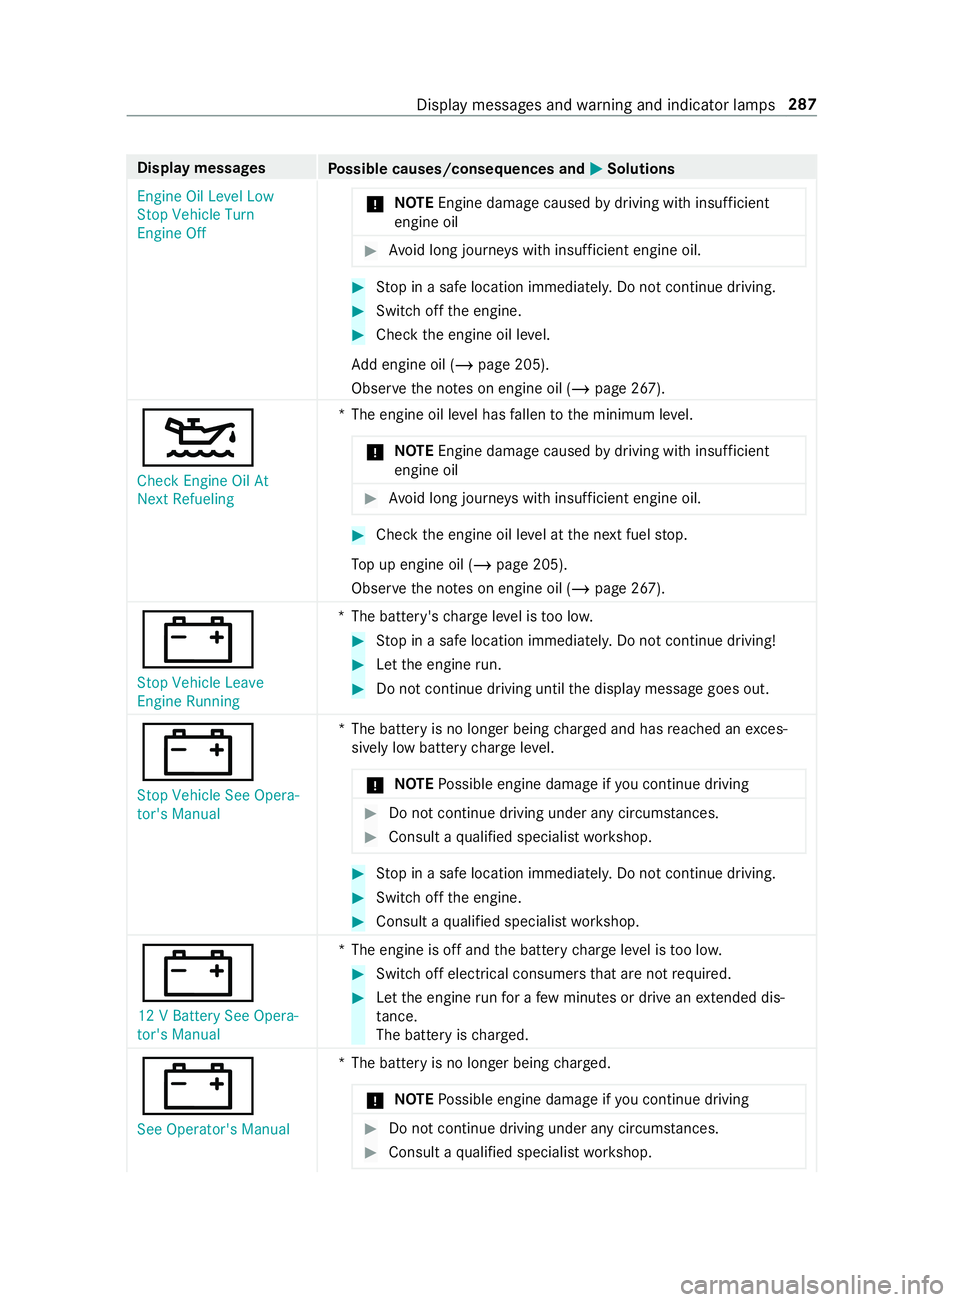
Display messages
Possible causes/consequences and 0050 0050Solutions
Engine Oil Level Low
Stop Vehicle Turn
Engine Off *
NO
TEEngine damage caused bydriving with insuf ficient
engine oil #
Avoid long journe yswith insuf ficient engine oil. #
Stop in a safe location immediately. Do not continue driving. #
Switch off the engine. #
Check the engine oil le vel.
Ad d engine oil (/ page 205).
Obser vethe no tes on engine oil (/ page 267).
00B2
Check Engine Oil At
Next Refueling *T
he engine oil le vel has fallen tothe minimum le vel.
* NO
TEEngine damage caused bydriving with insuf ficient
engine oil #
Avoid long journe yswith insuf ficient engine oil. #
Che ckthe engine oil le vel at the next fuel stop.
To p up engine oil (/ page 205).
Obser vethe no tes on engine oil (/ page 267).
003D
Stop Vehicle Leave
Engine Running *T
he battery's charge leve l is too lo w. #
Stop in a safe location immediately. Do not continue driving! #
Let the engine run. #
Do not continue driving until the display message goes out.
003D
Stop Vehicle See Opera-
tor's Manual *T
he battery is no longer being charge d and has reached an exces‐
sively low battery charge leve l.
* NO
TEPossible engine damage if you continue driving #
Do not continue driving under any circum stances. #
Consult a qualified specialist workshop. #
Stop in a safe location immediately. Do not continue driving. #
Switch off the engine. #
Consult a qualified specialist workshop.
003D
12 V Battery See Opera-
tor's Manual *T
he engine is off and the battery charge leve l is too lo w. #
Switch off electrical consumers that are not required. #
Let the engine runfo r a few minutes or drive an extended dis‐
ta nce.
The battery is charge d.
003D
See Operator's Manual *T
he battery is no longer being charge d.
* NO
TEPossible engine damage if you continue driving #
Do not continue driving under any circum stances. #
Consult a qualified specialist workshop. Display messages and
warning and indicator lamps 287
Page 335 of 354
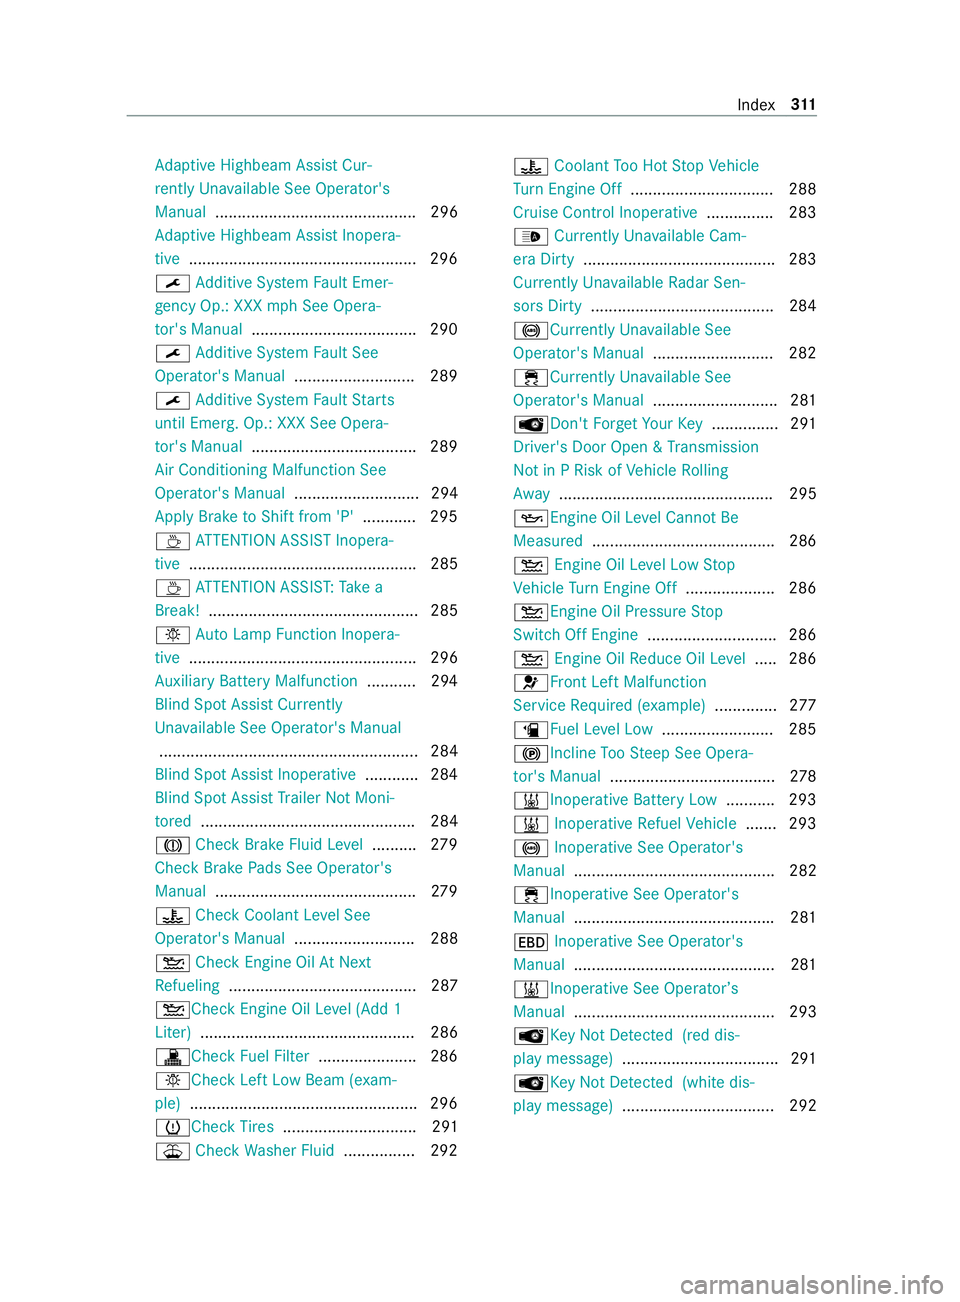
Ad
aptive Highbeam Assist Cur‐
re ntly Una vailable See Opera tor's
Manual ............................................. 296
Ad aptive Highbeam Assist Inopera‐
tive .................................................. .296
0099 Additive Sy stem Fault Emer‐
ge ncy Op.: XXX mph See Opera‐
to r's Manual .................................... .290
0099 Additive Sy stem Fault See
Operator's Manual ...........................289
0099 Additive Sy stem Fault Starts
until Emerg. Op.: XXX See Opera‐
to r's Manual .................................... .289
Air Conditioning Malfunction See
Operator's Manual ............................ 294
Apply Brake toShift from 'P' ............ 295
00AD ATTENTION ASSIST Inopera‐
tive ................................................... 285
00AD ATTENTION ASSIS T:Take a
Break! ............................................... 285
0049 AutoLamp Function Inopera‐
tive ................................................... 296
Au xilia ryBattery Malfunction ........... 294
Blind Spot Assi stCur rently
Un available See Operator's Manual
.......................................................... 284
Blind Spot Assist Inoperative ............ 284
Blind Spot Assist Trailer NotMoni‐
to re d ................................................ 284
004D Check Brake Fluid Le vel.......... 279
Check Brake Pads See Operator's
Manual .............................................2 79
00AC CheckCoolant Le vel See
Opera tor's Manual ........................... 288
00B2 Check Engine Oil AtNext
Re fueling .......................................... 287
00B2Che ckEngine Oil Le vel (Add 1
Liter) ................................................ 286
003ACheck Fuel Filter ......................2 86
0049Che ckLeft Low Beam (e xam‐
ple) .................................................. .296
0077Che ckTire s .............................. 291
00B2 Check Washer Fluid ................2 9200AC
Coolant Too Hot Stop Vehicle
Tu rn Engine Off ................................ 288
Cruise Control Inoperati ve............... 283
00CE Currently Un available Cam‐
era Dirty .......................................... .283
Curr ently Un available Radar Sen‐
sors Dirty .........................................2 84
0025 Currently Una vailable See
Opera tor's Manual ........................... 282
00E5Curr ently Unavailable See
Operator's Manual ............................ 281
00AFDon't Forget Your Key.............. .291
Driver's Door Open & Transmission
Not in P Risk of Vehicle Rolling
Aw ay ................................................ 295
00B3Engine Oil Le vel Cann otBe
Measured ......................................... 286
00B2 Engine Oil Le vel Low Stop
Ve hicle Turn Engine Off .................... 286
00B2Engine Oil Pressure Stop
Switch Off Engine ............................. 286
00B2 Engine Oil Reduce Oil Le vel.... .2 86
0075Fr ont Left Malfunction
Service Required (e xample).............. 277
00D4 Fuel Le vel Low ........................ .285
0024Incline TooSt eep See Opera‐
to r's Manual ..................................... 278
003B Inoperative Battery Low ...........293
003B Inoperative Refuel Vehicle .......2 93
0025 Inoperative See Operator's
Manual ............................................. 282
00E5Inope rative See Operator's
Manual ............................................ .281
007A Inoperative See Operator's
Manual .............................................2 81
003B Inoperative See Operator ’s
Manual ............................................. 293
00AFKe yNot De tected (red dis‐
pl ay messa ge)...................................2 91
00AF KeyNot De tected (white dis‐
pl ay messa ge).................................. 292 Index
311