isofix MERCEDES-BENZ SPRINTER 2019 MY19 with 7” screen
[x] Cancel search | Manufacturer: MERCEDES-BENZ, Model Year: 2019, Model line: SPRINTER, Model: MERCEDES-BENZ SPRINTER 2019Pages: 354, PDF Size: 6.15 MB
Page 58 of 354
Child
ren in theve hicle Note
s onthe safe transportation of children &
WARNING Risk of accident and inju ry
due tochildren left unat tended in the
ve hicle
If ch ildren are left unat tended in theve hicle,
th ey could:
R Open doo rs,th ereby endangering other
persons or road users.
R Get out and be stru ck byoncoming traf‐
fi c.
R Ope rate ve hicle equipment and become
trapped, forex ample.
In addition, thech ildren could also set the
ve hicle in motion, forex ample by:
R Releasing the parking brake.
R Changing the transmission position.
R Starting theve hicle. #
Never lea vechildren unat tended in the
ve hicle. #
When leaving theve hicle, alw aysta ke
th eke y with you and lock theve hicle. #
Keep theve hicle key out of reach of
ch ildren. &
WARNING Risk offata l injury due to
ex posure toextreme heat or cold in the
ve hicle
If people – particular lych ildren – are exposed
to extreme temp eratures over an extended
pe riod of time, there is a risk of serious or
eve nfa ta l injur y. #
Never lea veanyone – pa rticularly chil‐
dren – unat tended in theve hicle. #
Never lea veanimals in theve hicle unat‐
te nded. &
WARNING Risk of bu rns when thech ild
seat is exposed todirect sunlight
If th ech ild restra int sy stem is exposed to
direct sunlight or heat, parts could heat up.
Children could suf fer burns from these parts,
particular lyon me tallic parts of thech ild
re stra int sy stem. #
Always make sure that thech ild
re stra int sy stem is not exposed todirect
sunlight. #
Protect it with a blank et,fo rex ample. #
Ifth ech ild restra int sy stem has been
ex posed todirect sunlight, allow it to
cool before secu ring a child into it. #
Never lea vechildren unat tended in the
ve hicle. The use of seat belts and
child restra int sy stems
is requ ired bylaw:
R in all 50 states
R inU.S. territories
R inthe District of Columbia
R in all Canadian pr ovinces
All child restra int sy stems must meet thefo llow‐
ing standards:
R U.S. Federal Mo torVe hicle Saf etySt andards
21 3 and 225
R Canadian Mo torVe hicle Saf etySt andards 213
and 210.2
Yo u can obtain fur ther information about the cor‐
re ct child restra int sy stem from an authorized
Mercedes-Benz Center.
To impr oveprotection forch ildren younger than
12 years old or under 5 ft(1.50 m) in height,
Mercedes-Benz recommends you alw ays obser ve
th efo llowing no tes:
R Only secure children in a child restra int sys‐
te m which is suitable and recommended for
Mercedes-Benz vehicles and which is appro‐
priate forth e age, weight and size of the
ch ild. Obser vethe instructions for cor rect use
of thech ild restra int sy stem.
R If possible, ins tallth ech ild restra int sy stem
on a rear seat.
R Onlyuse thefo llowing securing sy stems for
ch ild restra int sy stems:
- the seat belt sy stem
- theLA TC H-type (ISOFIX) secu ring rings
- theTo pTe ther anchorages
R Obser vethech ild restra int sy stem manufac‐
turer's ins tallation instructions.
R Obser vethewa rning labels in theve hicle
interior and on thech ild restra int sy stem. 34
Occupant saf ety
Page 60 of 354
#
Toinstall a child restra int sy stem: when
ins talling a child restra int sy stem, alw ays
obser vethe manufacturer's ins tallation and
operating instructions as well as the informa‐
tion in this Operator's Manual. #
Pull the seat belt smoo thly from the seat belt
outlet. #
Enga gethe seat belt tongue in the seat belt
buckle. #
Toactivate the special seat belt retractor:
pull the seat belt out fully and let the inertia
re el retract it again.
When the special seat belt retractor is acti va‐
te d, you should hear a ratcheting sound. #
Push thech ild restra int sy stem down until the
seat belt sits tightl y. #
Todeactivate the special seat belt retrac‐
to r:press there lease button of the seat belt
buckle. #
Hold the seat belt tongue and guide ba ckto
th e seat belt outlet. Installing
theLA TC H-type (ISOFIX) child
re stra int sy stem on there ar seat Note
s onLATC H-type (ISOFIX) child seat
securing sy stems &
WARNING Risk of inju ryor death if the
permissible gross mass of thech ild and
ch ild restra int sy stem is exceeded
Fo rLA TC H-type (ISOFIX) child restra int sys‐
te ms in which thech ild is secured using the
integ rated seat belt in thech ild restra int sys‐
te m, the permissible gross mass of thech ild
and child restra int sy stem is 73lb (33 kg).
If th ech ild and thech ild restra int sy stem
to ge ther we igh more than 73 lb (33 kg),the
LA TC H-type (ISOFIX) child restra int sy stem
with integrated seat belt does not of fer suf fi‐
cient pr otection. An excessive load may be
placed on theLA TC H-type (ISOFIX) child seat
attachments and thech ild may not be
re stra ined in theeve nt of an accident, for
ex ample. #
Ifth ech ild and thech ild restra int sys‐
te m toge ther we igh more than 73 lb
(33 kg), use only a LATC H-type (ISOFIX)
ch ild restra int sy stem that secures the
ch ild with theve hicle seat belt. #
Also secure thech ild restra int sy stem
with theTo pTe ther belt, if available. Alw
ays comply with the information about the
mass of thech ild restra int sy stem:
R Inthe manufacturer's ins tallation and operat‐
ing instructions forth ech ild restra int sy stem
used
R On a label on thech ild restra int sy stem, if
av ailable
Check regularly that the permissible gross mass
of thech ild plus thech ild restra int sy stem is not
exc eeded.
When ins talling a child restra int sy stem, be sure
to obser vethe manufacturer's ins tallation and
operating instructions and the cor rect use of the
ch ild restra int sy stem as well as consider the
suitability of the seats.
ISOFIX is a standardized securing sy stem for spe‐
cial restra int sy stems. LATC H-type (ISOFIX) child
re stra int sy stems are appr oved in accordance
with UN-R44.
Only child restra int sy stems that ha vebeen
appr oved in accordance with UN-R44 may be
attached toLATC H-type (ISOFIX) mounting brack‐
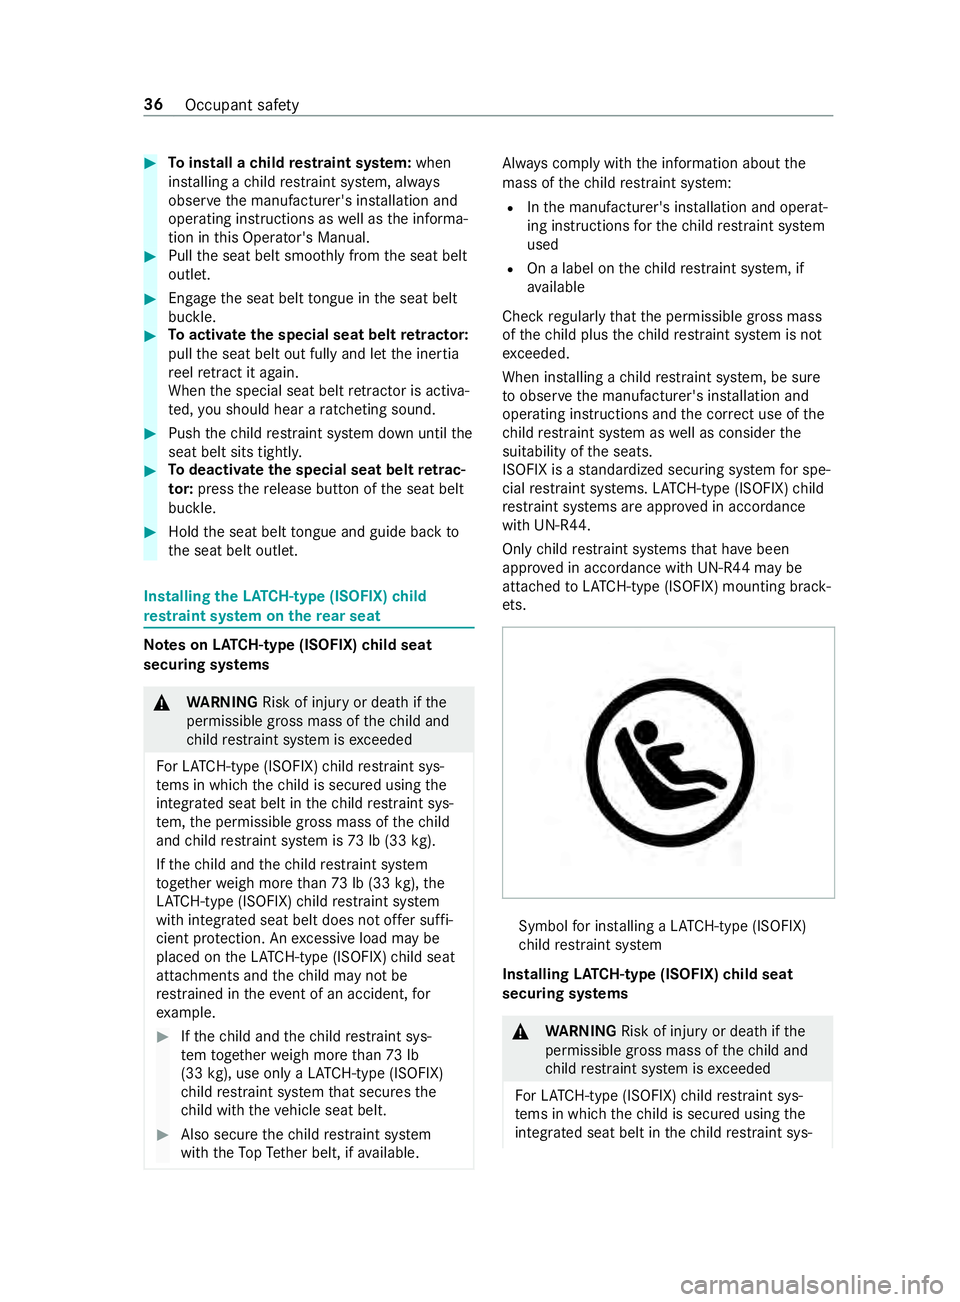
et s. Symbol
for ins talling a LATC H-type (ISOFIX)
ch ild restra int sy stem
Installing LATC H-type (ISOFIX) child seat
securing sy stems &
WARNING Risk of inju ryor death if the
permissible gross mass of thech ild and
ch ild restra int sy stem is exceeded
Fo rLA TC H-type (ISOFIX) child restra int sys‐
te ms in which thech ild is secured using the
integ rated seat belt in thech ild restra int sys‐ 36
Occupant saf ety
Page 61 of 354
te
m, the permissible gross mass of thech ild
and child restra int sy stem is 73lb (33 kg).
If th ech ild and thech ild restra int sy stem
to ge ther we igh more than 73 lb (33 kg),the
LA TC H-type (ISOFIX) child restra int sy stem
with integrated seat belt does not of fer suf fi‐
cient pr otection. An excessive load may be
placed on theLA TC H-type (ISOFIX) child seat
attachments and thech ild may not be
re stra ined in theeve nt of an accident, for
ex ample. #
Ifth ech ild and thech ild restra int sys‐
te m toge ther we igh more than 73 lb
(33 kg), use only a LATC H-type (ISOFIX)
ch ild restra int sy stem that secures the
ch ild with theve hicle seat belt. #
Also secure thech ild restra int sy stem
with theTo pTe ther belt, if available. Alw
ays comply with the information about the
mass of thech ild restra int sy stem:
R Inthe manufacturer's ins tallation and operat‐
ing instructions forth ech ild restra int sy stem
used
R On a label on thech ild restra int sy stem, if
av ailable
Check regularly that the permissible gross mass
of thech ild plus thech ild restra int sy stem is not
exc eeded.
When ins talling a child restra int sy stem, be sure
to obser vethe manufacturer's ins tallation and
operating instructions and the cor rect use of the
ch ild restra int sy stem as well as consider the
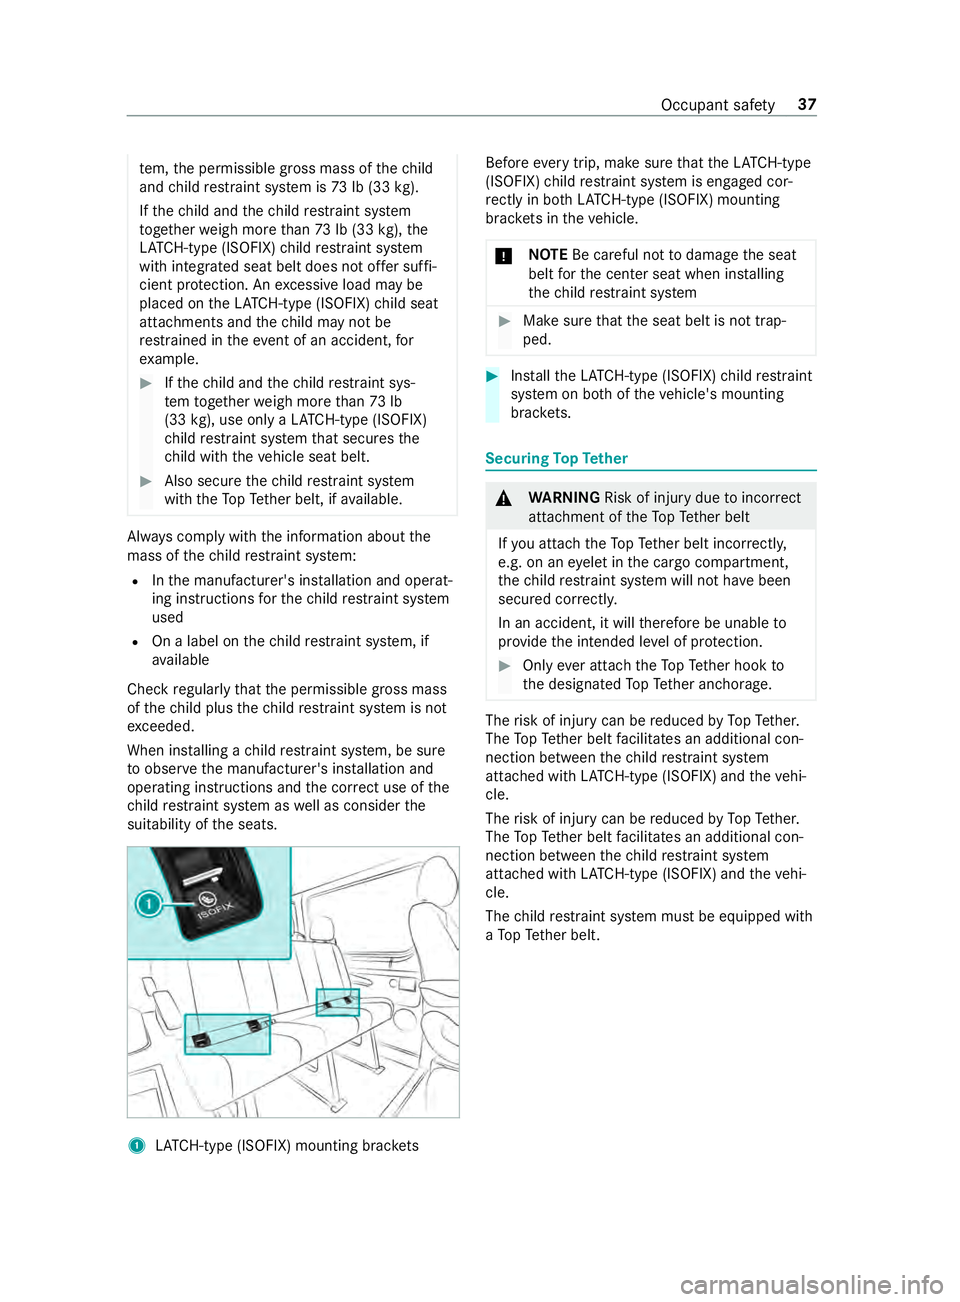
suitability of the seats. 1
LATC H-type (ISOFIX) mounting brac kets Before
every trip, make sure that theLA TC H-type
(ISOFIX) child restra int sy stem is engaged cor‐
re ctly in bo thLATC H-type (ISOFIX) mounting
brac kets in theve hicle.
* NO
TEBe careful not todamage the seat
belt forth e center seat when ins talling
th ech ild restra int sy stem #
Make sure that the seat belt is not trap‐
ped. #
Installth eLA TC H-type (ISOFIX) child restra int
sy stem on bo thoftheve hicle's mounting
brac kets. Secu
ring TopTe ther &
WARNING Risk of inju rydue toincor rect
attachment of theTo pTe ther belt
If yo u attach theTo pTe ther belt incor rectl y,
e.g. on an eyelet in the cargo compartment,
th ech ild restra int sy stem will not ha vebeen
secured cor rectly.
In an accident, it will therefore be unable to
pr ov ide the intended le vel of pr otection. #
Only ever attach theTo pTe ther hook to
th e designated TopTe ther anchorage. The
risk of injury can be reduced byTopTe ther.
The TopTe ther belt facilitates an additional con‐
nection between thech ild restra int sy stem
attached with LATC H-type (ISOFIX) and theve hi‐
cle.
The risk of injury can be reduced byTopTe ther.
The TopTe ther belt facilitates an additional con‐
nection between thech ild restra int sy stem
attached with LATC H-type (ISOFIX) and theve hi‐
cle.
The child restra int sy stem must be equipped with
a To pTe ther belt. Occupant saf
ety37
Page 62 of 354
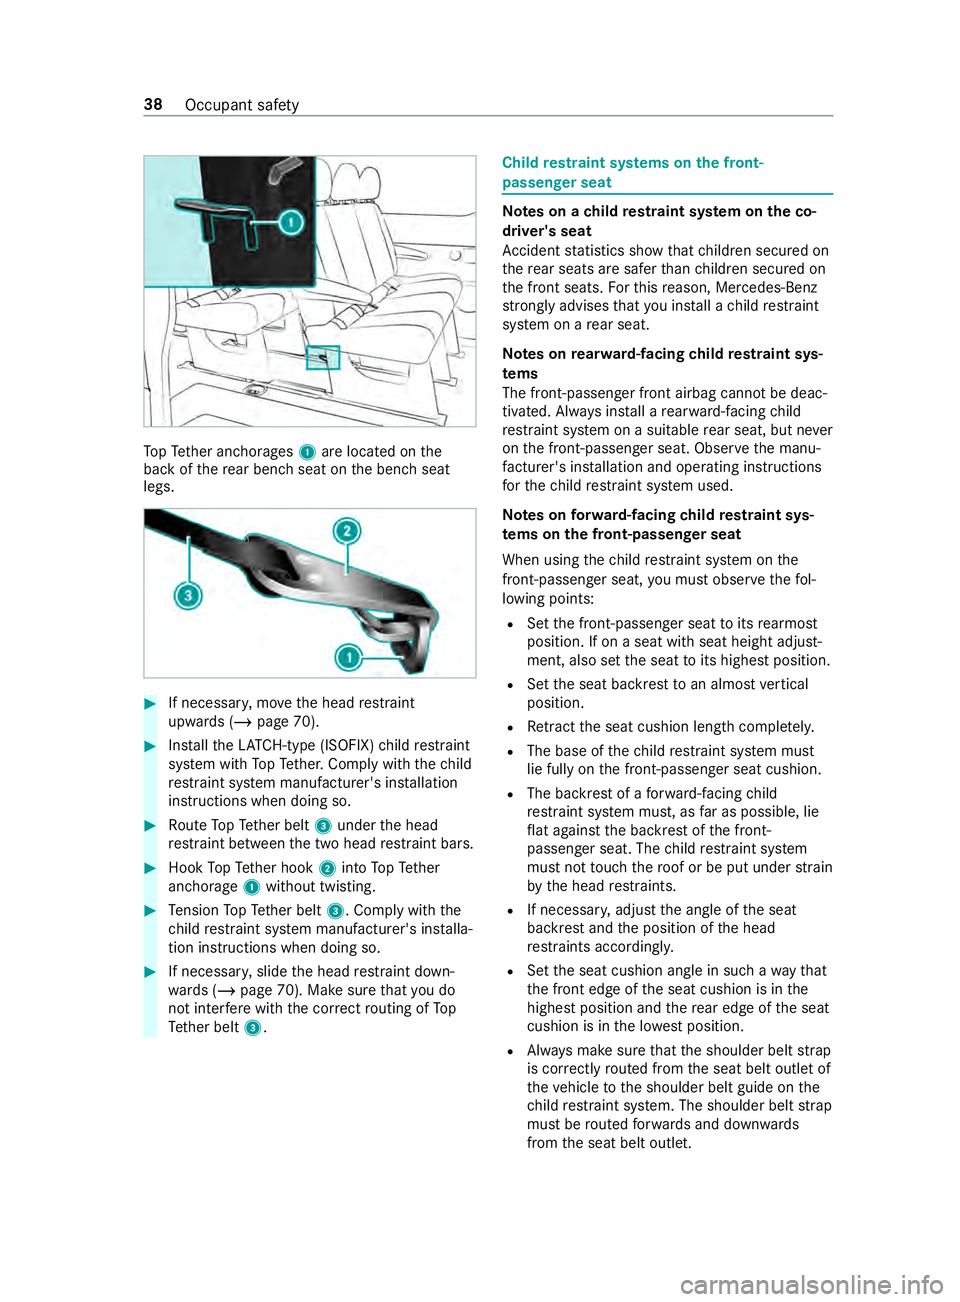
To
pTe ther anchorages 1are located on the
back of there ar ben chseat on the bench seat
legs. #
If necessar y,mo vethe head restra int
upwards (/ page 70). #
Installth eLA TC H-type (ISOFIX) child restra int
sy stem with TopTe ther. Comply with thech ild
re stra int sy stem manufacturer's ins tallation
instructions when doing so. #
Route TopTe ther belt 3under the head
re stra int between the two head restra int bars. #
Hook TopTe ther hook 2into TopTe ther
anchorage 1without twisting. #
Tension TopTe ther belt 3. Comply with the
ch ild restra int sy stem manufacturer's ins talla‐
tion instructions when doing so. #
If necessar y,slide the head restra int down‐
wa rds (/ page 70). Make sure that you do
not inter fere with the cor rect routing of To p
Te ther belt 3. Child
restra int sy stems on the front-
passenger seat Note
s on a child restra int sy stem on the co-
driver's seat
Ac cident statistics show that children secured on
th ere ar seats are safer than children secured on
th e front seats. Forth is reason, Mercedes-Benz
stro ngly advises that you ins tall a child restra int
sy stem on a rear seat.
Note s onrear wa rd-facing child restra int sys‐
te ms
The front-passen ger front airbag cannot be deac‐
tivated. Alw ays ins tall a rear wa rd-facing child
re stra int sy stem on a suitable rear seat, but ne ver
on the front-passen ger seat. Obser vethe manu‐
fa cturer's ins tallation and operating instructions
fo rth ech ild restra int sy stem used.
Note s onforw ard-facing child restra int sys‐
te ms on the front-passenger seat
When using thech ild restra int sy stem on the
front-passenger seat, you must obse rveth efo l‐
lowing points:
R Set the front-passen ger seat toits rearmost
position. If on a seat with seat height adjust‐
ment, also set the seat toits highest position.
R Set the seat backrest toan almost vertical
position.
R Retract the seat cushion length comple tely.
R The base of thech ild restra int sy stem must
lie fully on the front-passen ger seat cushion.
R The backrest of a forw ard-facing child
re stra int sy stem must, as far as possible, lie
fl at against the backrest of the front-
passenger seat. The child restra int sy stem
must not touch thero of or be put under stra in
by the head restra ints.
R If necessar y,adjust the angle of the seat
backrest and the position of the head
re stra ints acco rding ly.
R Set the seat cushion angle in such a wayth at
th e front edge of the seat cushion is in the
highest position and there ar edge of the seat
cushion is in the lo west position.
R Always make sure that the shoulder belt strap
is cor rectly routed from the seat belt outlet of
th eve hicle tothe shoulder belt guide on the
ch ild restra int sy stem. The shoulder belt strap
must be routed forw ards and down wards
from the seat belt outlet. 38
Occupant saf ety
Page 333 of 354

Changing bulbs
...................................... .83
High beam .......................................... 84
Indicator (front) .................................. 84
Interior lamps (rear compartment) ..... 88
License plate lamp ............................ .86
Light bulb types haloge n headlamps ..84
Low beam ........................................... 84
No tes .................................................83
Ta il lamp bulb types (Cargo Van
and Passenger Van) ............................ 85
Ta il lamp bulb types (chassis) ............ .87
Tu rn signal light (rear) (chassis) ..........87
Changing lamps see Changing bulbs
Changing owner ...................................... 21
Cha racteristics of the tire .................. .245
Charging Battery .............................................. 219
Mobile phone (wireless) ..................... 77
Child saf ety lock (doors) ........................ 39
Child seat front-passenger seat (no tes) .............. 38
front-passenger seat (rear ward-
fa cing/for ward-facing) ....................... 38
LA TC H-type (ISOFIX) (ins talling) ........ .36
LA TC H-type (ISOFIX) (no tes) ............... 36
No tes on the safe transpor tation of
ch ildren .............................................. 34
Re arwa rd-facing child restra int sys‐
te m (Information) .............................. .38
To pTe ther ...........................................37
Child ren
No tes on safe transpor tation .............. 34
Special seat belt retractor .................. 35
Ci ga rette lighter ..................................... 75
Cleaning see Care
Cleaning water drain valve of the air
intake box ............................................ .208
Climate control Activating/deactivating ...................... 95
Ad justing rear-compartment heat‐
ing ...................................................... 96
Air distribution settings ...................... 97
automatically controlling (rear
passenger compartment) .................. .97
Au xilia ryheating ................................. 99
Cargo compartment ventilation ........ 102
Clearing fogged up windo ws............... 97
Control panel for 3-zone auto matic
clima tecontrol ................................... 95 Control panel
for dual-zone auto‐
matic clima tecontrol .......................... 94
Controlling automatically .................... 96
Hot- wate r auxilia ryheater ................1 00
Re frigerant ........................................ 271
Setting the air distribution .................. 97
Switching ai r-re circulation mode
on/off ................................................ 98
Switching synchronization function
on/off (control panel) ......................... 97
Switching the A/C function on/off ....96
Switching there ar wind ow
defros ter on/off ................................. 98
Switching the windshield heater
on/off ................................................ 98
Ve ntilating theve hicle (con veni‐
ence opening) ..................................... 54
Ve ntilation nozzles at front ................. 98
Ve ntilation nozzles in thero of ............ 99
Ve ntilation nozzles, rear passenger
compartment .................................... .99
Cockpit (o verview) .................................. .6
Combination switch see High beam
see High-beam flasher
see Indicator
Compu ter
see On-board computer
Contacts ................................................ 185
Calling up ........................................ .185
Deleting ............................................ 185
Downloading (from mobile phone) .... 185
Information .......................................1 85
Making a call ................................... .185
Na me form at .................................... 185
Con venience closing .............................. 54
Con venience opening ............................. 54
Con versions ............................................ 19
Coolant Filling capacities .............................. .270
Coolant (engine) Che cking le vel .................................. 206
No tes ............................................... 269
Copyright License ............................................... 27
Tr ademar ks......................................... 27
Cornering light ...................................... .80
Crosswind Assist Function/no tes ................................ 13 8
Cruise control ...................................... .141
Ac tivating ......................................... 14 2 Index
309
Page 340 of 354
Instrument Display
see Warning/indicator lamp
Instrument lighting ..............................16 6
Intelligent light sy stem
Ad aptive Highbeam Assist .................. 81
Corne ring light ................................... 80
In te rior lamps (rear compa rtment)
(replacing the light bulbs) ..................... 88
In te rior lighting
Cargo compartment .......................... .83
Re ar compartment ............................ .83
Setting ................................................ 82
Switch-off del aytime .......................... 83
In te rior motion sensor
Fu nction ............................................. 57
Switching on/off ................................ 57
Interior roof car rier sy stem ................ .199
iPhone ®
see Apple CarPlay™ J
Jack ....................................................... 250
Hydraulic .......................................... 230
Re moving thehy draulic jack from
th estow age compartment .............. .230
St orage location of hydraulic jack .... 230
Jump-start connection .........................219
Jump-starting see Jump-s tart connection K
Ke y........................................................... 41
Battery ............................................... 42
Electrical consu mption ...................... .42
Fu nctions ............................................ 41
Ke yring attachment ........................... 42
Mechanical key .................................. .42
Overview ............................................. 41
Problem ..............................................43
Ra dio connection ................................ 41
Un locking setting .............................. .42L
Labeling (tires) see Tire labeling
Lane de tection (au tomatic)
see Active Lane Keeping Assist
Lane Keeping Assist ............................ .155
Fu nction ........................................... 15 5
Sy stem limitations ............................1 55Tr
ailer operation .............................. .155
Lane Keeping Assist
see Active Lane Keeping Assist
see Lane Keeping Assist
Language ............................................... 181
No tes ................................................ 181
Setting .............................................. 181
LA TC H-type (ISOFIX) child seat
securing sy stem
In stalling ............................................ .36
No tes .................................................36
Le vel control
see ENR (elect ronic le vel control)
License pla telamp (changing bulbs) .... 86
Light switch (o verview) ........................ .79
Lighting see Lights
Lights ...................................................... 79
Ad aptive Highbeam Assist .................. 81
Au tomatic driving lights ...................... 79
Combination switch ............................ 80
Cornering light ................................... 80
Driving abroad (symmetrical low
beam) ................................................. 79
Hazard warning lamps ........................ 80
High beam .......................................... 80
High-beam flasher .............................. 80
Indicator ............................................ .80
Light switch ........................................ 79
Low beam ........................................... 79
Pa rking light ...................................... .79
Re ar fog light ...................................... 79
Re sponsibility with lighting sy stems ... 79
Setting theex terior lighting switch-
off delay time ...................................... 81
Setting the instrument lighting ......... 16 6
Switching the sur round lighting
on/off ................................................ .81
Limiting speed ...................................... 107
Load Determ ining the maximum ................2 41
Sample calculation ........................... 24 2
Load distribution .................................. 19 6
Load index (tire) .................................. .245
Load securing Carg o tie-down point ........................ 197
Ins talling and removing tie-down
ey es .................................................. 19 8
No tes ................................................ 19 6
Load-bea ring capacity (tire) ................245 316
Index