lights Mercury Mercury Cougar 2002 User Guide
[x] Cancel search | Manufacturer: MERCURY, Model Year: 2002, Model line: Mercury Cougar, Model: Mercury Mercury Cougar 2002Pages: 216, PDF Size: 4.04 MB
Page 51 of 216

BULBS
Replacing exterior bulbs
Check the operation of the following lamps frequently:
²Headlamps
²Tail lamps
²Brakelamps
²High-mount brakelamp
²Turn signal lamps
²Backup lamps
²License plate lamp
Do not remove lamp bulbs unless they will be replaced immediately. If a
bulb is removed for an extended period of time, contaminants may enter
the lamp housings and affect performance.
Using the right bulbs
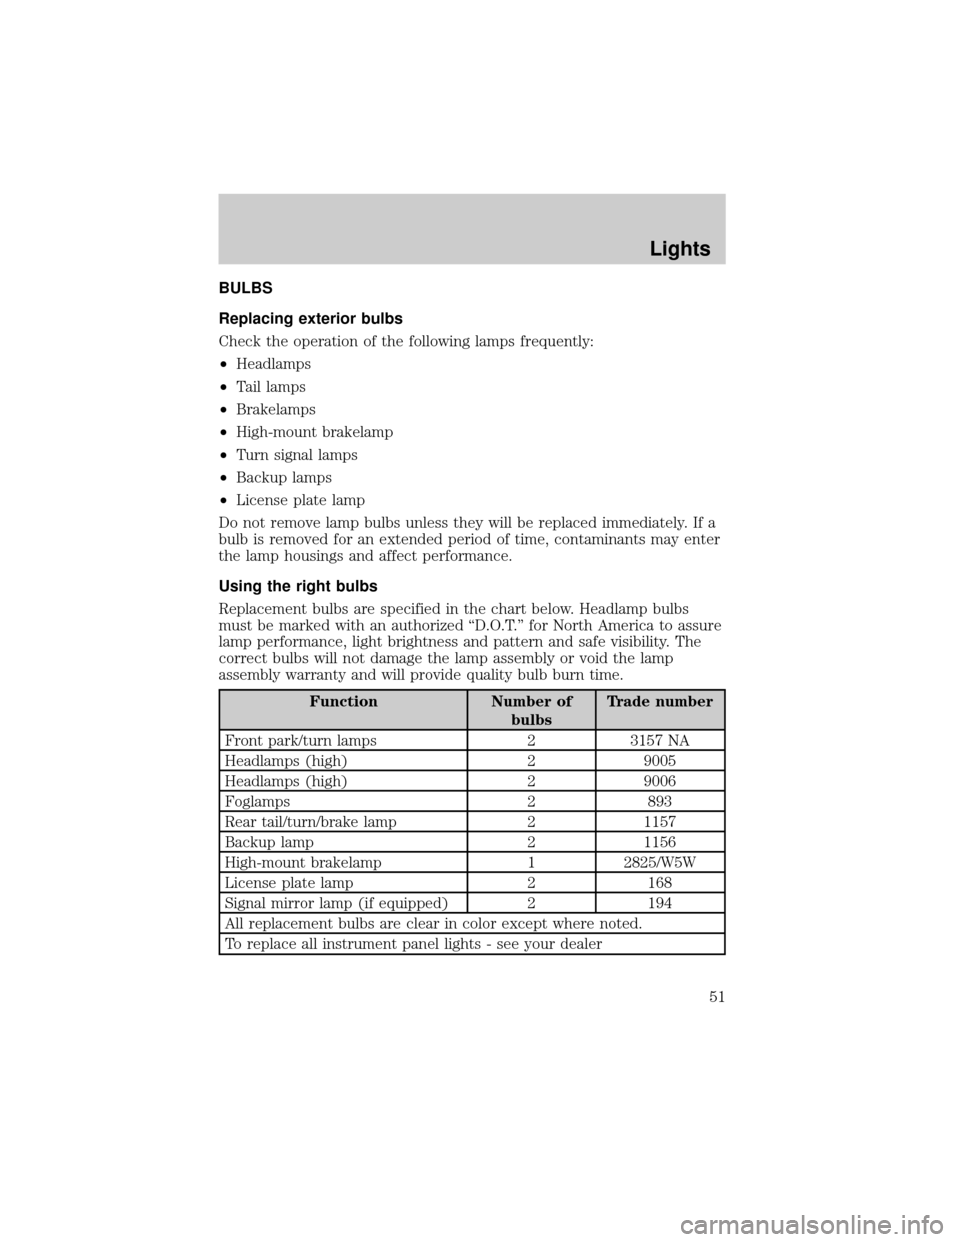
Replacement bulbs are specified in the chart below. Headlamp bulbs
must be marked with an authorized ªD.O.T.º for North America to assure
lamp performance, light brightness and pattern and safe visibility. The
correct bulbs will not damage the lamp assembly or void the lamp
assembly warranty and will provide quality bulb burn time.
Function Number of
bulbsTrade number
Front park/turn lamps 2 3157 NA
Headlamps (high) 2 9005
Headlamps (high) 2 9006
Foglamps 2 893
Rear tail/turn/brake lamp 2 1157
Backup lamp 2 1156
High-mount brakelamp 1 2825/W5W
License plate lamp 2 168
Signal mirror lamp (if equipped) 2 194
All replacement bulbs are clear in color except where noted.
To replace all instrument panel lights - see your dealer
Lights
51
Page 52 of 216

Replacing headlamp bulbs
Make sure the headlamp switch is in the OFF position.
To remove the high or low beam headlamp bulb:
1. Lift the hood and release the wire
clip on the rear of the headlamp
assembly and remove the cover.
2. Disconnect the electrical
connector by turning the bulb
holder counterclockwise.
3. Pull the bulb holder straight out
to remove the bulb.
To install the new bulb:
Handle a halogen headlamp bulb carefully and keep out of
children's reach. Grasp the bulb by only its plastic base and do
not touch the glass. The oil from your hand could cause the bulb to
break the next time the headlamps are operated.
Note:If the bulb is accidentally touched, it should be cleaned with
rubbing alcohol before being used.
1. Install the new bulb in the lamp assembly by pushing it straight in and
turning to lock it in position. You may need to turn the bulb slightly to
align the grooves in the plastic base with the tabs in the lamp assembly.
Lights
52
Page 53 of 216

2. Connect the electrical connector to the bulb.
3. Install the protective cover and secure it with the wire clips.
4. Turn the headlamps on and make sure they work properly. if the
headlamp was correctly aligned before you changed the bulb, you need
to align it again.
Replacing front parking lamp/turn signal bulbs
1. Remove the headlamp assembly
cover.
2. Turn the bulb holder counter
clockwise.
3. Remove the bulb socket by
pulling it straight out from the lamp
assembly.
4. Pull the bulb straight out of the
socket and press in the new bulb.
5. Install the bulb socket into the
lamp assembly by turning clockwise.
Replacing side marker lamps
1. Push the complete light assembly
to the front and pull it out.
2. Remove the socket from the
assembly by turning it counter
clockwise.
3. Pull the bulb straight out and
replace it.
4. Install the bulb socket into the
assembly by turning it clockwise.
Replacing brake/turn signal/tail/backup lamps
The brake, turn signal, tail and backup lamps bulbs are located in the
same portion of the tail lamp assembly. Follow the same steps to replace
either bulb.
Lights
53
Page 54 of 216

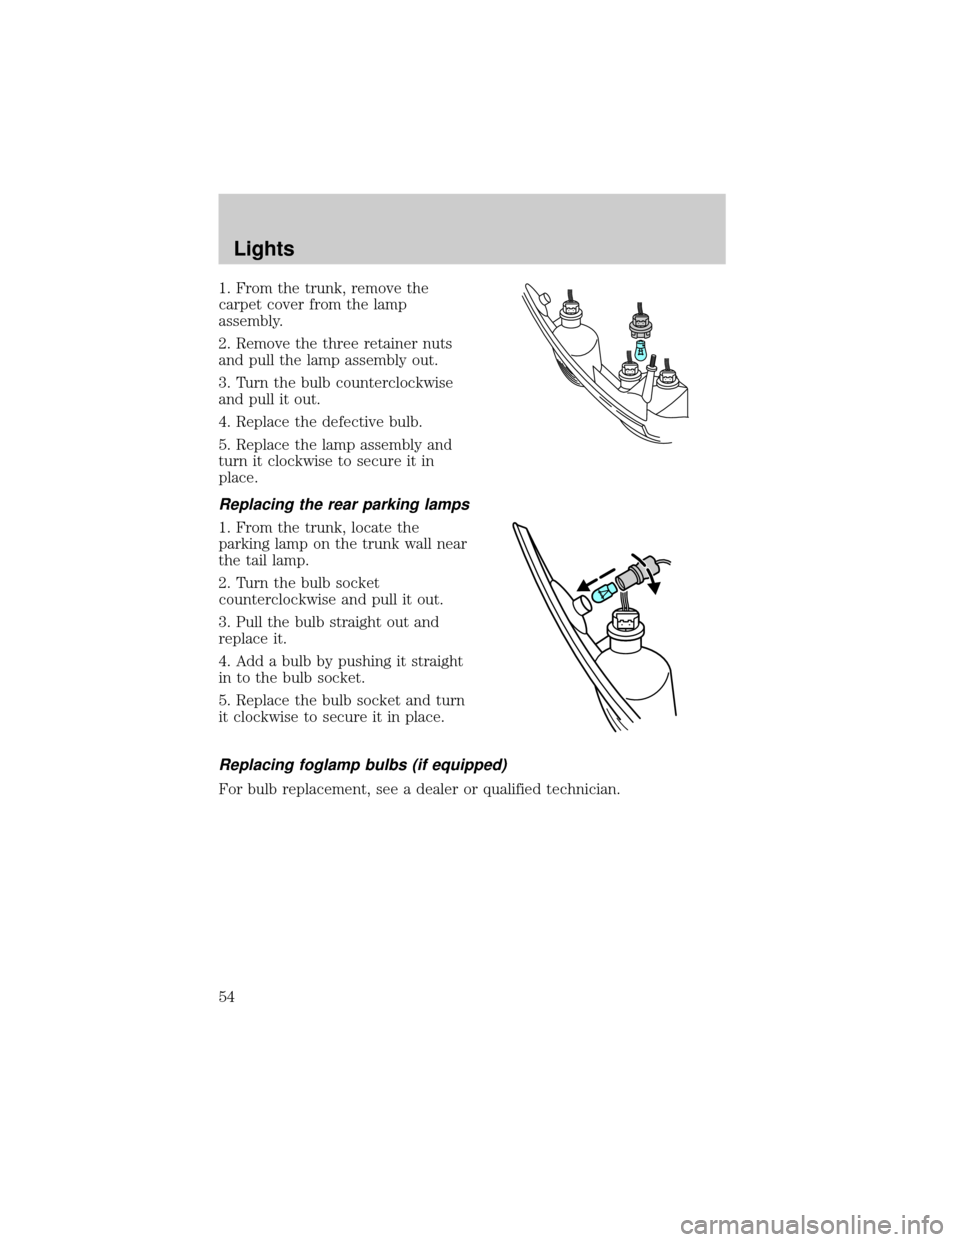
1. From the trunk, remove the
carpet cover from the lamp
assembly.
2. Remove the three retainer nuts
and pull the lamp assembly out.
3. Turn the bulb counterclockwise
and pull it out.
4. Replace the defective bulb.
5. Replace the lamp assembly and
turn it clockwise to secure it in
place.
Replacing the rear parking lamps
1. From the trunk, locate the
parking lamp on the trunk wall near
the tail lamp.
2. Turn the bulb socket
counterclockwise and pull it out.
3. Pull the bulb straight out and
replace it.
4. Add a bulb by pushing it straight
in to the bulb socket.
5. Replace the bulb socket and turn
it clockwise to secure it in place.
Replacing foglamp bulbs (if equipped)
For bulb replacement, see a dealer or qualified technician.
Lights
54
Page 55 of 216

Replacing high-mount brake
lamp bulbs
1. Remove the push pins and cover
from the liftgate. (To remove the
push pins, press the two tabs of the
push pin insert inward and pull the
insert out.)
2. Turn the bulb socket
counterclockwise.
3. Pull the bulb straight out of the
socket and push in the new bulb.
To install the lamp assembly:
1. Install the bulb into the lamp assembly and turn it clockwise
2. Replace the cover and the push pins.
Replacing the luggage compartment lamp
1. Remove the light assembly from
the underside of the liftgate.
2. Turn the spherical bulb (with
slight pressure) counterclockwise to
remove.
3. To replace the bulb, insert bulb
and turn it clockwise to secure in
place.
Lights
55
Page 56 of 216

Replacing interior lamps
1. Switch off the interior lamps
(middle switch position).
2. Open the lamp assembly.
3. Release the reflector at the side.
4. Pull out and replace the bulb.
Replacing reading bulbs (if equipped)
1. Open the reading lamp assembly.
2. Pull the bulb straight out and
replace it.
3. After the bulb has been replaced,
close the lamp assembly.
Lights
56
Page 73 of 216

Opening the luggage compartment
Press this control to open the
luggage compartment.
Be certain the luggage compartment
is closed before driving your vehicle.
The luggage compartment may
appear closed, but it may not be
latched. Failure to do so may cause
objects to fall out of the luggage
compartment or block rear view
vision.
Sounding a panic alarm
Press this control to activate the
alarm. The horn will sound and the
lights will flash for approximately
two minutes.
To deactivate the alarm, press the
control again or turn the ignition to
ON.
Replacing the batteries
The transmitter is powered by one coin type three-volt lithium batteries.
Typical operating range will allow you to be up to 10 meters (33 feet)
away from your vehicle. A decrease in operating range can be caused by:
²Weather conditions
²Nearby radio towers
²Structures around the vehicle
²Other vehicles parked next to the vehicle
To replace the batteries:
Locks and Security
73
Page 112 of 216

STARTING
Positions of the ignition
1. LOCK, locks the steering wheel,
gearshift lever (automatic transaxle
only) and allows key removal. On
vehicles with a manual transaxle
push the key in while turning to
lock.
2. ACCESSORY, allows the electrical
accessories such as the radio to
operate while the engine is not
running.
3. ON, all electrical circuits operational. Warning lights illuminated. Key
position when driving.
4. START, cranks the engine. Release the key as soon as the engine
starts.
Preparing to start your vehicle
Engine starting is controlled by the powertrain control system. This
system meets all Canadian Interference-Causing Equipment standard
requirements regulating the impulse electrical field strength of radio
noise.
When starting a fuel-injected engine, avoid pressing the accelerator
before or during starting. Only use the accelerator when you have
difficulty starting the engine. For more information on starting the
vehicle, refer toStarting the enginein this chapter.
Extended idling at high engine speeds can produce very high
temperatures in the engine and exhaust system, creating the risk
of fire or other damage.
Do not park, idle, or drive your vehicle in dry grass or other dry
ground cover. The emission system heats up the engine
compartment and exhaust system, which can start a fire.
Do not start your vehicle in a closed garage or in other enclosed
areas. Exhaust fumes can be toxic. Always open the garage door
before you start the engine. SeeGuarding against exhaust fumesin
this chapter for more instructions.
Driving
112
Page 114 of 216

If starting a vehicle with a manual
transaxle:
²Push the clutch pedal to the
floor, put the gearshift in neutral.
4. Turn the key to 3 (ON) without
turning the key to 4 (START).
If there is difficulty in turning the
key, firmly rotate the steering wheel
left and right until the key turns
freely. This condition may occur
when:
²front wheels are turned
²front wheel is against the curb
²steering wheel is turned when
getting in or out of the vehicle
Make sure the corresponding lights illuminate or illuminate briefly. If a
light fails to illuminate, have the vehicle serviced.
Driving
114
Page 135 of 216

If you need to arrange roadside assistance for yourself, Ford Motor
Company will reimburse a reasonable amount. To obtain reimbursement
information, U.S. Ford or Mercury vehicles customers call
1-800-241-3673; Lincoln vehicle customers call 1±800±521±4140.
Canadian customers who need to obtain reimbursement information, call
1±800±665±2006.
ROADSIDE COVERAGE BEYOND BASIC WARRANTY
In the United States, you may purchase additional roadside assistance
coverage beyond this period through the Ford Auto Club by contacting
your Ford or Lincoln Mercury dealer.
Similarly in Canada, for uninterrupted Roadside Assistance coverage, you
may purchase extended coverage prior to your Basic Warranty's Roadside
Assistance expiring. For more information and enrollment, contact
1±877±294±2582 or visit our website at www.ford.ca.
HAZARD LIGHTS CONTROL
Use only in an emergency to warn traffic of vehicle breakdown,
approaching danger, etc. The hazard flashers can be operated when the
ignition is off.
²The hazard lights control is
located on top of the steering
column.
²Depress hazard lights control to
activate the hazard flashers.
²Depress control again to turn the
flashers off.
FUEL PUMP SHUT-OFF SWITCH
FUEL
RESET
The fuel pump shut-off switch is a device intended to stop the electric
fuel pump when your vehicle has been involved in a substantial jolt.
After a collision, if the engine cranks but does not start, the fuel pump
shut-off switch may have been activated.
Roadside Emergencies
135