brake Mercury Sable 2002 s Owner's Guide
[x] Cancel search | Manufacturer: MERCURY, Model Year: 2002, Model line: Sable, Model: Mercury Sable 2002Pages: 240, PDF Size: 3.53 MB
Page 145 of 240
Always set the parking brake fully and make sure the gearshift is
latched in P (Park). Turn the ignition to the LOCK position and
remove the key whenever you leave your vehicle.
If the parking brake is fully released, but the brake warning lamp
remains illuminated, the brakes may not be working properly.
See your dealer or a qualified service technician.
Driving with an automatic overdrive transaxle
Your automatic transaxle electronically controls the shift feel by using an
adaptive learning strategy. This feature is designed to optimize shift
smoothness. It is normal for your transaxle to shift firmly during the first
few hundred kilometers (miles) of operation until the adaptive strategy
has been learned. The adaptive learning strategy is maintained by power
from the battery. When the battery is disconnected or a new battery is
installed, the transaxle must relearn its adaptive strategy. Optimal
shifting will resume within a few hundred kilometers (miles) of
operation.
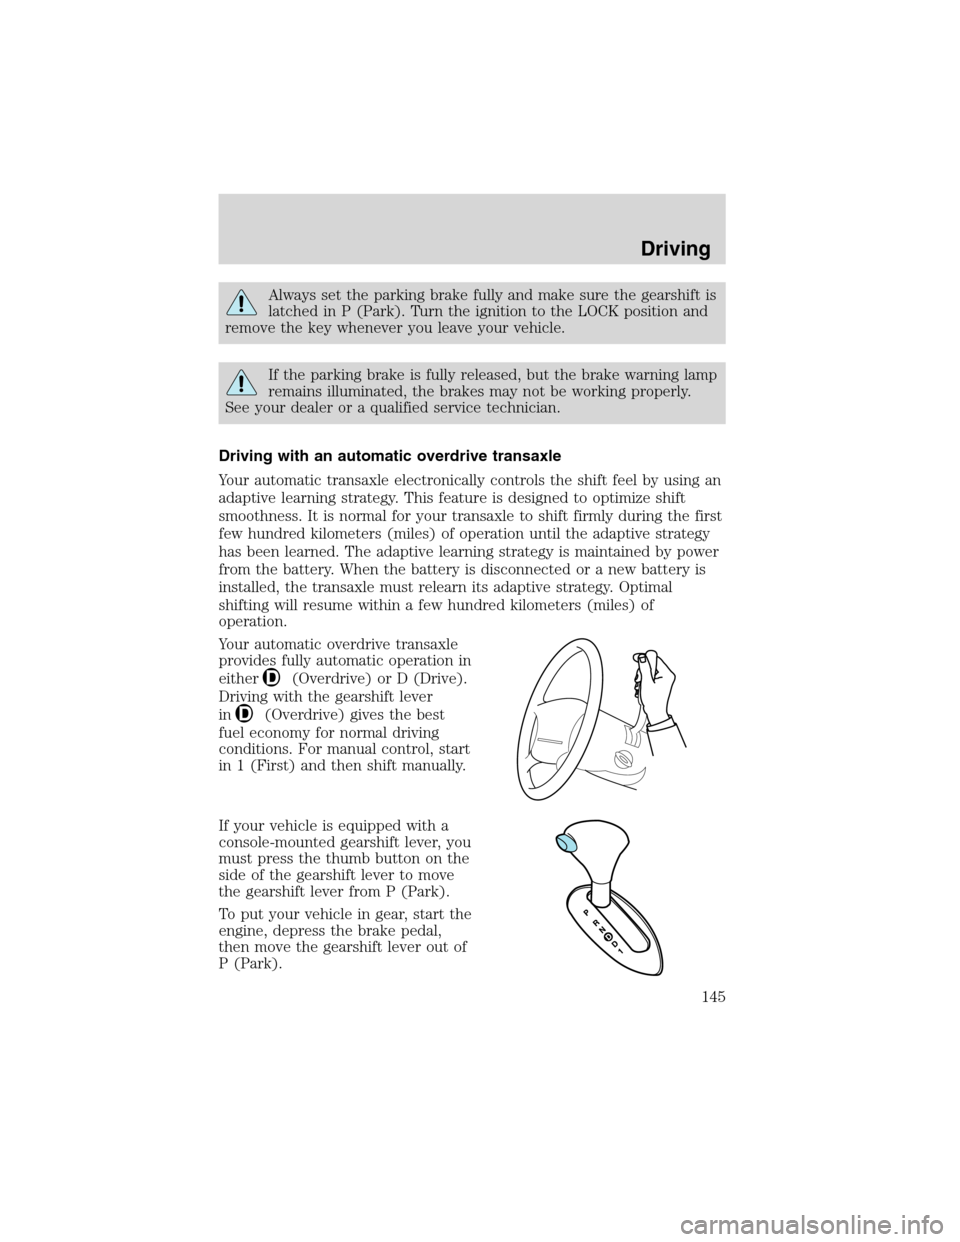
Your automatic overdrive transaxle
provides fully automatic operation in
either
(Overdrive) or D (Drive).
Driving with the gearshift lever
in
(Overdrive) gives the best
fuel economy for normal driving
conditions. For manual control, start
in 1 (First) and then shift manually.
If your vehicle is equipped with a
console-mounted gearshift lever, you
must press the thumb button on the
side of the gearshift lever to move
the gearshift lever from P (Park).
To put your vehicle in gear, start the
engine, depress the brake pedal,
then move the gearshift lever out of
P (Park).
Driving
145
Page 146 of 240

Hold the brake pedal down while you move the gearshift lever
from P (Park) to another position. If you do not hold the brake
pedal down, your vehicle may move unexpectedly and injure someone.
Understanding gearshift positions
P (Park)
Always come to a complete stop
before shifting into P (Park). Make
sure the gearshift lever is securely
latched in P (Park). This locks the
transaxle and prevent the front
wheels from rotating.
Always set the parking
brake fully and make sure
the gearshift is latched in P
(Park). Turn the ignition to the
LOCK position and remove the
key whenever you leave your
vehicle.
R (Reverse)
With the gearshift lever in R
(Reverse), the vehicle will move
backward. You should always come
to a complete stop before shifting
into and out of R (Reverse).
PRNDD1
PRNDD1
Driving
146
Page 147 of 240

N (Neutral)
With the gearshift lever in the N
(Neutral) position, the vehicle can
be started and is free to roll. Hold
the brake pedal down while in this
position.
(Overdrive)
The
(Overdrive) position is the
normal driving position for an
automatic overdrive transaxle.
When in the
(Overdrive)
position, the transaxle works the
same way as when in D (Drive).
However, when your vehicle cruises
at a constant speed for any length
of time, the transaxle shifts into a
fourth gear (Overdrive) and allows
the torque converter to lock-up.
Overdrive will increase your fuel
economy when you travel at cruising
speeds.
Overdrive may not be appropriate
for certain terrains. If the transaxle shifts back and forth between third
and fourth gears while you are driving on hilly roads, or if your vehicle
requires additional power for climbing hills, shift into D (Drive).
PRNDD1
PRNDD1
Driving
147
Page 149 of 240
When parking, do not use the gearshift in place of the parking
brake. Always set the parking brake fully and make sure that the
gearshift is securely latched in Park (P). Turn off the ignition
whenever you leave your vehicle. Never leave your vehicle unattended
while it is running. If you do not take these precautions, your vehicle
may move unexpectedly and injure someone.
DRIVING THROUGH WATER
Do not drive quickly through standing water, especially if the depth is
unknown. Traction or brake capability may be limited and if the ignition
system gets wet, your engine may stall. Water may also enter your
engine’s air intake and severely damage your engine.
If driving through deep or standing water is unavoidable, proceed very
slowly. Never drive through water that is higher than the bottom of the
hubs (for trucks) or the bottom of the wheel rims (for cars).
Once through the water, always try the brakes. Wet brakes do not stop
the vehicle as effectively as dry brakes. Drying can be improved by
moving your vehicle slowly while applying light pressure on the brake
pedal.
Driving through deep water where the transmission vent tube is
submerged may allow water into the transmission and cause
internal transmission damage. Have the fluid checked and, if
water is found, replace the fluid.
VEHICLE LOADING
Before loading a vehicle, familiarize yourself with the following terms:
•Base Curb Weight:Weight of the vehicle including any standard
equipment, fluids, lubricants, etc. It does not include occupants or
aftermarket equipment.
•Payload:Combined maximum allowable weight of cargo, occupants
and optional equipment. The payload equals the gross vehicle weight
rating minus base curb weight.
•GVW (Gross Vehicle Weight):Base curb weight plus payload
weight. The GVW is not a limit or a specification.
•GVWR (Gross Vehicle Weight Rating):Maximum permissible total
weight of the base vehicle, occupants, optional equipment and cargo.
The GVWR is specific to each vehicle and is listed on the Safety
Certification Label on the driver’s door pillar.
Driving
149
Page 151 of 240
your vehicle including both gross vehicle weight and front and rear gross
axle weight rating limits. Under no circumstance should these limitations
be exceeded.
Exceeding any vehicle weight rating limitation could result in
serious damage to the vehicle loss of vehicle control, vehicle
rollover, and/or personal injury.
TRAILER TOWING
Your vehicle is classified as a light duty towing vehicle. The amount of
weight you can safely tow depends on the type of engine you have in
your vehicle. Your vehicle does not come from the factory fully equipped
to tow. No towing packages are available through Ford or
Mercury/Lincoln dealers. Do not tow a trailer until your vehicle has been
driven at least 800 km (500 miles). If towing with a station wagon, inflate
the rear tires to 35 psi.
Towing a trailer places an additional load on your vehicle’s engine,
transaxle, brakes, tires and suspension. Inspect these components
carefully after towing.
In order to identify your vehicle’s engine, refer toIdentifying
components in the engine compartmentin theMaintenance and
specificationschapter.
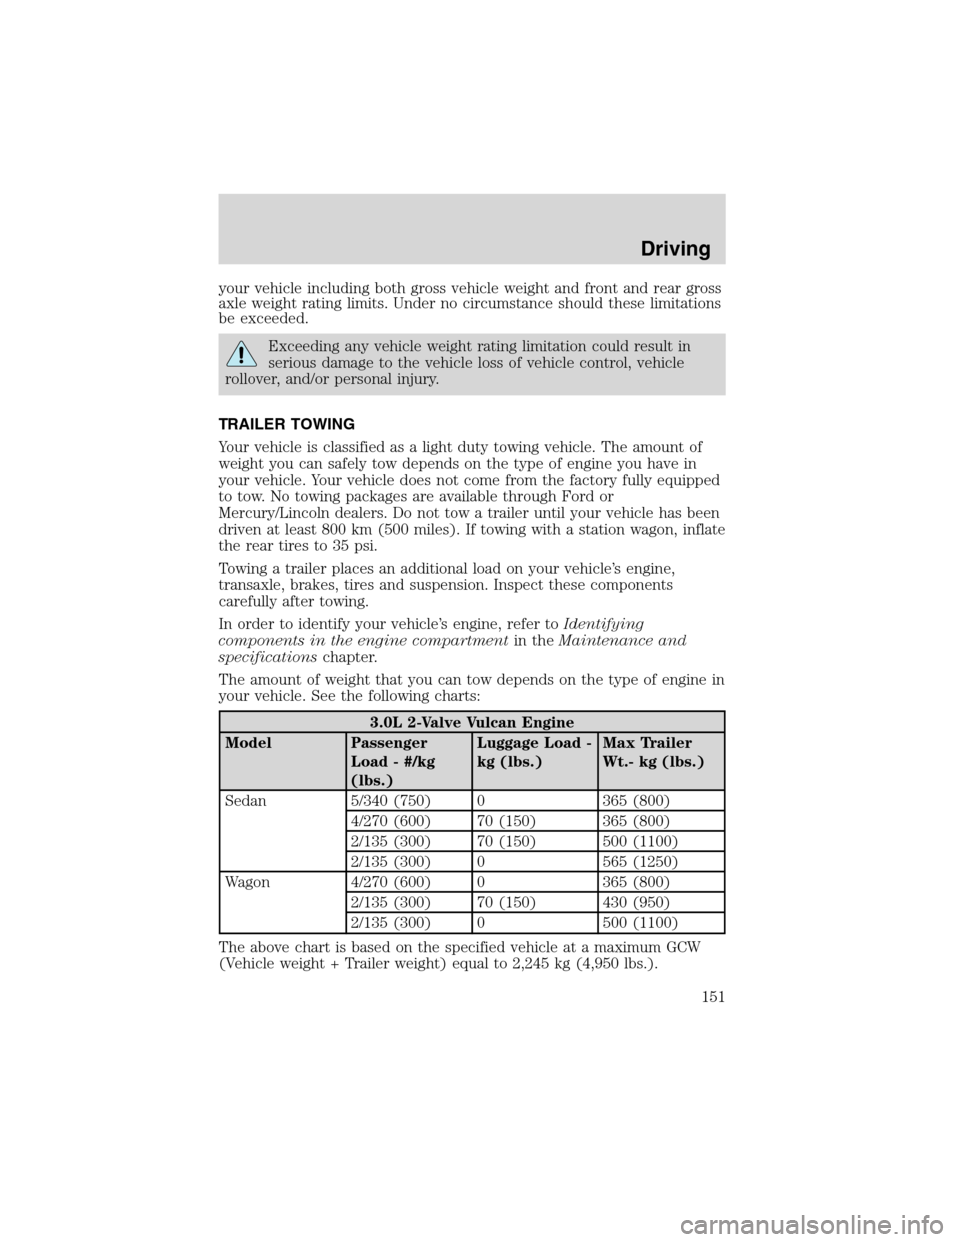
The amount of weight that you can tow depends on the type of engine in
your vehicle. See the following charts:
3.0L 2-Valve Vulcan Engine
Model Passenger
Load - #/kg
(lbs.)Luggage Load -
kg (lbs.)Max Trailer
Wt.- kg (lbs.)
Sedan 5/340 (750) 0 365 (800)
4/270 (600) 70 (150) 365 (800)
2/135 (300) 70 (150) 500 (1100)
2/135 (300) 0 565 (1250)
Wagon 4/270 (600) 0 365 (800)
2/135 (300) 70 (150) 430 (950)
2/135 (300) 0 500 (1100)
The above chart is based on the specified vehicle at a maximum GCW
(Vehicle weight + Trailer weight) equal to 2,245 kg (4,950 lbs.).
Driving
151
Page 153 of 240
Trailer brakes
Electric brakes and manual, automatic or surge-type trailer brakes are
safe if installed properly and adjusted to the manufacturer’s
specifications. The trailer brakes must meet local and Federal
regulations.
Do not connect a trailer’s hydraulic brake system directly to your
vehicle’s brake system. Your vehicle may not have enough
braking power and your chances of having a collision greatly increase.
The braking system of the tow vehicle is rated for operation at the
GVWR not GCWR.
Trailer lamps
Trailer lamps are required on most towed vehicles. Make sure your
trailer lamps conform to local and Federal regulations. See your dealer or
trailer rental agency for proper instructions and equipment for hooking
up trailer lamps.
Driving while you tow
When towing a trailer:
•Turn off the speed control. The speed control may shut off
automatically when you are towing on long, steep grades.
•Consult your local motor vehicle speed regulations for towing a trailer.
•To eliminate excessive shifting, use a lower gear. This will also assist
in transaxle cooling.
•Anticipate stops and brake gradually.
Servicing after towing
If you tow a trailer for long distances, your vehicle will require more
frequent service intervals. Refer to your scheduled maintenance guide for
more information.
Driving
153
Page 154 of 240
Trailer towing tips
•Practice turning, stopping and backing up before starting on a trip to
get the feel of the vehicle trailer combination. When turning, make
wider turns so the trailer wheels will clear curbs and other obstacles.
•Allow more distance for stopping with a trailer attached.
•If you are driving down a long or steep hill, shift to a lower gear. Do
not apply the brakes continuously, as they may overheat and become
less effective.
•The trailer tongue weight should be 10–15% of the loaded trailer
weight.
•After you have traveled 80 km (50 miles), thoroughly check your
hitch, electrical connections and trailer wheel lug nuts.
•To aid in engine/transmission cooling and A/C efficiency during hot
weather while stopped in traffic, place the gearshift lever in P (Park).
•Vehicles with trailers should not be parked on a grade. If you must
park on a grade, place wheel chocks under the trailer’s wheels.
RECREATIONAL TOWING
Follow these guidelines for your specific powertrain combination to tow
your vehicle with all four wheels on the ground (such as behind a
recreational vehicle).
These guidelines are designed to ensure that your transmission is not
damaged due to insufficient lubrication.
All Front Wheel Drive (FWD) vehicles:
It is not recommended to tow front wheel drive vehicles with the front
drive wheels on the ground. It is recommended to tow your vehicle with
the drive wheels on a dolly or two wheel car hauling trailer.
In case of a roadside emergency with a disabled vehicle (without access
to wheel dollies, car hauling trailer or flatbed transport vehicle) your
vehicle can be flat towed (all wheels on the ground) under the following
conditions:
•Place the transmission in N (Neutral).
•Maximum speed is 56 km/h (35 mph).
•Maximum distance is 80 km (50 miles).
Driving
154
Page 159 of 240
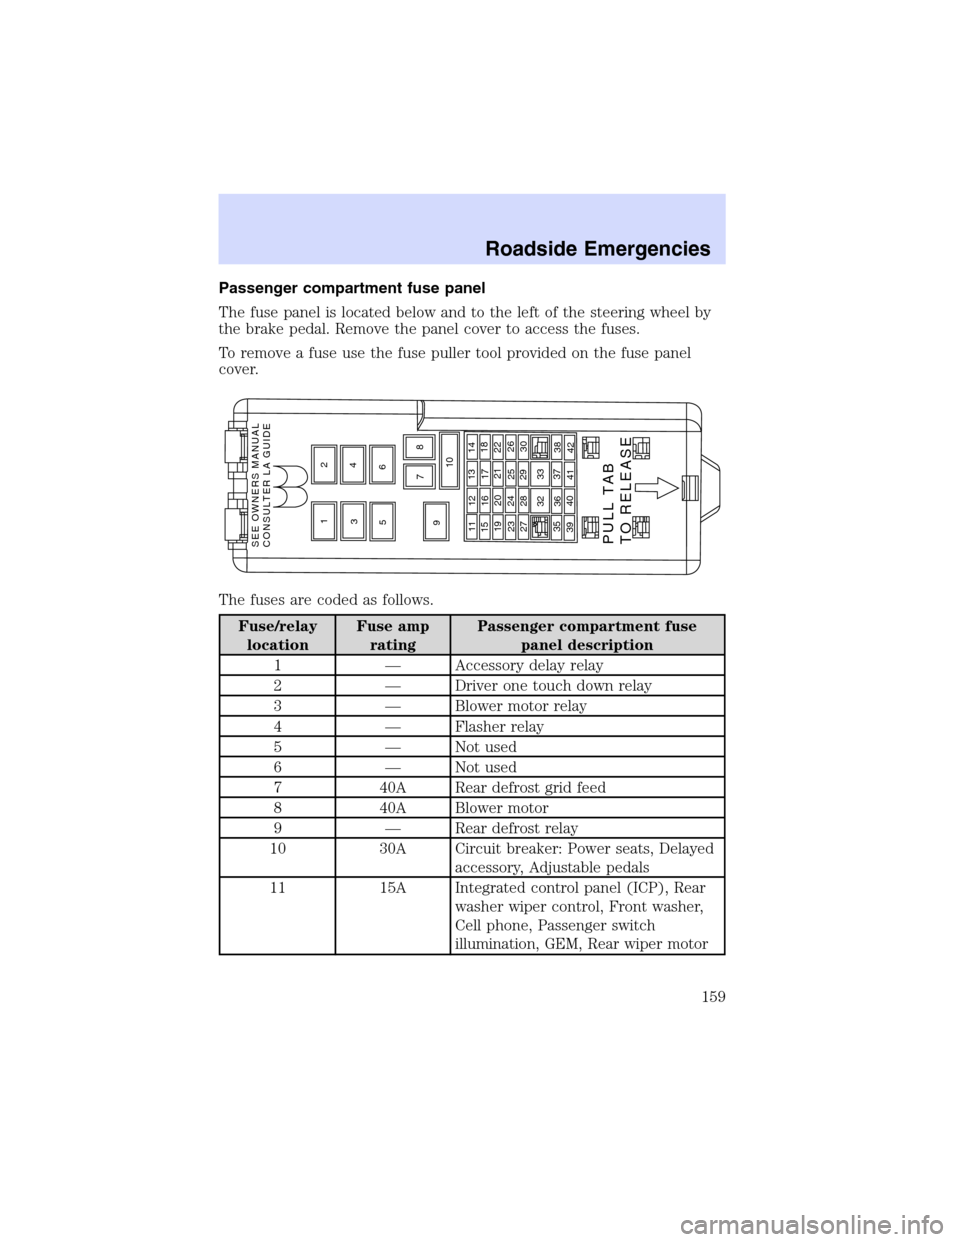
Passenger compartment fuse panel
The fuse panel is located below and to the left of the steering wheel by
the brake pedal. Remove the panel cover to access the fuses.
To remove a fuse use the fuse puller tool provided on the fuse panel
cover.
The fuses are coded as follows.
Fuse/relay
locationFuse amp
ratingPassenger compartment fuse
panel description
1—Accessory delay relay
2—Driver one touch down relay
3—Blower motor relay
4—Flasher relay
5—Not used
6—Not used
7 40A Rear defrost grid feed
8 40A Blower motor
9—Rear defrost relay
10 30A Circuit breaker: Power seats, Delayed
accessory, Adjustable pedals
11 15A Integrated control panel (ICP), Rear
washer wiper control, Front washer,
Cell phone, Passenger switch
illumination, GEM, Rear wiper motor
12
34
56
78
9
10
11 1213 14
15
16 1718
19 2021 22
2324
2526
27 2829
30
32 33
35
3637
38
39 40
41
42
PULL TAB
TO RELEASE SEE OWNERS MANUAL
CONSULTER LA GUIDE
Roadside Emergencies
159
Page 161 of 240
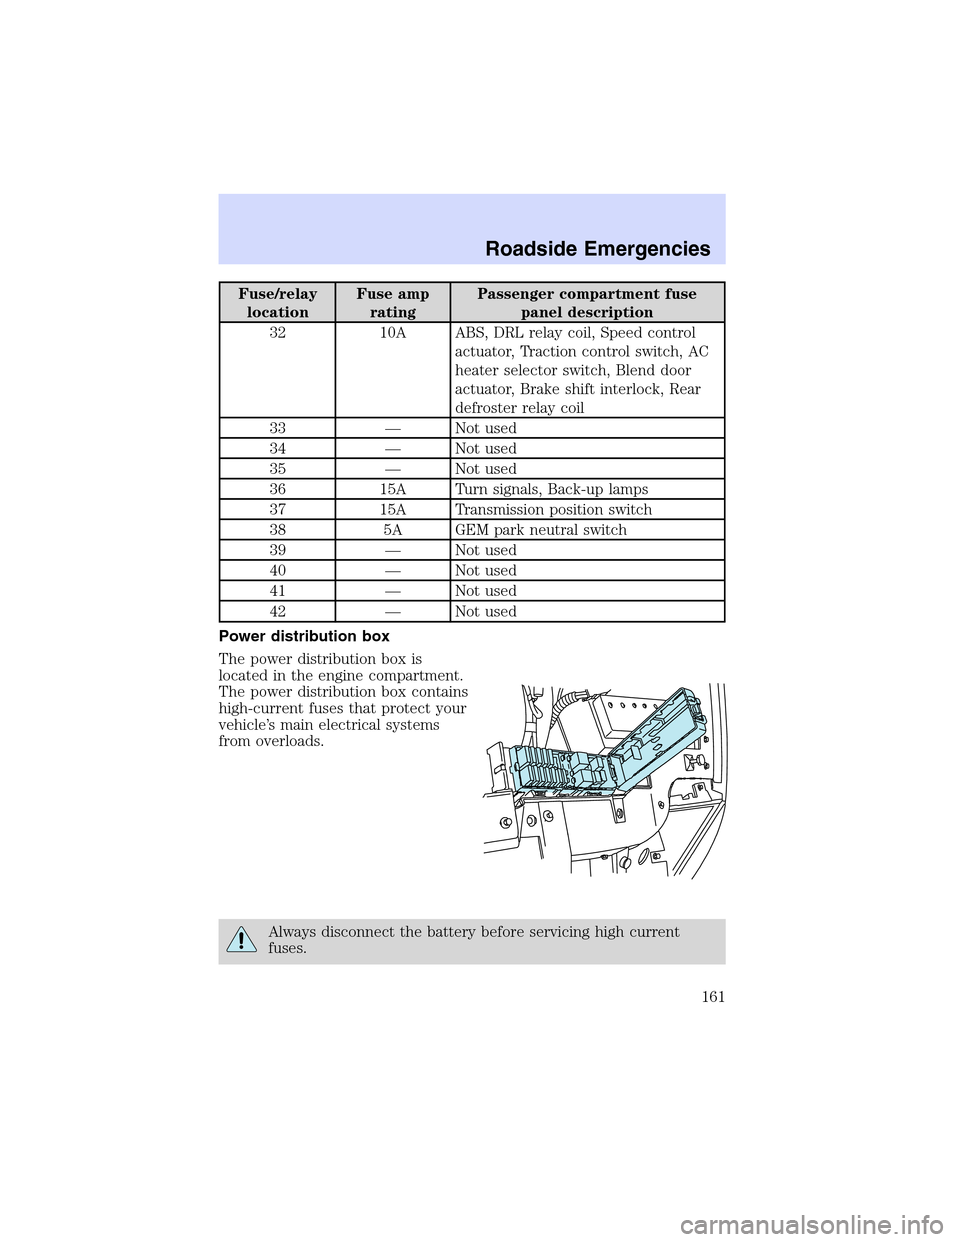
Fuse/relay
locationFuse amp
ratingPassenger compartment fuse
panel description
32 10A ABS, DRL relay coil, Speed control
actuator, Traction control switch, AC
heater selector switch, Blend door
actuator, Brake shift interlock, Rear
defroster relay coil
33—Not used
34—Not used
35—Not used
36 15A Turn signals, Back-up lamps
37 15A Transmission position switch
38 5A GEM park neutral switch
39—Not used
40—Not used
41—Not used
42—Not used
Power distribution box
The power distribution box is
located in the engine compartment.
The power distribution box contains
high-current fuses that protect your
vehicle’s main electrical systems
from overloads.
Always disconnect the battery before servicing high current
fuses.
Roadside Emergencies
161
Page 163 of 240
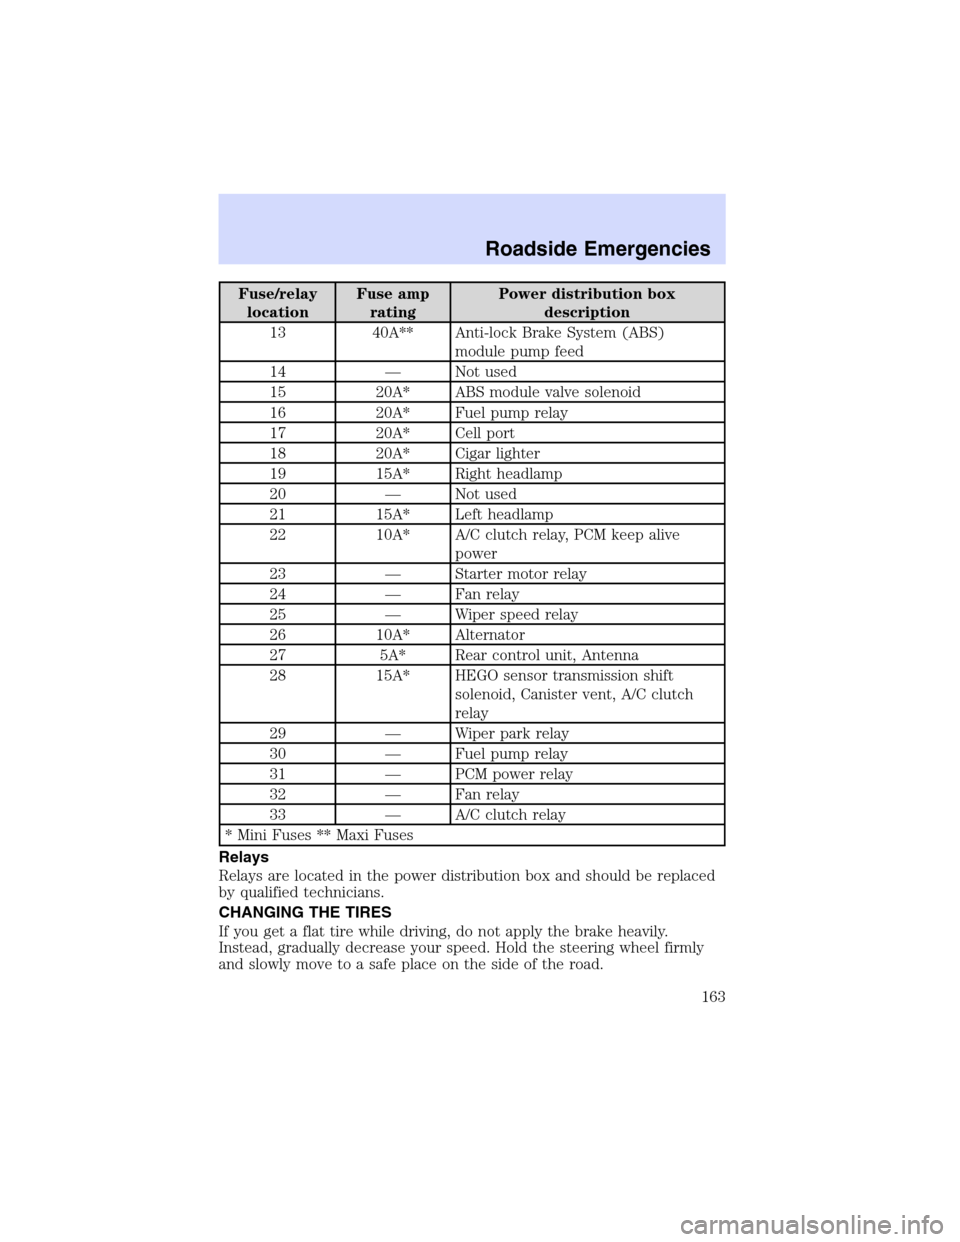
Fuse/relay
locationFuse amp
ratingPower distribution box
description
13 40A** Anti-lock Brake System (ABS)
module pump feed
14—Not used
15 20A* ABS module valve solenoid
16 20A* Fuel pump relay
17 20A* Cell port
18 20A* Cigar lighter
19 15A* Right headlamp
20—Not used
21 15A* Left headlamp
22 10A* A/C clutch relay, PCM keep alive
power
23—Starter motor relay
24—Fan relay
25—Wiper speed relay
26 10A* Alternator
27 5A* Rear control unit, Antenna
28 15A* HEGO sensor transmission shift
solenoid, Canister vent, A/C clutch
relay
29—Wiper park relay
30—Fuel pump relay
31—PCM power relay
32—Fan relay
33—A/C clutch relay
* Mini Fuses ** Maxi Fuses
Relays
Relays are located in the power distribution box and should be replaced
by qualified technicians.
CHANGING THE TIRES
If you get a flat tire while driving, do not apply the brake heavily.
Instead, gradually decrease your speed. Hold the steering wheel firmly
and slowly move to a safe place on the side of the road.
Roadside Emergencies
163