fuel Mercury Sable 2003 s User Guide
[x] Cancel search | Manufacturer: MERCURY, Model Year: 2003, Model line: Sable, Model: Mercury Sable 2003Pages: 216, PDF Size: 1.66 MB
Page 112 of 216

Make sure the corresponding lights illuminate or illuminate briefly. If a
light fails to illuminate, have the vehicle serviced.
•If the driver’s safety belt is fastened, the
light may not illuminate.
Starting the engine
Note:Whenever you start your vehicle, release the key as soon as the
engine starts. Excessive cranking could damage the starter.
1. Turn the key to 5 (START)
without pressing the accelerator
pedal and release as soon as the
engine starts. The key will return to
4 (ON).
2. If the temperature is above -12°C
(10°F) and the engine does not
start within five seconds on the first
try, turn the key to OFF, wait 10 seconds and try again.
3. If the temperature is below -12°C (10°F) and the engine does not
start in 15 seconds on the first try, turn the key OFF and wait 10
seconds and try again. If the engine does not start in two attempts, Press
the accelerator pedal all the way to floor and hold. Turn the key to
START position.
4. When the engine starts, release the key, then release the accelerator
pedal gradually as the engine speeds up.
5. After idling for a few seconds, apply the brake, shift into gear and
drive.
Cold weather starting (flexible fuel vehicles only)
In cold weather, ethanol fuel distributors should supply winter grade
(E
d85) ethanol. If summer grade (Ed85) ethanol is used in cold weather,
you may experience increased cranking times, rough idle or hesitation
until the engine has warmed up. Consult your fuel distributor for the
availability of winter grade (E
d85) ethanol. High-quality blends of winter
grade (E
d85) ethanol will produce satisfactory cold weather starting and
driving results.
Cold starting performance can also be improved by using an engine block
heater. Engine block heaters are available as an option and can be
obtained from your Ford dealer. Consult the engine block heater section
for proper use of the engine block heater.
3
4
1 2
5
Driving
112
Page 113 of 216
If you experience cold weather starting problems on (Ed85) ethanol, and
neither an alternative brand of (E
d85) ethanol nor an engine block
heater is available, adding unleaded gasoline to your tank will improve
cold starting performance. Your vehicle is designed to operate on (E
d85)
ethanol, unleaded gasoline alone, or any mixture of the two.
If the engine fails to start using the preceding instructions (flexible
fuel vehicles only)
1. Press and hold down the accelerator 1/3 to 1/2 way to floor, then
crank the engine.
2. When the engine starts, release the key, then gradually release the
accelerator pedal as the engine speeds up. If the engine still fails to start,
repeat Step 1.
Using the engine block heater (if equipped)
An engine block heater warms the engine coolant which aids in starting
and heater/defroster performance. Use of an engine block heater is
strongly recommended if you live in a region where temperatures reach
-23°C (-10°F) or below. For best results, plug the heater in at least
three hours before starting the vehicle. The heater can be plugged in the
night before starting the vehicle.
To reduce the risk of electrical shock, do not use your heater
with ungrounded electrical systems or two-pronged (cheater)
adapters.
Guarding against exhaust fumes
Carbon monoxide is present in exhaust fumes. Take precautions to avoid
its dangerous effects.
If you smell exhaust fumes inside your vehicle, have your dealer
inspect your vehicle immediately. Do not drive if you smell
exhaust fumes.
Important ventilating information
If the engine is idling while the vehicle is stopped for a long period of
time, open the windows at least 2.5 cm (one inch) or adjust the heating
or air conditioning to bring in fresh air.
Driving
113
Page 118 of 216

Driving with an automatic overdrive transaxle
Your automatic overdrive transaxle
provides fully automatic operation in
either
(Overdrive) or D (Drive).
Driving with the gearshift lever
in
(Overdrive) gives the best
fuel economy for normal driving
conditions. For manual control, start
in 1 (First) and then shift manually.
If your vehicle is equipped with a
console-mounted gearshift lever, you
must press the thumb button on the
side of the gearshift lever to move
the gearshift lever from P (Park).
To put your vehicle in gear, start the
engine, depress the brake pedal,
then move the gearshift lever out of
P (Park).
Hold the brake pedal down while you move the gearshift lever
from P (Park) to another position. If you do not hold the brake
pedal down, your vehicle may move unexpectedly and injure someone.
Driving
118
Page 120 of 216
Always set the parking brake fully and make sure the gearshift is
latched in P (Park). Turn the ignition to the LOCK position and
remove the key whenever you leave your vehicle.
R (Reverse)
With the gearshift lever in R (Reverse), the vehicle will move backward.
Always come to a complete stop before shifting into and out of R
(Reverse).
N (Neutral)
With the gearshift lever in N (Neutral), the vehicle can be started and is
free to roll. Hold the brake pedal down while in this position.
(Overdrive)
The normal driving position for the best fuel economy. The transaxle
operates in gears one through four.
D (Drive)
•This position allows for all forward gears except overdrive.
•Provides more engine braking than
(Overdrive).
•Use when driving conditions cause excessive shifting from O/D to
other gears. Examples: city traffic, hilly terrain, heavy loads, trailer
towing and when engine braking is required.
1 (First)
•Provides maximum engine braking.
•Allows upshifts by moving gearshift lever.
•Will not downshift into 1 (First) at high speeds; allows for 1 (First)
when vehicle reaches slower speeds.
When parking, do not use the gearshift in place of the parking
brake. Always set the parking brake fully and make sure that the
gearshift is securely latched in Park (P). Turn off the ignition
whenever you leave your vehicle. Never leave your vehicle unattended
while it is running. If you do not take these precautions, your vehicle
may move unexpectedly and injure someone.
If your vehicle gets stuck in mud or snow
If your vehicle gets stuck in mud or snow, it may be rocked out by
shifting from forward and reverse gears, stopping between shifts in a
steady pattern. Press lightly on the accelerator in each gear.
Driving
120
Page 127 of 216
GETTING ROADSIDE ASSISTANCE
To fully assist you should you have a vehicle concern, Ford Motor
Company offers a complimentary roadside assistance program. This
program is separate from the New Vehicle Limited Warranty. The service
is available:
•24–hours, seven days a week
•for the New Vehicle Limited Warranty period of three years or 60,000
km (36,000 miles), whichever occurs first on Ford and Mercury
vehicles, and four years or 80,000 km (50,000 miles) on Lincoln
vehicles.
Roadside assistance will cover:
•changing a flat tire
•jump-starts
•lock-out assistance
•limited fuel delivery
•towing of your disabled vehicle to the nearest Ford Motor Company
dealership, or your selling dealer if within 56.3 km (35 miles) of the
nearest Ford Motor Company dealership (one tow per disablement).
Even non-warranty related tows, like accidents or getting stuck in the
mud or snow, are covered (some exclusions apply, such as impound
towing or repossession).
Canadian customers refer to your Owner Information Guide for
information on:
•coverage period
•exact fuel amounts
•towing of your disabled vehicle
•emergency travel expense reimbursement
•travel planning benefits
USING ROADSIDE ASSISTANCE
Complete the roadside assistance identification card and place it in your
wallet for quick reference. In the United States, this card is found in the
Owner Guide portfolio in the glove compartment in Ford vehicles and is
mailed to you if you own a Mercury or Lincoln. In Canada, the card is
found in the Owner Information Guide in the glove compartment.
U.S. Ford or Mercury vehicle customers who require roadside assistance,
call 1–800–241–3673; Lincoln vehicle customers call 1–800–521–4140.
Roadside Emergencies
Roadside Emergencies
127
Page 128 of 216
Canadian customers who require roadside assistance, call
1–800–665–2006.
If you need to arrange roadside assistance for yourself, Ford Motor
Company will reimburse a reasonable amount. To obtain reimbursement
information, U.S. Ford or Mercury vehicles customers call
1-800-241-3673; Lincoln vehicle customers call 1–800–521–4140.
Canadian customers who need to obtain reimbursement information, call
1–800–665–2006.
ROADSIDE COVERAGE BEYOND BASIC WARRANTY
In the United States, you may purchase additional roadside assistance
coverage beyond this period through the Ford Auto Club by contacting
your Ford or Lincoln Mercury dealer.
Similarly in Canada, for uninterrupted Roadside Assistance coverage, you
may purchase extended coverage prior to your Basic Warranty’s Roadside
Assistance expiring. For more information and enrollment, contact
1–877–294–2582 or visit our website at www.ford.ca.
HAZARD FLASHER
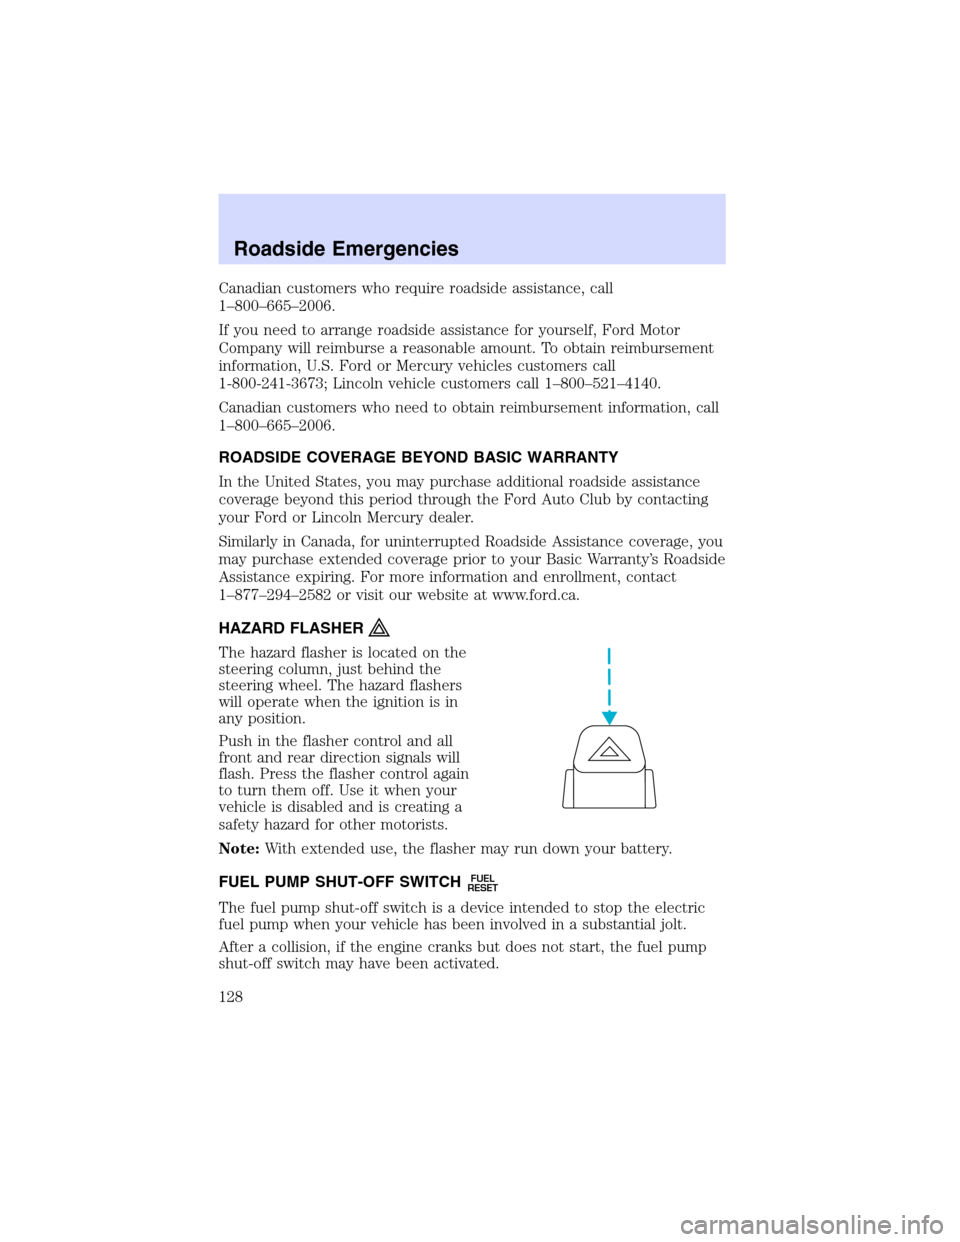
The hazard flasher is located on the
steering column, just behind the
steering wheel. The hazard flashers
will operate when the ignition is in
any position.
Push in the flasher control and all
front and rear direction signals will
flash. Press the flasher control again
to turn them off. Use it when your
vehicle is disabled and is creating a
safety hazard for other motorists.
Note:With extended use, the flasher may run down your battery.
FUEL PUMP SHUT-OFF SWITCH
FUEL
RESET
The fuel pump shut-off switch is a device intended to stop the electric
fuel pump when your vehicle has been involved in a substantial jolt.
After a collision, if the engine cranks but does not start, the fuel pump
shut-off switch may have been activated.
Roadside Emergencies
128
Page 129 of 216
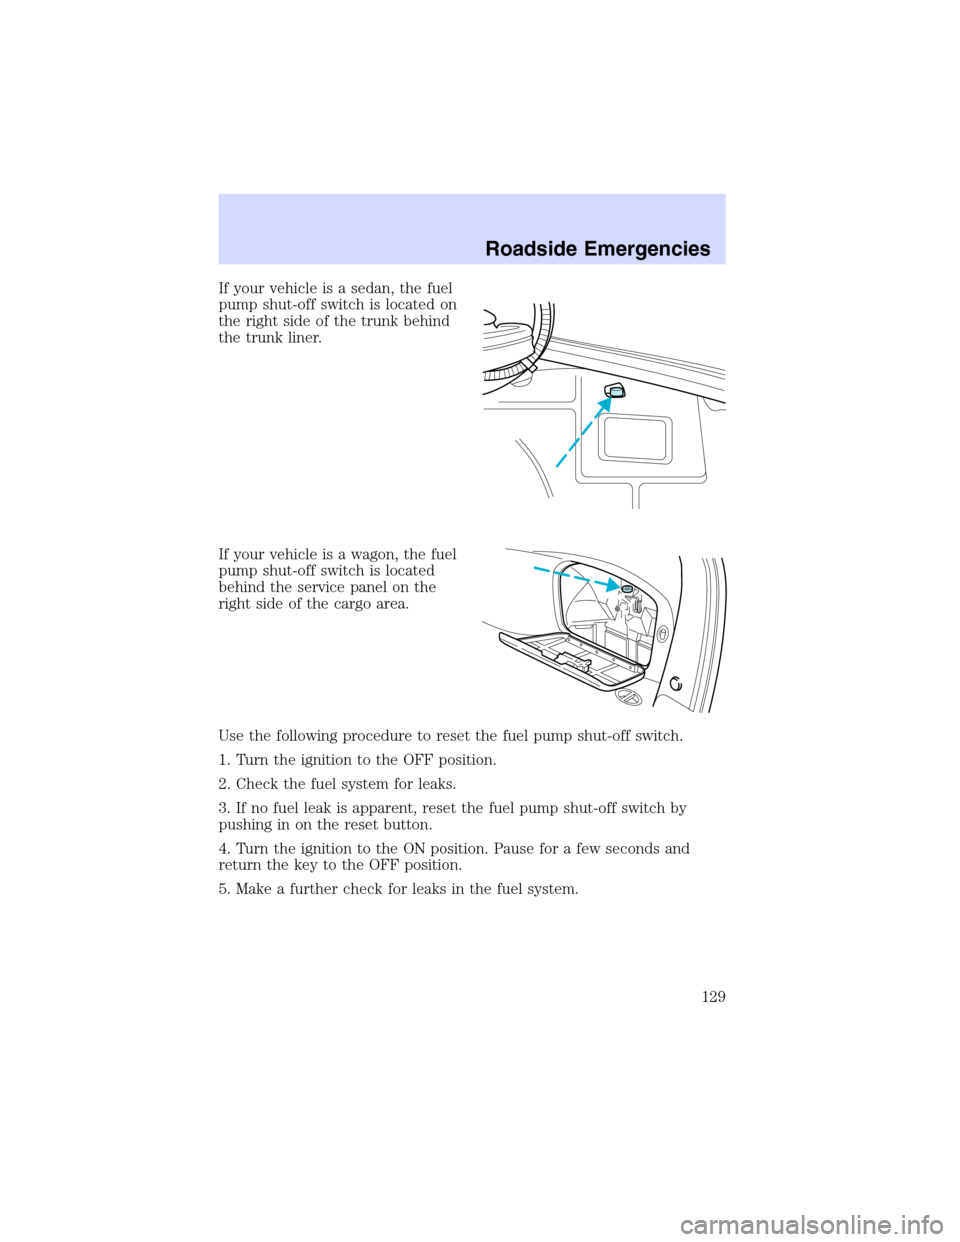
If your vehicle is a sedan, the fuel
pump shut-off switch is located on
the right side of the trunk behind
the trunk liner.
If your vehicle is a wagon, the fuel
pump shut-off switch is located
behind the service panel on the
right side of the cargo area.
Use the following procedure to reset the fuel pump shut-off switch.
1. Turn the ignition to the OFF position.
2. Check the fuel system for leaks.
3. If no fuel leak is apparent, reset the fuel pump shut-off switch by
pushing in on the reset button.
4. Turn the ignition to the ON position. Pause for a few seconds and
return the key to the OFF position.
5. Make a further check for leaks in the fuel system.
Roadside Emergencies
129
Page 132 of 216
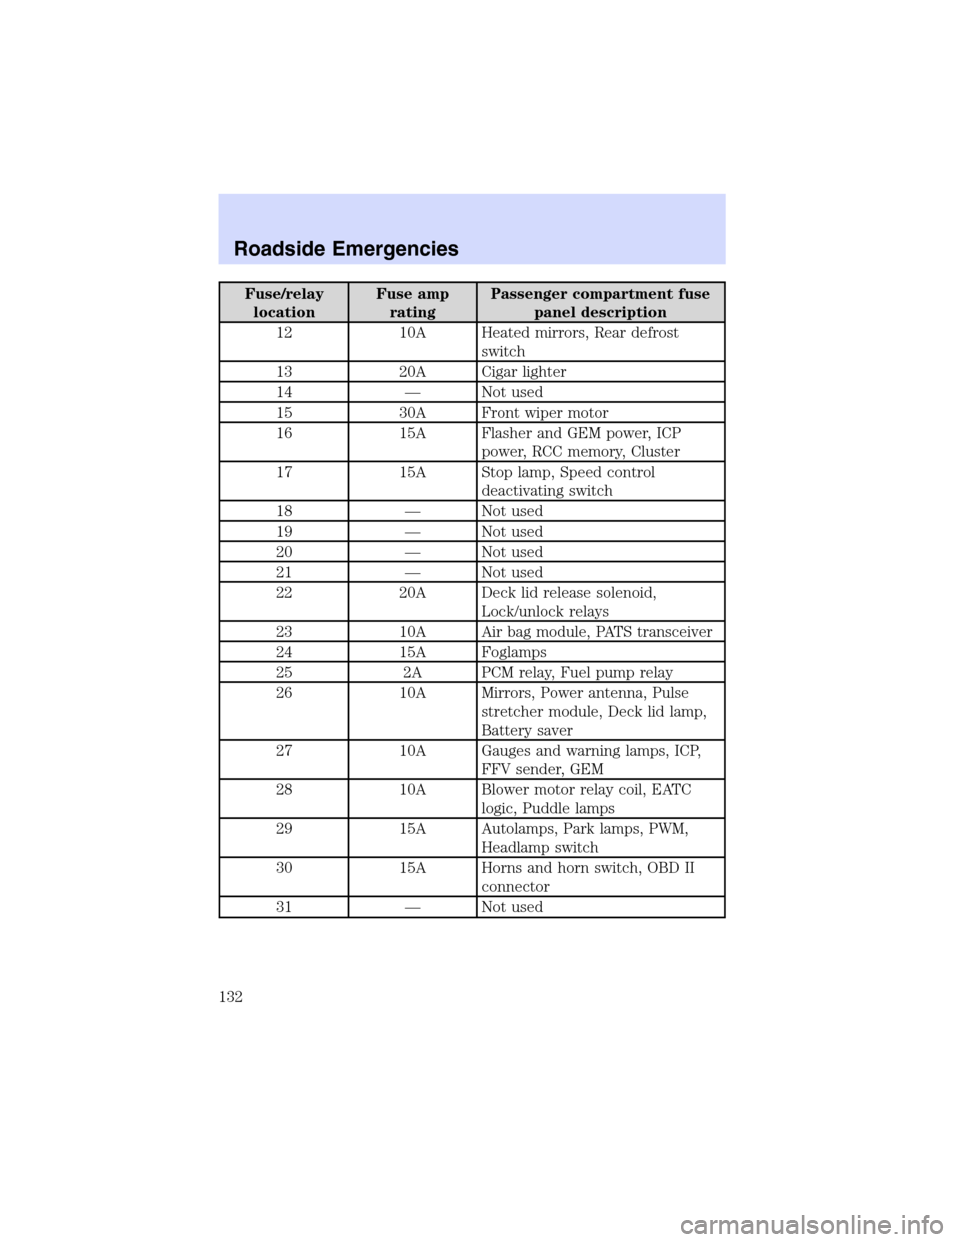
Fuse/relay
locationFuse amp
ratingPassenger compartment fuse
panel description
12 10A Heated mirrors, Rear defrost
switch
13 20A Cigar lighter
14—Not used
15 30A Front wiper motor
16 15A Flasher and GEM power, ICP
power, RCC memory, Cluster
17 15A Stop lamp, Speed control
deactivating switch
18—Not used
19—Not used
20—Not used
21—Not used
22 20A Deck lid release solenoid,
Lock/unlock relays
23 10A Air bag module, PATS transceiver
24 15A Foglamps
25 2A PCM relay, Fuel pump relay
26 10A Mirrors, Power antenna, Pulse
stretcher module, Deck lid lamp,
Battery saver
27 10A Gauges and warning lamps, ICP,
FFV sender, GEM
28 10A Blower motor relay coil, EATC
logic, Puddle lamps
29 15A Autolamps, Park lamps, PWM,
Headlamp switch
30 15A Horns and horn switch, OBD II
connector
31—Not used
Roadside Emergencies
132
Page 135 of 216
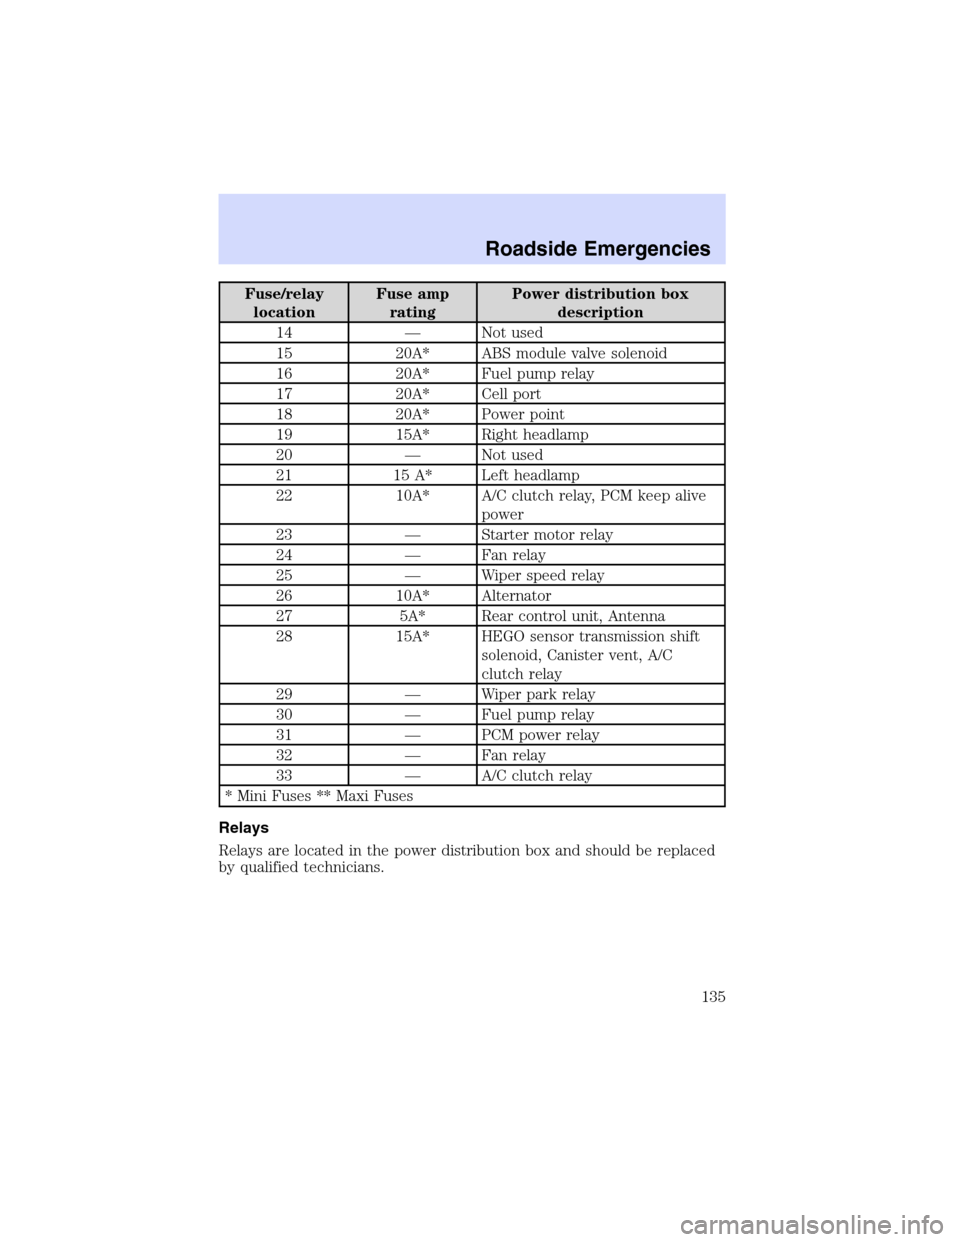
Fuse/relay
locationFuse amp
ratingPower distribution box
description
14—Not used
15 20A* ABS module valve solenoid
16 20A* Fuel pump relay
17 20A* Cell port
18 20A* Power point
19 15A* Right headlamp
20—Not used
21 15 A* Left headlamp
22 10A* A/C clutch relay, PCM keep alive
power
23—Starter motor relay
24—Fan relay
25—Wiper speed relay
26 10A* Alternator
27 5A* Rear control unit, Antenna
28 15A* HEGO sensor transmission shift
solenoid, Canister vent, A/C
clutch relay
29—Wiper park relay
30—Fuel pump relay
31—PCM power relay
32—Fan relay
33—A/C clutch relay
* Mini Fuses ** Maxi Fuses
Relays
Relays are located in the power distribution box and should be replaced
by qualified technicians.
Roadside Emergencies
135
Page 142 of 216

3. Connect the negative (-) cable to the negative (-) terminal of the
assisting battery.
4. Make the final connection of the negative (-) cable. Make the
connection to an exposed metal part of the stalled vehicle’s engine, away
from the battery and the carburetor/fuel injection system.Do notuse
fuel lines, engine rocker covers or the intake manifold asgrounding
points.
Do not connect the end of the second cable to the negative (-)
terminal of the battery to be jumped. A spark may cause an
explosion of the gases that surround the battery.
5. Ensure that the cables are clear of fan blades, belts, moving parts of
both engines, or any fuel delivery system parts.
+–+–
+–+–
Roadside Emergencies
142