window Mercury Villager 2002 s User Guide
[x] Cancel search | Manufacturer: MERCURY, Model Year: 2002, Model line: Villager, Model: Mercury Villager 2002Pages: 256, PDF Size: 1.91 MB
Page 85 of 256

Changing the wiper blades
To replace the wiper blades:
1. Pull the wiper arm away from the
windshield and lock into the service
position.
2. Turn the blade at an angle from
the wiper arm. Push the lock pin
manually to release the blade and
pull the wiper blade down toward
the windshield to remove it from the
arm.
3. Attach the new wiper to the
wiper arm and press it into place
until a click is heard.
Rear window wiper blade
Refer toWindshield wiper bladesin this section for more information
on rear wiper blades.
TILT STEERING WHEEL
Push the tilt steering wheel lever
downward to move the steering
wheel up or down. Push the lever
upward to lock the steering wheel in
position.
Never adjust the steering wheel when the vehicle is moving.
Driver Controls
85
Page 87 of 256

There are two auxiliary power points:
•One is located on the instrument
panel.
•The second is located in the
drivers side 2nd row trim panel.
POWER WINDOWS
•Press and hold the switch to
open.
•Pull up and hold the switch to
close.
DC
12V
AUTO
L VENT R
Driver Controls
87
Page 88 of 256

One touch down
•Press AUTO completely down and
release quickly. The driver’s
window will open fully. Depress
again to stop window operation.
Window lock
The window lock feature allows only
the driver to operate the power
windows.
To lock out all the window controls
except for the driver’s press the
control. Press the control again to
restore the window controls.
Accessory delay
With accessory delay, the window and moonroof switches may be used
for up to 15 minutes after the ignition switch is turned to the OFF
position or until either of the front doors are opened.
Power vent windows (if equipped)
Your vehicle may be equipped with
rear power vent windows which are
operated the same as the front
power windows.
AUTO
AUTO
L VENT R
Driver Controls
88
Page 89 of 256

POWER SIDE VIEW MIRRORS
The ignition must be in ACC or ON position to adjust the power side
view mirrors.
To adjust your mirrors:
1. Select L to adjust the left mirror
or R to adjust the right mirror.
2. Move the control in the direction
you wish to tilt the mirror.
3. Return to the center position to
lock mirrors in place.
Heated outside mirrors
R(if equipped)
Both mirrors are heated
automatically to remove ice, mist
and fog when the rear window
defrost is activated.
Do not remove ice from the
mirrors with a scraper or
attempt to readjust the mirror
glass if it is frozen in place.
These actions could cause
damage to the glass and mirrors.
MIRRORS
L R
MIRRORS
L R
Driver Controls
89
Page 104 of 256

Deactivating overdrive
Press the Transmission Control
Switch (TCS) located on the end of
the gearshift lever. The O/D OFF
indicator light will illuminate. The
transaxle will operate in all gears
except overdrive.
To return to normal overdrive mode, press the Transmission Control
Switch again. The O/D OFF indicator light will no longer be illuminated.
When you shut off and re-start your vehicle, the transaxle will
automatically return to normal D (Overdrive) mode.
For additional information about the gearshift lever and the transmission
control switch operation refer to theAutomatic Transaxle Operation
section of theDrivingchapter.
LIFTGATE
To open the liftgate window (if
equipped), insert key into lock and
turn clockwise. The window
unlatches and the wiper moves out
of the way.
To open the liftgate, insert key into
lock and turn counterclockwise. Pull
back and upward on liftgate handle
to fully open liftgate.
•The auto-rise feature automatically raises the liftgate or window (if
equipped). In cold weather you may have to assist opening the liftgate
or window since the auto-rise feature may slow down.
•Do not open the liftgate or liftgate window in a garage or other
enclosed area with a low ceiling. If the liftgate window is raised and
the liftgate is also opened, both liftgate and window could be damaged
against a low ceiling.
•The liftgate can be locked by turning the key clockwise in between
the upright key position and the liftgate window (if equipped) key
position. Do not turn the key fully clockwise unless you wish to open
the liftgate window (if equipped).
Make sure that the liftgate door and/or window are closed to
prevent exhaust fumes from being drawn into the vehicle. This
will also prevent passengers and cargo from falling out. If you must
drive with the liftgate door or window open, keep the vents open so
outside air comes into the vehicle.
OVERDRIVE
OFF/ON
Driver Controls
104
Page 158 of 256

seconds and try again. If the engine does not start in two attempts, Press
the accelerator pedal all the way to floor and hold. Turn the key to
START position.
4. When the engine starts, release the key, then release the accelerator
pedal gradually as the engine speeds up.
5. After idling for a few seconds, apply the brake, shift into gear and
drive.
Guarding against exhaust fumes
Although odorless and colorless, carbon monoxide is present in exhaust
fumes. Take precautions to avoid its dangerous effects.
If you ever smell exhaust fumes of any kind inside your vehicle,
have your dealer inspect and fix your vehicle immediately. Do
not drive if you smell exhaust fumes. These fumes are harmful and
could kill you.
Have the exhaust and body ventilation systems checked whenever:
•the vehicle is raised for service.
•the sound of the exhaust system changes.
•the vehicle has been damaged in a collision.
WARNING:Engine exhaust, some of its constituents, and
certain vehicle components contain or emit chemicals known to
the State of California to cause cancer and birth defects or other
reproductive harm. In addition, certain fluids contained in vehicles and
certain products of component wear contain or emit chemicals known
to the State of California to cause cancer and birth defects or other
reproductive harm.
Important ventilating information
If the engine is idling while the vehicle is stopped in an open area for
long periods of time, open the windows at least 2.5 cm (one inch).
Adjust the heating or air conditioning to bring in fresh air.
Improve vehicle ventilation by keeping all air inlet vents clear of snow,
leaves and other debris.
BRAKES
Your service brakes are self-adjusting. Refer to the scheduled
maintenance guide for scheduled maintenance.
Driving
158
Page 179 of 256

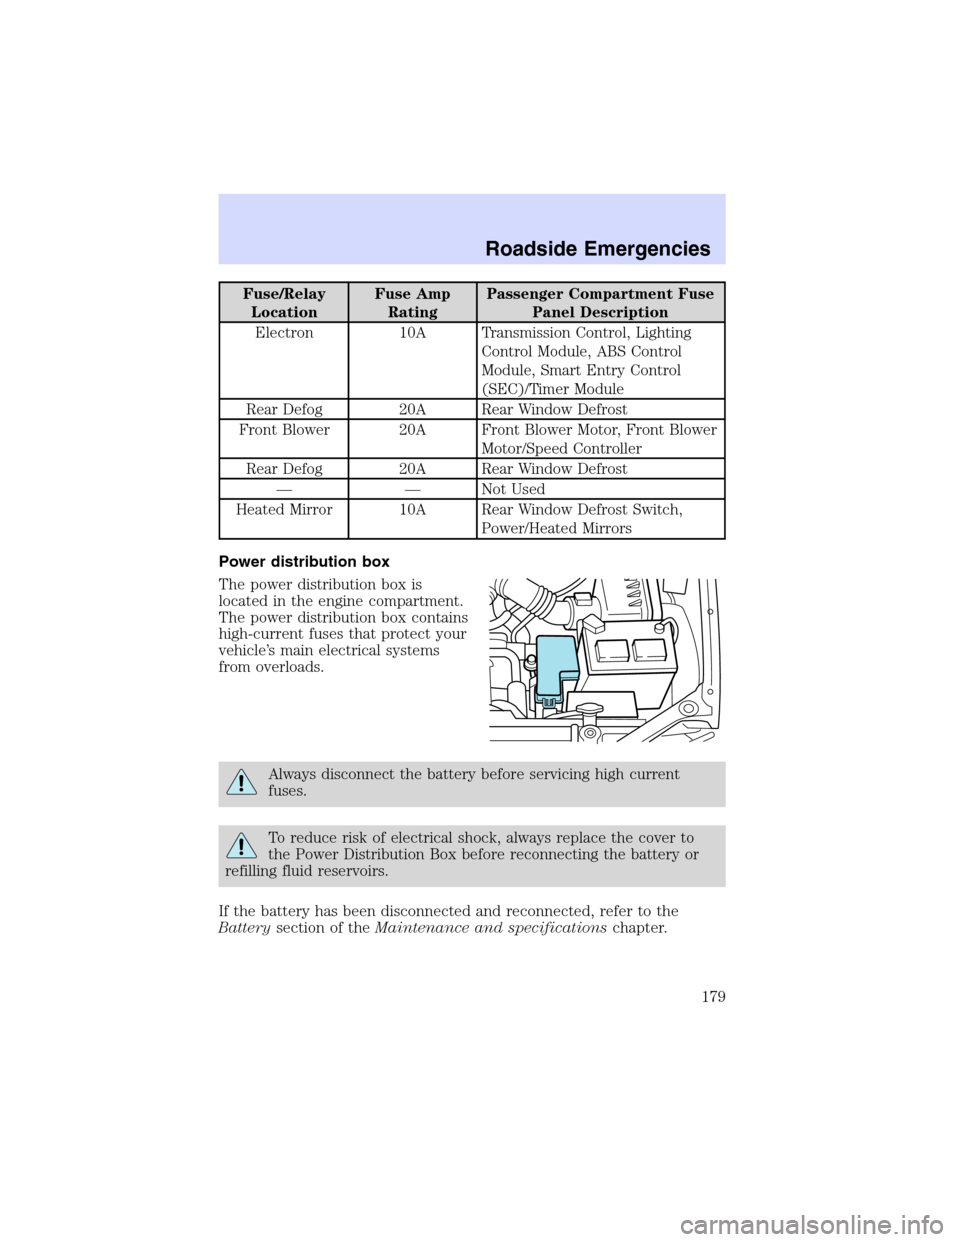
Fuse/Relay
LocationFuse Amp
RatingPassenger Compartment Fuse
Panel Description
Electron 10A Transmission Control, Lighting
Control Module, ABS Control
Module, Smart Entry Control
(SEC)/Timer Module
Rear Defog 20A Rear Window Defrost
Front Blower 20A Front Blower Motor, Front Blower
Motor/Speed Controller
Rear Defog 20A Rear Window Defrost
——Not Used
Heated Mirror 10A Rear Window Defrost Switch,
Power/Heated Mirrors
Power distribution box
The power distribution box is
located in the engine compartment.
The power distribution box contains
high-current fuses that protect your
vehicle’s main electrical systems
from overloads.
Always disconnect the battery before servicing high current
fuses.
To reduce risk of electrical shock, always replace the cover to
the Power Distribution Box before reconnecting the battery or
refilling fluid reservoirs.
If the battery has been disconnected and reconnected, refer to the
Batterysection of theMaintenance and specificationschapter.
Roadside Emergencies
179
Page 181 of 256

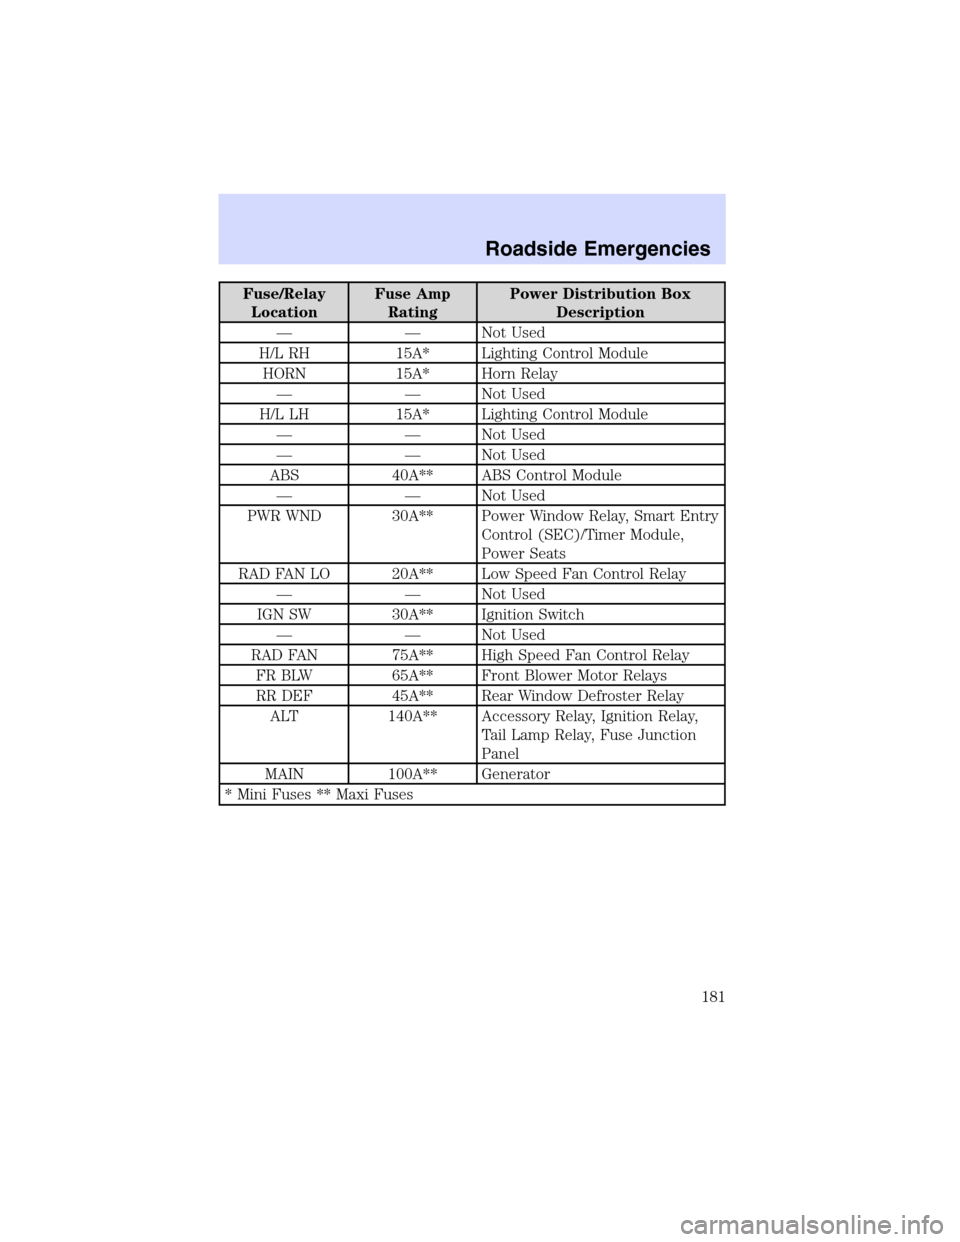
Fuse/Relay
LocationFuse Amp
RatingPower Distribution Box
Description
——Not Used
H/L RH 15A* Lighting Control Module
HORN 15A* Horn Relay
——Not Used
H/L LH 15A* Lighting Control Module
——Not Used
——Not Used
ABS 40A** ABS Control Module
——Not Used
PWR WND 30A** Power Window Relay, Smart Entry
Control (SEC)/Timer Module,
Power Seats
RAD FAN LO 20A** Low Speed Fan Control Relay
——Not Used
IGN SW 30A** Ignition Switch
——Not Used
RAD FAN 75A** High Speed Fan Control Relay
FR BLW 65A** Front Blower Motor Relays
RR DEF 45A** Rear Window Defroster Relay
ALT 140A** Accessory Relay, Ignition Relay,
Tail Lamp Relay, Fuse Junction
Panel
MAIN 100A** Generator
* Mini Fuses ** Maxi Fuses
Roadside Emergencies
181
Page 206 of 256

WINDOWS AND WIPER BLADES
The windshield, rear window and wiper blades should be cleaned
regularly. If the wiper does not wipe properly, substances on the
windshield, rear window or the wiper blades may be the cause. These
may include hot wax treatments used by commercial car washes, tree
sap, or other organic contamination. To clean these items, please follow
these tips:
•The windshield or rear window may be cleaned with a non-abrasive
cleaner such as Motorcraft Ultra Clear Spray Glass Cleaner (ZC-23),
available from your dealer.
•Do not use abrasives, as they may cause scratches.
•Do not use fuel, kerosene, or paint thinner to clean any parts.
•Wiper blades can be cleaned with isopropyl (rubbing) alcohol or
windshield washer solution. Be sure to replace wiper blades when they
appear worn or do not function properly.
INSTRUMENT PANEL AND CLUSTER LENS
Clean the instrument panel with a damp cloth, then dry with a dry cloth.
•Avoid cleaners or polish that increase the gloss of the upper portion of
the instrument panel. The dull finish in this area helps protect the
driver from undesirable windshield reflection.
Do not use chemical solvents or strong detergents when cleaning
the steering wheel or instrument panel to avoid contamination of
the air bag system.
•Be certain to wash or wipe your hands clean if you have been in
contact with certain products such as insect repellent and suntan
lotion in order to avoid possible damage to the painted surfaces.
Cleaning
206
Page 228 of 256

•Resting your foot on the brake pedal while driving may reduce fuel
economy.
•Combine errands and minimize stop-and-go driving.
Maintenance
•Keep tires properly inflated and use only recommended size.
•Operating a vehicle with the wheels out of alignment will reduce fuel
economy.
•Use recommended engine oil. Refer toLubricant specificationsin
this chapter.
•Perform all regularly scheduled maintenance items. Follow the
recommended maintenance schedule and owner maintenance checks
found in your vehicle scheduled maintenance guide.
Conditions
•Heavily loading a vehicle or towing a trailer may reduce fuel economy
at any speed.
•Carrying unnecessary weight may reduce fuel economy (approximately
0.4 km/L [1 mpg] is lost for every 180 kg [400 lb] of weight carried).
•Adding certain accessories to your vehicle (for example bug
deflectors, rollbars/light bars, running boards, ski/luggage racks) may
reduce fuel economy.
•Using fuel blended with alcohol may lower fuel economy.
•Fuel economy may decrease with lower temperatures during the first
12–16 km (8–10 miles) of driving.
•Driving on flat terrain offers improved fuel economy as compared to
driving on hilly terrain.
•Transmissions give their best fuel economy when operated in the top
cruise gear and with steady pressure on the gas pedal.
•Close windows for high speed driving.
EPA window sticker
Every new vehicle should have the EPA window sticker. Contact your
dealer if the window sticker is not supplied with your vehicle. The EPA
window sticker should be your guide for the fuel economy comparisons
with other vehicles.
It is important to note the box in the lower left corner of the window
sticker. These numbers represent the Range of L/100 km (MPG)
expected on the vehicle under optimum conditions. Your fuel economy
may vary depending upon the method of operation and conditions.
Maintenance and Specifications
228