ESP MINI 3 door 2014 User Guide
[x] Cancel search | Manufacturer: MINI, Model Year: 2014, Model line: 3 door, Model: MINI 3 door 2014Pages: 240, PDF Size: 11.05 MB
Page 52 of 240
AdjustingVehicle features and op‐
tions
This chapter describes all standard, country-
specific and optional features offered with the
series. It also describes features that are not
necessarily available in your car, e. g., due to
the selected options or country versions. This
also applies to safety-related functions and sys‐
tems.
Sitting safely The ideal seating position can make a vital con‐
tribution to relaxed, fatigue-free driving.
The seating position plays an important role in
an accident in combination with:▷Safety belts, refer to page 50.▷Head restraints, refer to page 52.▷Airbags, refer to page 93.
Seats
Hints Do not adjust the seat while driving
Do not adjust the driver's seat while driv‐
ing, or the seat could respond with unexpected
movement and the ensuing loss of vehicle con‐
trol could lead to an accident. ◀
Do not incline the backrest too far to the
rear
Also on the front passenger side, do not incline
the backrest on the front passenger side too far to the rear while driving, or there is a risk of
slipping under the safety belt in the event of an
accident. This would eliminate the protection
normally provided by the belt. ◀
Keep the movement area unobstructed
When changing the seat position, keep
the seat's area of movement unobstructed;
otherwise, people might get injured or objects
damaged. ◀
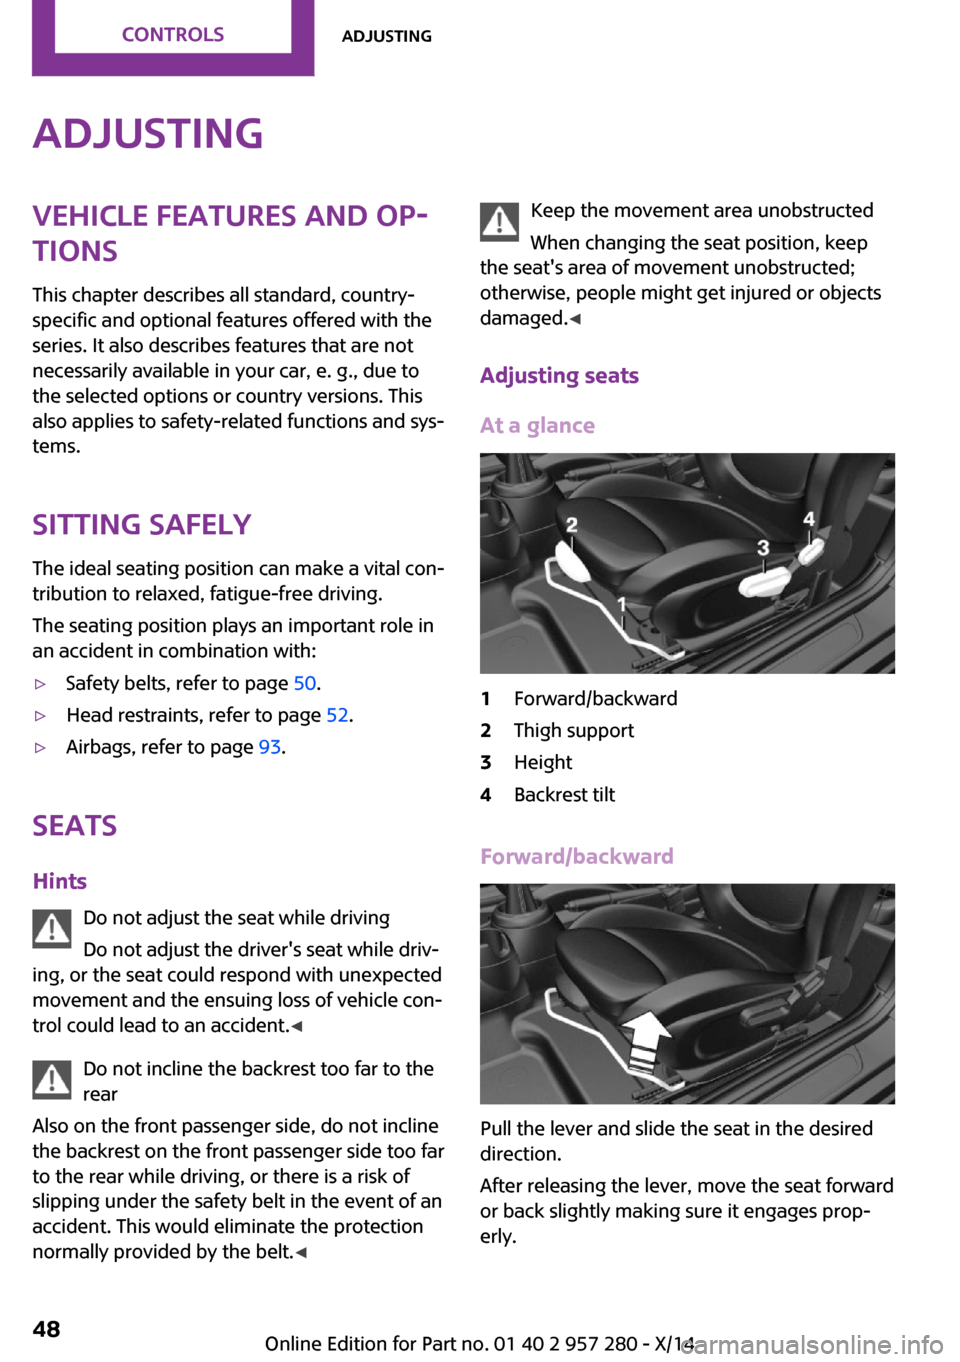
Adjusting seats At a glance1Forward/backward2Thigh support3Height4Backrest tilt
Forward/backward
Pull the lever and slide the seat in the desired
direction.
After releasing the lever, move the seat forward
or back slightly making sure it engages prop‐
erly.
Seite 48CONTROLSAdjusting48
Online Edition for Part no. 01 40 2 957 280 - X/14
Page 58 of 240
Estimating distances correctly
Objects reflected in the mirror are closer
than they appear. Do not estimate the distance
to the traffic behind you based on what you see
in the mirror, as this will increase your risk of an
accident. ◀
Depending on the car's features, the mirror set‐
ting is stored in the applicable remote control.
When the vehicle is unlocked via the remote
control, the position is automatically retrieved if
this function is active.
Selecting a mirror To change over to the other mirror:
Slide the switch.
Adjusting electrically The setting corresponds to the direction
in which the button is pressed.
Adjusting manually In case of electrical malfunction press edges of
mirror.
Automatic Curb Monitor The concept
If reverse gear is engaged, the mirror glass on
the front passenger side is tilted downward.
This improves your view of the curb and other
low-lying obstacles when parking, e.g.
Activating1. Slide the switch to the driver's side
mirror position.2.Engage selector lever position R.
Deactivating
Slide the switch to the passenger side mirror
position.
Fold in and out
Press button.
Possible at speeds up to approx.
15 mph/20 km/h.
E. g. this is advantageous▷In car washes.▷In narrow streets.▷For folding mirrors back out that were
folded away manually.
Mirrors that were folded in are folded out auto‐
matically at a speed of approx.
25 mph/40 km/h.
Fold in the mirror in a car wash
Before washing the car in an automatic
car wash, fold in the exterior mirrors by hand or
with the button; otherwise, the mirrors could
be damaged, depending on the width of the
vehicle. ◀
Automatic heating
Both exterior mirrors are automatically heated
whenever the engine is running.
Automatic dimming featureBoth exterior mirrors are automatically dim‐
med. Photocells are used to control the Interior rearview mirror, refer to page 55.
Seite 54CONTROLSAdjusting54
Online Edition for Part no. 01 40 2 957 280 - X/14
Page 62 of 240
and CRS weight of 65 lb when the child is re‐
strained by the internal harnesses.
Properly engage the lower LATCH an‐chors
Make sure that the lower LATCH anchors have
properly engaged and that the child restraint
system is resting snugly against the backrest;
otherwise, the degree of protection may be re‐
duced. ◀
Before mounting the LATCH child restraint sys‐
tem, pull the belt away from the child restraint
system.
Position
Attach to the lower LATCH anchors located be‐
hind the indicated covers.
The corresponding symbol shows the
mounts for the lower LATCH anchors.
Assembly of LATCH child restraint
systems
1.Mount the child restraint system; refer to
the user's manual of the system.2.Ensure that both LATCH anchors are prop‐
erly connected.Child restraint fixing system with a
tether strap
Note Mounting eyelets
Use the mounting eyes only for the upper
retaining strap to secure child restraint systems;
otherwise, the mounting eyes could be dam‐
aged. ◀
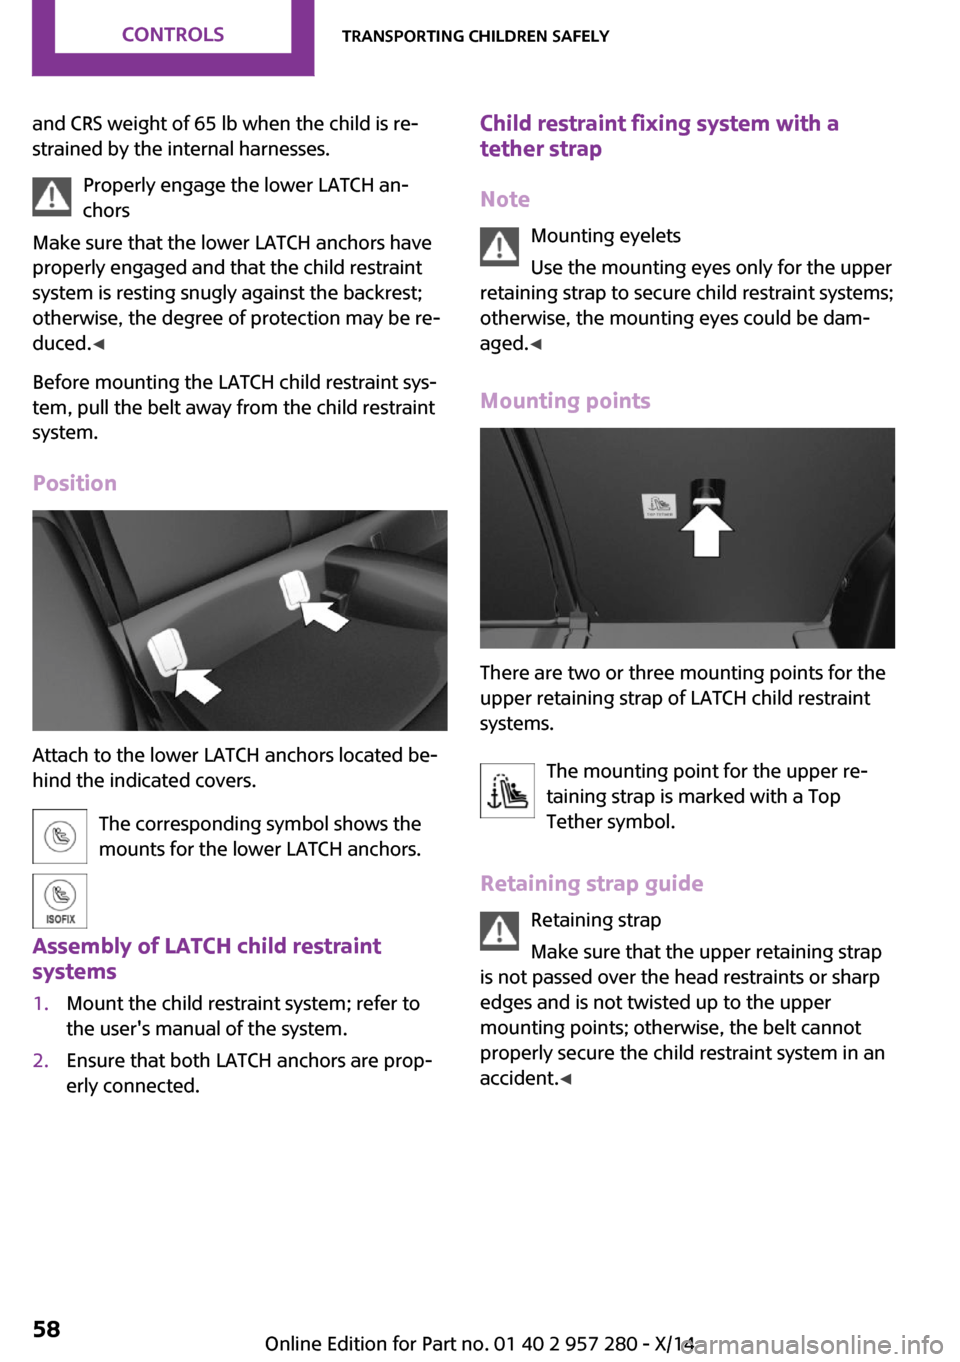
Mounting points
There are two or three mounting points for the
upper retaining strap of LATCH child restraint
systems.
The mounting point for the upper re‐
taining strap is marked with a Top
Tether symbol.
Retaining strap guide Retaining strap
Make sure that the upper retaining strap
is not passed over the head restraints or sharp edges and is not twisted up to the upper
mounting points; otherwise, the belt cannot
properly secure the child restraint system in an
accident. ◀
Seite 58CONTROLSTransporting children safely58
Online Edition for Part no. 01 40 2 957 280 - X/14
Page 74 of 240
The selected gear is briefly displayed in the in‐
strument cluster, followed by the currently se‐
lected gear.
Manual mode M/S: prevent automatic
upshifting
Once maximum engine speed is attained, M/S
manual mode is automatically upshifted as
needed.
For vehicles with Steptronic Sport transmission,
automatic shift operations are not performed if
one of the following conditions is met:▷DSC is deactivated.▷TRACTION is activated.
In addition, the kickdown is deactivated.
Ending the sport program/manual
mode
Push the selector lever to the right.
D is displayed in the instrument cluster.
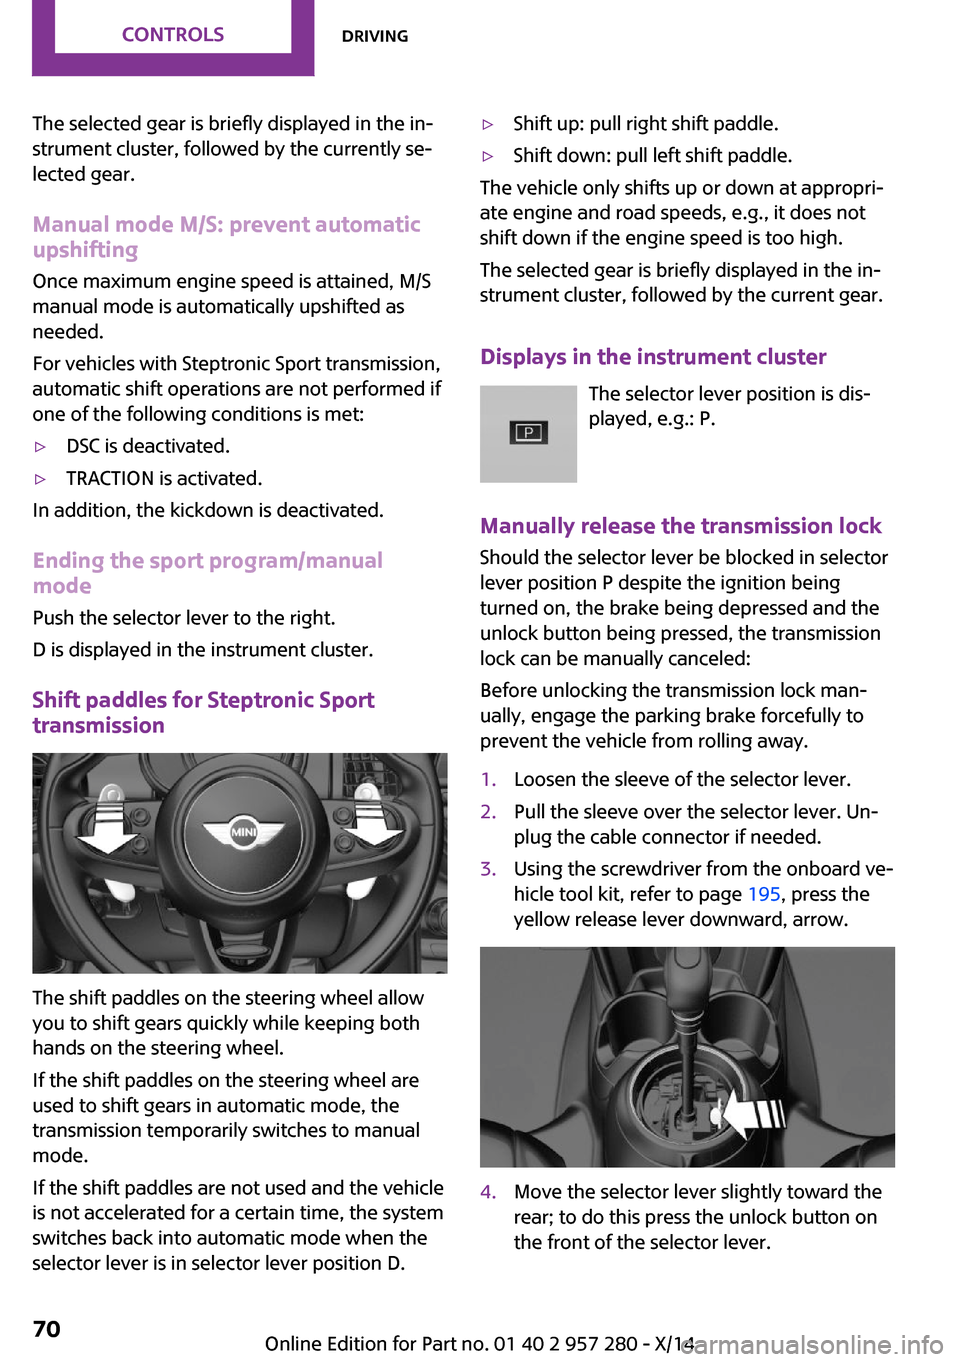
Shift paddles for Steptronic Sport
transmission
The shift paddles on the steering wheel allow
you to shift gears quickly while keeping both
hands on the steering wheel.
If the shift paddles on the steering wheel are
used to shift gears in automatic mode, the
transmission temporarily switches to manual
mode.
If the shift paddles are not used and the vehicle
is not accelerated for a certain time, the system
switches back into automatic mode when the
selector lever is in selector lever position D.
▷Shift up: pull right shift paddle.▷Shift down: pull left shift paddle.
The vehicle only shifts up or down at appropri‐
ate engine and road speeds, e.g., it does not
shift down if the engine speed is too high.
The selected gear is briefly displayed in the in‐
strument cluster, followed by the current gear.
Displays in the instrument cluster The selector lever position is dis‐
played, e.g.: P.
Manually release the transmission lock
Should the selector lever be blocked in selector
lever position P despite the ignition being
turned on, the brake being depressed and the
unlock button being pressed, the transmission
lock can be manually canceled:
Before unlocking the transmission lock man‐
ually, engage the parking brake forcefully to
prevent the vehicle from rolling away.
1.Loosen the sleeve of the selector lever.2.Pull the sleeve over the selector lever. Un‐
plug the cable connector if needed.3.Using the screwdriver from the onboard ve‐
hicle tool kit, refer to page 195, press the
yellow release lever downward, arrow.4.Move the selector lever slightly toward the
rear; to do this press the unlock button on
the front of the selector lever.Seite 70CONTROLSDriving70
Online Edition for Part no. 01 40 2 957 280 - X/14
Page 85 of 240
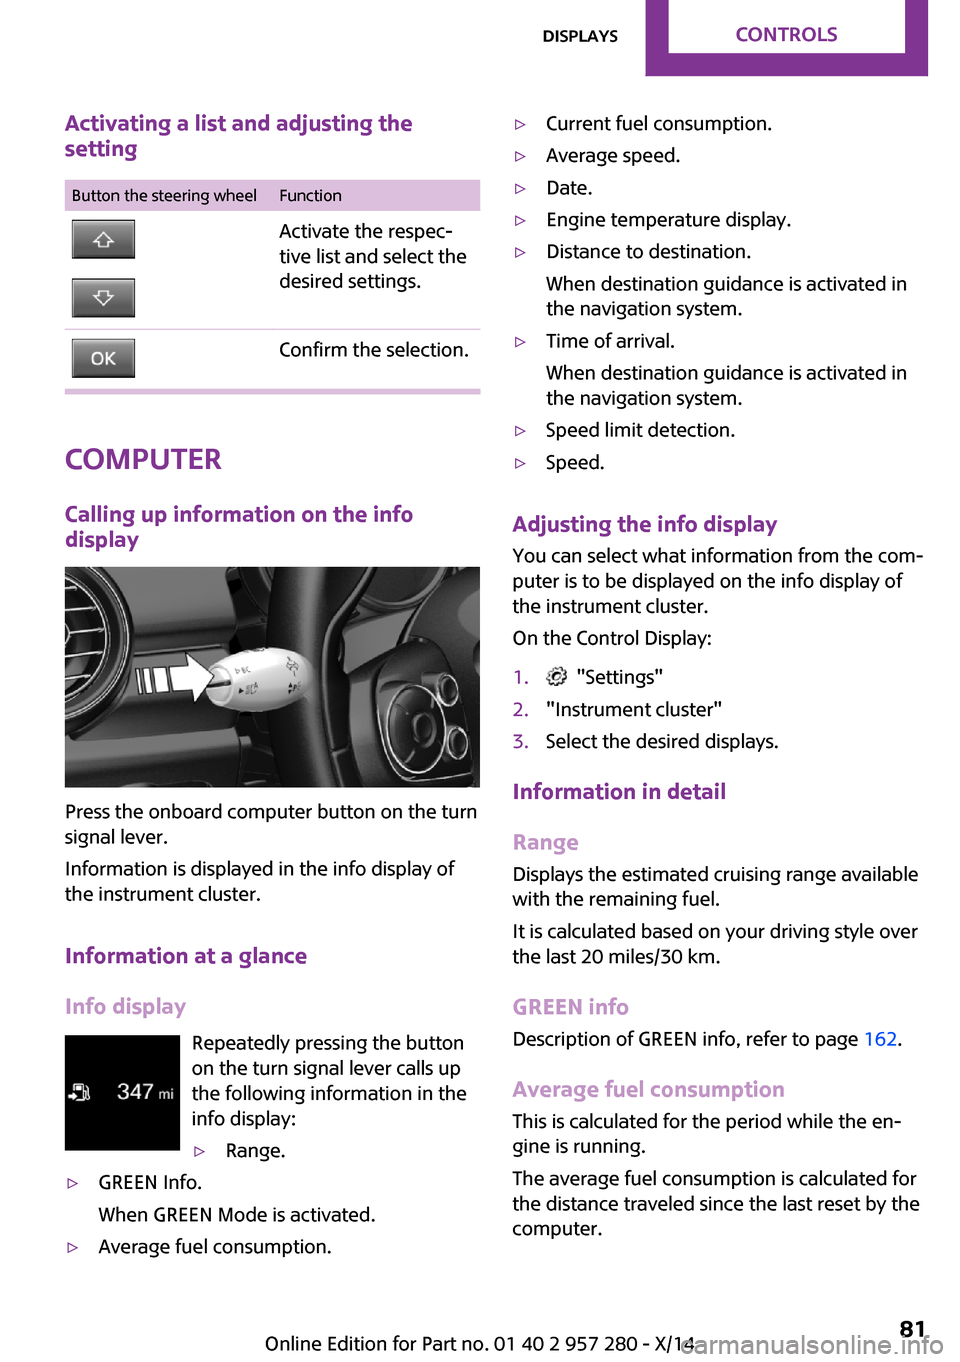
Activating a list and adjusting the
settingButton the steering wheelFunctionActivate the respec‐
tive list and select the
desired settings.Confirm the selection.
Computer
Calling up information on the info
display
Press the onboard computer button on the turn
signal lever.
Information is displayed in the info display of
the instrument cluster.
Information at a glance
Info display Repeatedly pressing the button
on the turn signal lever calls up
the following information in the
info display:
▷Range.▷GREEN Info.
When GREEN Mode is activated.▷Average fuel consumption.▷Current fuel consumption.▷Average speed.▷Date.▷Engine temperature display.▷Distance to destination.
When destination guidance is activated in
the navigation system.▷Time of arrival.
When destination guidance is activated in
the navigation system.▷Speed limit detection.▷Speed.
Adjusting the info display
You can select what information from the com‐
puter is to be displayed on the info display of
the instrument cluster.
On the Control Display:
1. "Settings"2."Instrument cluster"3.Select the desired displays.
Information in detail
Range
Displays the estimated cruising range available
with the remaining fuel.
It is calculated based on your driving style over
the last 20 miles/30 km.
GREEN info Description of GREEN info, refer to page 162.
Average fuel consumption
This is calculated for the period while the en‐
gine is running.
The average fuel consumption is calculated for
the distance traveled since the last reset by the
computer.
Seite 81DisplaysCONTROLS81
Online Edition for Part no. 01 40 2 957 280 - X/14
Page 86 of 240
Average speed
Periods in which the vehicle is parked with the
engine manually stopped are not included in
the calculation of the average speed.
Resetting average valuesPress and hold the onboard computer button
on the turn signal lever.
Engine temperature display Displays the current engine temperature, based
on a combination of coolant and motor oil tem‐
perature. As soon as the optimum operating
temperature has been attained, the indicator is
in the center position.
If the engine oil or coolant, thus the engine, be‐
come too hot, a Check Control message is dis‐
played.
Check the coolant level, refer to page 191.
Distance to destination The distance remaining to the destination is
displayed if a destination is entered in the navi‐
gation system before the trip is started.
The distance to the destination is adopted au‐
tomatically.
Time of arrival The estimated time of arrival is displayed if a
destination is entered in the navigation system before the trip is started.
The time must be correctly set.
Speed limit detection
Description of the speed limit detection, refer
to page 79, function.
Trip computer
The vehicle features two types of board com‐
puters.▷"Onboard info": the values can be reset as
often as necessary.▷"Trip computer": the values provide an
overview of the current trip.
Resetting the trip computer
On the Control Display:
1. "Vehicle info"2."Trip computer"3."Reset": all values are reset.
"Automatically reset": all values are reset
approx. 4 hours after the vehicle came to a
standstill.
Display on the Control Display
Display the computer or trip computer on the
Control Display.
On the Control Display:
1. "Vehicle info"2."Onboard info" or "Trip computer"
Resetting the fuel consumption and
speed
On the Control Display:
1. "Vehicle info"2."Onboard info"3."Consumpt." or "Speed"4."Yes"
Driving Excitement
The concept
On the Control Display, sport instruments can
be displayed, and the vehicle condition can be
checked before the use of the SPORT program.
Sport instruments On the Control Display, values for power and
torque are displayed.
Seite 82CONTROLSDisplays82
Online Edition for Part no. 01 40 2 957 280 - X/14
Page 89 of 240
Brightness
Setting the brightness To set the brightness of the Control Display:1. "Settings"2."Control display"3."Brightness"4.Turn the controller until the desired bright‐
ness is set.5.Press the controller.
Settings are stored for the profile currently in
use.
Depending on the light conditions, the bright‐
ness settings may not be clearly visible.
LED ring on the central
instrument cluster
The concept
The LED ring displays light animations to repre‐
sent specific functions.
Basic displays
Basic functions, for example the tachometer,
can be set to be displayed continually if so de‐
sired.
Event displays Functions that are only displayed temporarily,
for example the volume or temperature set‐ tings, can be set as event displays.
Several vehicle assistance functions can also be displayed on the LED ring. This display corre‐
sponds with the displays of the function in the
respective display.
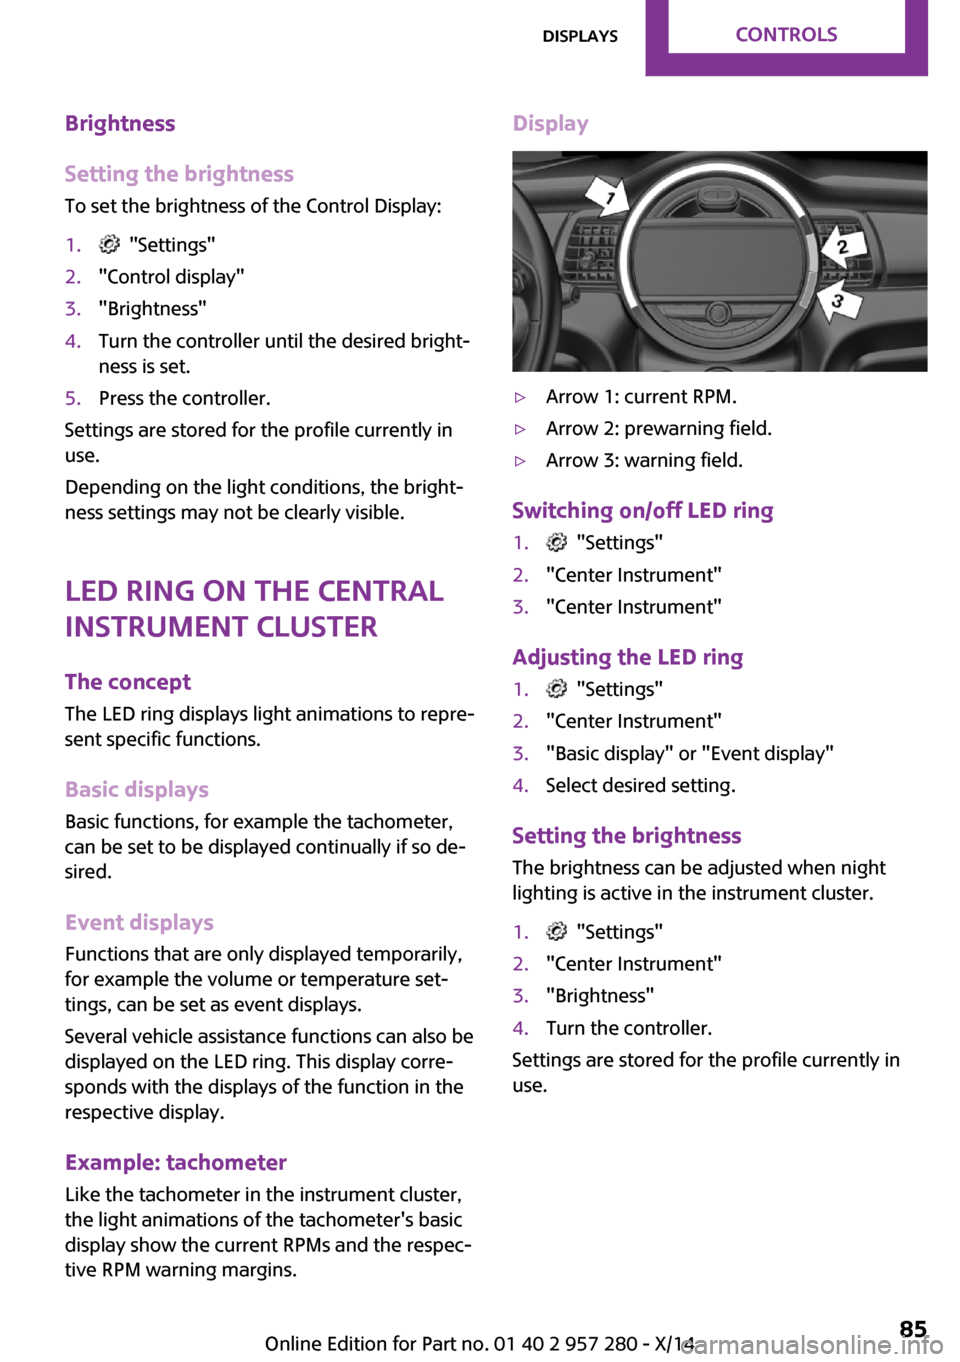
Example: tachometer Like the tachometer in the instrument cluster,
the light animations of the tachometer's basic
display show the current RPMs and the respec‐
tive RPM warning margins.
Display▷Arrow 1: current RPM.▷Arrow 2: prewarning field.▷Arrow 3: warning field.
Switching on/off LED ring
1. "Settings"2."Center Instrument"3."Center Instrument"
Adjusting the LED ring
1. "Settings"2."Center Instrument"3."Basic display" or "Event display"4.Select desired setting.
Setting the brightness
The brightness can be adjusted when night
lighting is active in the instrument cluster.
1. "Settings"2."Center Instrument"3."Brightness"4.Turn the controller.
Settings are stored for the profile currently in
use.
Seite 85DisplaysCONTROLS85
Online Edition for Part no. 01 40 2 957 280 - X/14
Page 93 of 240
Welcome lights and
headlight courtesy de‐
lay feature
Welcome lights When the vehicle is parked, leave the reel in
position
or : parking and interior lights
come on briefly when the vehicle is unlocked
depending on the ambient brightness.
Activating/deactivating
1. "Settings"2."Lighting"3."Welcome lights"
Settings are stored for the profile currently in
use.
Headlight courtesy delay feature
The low beams stay lit for a short while after
the radio-ready state is switched off if the lights
are turned off and the headlight flasher is
switched on.
Setting the duration
1. "Settings"2."Lighting"3."Pathway lighting:"4.Set length of time.
Settings are stored for the profile currently in
use.
Automatic headlight
control
Position of switch
: the low beams are acti‐
vated and off automatically, e.g., in tunnels, in
twilight or if there is precipitation. The indicator
lamp in the instrument cluster lights up.
A blue sky with the sun low on the horizon can
cause the lights to be switched on.
The low beams always stay on when the fog
lights are activated.
Personal responsibility
The automatic headlight control cannot
serve as a substitute for your personal judg‐
ment in determining when to turn the lights on
in response to ambient lighting conditions.
E. g. the sensors are unable to detect fog or
hazy weather. To avoid safety risks under these
conditions, you should always switch on the
lights manually. ◀
Daytime running lights
With the ignition switched on, the daytime run‐
ning lights light up in position 0,
or .
After the ignition is switched off, the parking
lights light up in position
.
Activating/deactivating
In some countries, daytime running lights are
mandatory, so it may not be possible to deacti‐
vate the daytime running lights.
1. "Settings"2."Lighting"3."Daytime running lamps"
Settings are stored for the remote control cur‐
rently in use.
Cornering lamp
Position of switch
: going around corners,
the cornering lamp also lights the interior area
of the curve. Below a speed of approx.
25 mph/40 km/h when the flasher is switched
on and the steering angle is detected, there is
automatic activation.
Malfunction
A Check Control message is displayed.
Seite 89LightsCONTROLS89
Online Edition for Part no. 01 40 2 957 280 - X/14
Page 94 of 240
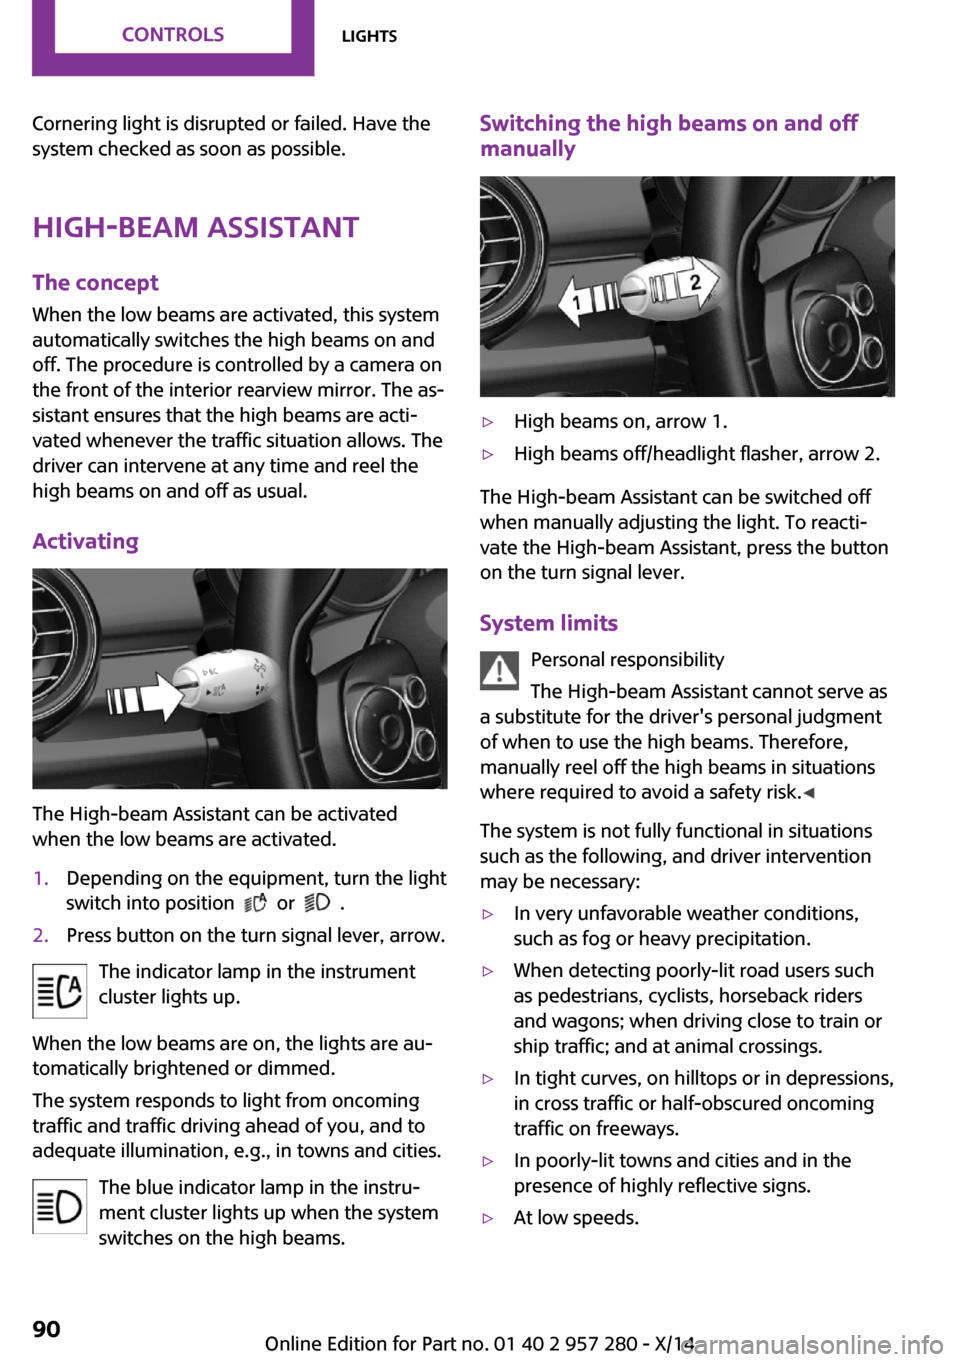
Cornering light is disrupted or failed. Have the
system checked as soon as possible.
High-beam Assistant The concept
When the low beams are activated, this system
automatically switches the high beams on and
off. The procedure is controlled by a camera on
the front of the interior rearview mirror. The as‐
sistant ensures that the high beams are acti‐
vated whenever the traffic situation allows. The
driver can intervene at any time and reel the
high beams on and off as usual.
Activating
The High-beam Assistant can be activated
when the low beams are activated.
1.Depending on the equipment, turn the light
switch into position
or .
2.Press button on the turn signal lever, arrow.
The indicator lamp in the instrument
cluster lights up.
When the low beams are on, the lights are au‐
tomatically brightened or dimmed.
The system responds to light from oncoming
traffic and traffic driving ahead of you, and to
adequate illumination, e.g., in towns and cities.
The blue indicator lamp in the instru‐
ment cluster lights up when the system
switches on the high beams.
Switching the high beams on and off
manually▷High beams on, arrow 1.▷High beams off/headlight flasher, arrow 2.
The High-beam Assistant can be switched off
when manually adjusting the light. To reacti‐
vate the High-beam Assistant, press the button
on the turn signal lever.
System limits Personal responsibility
The High-beam Assistant cannot serve as
a substitute for the driver's personal judgment
of when to use the high beams. Therefore,
manually reel off the high beams in situations
where required to avoid a safety risk. ◀
The system is not fully functional in situations
such as the following, and driver intervention
may be necessary:
▷In very unfavorable weather conditions,
such as fog or heavy precipitation.▷When detecting poorly-lit road users such
as pedestrians, cyclists, horseback riders
and wagons; when driving close to train or
ship traffic; and at animal crossings.▷In tight curves, on hilltops or in depressions,
in cross traffic or half-obscured oncoming
traffic on freeways.▷In poorly-lit towns and cities and in the
presence of highly reflective signs.▷At low speeds.Seite 90CONTROLSLights90
Online Edition for Part no. 01 40 2 957 280 - X/14
Page 97 of 240
SafetyVehicle features and op‐
tions
This chapter describes all standard, country-
specific and optional features offered with theseries. It also describes features that are not
necessarily available in your car, e. g., due to
the selected options or country versions. This
also applies to safety-related functions and sys‐
tems.
Airbags
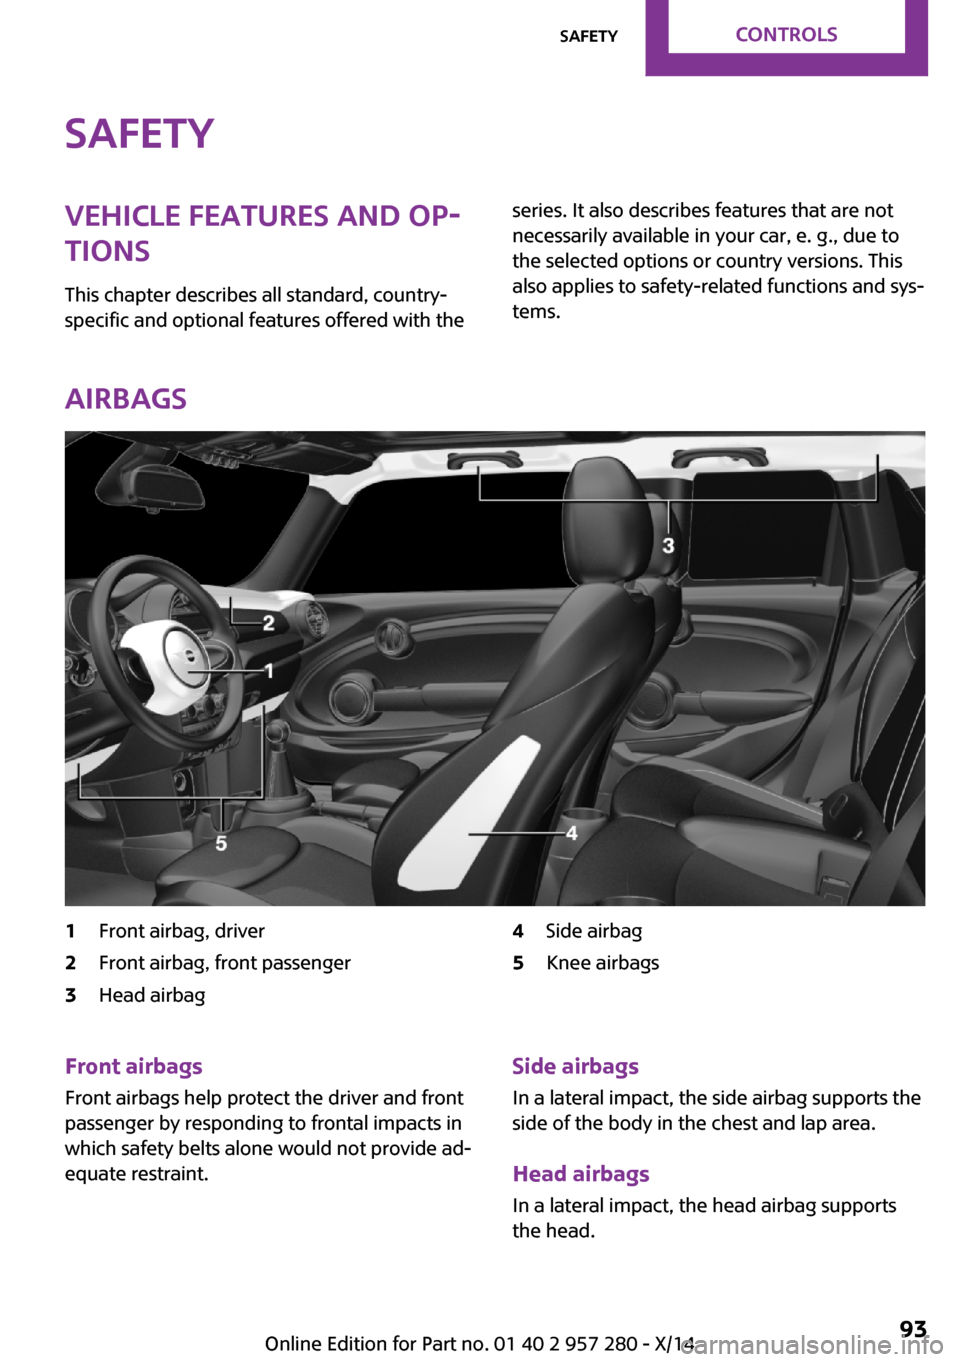
1Front airbag, driver2Front airbag, front passenger3Head airbag4Side airbag5Knee airbagsFront airbags
Front airbags help protect the driver and front
passenger by responding to frontal impacts in
which safety belts alone would not provide ad‐
equate restraint.Side airbags
In a lateral impact, the side airbag supports the
side of the body in the chest and lap area.
Head airbags
In a lateral impact, the head airbag supports
the head.Seite 93SafetyCONTROLS93
Online Edition for Part no. 01 40 2 957 280 - X/14