MINI 3 door 2014 Workshop Manual
Manufacturer: MINI, Model Year: 2014, Model line: 3 door, Model: MINI 3 door 2014Pages: 240, PDF Size: 11.05 MB
Page 51 of 240
Danger of jamming even with pinch pro‐
tection
Despite the pinch protection system, check that
the glass sunroof's closing path is clear; other‐
wise, the closing action may not be interrupted
in certain extreme situations, such as when thin
objects are present. ◀
Closing without the pinch protection
system
E. g. if there is an external danger, proceed as
follows:1.Press the reel forward beyond the resist‐
ance point and hold it.
The pinch protection is limited and the
glass sunroof reopens slightly if the closing
force exceeds a certain margin.2.Press the reel forward again beyond the re‐
sistance point and hold until the glass sun‐
roof closes without jam protection. Make
sure that the closing area is clear.
Initializing after a power failure
After a power failure, it can happen that the
glass sunroof can only be raised. The system
must be initialized in this case. MINI recom‐
mends having this work performed by your
service center.
Seite 47Opening and closingCONTROLS47
Online Edition for Part no. 01 40 2 957 280 - X/14
Page 52 of 240
AdjustingVehicle features and op‐
tions
This chapter describes all standard, country-
specific and optional features offered with the
series. It also describes features that are not
necessarily available in your car, e. g., due to
the selected options or country versions. This
also applies to safety-related functions and sys‐
tems.
Sitting safely The ideal seating position can make a vital con‐
tribution to relaxed, fatigue-free driving.
The seating position plays an important role in
an accident in combination with:▷Safety belts, refer to page 50.▷Head restraints, refer to page 52.▷Airbags, refer to page 93.
Seats
Hints Do not adjust the seat while driving
Do not adjust the driver's seat while driv‐
ing, or the seat could respond with unexpected
movement and the ensuing loss of vehicle con‐
trol could lead to an accident. ◀
Do not incline the backrest too far to the
rear
Also on the front passenger side, do not incline
the backrest on the front passenger side too far to the rear while driving, or there is a risk of
slipping under the safety belt in the event of an
accident. This would eliminate the protection
normally provided by the belt. ◀
Keep the movement area unobstructed
When changing the seat position, keep
the seat's area of movement unobstructed;
otherwise, people might get injured or objects
damaged. ◀
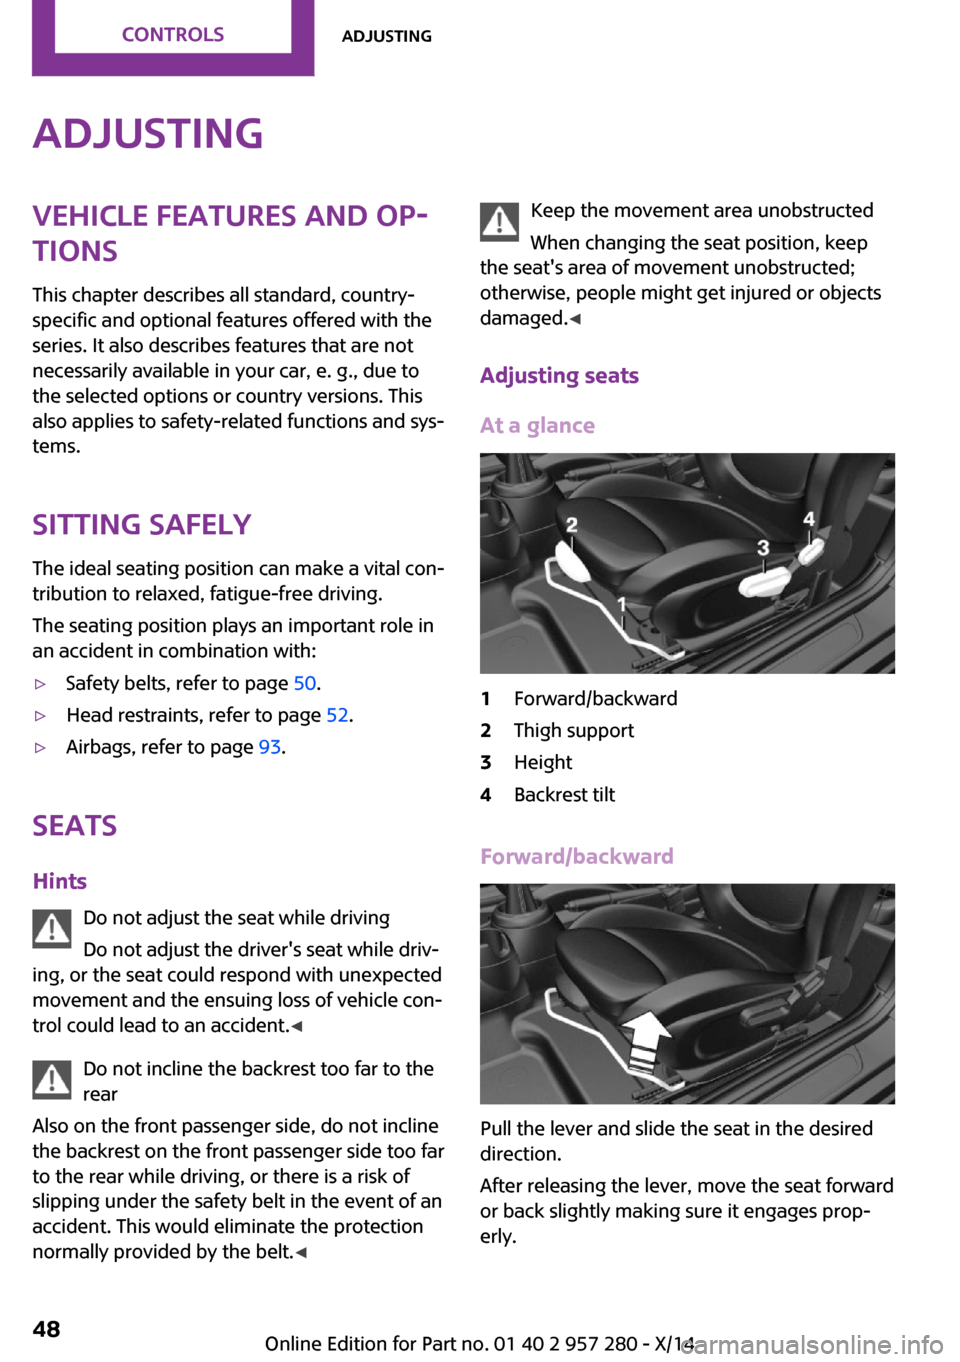
Adjusting seats At a glance1Forward/backward2Thigh support3Height4Backrest tilt
Forward/backward
Pull the lever and slide the seat in the desired
direction.
After releasing the lever, move the seat forward
or back slightly making sure it engages prop‐
erly.
Seite 48CONTROLSAdjusting48
Online Edition for Part no. 01 40 2 957 280 - X/14
Page 53 of 240
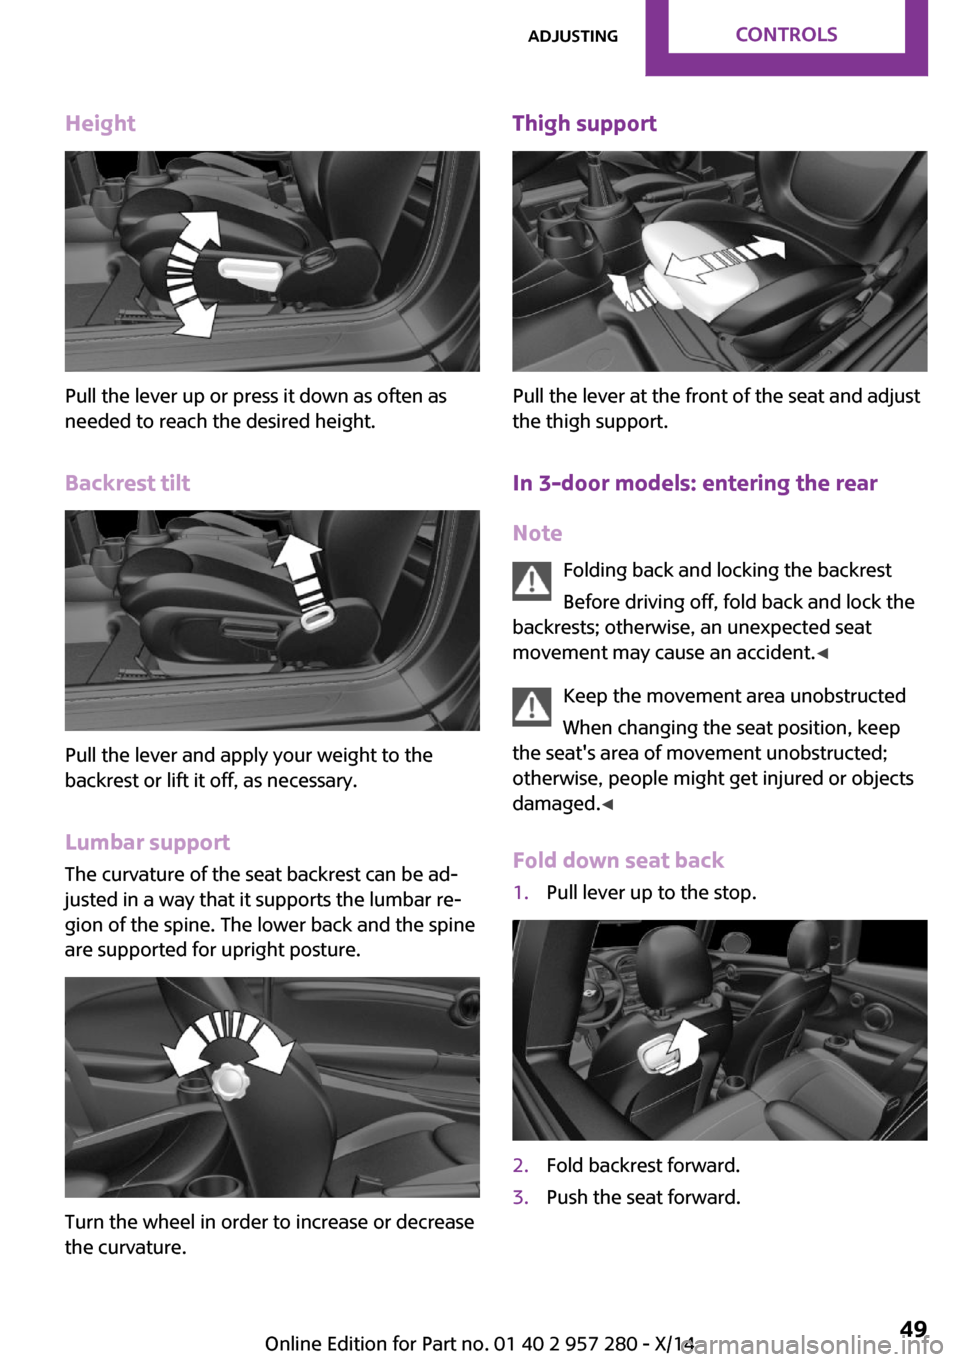
Height
Pull the lever up or press it down as often as
needed to reach the desired height.
Backrest tilt
Pull the lever and apply your weight to the
backrest or lift it off, as necessary.
Lumbar support
The curvature of the seat backrest can be ad‐
justed in a way that it supports the lumbar re‐
gion of the spine. The lower back and the spine
are supported for upright posture.
Turn the wheel in order to increase or decrease
the curvature.
Thigh support
Pull the lever at the front of the seat and adjust
the thigh support.
In 3-door models: entering the rearNote Folding back and locking the backrest
Before driving off, fold back and lock the
backrests; otherwise, an unexpected seat
movement may cause an accident. ◀
Keep the movement area unobstructed
When changing the seat position, keep
the seat's area of movement unobstructed;
otherwise, people might get injured or objects
damaged. ◀
Fold down seat back
1.Pull lever up to the stop.2.Fold backrest forward.3.Push the seat forward.Seite 49AdjustingCONTROLS49
Online Edition for Part no. 01 40 2 957 280 - X/14
Page 54 of 240
Original positionThe driver's seat features a mechanical mem‐
ory function for forward/back and backrest ad‐
justment.1.Push the seat back into the original posi‐
tion.2.Fold back the backrest to lock the seat.
If the backrest is folded back when the seat is
not yet in the original position, the seat latches
in the current position. In this case, manually
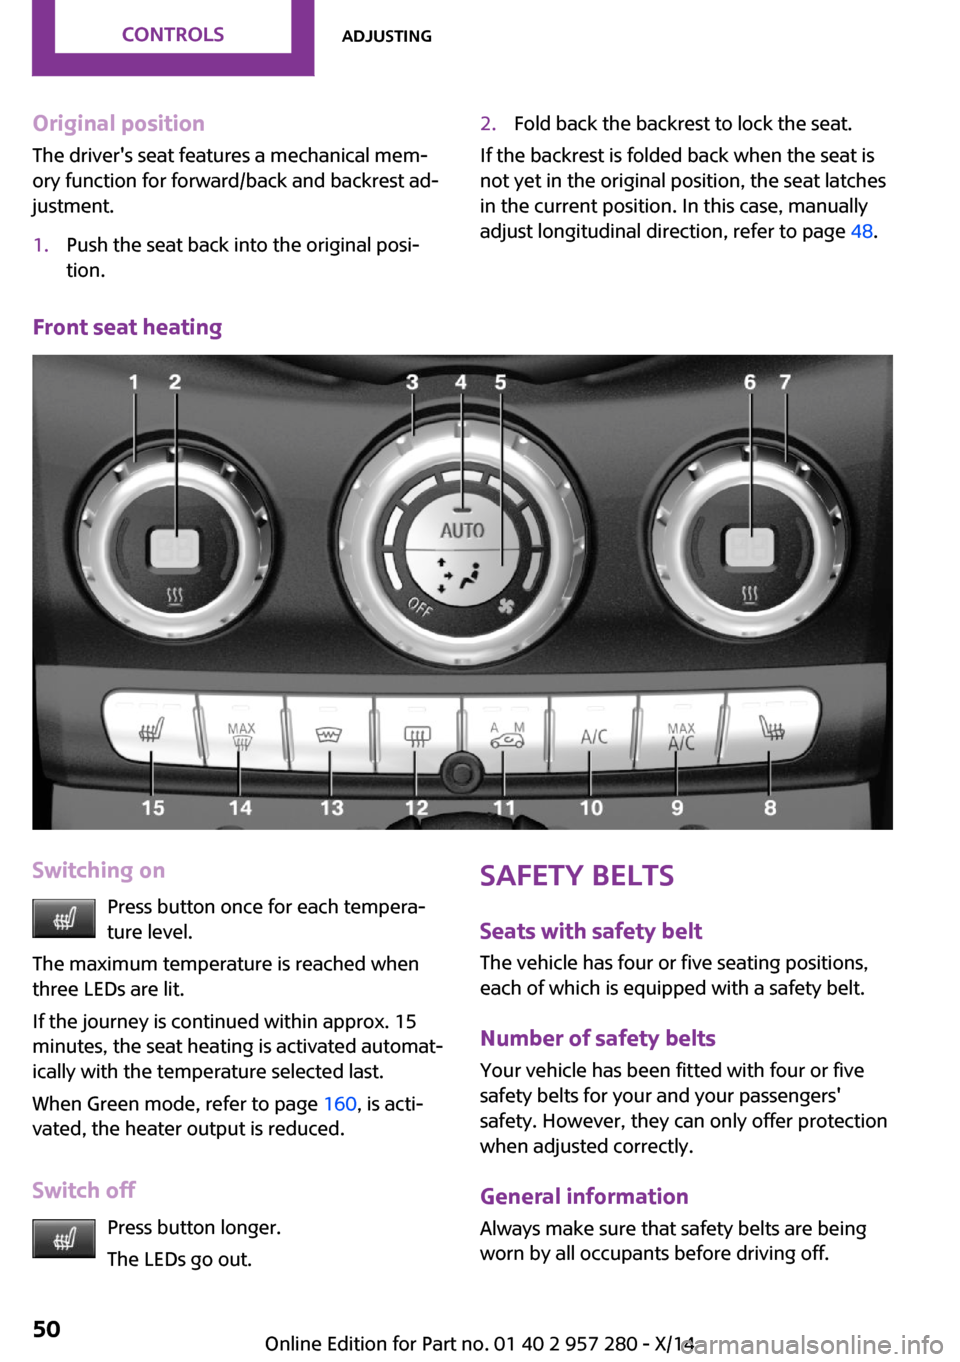
adjust longitudinal direction, refer to page 48.Front seat heating
Switching on
Press button once for each tempera‐
ture level.
The maximum temperature is reached when
three LEDs are lit.
If the journey is continued within approx. 15
minutes, the seat heating is activated automat‐
ically with the temperature selected last.
When Green mode, refer to page 160, is acti‐
vated, the heater output is reduced.
Switch off Press button longer.
The LEDs go out.Safety belts
Seats with safety belt
The vehicle has four or five seating positions,
each of which is equipped with a safety belt.
Number of safety belts Your vehicle has been fitted with four or five
safety belts for your and your passengers' safety. However, they can only offer protection
when adjusted correctly.
General information
Always make sure that safety belts are being
worn by all occupants before driving off.Seite 50CONTROLSAdjusting50
Online Edition for Part no. 01 40 2 957 280 - X/14
Page 55 of 240
For the occupants' safety the belt locking
mechanism triggers early. Slowly guide the belt
out of the holder when applying it.
If needed, disengage the belt in the rear from
the belt buckle on the side.
Although airbags enhance safety by providing
added protection, they are not a substitute for
safety belts.
The two outer safety belt buckles, integrated
into the rear seat, are for passengers sitting on
the left and right.
The center rear safety belt buckle is solely in‐
tended for the center passenger.
Hints One person per safety belt
Never allow more than one person to
wear a single safety belt. Never allow infants or
small children to ride on a passenger's lap. ◀
Putting on the belt
Lay the belt, without twisting, snugly
across the lap and shoulders, as close to the
body as possible. Make sure that the belt lies
low around the hips in the lap area and does
not press on the abdomen. Otherwise, the belt
can slip over the hips in a frontal impact and in‐
jure the abdomen.
The safety belt must not lie across the neck, rub
on sharp edges, be routed over breakable ob‐
jects, or be pinched. ◀
What reduces the restraining effect
Avoid wearing bulky clothing, and pull
the shoulder belt periodically to readjust the
tension. Make sure that the belt is not jammed;
otherwise, the belt can be damaged and the
restraining effect is reduced. ◀
Using the middle safety belt
If the middle safety belt in the rear is
used, the larger side of the backrest must be
locked. Otherwise, the safety belt will not have
a restraining effect. ◀Buckling the belt
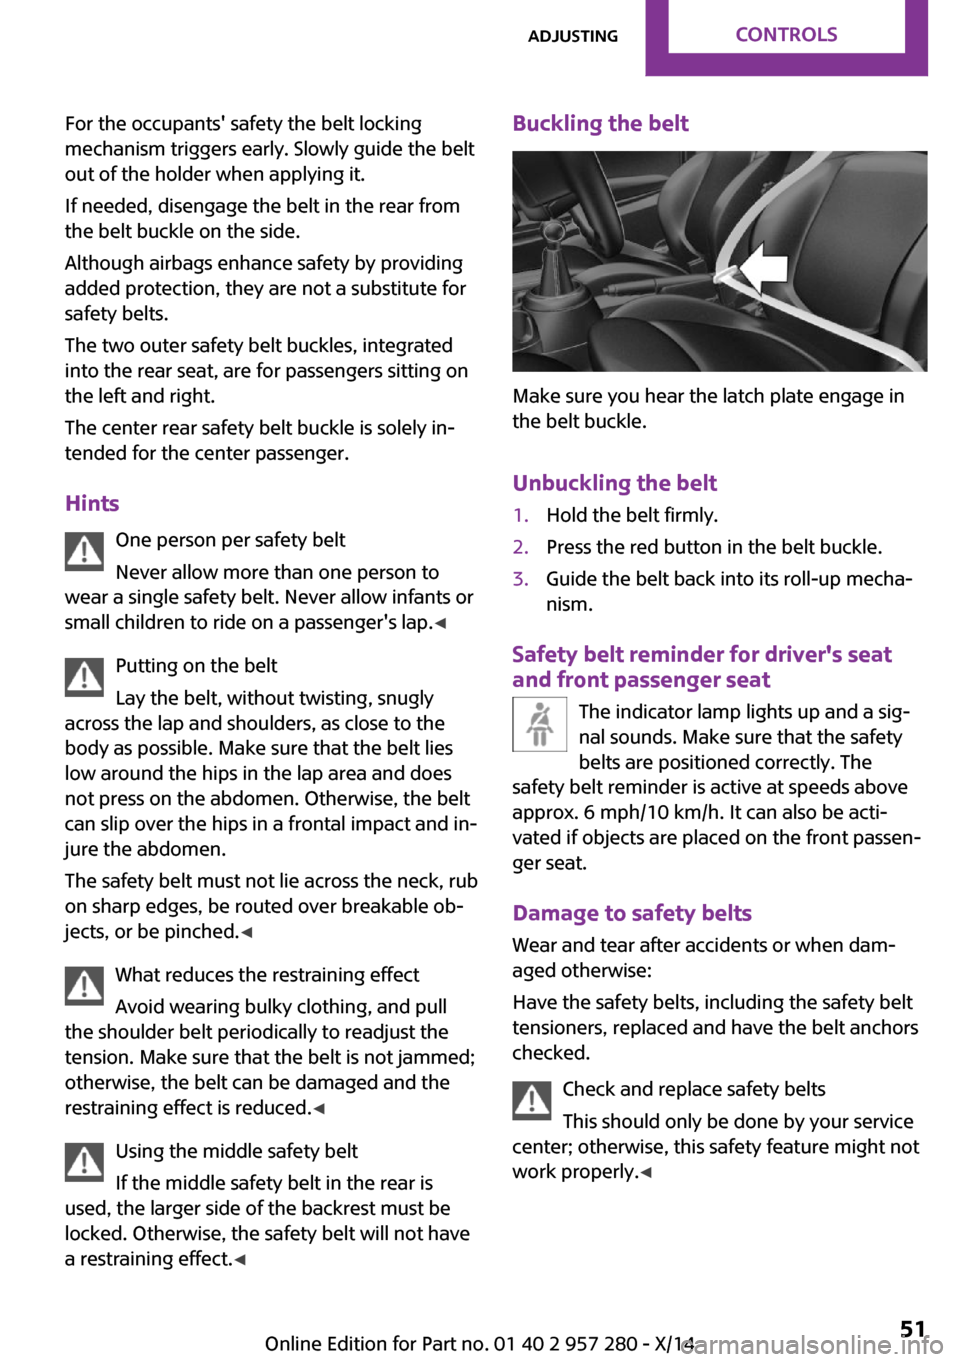
Make sure you hear the latch plate engage in
the belt buckle.
Unbuckling the belt
1.Hold the belt firmly.2.Press the red button in the belt buckle.3.Guide the belt back into its roll-up mecha‐
nism.
Safety belt reminder for driver's seat
and front passenger seat
The indicator lamp lights up and a sig‐
nal sounds. Make sure that the safety
belts are positioned correctly. The
safety belt reminder is active at speeds above
approx. 6 mph/10 km/h. It can also be acti‐
vated if objects are placed on the front passen‐
ger seat.
Damage to safety belts
Wear and tear after accidents or when dam‐
aged otherwise:
Have the safety belts, including the safety belt
tensioners, replaced and have the belt anchors
checked.
Check and replace safety belts
This should only be done by your service
center; otherwise, this safety feature might not
work properly. ◀
Seite 51AdjustingCONTROLS51
Online Edition for Part no. 01 40 2 957 280 - X/14
Page 56 of 240
Front head restraintsCorrectly adjusted head restraint
A correctly adjusted head restraint reduces the
risk of injury to cervical vertebrae in the event
of an accident.
Adjusting the head restraint
Adjust the head restraints of all occupied
seats properly; otherwise, there is an increased
risk of injury in an accident. ◀
Height
Adjust the head restraint so that its center is approximately at ear level.
Distance
Adjust the distance so that the head restraint is
as close as possible to the back of the head.
If necessary, adjust the distance by adjusting
the tilt of the backrest.
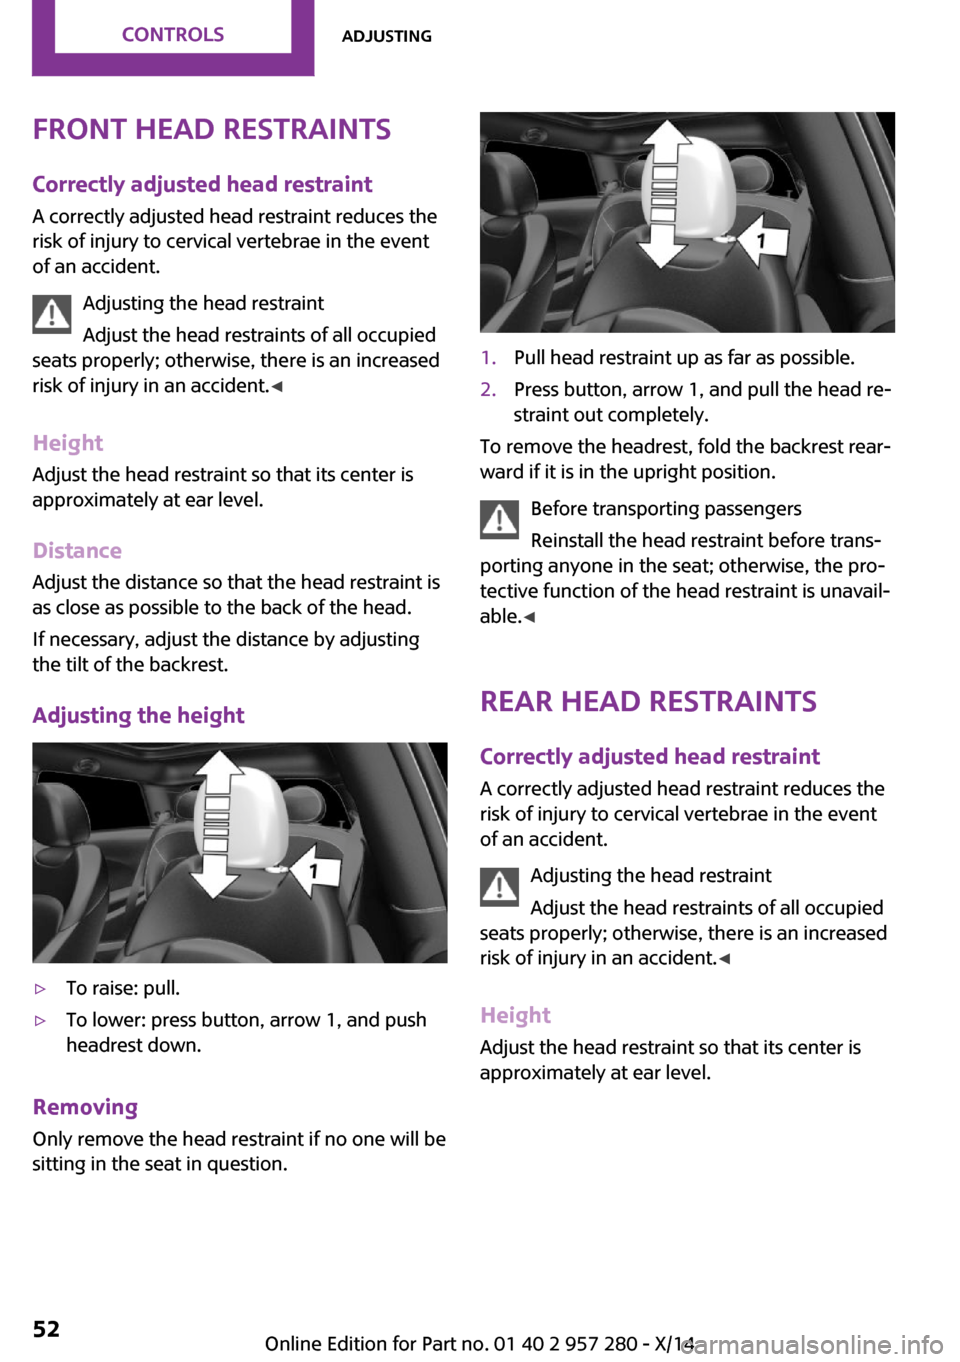
Adjusting the height▷To raise: pull.▷To lower: press button, arrow 1, and push
headrest down.
Removing
Only remove the head restraint if no one will be
sitting in the seat in question.
1.Pull head restraint up as far as possible.2.Press button, arrow 1, and pull the head re‐
straint out completely.
To remove the headrest, fold the backrest rear‐
ward if it is in the upright position.
Before transporting passengers
Reinstall the head restraint before trans‐
porting anyone in the seat; otherwise, the pro‐
tective function of the head restraint is unavail‐
able. ◀
Rear head restraints
Correctly adjusted head restraint
A correctly adjusted head restraint reduces the
risk of injury to cervical vertebrae in the event
of an accident.
Adjusting the head restraint
Adjust the head restraints of all occupied
seats properly; otherwise, there is an increased
risk of injury in an accident. ◀
Height Adjust the head restraint so that its center isapproximately at ear level.
Seite 52CONTROLSAdjusting52
Online Edition for Part no. 01 40 2 957 280 - X/14
Page 57 of 240
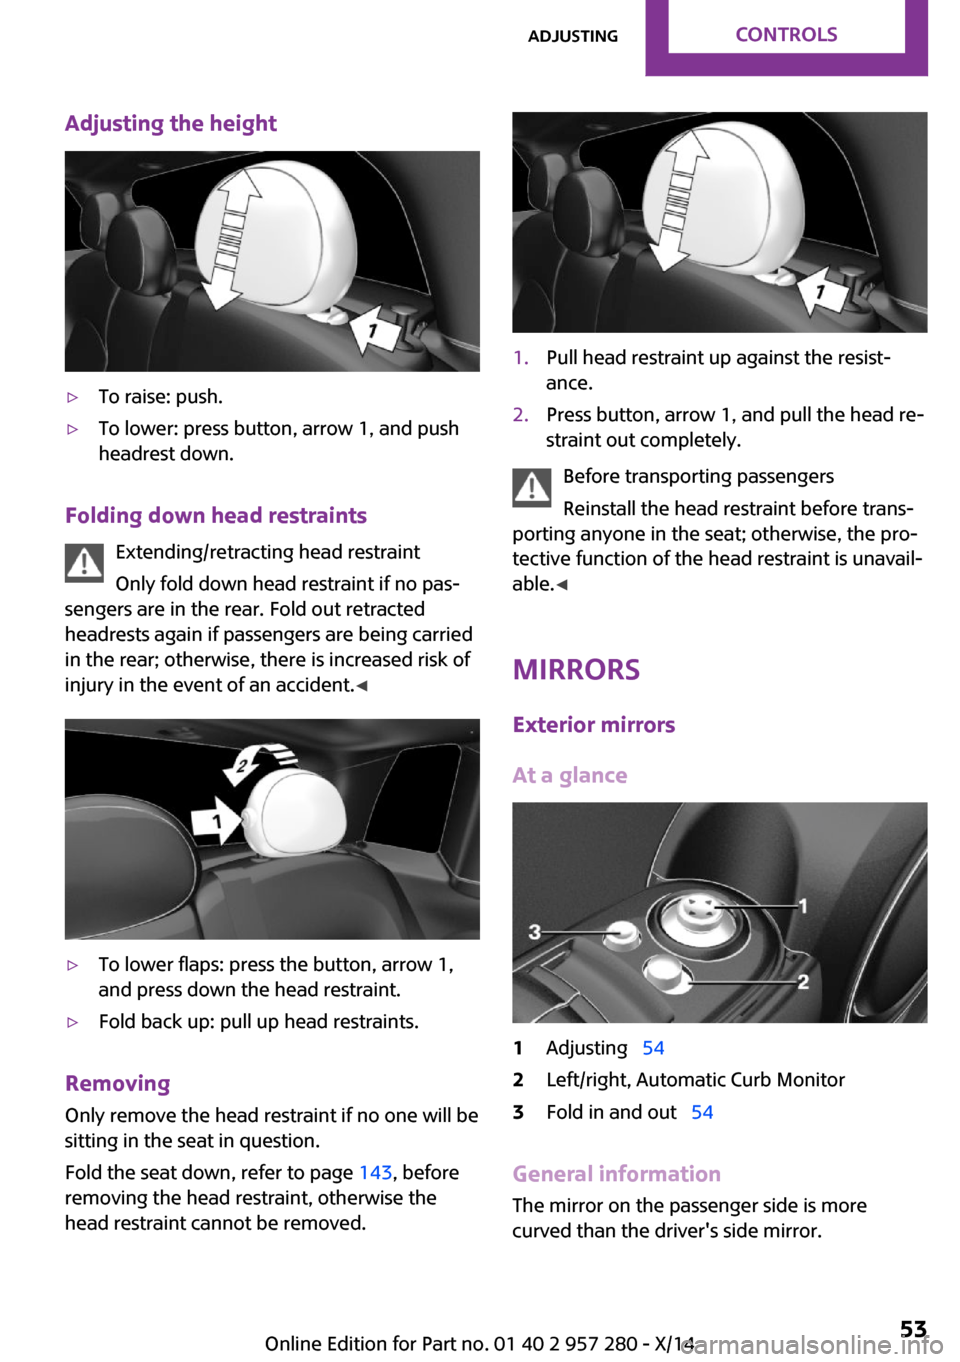
Adjusting the height▷To raise: push.▷To lower: press button, arrow 1, and push
headrest down.
Folding down head restraints
Extending/retracting head restraint
Only fold down head restraint if no pas‐
sengers are in the rear. Fold out retracted
headrests again if passengers are being carried
in the rear; otherwise, there is increased risk of
injury in the event of an accident. ◀
▷To lower flaps: press the button, arrow 1,
and press down the head restraint.▷Fold back up: pull up head restraints.
Removing
Only remove the head restraint if no one will be
sitting in the seat in question.
Fold the seat down, refer to page 143, before
removing the head restraint, otherwise the
head restraint cannot be removed.
1.Pull head restraint up against the resist‐
ance.2.Press button, arrow 1, and pull the head re‐
straint out completely.
Before transporting passengers
Reinstall the head restraint before trans‐
porting anyone in the seat; otherwise, the pro‐
tective function of the head restraint is unavail‐
able. ◀
Mirrors Exterior mirrors
At a glance
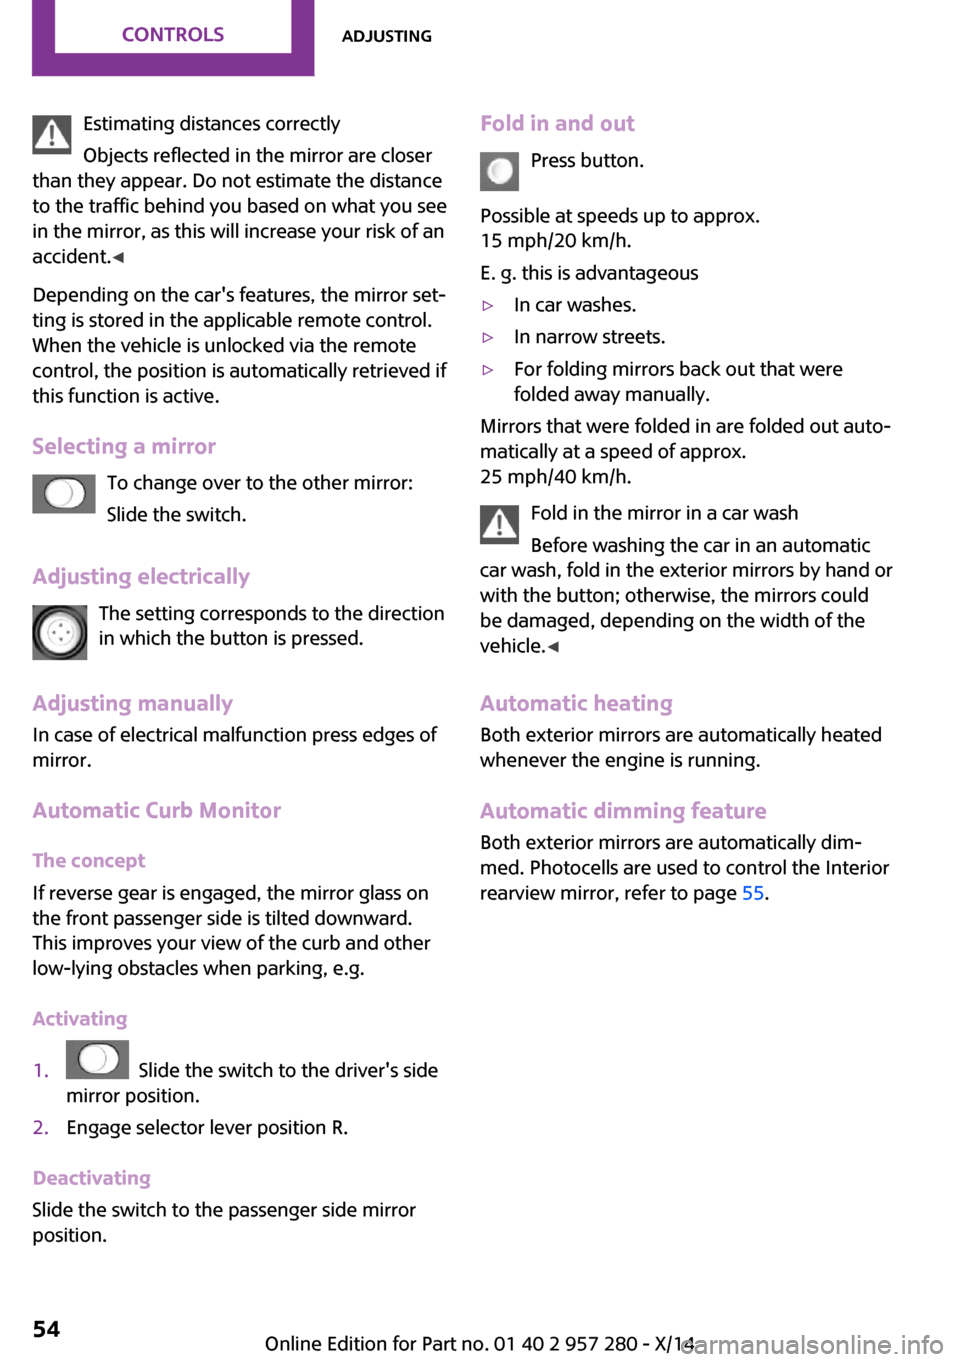
1Adjusting 542Left/right, Automatic Curb Monitor3Fold in and out 54
General information
The mirror on the passenger side is more
curved than the driver's side mirror.
Seite 53AdjustingCONTROLS53
Online Edition for Part no. 01 40 2 957 280 - X/14
Page 58 of 240
Estimating distances correctly
Objects reflected in the mirror are closer
than they appear. Do not estimate the distance
to the traffic behind you based on what you see
in the mirror, as this will increase your risk of an
accident. ◀
Depending on the car's features, the mirror set‐
ting is stored in the applicable remote control.
When the vehicle is unlocked via the remote
control, the position is automatically retrieved if
this function is active.
Selecting a mirror To change over to the other mirror:
Slide the switch.
Adjusting electrically The setting corresponds to the direction
in which the button is pressed.
Adjusting manually In case of electrical malfunction press edges of
mirror.
Automatic Curb Monitor The concept
If reverse gear is engaged, the mirror glass on
the front passenger side is tilted downward.
This improves your view of the curb and other
low-lying obstacles when parking, e.g.
Activating1. Slide the switch to the driver's side
mirror position.2.Engage selector lever position R.
Deactivating
Slide the switch to the passenger side mirror
position.
Fold in and out
Press button.
Possible at speeds up to approx.
15 mph/20 km/h.
E. g. this is advantageous▷In car washes.▷In narrow streets.▷For folding mirrors back out that were
folded away manually.
Mirrors that were folded in are folded out auto‐
matically at a speed of approx.
25 mph/40 km/h.
Fold in the mirror in a car wash
Before washing the car in an automatic
car wash, fold in the exterior mirrors by hand or
with the button; otherwise, the mirrors could
be damaged, depending on the width of the
vehicle. ◀
Automatic heating
Both exterior mirrors are automatically heated
whenever the engine is running.
Automatic dimming featureBoth exterior mirrors are automatically dim‐
med. Photocells are used to control the Interior rearview mirror, refer to page 55.
Seite 54CONTROLSAdjusting54
Online Edition for Part no. 01 40 2 957 280 - X/14
Page 59 of 240
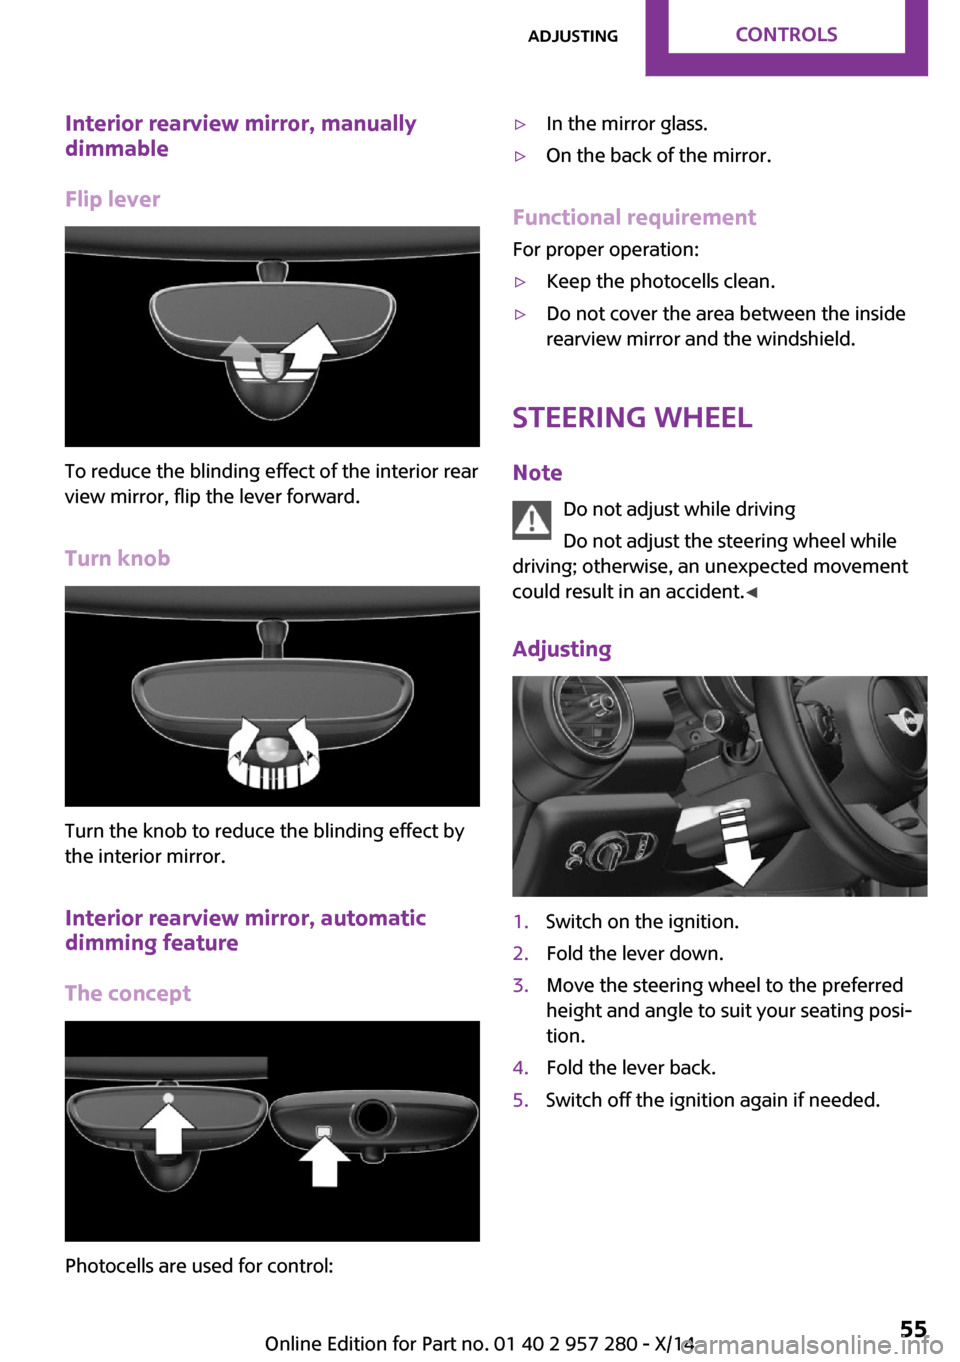
Interior rearview mirror, manually
dimmable
Flip lever
To reduce the blinding effect of the interior rear
view mirror, flip the lever forward.
Turn knob
Turn the knob to reduce the blinding effect by
the interior mirror.
Interior rearview mirror, automatic
dimming feature
The concept
Photocells are used for control:
▷In the mirror glass.▷On the back of the mirror.
Functional requirement
For proper operation:
▷Keep the photocells clean.▷Do not cover the area between the inside
rearview mirror and the windshield.
Steering wheel
Note Do not adjust while driving
Do not adjust the steering wheel while
driving; otherwise, an unexpected movement
could result in an accident. ◀
Adjusting
1.Switch on the ignition.2.Fold the lever down.3.Move the steering wheel to the preferred
height and angle to suit your seating posi‐
tion.4.Fold the lever back.5.Switch off the ignition again if needed.Seite 55AdjustingCONTROLS55
Online Edition for Part no. 01 40 2 957 280 - X/14
Page 60 of 240
Transporting children safelyVehicle features and op‐
tions
This chapter describes all standard, country-
specific and optional features offered with theseries. It also describes features that are not
necessarily available in your car, e. g., due to
the selected options or country versions. This
also applies to safety-related functions and sys‐
tems.
The right place for children
Note
Children in the vehicle
Do not leave children unattended in the
vehicle; otherwise, they could endanger them‐
selves and other persons, e.g., by opening the
doors. ◀
Children should always be in the rear Accident research shows that the safest place
for children is in the back seat.
Transporting children in the rear
Only transport children younger than
13 years of age or shorter than 5 ft/150 cm in
the rear in child restraint systems provided in
accordance with the age, weight and size of
the child; otherwise, there is an increased risk
of injury in an accident.
Children 13 years of age or older must wear a
safety belt as soon as a suitable child restraint system can no longer be used due to their age,
weight and size. ◀
Children on the front passenger seat
Should it ever be necessary to use a child re‐
straint system in the front passenger seat,
make sure that the front, knee and side airbags
on the front passenger side are deactivated.
Automatic deactivation of front-seat passenger
airbags, refer to page 95.Note
Deactivating the front-seat passenger air‐
bags
If a child restraint system is used in the front
passenger seat, deactivate the front-seat pas‐
senger airbags; otherwise, there is an increased
risk of injury to the child when the airbags are
activated, even with a child restraint system. ◀
Installing child re‐
straint systems
Hints Manufacturer's information for child re‐straint systems
To select, mount and use child restraint sys‐
tems, observe the information provided by the
system manufacturer; otherwise, the protective
effect can be lost. ◀
Ensuring the stability of the child seat
When installing child restraint systems,
make sure that the child seat is securely fas‐
tened to the backrest of the seat. Angle and
headrest of the backrest might need to be ad‐
justed or possibly be removed. Make sure that
all backrests are securely locked. Otherwise the
stability of the child seat can be affected, and
there is an increased risk of injury because ofSeite 56CONTROLSTransporting children safely56
Online Edition for Part no. 01 40 2 957 280 - X/14