ESP MINI Clubman 2010 (Mini Connected) Owner's Guide
[x] Cancel search | Manufacturer: MINI, Model Year: 2010, Model line: Clubman, Model: MINI Clubman 2010Pages: 218, PDF Size: 3.97 MB
Page 101 of 218

MOBILITYAT A GLANCE CONTROLS DRIVING TIPS ENTERTAINMENT
99
NAVIGATION REFERENCE
If the rear seat backrests are positioned at
a steeper angle, do not install child-
restraint systems in the rear of the vehicle as
their protective features may be ineffective.<
Partition net*
Ensure that the partition net is firmly
attached; otherwise, injuries may occur.<
The partition net can be mounted in the cargo
bay or behind the front seats.
In the cargo bay
1.Fold the rear seat backrest forward if neces-
sary, page98.
2.Insert each partition net mounting pin all the
way into its respective rear mount in the
headliner, arrow 1, and push it forward.
3.Hang the hooks of the partition net into the
eyelets on the cargo bay floor, arrow2.
Behind the front seats
1.Fold down the rear seat backrests, refer to
Expanding the cargo bay.
2.Insert each partition net mounting pin all the
way into its respective front mount in the
headliner, arrow1, and push it forward.3.Fold up the eyelets on the rear seat and
hook the partition net into them, arrow2.
Level load floor*
The maximum load of the level load floor
is 165 lbs/75 kg. Do not exceed a maxi-
mum permissible load of 55 lbs/25 kg for the
storage compartment beneath the level load
floor; otherwise, damage can occur.<
Raise the level load floor and fold it up toward
the front, arrow.
Removing
1.Fold up the level load floor.
2.Pull the load floor back slightly.
3.Then take it out toward the top.
Determining cargo limit
1.Locate the following statement on your
vehicle's placard
*:
The combined weight of occupants
and cargo should never exceed
XXX kg or YYY lbs. Otherwise, the vehicle
may be damaged and unstable driving con-
ditions may result.<
Page 102 of 218
Things to remember when driving
100
2.Determine the combined weight of the
driver and passengers that will be riding in
your vehicle.
3.Subtract the combined weight of the driver
and passengers from XXX kilograms or YYY
pounds.
4.The resulting figure equals the available
amount of cargo and luggage load capacity.
For example, if the XXX amount equals
1,400 lbs and there will be four 150 lbs pas-
sengers in your vehicle, the amount of avail-
able cargo and luggage load capacity is
650 lbs:
1,400 lbs minus 750 lbs = 650 lbs.
5.Determine the combined weight of luggage
and cargo being loaded on the vehicle. That
weight may not safely exceed the available
cargo and luggage load capacity calculated
in step 4.
6.I f y o u r v e h icl e w i ll be t o w i n g a t r a il e r , pa r t o f
the load from your trailer will be transferred
to your vehicle. Consult the manual for
transporting a trailer to determine how this
may reduce the available cargo and luggage
load capacity of your vehicle.
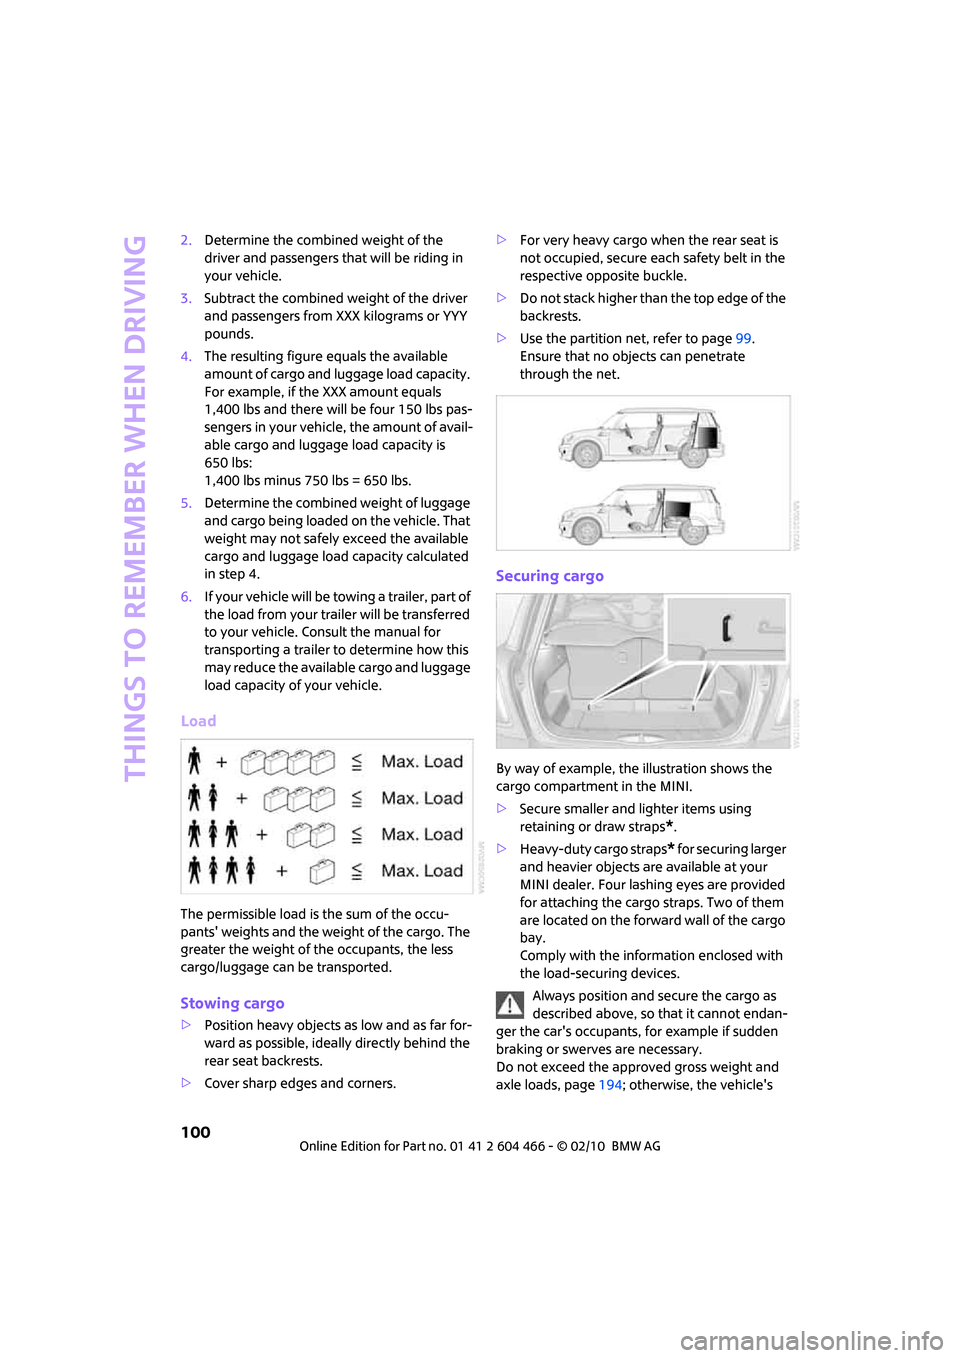
Load
The permissible load is the sum of the occu-
pants' weights and the weight of the cargo. The
greater the weight of the occupants, the less
cargo/luggage can be transported.
Stowing cargo
>Position heavy objects as low and as far for-
ward as possible, ideally directly behind the
rear seat backrests.
>Cover sharp edges and corners.>For very heavy cargo when the rear seat is
not occupied, secure each safety belt in the
respective opposite buckle.
>Do not stack higher than the top edge of the
backrests.
>Use the partition net, refer to page99.
Ensure that no objects can penetrate
through the net.
Securing cargo
By way of example, the illustration shows the
cargo compartment in the MINI.
>Secure smaller and lighter items using
retaining or draw straps
*.
>Heavy-duty cargo straps
* for securing larger
and heavier objects are available at your
MINI dealer. Four lashing eyes are provided
for attaching the cargo straps. Two of them
are located on the forward wall of the cargo
bay.
Comply with the information enclosed with
the load-securing devices.
Always position and secure the cargo as
described above, so that it cannot endan-
ger the car's occupants, for example if sudden
braking or swerves are necessary.
Do not exceed the approved gross weight and
axle loads, page194; otherwise, the vehicle's
Page 103 of 218
MOBILITYAT A GLANCE CONTROLS DRIVING TIPS ENTERTAINMENT
101
NAVIGATION REFERENCE
operating safety is no longer assured and the
vehicle will not be in compliance with the certifi-
cation regulations.
Heavy or hard objects should not be carried
loose inside the car, since they could be thrown
around, for example as a result of heavy braking,
sudden swerves, etc., and endanger the occu-
pants. Do not secure cargo using the fastening
points for the tether strap, page44; they may
become damaged.<
Roof-mounted luggage
rack*
A special rack system is available as an option for
your MINI. Your MINI dealer will be glad to
advise you. Comply with the installation instruc-
tions supplied with the rack system.
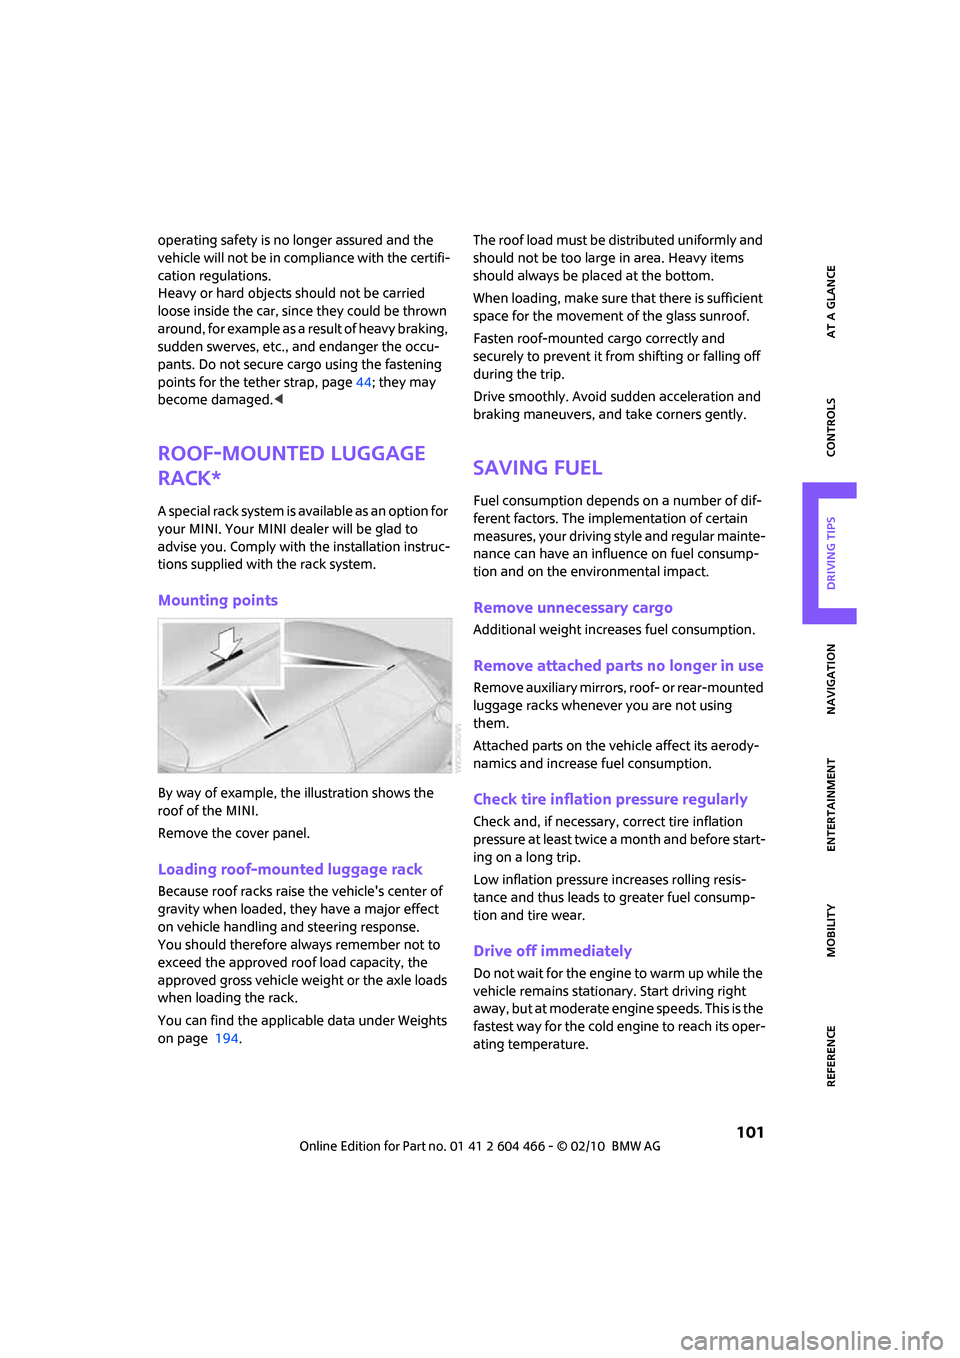
Mounting points
By way of example, the illustration shows the
roof of the MINI.
Remove the cover panel.
Loading roof-mounted luggage rack
Because roof racks raise the vehicle's center of
gravity when loaded, they have a major effect
on vehicle handling and steering response.
You should therefore always remember not to
exceed the approved roof load capacity, the
approved gross vehicle weight or the axle loads
when loading the rack.
You can find the applicable data under Weights
on page 194.The roof load must be distributed uniformly and
should not be too large in area. Heavy items
should always be placed at the bottom.
When loading, make sure that there is sufficient
space for the movement of the glass sunroof.
Fasten roof-mounted cargo correctly and
securely to prevent it from shifting or falling off
during the trip.
Drive smoothly. Avoid sudden acceleration and
braking maneuvers, and take corners gently.
Saving fuel
Fuel consumption depends on a number of dif-
ferent factors. The implementation of certain
measures, your driving style and regular mainte-
nance can have an influence on fuel consump-
tion and on the environmental impact.
Remove unnecessary cargo
Additional weight increases fuel consumption.
Remove attached parts no longer in use
Remove auxiliary mirrors, roof- or rear-mounted
luggage racks whenever you are not using
them.
Attached parts on the vehicle affect its aerody-
namics and increase fuel consumption.
Check tire inflation pressure regularly
Check and, if necessary, correct tire inflation
pressure at least twice a month and before start-
ing on a long trip.
Low inflation pressure increases rolling resis-
tance and thus leads to greater fuel consump-
tion and tire wear.
Drive off immediately
Do not wait for the engine to warm up while the
vehicle remains stationary. Start driving right
away, but at moderate engine speeds. This is the
fastest way for the cold engine to reach its oper-
ating temperature.
Page 112 of 218

Destination entry
110
Entering destination by zip code
1.Select "City / Zip code".
2.Enter the zip code:
Select the digits individually.
>To enter spaces, if necessary:
Select the symbol.
>To delete individual numbers or letters:
Move the MINI joystick to the right to
highlight and press the MINI joystick.
>To delete all numbers or letters:
Move the MINI joystick to the right to
highlight and press the MINI joystick
for an extended period.
3.Select the zip code.
The corresponding destination is displayed.
4.Move the highlight marker to the third field
from the top. Select the town/city.
Entering street, house number and
intersection
After the street you can also enter the intersec-
tion or the house number.
Entering street and intersection
1.Select "Street" or displayed street.
2.Enter the street.
The street is entered in the same manner as
the town or city.
The intersection is entered in the same way as
the street.
Entering a street without entering a
town/city
You can also enter a street without specifying a
town/city. In this case, all streets in the desig-
nated country are offered. The corresponding
town/city is displayed after the street name.
1.Turn the MINI joystick until "State / Prov-
ince" or the displayed country is selected.
The list of available countries appears on the
display.
2.Select the country of destination.
3.Turn the MINI joystick until the "Street" is
selected.
4.Select the first letter.
A list of all streets starting with this letter and
of the associated towns/cities appears on
the Control Display.
Page 113 of 218
MOBILITYAT A GLANCE CONTROLS DRIVING TIPS ENTERTAINMENT
111
NAVIGATION REFERENCE
5.If necessary, enter more letters.
The list gradually grows smaller each time
you enter a new letter.
6.Change to the list of street names and select
the street name in the corresponding town/
city.
Entering a house number
You can enter all house numbers that are stored
for the street on the navigation DVD.
1.Select "House number".
2.To enter the house number:
Select the digits individually.
3.Move the highlight marker to the third field
from the top. Select the house number.
You can only enter house numbers that are
stored for the street on the navigation DVD.
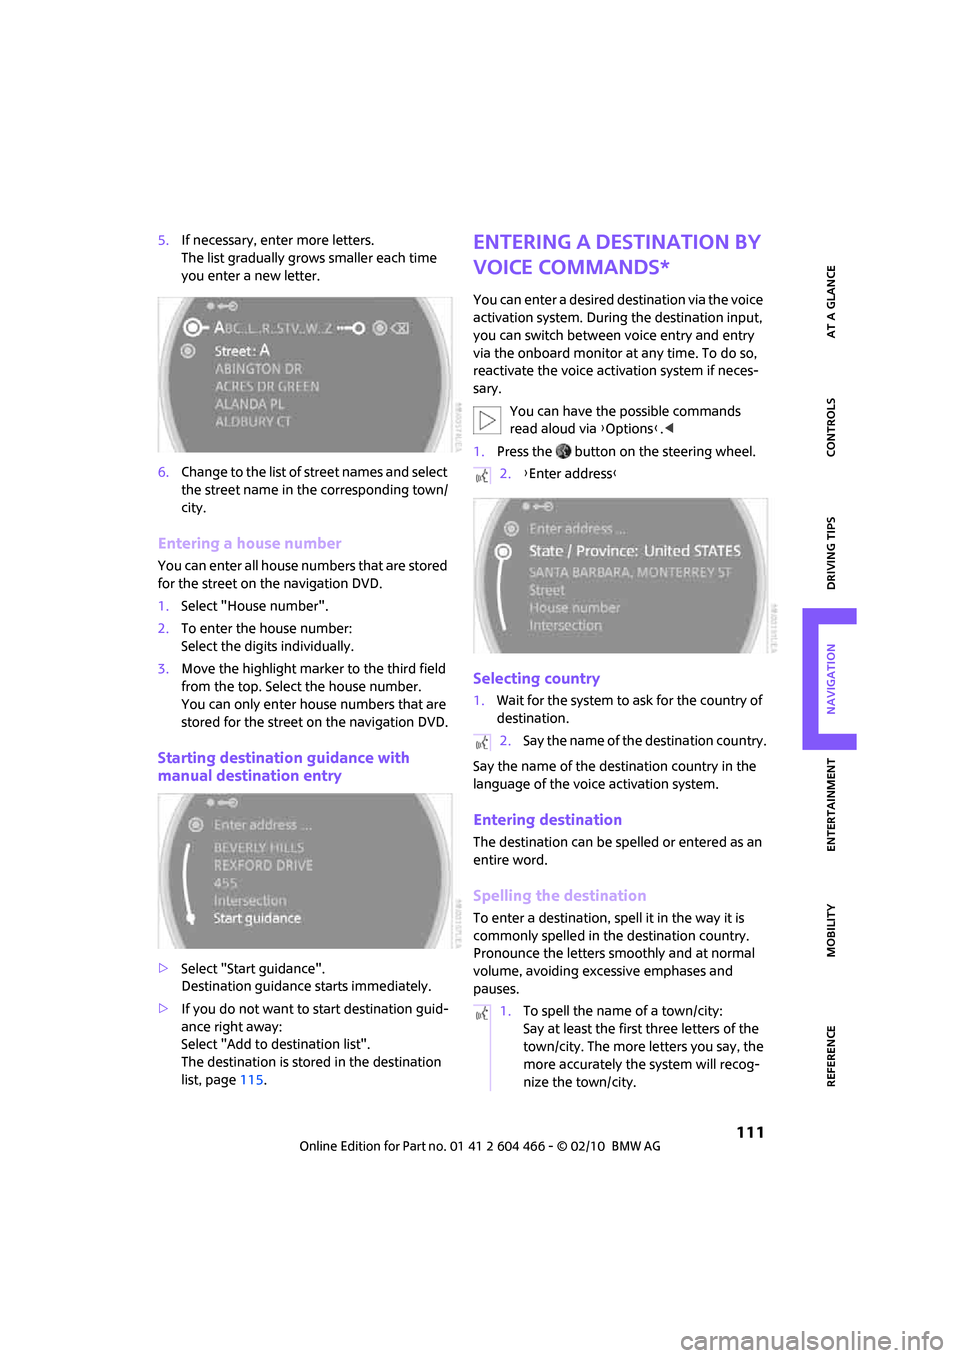
Starting destination guidance with
manual destination entry
>Select "Start guidance".
Destination guidance starts immediately.
>If you do not want to start destination guid-
ance right away:
Select "Add to destination list".
The destination is stored in the destination
list, page115.
Entering a destination by
voice commands*
You can enter a desired destination via the voice
activation system. During the destination input,
you can switch between voice entry and entry
via the onboard monitor at any time. To do so,
reactivate the voice activation system if neces-
sary.
You can have the possible commands
read aloud via {Options}.<
1.Press the button on the steering wheel.
Selecting country
1.Wait for the system to ask for the country of
destination.
Say the name of the destination country in the
language of the voice activation system.
Entering destination
The destination can be spelled or entered as an
entire word.
Spelling the destination
To enter a destination, spell it in the way it is
commonly spelled in the destination country.
Pronounce the letters smoothly and at normal
volume, avoiding excessive emphases and
pauses.
2.{Enter address}
2.Say the name of the destination country.
1.To spell the name of a town/city:
Say at least the first three letters of the
town/city. The more letters you say, the
more accurately the system will recog-
nize the town/city.
Page 114 of 218
Destination entry
112
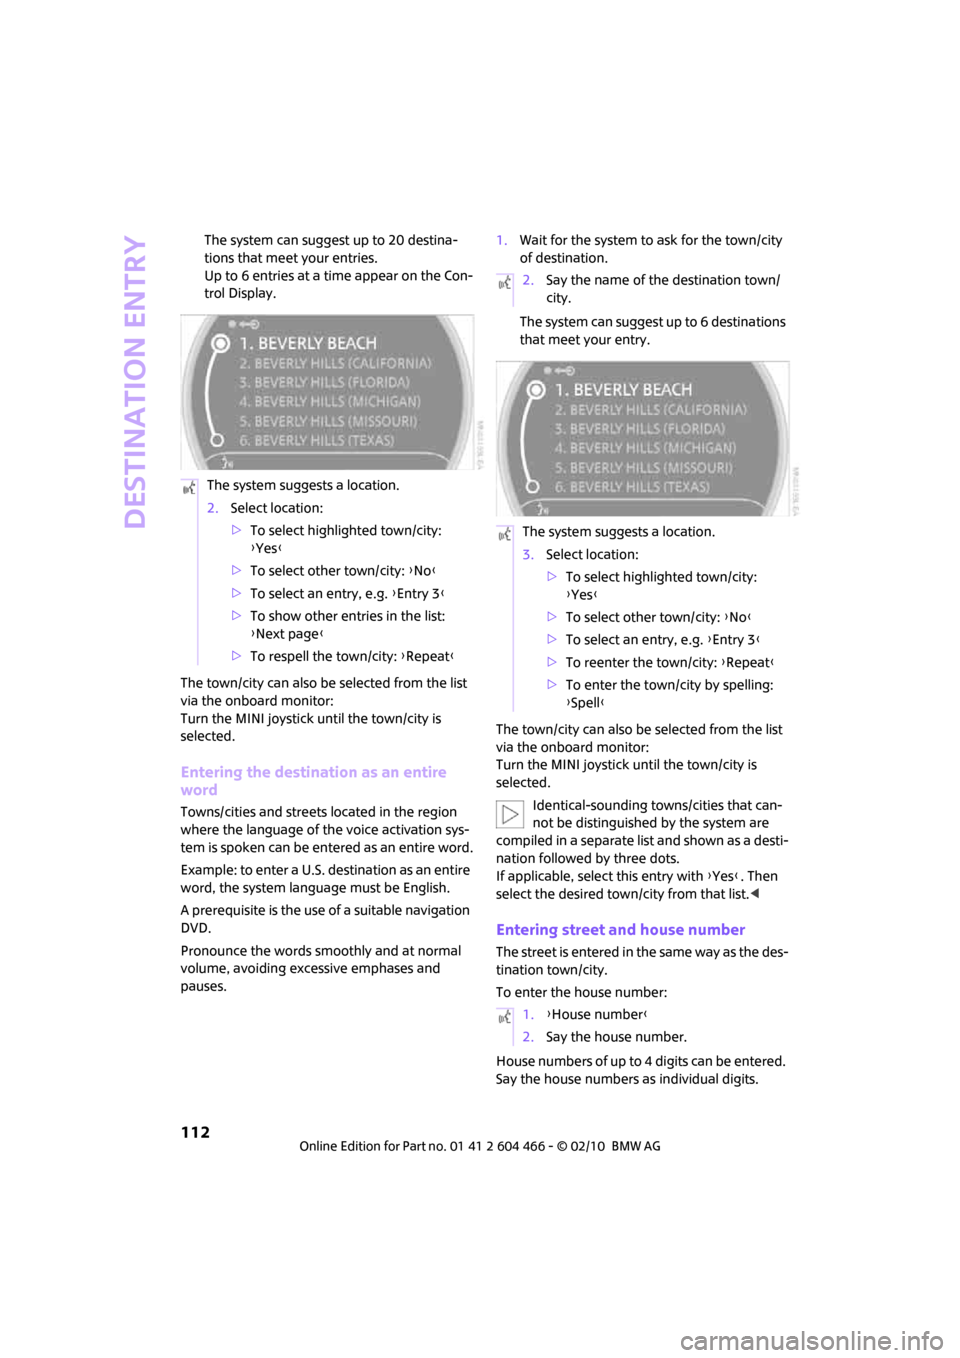
The system can suggest up to 20 destina-
tions that meet your entries.
Up to 6 entries at a time appear on the Con-
trol Display.
The town/city can also be selected from the list
via the onboard monitor:
Turn the MINI joystick until the town/city is
selected.
Entering the destination as an entire
word
Towns/cities and streets located in the region
where the language of the voice activation sys-
tem is spoken can be entered as an entire word.
Example: to enter a U.S. destination as an entire
word, the system language must be English.
A prerequisite is the use of a suitable navigation
DVD.
Pronounce the words smoothly and at normal
volume, avoiding excessive emphases and
pauses.1.Wait for the system to ask for the town/city
of destination.
The system can suggest up to 6 destinations
that meet your entry.
The town/city can also be selected from the list
via the onboard monitor:
Turn the MINI joystick until the town/city is
selected.
Identical-sounding towns/cities that can-
not be distinguished by the system are
compiled in a separate list and shown as a desti-
nation followed by three dots.
If applicable, select this entry with {Yes}. Then
select the desired town/city from that list.<
Entering street and house number
The street is entered in the same way as the des-
tination town/city.
To enter the house number:
House numbers of up to 4 digits can be entered.
Say the house numbers as individual digits. The system suggests a location.
2.Select location:
>To select highlighted town/city:
{Yes}
>To select other town/city: {No}
>To select an entry, e.g. {Entry 3}
>To show other entries in the list:
{Next page}
>To respell the town/city: {Repeat}
2.Say the name of the destination town/
city.
The system suggests a location.
3.Select location:
>To select highlighted town/city:
{Yes}
>To select other town/city: {No}
>To select an entry, e.g. {Entry 3}
>To reenter the town/city: {Repeat}
>To enter the town/city by spelling:
{Spell}
1.{House number}
2.Say the house number.
Page 115 of 218
MOBILITYAT A GLANCE CONTROLS DRIVING TIPS ENTERTAINMENT
113
NAVIGATION REFERENCE
Starting destination guidance
Destination guidance starts immediately.
Storing destinations
Destinations are added to the destination list or
can be stored in the address book.
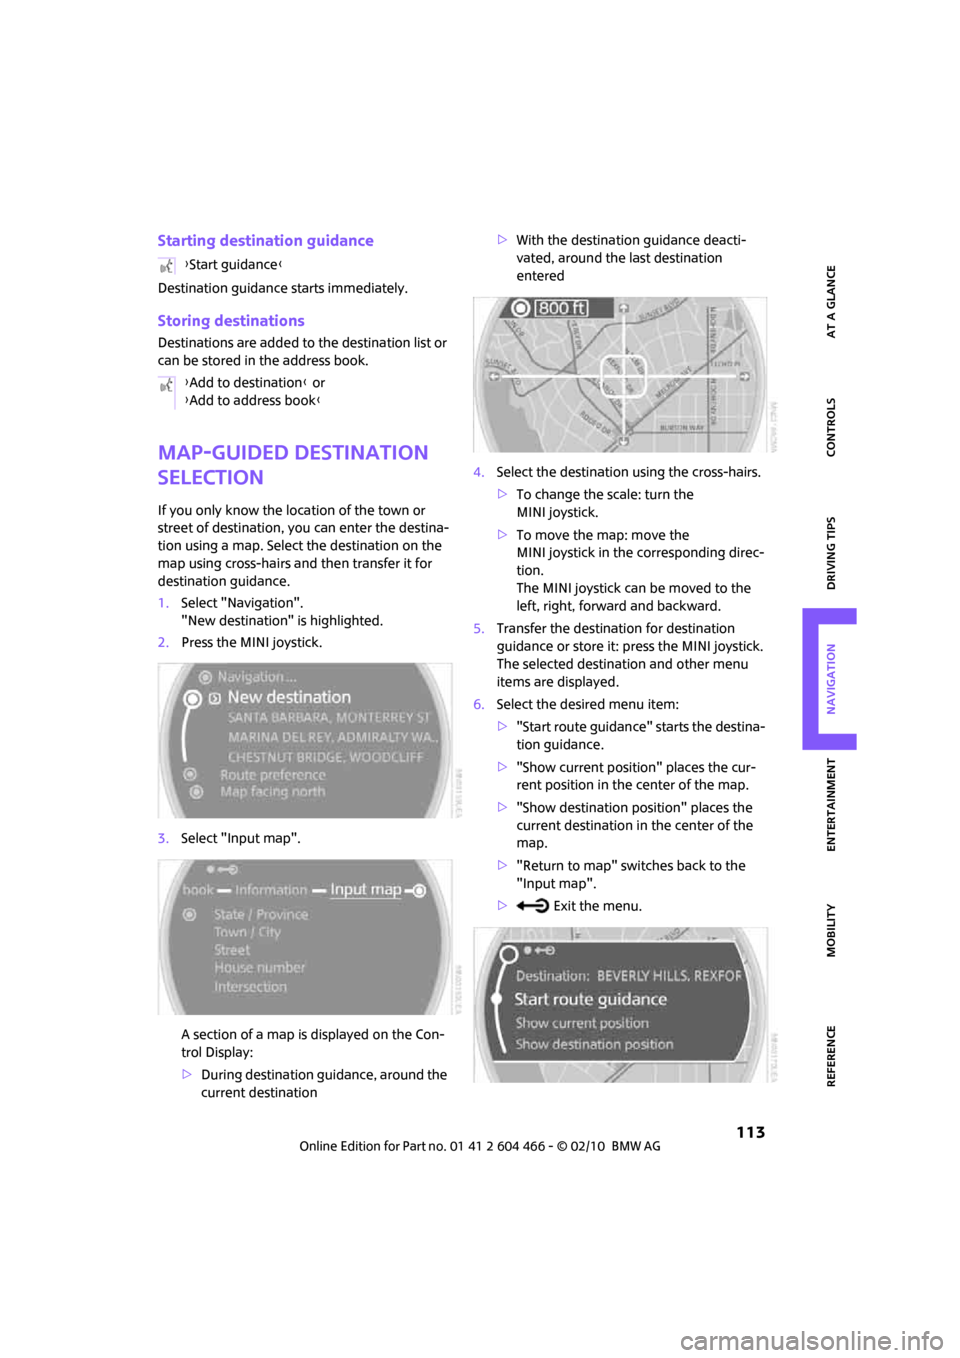
Map-guided destination
selection
If you only know the location of the town or
street of destination, you can enter the destina-
tion using a map. Select the destination on the
map using cross-hairs and then transfer it for
destination guidance.
1.Select "Navigation".
"New destination" is highlighted.
2.Press the MINI joystick.
3.Select "Input map".
A section of a map is displayed on the Con-
trol Display:
>During destination guidance, around the
current destination>With the destination guidance deacti-
vated, around the last destination
entered
4.Select the destination using the cross-hairs.
>To change the scale: turn the
MINI joystick.
>To move the map: move the
MINI joystick in the corresponding direc-
tion.
The MINI joystick can be moved to the
left, right, forward and backward.
5.Transfer the destination for destination
guidance or store it: press the MINI joystick.
The selected destination and other menu
items are displayed.
6.Select the desired menu item:
>"Start route guidance" starts the destina-
tion guidance.
>"Show current position" places the cur-
rent position in the center of the map.
>"Show destination position" places the
current destination in the center of the
map.
>"Return to map" switches back to the
"Input map".
> Exit the menu. {Start guidance}
{Add to destination} or
{Add to address book}
Page 120 of 218
Destination entry
118
Using home address as destination
1.Select "Home address".
2.Select "Start guidance".
Changing the home address
1.Select "Home address".
2.Select "Edit address".
For operation, refer to Entering a destination
manually, page108.
Route selection
You can influence the calculated route by choos-
ing certain route criteria. You can change the
route criteria as often as you like during destina-
tion entry or during destination guidance.
The route is planned according to fixed rules.
The type of road is taken into account, e.g.
whether it is a highway or a winding road. The
road types are stored on the navigation DVD. As
a result, the routes recommended by the navi-
gation system may not always be the same ones
that you would choose based on personal expe-
rience.
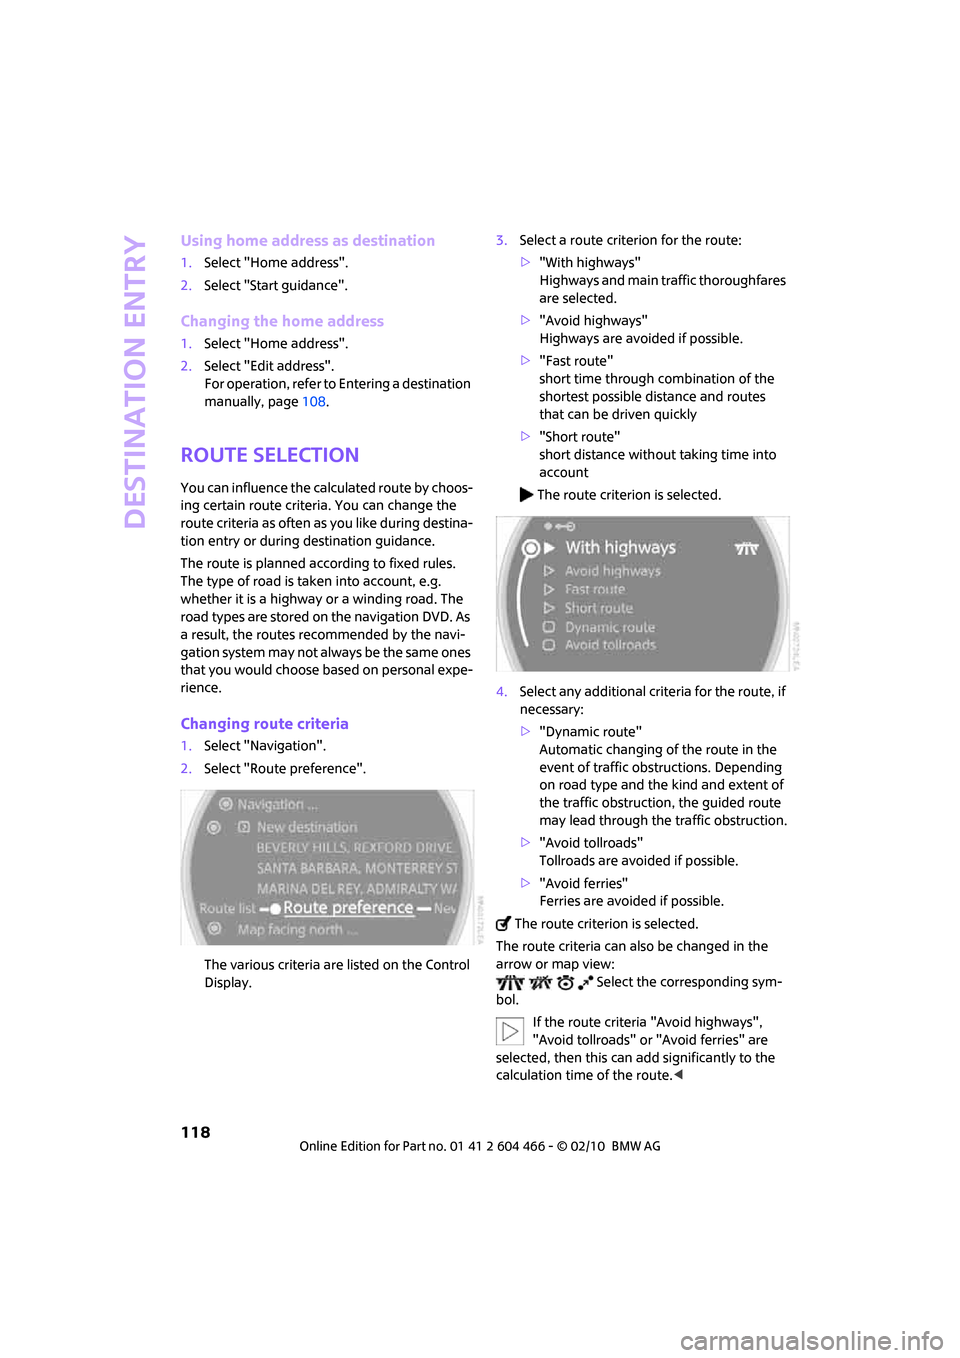
Changing route criteria
1.Select "Navigation".
2.Select "Route preference".
The various criteria are listed on the Control
Display.3.Select a route criterion for the route:
>"With highways"
Highways and main traffic thoroughfares
are selected.
>"Avoid highways"
Highways are avoided if possible.
>"Fast route"
short time through combination of the
shortest possible distance and routes
that can be driven quickly
>"Short route"
short distance without taking time into
account
The route criterion is selected.
4.Select any additional criteria for the route, if
necessary:
>"Dynamic route"
Automatic changing of the route in the
event of traffic obstructions. Depending
on road type and the kind and extent of
the traffic obstruction, the guided route
may lead through the traffic obstruction.
>"Avoid tollroads"
Tollroads are avoided if possible.
>"Avoid ferries"
Ferries are avoided if possible.
The route criterion is selected.
The route criteria can also be changed in the
arrow or map view:
Select the corresponding sym-
bol.
If the route criteria "Avoid highways",
"Avoid tollroads" or "Avoid ferries" are
selected, then this can add significantly to the
calculation time of the route.<
Page 121 of 218
MOBILITYAT A GLANCE CONTROLS DRIVING TIPS ENTERTAINMENT
119
NAVIGATION REFERENCE
Exiting the menu
Select the arrow.
Word-matching principle
The system's word-matching principle makes it
easier to enter the names of towns or streets.
The system runs ongoing checks, comparing
your destination entries with the data stored on
the navigation DVD as the basis for instant
response. The benefits for you include:
>Names of towns entered may differ from the
official versions if you are using a spelling
that is customary in another country.
Example:
Instead of "München", you can also enter
the English spelling "Munich" or the Italian
spelling "Monaco".
>When you are entering the names of towns
and streets the system will complete them
automatically as soon as enough letters are
available to ensure unambiguous identifica-
tion.
>The system offers only those letters for
selection of name entries that are stored on
the navigation DVD. Thus, entry of errone-
ous or unregistered names is impossible.
Page 124 of 218
Destination guidance
122
1.Select "Navigation".
2.Move the highlight marker to the fourth field
from the top. Select the desired map view:
>"Map facing north"
>"Map direction of travel"
>"Perspective"
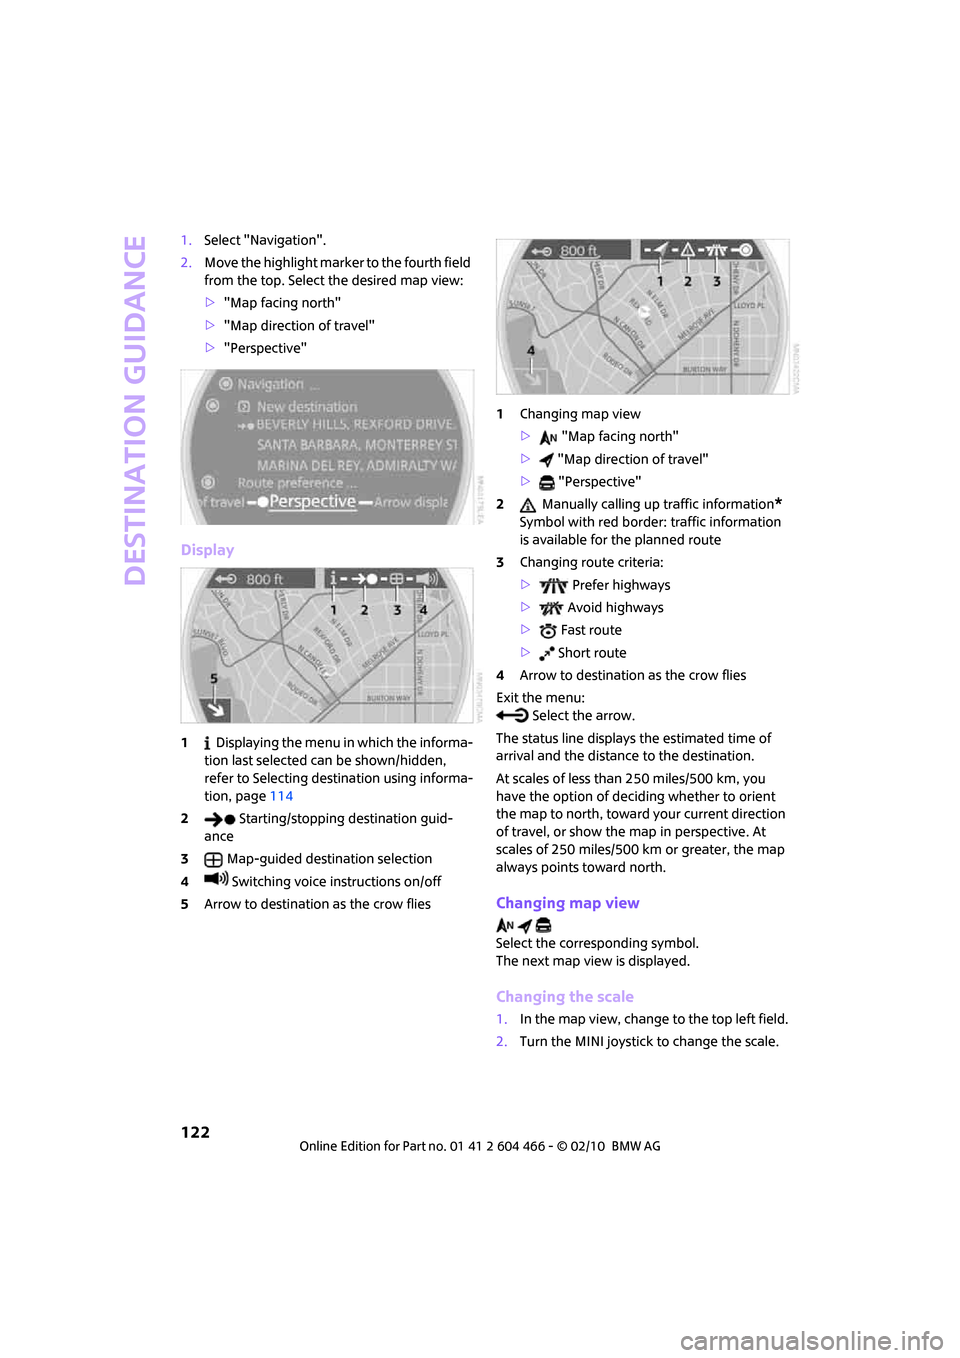
Display
1 Displaying the menu in which the informa-
tion last selected can be shown/hidden,
refer to Selecting destination using informa-
tion, page114
2 Starting/stopping destination guid-
ance
3Map-guided destination selection
4 Switching voice instructions on/off
5Arrow to destination as the crow flies1Changing map view
> "Map facing north"
> "Map direction of travel"
> "Perspective"
2 Manually calling up traffic information
*
Symbol with red border: traffic information
is available for the planned route
3Changing route criteria:
> Prefer highways
> Avoid highways
> Fast route
> Short route
4Arrow to destination as the crow flies
Exit the menu:
Select the arrow.
The status line displays the estimated time of
arrival and the distance to the destination.
At scales of less than 250 miles/500 km, you
have the option of deciding whether to orient
the map to north, toward your current direction
of travel, or show the map in perspective. At
scales of 250 miles/500 km or greater, the map
always points toward north.
Changing map view
Select the corresponding symbol.
The next map view is displayed.
Changing the scale
1.In the map view, change to the top left field.
2.Turn the MINI joystick to change the scale.