reset MINI Clubman 2010 Owner's Manual (Mini Connected)
[x] Cancel search | Manufacturer: MINI, Model Year: 2010, Model line: Clubman, Model: MINI Clubman 2010Pages: 218, PDF Size: 3.97 MB
Page 13 of 218
MOBILITYAT A GLANCE CONTROLS DRIVING TIPS ENTERTAINMENT
11
NAVIGATION REFERENCE
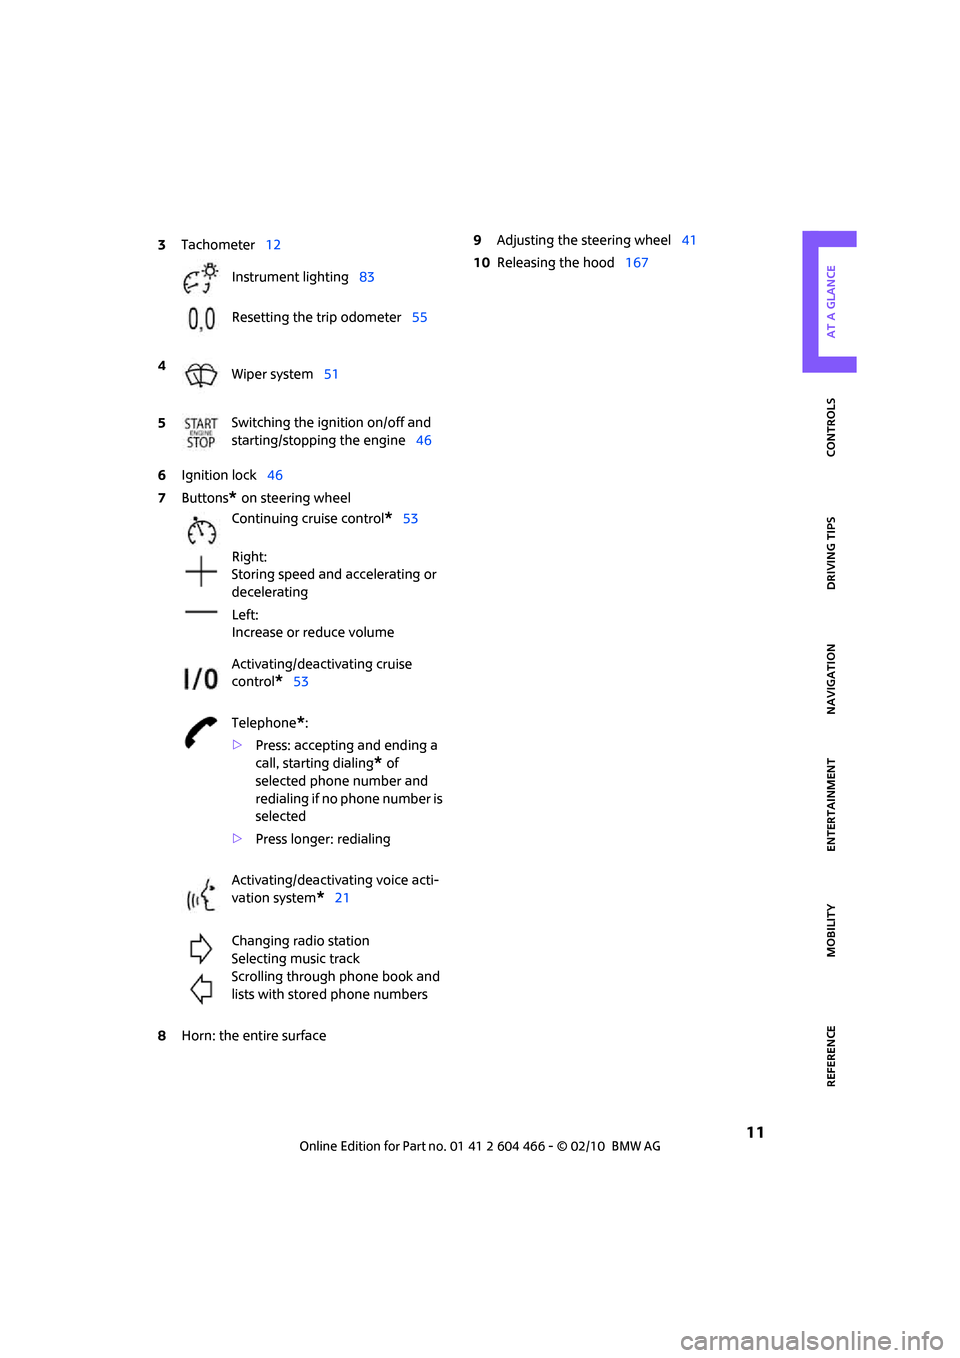
6Ignition lock46
7Buttons
* on steering wheel
8Horn: the entire surface9Adjusting the steering wheel41
10Releasing the hood167 3Tachometer12
Instrument lighting83
Resetting the trip odometer55
4
Wiper system51
5Switching the ignition on/off and
starting/stopping the engine46
Continuing cruise control
*53
Right:
Storing speed and accelerating or
decelerating
Left:
Increase or reduce volume
Activating/deactivating cruise
control
*53
Telephone
*:
>Press: accepting and ending a
call, starting dialing
* of
selected phone number and
redialing if no phone number is
selected
>Press longer: redialing
Activating/deactivating voice acti-
vation system
*21
Changing radio station
Selecting music track
Scrolling through phone book and
lists with stored phone numbers
Page 14 of 218
Cockpit
12
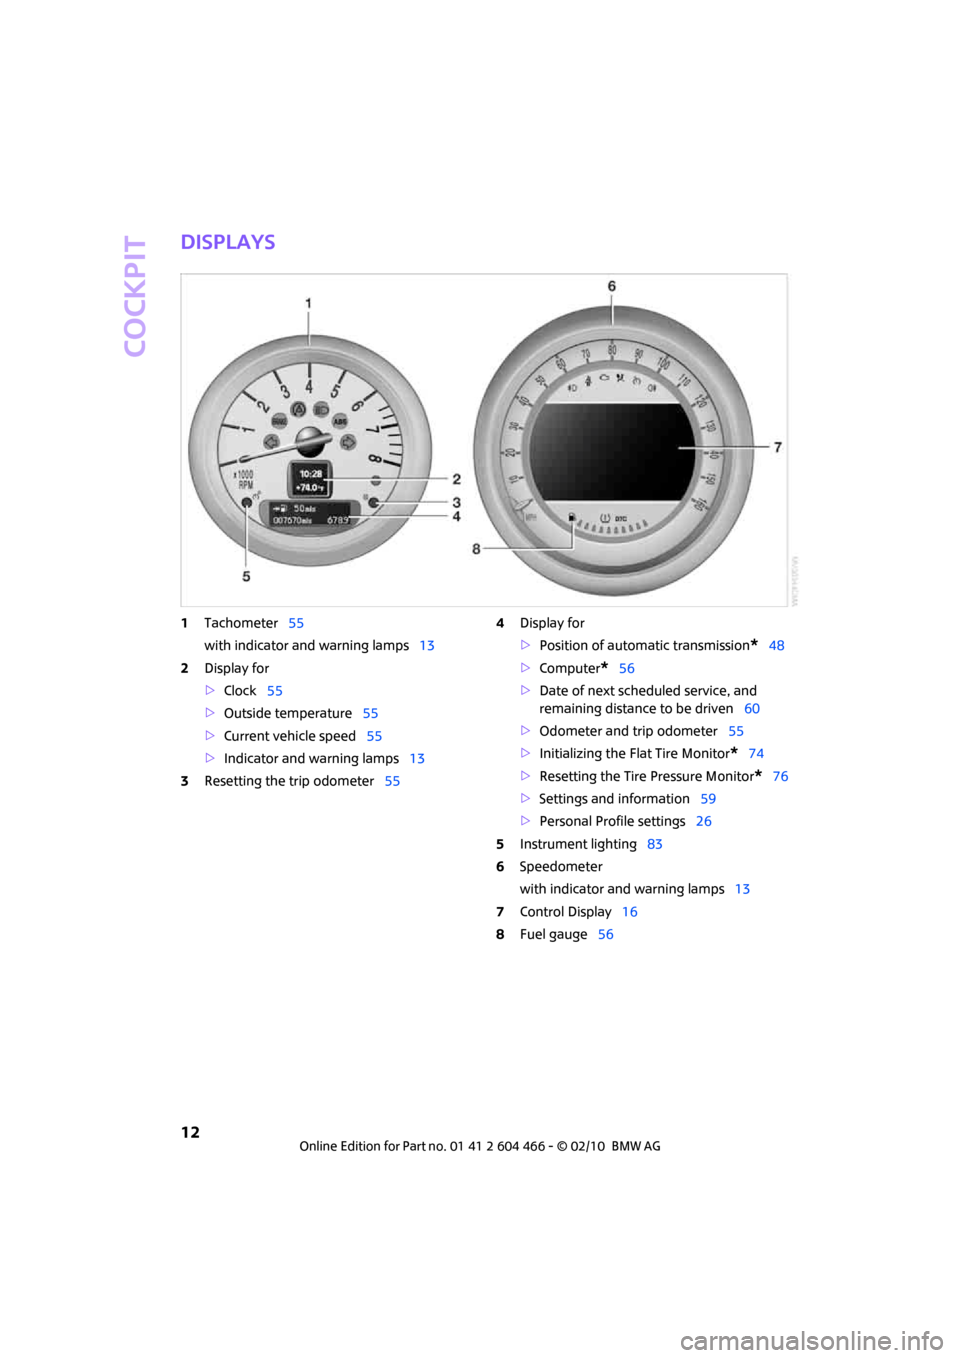
Displays
1Tachometer55
with indicator and warning lamps13
2Display for
>Clock55
>Outside temperature55
>Current vehicle speed55
>Indicator and warning lamps13
3Resetting the trip odometer554Display for
>Position of automatic transmission
*48
>Computer
*56
>Date of next scheduled service, and
remaining distance to be driven60
>Odometer and trip odometer55
>Initializing the Flat Tire Monitor
*74
>Resetting the Tire Pressure Monitor
*76
>Settings and information59
>Personal Profile settings26
5Instrument lighting83
6Speedometer
with indicator and warning lamps13
7Control Display16
8Fuel gauge56
Page 53 of 218
MOBILITYAT A GLANCE CONTROLS DRIVING TIPS ENTERTAINMENT
51
NAVIGATION REFERENCE
5.Select "Lighting".
6.Select "Triple turn signal".
Triple turn signaling is activated.
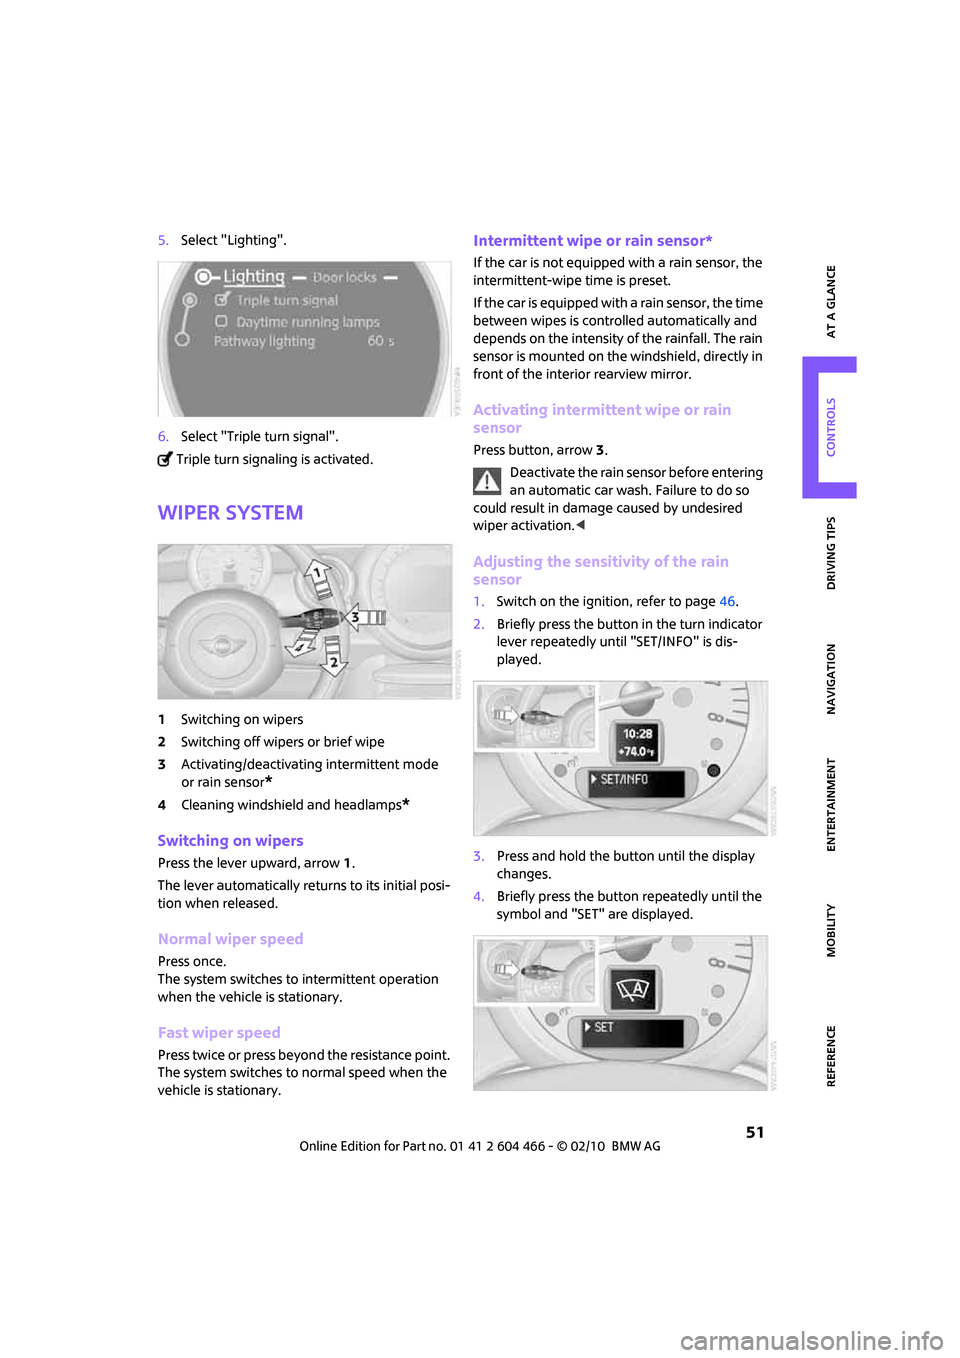
Wiper system
1Switching on wipers
2Switching off wipers or brief wipe
3Activating/deactivating intermittent mode
or rain sensor
*
4Cleaning windshield and headlamps*
Switching on wipers
Press the lever upward, arrow1.
The lever automatically returns to its initial posi-
tion when released.
Normal wiper speed
Press once.
The system switches to intermittent operation
when the vehicle is stationary.
Fast wiper speed
Press twice or press beyond the resistance point.
The system switches to normal speed when the
vehicle is stationary.
Intermittent wipe or rain sensor*
If the car is not equipped with a rain sensor, the
intermittent-wipe time is preset.
If the car is equipped with a rain sensor, the time
between wipes is controlled automatically and
depends on the intensity of the rainfall. The rain
sensor is mounted on the windshield, directly in
front of the interior rearview mirror.
Activating intermittent wipe or rain
sensor
Press button, arrow3.
Deactivate the rain sensor before entering
an automatic car wash. Failure to do so
could result in damage caused by undesired
wiper activation.<
Adjusting the sensitivity of the rain
sensor
1.Switch on the ignition, refer to page46.
2.Briefly press the button in the turn indicator
lever repeatedly until "SET/INFO" is dis-
played.
3.Press and hold the button until the display
changes.
4.Briefly press the button repeatedly until the
symbol and "SET" are displayed.
Page 57 of 218
MOBILITYAT A GLANCE CONTROLS DRIVING TIPS ENTERTAINMENT
55
NAVIGATION REFERENCE
Controls overview
Odometer, outside
temperature display,
clock
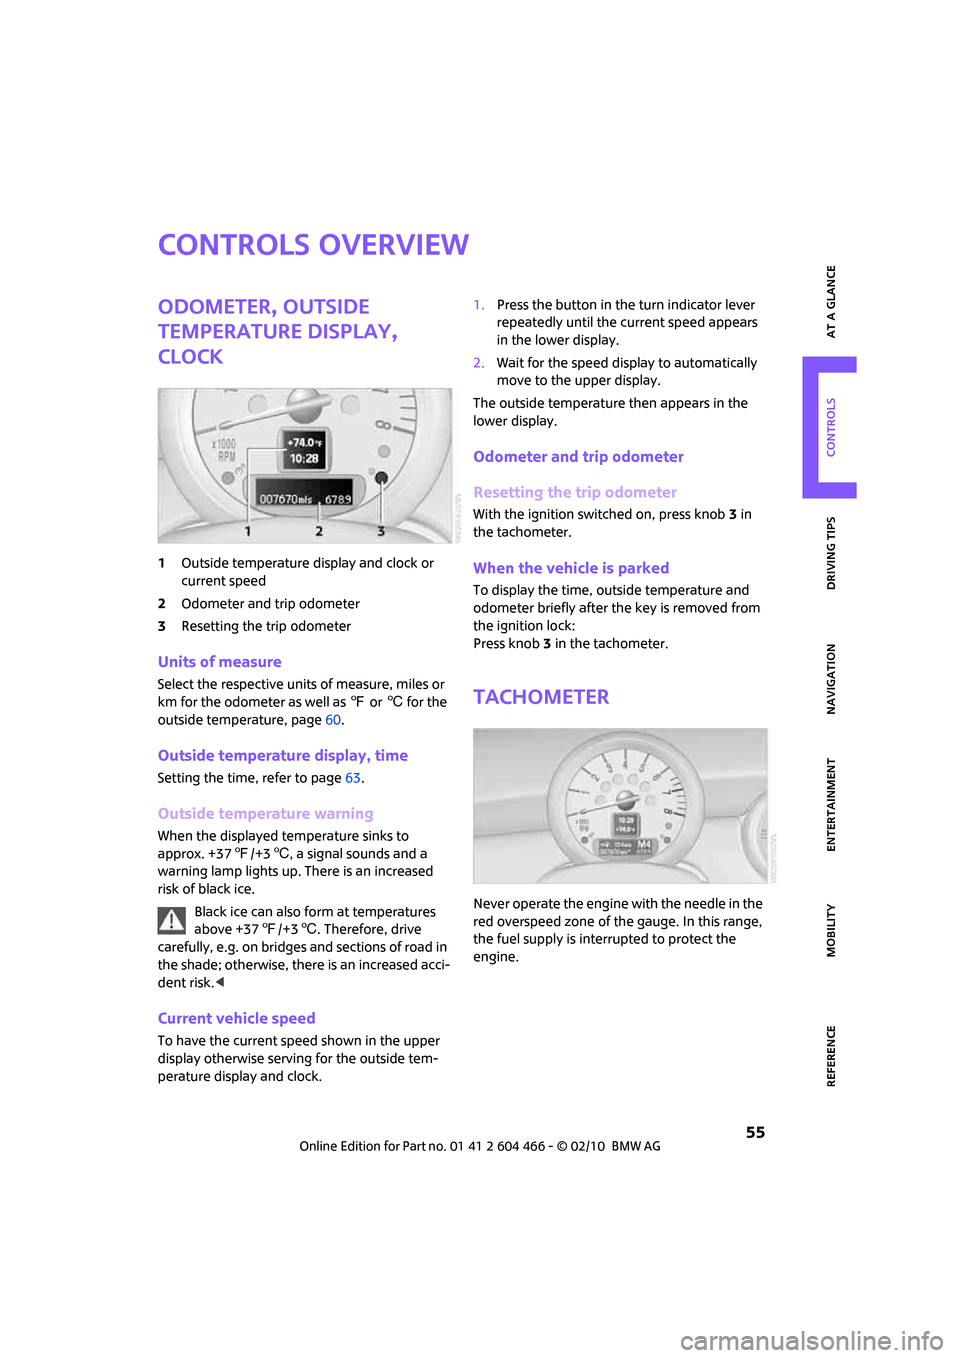
1Outside temperature display and clock or
current speed
2Odometer and trip odometer
3Resetting the trip odometer
Units of measure
Select the respective units of measure, miles or
km for the odometer as well as 7 or 6 for the
outside temperature, page60.
Outside temperature display, time
Setting the time, refer to page63.
Outside temperature warning
When the displayed temperature sinks to
approx. +377/+36, a signal sounds and a
warning lamp lights up. There is an increased
risk of black ice.
Black ice can also form at temperatures
above +377/+36. Therefore, drive
carefully, e.g. on bridges and sections of road in
the shade; otherwise, there is an increased acci-
dent risk.<
Current vehicle speed
To have the current speed shown in the upper
display otherwise serving for the outside tem-
perature display and clock.1.Press the button in the turn indicator lever
repeatedly until the current speed appears
in the lower display.
2.Wait for the speed display to automatically
move to the upper display.
The outside temperature then appears in the
lower display.
Odometer and trip odometer
Resetting the trip odometer
With the ignition switched on, press knob 3 in
the tachometer.
When the vehicle is parked
To display the time, outside temperature and
odometer briefly after the key is removed from
the ignition lock:
Press knob 3 in the tachometer.
Tachometer
Never operate the engine with the needle in the
red overspeed zone of the gauge. In this range,
the fuel supply is interrupted to protect the
engine.
Page 59 of 218
MOBILITYAT A GLANCE CONTROLS DRIVING TIPS ENTERTAINMENT
57
NAVIGATION REFERENCE
To reset average fuel consumption: press the
button in the turn indicator lever for approx.
2seconds.
Current fuel consumption
Displays the current fuel consumption to allow
you to see whether your current driving style is
conducive to fuel economy with minimum
exhaust emissions.
Average speed
Periods with the vehicle parked and the engine
switched off are not included in the calculations
of average speed.
With the trip computer, page58, you can have
the average speed for another trip displayed.
To reset average speed: press the button in the
turn indicator lever for approx. 2 seconds.
Current vehicle speed
To have the current speed shown in the upper
display otherwise serving for the outside tem-
perature display and clock.
1.Press the button in the turn indicator lever
repeatedly until the current speed appears
in the lower display.
2.Wait for the speed display to automatically
move to the upper display.
The outside temperature then appears in the
lower display of the computer.
Displays on the Control Display
To access the computer via the onboard moni-
tor, basic operation on page16.
1.Press the button.
This opens the start menu.
2.Move the MINI joystick to highlight "Naviga-
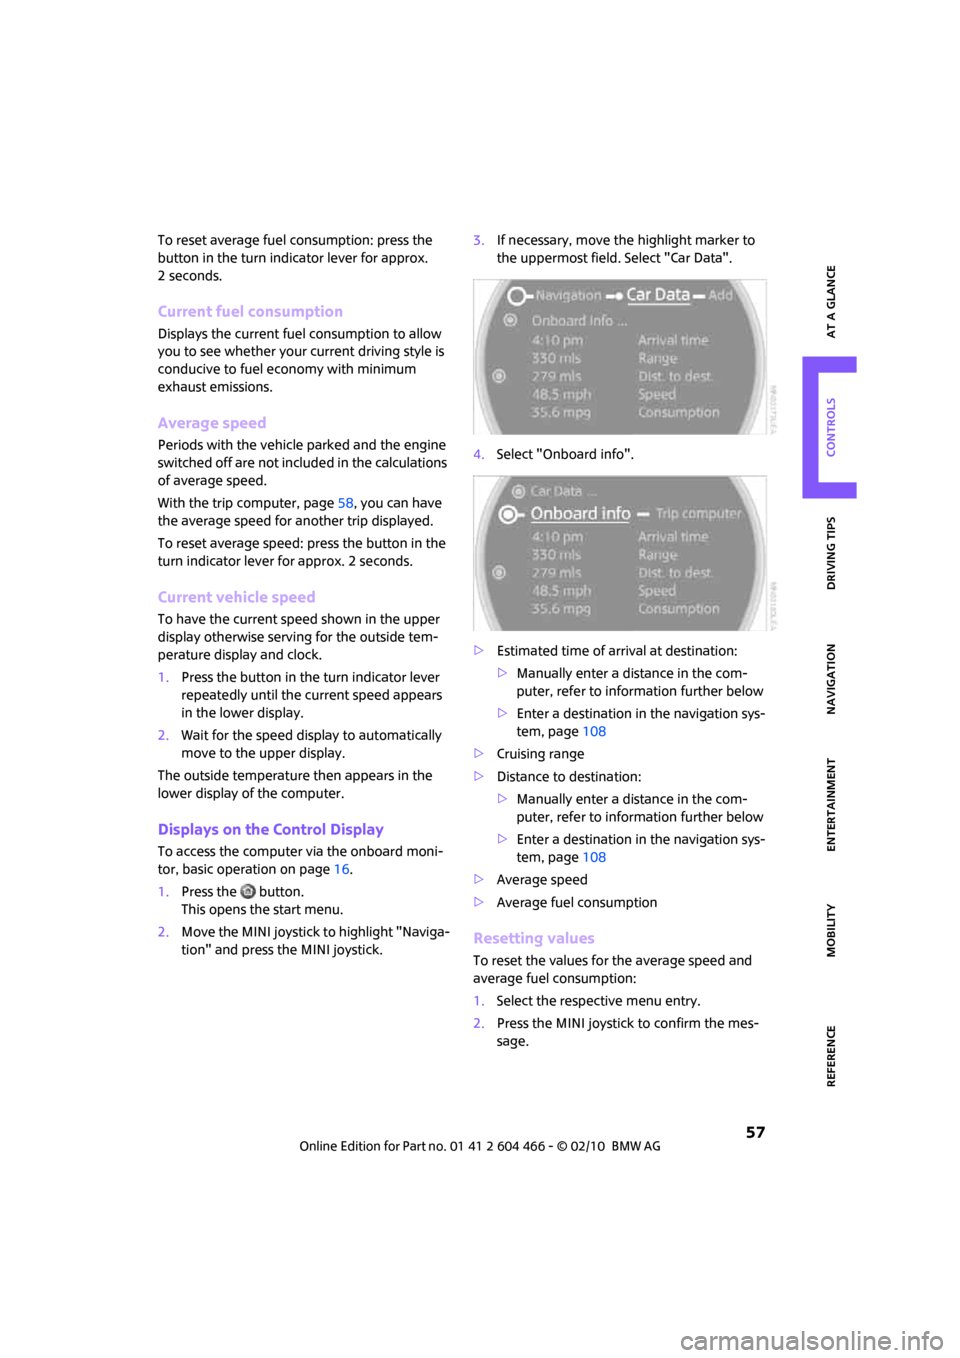
tion" and press the MINI joystick.3.If necessary, move the highlight marker to
the uppermost field. Select "Car Data".
4.Select "Onboard info".
>Estimated time of arrival at destination:
>Manually enter a distance in the com-
puter, refer to information further below
>Enter a destination in the navigation sys-
tem, page108
>Cruising range
>Distance to destination:
>Manually enter a distance in the com-
puter, refer to information further below
>Enter a destination in the navigation sys-
tem, page108
>Average speed
>Average fuel consumption
Resetting values
To reset the values for the average speed and
average fuel consumption:
1.Select the respective menu entry.
2.Press the MINI joystick to confirm the mes-
sage.
Page 60 of 218
Controls overview
58
Entering a distance manually
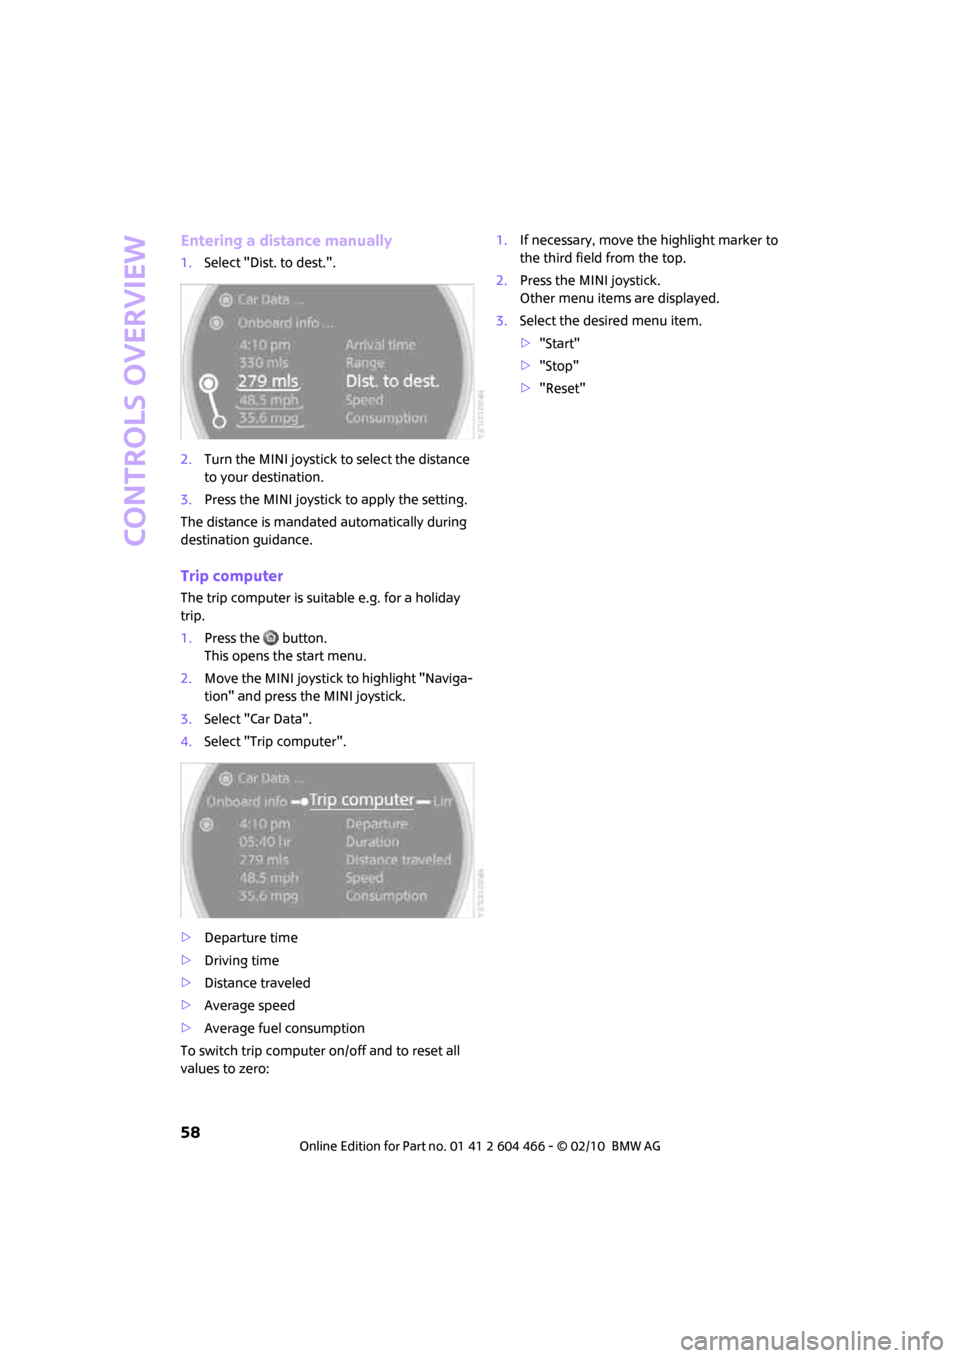
1.Select "Dist. to dest.".
2.Turn the MINI joystick to select the distance
to your destination.
3.Press the MINI joystick to apply the setting.
The distance is mandated automatically during
destination guidance.
Trip computer
The trip computer is suitable e.g. for a holiday
trip.
1.Press the button.
This opens the start menu.
2.Move the MINI joystick to highlight "Naviga-
tion" and press the MINI joystick.
3.Select "Car Data".
4.Select "Trip computer".
>Departure time
>Driving time
>Distance traveled
>Average speed
>Average fuel consumption
To switch trip computer on/off and to reset all
values to zero:1.If necessary, move the highlight marker to
the third field from the top.
2.Press the MINI joystick.
Other menu items are displayed.
3.Select the desired menu item.
>"Start"
>"Stop"
>"Reset"
Page 70 of 218
Controls overview
68
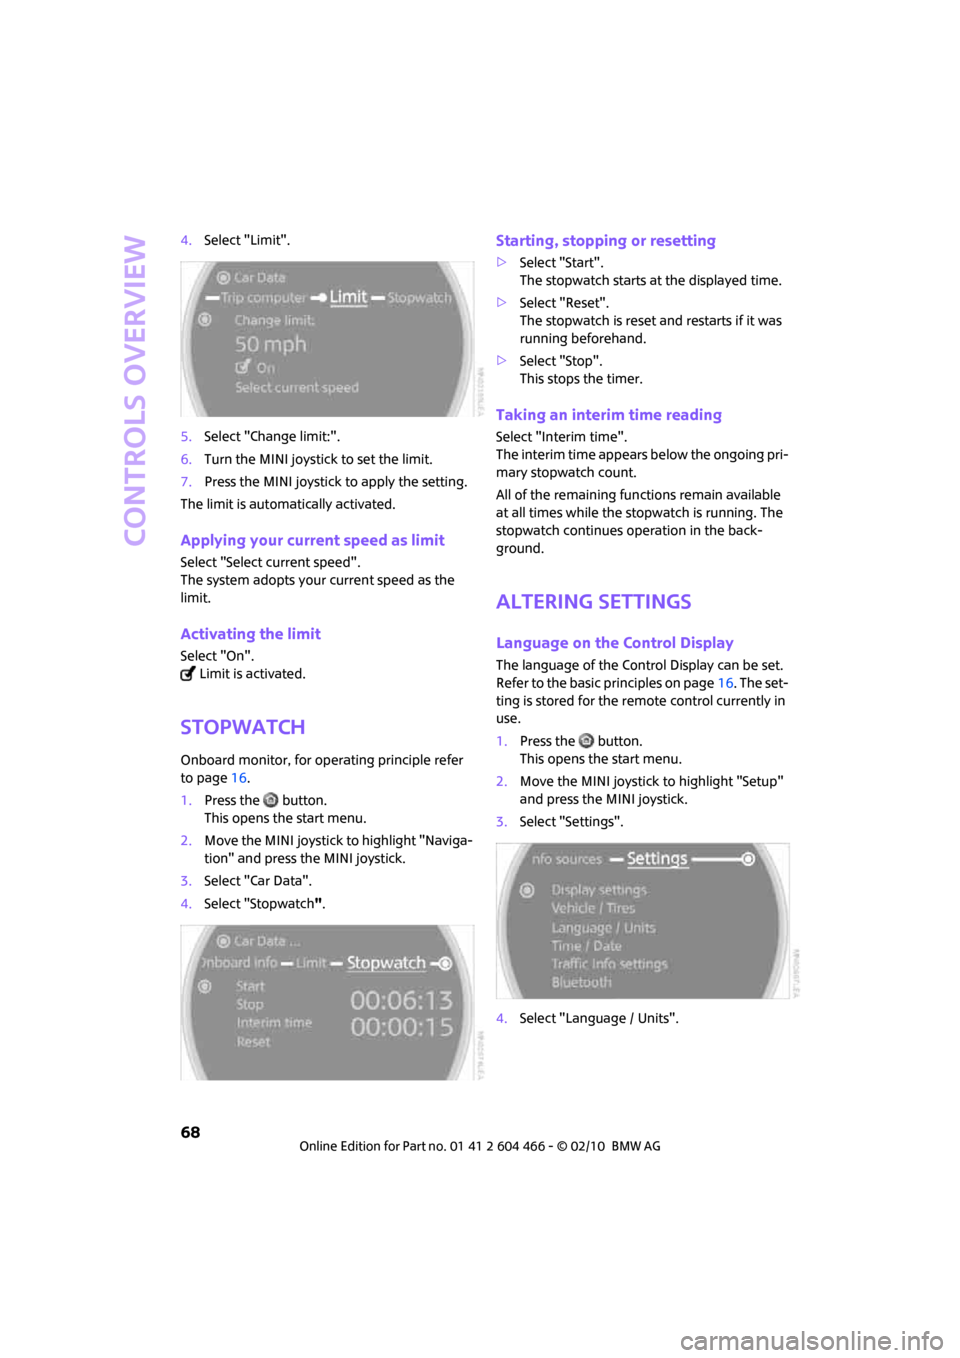
4.Select "Limit".
5.Select "Change limit:".
6.Turn the MINI joystick to set the limit.
7.Press the MINI joystick to apply the setting.
The limit is automatically activated.
Applying your current speed as limit
Select "Select current speed".
The system adopts your current speed as the
limit.
Activating the limit
Select "On".
Limit is activated.
Stopwatch
Onboard monitor, for operating principle refer
to page16.
1.Press the button.
This opens the start menu.
2.Move the MINI joystick to highlight "Naviga-
tion" and press the MINI joystick.
3.Select "Car Data".
4.Select "Stopwatch".
Starting, stopping or resetting
>Select "Start".
The stopwatch starts at the displayed time.
>Select "Reset".
The stopwatch is reset and restarts if it was
running beforehand.
>Select "Stop".
This stops the timer.
Taking an interim time reading
Select "Interim time".
The interim time appears below the ongoing pri-
mary stopwatch count.
All of the remaining functions remain available
at all times while the stopwatch is running. The
stopwatch continues operation in the back-
ground.
Altering settings
Language on the Control Display
The language of the Control Display can be set.
Refer to the basic principles on page16. The set-
ting is stored for the remote control currently in
use.
1.Press the button.
This opens the start menu.
2.Move the MINI joystick to highlight "Setup"
and press the MINI joystick.
3.Select "Settings".
4.Select "Language / Units".
Page 76 of 218
Technology for driving comfort and safety
74
Functional requirement
In order to assure the reliable reporting of a flat
tire, the system must be initialized for the cor-
rect tire inflation pressure.
Each time you correct the pressure in a
tire, or change a wheel or tire, the system
must be reinitialized.<
System limitations
The Flat Tire Monitor is unable to warn the driver
of sudden, severe tire damage caused by exter-
nal factors, nor can it identify the gradual loss of
pressure that will inevitably occur in all four tires
over a lengthy period of time.
In the following situations, the system could be
delayed or malfunction:
>System has not been initialized
>Driving on snowy or slippery road surface
>Performance-oriented style of driving: slip in
the drive wheels, high lateral acceleration
>Snow chains are attached
When the vehicle is driven with a space-saver
spare tire
*, page183, the Flat Tire Monitor can-
not function.
Initializing the system
The initialization is completed during driv-
ing, which can be interrupted at any time.
When driving resumes, the initialization is con-
tinued automatically.
Do not initialize the system if you are driving
with snow chains or a space-saver spare tire
*.<
Using the onboard monitor
Onboard monitor, for operating principle refer
to page16.
1.Press the button.
This opens the start menu.
2.Move the MINI joystick to highlight "Setup"
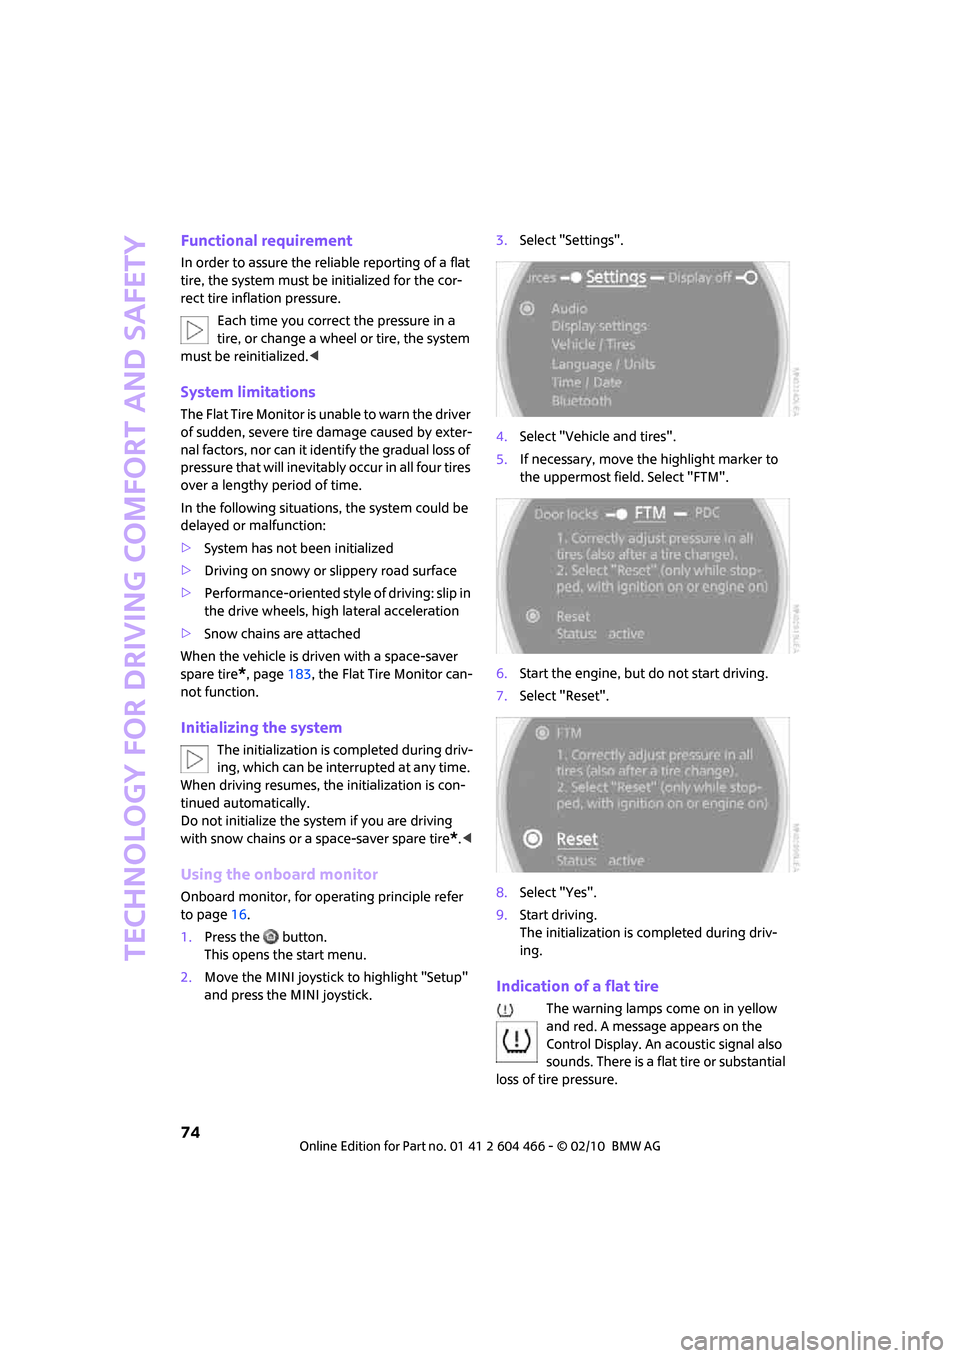
and press the MINI joystick.3.Select "Settings".
4.Select "Vehicle and tires".
5.If necessary, move the highlight marker to
the uppermost field. Select "FTM".
6.Start the engine, but do not start driving.
7.Select "Reset".
8.Select "Yes".
9.Start driving.
The initialization is completed during driv-
ing.
Indication of a flat tire
The warning lamps come on in yellow
and red. A message appears on the
Control Display. An acoustic signal also
sounds. There is a flat tire or substantial
loss of tire pressure.
Page 77 of 218
MOBILITYAT A GLANCE CONTROLS DRIVING TIPS ENTERTAINMENT
75
NAVIGATION REFERENCE
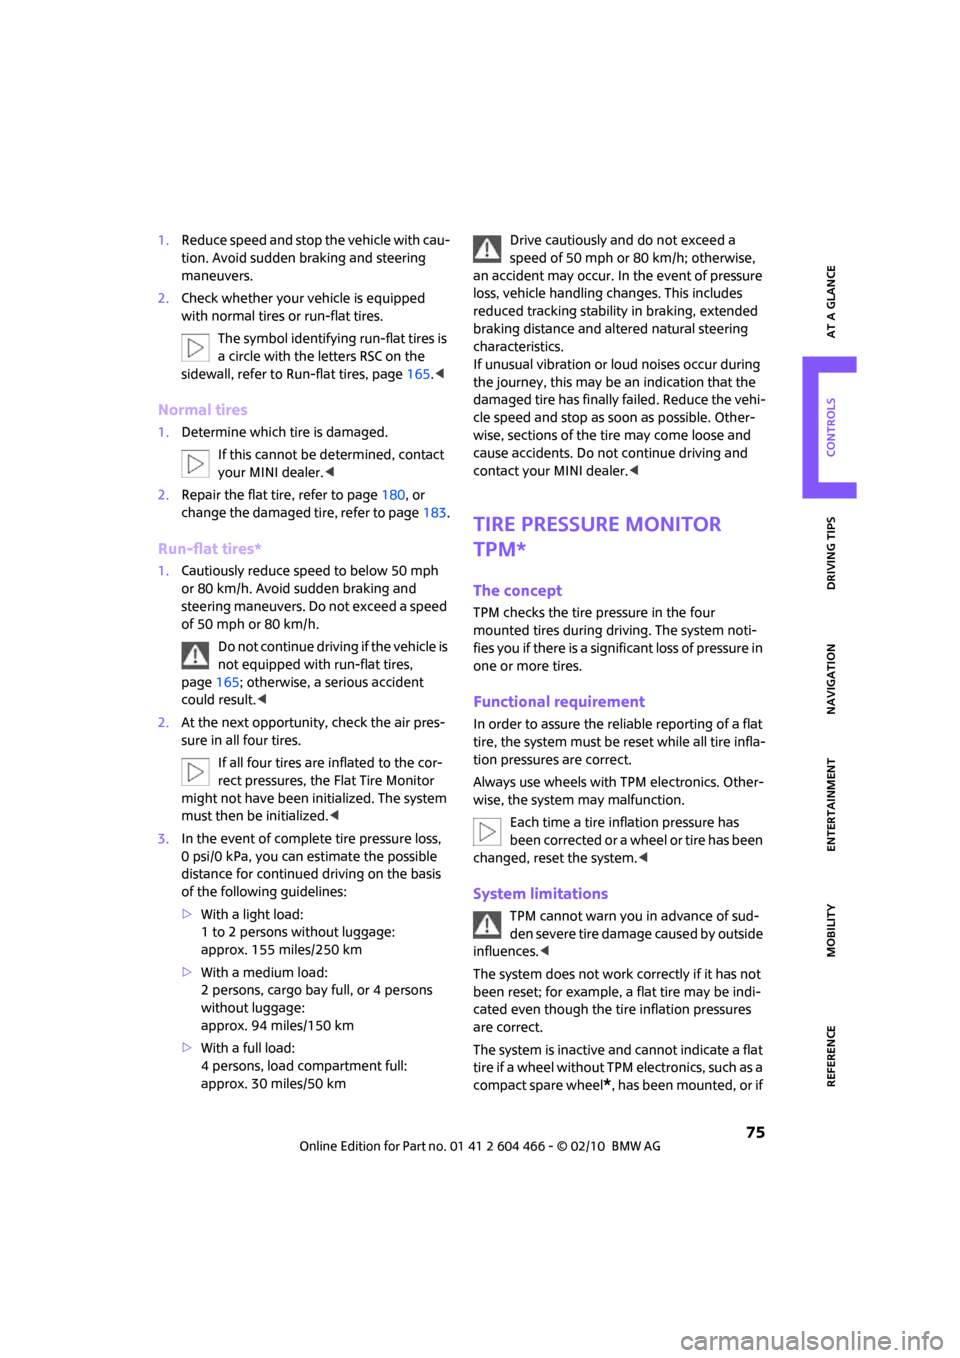
1.Reduce speed and stop the vehicle with cau-
tion. Avoid sudden braking and steering
maneuvers.
2.Check whether your vehicle is equipped
with normal tires or run-flat tires.
The symbol identifying run-flat tires is
a circle with the letters RSC on the
sidewall, refer to Run-flat tires, page165.<
Normal tires
1.Determine which tire is damaged.
If this cannot be determined, contact
your MINI dealer.<
2.Repair the flat tire, refer to page180, or
change the damaged tire, refer to page183.
Run-flat tires*
1.Cautiously reduce speed to below 50 mph
or 80 km/h. Avoid sudden braking and
steering maneuvers. Do not exceed a speed
of 50 mph or 80 km/h.
Do not continue driving if the vehicle is
not equipped with run-flat tires,
page165; otherwise, a serious accident
could result.<
2.At the next opportunity, check the air pres-
sure in all four tires.
If all four tires are inflated to the cor-
rect pressures, the Flat Tire Monitor
might not have been initialized. The system
must then be initialized.<
3.In the event of complete tire pressure loss,
0 psi/0 kPa, you can estimate the possible
distance for continued driving on the basis
of the following guidelines:
>With a light load:
1 to 2 persons without luggage:
approx. 155 miles/250 km
>With a medium load:
2 persons, cargo bay full, or 4 persons
without luggage:
approx. 94 miles/150 km
>With a full load:
4 persons, load compartment full:
approx. 30 miles/50 kmDrive cautiously and do not exceed a
speed of 50 mph or 80 km/h; otherwise,
an accident may occur. In the event of pressure
loss, vehicle handling changes. This includes
reduced tracking stability in braking, extended
braking distance and altered natural steering
characteristics.
If unusual vibration or loud noises occur during
the journey, this may be an indication that the
damaged tire has finally failed. Reduce the vehi-
cle speed and stop as soon as possible. Other-
wise, sections of the tire may come loose and
cause accidents. Do not continue driving and
contact your MINI dealer.<
Tire Pressure Monitor
TPM*
The concept
TPM checks the tire pressure in the four
mounted tires during driving. The system noti-
fies you if there is a significant loss of pressure in
one or more tires.
Functional requirement
In order to assure the reliable reporting of a flat
tire, the system must be reset while all tire infla-
tion pressures are correct.
Always use wheels with TPM electronics. Other-
wise, the system may malfunction.
Each time a tire inflation pressure has
been corrected or a wheel or tire has been
changed, reset the system.<
System limitations
TPM cannot warn you in advance of sud-
den severe tire damage caused by outside
influences.<
The system does not work correctly if it has not
been reset; for example, a flat tire may be indi-
cated even though the tire inflation pressures
are correct.
The system is inactive and cannot indicate a flat
tire if a wheel without TPM electronics, such as a
compact spare wheel
*, has been mounted, or if
Page 78 of 218
Technology for driving comfort and safety
76
TPM is temporarily malfunctioning due to other
systems or devices using the same radio fre-
quency.
Status indicator on the onboard monitor
The tire and system condition is indicated by the
color of the tires.
TPM takes into account the fact that tire pres-
sure changes while the vehicle is being driven.
The tire pressure does not need to be corrected
unless the TPM instructs you to do so by means
of color indicators.
Green
The tire inflation pressure corresponds to the
established target value.
"TPM active" is displayed on the onboard moni-
tor.
One wheel yellow
There is a flat tire or substantial loss of tire pres-
sure in the indicated tire. A message appears on
the onboard monitor.
All wheels yellow
There is a flat tire or substantial loss of tire pres-
sure in several tires. A message appears on the
onboard monitor.
Gray
The system cannot detect a puncture.
Possible reasons for this:
>TPM is being reset
>Temporary malfunction caused by systems
or devices using the same radio frequency
>Malfunction
Resetting the system
Each time a tire inflation pressure has
been corrected or a wheel or tire has been
changed, reset the system.<
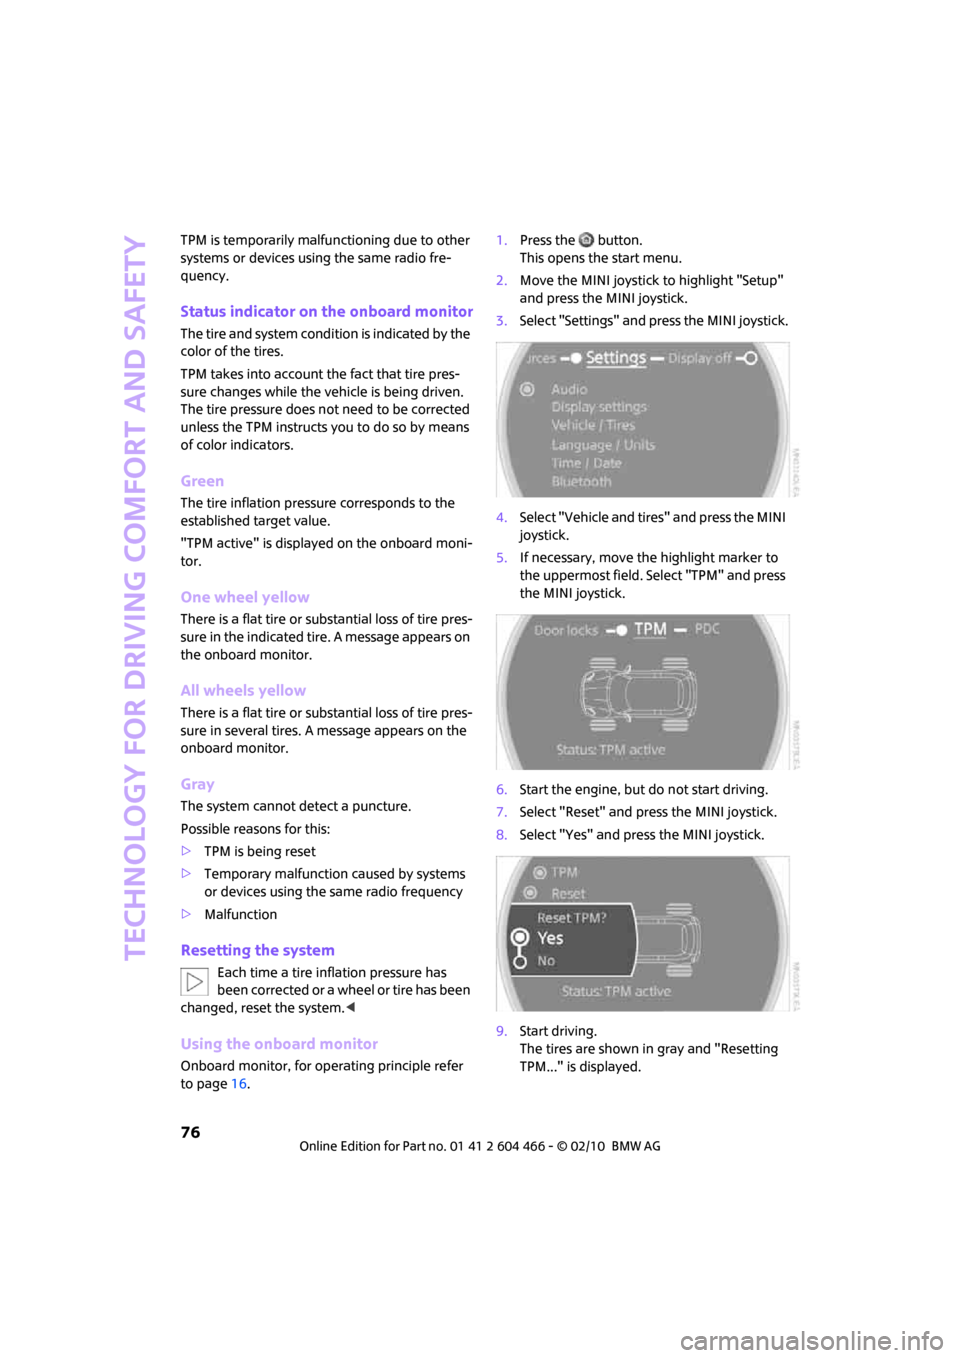
Using the onboard monitor
Onboard monitor, for operating principle refer
to page16.1.Press the button.
This opens the start menu.
2.Move the MINI joystick to highlight "Setup"
and press the MINI joystick.
3.Select "Settings" and press the MINI joystick.
4.Select "Vehicle and tires" and press the MINI
joystick.
5.If necessary, move the highlight marker to
the uppermost field. Select "TPM" and press
the MINI joystick.
6.Start the engine, but do not start driving.
7.Select "Reset" and press the MINI joystick.
8.Select "Yes" and press the MINI joystick.
9.Start driving.
The tires are shown in gray and "Resetting
TPM..." is displayed.