steering MINI Clubman 2011 Owner's Manual (Mini Connected)
[x] Cancel search | Manufacturer: MINI, Model Year: 2011, Model line: Clubman, Model: MINI Clubman 2011Pages: 256, PDF Size: 3.75 MB
Page 12 of 256
AT A GLANCECockpit
10
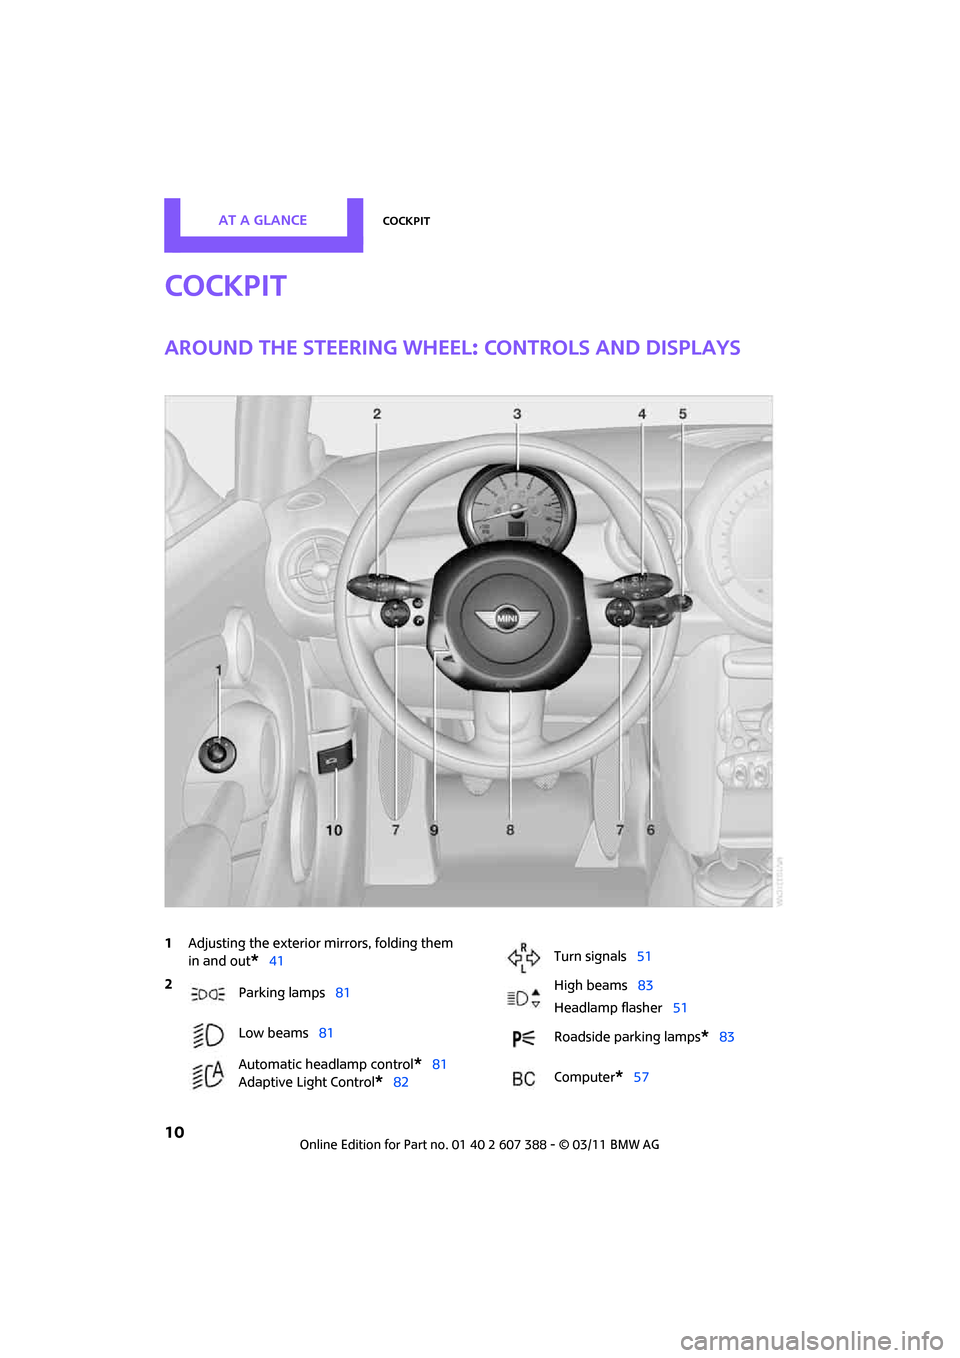
Cockpit
Around the steering wheel: controls and displays
1Adjusting the exterior mirrors, folding them
in and out
*41
2
Parking lamps 81
Low beams 81
Automatic headlamp control
*81
Adaptive Light Control
*82
Turn signals 51
High beams 83
Headlamp flasher 51
Roadside parking lamps
*83
Computer
*57
Page 13 of 256
CockpitAT A GLANCE
11
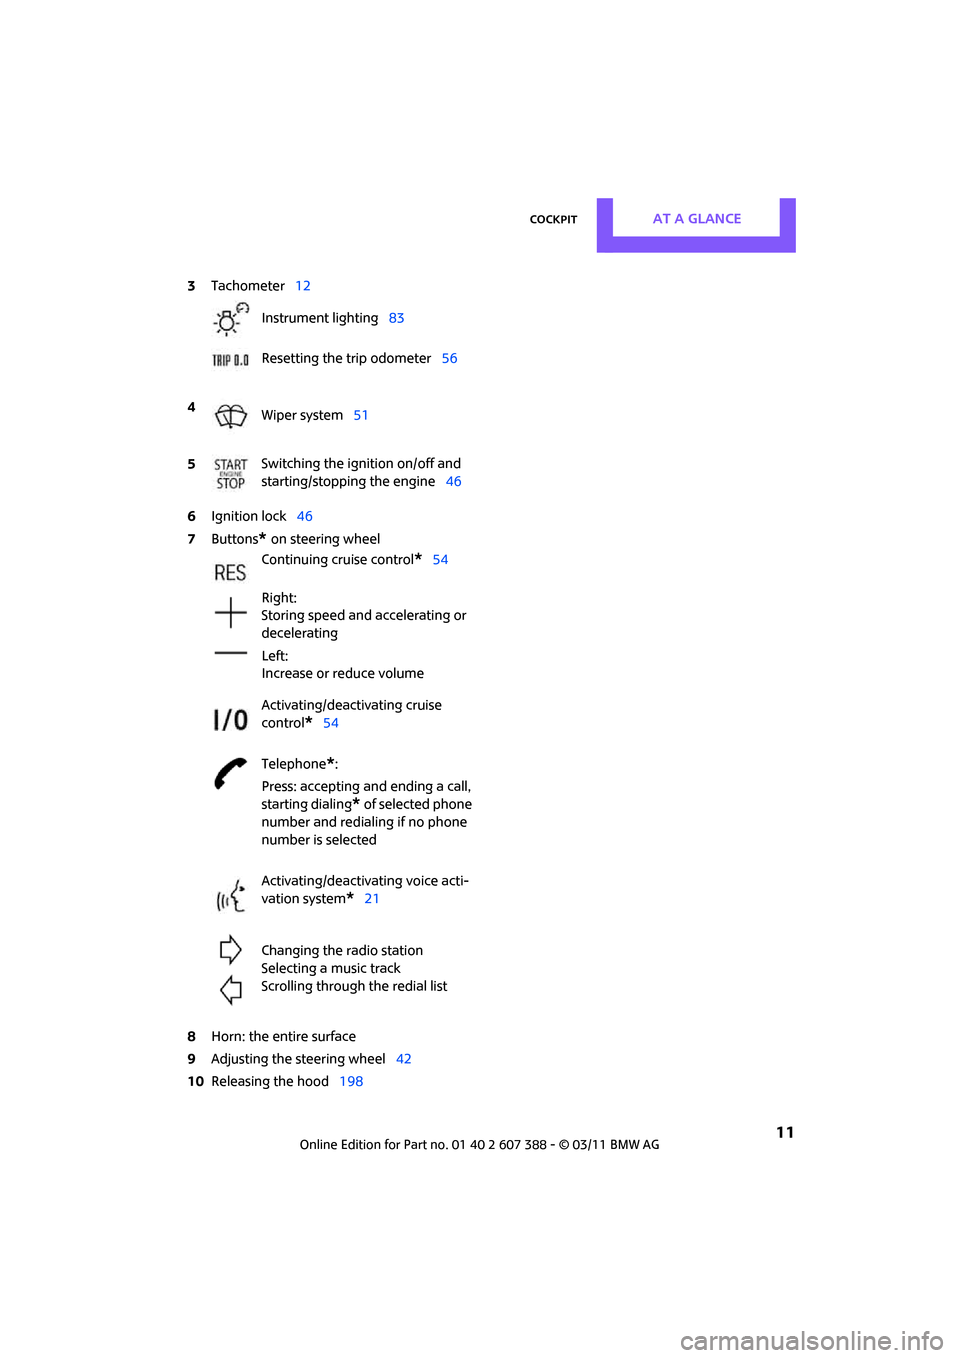
6Ignition lock 46
7 Buttons
* on steering wheel
8 Horn: the entire surface
9 Adjusting the steering wheel 42
10 Releasing the hood 198
3
Tachometer 12
Instrument lighting 83
Resetting the trip odometer 56
4 Wiper system 51
5 Switching the ignition on/off and
starting/stopping the engine
46
Continuing cruise control
*54
Right:
Storing speed and accelerating or
decelerating
Left:
Increase or reduce volume
Activating/deactivating cruise
control
*54
Telephone
*:
Press: accepting an d ending a call,
starting dialing
* of selected phone
number and redialing if no phone
number is selected
Activating/deactivating voice acti-
vation system
*21
Changing the radio station
Selecting a music track
Scrolling through the redial list
Page 23 of 256
Voice activation systemAT A GLANCE
21
Voice activation system
The concept
The voice activation system allows you to con-
trol operation of various vehicle systems without
removing your hands from the steering wheel.
Most menu items on the Control Display can be
voiced as commands. It is not necessary to use
the MINI joystick.
The voice activation sy stem transforms oral
commands into control signals for the selected
systems and provides support in the form of
instructions or questions.
Prerequisite
Via the on-board computer, select the language
in which the voice activation system is operat-
ing, so that the spoken commands can be iden-
tified. Setting the on-board computer language,
page 66.
Symbols in the Owner's Manual
Saying commands
Activating voice activation system
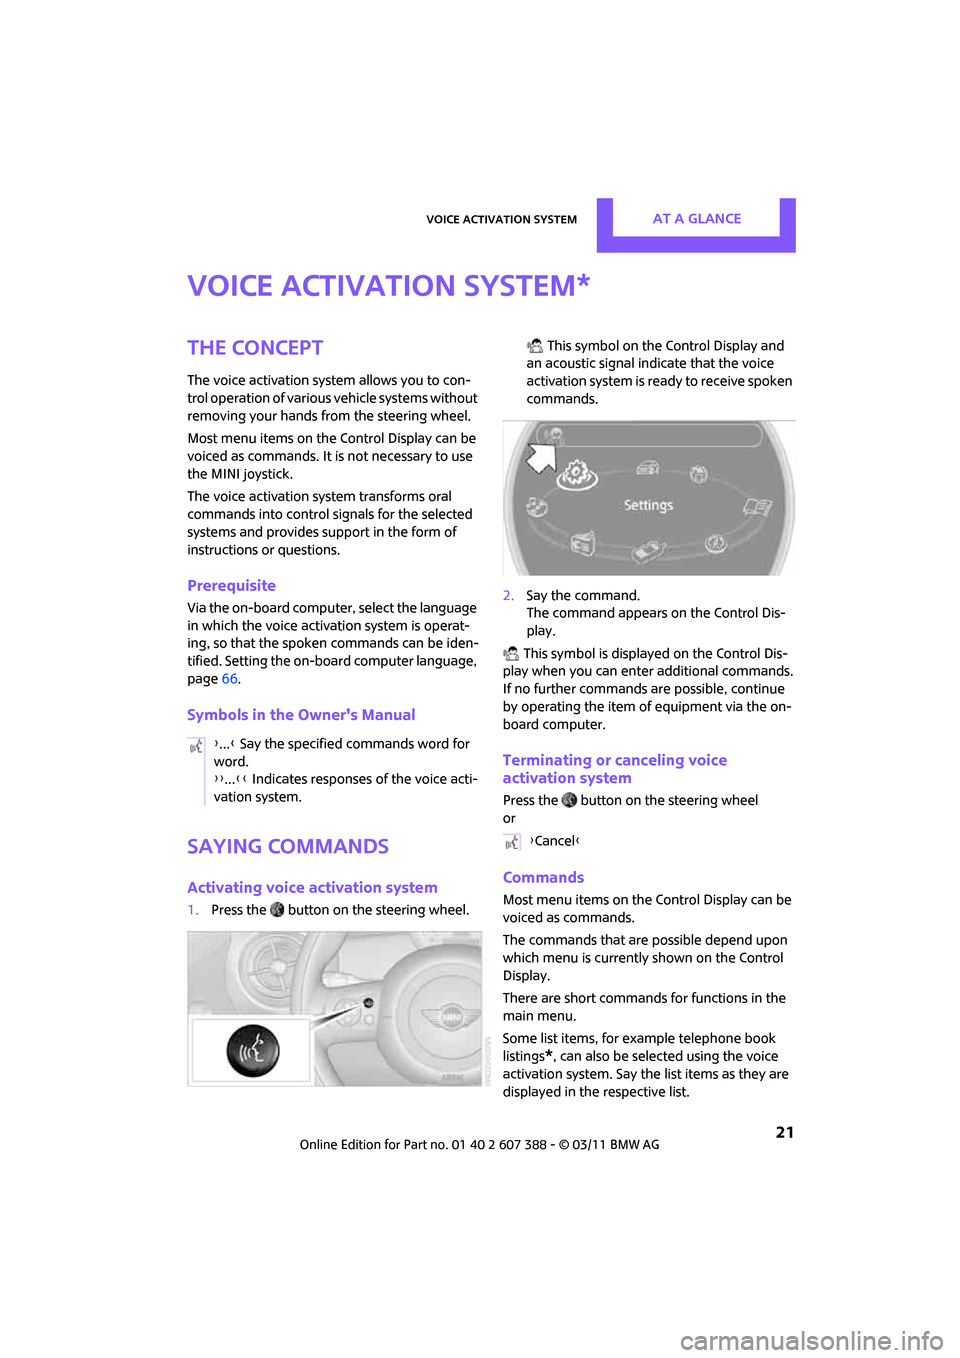
1. Press the button on the steering wheel. This symbol on the Control Display and
an acoustic signal indicate that the voice
activation system is ready to receive spoken
commands.
2. Say the command.
The command appears on the Control Dis-
play.
This symbol is displayed on the Control Dis-
play when you can ente r additional commands.
If no further commands are possible, continue
by operating the item of equipment via the on-
board computer.
Terminating or canceling voice
activation system
Press the button on the steering wheel
or
Commands
Most menu items on the Control Display can be
voiced as commands.
The commands that are possible depend upon
which menu is currently shown on the Control
Display.
There are short commands for functions in the
main menu.
Some list items, for example telephone book
listings
*, can also be selected using the voice
activation system. Say the list items as they are
displayed in the respective list.
*
{ ...} Say the specified commands word for
word.
{{ ...}} Indicates responses of the voice acti-
vation system.
{ Cancel }
Page 24 of 256
AT A GLANCEVoice activation system
22
Having the possible commands read
aloud
Having the possible commands read aloud:
For example if you have selected "CD" the sys-
tem will read aloud the possible commands for
operating the CD player.
Help for the voice activation system
Calling up Help:
Additional commands
* for Help:
> {Help with examples }: information about
the current operating options and the most
important commands for them are
announced.
> {Help with voice activation }: information
regarding the principles behind the voice
activation system is announced.
Using alternative commands
There are often a number of commands to run a
function, e.g.:
Calling up functions immediately via
short commands
Short commands enable you to perform certain
functions immediately, irrespective of which
menu item is selected, page 230.
Open the main menu
Example: selecting the track of a CD
1.Switch on Entertainment sound output if
necessary.
2. Press the button on the steering wheel.
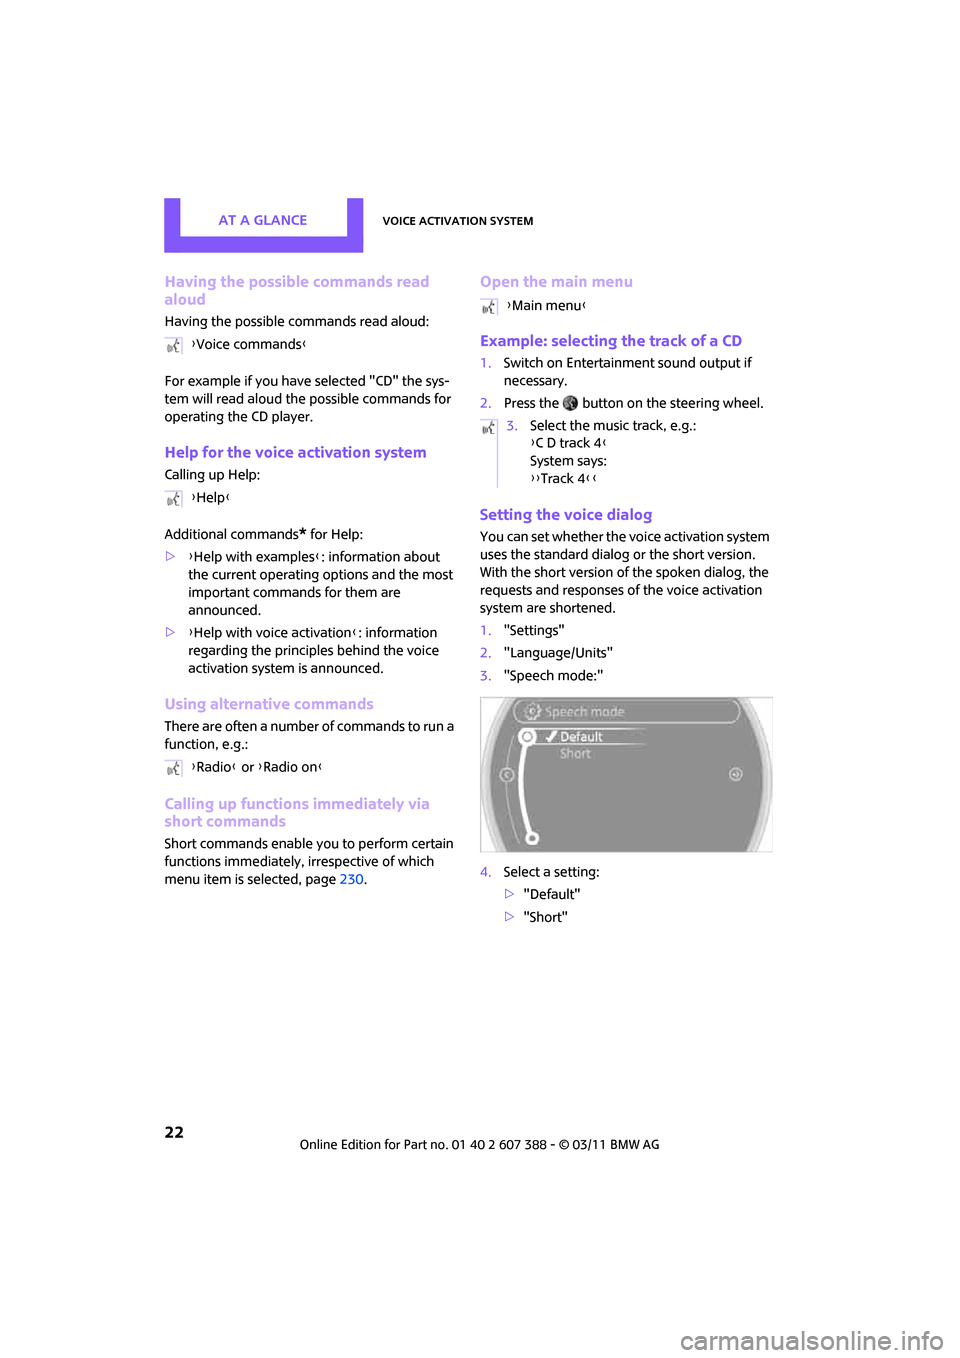
Setting the voice dialog
You can set whether the voice activation system
uses the standard dialog or the short version.
With the short version of the spoken dialog, the
requests and responses of the voice activation
system are shortened.
1."Settings"
2. "Language/Units"
3. "Speech mode:"
4. Select a setting:
>"Default"
> "Short"
{
Voice commands }
{ Help }
{ Radio } or {Radio on }
{Main menu }
3. Select the music track, e.g.:
{C D track 4 }
System says:
{{ Track 4 }}
Page 39 of 256

AdjustmentsCONTROLS
37
Adjustments
Sitting safely
The ideal sitting position can make a vital contri-
bution to relaxed, fatigue-free driving. In con-
junction with the safety belts, the head restraints
and the airbags, the seated position has a major
influence on your safety in the event of an acci-
dent. To ensure that th e safety systems operate
with optimal efficiency, we strongly urge you to
observe the instructions contained in the follow-
ing section.
For additional information on transporting chil-
dren safely, refer to page 43.
Airbags
Always maintain an adequate distance
between yourself and the airbags. Always
grip the steering wheel on the rim, with your
hands in the 3 o'clock and 9 o'clock positions, to
minimize the risk of inju ry to the hands or arms
in the event of the airbag being triggered off.
No one and nothing should come between the
airbags and the seat occupant.
Do not use the cover of the front airbag on the
front passenger side as a storage area. Ensure
that the front passenger is correctly seated, e.g.
that no feet or legs are propped against the
dashboard. Otherwise, leg injury could result if
the front airbag suddenly deployed.
Make sure that occupa nts keep their heads
away from the side airbag and do not lean
against the head-level airbag; otherwise injuries
can occur when the airbag is triggered. <
Even if you follow all the instructions, injuries
resulting from contact with airbags cannot be
fully excluded, depending on the circumstances.
The ignition and inflation noise may provoke a
mild hearing loss in ex tremely sensitive individ-
uals. This effect is usually only temporary.
For airbag locations and additional information
on airbags, refer to page 78.
Head restraint
A correctly adjusted head restraint reduces the
risk of neck injury in the event of an accident.
Adjust the head rest raint in such a way
that its center is at approx. ear level. Oth-
erwise, there is an increased risk of injury in the
event of an accident. <
Head restraints, refer to page 39.
Safety belt
Before every drive, make sure that all occupants
wear their safety belts. Airbags complement the
safety belt as an additi onal safety device, but
they do not represent a substitute.
Number of safety belts
Never allow more th an one person to
wear a single safety belt. Never allow
infants or small children to ride in a passenger's
lap.
Make sure that the belt in the lap area sits low
across the hips and does not press against the
abdomen. The safety belt must not rest against
the throat, run across sh arp edges, pass over
hard or fragile objects or be pinched. Fasten the
safety belt so that it is pulled taut across the lap
and shoulder, fitting the body snugly without
any twists. Otherwise, the belt could slide over
the hips in the event of a frontal collision and
injure the abdomen. Avoid wearing bulky cloth-
ing and regularly pull the belt in the upper-body
area taut; otherwise, its restraining effect could
be impaired. <
Safety belts, refer to page 40.
Page 44 of 256

CONTROLSAdjustments
42
For proper function:
>Keep the photosensors clean
> Do not cover the area between the interior
rearview mirror and the windshield
> Do not place stickers or decals on the wind-
shield in front of the mirror.
Steering wheel
Adjustments
Do not adjust the steering wheel position
while the car is in motion; otherwise, there
is a risk of accident du e to an unexpected move-
ment. <
1. Fold the lever down.
2. Move the steering wheel to the preferred
distance and angle to suit your seated posi-
tion.
3. Swing the lever back up.
Do not use force to swing the lever
back up; otherwise, the mechanism
will be damaged. <
Page 52 of 256
CONTROLSDriving
50
Sport program and manual mode M/S
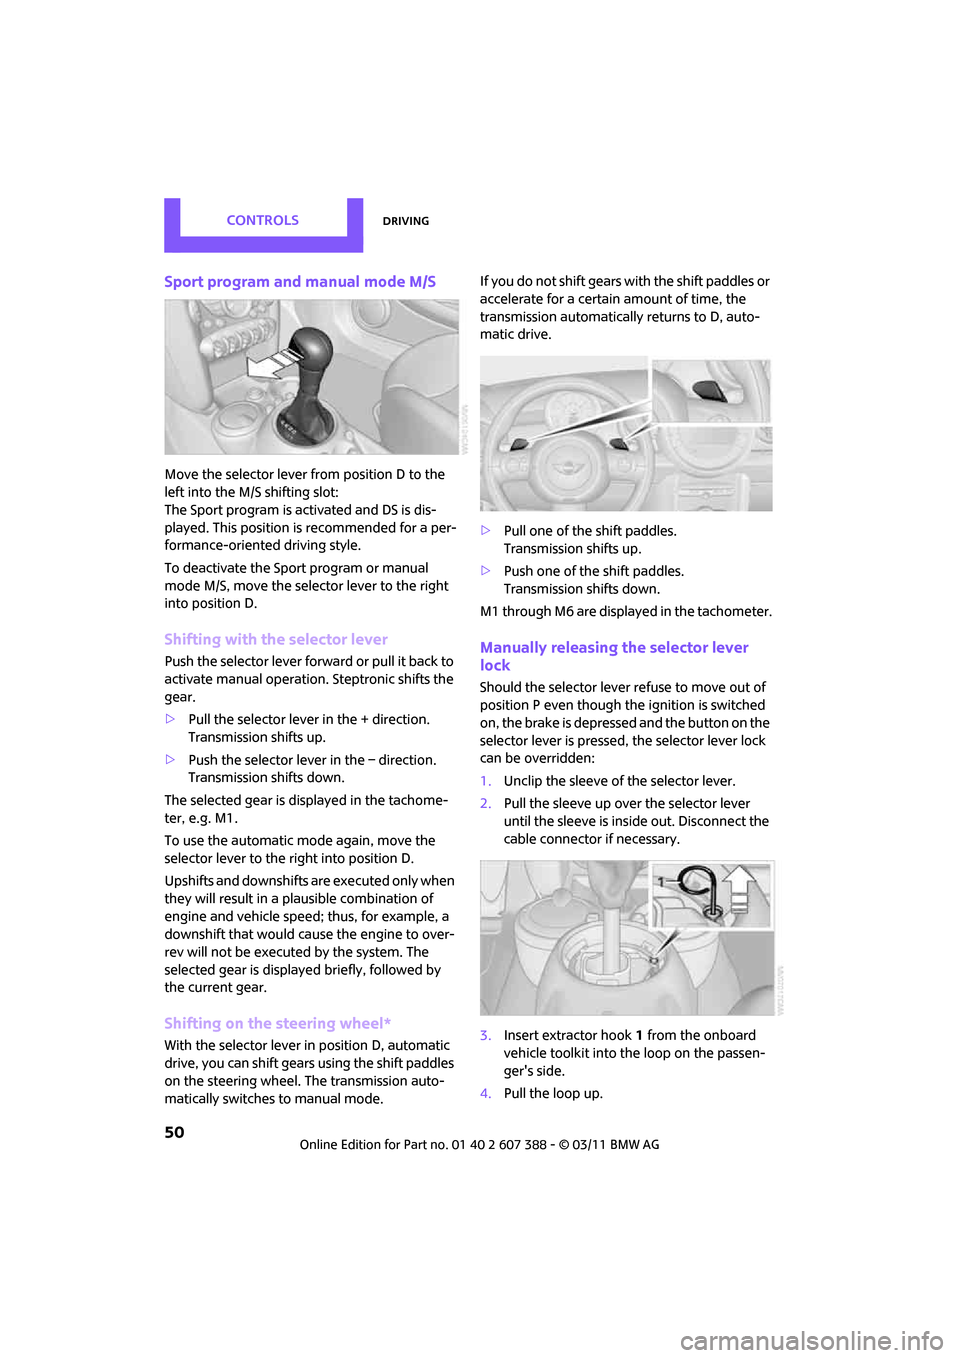
Move the selector lever from position D to the
left into the M/S shifting slot:
The Sport program is activated and DS is dis-
played. This position is recommended for a per-
formance-oriented driving style.
To deactivate the Sport program or manual
mode M/S, move the selector lever to the right
into position D.
Shifting with the selector lever
Push the selector lever forward or pull it back to
activate manual operation. Steptronic shifts the
gear.
> Pull the selector lever in the + direction.
Transmission shifts up.
> Push the selector leve r in the – direction.
Transmission shifts down.
The selected gear is displayed in the tachome-
ter, e.g. M1.
To use the automatic mode again, move the
selector lever to the right into position D.
Upshifts and downshifts are executed only when
they will result in a plausible combination of
engine and vehicle speed; thus, for example, a
downshift that would cause the engine to over-
rev will not be executed by the system. The
selected gear is displayed briefly, followed by
the current gear.
Shifting on the steering wheel*
With the selector lever in position D, automatic
drive, you can shift gears using the shift paddles
on the steering wheel. The transmission auto-
matically switches to manual mode. If you do not shift gears with the shift paddles or
accelerate for a certai
n amount of time, the
transmission automatically returns to D, auto-
matic drive.
> Pull one of the shift paddles.
Transmission shifts up.
> Push one of the shift paddles.
Transmission shifts down.
M1 through M6 are displayed in the tachometer.
Manually releasing the selector lever
lock
Should the selector lever refuse to move out of
position P even though the ignition is switched
on, the brake is depressed and the button on the
selector lever is pressed, the selector lever lock
can be overridden:
1. Unclip the sleeve of the selector lever.
2. Pull the sleeve up over the selector lever
until the sleeve is insi de out. Disconnect the
cable connector if necessary.
3. Insert extractor hook 1 from the onboard
vehicle toolkit into the loop on the passen-
ger's side.
4. Pull the loop up.
Page 56 of 256

CONTROLSDriving
54
Cruise control*
The concept
Cruise control is available at vehicle speeds of at
least approx. 20 mph or 30 km/h. The car then
stores and maintains the speed that you specify
using the button on the steering wheel.Do not use cruise control when driving at
constant speed is prevented by adverse
conditions, e.g. winding roads, dense traffic or
poor road conditions due to, e.g., snow, rain, ice
or loose surfaces. Otherwise, you could lose con-
trol of the vehicle and cause an accident as a
result. <
Activating
1Resuming cruise control
2 Activating/deactivating cruise control
3 Maintaining, storing and increasing speed
4 Maintaining, storing and decreasing speed
Indicator lamp in the speedometer lights up. The
cruise control system is ready and can be acti-
vated.
Activating/deactivating cruise control
Press button 2.
The system is automati cally deactivated if:
> Braking takes place
> The clutch is engaged
> The transmission is set on N
> The stability control system is on Cruise control is not deactivated by depressing
the accelerator pedal.
Once the accelerator
pedal is released, the stored speed is achieved
again and maintained.
The stored speed is cleared when the ignition is
switched off.
Maintaining current speed
Press button 3.
The system maintains and stores the current
vehicle speed.
If, on a downhill grade, the engine braking effect
is not sufficient, the controlled speed may be
exceeded. On uphill grades vehicle speed may
drop if the engine output is insufficient.
Increasing speed
Press button 3 repeatedly until the desired
speed is reached. Every time you press the but-
ton, the speed increases by approx. 1 mph or
2km/h.
Accelerating using the button
Press and hold button 3.
The vehicle accelerates without pressure on the
accelerator pedal. After the button is released,
the driving speed is maintained and stored.
Decreasing speed
Press button 4 repeatedly until the desired
speed is reached.
The functions here are the same as for increas-
ing the speed or accelerating, except that the
speed will be decreased.
Resuming a speed stored beforehand
Press button 1.
The last speed stored is achieved again and
maintained.
The stored speed is cleared when the ignition is
switched off.
Page 71 of 256

Technology for driving comfort and safetyCONTROLS
69
Driving stability control
systems
Your MINI has a number of systems that help to
maintain the vehicle's st ability even in adverse
driving conditions.
The laws of physics cannot be repealed,
even with driving stab ility control systems.
An appropriate driving style always remains the
responsibility of the driver. Therefore do not
reduce the additional safety margin by engaging
in hazardous driving thereby running the risk of
an accident. <
Antilock Brake System ABS
ABS prevents locking of the wheels during brak-
ing. Safe steering respon se is maintained even
during full braking. Act ive safety is thus
increased.
Braking safely, refer to page 99.
ABS is operational every time you start the
engine.
Cornering Brake Control CBC
Driving stability and steering characteristics are
further enhanced while braking in turns or dur-
ing a lane change.
Electronic brake-forc e distribution EBV
The system controls the brake pressure in the
rear wheels to ensure stable braking behavior.
Brake Assist
Rapidly depressing the brake causes this system
to automatically develop maximum braking
force. Thus, the system helps keep braking dis-
tance to a minimum. At the same time, all the
benefits provided by ABS are exploited.
Do not reduce the pressure on the brake for the
duration of the full braking application.
Dynamic Stability Control DSC
The concept
DSC prevents the driving wheels from losing
traction when you pull away from rest or accel-
erate.
DSC also detects unstable driving conditions
such as when the vehicle' s rear end fishtails or
the vehicle is sliding on its front wheels. In these
cases, DSC helps the vehicle maintain a safe
course within physical limits by reducing engine
output and through brakin g actions at the indi-
vidual wheels.
Every time that the engine is started, the DSC is
ready to operate.
Deactivating DSC
Press the button until the DSC OFF indicator light
on the speedometer is on and DSC OFF is dis-
played on the tachometer. DSC is deactivated.
Stabilizing and pr opulsion promoting actions are
no longer executed.
When driving with snow chains or to 'rock free'
in snow, it can be helpfu l to switch off DSC for a
brief period.
To increase vehicle stability, activate DSC again
as soon as possible.
Activating DSC
Press the button again: the DSC indicator lamps
in the display elements go out.
Page 73 of 256
Technology for driving comfort and safetyCONTROLS
71
Deactivating the DTC* and DSC together
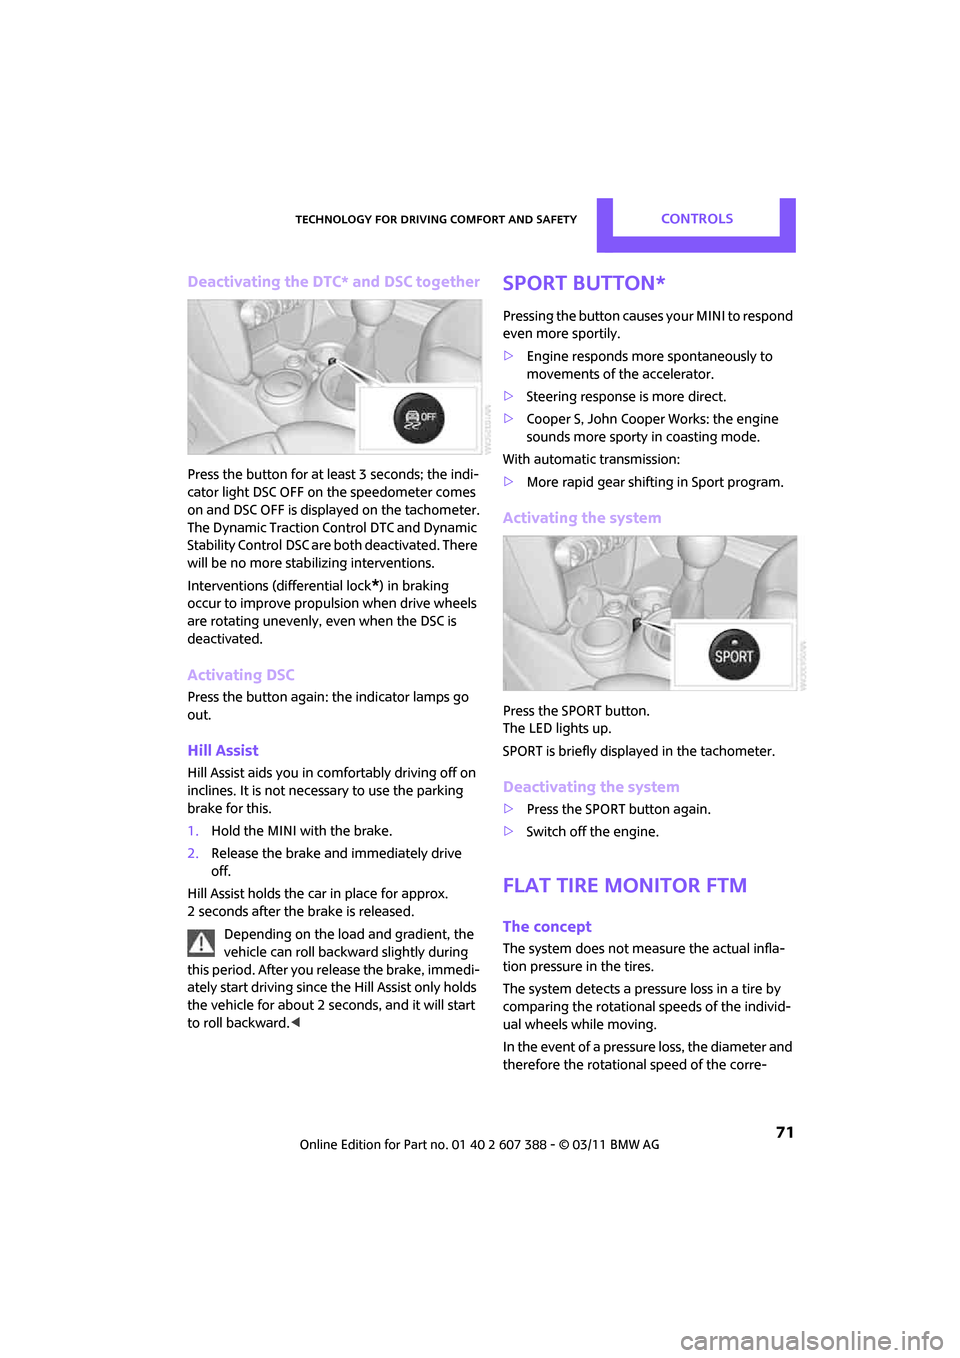
Press the button for at least 3 seconds; the indi-
cator light DSC OFF on the speedometer comes
on and DSC OFF is displayed on the tachometer.
The Dynamic Traction Control DTC and Dynamic
Stability Control DSC are both deactivated. There
will be no more stab ilizing interventions.
Interventions (differential lock
*) in braking
occur to improve propulsion when drive wheels
are rotating unevenly, even when the DSC is
deactivated.
Activating DSC
Press the button again: the indicator lamps go
out.
Hill Assist
Hill Assist aids you in co mfortably driving off on
inclines. It is not necessary to use the parking
brake for this.
1. Hold the MINI with the brake.
2. Release the brake and immediately drive
off.
Hill Assist holds the car in place for approx.
2 seconds after the brake is released. Depending on the load and gradient, the
vehicle can roll backwa rd slightly during
this period. After you release the brake, immedi-
ately start driving since the Hill Assist only holds
the vehicle for about 2 seconds, and it will start
to roll backward. <
Sport button*
Pressing the button causes your MINI to respond
even more sportily.
>Engine responds more spontaneously to
movements of the accelerator.
> Steering response is more direct.
> Cooper S, John Cooper Works: the engine
sounds more sporty in coasting mode.
With automatic transmission:
> More rapid gear shifting in Sport program.
Activating the system
Press the SPORT button.
The LED lights up.
SPORT is briefly displayed in the tachometer.
Deactivating the system
>Press the SPORT button again.
> Switch off the engine.
Flat Tire Monitor FTM
The concept
The system does not me asure the actual infla-
tion pressure in the tires.
The system detects a pre ssure loss in a tire by
comparing the rotational speeds of the individ-
ual wheels while moving.
In the event of a pressure loss, the diameter and
therefore the rotational speed of the corre-