engine MINI Clubman 2016 (Mini Connected) Workshop Manual
[x] Cancel search | Manufacturer: MINI, Model Year: 2016, Model line: Clubman, Model: MINI Clubman 2016Pages: 246, PDF Size: 5.21 MB
Page 180 of 246

FuelVehicle features and op‐
tions
This chapter describes all standard, country-
specific and optional features offered with the
series. It also describes features that are not
necessarily available in your car, e. g., due to
the selected options or country versions. This
also applies to safety-related functions and sys‐
tems. The respectively applicable country provi‐
sions must be observed when using the respec‐
tive features and systems.
Fuel recommendation
General information
Depending on the region, many gas stations
sell fuel that has been customized to winter or
summer conditions. Fuel that is available in
winter helps make a cold start easier, for exam‐
ple.
Information
CAUTION
Even fuels that conform to the specifica‐
tions can be of low quality. This may cause en‐
gine problems, for instance poor engine start-
up behavior, poor handling and/or poor
performance. There is risk of property damage.
In case of engine problems, switch gas stations
or use a brand name fuel with a higher octane
rating.◀
Gasoline
For the best fuel efficiency, the gasoline should
be sulfur-free or very low in sulfur content.
Fuels that are marked on the gas pump as con‐
taining metal must not be used.
CAUTION
Even small amounts of wrong fuel or
wrong fuel additives can damage the fuel sys‐
tem and the engine. Furthermore, the catalytic
converter is permanently damaged. There is
risk of property damage. Do not refuel or add
the following in the case of gasoline engines:
▷Leaded gasoline.▷Metallic additives, for example manganese
or iron.
Do not press the Start/Stop button after refuel‐
ing the wrong fuel. Contact a dealer’s service
center or another qualified service center or re‐
pair shop.◀
Fuels with a maximum ethanol content of
25 %, i. e. E10 or E25, may be used for refuel‐
ing.
Ethanol should satisfy the following quality
standards:
US: ASTM 4806–xx
CAN: CGSB-3.511–xx
xx: comply with the current standard in each
case.
CAUTION
Wrong fuels can damage the fuel system
and the engine. There is risk of property dam‐
age. Do not use a fuel with a higher ethanol
percentage than recommended or one with
other types of alcohol, for example M5 to
M100.◀
Recommended fuel grade
MINI recommends AKI 91.
Minimum fuel grade
MINI recommends AKI 89.
Seite 180MOBILITYFuel180
Online Edition for Part no. 01 40 2 964 571 - X/15
Page 181 of 246

CAUTION
Fuel that does not comply with the mini‐
mum quality can compromise engine function
or cause engine damage. There is risk of prop‐
erty damage. Do not fill with fuel that does not
comply with the minimum quality.◀
If you use gasoline with this minimum AKI Rat‐
ing, the engine may produce knocking sounds
when starting at high outside temperatures.
This has no effect on the engine life.
CAUTION
The use of poor-quality fuels may result in
harmful engine deposits or damage. Addition‐
ally, problems relating to drivability, starting
and stalling, especially under certain environ‐
mental conditions such as high ambient tem‐
perature and high altitude, may occur.
If drivability problems are encountered, we rec‐
ommend switching to a high quality gasoline
brand and a higher octane grade — AKI num‐
ber — for a few tank fills. To avoid harmful en‐
gine deposits, it is highly recommended to pur‐
chase gasoline from Top Tier retailers.
Failure to comply with these recommendations
may result in the need for unscheduled mainte‐
nance.◀
Seite 181FuelMOBILITY181
Online Edition for Part no. 01 40 2 964 571 - X/15
Page 190 of 246

7Connector/cable for socket8Connection hose
Filling the tire with sealant
1.Shake the sealant container.2.Pull filling hose completely out of the cover
of the sealant bottle. Do not kink the hose.
3.Slide the sealing container into the holder
on the compressor housing, ensuring that it
engages audibly.
4.Screw the filling hose of the sealant con‐
tainer onto the tire valve of the nonworking
wheel.
5.With the compressor switched off, insert
the plug into the power socket inside the
vehicle.
6.With operating readiness switched on or
the engine running, switch on the compres‐
sor.
Let the compressor run for max. 10 minutes to
fill the tire with sealant and achieve a tire infla‐
tion pressure of approx. 2.5 bar.
While the tire is being filled with sealant, the
tire inflation pressure may sporadically reach
approx. 5 bar. Do not switch off the compressor
at this point.
Seite 190MOBILITYWheels and tires190
Online Edition for Part no. 01 40 2 964 571 - X/15
Page 191 of 246
CAUTION
The compressor can overheat during ex‐
tended operation. There is risk of property
damage. Do not run the compressor for more
than 10 min.◀
If a tire inflation pressure of 2 bar is not
reached:
1.Switch off the compressor.2.Unscrew the filling hose from the wheel.3.Drive forward and back to distribute the
sealant in the tire.
4.Inflate the tire again using the compressor.
If a tire inflation pressure of 2 bar cannot be
reached, contact your dealer’s service cen‐
ter or another qualified service center or re‐
pair shop.
Stowing the Mobility System
1.Remove the connection hose of the sealant
container from the wheel.
2.After pressing the red unlock button on the
compressor, remove the sealing container.
3.Wrap the empty sealant container in suita‐
ble material to avoid dirtying the trunk.
4.Stow the Mobility System back in the vehi‐
cle.
Distributing the sealant
Immediately drive approx. 5 miles/10 km to en‐
sure that the sealant is evenly distributed in the
tire.
Do not exceed a speed of 50 mph/80 km/h.
If possible, do not drive at speeds less than
12 mph/20 km/h.
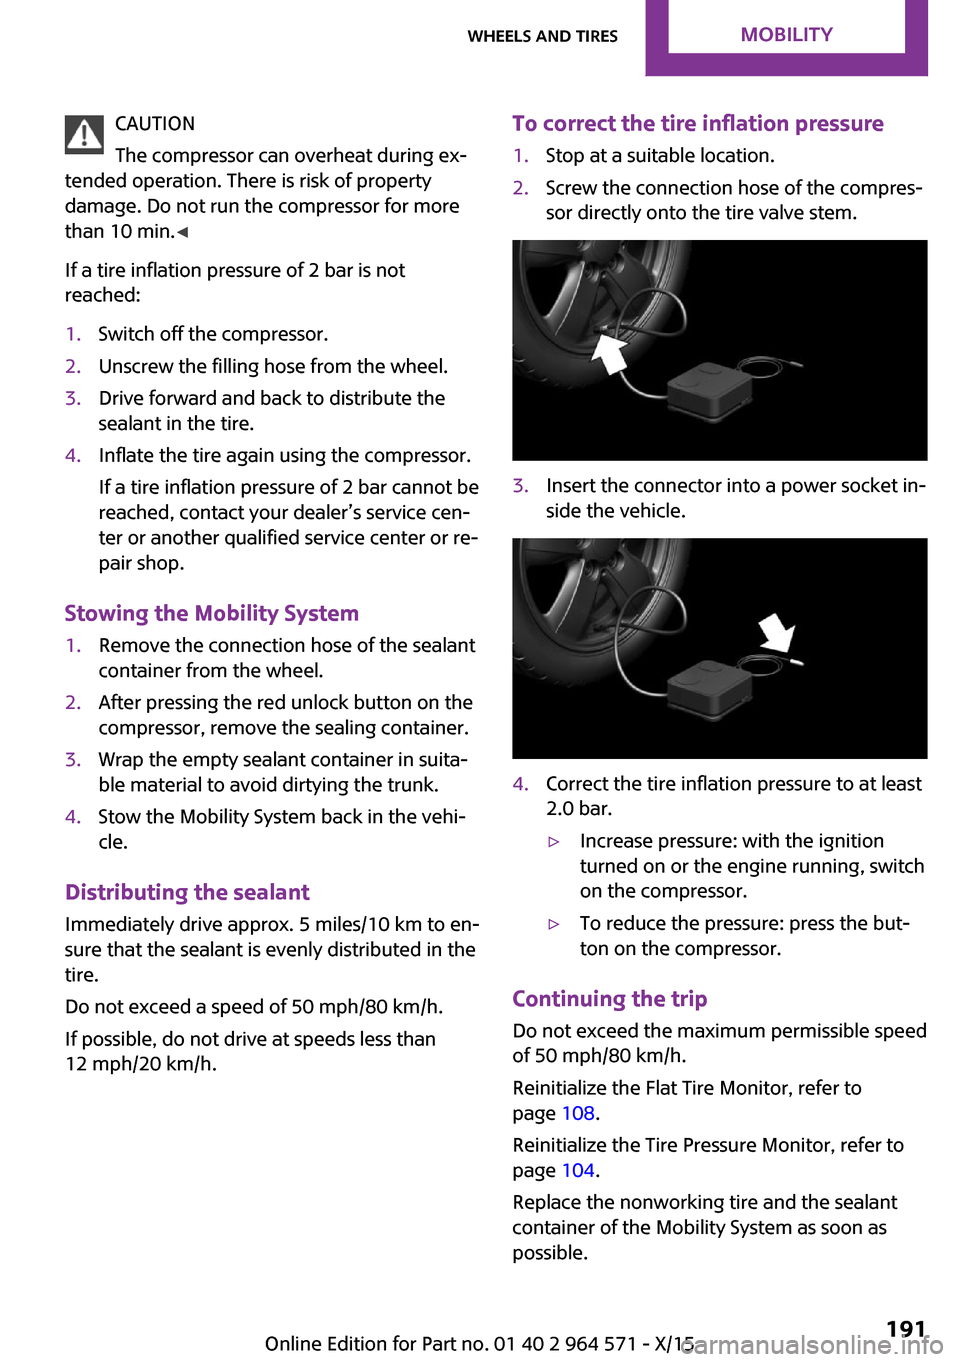
To correct the tire inflation pressure1.Stop at a suitable location.2.Screw the connection hose of the compres‐
sor directly onto the tire valve stem.
3.Insert the connector into a power socket in‐
side the vehicle.
4.Correct the tire inflation pressure to at least
2.0 bar.
▷Increase pressure: with the ignition
turned on or the engine running, switch
on the compressor.
▷To reduce the pressure: press the but‐
ton on the compressor.
Continuing the trip
Do not exceed the maximum permissible speed
of 50 mph/80 km/h.
Reinitialize the Flat Tire Monitor, refer to
page 108.
Reinitialize the Tire Pressure Monitor, refer to
page 104.
Replace the nonworking tire and the sealant
container of the Mobility System as soon as
possible.
Seite 191Wheels and tiresMOBILITY191
Online Edition for Part no. 01 40 2 964 571 - X/15
Page 193 of 246
Engine compartmentVehicle features and op‐
tions
This chapter describes all standard, country-
specific and optional features offered with the
series. It also describes features that are not
necessarily available in your car, e. g., due to
the selected options or country versions. This
also applies to safety-related functions and sys‐
tems. The respectively applicable country provi‐
sions must be observed when using the respec‐
tive features and systems.
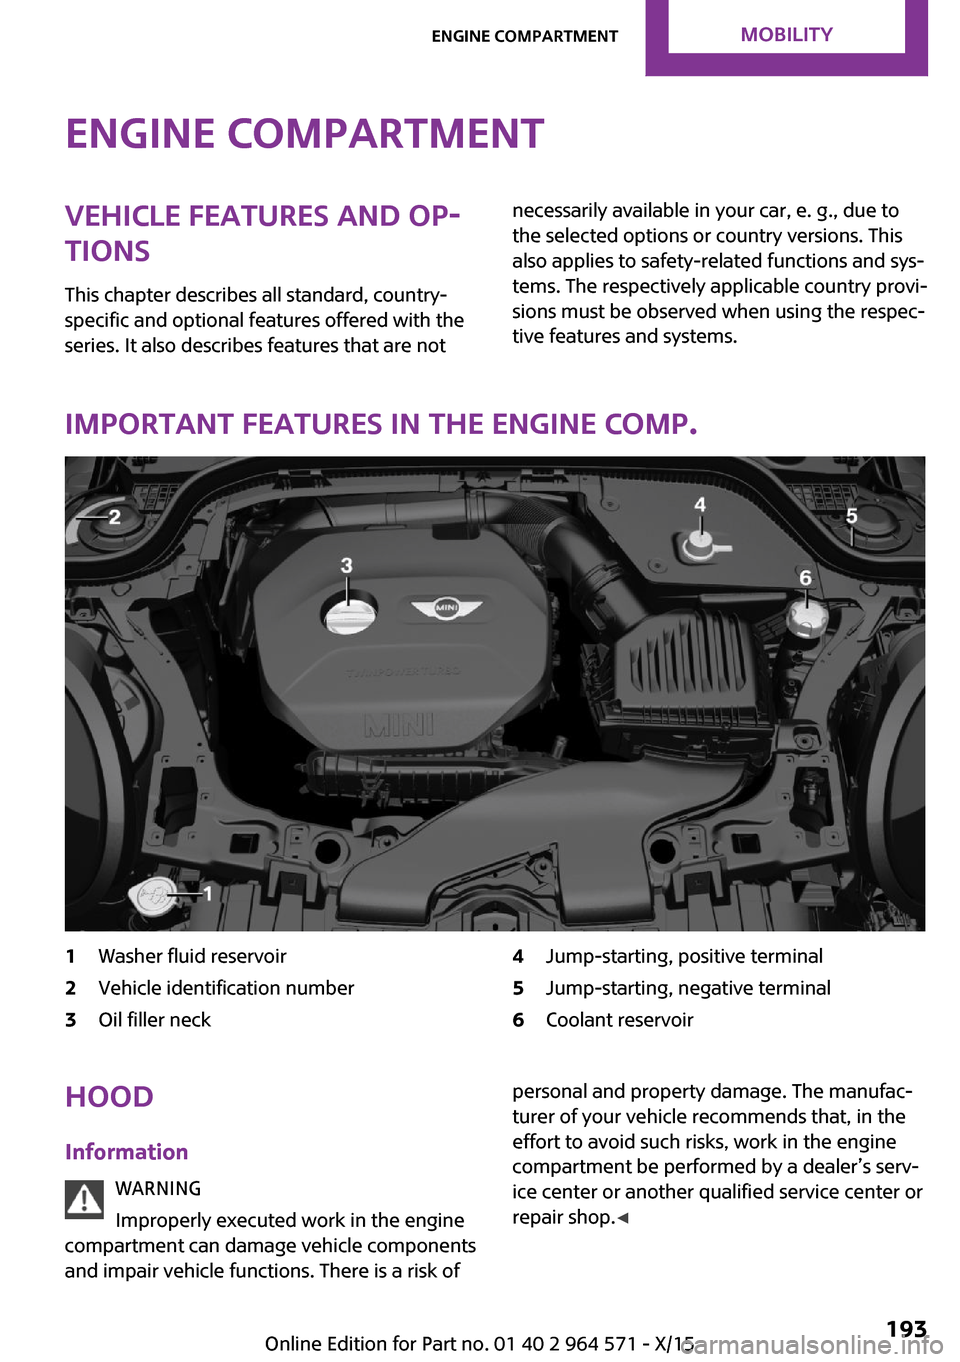
Important features in the engine comp.
1Washer fluid reservoir2Vehicle identification number3Oil filler neck4Jump-starting, positive terminal5Jump-starting, negative terminal6Coolant reservoirHood
Information
WARNING
Improperly executed work in the engine
compartment can damage vehicle components
and impair vehicle functions. There is a risk of
personal and property damage. The manufac‐
turer of your vehicle recommends that, in the
effort to avoid such risks, work in the engine
compartment be performed by a dealer’s serv‐
ice center or another qualified service center or
repair shop.◀
Seite 193Engine compartmentMOBILITY193
Online Edition for Part no. 01 40 2 964 571 - X/15
Page 194 of 246
WARNING
The engine compartment accommodates
moving components. Certain components in
the engine compartment can also move with
the vehicle switched off, for example the cooler
fan. There is risk of injuries. Do not reach into
the area of moving parts. Keep articles of cloth‐
ing and hair away from moving parts.◀
WARNING
There are protruding parts, for example
lock hook, on the inside of the hood. There is
risk of injuries. If the hood is open, pay atten‐
tion to protruding parts and keep these areas
clear.◀
WARNING
An incorrectly locked hood can open
while driving and restrict visibility. There is risk
of an accident. Stop immediately and correctly
close the hood.◀
WARNING
Body parts can be jammed on opening
and closing the hood. There is risk of injuries.
Make sure that the area of movement of the
hood is clear during opening and closing.◀
CAUTION
Folded-away wipers can be jammed
when the hood is opened. There is risk of prop‐
erty damage. Make sure that the wipers with
the wiper blades mounted are folded down
onto the windshield before opening the
hood.◀
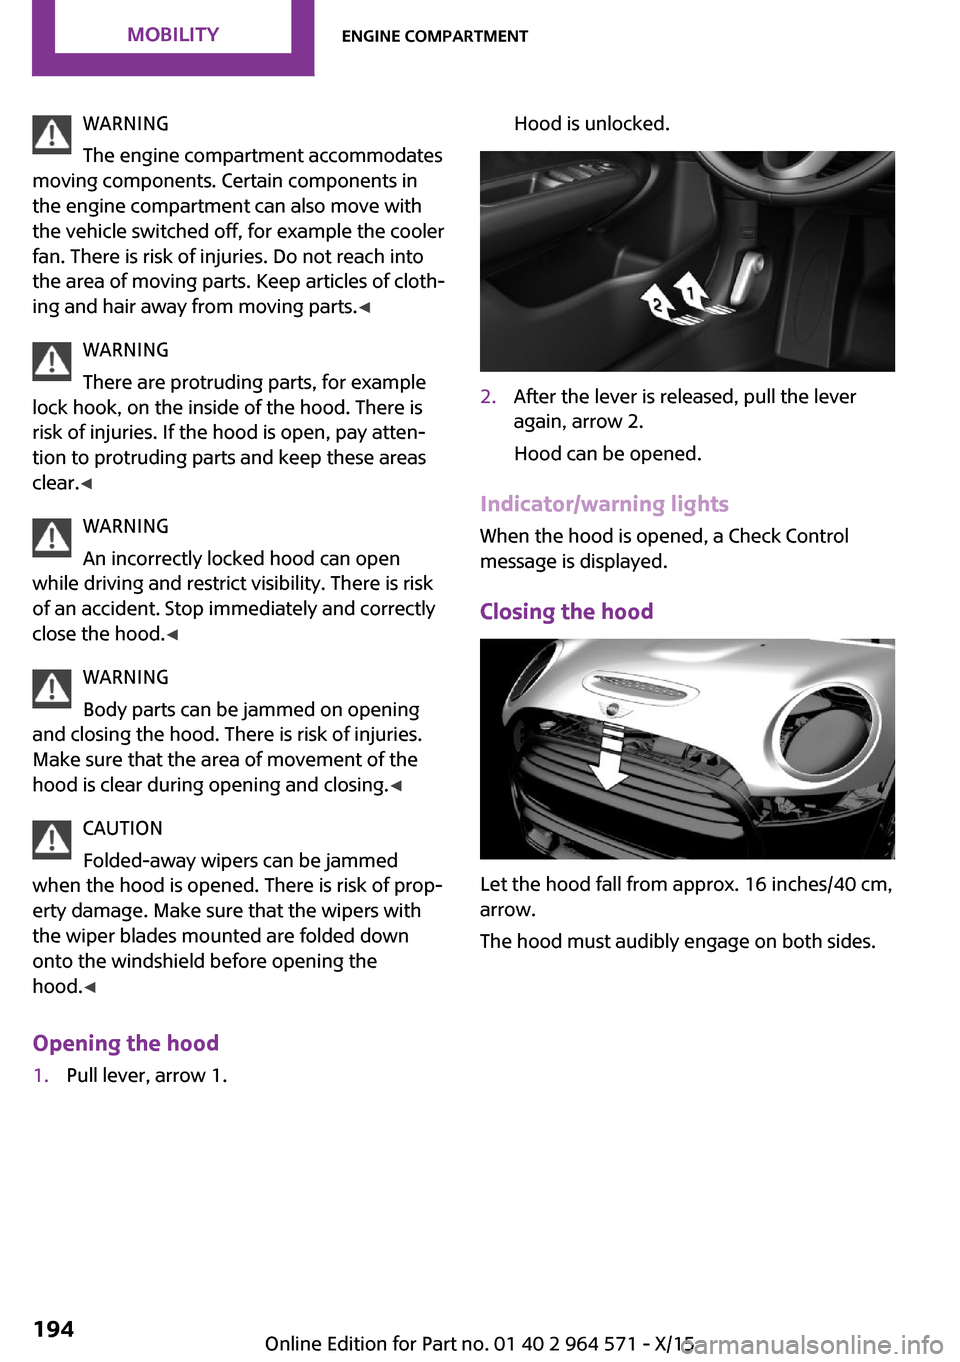
Opening the hood
1.Pull lever, arrow 1.Hood is unlocked.2.After the lever is released, pull the lever
again, arrow 2.
Hood can be opened.
Indicator/warning lights
When the hood is opened, a Check Control
message is displayed.
Closing the hood
Let the hood fall from approx. 16 inches/40 cm,
arrow.
The hood must audibly engage on both sides.
Seite 194MOBILITYEngine compartment194
Online Edition for Part no. 01 40 2 964 571 - X/15
Page 195 of 246
Engine oilVehicle features and op‐
tions
This chapter describes all standard, country-
specific and optional features offered with the
series. It also describes features that are not
necessarily available in your car, e. g., due to
the selected options or country versions. This
also applies to safety-related functions and sys‐
tems. The respectively applicable country provi‐
sions must be observed when using the respec‐
tive features and systems.
General information
The engine oil consumption is dependent on
the driving style and driving conditions.
The engine oil consumption can increase in the
following situations, for example:
▷Sporty driving style.▷Break-in of the engine.▷Idling of the engine.▷With use of engine oil types that are classi‐
fied as not suitable.
Therefore, regularly check the engine oil level
after refueling.
The vehicle is equipped with electronic oil
measurement.
The electronic oil measurement has two meas‐
uring principles:
▷Status display.▷Detailed measurement.Electronic oil measure‐
ment
Status display
The concept
The engine oil level is monitored electronically
while driving and shown on the Control Display.
If the engine oil level reaches the minimum
level, a check control message is displayed.
Requirements
A current measured value is available after ap‐
prox. 30 minutes of driving. During a shorter
trip, the status of the last, sufficiently long trip is
displayed.
With frequent short-distance trips, perform a
detailed measurement.
Displaying the engine oil level
On the Control Display:
1. "Vehicle info"2."Vehicle status"3. "Engine oil level"
Engine oil level display messages
Different messages appear on the display de‐
pending on the engine oil level. Pay attention
to these messages.
If the engine oil level is too low within the next
125 miles/200 km, add engine oil, refer to
page 196.
CAUTION
A too low engine oil level causes engine
damage. There is risk of property damage. Im‐
mediately add engine oil.◀
Take care not to add too much engine oil.
Seite 195Engine oilMOBILITY195
Online Edition for Part no. 01 40 2 964 571 - X/15
Page 196 of 246
CAUTION
Too much engine oil can damage the en‐
gine or the catalytic converter. There is risk of
property damage. Do not add too much engine
oil. When too much engine oil is added, have oil
level corrected by a dealer’s service center or
another qualified service center or repair
shop.◀
Detailed measurement
The concept
In the detailed measurement the engine oil
level is checked when the vehicle is stationary,
and displayed via a scale.
If the engine oil level reaches the minimum
level, a check control message is displayed.
During the measurement, the idle speed is in‐
creased somewhat.
Requirements
▷Vehicle is parked in a horizontal position.▷Manual transmission: shift lever in neutral
position, clutch and accelerator pedals not
depressed.
▷Steptronic transmission: selector lever in se‐
lector lever position N or P and accelerator
pedal not depressed.
▷Engine is running and is at operating tem‐
perature.
Performing a detailed measurement
On the Control Display:
1. "Vehicle info"2."Vehicle status"3. "Measure engine oil level"4."Start measurement"
The engine oil level is checked and displayed
via a scale.
Time: approx. 1 minute.
Adding engine oil
Information
WARNING
Operating materials, for example oils,
greases, coolants, fuels, can contain harmful in‐
gredients. There is risk of injuries or danger to
life. Observe the instructions on the containers.
Avoid the contact of articles of clothing, skin or
eyes with operating materials. Do not refill op‐
erating materials into different bottles. Store
operating materials out of reach of children.◀
CAUTION
A too low engine oil level causes engine
damage. There is risk of property damage.
Add engine oil within the next
125 miles/200 km.◀
CAUTION
Too much engine oil can damage the en‐
gine or the catalytic converter. There is risk of
property damage. Do not add too much engine
oil. When too much engine oil is added, have oil
level corrected by a dealer’s service center or
another qualified service center or repair
shop.◀
General information
Only add engine oil when the message is dis‐
played in the instrument cluster. The quantity
to be added is indicated in the message dis‐
played in the instrument cluster.
Switch off the ignition and safely park the vehi‐
cle before engine oil is added.
Overview
The oil filler neck is located in the engine com‐
partment, refer to page 193.
Opening the oil filler neck
1.Open the hood, refer to page 193.Seite 196MOBILITYEngine oil196
Online Edition for Part no. 01 40 2 964 571 - X/15
Page 197 of 246
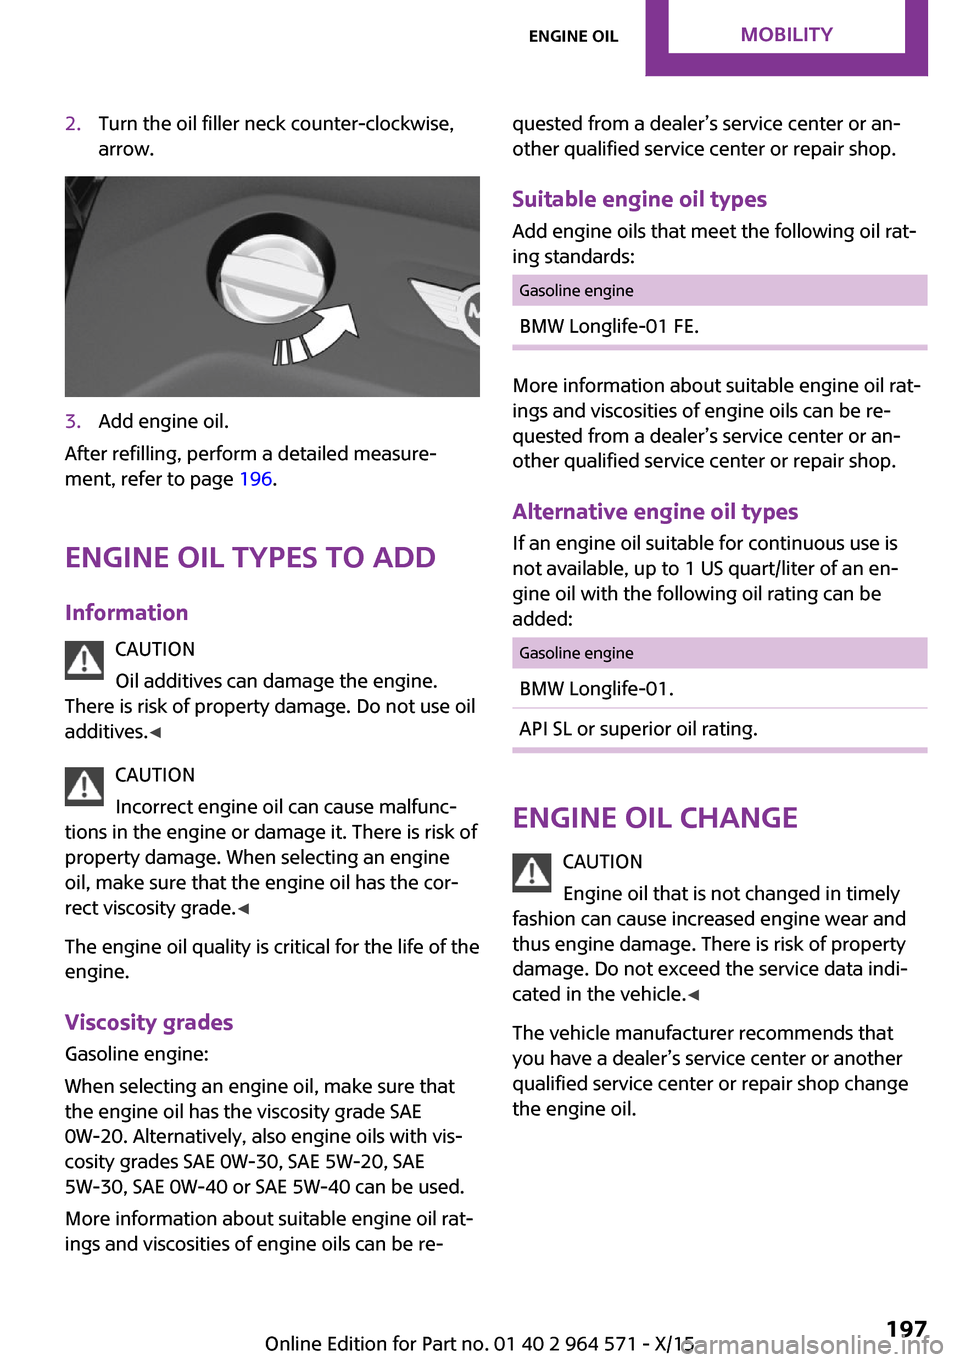
2.Turn the oil filler neck counter-clockwise,
arrow.
3.Add engine oil.
After refilling, perform a detailed measure‐
ment, refer to page 196.
Engine oil types to add
Information
CAUTION
Oil additives can damage the engine.
There is risk of property damage. Do not use oil
additives.◀
CAUTION
Incorrect engine oil can cause malfunc‐
tions in the engine or damage it. There is risk of
property damage. When selecting an engine
oil, make sure that the engine oil has the cor‐
rect viscosity grade.◀
The engine oil quality is critical for the life of the
engine.
Viscosity grades
Gasoline engine:
When selecting an engine oil, make sure that
the engine oil has the viscosity grade SAE
0W-20. Alternatively, also engine oils with vis‐
cosity grades SAE 0W-30, SAE 5W-20, SAE
5W-30, SAE 0W-40 or SAE 5W-40 can be used.
More information about suitable engine oil rat‐
ings and viscosities of engine oils can be re‐
quested from a dealer’s service center or an‐
other qualified service center or repair shop.
Suitable engine oil types
Add engine oils that meet the following oil rat‐
ing standards:
Gasoline engineBMW Longlife-01 FE.
More information about suitable engine oil rat‐
ings and viscosities of engine oils can be re‐
quested from a dealer’s service center or an‐
other qualified service center or repair shop.
Alternative engine oil types
If an engine oil suitable for continuous use is
not available, up to 1 US quart/liter of an en‐
gine oil with the following oil rating can be
added:
Gasoline engineBMW Longlife-01.API SL or superior oil rating.
Engine oil change
CAUTION
Engine oil that is not changed in timely
fashion can cause increased engine wear and
thus engine damage. There is risk of property
damage. Do not exceed the service data indi‐
cated in the vehicle.◀
The vehicle manufacturer recommends that
you have a dealer’s service center or another
qualified service center or repair shop change
the engine oil.
Seite 197Engine oilMOBILITY197
Online Edition for Part no. 01 40 2 964 571 - X/15
Page 198 of 246

Seite 198MOBILITYEngine oil198
Online Edition for Part no. 01 40 2 964 571 - X/15